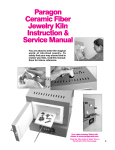
1
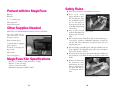
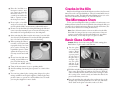
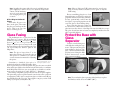
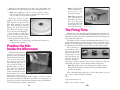
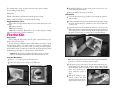
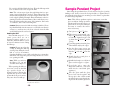
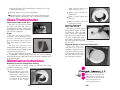
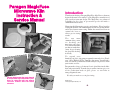
Paragon MagicFuse
Microwave Kiln
Instruction &
Service Manual
Introduction
Thank you for buying a Paragon MagicFuse kiln. You are about to
begin an adventure in creativity. Use the MagicFuse to make fused
glass jewelry of your own design. The MagicFuse uses advanced
technology to fuse glass at spectacular speeds—all inside a
common microwave oven.
Mastering this kiln requires practice and patience. Please begin by
reading the manual. The information here will save you much time
and is based on our own testing. Follow the manual and learn to
control the heat to
achieve precise fusing
results.
The
two
most
common firing errors
are breaking and
over-firing the glass.
The manual will show
you how to avoid those
errors by pre-heating
the glass and checking
it visually.
Checking the glass visually.
To expand your
knowledge of glass, visit www.paragonweb.com and select “Products,” then “Books & DVDs” from the drop menu. You will find a
wide selection of recommended books that you can purchase from
your favorite reseller.
Paragon makes a large selection of electric glass kilns for the hobbyist and professional. To make larger or more intricate pieces or
to fire production loads of glass, please see our kilns at
www.paragonweb.com.
You are about to enter the magical world
of accelerated high temperature glass
firing. To safely find your way around,
read this manual. Save for future
reference.
We wish you much success in glass fusing.
IM-240/10-08
©2008, by Paragon Industries, L.P.
-2-
Packed with the MagicFuse
Kiln top
Safety Rules
I
I
Kiln base
6 - ½" ceramic posts
Glass separator
Instruction manual
Other Supplies Needed
Microwave oven with metal interior that is at least 8" tall inside
12" x 12" ceramic tile, ceramic kiln shelf, or other
heat-proof surface
I
I
Heat-resistant gloves
1" paint brush for applying
glass separator
Notebook for keeping firing records
I
Glass cutter
I
Clear safety glasses
MagicFuse Kiln Specifications
Interior: 4 ½" diameter firing surface x 1 ½" high
Exterior: 7" wide x 4" high
1" thick ceramic fiber walls
Maximum temperature 1650°F / 898°C
I
Do not use extension cords with the microwave.
Wear clear safety
glasses whenever visually checking the glass
in a hot kiln. It is possible for hot glass to
break apart and fly out
of the kiln during firing
and cooling.
Stay at arm's length
from the kiln when you
lift the top to check hot
glass.
Wear safety glasses when visually checking the
glass in the kiln.
Fire only glass in the MagicFuse. Do not fire marbles, precious stones, ceramics, combustible materials, or metal inside the kiln. These materials can explode due to the very
rapid heating rate.
Fire only fusing-compatible glass, which is available from art
glass suppliers. Incompatible glass will break, sometimes
weeks after the piece is fired.
Wear heat-protective gloves when removing the hot kiln from
the microwave oven. Hold the kiln top and base with both
hands.
Remove the kiln from
the microwave oven
immediately after the
firing is finished. Do
not allow the kiln to
cool inside the microwave.
Remove the kiln right after the firing is finished.
Wear heat-protective gloves.
-3-
-4-
I
I
I
I
I
I
I
I
I
Cracks in the Kiln
Place the hot kiln on a
heat-proof surface after
you remove it from the
microwave. Place 3 - ½"
ceramic posts under the
kiln to separate it from
the heat-proof surface.
Small cracks will appear inside the kiln after you have fired it several
times. Do not be concerned with these. They are normal and do not affect the firing results. The kiln will make plinking noises as it cools.
This is also normal and nothing to be concerned about.
Do not place a hot kiln
under an overhead cabinet. Keep the hot kiln 8" away from any combustible surface.
Do not over-fire the kiln. Over-firing will damage the kiln and
is not covered by warranty. If you are not sure how long to fire,
then under-fire and gradually increase the firing time.
After removing the kiln from the microwave, leave the kiln
closed for at least 45 minutes. Do not fire the kiln again until it
has cooled at least 45 minutes since the last firing.
When opening the kiln after it has cooled, lay the kiln
top upside-down on a heat
proof surface. Placing the
top with the open face down
against the heat-proof surface may cause heat to build
up.
Do not leave the kiln unattended around children or
pets. The kiln interior can
reach well over 1650°F (898°C)!
Turn off the microwave if you see sparking inside.
Avoid breathing dust from glass separator or ceramic fiber
paper.
You can fuse painted glass (using paint designed for glass
fusing, available from art glass suppliers.) Painted glass may
produce fumes, so operate in a well-ventilated area. Consult
your art glass supplier for more details.
-5-
The Microwave Oven
To fire your new MagicFuse kiln, you will need a microwave oven
with metal interior that is at least 8" tall inside. After firing the kiln, you
can still cook food in the microwave. But you should clean it first. (See
your microwave manual for cleaning instructions.)
Note: Some older microwave ovens are not able to fire the kiln.
If the kiln does not get hot, try a newer microwave. Some microwave ovens heat the glass unevenly. In this case, try a different microwave, or fire only one piece of glass at a time.
Basic Glass Cutting
Caution: Always wear clear safety glasses while cutting glass.
Small slivers of glass can become airborne.
Lay the glass
on a clean, flat
surface. Mark
off the cut with
a grease pencil
at each end of
the glass. Lay a
straight edge
over the glass
and line it up
with the marks
you just made.
Hold the straight edge firmly and score the glass with a quality
glass cutter (preferably one with an oil reservoir). Hold the
cutter vertically and not slanted. Press hard enough so that
the scoring noise sounds steady and unbroken. But don't
press harder than you need to.
Place the straight edge under the glass so that an edge of the
straight edge is lined up with the score line you just made.
Press down on the glass to break it on the score line.
-6-
Note: A quality glass cutter with oil reservoir, available from art
glass suppliers, is much easier to use than the inexpensive
cutters sold in hardware
stores. A good cutter will
save enough glass to pay
for itself.
A Fast Way to Cut Small
Pieces
First make all your score
lines on the glass. Then turn
the glass over and tap out the
pieces. This is an easy, fast
way to cut many pieces.
Glass Fusing
Before assembling glass pieces, clean
them with water or alcohol to remove fingerprints and dirt, which may otherwise
become permanently etched into the
fired glass. A greasy fingerprint can also
cause the glass to break during firing.
Do not glue the glass pieces that you Clean the glass before firing.
are about to fire. Glue between layers of
glass increases the chance of breakage. Because the kiln fires so rapidly, glue doesn't have time to burn out completely and discolors the
glass, especially dichroic.
Coat the circular firing area
of the kiln base with glass separator. This prevents hot glass
from sticking to the base. Apply 2 - 3 thin coats with a brush,
and dry before firing the kiln.
Follow instructions on the
glass separator package.
Note: For pieces larger than 1" or for
See your microwave manual for instructions on reducing the power to 50%.
Sometimes a finished glass piece is
underfired and needs additional fusing. After
layers of glass have been fused together, the glass becomes one thick
mass and is more likely to break from heat shock if fused a second time
in the MagicFuse. However, you can usually succeed with a second firing if you pre-heat the piece at 40 - 50% for 5 - 10 minutes.
Fire fusing-compatible glass purchased from an art glass supplier.
The glass that you fuse together must be rated to the same coefficient
of expansion (COE). A piece made from glasses of different COE ratings will likely break as it cools. Your supplier can give you the COE
rating of your glass (usually 90 or 96).
-7-
rately in clearly marked containers, or use glass of only one
COE rating.
Protect the Base with
Glass
Separator
The maximum size of glass fired in the
MagicFuse is 2" square, and the maximum
thickness is 2 layers of 18 " or 4 layers of 161 ". Two
layers of 18 " x 1" x 1 ½" is a good average size.
Larger or thicker projects may break from
heat shock due to the very fast firing rate. You
can successfully fuse dichroic glass in the
MagicFuse.
more than 2 layers, pre-heat the glass at
50% power for 5 minutes. See your microwave instruction manual for adjusting
the power.
Note: Glass of different COE ratings must be stored sepa-
Drying the glass separator with a hair dryer.
Sand off a damaged coat of glass separator before applying a new coat.
Note: You can dry the glass separator with a hair dryer or place
the kiln base inside an oven at 200°F (90°C).
-8-
Apply more glass separator to areas where the coating flakes off or
cracks with use. Gently sandpaper the base and apply another coat.
Note: Before applying a new coat of glass separator, remove
only enough of the old separator to smoothen the surface. It is
not necessary to remove all the separator.
Shelf paper, sold by art glass
suppliers, does the same thing as
shelf separator: It prevents the
glass from sticking to the kiln
base. The shelf paper is placed
between the glass and the kiln
base. But if you use glass separator, you do not need shelf paper.
Some brands of shelf paper
produce an odor. For this reason Shelf paper under the glass.
we recommend only glass separator when working in a kitchen area.
Note: Even if you use shelf paper, the kiln base still needs a
coating of glass separator.
Position the Kiln
Inside the Microwave
Firing the kiln on the microwave's food rotator tray
produces better heat distribution inside the kiln. However, in some microwaves
the rotator tray jerks as it
turns, moving glass pieces
out of position. If this is a
problem with your microwave, either use a different
microwave, or remove the
rotator tray and rollers from
the microwave. If you cannot Removing the rotator tray and rollers.
remove the rotator parts,
then turn the rotator tray upside-down, and place 3 of the ½" ceramic
posts that came with your kiln on the tray. If there is enough space, it
may also be possible to remove the tray and place the posts in the bottom of the microwave near the rotator parts.
-9-
Note: Clean the rollers
and area under the rotator tray for the
smoothest rotation.
Note: Always position 3
- 1/2" posts under the
kiln inside the microwave oven. The posts
prevent the kiln from
overheating the bottom of the microwave.
Clean the rollers and track for the smoothest rotation of the tray.
The Firing Time
All microwave ovens fire differently. The firing time varies from one
microwave to the next, and a kiln that is still warm from a previous firing takes less time to fire than a cold kiln. A fluctuation in voltage can
also change the firing time.
Five minutes is the recommended minimum firing time. Use a reduced power setting on your microwave if it fires in less time than 5
minutes. This will lengthen the firing time to give you finer control.
See the microwave manual for instructions on reduced heat settings.
The easiest way to
fire the kiln is to fire a
glass piece in several
stages, visually checking the glass at each
stage. Each time you
visually check the Left to right: tack fuse, medium fuse, and full fuse.
glass, fire 30 - 60 seconds longer until the glass has fused to your satisfaction. Start out
underfiring a test piece, and gradually add more firing time.
Note: The glass begins to fuse during the last 30 seconds of
firing. This is why precise fusing is much easier with visual inspection of the glass.
Keep a detailed firing logbook to record the firing times for each
type of project. Write down the following:
Date
Type of microwave oven
Brand, color, and size of glass
-10-
Pre-heating time, if any, and pre-heat microwave power setting
Power setting during firing
Position the kiln base on top of the posts so the base is centered inside the microwave.
Place the kiln body on top of the base.
Firing time
Whether the kiln was still warm from the previous firing
Firing results and what you learned from the firing
Suggested Firing Times
These times are approximate and are based on the microwave oven
wattage.
800 watts: 6 minutes
1000 watts: 5 minutes
1200 watts: 4 minutes (Remember, use a reduced power setting
when the firing time is under 5 minutes.)
Fire the Kiln
Fire the Kiln
Close the microwave door gently to avoid jarring the glass inside the kiln.
Until you know how long to fire the kiln, start out under-firing
the glass. Set the timer for 3 minutes or less. Turn on the microwave oven.
Open the microwave door when the timer goes off. Leave the
kiln inside the microwave. Wearing heat-protective gloves and
clear safety glasses, lift the kiln top about an inch and check
the glass. Look for only a second or two. Lower the kiln top.
Preparation
Before firing the kiln, make sure the glass separator that you applied to the base has dried.
Decide where you will place the hot kiln when you remove it from
the microwave. Three ½" ceramic posts on a 12" x 12" ceramic tile or
ceramic kiln shelf are good choices. The 3 ceramic posts will separate
the hot kiln from the ceramic tile or shelf. The posts prevent heat from
transferring to the table or counter surface under the tile.
Caution: Avoid placing a hot kiln on Formica, wood, or plastic
surfaces. Do not place the kiln on top of the microwave to cool.
Load the Microwave
Place 3 - ½" ceramic posts in the microwave.
Center the glass you are firing on the kiln base.
Wear safety glasses and stay at arm’s length when checking the glass visually.
Note: Wear safety glasses and stay at arm's length from the kiln
(at least 15") whenever looking at the hot glass.
If the glass needs to fire longer, close the microwave door, program another 30 - 60 seconds, and fire again. Then visually
check the kiln again as in Step 3 above. Keep adding firing
time and checking the
glass until the glass is
done.
When the firing is completed, remove the kiln
from the microwave wearing heat-protective gloves.
-11-
-12-
Be careful to hold the kiln by the base. Keep the kiln top on the
base so that heat does not escape the kiln.
Note: The easiest way to figure the total firing time is to pro-
gram a longer firing than is needed. Then subtract the time
shown in the display at the end of the firing from the time entered at the beginning. Example: Enter 10 minutes at the beginning. The timer shows 4 minutes, 30 seconds when you remove the kiln from the microwave. 10 - 4 minutes, 30 seconds
= 5 minutes, 30 seconds total firing time.
Caution: Always remove the kiln after firing is finished. Leav-
ing a hot kiln inside the microwave to cool would cause the microwave to overheat since the heat released from the kiln
would build up in the enclosed space.
Cooling the Kiln
Place the kiln on top of 3 - ½" ceramic posts that are on a
heat-proof surface such as a ceramic tile. Allow the kiln to cool for
at least 45 minutes before lifting
the kiln top.
Caution: Do not speed up the
cooling by lifting the kiln top Place 3 ceramic posts between the kiln
or using a fan. Allow the closed and a heat-proof surface.
kiln to cool for 45 minutes.
Opening the kiln too soon could crack glass pieces from thermal shock. The larger the glass, the longer it takes to cool before opening the kiln.
Note: While you wait for
Sample Pendant Project
After firing, the pendant is done. You do not need to glue a jewelry
finding to the back, because the design includes a channel that is
fused into the glass where you can string a cord or chain. Use glass that
is rated fusing compatible.
Note: This delicate pendant requires a microwave oven that
does not vibrate during operation.
Vibration will cause the top piece of
glass to move out of place. It may be
necessary to remove the microwave rotator tray.
Cut 2 pieces of 34 " x 1 12 " glass.
With scissors or razor blade, cut a
strip of 18 " thick fiber shelf paper
to form the channel for the cord
or chain. Size: 18 " thick x 18 " wide x
1" long.
Clean fingerprints from the glass.
Then handle only by the edges.
Lay the fiber paper across one
piece of glass so that it is parallel
with the 34 " side and 38 " from the
edge.
Gently lay the second piece of
glass over the first.
Sprinkle broken pieces of dichroic
glass over the top piece of glass.
the kiln to cool, cut and
assemble the next pieces.
Load the piece onto the
MagicFuse kiln base. (The base
must first be coated with glass
separator.)
When opening the kiln after it has cooled, lay the kiln
top upside-down on a
heatproof surface. Placing the
top with the open face down
against the heat proof surface
may cause heat to build up.
Place the warm top upside-down after removing
the glass from the base.
-13-
Fire the glass until the glass
pieces have fused together and
the top piece has curled around
the fiber paper scrap. Stop the firing before the dichroic glass flat-
-14-
tens into the surface. This particular piece should receive only
a light-to-medium fuse.
Sand until the interior is
white to gray in color.
Allow the kiln to cool for at least 45 minutes.
Apply a new coat with a 1"
paint brush.
When the glass is cool enough to touch, remove the fiber paper
with a tooth pick and thread a cord or chain into the channel.
Glass Troubleshooter
Points on the edges of the glass
The glass was fired too hot. Grind
the edges of the glass with a sheet of
fine sandpaper or emery cloth. Lay the
sandpaper on a flat surface and rub the
glass over the sandpaper.
Cracks
Apply a second coating after
24 hours.
Allow the kiln to dry completely before firing.
Removing Embedded
Glass from the Kiln
Removing pointed corners from the
The piece was too large or had too glass.
many layers. Or you fired a piece a second time. Next time, fire smaller
pieces, pre-heat the glass, or fire at a
lower heat setting on your microwave
oven.
The glass was removed too soon
from the kiln. Allow the glass to cool at
least 45 minutes before lifting the kiln
top and removing the piece.
The glass pieces that fused together
are incompatible. This means they expanded and contracted during
firing at different rates. Buy glass that is rated fusing compatible from
an art glass supplier.
Hot glass can break during
firing and fly against the kiln
top and base. After the kiln
cools, remove the embedded
glass. If necessary, dig the glass
out of the ceramic fiber using a
pocketknife. Repairing small
low spots in the fiber is usually
not necessary.
Use a pocket knife to remove embedded glass
from the base.
Repairing Gouges in the Ceramic Fiber Base
Turn the base upside-down on a sheet of
sandpaper and rub in a circular motion. Remove as little material as possible from
the base. Then recoat the
base with glass separator.
Maintenance Instructions
Repairing Cracked or Flaked Black Coating
To repair the silicon carbide coating, you will need the coating
(available from Paragon), sandpaper, and a 1” paint brush.
Lay the kiln top on its side.
Sand the black coating on the
inner surface with a piece of
sandpaper. Rotate the kiln top
as you sand. You do not need
to remove all the coating.
-15-
Sanding the base to remove minor gouges.
2011 South Town East Blvd.
Mesquite, Texas 75149-1122
800-876-4328 / 972-288-7557
Toll Free Fax: 888-222-6450
[email protected]
www.paragonweb.com
-16-