1
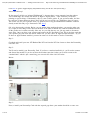
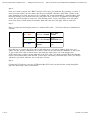
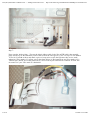
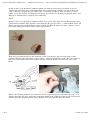
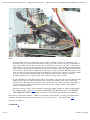
The (mis?)Adventures of Shane Curd… » Adding a PCI Video Card...
http://web.archive.org/web/20070529132408/http://www.shanecurd...
The (mis?)Adventures of Shane Curd…
HomeBioPhotosTravelsProjectsResumeContact
Login | Rss
Adding a PCI Video Card to an Apple Macintosh G3 AIO
September 26th, 2006
Details
If you have a G3 AIO, I think one of your biggest complaints will be the video. It has a slow 2 MB Rage
Pro or Rage IIc onboard video controller and since the CRT is integrated, you cannot simply install a PCI
video card… With the help of my scientist father and his new Tektronix scope, we figured out how to
wire in a new video card to utilize the integrated CRT.
I can assure you that I have made this modification to my AIO and am THRILLED with the performance
increase!
The upgrade I try to outline below will result in excellent 3D performance even flawless DVD-playback!
One day, someone will get Quartz Extreme to work — let me know if you do… If you’d like to perform
the same upgrade on your AIO, please see the “almost-walkthrough” below. It’s a work in progress and I
welcome your feedback.
What to Buy and Required Tools
1. A completely tested pre-manufactured solderless solution I’ve already made. Click here for more
information and to place your order.
2. Tools: Screwdriver to open your AIO case.
3. A new ATI Radeon PCI Card for Macintosh Computers (As of 9/06 $92 try here).
-or1. A VGA cable for a monitor with BNC connections. You need one of these cables with 5 leads (Red,
Blue, Green, H-Sync, and V-Sync).
2. Some connectors of various kinds (see below).
3. Some spare wire, electrical tape, heat shrink tubing, zip ties.
4. Tools: Screwdriver, soldering iron, solder, solder wick, precise wire-cutters, heat gun, multimeter.
5. Lots of patience.
6. A new ATI Radeon PCI Card for Macintosh Computers (As of 9/06 $92 try here).
Useful Software/Documentation
Note: I do not host this software or documentation. I link to other sites where I’ve found someone who
has posted them. If the links below don’t work, please use the “Contact” button above and write me an
e-mail and maybe I can point you in the right direction.
Click here to get to download the Apple Factory Service Manual for the G3 AIO.
1 of 10
11/28/07 12:32 AM
The (mis?)Adventures of Shane Curd… » Adding a PCI Video Card...
http://web.archive.org/web/20070529132408/http://www.shanecurd...
Click here to get the Apple Display Adjustment Utility for the G3 AIO (OS 9 Only).
Almost-Walkthrough
So the reason I call this an “Almost-Walkthrough” is because there is more narrative here than photos.
True walkthroughs are loaded with dozens of high-res digital photos - some with fancy red arrows
pointing to specific things. Unfortunately, this isn’t one of those guides. If you get into trouble, feel free
to e-mail me (Contact button up above) and I will do my best to help you. [Shameless plug: Of course…
The easiest way for you to get this done is to purchase one of my pre-manufactured solderless solutions
already tested and ready to go! Interested? Click here.]
Ok, we’re about ready to begin. Before you get started doing anything hardcore, you need to make sure
of a couple of basic things. First, unscrew the back of the AIO so that the tray with the motherboard and
all the goodies we’re about to modify slides out. As you slide the tray out, you may need to disconnect
some wires. Once you have it out, unscrew and remove the G3 Personality Card. This is the large card that
your speakers plug into from the outside. Make sure you don’t have an Apple modem installed… (If you
do have an Apple modem installed, you need to remove it for this mod to work as I intended.)
Step 1:
Go ahead and install your new ATI Radeon Mac PCI card into the PCI slot closest to where the Personality
card once was.
Step 2:
You’ll need to modify your Personality Card. If you have a modem installed in it, you’ll need to remove
and discard the modem. If you do not have the modem (most don’t) then you’ll need to remove the
“modem blank” which is just a metal slug you can twist off of the card. See below.
Before:
After:
Step 3:
Now, re-install your Personality Card with the exposed gap where your modem should be or once was.
2 of 10
11/28/07 12:32 AM
The (mis?)Adventures of Shane Curd… » Adding a PCI Video Card...
http://web.archive.org/web/20070529132408/http://www.shanecurd...
Step 4:
Now you’ll need to prepare the 5-BNC Connector VGA cable you purchased. By preparing, of course, I
mean you need to take your wire-cutters and chop off each BNC connector. Strip about 2 inches of the
outer insulation off of each wire and you’ll see another wire inside surrounded by a metal shielding. Pull
the metal shielding away from the inner wire and gather. Once you have it all gathered, twist and apply
solder. This will be ground for each color. (The shielding on the V-Sync and H-Sync wires will not be
used.) Now, Strip a small amount of insulation from each inner wire and apply solder to each lead.
Step 5:
Here’s a handy table showing the pinout of a standard VGA cable… You’ll need this and a multimeter to
continue.
Pin 1 - Red
Pin 8 - Blue
Pins 5,10 - Ground Ground
Pin 2 - Green
Pin 6 - Red Ground Pin 13 Horizontal Sync
Pin 3 - Blue
Pin 7 - Green
Ground
Pin 14 - Vertical
Sync
Now that you’ve prepared the VGA cable as instructed above, you need to identify which wire goes
where. For this, you use a multimeter set to Ohms. Touch one test lead from the multimeter to one of the
15 pins of the VGA cable (as shown above) and touch the other lead to one of the stripped and
solder-coated wires you have on the other end of the VGA cable. You need to identify Red, Red Ground,
Green, Green Ground, Blue, Blue Ground, Vertical Sync, and finally, Horizontal Sync. Once you identify
which wire goes where, label the wire or take notes for later.
Step 6:
Connect the VGA cable to your new ATI Radeon Mac PCI video card and feed the wiring through the
gap in the Personality Card as shown below:
3 of 10
11/28/07 12:32 AM
The (mis?)Adventures of Shane Curd… » Adding a PCI Video Card...
http://web.archive.org/web/20070529132408/http://www.shanecurd...
Step 7:
Now, onto the inside wiring… Free up the 40-pin ribbon cable (looks like an IDE cable) that normally
plugs into the top of the Personality Card. Count in from the side opposite of the red stripe to wire number
12 and 14. Cut both of those and attach a piece of scrap wire to each lead (because they are too weak,
otherwise). Wire number 12 (yellow wire in the photo below) is Horizontal Sync and wire number 14 is
Vertical Sync (brown wire in the photo below). You’ll want to put some kind of connector on each wire
for removal so your VGA mod isn’t hardwired.
4 of 10
11/28/07 12:32 AM
The (mis?)Adventures of Shane Curd… » Adding a PCI Video Card...
http://web.archive.org/web/20070529132408/http://www.shanecurd...
In Step 5 above, you should have identified which wire from the VGA cable you hacked up goes to
Vertical Sync and which goes to Horizontal Sync. Put a corresponding connector on each of those two
wires so that they can plug into your ribbon cable’s connectors (as above). Note: (For these two wires
ONLY you do not need the shielding and can remove and discard. The shielding around Red, Green, and
Blue act as Ground which is required to be connected.)
Step 8:
In Step 5 above, you should have identified which wires in your VGA cable are Red, Red Ground, Green,
Green Ground, and Blue, Blue ground. I used connectors like you see below… I soldered Red, Green, and
Blue to one connector and Red Ground, Green Ground, and Blue Ground to the other connector. I used
heat-shrink tubing and electrical tape to protect against shorts.
Make sure you solder the wires to the connector in such a way that the pins will align to the correct
position within the AIO video cable as shown below… Notice that four holes on the AIO video cable are
unused. I covered them with electrical tape to prevent confusion should I disconnect the wires in the
future.
Below is the finished product. I used a bunch of electrical tape and zip ties to tidy things up a bit… You
simply connect the two Sync wires using connectors similar to the light-blue crimp-on ones I used below
and then you slide the pins from the newly-modified VGA cable into the AIO video cable.
5 of 10
11/28/07 12:32 AM
The (mis?)Adventures of Shane Curd… » Adding a PCI Video Card...
http://web.archive.org/web/20070529132408/http://www.shanecurd...
Notes:
On your first boot after the mod, make sure you have a monitor of some sort connected to the
on-board video port (via mac VGA connector in the rear). You’ll have to boot up on the onboard
video first and then specify that you want your new PCI video card to be “primary” in the Display
Control Panel. As of yet, I have not been able to figure out how to truly disable the onboard video.
Even with the internal monitor connected to your newly installed video card, Apple System Profiler
still sees the on-board video as enabled and connected to a “ghost” monitor. What this means is you
need to either have video mirroring turned on (makes the system slow as hell) or you need to make
your new video card the primary display in the Displays Control Panel and have a “ghost”
secondary monitor exist on your system. Your mouse could get lost over there!
If you disconnect the AIO ribbon cable from the Personality card, then the on-board video becomes
disabled. This leads me to believe that there are some kind of monitor sense lines on that cable
which could be disconnected. Please play around and let me know what you find!! Unfortunately,
you can’t just leave it disconnected as it also has the speaker, volume controls, and brightness
controls coming through it…
Since the on-board video is always enabled, I cannot get Quartz Extreme to work with that patch I
see floating around.. (click here for details). PLEASE LET ME KNOW IF YOU CAN DISABLE
THE ONBOARD VIDEO! If you know someone at ATI with the chip datasheets or something…
Still want to do this mod yourself? Thanks to an awesome reader, Donnie, I made 5 pre-manufactured
solderless solutions already tested and ready to go! So far, I have 4 left… Interested? Click here.
Posted by crzyshane |
8 Comments »
6 of 10
11/28/07 12:32 AM
The (mis?)Adventures of Shane Curd… » Adding a PCI Video Card...
http://web.archive.org/web/20070529132408/http://www.shanecurd...
1. Mike mcManus says
Wow. Good job. Have you had any problems with the mod? How do you get the G3 aio Servce
manual. It is not on thaat site anymore. Going to try this.
Going to put a faster cpu in. Will it have any effect on the mod?
November 11th, 2006 | #
2. Martin Graiter says
Hi.
Great site and great articles!
As for disabling the internal graphics card, if you can find a pinout of the graphics chip, probably
some ATI chip, then look for a pin named CE.
This stands for Chip Enable and is usually negative logic. When you feed it with a constant “1″
(+5V) it will be disabled.
You also need to disconnect this CE input from its normal source so that the source isn’t force-fed
with the same logical “1″.
I’m speculating now, but I’m sure that when the bus master hardware gets no feedback from the
built-in graphics processor it will assume it to be not present.
If I could find a source for ATI graphics controller pinouts I’d gladly test this on one of my own
Macs. I’m 90% sure that this will work though.
Regards, Martin, Sweden
December 2nd, 2006 | #
3. DrBunsen says
I don’t think it’s such a good idea to do the wiring mod while the other end is plugged into your
brand new Radeon. You want to triple check the wire assignments before powering up.
And that big loop of video cable inside the computer is going to act like a coil and pick up
interference. Better to make the cable shorter.
That said, well done!
January 3rd, 2007 | #
4. Morgan says
I am making a modification using a motherboardless AIO. I am going to try to do the same thing,
but I was wondering if there is anything that i need to hardwire to make the monitor come on. or
does it just activate with the powersupply?
January 9th, 2007 | #
5. Frank M. says
hello
i sent you a few emails before but never got a reply from you. i have tiger 10.4.8 installed and i
have a Radeon 7000 ME PCI installed in my AIO and have PCI extreme installed and it runs on the
7 of 10
11/28/07 12:32 AM
The (mis?)Adventures of Shane Curd… » Adding a PCI Video Card...
http://web.archive.org/web/20070529132408/http://www.shanecurd...
Radeon 7000 just fine. with extreme cheacker it shows as active and the onboard video as not
supported. i used PCI extreme 3.1 from xlr8yourmac.com to get it working.
i have had tiger installed since 10.4.3 and have not had a single problem with tiger (runs better than
10.2 or 10.3 some times OS 9.x). i use 2 monitors one is hooked to the 7000 and the internal is still
hooked to the onboard. i use to want to do this mod but i liked having extended desktop mode. the
internal monitor used for the IRC chat client and the 7000 used for everything else since its way
faster.
but i always thought this was a great mod to do if you dont want another monitor.
Specs of my AIO
Beige G3 AIO Rev b rom, Rav 2 mobo
G3 466mhz ( bought a G3 450mhz cpu from a B&W)
448mb ram
Western Digital SE 120gb HDD
Pioneer DVR-110D
internal zip 100
internal comm slot II 56k v90 modem
1 2 port USB 1.1 PCI card
ATI Radeon 7000 Mac Edition PCI video card
ATI Rage Pro onboard video 6mb vram (2mb stock vram 4mb vram sodimm upgrade)
15″ external monitor hooked to the Radeon 7000
OS 9.2.2 and OS X 10.4.8 with PCI Extreme enabled and running great with hardly any ill effects.
have burn support with the Pioneer drive in OS 9.2.2 with iTunes and finder burning with a
modded PioneerCDR Authoring support extension, modded that file to also support the 111D
drives. installed intech CD/DVD speed tools 6.0 to fix the wake up freeze caused by the stocl apple
cd/dvd driver with the Pioneer DVR-110D
January 21st, 2007 | #
6. Frank says
i have PCI Extreme enabled on my AIO and im useing a ATI Radeon 7000 PCI video card and the
onboard video ( yea the onboard video wont support PCI extreme but the 7000 does and works
great. have had no problems running it. i have 10.4.8 installed on my AIO i used PCI extreme
enabler 3.1.
i used the PCI extreme cheack app and shows the 7000 being enabled and shows a great
improvement in GUI speed and other stuff has also gained in performance. i was going to do this
hace on my AIO but i grew on having extended desktop mode. i like having the room
January 24th, 2007 | #
7. Andrew says
Where/how did you find the pinout for the AIO connector? I’m looking for the Sync Ground on
the card…
February 2nd, 2007 | #
8. Seth B says
Frank M: I am just getting started in doing some upgrades on my AIO. I was wondering if you
could give me some more information on some of upgrades you did, like HDD, DVD-R,
Proccessor, etc… Any help would be greatly appreciated.
March 8th, 2007 | #
8 of 10
11/28/07 12:32 AM
The (mis?)Adventures of Shane Curd… » Adding a PCI Video Card...
http://web.archive.org/web/20070529132408/http://www.shanecurd...
Leave a comment
Name (required)
Mail (will not be published) (required)
Website
:mrgreen: :neutral: :twisted: :shock: :smile: :???: :cool: :evil: :grin: :oops: :razz: :roll: :wink: :cry: :eek: :lol:
:mad: :sad:
Submit Comment
RSS feed for these comments. | TrackBack URI
Translate to English
Übersetzen Sie zum Traduzca al
Deutsch/German
Español/Spanish
Traduza ao
Português/Portuguese
日本語に翻訳しな
さい /Japanese
Traduisez au
Français/French
Traduca ad
Italiano/Italian
한국어에게 번역하
中文翻译/Chinese
십시오/Korean
Events/Travel
May 2007
M T W T F S S
1 2 3 4 5 6
7 8 9 10 11 12 13
14 15 16 17 18 19 20
21 22 23 24 25 26 27
28 29 30 31
Recent Posts
Since when did a Vodka Cranberry become a Cape Cod?
WTF is LazyTown?
Here we go again! Night Hawks LA Event - June 18th
Why does everyone love eHarmony? Perhaps it’s all about Attitude and the $50/mo. price tag!
Tony Has Left The Building!
Paulie Shore Beats… err… Starves His Dog!
Night Hawks LA’s “Le Cirque Du Titty! Titty! Bang! Bang!”
“You should say ‘thank you,’ sir.” - “What is Berlin, is that a country?” - And other reasons why I
hate Los Angeles.
Lunch in Poland
Saturday Night In Chicago
Search
9 of 10
11/28/07 12:32 AM
The (mis?)Adventures of Shane Curd… » Adding a PCI Video Card...
http://web.archive.org/web/20070529132408/http://www.shanecurd...
Powered By: WordPress | Original Design By: Kaushal Sheth
10 of 10
11/28/07 12:32 AM