1
UGTXKEG"OCPWCN
FkcoqpfEctg™
Tgeguugf"Ycnn
Qwvngv"cpf
Gngevtkecn
Product No. 6803
TexText
Hqt"Rctvu"qt"Vgejpkecn"Cuukuvcpeg
Technical Support: 1-888-4MEDGAS (463-3427)
Customer Service: 1-888-4MEDGAS (463-3427)
www.beaconmedaes.com
Text
OCP467"Tgx0"C
Andersen Medical Gas
12 Place Lafifitte
Madisonville, LA 70447
http://www.TheMedicalGas.com
1-866-288-3783
©2004 by BeaconMedæs. ALL RIGHTS RESERVED.
No part of this text shall be reproduced or transmitted in any form or by any means,
electronic or mechanical, including photocopying, recording, or by any information or
retrieval system without written permission from BeaconMedæs.
First Edition
First Printing 2004
Printed in the USA
CSA® is a registered trademark of Canadian Standards Association.
Decora® is a registered trademark of Leviton Manufacturing Co., Inc.
Diamond® is a trademark of BeaconMedæs.
DiamondCare® is a trademark of BeaconMedæs.
Krytox® is a registered trademark of E. I. du Pont and de Nemours and Company.
The information contained in this manual is subject to change without notice.
BeaconMedæs makes no commitment to update or keep current, the information contained
in this manual.
The only product warranty intended by BeaconMedæs is the express, written warranty
accompanying the bill of sale to the original purchaser. BeaconMedæs makes no other
warranty, express or implied, and in particular, makes no warranty of merchantability or
fitness for a particular purpose.
Table of Contents
Chapt er 1 Int roducti on
Purpose .......................................................................................................................1-3
Audience.....................................................................................................................1-3
Organization ...............................................................................................................1-3
Chapter 1: Introduction ........................................................................................1-3
Chapter 2: Troubleshooting Procedures ...............................................................1-3
Chapter 3: Theory of Operation ...........................................................................1-3
Chapter 4: Removal, Replacement, and Adjustment Procedures ........................1-3
Chapter 5: Parts List.............................................................................................1-3
Chapter 6: General Procedures.............................................................................1-3
Typographical Conventions........................................................................................1-4
Terminology................................................................................................................1-5
Definitions ............................................................................................................1-5
Acronyms..............................................................................................................1-5
Introduction ................................................................................................................1-6
Operating Precautions ..........................................................................................1-7
Specifications..............................................................................................................1-8
Physical Description.............................................................................................1-8
Rough-In Assembly ........................................................................................1-8
Finish Assembly .............................................................................................1-8
Regulations, Standards, and Codes ......................................................................1-9
System Features..........................................................................................................1-9
Key Style Identification............................................................................................1-10
Assembly Identification............................................................................................1-11
Wall Outlet Rough-In Assemblies ......................................................................1-11
Wall Outlet Finish Assemblies ...........................................................................1-12
Safety Tips ................................................................................................................1-13
Warning and Caution Labels ....................................................................................1-16
DiamondCare® Recessed Wall Outlet and Electrical Accessories (####-###-####)
Page i
Table of Contents
Chapt er 2 T roubleshooti ng Procedures
Getting Started............................................................................................................2-2
Initial Actions .............................................................................................................2-2
Function Checks .........................................................................................................2-3
Final Actions...............................................................................................................2-4
Test Equipment ...........................................................................................................2-4
DISS Key Style Medical Gas Wall Outlet Leakage...................................................2-5
Diamond®, Latch Index, or Geometric Key Style Medical Gas
Wall Outlet Leakage ...................................................................................................2-5
Attachment Malfunction.............................................................................................2-6
Rough-In Assembly Leakage (Pressurized Medical Gases) ......................................2-7
Rough-In Assembly Leakage (Vacuum Outlets Only)...............................................2-7
Chapt er 3 T heory of Ope ration
Theory of Operation ...................................................................................................3-2
Hardware ..............................................................................................................3-2
Quick-Connect Key Style Outlets ..................................................................3-2
DISS Key Style Outlets..................................................................................3-2
Chapt er 4 Removal , Repl ace ment , and Adj ust ment Proc edures
Frontbody Assembly...................................................................................................4-3
Removal................................................................................................................4-3
Replacement .........................................................................................................4-3
Twist-Lock Replaceable Barrel Assembly .................................................................4-4
Removal................................................................................................................4-4
Replacement .........................................................................................................4-4
Rough-In Secondary Check Unit Assembly (Pressurized Outlets Only) ..................4-6
Removal................................................................................................................4-6
Replacement .........................................................................................................4-7
Rough-In Assembly (Vacuum Outlets Only) .............................................................4-8
Removal................................................................................................................4-8
Replacement .........................................................................................................4-8
DISS Key Style Frontbody Assembly......................................................................4-10
Page ii
DiamondCare® Recessed Wall Outlet and Electrical Accessories (####-###-####)
Table of Contents
Removal..............................................................................................................4-10
Replacement .......................................................................................................4-11
Diamond® Quick-Connect Key Style Frontbody Assembly ...................................4-12
Removal..............................................................................................................4-12
Replacement .......................................................................................................4-13
Latch Index Quick-Connect Key Style Frontbody Assembly..................................4-15
Removal..............................................................................................................4-15
Replacement .......................................................................................................4-16
Geometric Quick-Connect Key Style Frontbody Assembly ....................................4-17
Removal..............................................................................................................4-17
Replacement .......................................................................................................4-18
Chapt er 5 Part s List
Warranty .....................................................................................................................5-3
Service Parts Ordering................................................................................................5-5
Recommended Spare Parts.........................................................................................5-5
DISS Key Style Finish Assembly...............................................................................5-6
Diamond® Quick-Connect Key Style Finish Assembly............................................5-8
Latch Index Quick-Connect Key Style Finish Assembly ........................................5-10
Geometric Quick-Connect Key Style Finish Assembly...........................................5-12
Gas Service Rough-In Assembly..............................................................................5-14
Twist-Lock Finish Assembly....................................................................................5-16
Power Drop Straight Blade Finish Assembly...........................................................5-17
Duplex Receptacle Finish Assembly........................................................................5-18
Outlet—GFCI Finish Assembly ...............................................................................5-19
Toggle Switch Finish Assembly ...............................................................................5-20
Decora® Switch Finish Assembly ...........................................................................5-21
Low Voltage Switch Finish Assembly .....................................................................5-22
Blank Provision Finish Assembly ............................................................................5-23
Electrical Accessories Rough-In Assembly..............................................................5-24
DiamondCare® Recessed Wall Outlet and Electrical Accessories (####-###-####)
Page iii
Table of Contents
Recessed Wall Slide Finish Assembly......................................................................5-25
Recessed Wall Blank Finish Assembly ....................................................................5-26
Recessed Wall Slide Rough-In Assembly ................................................................5-27
Wall-Mounted Slide Finish Assembly with Anchors ...............................................5-28
Surface-Mounted Gas Outlet Enclosure...................................................................5-29
Surface-Mounted Slide Enclosure............................................................................5-30
Replacement Twist-Lock Barrel Assembly Repair Kits ..........................................5-31
Frontbody Repair Parts Kits.....................................................................................5-32
Rough-In Assembly Repair Parts Kits .....................................................................5-33
DiamondCare® Conversion Kits .............................................................................5-34
Chapt er 6 Gene ral Proc edures
Cleaning......................................................................................................................6-2
Steam Cleaning.....................................................................................................6-2
Cleaning Hard to Clean Spots ..............................................................................6-2
Disinfection ..........................................................................................................6-2
Component Handling..................................................................................................6-3
Lubrication Requirements ..........................................................................................6-3
Service ........................................................................................................................6-4
Repair Policy and Procedure ......................................................................................6-5
Repair Kits..................................................................................................................6-6
General Service Procedures........................................................................................6-7
Tool and Supply Requirements ..................................................................................6-8
Page iv
DiamondCare® Recessed Wall Outlet and Electrical Accessories (####-###-####)
Chapter 1
Introduction
Ejcrvgt"Eqpvgpvu
Purpose .......................................................................................................................1-3
Audience.....................................................................................................................1-3
Organization ...............................................................................................................1-3
Chapter 1: Introduction ........................................................................................1-3
Chapter 2: Troubleshooting Procedures ...............................................................1-3
Chapter 3: Theory of Operation ...........................................................................1-3
Chapter 4: Removal, Replacement, and Adjustment Procedures ........................1-3
Chapter 5: Parts List.............................................................................................1-3
Chapter 6: General Procedures.............................................................................1-3
Typographical Conventions........................................................................................1-4
Terminology................................................................................................................1-5
Definitions ............................................................................................................1-5
Acronyms..............................................................................................................1-5
Introduction ................................................................................................................1-6
Operating Precautions ..........................................................................................1-7
Specifications..............................................................................................................1-8
Physical Description.............................................................................................1-8
Rough-In Assembly ........................................................................................1-8
Finish Assembly .............................................................................................1-8
Regulations, Standards, and Codes ......................................................................1-9
System Features..........................................................................................................1-9
Key Style Identification............................................................................................1-10
Assembly Identification............................................................................................1-11
Wall Outlet Rough-In Assemblies ......................................................................1-11
DiamondCare® Recessed Wall Outlet and Electrical Accessories (####-###-####)
Page 1-1
3
Chapter Contents
Chapter 1
Wall Outlet Finish Assemblies ...........................................................................1-12
Safety Tips ................................................................................................................1-13
Warning and Caution Labels ....................................................................................1-16
Page 1-2
DiamondCare® Recessed Wall Outlet and Electrical Accessories (####-###-####)
Purpose
Chapter 1
Purpose
This manual provides requirements for DiamondCare® Medical Gas/Vacuum Recessed
Wall Outlets and Electrical Accessories operation and service. It also includes parts lists (in
chapter 5) for ordering replacement components.
Audience
This manual is intended for use by only facility-authorized personnel. Failure to observe
this restriction can result in severe injury to people and serious damage to equipment.
Organization
This manual contains seven chapters.
Chapter 1: I ntrod uctio n
Chapter 1 contains a brief description of this service manual, as well as a product overview.
Chapter 2: Tr ou blesh oo tin g Pro ced ures
Chapter 2 contains repair analysis procedures. Use these procedures to gather information,
identify a repair need, and verify the effectiveness of the repair.
Chapter 3: Th eo ry o f Op er ation
Chapter 3 describes the application of the mechanical system employed in this product.
Chapter 4: Remov al, Rep lacement, an d Ad ju stmen t Pr ocedu res
Chapter 4 contains the detailed repair procedures determined necessary in chapter 2.
Chapter 5: Parts List
Chapter 5 contains the warranty, part-ordering procedure, and illustrated parts lists for this
product.
Chapter 6: G en eral Pro ced ur es
Chapter 6 contains cleaning, servicing, and other general procedures.
DiamondCare® Recessed Wall Outlet and Electrical Accessories (####-###-####)
Page 1-3
3
Typographical Conventions
Chapter 1
T ypographica l C onventions
This manual contains different typefaces and icons designed to improve readability and
increase understanding of its content. Note the following examples:
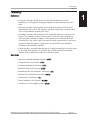
• Standard text—used for regular information.
• Boldfac e t ext—emphasizes a word or phrase.
• NOTE :—sets apart special information or important instruction clarification.
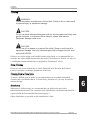
• The symbol below highlights a WARNING or CAUTION:
Hkiwtg"3/30""Yctpkpi"cpf"Ecwvkqp
Page 1-4
–
A WARNING identifies situations or actions that may affect patient or
user safety. Disregarding a warning could result in patient or user
injury.
–
A CAUTION points out special procedures or precautions that
personnel must follow to avoid equipment damage.
DiamondCare® Recessed Wall Outlet and Electrical Accessories (####-###-####)
Terminology
Chapter 1
T erminology
Definitio ns
• Recessed wall outlet: Medical gas/vacuum outlet intended for in-wall
installation. It is designed to be ganged together for placement between wall
studs.
• Rough-in assembly: Sub-assembly of the outlet that connects to the facility’s
piped medical gas system. The rough-in assembly contains the secondary check
valve (for pressurized medical gases only).
• Frontbody assembly: Sub-assembly of the outlet that connects to a patient care
system. The frontbody consists of the primary check valve and a keying disc.
The keying disc contains an adapter release button (for Latch Index Key and
Geometric Key key styles), and a gas-specific keying system that prevents crossconnection from the outlet to a patient care system and from the frontbody
assembly to the backbody assembly.
• Finish assembly: Assembly that attaches to a rough-in assembly to trim the outlet
to the rough wall opening. For example, the recessed outlet finish assembly
consists of the frontbody assembly and a finish faceplate.
Acro ny ms
• American National Standards Institute (A
ANSI)
• Compressed Gas Association (C
CGA )
• Canadian Standards Association (C
CSA)
• Diameter Index Safety System (D
DISS )
• International Electro-technical Commission (IIEC)
• National Fire Protection Association (N
NFPA)
• Underwriters Laboratories (U
UL)
• Waste Anesthetic Gas Disposal (W
WAGD)
• Anesthetic Gas Scavenging System (A
AGSS )
DiamondCare® Recessed Wall Outlet and Electrical Accessories (####-###-####)
Page 1-5
3
Introduction
Chapter 1
Introduction
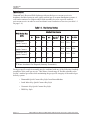
DiamondCare® Recessed Wall Outlets provide medical gas or vacuum services in
healthcare facilities having in-wall, piped, medical gas or vacuum distribution systems. A
wall outlet consists of a rough-in and a finish assembly, keyed to a specific medical
gas/vacuum service in order to avoid accidental cross-connection of services (see table 1-1
on page 1–6).
Ta ble 1-1. Gas Service Options
W all Outlet Key
Style
Medica l Gas Servi ce
O2
N2O
Va c
Air
WAGD w CO 2
N2
O2/CO2
Diamond®
Quick-Connect
x
x
x
x
x
N/A
N/A
N/A
Latch Index Key
Quick-Connect
x
x
x
x
x
N/A
N/A
N/A
Geometric Key
Quick-Connect
x
x
x
x
x
N/A
N/A
N/A
DISS
x
x
x
x
x
x
x
x
w Waste Anesthetic Gas Disposal (formerly Evacuation)
Each gas-specific rough-in assembly may be combined with any of the following frontbody
assemblies of the same gas service. This allows a broad range of flexible solutions to the
facility’s medical gas needs while maintaining the gas specific integrity of the medical gas
delivery system.
• Diamond® Quick-Connect Key Style from BeaconMedæs
• Latch Index Key Quick-Connect Key Style
• Geometric Key Quick-Connect Key Style
• DISS Key Style
Page 1-6
DiamondCare® Recessed Wall Outlet and Electrical Accessories (####-###-####)
Introduction
Chapter 1
All outlets are color-coded and labeled according to NFPA and CSA standards for safety. All
outlets are listed by UL and CSA.
DiamondCare® outlets for all pressurized medical gases are rated for a maximum service
pressure of 200 psig. They contain both a secondary check valve and a primary check valve.
DiamondCare® vacuum inlets consist of a primary check valve only. The primary check
valve (located in the frontbody) prevents gas flow when an outlet adapter or patient
treatment device is removed from the outlet. The secondary check valve (located in the
rough-in assembly) prevents gas flow when the frontbody is removed from a pressure gas
rough-in assembly.
Op erating P recau tion s
Wall Outlets perform in conformity with the description contained in this service manual
and accompanying labels and/or inserts when installed, assembled, operated, and repaired in
accordance with the instructions provided. Outlets must be checked periodically. Refer to
CGA Pamphlet E-10 (1999 Edition), Maintenance of Medical Gas and Vacuum Systems in
Health Care Facilities. If an outlet does not work, the outlet should not be used. Broken,
missing, plainly worn, distorted, or contaminated parts should be replaced immediately. If
repair or replacement become necessary, BeaconMedæs recommends that a phone call or
written request for service advice be made to BeaconMedæs Customer Service. This
product and any of its components should be repaired in accordance with written
instructions provided by BeaconMedæs.
WARNING:
Components of outlets for vacuum service must never be interchanged or
used in outlets delivering pressurized gas service. Possibly injury or
equipment damage could occur.
Components of outlets for vacuum service must never be interchanged or used in outlets
delivering pressurized gas service. The outlet should not be altered without the prior written
approval of BeaconMedæs. The user of this product shall have the sole responsibility for
any malfunction that results from improper use, faulty installation, improper repair, damage,
or alteration.
DiamondCare® Recessed Wall Outlet and Electrical Accessories (####-###-####)
Page 1-7
3
Specifications
Chapter 1
Specific ations
Ph ysical D escr ip tion
The DiamondCare® Recessed Wall Outlet consists of a rough-in assembly and a finish
assembly.
Rough-In Assem bly
The rough-in assembly consists of a zinc die-cast backplate with mounting flanges on all
four sides, a 1/2" (12.7 mm) raised plaster strike, and a non-removable, positive, pin-keying
arrangement for each specific service. Identification of each service is permanently cast into
the backplate.
The rough-in assembly for all pressurized gas services contains a fully assembled secondary
check, which is serviceable completely from the front. This check prevents gas flow when
the finish assembly is removed for service. The rough-in inlet is a 7" (18 cm) long, 1/2"
(12.7 mm) OD, type K, copper inlet tube, with a plastic dust cap and label identifying the
specific gas by name and color. Rotation of the inlet tube allows alignment with system
piping for connections.
Finish Assem bly
The finish assembly consists of a light neutral colored, powder-coated, zinc die-cast, finish
faceplate, an attached frontbody keying disc assembly, and a barrel assembly which houses
the primary check valve. The keying disc assembly is color-coded and labeled with the
name of the gas service. A serviceable barrel assembly includes the primary check valve
that engages and seals when an adapter or patient treatment device is removed from the
outlet.
Page 1-8
DiamondCare® Recessed Wall Outlet and Electrical Accessories (####-###-####)
Specifications
Chapter 1
Reg ulation s, Stan dard s, an d Cod es
All DiamondCare® Recessed Wall Outlets are designed and manufactured to applicable
NFPA, CGA, and CSA standards:
• NFPA 99 (1999 Edition) Standard for Health Care Facilities
• CSA standard Z305.1 Non-Flammable Medical Gas/Vacuum System Terminal
Outlets
• CSA Z305.5, Standard for Non-Flammable Medical Gas Piping Systems
• CGA Pamphlet G-4.1, Cleaning for Oxygen Service
• CGA Pamphlet P-2, Characteristics and Safe Handling of Medical Gases
• CGA Pamphlet V-5, Diameter Index Safety System-Non-Interchangeable LowPressure Connections for Medical Gas Applications
• CGA Pamphlet E-10 (1999 Edition), Maintenance of Medical Gas and Vacuum
Systems in Health Care Facilities
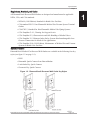
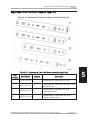
System Feature s
DiamondCare® Medical Gas Recessed Wall Outlets are available in the following four key
styles (see figure 1-2 on page 1–9):
• DISS
• Diamond® Quick-Connect from BeaconMedæs
• Latch Index Key Quick-Connect
• Geometric Key Quick-Connect
Hkiwtg"3/40""FkcoqpfEctg™"Tgeguugf"Ycnn"Qwvngv"Mg{"Uv{ngu
DiamondCare® Recessed Wall Outlet and Electrical Accessories (####-###-####)
Page 1-9
3
Key Style Identification
Chapter 1
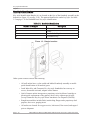
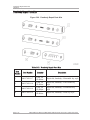
Key Style Identification
Key style identification dimples (A) are located on the face of the frontbody assembly at the
bottom (see figure 1-3 on page 1–10). The pattern identifies the outlet key style. See table
1-2 on page 1-10 for DiamondCare® key style identification.
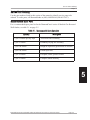
Ta ble 1-2. Key Styl e Ident ific ati on
Numbe r of Dimpl es
1
2
3
4
Descript ion
Diamond®
DISS
Latch Index Key®
Geometric Key
Hkiwtg"3/50""Fkorng"Nqecvkqp
Other system features include the following:
• All wall outlets have a color-coded and labeled frontbody assembly to enable
quick identification of all medical gases.
• Latch Index Key and Geometric Key key style frontbodies have an easy to
access, downward-activated, adapter release button.
• Quick-Connect outlets incorporate a proprietary twist-lock barrel cartridge to
permit quick replacement of the primary check valve without special tools
(except Geometric Key key style Waste Anesthetic Gas Disposal (WAGD)).
• Rough-in assemblies include flush, interlocking flanges and a proprietary dual
purpose, dust cover, purging insert.
• All outlets are cleaned for oxygen service, leak-tested, flow-tested, and capped
prior to shipment.
Page 1-10
DiamondCare® Recessed Wall Outlet and Electrical Accessories (####-###-####)
Assembly Identification
Chapter 1
As sembly Identification
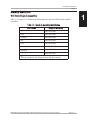
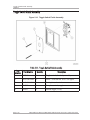
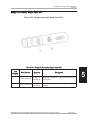
Wall Ou tlet Ro ug h- In Ass emb lies
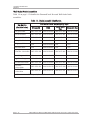
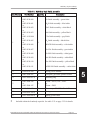
Table 1-3 on page 1-11 identifies the DiamondCare® Recessed Wall Outlet rough-in
assemblies.
T able 1-3. Rough-In Assembl y Identi fica tion
Gas Servic e
Rough-In Assem bly
O2
6803-8139-800
N2O
6803-8139-801
Vacuum
6803-8139-802
Air
6803-8139-803
CO2
6803-8139-804
N2
6803-8139-805
WAGDw
6803-8139-806
O2/CO2
6803-8139-807
wWaste Anesthetic Gas Disposal (formerly Evacuation)
DiamondCare® Recessed Wall Outlet and Electrical Accessories (####-###-####)
Page 1-11
3
Assembly Identification
Chapter 1
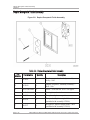
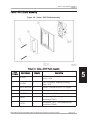
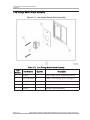
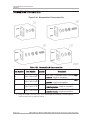
Wall Ou tlet Finish Assemb lies
Table 1-4 on page 1-12 identifies the DiamondCare® Recessed Wall Outlet finish
assemblies.
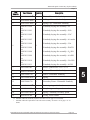
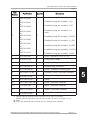
T able 1-4. Fini sh Assembl y Identi fica tion
Wal l Outl et Fini sh Assembl y Key Style
La tch Inde x
Dia mond®
DISS
Geom etri c Key
Key
Gas Servic e
(disc/ labe l c olor)
O2-green/white
6803-8121-800
6803-8120-800
6803-8123-800
6803-8122-800
N2O-blue/white
6803-8121-801
6803-8120-801
6803-8123-801
6803-8122-801
Vacuum-white/black
6803-8121-802
6803-8120-802
6803-8123-802
6803-8122-802
Air-yellow/black
6803-8121-803
6803-8120-803
6803-8123-803
6803-8122-803
CO2-grey/black
N/A
6803-8120-804
N/A
N/A
N2-black/white
N/A
6803-8120-805
N/A
N/A
WAGDw-violet/white
6803-8121-806
6803-8120-806
6803-8123-806
6803-8122-806
O2/CO2-green/white
N/A
6803-8120-807
N/A
N/A
O2-ISO-white/green
6803-8121-808
6803-8120-808
6803-8123-808
6803-8122-808
Air-ISO-white/black
6803-8121-809
6803-8120-809
6803-8123-809
6803-8122-809
Vac-ISOyellow/black
6803-8121-810
6803-8120-810
6803-8123-810
6803-8122-810
AGSS-ISOviolet/white
6803-8121-811
6803-8120-811
6803-8123-811
6803-8122-811
w Waste Anesthetic Gas Disposal (formerly Evacuation)
Page 1-12
DiamondCare® Recessed Wall Outlet and Electrical Accessories (####-###-####)
Safety Tips
Chapter 1
Safety T ips
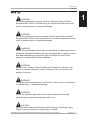
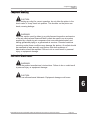
WARNING:
Only facility-authorized personnel should troubleshoot DiamondCare®
Recessed Wall Outlets. Troubleshooting by unauthorized personnel could
result in personal injury or equipment damage.
WARNING:
Only facility-authorized service personnel should service DiamondCare®
Recessed Wall Outlets. Service performed by unauthorized personnel could
result in personal injury or equipment damage.
WARNING:
Use only BeaconMedæs service parts or assemblies for repairs and service
procedures. Standard hardware and parts manufactured or supplied by other
than BeaconMedæs may cause the outlet to malfunction and void all
warranty or responsibility by BeaconMedæs.
WARNING:
Adhere to the “Infection Control Policies and Procedures” outlined in the
Safety Coordinator Reference Guide. Failure to do so could result in the
spread of infection.
WARNING:
Follow the product manufacturer’s instructions. Failure to do so could result
in personal injury or equipment damage.
WARNING:
Do not mix pressure (gas) and vacuum outlet components. Possible
personal injury or equipment damage could occur.
CAUTION:
Notify all facility personnel whenever shutting off any medical gas supply.
Failure to do so could result in patient injury or death.
DiamondCare® Recessed Wall Outlet and Electrical Accessories (####-###-####)
Page 1-13
3
Safety Tips
Chapter 1
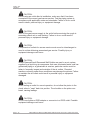
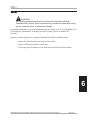
CAUTION:
Before using an outlet after its installation, make sure that it has been
connected to the correct gas/vacuum service. Test the piping system in
accordance with applicable codes and standards. Failure to do so could
result in death, personal injury or equipment damage.
CAUTION:
Shut off the gas/vacuum supply to the outlet before servicing the rough-in
secondary check unit or seal bushing. Failure to do so could result in
personal injury or equipment damage.
CAUTION:
Components of outlets for vacuum service must never be interchanged or
used in outlets delivering pressurized gas service. Possibly injury or
equipment damage could occur.
CAUTION:
Where DiamondCare® Recessed Wall Outlets are used in an air system
supplied by a liquid ring air compressor that uses chlorinated water, and has
galvanized piping or a galvanized air receiver, particular caution must be
taken to frequently inspect and maintain of the air outlets. Chemical
reactions occurring under those conditions may damage the pistons. Failure
to maintain the air outlets could result in personal injury or equipment
damaged.
CAUTION:
When testing an outlet for correct operation, do not allow the piston in the
check valve to "snap" back into position. The shoulder on the piston can
break, causing leakage.
CAUTION:
Do not over tighten a DISS adapter or connector to a DISS outlet. Possible
equipment damage could occur.
Page 1-14
DiamondCare® Recessed Wall Outlet and Electrical Accessories (####-###-####)
Safety Tips
Chapter 1
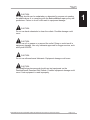
CAUTION:
No repair should ever be undertaken or attempted by anyone not meeting
the qualifications of or complying with the BeaconMedæs repair policy and
procedures. Failure to do so could result in equipment damage.
CAUTION:
Do not use harsh chemicals to clean the outlets. Possible damage could
occur.
CAUTION:
Do not use oil or grease on or around the outlet. Doing so could result in
equipment damage. Use only lubricants approved for oxygen service, such
as Krytox® 6PL205.
CAUTION:
Do not use silicone-based lubricants. Equipment damage could occur.
CAUTION:
Only qualified service personal should use test equipment on the
DiamondCare® Recessed Wall Outlets. Possible equipment damage could
occur if test equipment is used improperly.
DiamondCare® Recessed Wall Outlet and Electrical Accessories (####-###-####)
Page 1-15
3
Warning and Caution Labels
Chapter 1
Warning and Caution Labe ls
Hkiwtg"3/60""Yctpkpi"cpf"Ecwvkqp"Ncdgnu
Page 1-16
DiamondCare® Recessed Wall Outlet and Electrical Accessories (####-###-####)
Chapter 2 Troubleshooting
Procedures
Ejcrvgt Eqpvgpvu
Getting Started............................................................................................................2-2
Initial Actions .............................................................................................................2-2
Function Checks .........................................................................................................2-3
Final Actions...............................................................................................................2-4
Test Equipment ...........................................................................................................2-4
DISS Key Style Medical Gas Wall Outlet Leakage...................................................2-5
Diamond®, Latch Index, or Geometric Key Style Medical Gas
Wall Outlet Leakage ...................................................................................................2-5
Attachment Malfunction.............................................................................................2-6
Rough-In Assembly Leakage (Pressurized Medical Gases) ......................................2-7
Rough-In Assembly Leakage (Vacuum Outlets Only)...............................................2-7
DiamondCare® Recessed Wall Outlet and Electrical Accessories (####-###-####)
Page 2-1
4
Getting Started
Chapter 2
Getting Started
WARNING:
Only facility-authorized personnel should troubleshoot DiamondCare®
Recessed Wall Outlets. Troubleshooting by unauthorized personnel could
result in personal injury or equipment damage.
Begin each procedure in this chapter with step 1. Follow the sequence outlined (each step
assumes the previous step has been completed). In each step, the normal operation of the
product can be confirmed by answering Yes or No to the statement. Your response will lead
to another step in the procedure, a repair analysis procedure (RAP), or a component
replacement. If more than one component is listed, replace them in the given order.
To begin gathering information about the problem, start with Init ial Actions .
Perform the Funct ion Che cks to isolate or identify a problem and to verify the repair after
completing each corrective action (replacing or adjusting a part, seating a connector, etc.).
To verify the repair, perform the Fina l Acti ons after the Functi on Chec ks.
If troubleshooting procedures do not isolate the problem, call BeaconMedæs Technical
Support at 1-(888) 4-MEDGAS (463-3427) for assistance.
Initial Actions
To gather information from operators concerning problems with the DiamondCare®
Recessed Wall Outlets, use Initial Actions. Note symptoms or other information concerning
the problem that the operator describes. This information helps identify the probable cause.
1. Someone who can explain the problem is available.
[gu
i
Pq
g Go to “Function Checks” on page 2–3.
2. Ask that person to demonstrate or explain the problem. The problem can be
duplicated.
[gu
i
3.
[gu
i
Pq
g Go to “Function Checks” on page 2–3.
The problem is a result of improper operator action.
Pq
g Go to “Function Checks” on page 2–3.
4. To ensure proper operation of the DiamondCare® Recessed Wall Outlet, perform
the “Function Checks” on page 2–3.
Page 2-2
DiamondCare® Recessed Wall Outlet and Electrical Accessories (####-###-####)
Function Checks
Chapter 2
Function C hecks
1. Initial Actions have been performed.
[gu
i
Pq
g Go to “Initial Actions” on page 2-2.
2. Attach a secondary piece of equipment to the DISS gas outlet. The gas outlet
does not leak and is properly sealed.
[gu
i
Pq
g Go to RAP 2.1.
3. Attach a secondary piece of equipment to the Diamond®, Latch Index, or
Geometric quick connect key style gas outlet. The gas outlet does not leak and is
properly sealed.
[gu
i
Pq
g Go to RAP 2.2.
4. The gas outlet does not leak and is properly sealed when no secondary piece of
equipment is attached.
[gu
i
Pq
g For DISS gas outlets, go to RAP 2.1. For Diamond®, Latch
Index, or Geometric quick connect key style gas outlets go to
RAP 2.2.
5. Attach a secondary piece of equipment to the DISS, Diamond®, Latch Index, or
Geometric key style gas outlet. The secondary piece of equipment locks into
place and is properly attached to the gas outlet.
[gu
i
Pq
g Go to RAP 2.3.
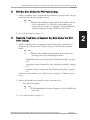
6. For pressurized medical gases, remove the finish assembly from the rough-in
assembly. The rough-in assembly does not leak when the finish assembly is
removed.
[gu
i
Pq
g Go to RAP 2.4.
7. For vacuum outlets, ensure that the finish assembly is properly installed. The
rough-in assembly does not leak, and is properly sealed when the finish
assembly is installed.
[gu
i
Pq
g Go to RAP 2.5.
8. Go to “Final Actions” on page 2–4.
DiamondCare® Recessed Wall Outlet and Electrical Accessories (####-###-####)
Page 2-3
4
Final Actions
Chapter 2
Final Ac tions
1. Complete the required service procedures. Refer to CGA Pamphlet E-10 (1999
Edition), Maintenance of Medical Gas and Vacuum Systems in Health Care
Facilities.
2. Complete all required administrative tasks.
T est Equipment
CAUTION:
Only qualified service personal should use test equipment on the
DiamondCare® Recessed Wall Outlets. Possible equipment damage could
occur if test equipment is used improperly.
To complete the leakage test described, you will need fluid snoop in a bottle
This test equipment will help personnel pinpoint problems with the DiamondCare®
Recessed Wall Outlets.This chapter includes a list of functions and the technical information
required to inspect the outlet for problems.
Page 2-4
DiamondCare® Recessed Wall Outlet and Electrical Accessories (####-###-####)
DISS, Diamond® Latch Index or Geometric Key Style Medical Gas Console Outlet Leakage
Chapter 2
2.1
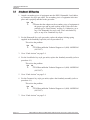
DISS Key Style Me dic al Gas Wall Outlet Le akage
1. Attach a secondary piece of equipment to the DISS key style gas outlet. The gas
outlet does not leak and is properly sealed.
[gu
i
Pq
g Replace the frontbody O-ring supplied in the DISS repair kit
(refer to procedure 4.5). If this solves the problem, go to
“Final Actions” on page 2–4. Otherwise, call BeaconMedæs
Technical Support at 1-(888) 4-MEDGAS (463-3427).
2. Go to “Final Actions” on page 2–4.
2.2
Diamond®, L atch Inde x, or Ge ometric Ke y Style Me dic al Gas Wa ll
Outlet Leaka ge
1. Attach a secondary piece of equipment onto the Diamond®, Latch Index, or
Geometric key style gas outlet. The gas outlet does not leak and is properly
sealed.
[gu
i
Pq
g Replace the frontbody O-ring supplied in the repair kit by
referring to one of the following procedures:
–
“Diamond® Quick-Connect Key Style Frontbody Assembly” on page
4–12
–
“Latch Index Quick-Connect Key Style Frontbody Assembly” on page
4–15
–
“Geometric Quick-Connect Key Style Frontbody Assembly” on page
4–17
If this solves the problem, go to “Final Actions” on page 2–4. Otherwise, go to
step 2.
2. Replace the loaded barrel assembly (refer to procedure 4.2).
This solves the problem.
[gu
i
Pq
g Call BeaconMedæs Technical Support at 1-(888) 4-MEDGAS
(463-3427).
3. Go to “Final Actions” on page 2–4.
DiamondCare® Recessed Wall Outlet and Electrical Accessories (####-###-####)
Page 2-5
4
Attachment Malfunction
Chapter 2
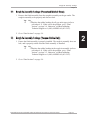
2.3
Attachment Ma lfunction
1. Attach a secondary piece of equipment onto the DISS, Diamond®, Latch Index,
or Geometric key style gas outlet. The secondary piece of equipment locks into
place and is properly attached to the gas outlet.
[gu
i
Pq
g Ensure that the adapter on the secondary piece of equipment is
the proper type and in good working order. If this solves the
problem, go to “Final Actions” on page 2-4. Otherwise, go to
step 2 for Diamond® key style, step 4 for Latch Index key
style, or step 6 for Geometric key style.
2. For the Diamond® key style gas outlet, replace the adapter locking spring
supplied in the frontbody repair kit (refer to procedure 4.6).
This solves the problem.
[gu
i
Pq
g Call BeaconMedæs Technical Support at 1-(888) 4-MEDGAS
(463-3427).
3. Go to “Final Actions” on page 2-4.
4. For the Latch Index key style gas outlet, replace the frontbody assembly (refer to
procedure 4.1).
This solves the problem.
[gu
i
Pq
g Call BeaconMedæs Technical Support at 1-(888) 4-MEDGAS
(463-3427).
5. Go to “Final Actions” on page 2-4.
6. For the Geometric key style gas outlet, replace the frontbody assembly (refer to
procedure 4.1).
This solves the problem.
[gu
i
Pq
g Call BeaconMedæs Technical Support at 1-(888) 4-MEDGAS
(463-3427).
7. Go to “Final Actions” on page 2-4.
Page 2-6
DiamondCare® Recessed Wall Outlet and Electrical Accessories (####-###-####)
Rough-In Assembly Leakage
Chapter 2
2.4
Rough-In A sse mbly L eakage (Pre ss urize d M edical Gas es)
1. Remove the finish assembly from the rough-in assembly on the gas outlet. The
rough-in assembly seals properly and does not leak.
[gu
i
Pq
g Replace the rubber bushing for all gas outlet types (refer to
procedure 4.3). If this solves the problem, go to “Final
Actions” on page 2-4. Otherwise, call BeaconMedæs
Technical Support at 1-(888) 4-MEDGAS (463-3427).
2. Go to “Final Actions” on page 2-4.
2.5
Rough-In A sse mbly L eakage (Vac uum Outlets O nly)
1. Ensure the finish assembly is properly installed. The rough-in assembly does not
leak, and is properly sealed when the finish assembly is installed.
[gu
i
Pq
g Replace the rubber bushing in the rough-in assembly (refer to
procedure 4.4). If this solves the problem, go to “Final
Actions” on page 2-5. Otherwise, call BeaconMedæs
Technical Support at 1-(888) 4-MEDGAS (463-3427).
2. Go to “Final Actions” on page 2-4.
DiamondCare® Recessed Wall Outlet and Electrical Accessories (####-###-####)
Page 2-7
4
Chapter 2
NOTE S:
Page 2-8
DiamondCare® Recessed Wall Outlet and Electrical Accessories (####-###-####)
Chapter 3
Theory of Operation
Ejcrvgt Eqpvgpvu
Theory of Operation ...................................................................................................3-2
Hardware ..............................................................................................................3-2
Quick-Connect Key Style Outlets ..................................................................3-2
DISS Key Style Outlets..................................................................................3-2
DiamondCare® Recessed Wall Outlet and Electrical Accessories (####-###-####)
Page 3-1
5
Theory of Operation
Chapter 3
T heory of Opera tion
Hard ware
Quick-Conne ct Key St yle Out let s
This section describes the theory of operation for a Quick-Connect Key Style Wall Outlet
and identifies the corresponding parts.
NOTE:
In pressurized gas outlets, both the frontbody and rough-in assemblies contain
primary and secondary check units. However, according to NFPA 99, medical
vacuum inlets (which also include WAGD and AGSS) shall not contain secondary
check units.
In the outlet rough-in assembly, a spring pushes the secondary check unit against a rubber
bushing. This forms a gas-tight seal when a frontbody assembly is not attached to the
rough-in assembly.
When a frontbody barrel is inserted into a rough-in assembly, the secondary check unit is
forced open, which permits gas flow through the secondary check unit. A rubber bushing
seals the barrel, preventing external leaks.
The primary check unit in the frontbody assembly prevents gas flow out of the outlet until
an appropriate gas-specific adapter is fully inserted and engages the frontbody assembly.
When an adapter is inserted into the frontbody keying disc, the adapter nose pushes the
frontbody piston back. This breaks the seal between the frontbody barrel and the frontbody
O-ring, which allows gas to flow. A locking spring or latching plate holds the adapter in
place.
The frontbody O-ring forms a gas-tight seal around the nose of the adapter, allowing gas to
pass through the adapter without leaking.
DISS Key Styl e Outl ets
This section describes the theory of operation for a DISS Key Style Wall Outlet and
identifies the corresponding parts.
NOTE:
In pressurized gas outlets both the frontbody and rough-in assemblies contain check
units, primary and secondary check units respectively. However, according to NFPA
99, medical vacuum inlets (which also include WAGD and AGSS) shall not contain
secondary check units.
In the outlet rough-in assembly, a spring pushes the secondary check unit against a rubber
bushing. This forms a gas-tight seal when a frontbody assembly is not attached to the
rough-in assembly.
Page 3-2
DiamondCare® Recessed Wall Outlet and Electrical Accessories (####-###-####)
Theory of Operation
Chapter 3
When a frontbody barrel is inserted into a rough-in assembly, the secondary check unit is
forced open, which permits gas flow through the secondary check unit. A rubber bushing
seals the barrel, preventing external leaks.
The primary check unit in the frontbody assembly prevents gas flow out of the outlet until
an appropriate gas-specific adapter is fully inserted and engaged in the frontbody assembly.
When a DISS (female) adapter is connected onto the frontbody threaded DISS (male)
barrel, the nose of the DISS adapter pushes the frontbody piston back. This breaks the seal
between the frontbody barrel and the frontbody O-ring, which allows gas to flow.
5
DiamondCare® Recessed Wall Outlet and Electrical Accessories (####-###-####)
Page 3-3
Chapter 3
NOTE S:
Page 3-4
DiamondCare® Recessed Wall Outlet and Electrical Accessories (####-###-####)
Chapter 4 Removal,
Replacement, and Adjustment
Procedures
Ejcrvgt"Eqpvgpvu
Frontbody Assembly...................................................................................................4-3
Removal................................................................................................................4-3
Replacement .........................................................................................................4-3
Twist-Lock Replaceable Barrel Assembly .................................................................4-4
Removal................................................................................................................4-4
Replacement .........................................................................................................4-4
Rough-In Secondary Check Unit Assembly (Pressurized Outlets Only) ..................4-6
Removal................................................................................................................4-6
Replacement .........................................................................................................4-7
Rough-In Assembly (Vacuum Outlets Only) .............................................................4-8
Removal................................................................................................................4-8
Replacement .........................................................................................................4-8
DISS Key Style Frontbody Assembly......................................................................4-10
Removal..............................................................................................................4-10
Replacement .......................................................................................................4-11
Diamond® Quick-Connect Key Style Frontbody Assembly ...................................4-12
Removal..............................................................................................................4-12
Replacement .......................................................................................................4-13
Latch Index Quick-Connect Key Style Frontbody Assembly..................................4-15
Removal..............................................................................................................4-15
Replacement .......................................................................................................4-16
Geometric Quick-Connect Key Style Frontbody Assembly ....................................4-17
DiamondCare® Recessed Wall Outlet and Electrical Accessories (####-###-####)
Page 4-1
6
Chapter Contents
Chapter 4
Removal..............................................................................................................4-17
Replacement .......................................................................................................4-18
Page 4-2
DiamondCare® Recessed Wall Outlet and Electrical Accessories (####-###-####)
4.1 Frontbody Assembly
Chapter 4
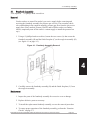
4.1
Frontbody Ass embly
Tools required:
#2 phillips head screwdriver
Remo val
You do not have to turn off an outlet’s gas service supply before removing and
servicing the frontbody assembly for pressure gas services. The secondary check
valve and bushing in the rough-in assembly prevents gas flow from the gas service
supply line. (Since medical vacuum, WAGD, and AGSS do not have secondary
checks, temporarily turn off the outlet’s vacuum supply or install the pressure test
cap.)
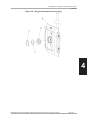
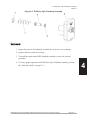
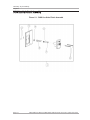
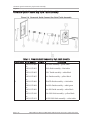
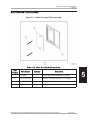
1. Using a #2 phillips head screwdriver, loosen the two screws (A) that secure the
frontbody assembly (B) and the finish faceplate (C) to the rough-in assembly (D)
(see figure 4-1 on page 4–3).
Hkiwtg"6/30""Htqpvdqf{"Cuugodn{"Tgoqxcn
6
2. Carefully remove the frontbody assembly (B) and the finish faceplate (C) from
the rough-in assembly.
Rep lacemen t
1. Inspect the parts of the frontbody assembly for excessive wear or damage.
2. Replace defective parts as necessary.
3. To install the replacement frontbody assembly, reverse the removal procedure.
4. To ensure proper operation of the frontbody assembly, perform the “Function
Checks” on page 2–3.
DiamondCare® Recessed Wall Outlet and Electrical Accessories (####-###-####)
Page 4-3
4.2 Twist-Lock Replaceable Barrel Assembly
Chapter 4
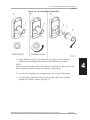
4.2
T wist-L ock Re pla ceable Ba rrel Ass embly
Tools required:
None
Parts required:
Refer to “Replacement Twist-Lock Barrel Assembly Repair Kits” on page
5–31 to select the proper twist-lock replaceable barrel assembly.
Remo val
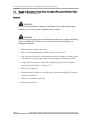
WARNING:
Notify all facility personnel whenever shutting off any medical gas supply.
Failure to do so could result in patient injury or death.
NOTE:
You do not have to turn off an outlet’s gas service supply before removing and
servicing the twist-lock replaceable barrel assembly for pressure gas services. The
secondary check valve and bushing in the rough-in assembly prevent gas flow from
the gas service supply line. (Since medical vacuum, WAGD, and AGSS do not have
secondary checks, temporarily turn off the outlet’s gas service supply, or install the
pressure test cap.)
1. Remove the frontbody assembly (refer to procedure 4.1).
2. Rotate the twist-lock barrel assembly (A) counterclockwise 180° until the flat
portion of the barrel assembly is moved from the 6:00 position (llocke d) to the
unl ocked ) (see figure 4-2 on page 4–5).
12:00 position (u
NOTE:
Be careful not to lose the O-ring and washer when removing the twist-lock
replaceable barrel assembly from the keying disc assembly.
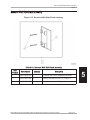
3. Tilt the twist-lock replaceable barrel assembly (A) downward, and remove it
from the keying disc assembly (B), being careful not to lose the small O-ring (C)
and washer (D).
Rep lacemen t
1. Inspect the parts of the frontbody assembly for excessive wear or damage.
2. Replace defective parts as necessary.
3. To install a twist-lock replaceable barrel assembly (A), reverse the removal
procedure.
Page 4-4
DiamondCare® Recessed Wall Outlet and Electrical Accessories (####-###-####)
4.2 Twist-Lock Replaceable, Barrel Assembly
Chapter 4
Hkiwtg"6/40""Htqpvdqf{"Dcttgn"Cuugodn{
4. Ensure that the O-ring (C) and washer (D) are in place on the frontbody
assembly before installing the twist-lock replaceable barrel assembly.
NOTE:
Once the twist-lock replaceable barrel assembly is installed, the flat portion of the
barrel assembly should be located in the bottom, 6:00 position.
5. Lock the barrel assembly by twisting it back to its original 6:00 position.
6. To ensure proper operation of the twist-lock replaceable barrel assembly,
perform the “Function Checks” on page 2–3.
DiamondCare® Recessed Wall Outlet and Electrical Accessories (####-###-####)
Page 4-5
6
4.3 Rough-In Secondary Check Unit Assembly (Pressurized Outlets Only)
Chapter 4
4.3
Rough-In Sec ondary C heck Unit Ass embly (Pre ss urize d Outlets Only)
Tools required:
Small screwdriver
Remo val
WARNING:
Notify all facility personnel whenever shutting off any medical gas supply.
Failure to do so could result in patient injury or death.
WARNING:
Shut off the gas supply to the outlet before servicing the rough-in secondary
check unit assembly. Failure to do so could result in personal injury or
equipment damage.
1. Shut off the gas supply to the outlet.
2. Remove the finish/frontbody assembly (refer to procedure 4.1).
3. Note the removal sequence of the internal parts in the rough-in secondary check
unit assembly to ensure proper replacement during the installation procedure.
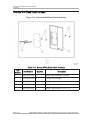
4. Using a small screwdriver, remove the retaining ring (A) from the rough-in
assembly (B) (see figure 4-3 on page 4–7).
5. Remove the washer (C).
6. Using the small screwdriver, carefully remove the rubber bushing (D) from the
rough-in assembly (B).
7. Remove the secondary check (E).
8. Remove the spring (F).
Page 4-6
DiamondCare® Recessed Wall Outlet and Electrical Accessories (####-###-####)
4.4 Rough-In Assembly (Vacuum Outlets Only)
Chapter 4
Hkiwtg"6/50""Tqwij/Kp"Ugeqpfct{"Ejgem"Wpkv"Cuugodn{"*Rtguuwtg"Icu+
Rep lacemen t
1. Replace all the parts included in the replacement kit.
2. To install the replacement secondary check unit assembly, reverse the removal
procedure.
3. To ensure proper operation of the rough-in secondary check unit assembly,
perform the “Function Checks” on page 2–3.
DiamondCare® Recessed Wall Outlet and Electrical Accessories (####-###-####)
Page 4-7
6
4.4 Rough-In Assembly (Vacuum Outlets Only)
Chapter 4
4.4
Rough-In A sse mbly (Vacuum Outlets Only)
Tools required:
Small screwdriver
Remo val
WARNING:
Notify all facility personnel whenever shutting off any medical gas supply.
Failure to do so could result in patient injury or death.
WARNING:
Shut off the service supply to the outlet before servicing the vacuum outlet
bushing. Failure to do so could result in personal injury or equipment
damage.
1. Shut off the service supply to the outlet.
2. Remove the frontbody assembly (refer to procedure 4.1).
3. Note the removal sequence of the internal parts in the rough-in assembly to
ensure proper replacement during the installation procedure.
4. Using a small screwdriver, remove the retaining ring (A) from the rough-in
assembly (B) (see figure 4-4 on page 4–9).
5. Remove the washer (C).
6. Using the small screwdriver, carefully remove the rubber bushing (D) from the
rough-in assembly (B).
Rep lacemen t
1. Replace all the parts included in the replacement kit.
2. To install the replacement rough-in assembly, reverse the removal procedure.
3. To ensure proper operation of the rough-in assembly, perform the “Function
Checks” on page 2–3.
Page 4-8
DiamondCare® Recessed Wall Outlet and Electrical Accessories (####-###-####)
4.4 Rough-In Assembly (Vacuum Outlets Only)
Chapter 4
Hkiwtg"6/60""Tqwij/Kp"Cuugodn{"*Xcewwo"Qpn{+
6
DiamondCare® Recessed Wall Outlet and Electrical Accessories (####-###-####)
Page 4-9
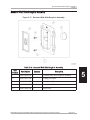
4.5 DISS Key Style Frontbody Assembly
Chapter 4
4.5
DISS Key Style Frontbody Ass embly
Tools required:
Retaining ring removal/installation tool (appropriate size/type)
Small screwdriver
Remo val
WARNING:
Notify all facility personnel whenever shutting off any medical gas supply.
Failure to do so could result in patient injury or death.
NOTE:
You do not have to turn off the outlet’s gas service supply before removing and
servicing the DISS key style frontbody assembly for pressure gas services. The
secondary check valve and bushing in the rough-in assembly prevents gas flow from
the pressure gas service supply line except in vacuum outlets.
NOTE:
Medical vacuum, WAGD, and AGSS do not have secondary checks. The service
supply must be turned off, or the pressure test cap should be installed in order to
service their rough-in assemblies. Otherwise, the line will continue to maintain a
draw (suction).
1. Remove the frontbody assembly (refer to procedure 4.1).
2. Note the removal sequence of the internal parts of the DISS key style frontbody
assembly to ensure proper replacement during the installation procedure.
3. Using the retaining ring removal/installation tool or a small screwdriver, remove
the retaining ring (A) from the rear of the DISS frontbody assembly (B) (see
figure 4-5 on page 4–11).
4. Remove all of the internal parts from the DISS frontbody assembly (B) by
performing the following:
a. Carefully remove the DISS frontbody spring (C).
b. Remove the DISS piston (D).
c. Remove the frontbody piston O-ring (E) from the DISS piston (D).
Page 4-10
DiamondCare® Recessed Wall Outlet and Electrical Accessories (####-###-####)
4.5 DISS Key Style Frontbody Assembly
Chapter 4
Hkiwtg"6/70""FKUU"Mg{"Uv{ng"Htqpvdqf{"Cuugodn{
Rep lacemen t
1. Inspect the parts of the frontbody assembly for excessive wear or damage.
2. Replace defective parts as necessary.
3. To install the replacement DISS frontbody assembly, reverse the removal
procedure.
4. To ensure proper operation of the DISS key style frontbody assembly, perform
the “Function Checks” on page 2–3.
DiamondCare® Recessed Wall Outlet and Electrical Accessories (####-###-####)
Page 4-11
6
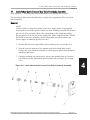
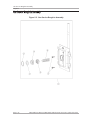
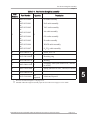
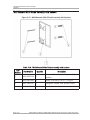
4.6 Diamond® Quick-Connect Key Style Frontbody Assembly
Chapter 4
4.6
Diamond® Quic k-C onnect Key Style Frontbody Ass embly
Tools required:
Retaining ring removal/installation tool (appropriate size/type)
Needle nose pliers
The procedure in this section describes how to replace the components of the twist-lock
barrel assembly.
Remo val
NOTE:
You do not have to turn off the outlet’s gas service supply before removing and
servicing the Diamond® Quick-Connect key style frontbody assembly for pressure
gas services. The secondary check valve and bushing in the rough-in assembly
prevents gas flow from the pressure gas service supply line.
NOTE:
Medical vacuum, WAGD, and AGSS do not have secondary checks. The service
supply must be turned off, or the pressure test cap should be installed in order to
service their rough-in assemblies. Otherwise, the line will continue to maintain a
draw (suction).
1. Remove the twist-lock replaceable barrel assembly (refer to procedure 4.2).
2. Note the removal sequence of the internal parts in the Diamond® Quick-Connect
frontbody assembly to ensure proper replacement during the installation
procedure.
3. Using the retaining ring removal tool or a small screwdriver, remove the
retaining ring (A) from the rear of the twist-lock replaceable barrel assembly (B)
(see figure 4-6 on page 4–12).
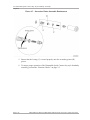
Hkiwtg"6/80""Fkcoqpf™"Swkem/Eqppgev"Mg{"Uv{ng"Htqpvdqf{"Cuugodn{
Page 4-12
DiamondCare® Recessed Wall Outlet and Electrical Accessories (####-###-####)
4.6 Diamond® Quick-Connect Key Style Frontbody Assembly
Chapter 4
4. Remove all of the internal parts from the twist-lock replaceable barrel assembly
(B) by performing the following:
a. Carefully remove the frontbody secondary piston spring (C).
b. Remove the secondary piston (D).
c. Remove the frontbody piston O-ring (E) from the secondary piston (D).
d. Remove the spring (F).
e. Remove the frontbody piston (G).
5. Remove the parts located at the front of the twist-lock replaceable barrel
assembly (B) by performing the following:
a. Remove the O-ring (H) from the front of the twist-lock replaceable barrel
assembly (B).
NOTE:
The adapter locking spring clip in the frontbody keying disc assembly can be
accessed through the opening from which the twist-lock replaceable barrel assembly
was removed.
b. Remove the frontbody washer (I) from the frontbody keying disc assembly
(K).
c. Using the needle nose pliers, remove the adapter locking spring clip (J) from
the keying disc assembly (K).
Rep lacemen t
1. Inspect the parts of the frontbody assembly for excessive wear or damage.
2. Replace defective parts as necessary.
3. To install the replacement Diamond® Quick-Connect frontbody assembly,
reverse the removal procedure.
4. During the replacement procedure, ensure that the frontbody secondary piston
spring (A) is seated properly onto the secondary piston (B) groove (see figure 47 on page 4–14).
DiamondCare® Recessed Wall Outlet and Electrical Accessories (####-###-####)
Page 4-13
6
4.6 Diamond® Quick-Connect Key Style Frontbody Assembly
Chapter 4
Hkiwtg"6/90""Ugeqpfct{"Rkuvqp"Cuugodn{"Tgrncegogpv
5. Ensure that the O-ring (C) is seated properly onto the secondary piston (B)
groove.
6. To ensure proper operation of the Diamond® Quick-Connect key style frontbody
assembly, perform the “Function Checks” on page 2–3.
Page 4-14
DiamondCare® Recessed Wall Outlet and Electrical Accessories (####-###-####)
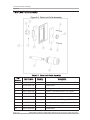
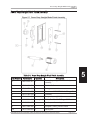
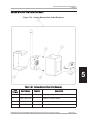
4.7 Latch Index Quick-Connect Key Style Frontbody Assembly
Chapter 4
4.7
L atch Inde x Quic k-C onne ct Key Style Frontbody A sse mbly
Tools required:
Retaining ring removal/installation tool (appropriate size/type)
The procedure in this section describes how to replace the components of the twist-lock
barrel assembly.
Remo val
NOTE:
You do not have to turn off an outlet’s gas service supply before removing and
servicing the Latch Index Quick-Connect key style frontbody assembly for pressure
gas services. The secondary check valve and bushing in the rough-in assembly
prevent gas flow from the gas service supply line. (Since medical vacuum, WAGD,
and AGSS do not have secondary checks, temporarily turn off the outlet’s gas
service supply or install the pressure test cap.)
1. Remove the twist-lock replaceable barrel assembly (refer to procedure 4.2).
2. Note the removal sequence of the internal parts in the Latch Index QuickConnect key style frontbody assembly to ensure proper replacement during the
installation procedure.
3. Using the retaining ring removal tool, remove the retaining ring (A) from the
rear of the twist-lock replaceable barrel assembly (B) (see figure 4-8 on page
4–15).
Hkiwtg"6/:0""Ncvej"Kpfgz™"Swkem/Eqppgev"Mg{"Uv{ng"Htqpvdqf{"Cuugodn{"
DiamondCare® Recessed Wall Outlet and Electrical Accessories (####-###-####)
Page 4-15
6
4.7 Latch Index Quick-Connect Key Style Frontbody Assembly
Chapter 4
4. Remove all of the internal parts from the twist-lock replaceable barrel assembly
(B) by performing the following:
a. Carefully remove the frontbody secondary piston spring (C).
b. Remove the secondary piston (D).
c. Remove the frontbody piston O-ring (E) from the secondary piston (D).
d. Remove the spring (F).
e. Remove the frontbody piston (G).
f. Remove the O-ring (H) from the front of the twist-lock replaceable barrel
assembly (B).
g. Remove the frontbody washer (I) from the frontbody keying disc assembly
(J).
Rep lacemen t
1. Inspect the parts of the frontbody assembly for excessive wear or damage.
2. Replace defective parts as necessary.
3. To install the replacement Latch Index Quick-Connect key style frontbody
assembly, reverse the removal procedure.
4. To ensure proper operation of the Latch Index Quick-Connect key style
frontbody assembly, perform the “Function Checks” on page 2–3.
Page 4-16
DiamondCare® Recessed Wall Outlet and Electrical Accessories (####-###-####)
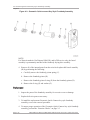
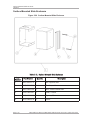
4.8 Geometric Quick-Connect Key Style Frontbody Assembly
Chapter 4
4.8
Geometric Quick-Connect Key Style Frontbody Ass embly
Tools required:
Retaining ring removal/installation tool (appropriate size/type)
The procedure in this section describes how to replace the components of the twist-lock
barrel assembly.
Remo val
NOTE:
You do not have to turn off the outlet’s gas service supply before removing and
servicing the Geometric Quick-Connect key style frontbody assembly for pressure
gas services. The secondary check valve and bushing in the rough-in assembly
prevents gas flow from the pressure gas service supply line.
NOTE:
Medical vacuum, WAGD, and AGSS do not have secondary checks. The service
supply must be turned off, or the pressure test cap should be installed in order to
service their rough-in assemblies. Otherwise, the line will continue to maintain a
draw (suction).
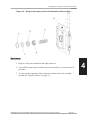
1. Remove the twist-lock replaceable barrel assembly (refer to procedure 4.2).
2. Note the removal sequence of the internal parts in the Geometric Quick-Connect
key style frontbody assembly to ensure proper replacement during the
installation procedure.
3. Using the retaining ring removal tool, remove the retaining ring (A) from the
rear of the twist-lock replaceable barrel assembly (B) (see figure 4-9 on page
4–18).
DiamondCare® Recessed Wall Outlet and Electrical Accessories (####-###-####)
Page 4-17
6
4.8 Geometric Quick-Connect Key Style Frontbody Assembly
Chapter 4
Hkiwtg"6/;0""Igqogvtke"Swkem/eqppgev"Mg{"Uv{ng"Htqpvdqf{"Cuugodn{"
NOTE:
For Waste Anesthetic Gas Disposal (WAGD), and AGSS service only, the barrel
assembly is permanently attached to the frontbody keying disc assembly.
4. Remove all of the internal parts from the twist-lock replaceable barrel assembly
(B) by performing the following:
a. Carefully remove the frontbody piston spring (C).
b. Remove the frontbody piston (D).
c. Remove the frontbody piston O-ring (E) from the frontbody piston (D).
d. Remove the O-ring (F) and washer (G).
Rep lacemen t
1. Inspect the parts of the frontbody assembly for excessive wear or damage.
2. Replace defective parts as necessary.
3. To install the replacement Geometric Quick-Connect key style frontbody
assembly, reverse the removal procedure.
4. To ensure proper operation of the Geometric Quick-Connect key style frontbody
assembly, perform the “Function Checks” on page 2–3.
Page 4-18
DiamondCare® Recessed Wall Outlet and Electrical Accessories (####-###-####)
Chapter 5
Parts List
Ejcrvgt Eqpvgpvu
Warranty .....................................................................................................................5-3
Service Parts Ordering................................................................................................5-5
Recommended Spare Parts.........................................................................................5-5
DISS Key Style Finish Assembly...............................................................................5-6
Diamond® Quick-Connect Key Style Finish Assembly............................................5-8
Latch Index Quick-Connect Key Style Finish Assembly ........................................5-10
Geometric Quick-Connect Key Style Finish Assembly...........................................5-12
Gas Service Rough-In Assembly..............................................................................5-14
Twist-Lock Finish Assembly....................................................................................5-16
Power Drop Straight Blade Finish Assembly...........................................................5-17
Duplex Receptacle Finish Assembly........................................................................5-18
Outlet—GFCI Finish Assembly ...............................................................................5-19
Toggle Switch Finish Assembly ...............................................................................5-20
Decora® Switch Finish Assembly ...........................................................................5-21
Low Voltage Switch Finish Assembly .....................................................................5-22
Blank Provision Finish Assembly ............................................................................5-23
Electrical Accessories Rough-In Assembly..............................................................5-24
Recessed Wall Slide Finish Assembly......................................................................5-25
Recessed Wall Blank Finish Assembly ....................................................................5-26
Recessed Wall Slide Rough-In Assembly ................................................................5-27
Wall-Mounted Slide Finish Assembly with Anchors ...............................................5-28
DiamondCare® Recessed Wall Outlet and Electrical Accessories (####-###-####)
Page 5-1
7
Chapter Contents
Chapter 5
Surface-Mounted Gas Outlet Enclosure...................................................................5-29
Surface-Mounted Slide Enclosure............................................................................5-30
Replacement Twist-Lock Barrel Assembly Repair Kits ..........................................5-31
Frontbody Repair Parts Kits.....................................................................................5-32
Rough-In Assembly Repair Parts Kits .....................................................................5-33
DiamondCare® Conversion Kits .............................................................................5-34
Page 5-2
DiamondCare® Recessed Wall Outlet and Electrical Accessories (####-###-####)
Warranty
Chapter 5
Warranty
BeaconMedæs warrants the
DiamondCare® Recessed Wall
Outlets and Electrical Accessories to
be free of defects in materials or
workmanship when installed and
operated in accordance with
instructions. The warranty period is
30 months from shipment date or 24
months from startup, whichever
period terminates earlier.
This warranty covers all necessary
parts and labor required for
correction of the defect whether by
any or all of repair, replacement, or
credit, which election shall be made
by BeaconMedæs at it's sole
discretion.
This warranty requires the owner to
ensure that the equipment is
1) started up or placed in service by
an authorized representative of
BeaconMedæs, 2) certified in
accordance with NFPA 99, most
recent edition, by a properly
qualified certification agency, and 3)
maintained in strict accordance with
Operation and Maintenance
Instructions provided with the
product.
Warranty claims will be honored only
after examination by BeaconMedæs
and only when such examination
shall disclose to BeaconMedæs's
reasonable satisfaction that such
equipment has not been damaged in
shipment or
Page 5-3
installation, improperly installed,
operated outside of any published
operating limits (including but not
limited to temperature, pressure,
humidity, or ventilation), improperly
or inadequately maintained, field
modified in any way, improperly
repaired, or in any other way
improperly applied or used.
All claims against this warranty
require prompt notification, within
the warranty period, of any seeming
defect. Failure to promptly notify
BeaconMedæs of the seeming
defect will invalidate all warranties.
This warranty excludes damage or
defect caused by shipping, acts of
God, fire, war, labor difficulties,
action of government, or other
cause beyond the reasonable
control of BeaconMedæs.
This warranty is given in lieu of all
other warranties, expressed or
implied, including implied warranties
of fitness for a particular purpose
and merchantability. In no event
shall BeaconMedæs be liable for
damages in excess of the value of
the defective product, nor shall
BeaconMedæs be liable for any
direct, special or consequential
damages, loss of profit of any kind,
or for loss of use of the products.
DiamondCare® Recessed Wall Outlet and Electrical Accessories (####-###-####)
Warranty
Chapter 5
NOTE S:
Page 5-4
DiamondCare® Recessed Wall Outlet and Electrical Accessories (####-###-####)
Service Parts Ordering
Chapter 5
Servic e Pa rts Ordering
Use the part numbers listed in this section of the manual to identify service parts to be
ordered. To order parts, call BeaconMedæs at (888) 4-MEDGAS (888-463-3427).
Re comme nded Spa re Parts
For a recommended spare parts list for the DiamondCare® series of Medical Gas Recessed
Wall Outlets, see table 5-1 on page 5-5.
Ta ble 5-1. Rec omme nded Spare Pa rts Li st
Quantit y
Desc ripti on
1 per 10 outlets per key style
Twist-lock barrel assembly
1 per 25 outlets
Frontbody keying disc assembly
3 per 100 outlets
Rough-in repair kits (pressurized or vacuum)
3 per 100 outlets
Finish repair kits
1 per 20 outlets
Faceplate, outlet, powder coated
1 per 25 outlets
Complete finish assembly
7
DiamondCare® Recessed Wall Outlet and Electrical Accessories (####-###-####)
Page 5-5
DISS Key Style Frontbody
Chapter 5
DISS Key Style Finis h Ass embly
Hkiwtg"7/30""FKUU"Mg{"Uv{ng"Hkpkuj"Cuugodn{
Page 5-6
DiamondCare® Recessed Wall Outlet and Electrical Accessories (####-###-####)
DISS Key Style Frontbody
Chapter 5
Ta ble 5-2. DISS Key St yle Fini sh Assembl y
Item Num ber
Quant ity
Descript ion
6803-8120-800
or
6803-8120-801
or
6803-8120-802
or
6803-8120-803
or
6803- 8120-804
or
6803-8120-805
or
6803-8120-806
or
6803-8120-807
or
6803-8120-808
or
6803-8120-809
or
6803-8120-810
or
6803-8120-811
1
2
0210-0559-300
2
O-ring, screw retainer
3
6803-2000-205
1
Faceplate, gas outlet, powder coated
4
6812-2001-007w
1
Retaining ring
5
6803-2000-188
or
6803-2000-187
1
Piston—for O2, VAC, EVAC
or
Piston—DISS
6
6812-2001-003
2
Screw—pan PH SST 6-32 x 1-7/8
7
0210-0601-300w
1
O-ring
8
6812-2001-008w
1
Spring, piston DISS
1
w
Pa rt Number
O2 finish assembly—green/white
N2O finish assembly—blue/white
VAC finish assembly—white/black
Air finish assembly—yellow/black
CO2 finish assembly—grey/black
N2 finish assembly—black/white
WAGD finish assembly—violet/white
O2/CO2 finish assembly—green/white
O2-ISO finish assembly—white/green
Air-ISO finish assembly—white/black
Vac-ISO finish assembly—yellow/black
AGSS-ISO finish assembly—violet/white
Included within the frontbody repair kit. See table 5-23 on page 5-32 for details.
DiamondCare® Recessed Wall Outlet and Electrical Accessories (####-###-####)
Page 5-7
7
Diamond® Quick-Connect Key Style Frontbody
Chapter 5
Diamond® Quic k-C onnect Key Style Finish As sembly
Hkiwtg"7/40""Fkcoqpf™"Swkem/Eqppgev"Mg{"Uv{ng"Hkpkuj"Cuugodn{
Tabl e 5-3. Diam ond® Quick-Conne ct Key St yle Fi nish Assem bly
It em Num be r
1
2
Page 5-8
Part Numbe r
6803-8121-800
or
6803-8121-801
or
6803-8121-802
or
6803-8121-803
or
6803-8121-806
or
6803-8121-808
or
6803-8121-809
or
6803-8121-810
or
6803-8121-811
Quanti ty
Descripti on
O2 finish assembly—green/white
N2O finish assembly—blue/white
VAC finish assembly—white/black
Air finish assembly—yellow/black
1
0210-0601-300w+ 1
WAGD finish assembly—violet/white
O2-ISO finish assembly—white/green
Air-ISO finish assembly—white/black
Vac-ISO finish assembly—yellow/black
AGSS-ISO finish assembly—violet/white
O-Ring—frontbody piston
DiamondCare® Recessed Wall Outlet and Electrical Accessories (####-###-####)
Diamond® Quick-Connect Key Style Frontbody
Chapter 5
Item
Num ber
3
6803-2000-200w+ 1
Piston—Diamond® frontbody
4
0210-0664-300w+ 1
O-Ring—Diamond® frontbody
5
0203-5069-300w+ 1
Spring Clip—Diamond® frontbody
Frontbody keying disc assembly—O2
6
6803-8111-900
or
6803-8111-901
or
6803-8111-902
or
6803-8111-903
or
6803-8111-904
or
6803-8111-906
or
6803-8111-908
or
6803-8111-909
or
6803-8111-910
or
6803-8111-911
1
7
6812-2001-003
2
8
0402-1130-300w+ 1
Washer—Diamond® frontbody
9
6803-2000-178+
Barrel—Diamond® frontbody
10
6812-2000-995w+ 1
Spring
11
6803-2000-174+
Secondary Piston—Diamond® frontbody
12
6812-2001-007w+ 1
Retaining ring, outlet barrel
13
6803-2000-205
1
Faceplate, gas outlet, powder coated
14
6812-2001-009w+ 1
Spring—frontbody secondary piston
15
0210-0559-300
O-ring, screw retainer
w
+
Part Num ber
Quant ity
Desc ripti on
Frontbody keying disc assembly—N2O
Frontbody keying disc assembly—VAC
Frontbody keying disc assembly—Air outlet
Frontbody keying disc assembly—CO2
Frontbody keying disc assembly—WAGD
Frontbody keying disc assembly—O2-ISO
Frontbody keying disc assembly—Air-ISO
Frontbody keying disc assembly—Vac-ISO
Frontbody keying disc assembly—AGSS
1
1
2
Screw—pan PH SST 6-32 x 1-7/8
7
Included within the frontbody repair kit. See table 5-23 on page 5-32 for details.
Included within the replacement twist-lock barrel assembly. See table 5-22 on page 5-31 for
details.
DiamondCare® Recessed Wall Outlet and Electrical Accessories (####-###-####)
Page 5-9
Latch Index Quick-Connect Key Style Frontbody
Chapter 5
L atch Inde x Quic k-Conne ct Key Style Finish As sembly
Hkiwtg"7/50""Ncvej"Kpfgz"Swkem/Eqppgev"Mg{"Uv{ng"Hkpkuj"Cuugodn{
Tabl e 5-4. Lat ch Inde x Quick-Conne ct Ke y St yle Fi nish Assem bly
Item
Number
1
Page 5-10
Part Number
6803-8123-800
or
6803-8123-801
or
6803-8123-802
or
6803-8123-803
or
6803-8123-806
or
6803-8123-808
or
6803-8123-809
or
6803-8123-810
or
6803-8123-811
Quant ity
Descript ion
O2 finish assembly—green/white
N2O finish assembly—blue/white
VAC finish assembly—white/black
Air finish assembly—yellow/black
1
WAGD finish assembly—violet/white
O2-ISO finish assembly—white/green
Air-ISO finish assembly—white/black
Vac-ISO finish assembly—yellow/black
AGSS-ISO finish assembly—violet/white
DiamondCare® Recessed Wall Outlet and Electrical Accessories (####-###-####)
Latch Index Quick-Connect Key Style Frontbody
Chapter 5
Item
Number
Part Number
Quant ity
Descript ion
Frontbody keying disc assembly—O2
6803-8114-900
or
6803-8114-901
or
6803-8114-902
or
6803-8114-903
or
6803-8114-906
or
6803-8114-908
or
6803-8114-909
or
6803-8114-910
or
6803-8114-911
1
3
6812-2001-003
2
Screw—pan PH SST 6-32 x 1-7/8
4
0210-0559-300
2
O-ring, screw retainer
5
6803-2000-205
1
Faceplate, outlet, powder coated
6
6812-2001-007w+
1
Retaining ring, outlet barrel
7
6812-2001-009w+
1
Spring—frontbody secondary piston
8
6803-2000-174+v
1
Secondary piston—Diamond® frontbody
9
0210-0601-300w+
1
O-ring—frontbody piston
10
6812-2000-995w+
1
Spring
11
6803-2000-200w+v 1
Piston—Diamond® frontbody
12
525229-00+v
1
Barrel—Diamond® frontbody
13
0402-1130-300w+
1
Washer—Diamond® frontbody
14
0210-0664-300w+
1
O-ring—Diamond® frontbody
2
w
+
v
Frontbody keying disc assembly—N2O
Frontbody keying disc assembly—VAC
Frontbody keying disc assembly—Air
outlet
Frontbody keying disc assembly—WAGD
Frontbody keying disc assembly—O2-ISO
Frontbody keying disc assembly—Air-ISO
Frontbody keying disc assembly—Vac-ISO
Frontbody keying disc assembly—AGSS
Included within the frontbody repair kit. See table 5-23 on page 5-32 for details.
Included within the replacement twist-lock barrel assembly. See table 5-22 on page 5-31 for
details.
Used in both Diamond® and Latch Index key style frontbody barrel assemblies.
DiamondCare® Recessed Wall Outlet and Electrical Accessories (####-###-####)
Page 5-11
7
Geometric Quick-Connect Key Style Finish Assembly
Chapter 5
Geometric Quick-Connect Key Style Finis h Ass embly
Hkiwtg"7/60""Igqogvtke"Swkem/Eqppgev"Mg{"Uv{ng"Hkpkuj"Cuugodn{
T able 5-5. Geom etri c Quic k-Connect Key Style Finish Asse mbly
Item Number Part Num ber Quantit y
Desc ripti on
6803-8122-800
O2 finish assembly—green/white
or
N2O finish assembly—blue/white
6803-8122-801
or
VAC finish assembly—white/black
6803-8122-802
or
Air finish assembly—yellow/black
6803-8122-803
or
WAGD finish assembly—violet/white
1
6803-8122-806 1
or
O2-ISO finish assembly—white/green
6803-8122-808
or
Air-ISO finish assembly—white/black
6803-8122-809
or
Vac-ISO finish assembly—yellow/black
6803-8122-810
or
AGSS-ISO finish assembly—violet/white
6803-8122-811
Page 5-12
DiamondCare® Recessed Wall Outlet and Electrical Accessories (####-###-####)
Geometric Quick-Connect Key Style Finish Assembly
Chapter 5
Item
Number
Part Number
Quant ity
Descript ion
6803-8112-900
or
6803-8112-901
or
6803-8112-902
or
6803-8112-903
or
6803-8112-908
or
6803-8112-909
or
6803-8112-910
1
3
6812-2001-003
2
Screw—pan PH SST 6-32 x 1-7/8
4
0210-0559-300
2
O-ring, screw retainer
5
6803-2000-205
1
Faceplate, outlet, powder coated
6
6812-2001-007w+ 1
Retaining ring
7
6812-2001-009w+ 1
Spring—frontbody secondary piston
8
6803-2000-194+
1
Piston—Geometric Key frontbody
9
0210-0601-300w+
1
O-Ring
10
6803-2000-177+
1
Barrel—Geometric Key frontbody
11
6812-2110-003+
1
O-ring
12
6812-2000-999+
1
Washer
2
w
+
Frontbody keying disc assembly—O2
Frontbody keying disc assembly—N2O
Frontbody keying disc assembly—VAC
Frontbody keying disc assembly—Air outlet
Frontbody keying disc assembly—O2-ISO
Frontbody keying disc assembly—Air-ISO
Frontbody keying disc assembly—Vac-ISO
Included within the frontbody repair kit. See table 5-23 on page 5-32 for details.
Included within the replacement twist-lock barrel assembly (not available for WAGD/AGSS).
See table 5-22 on page 5-31 for details.
DiamondCare® Recessed Wall Outlet and Electrical Accessories (####-###-####)
Page 5-13
7
Gas Service Rough-In Assembly
Chapter 5
Gas Se rvice R ough-In Ass embly
Hkiwtg"7/70""Icu"Ugtxkeg"Tqwij/Kp"Cuugodn{
Page 5-14
DiamondCare® Recessed Wall Outlet and Electrical Accessories (####-###-####)
Gas Service Rough-In Assembly
Chapter 5
Tabl e 5-6. Ga s Se rvice Rough-In Assem bly
Item
Number
Part Num ber
Quantit y
Descript ion
O2 outlet assembly
6803-8139-800
or
6803-8139-801
or
6803-8139-802
or
6803-8139-803
or
6803-8139-804
or
6803-8139-805
or
6803-8139-806
or
6803-8139-807
1
2
6812-2000-075
2
3
6812-2001-004w 1
Retaining ring
4
6812-2001-037w 1
Bushing
5
6803-2000-199w 1
Secondary check (not used in VAC, WAGD,
or AGSS)
6
0203-3508-300w 1
Spring (not used in VAC, WAGD, or AGSS)
7
6812-2000-851w 1
Washer
8
6812-2160-008+
1
+
w
N2O outlet assembly
VAC outlet assembly
Air outlet assembly
CO2 outlet assembly
N2 outlet assembly
WAGD outlet assembly
O2/CO2 outlet assembly
As
required
Screw, #8 x 5/8
7
Lubricant, Krytox®
Item 8 is not shown in figure 5-5 on page 5–14.
Included within the rough-in assembly repair kit. See table 5-24 on page 5-33 for details.
DiamondCare® Recessed Wall Outlet and Electrical Accessories (####-###-####)
Page 5-15
Twist-Lock Finish Assembly
Chapter 5
T wist-L ock Finis h Ass embly
Hkiwtg"7/80""Vykuv/Nqem"Hkpkuj"Cuugodn{
Tabl e 5-7. Twist-Loc k Finish Assem bly
Item
Number
1
6803-8030-272
1
Power drop twist lock frontbody assembly
2
0208-0600-300
1
Strain relief
3
4
5
0210-0559-300
6812-2001-002
0211-1492-300
2
2
1
O-ring, screw retainer
Screw—oval PH SST #6 x 1-3/4 type F
Grommet
6
0208-0502-300
1
Receptacle, twist lock
7
0999-7996-010
As required Cable, flexible 12 AWG type SOW
8
6812-2540-007
1
Bracket, cord mounting
9
10
6803-2000-206
6812-2540-005
1
1
Faceplate, outlet, powder coated
Finish plate
Page 5-16
Part Numbe r
Quanti ty
Descript ion
DiamondCare® Recessed Wall Outlet and Electrical Accessories (####-###-####)
Power Drop Straight Blade Finish Assembly
Chapter 5
Power Drop Stra ight B la de Finis h A sse mbly
Hkiwtg"7/90""Rqygt"Ftqr"Uvtckijv"Dncfg"Hkpkuj"Cuugodn{
Ta ble 5-8. Powe r Drop Strai ght Bl ade Fini sh Assembl y
It em Numbe r
Part Numbe r
Quanti ty
Descript ion
Power drop straight blade frontbody
assembly
1
6803-8030-267 1
2
0208-0600-300 1
Strain relief
3
4
5
0210-0559-300 2
6812-2001-002 2
0211-1492-300 1
O-ring, screw retainer
Screw—oval PH SST #6 x 1-3/4 type F
Grommet
6
0208-0501-300 1
Receptacle, straigh blade
7
0999-7996-010 As required Cable, flexible 12 AWG type SOW
8
6812-2540-007 1
Bracket, cord mounting
9
6803-2000-206 1
Faceplate, outlet, powder coated
10
6812-2540-005 1
Finish plate
DiamondCare® Recessed Wall Outlet and Electrical Accessories (####-###-####)
Page 5-17
7
Duplex Receptacle Finish Assembly
Chapter 5
Duplex Rec eptacle Finish Ass embly
Hkiwtg"7/:0""Fwrngz"Tgegrvceng"Hkpkuj"Cuugodn{
Ta ble 5-9. Duplex Rece ptac le Fini sh Assembl y
Item
Number
Part Num ber
Quant ity
De sc ripti on
1
675E01
1
Duplex receptacle, frontbody assembly—
Ivory—20A
2
675E02
1
Duplex receptacle, frontbody assembly—
Red—20A
3
6812-2001-002
2
Screw—oval PH SST #6 x 1-3/4 type F
4
6803-2000-002
1
Finish plate, electrical
5
205454
1
Faceplate, duplex receptacle
6
205556
1
Receptacle, Duplex straight blade—Ivory
(included with assembly 675E01)
7
205557
1
Receptacle, Duplex straight blade—Red
(included with assembly 675E02)
Page 5-18
DiamondCare® Recessed Wall Outlet and Electrical Accessories (####-###-####)
Outlet—GFCI Finish Assembly
Chapter 5
Outlet—GFCI Finish As sembly
Hkiwtg"7/;0""Qwvngv¤IHEK"Hkpkuj"Cuugodn{
Ta ble 5-10. Outle t—GFCI Fi nish Assembl y
Item
Number
Part Num ber
Quant ity
De sc ripti on
1
675E07
1
GFCI receptacle, frontbody assembly—
Ivory—20A
2
675E06
1
GFCI receptacle, frontbody assembly—
Red—20A
3
6812-2001-002
2
Screw—oval PH SST #6 x 1-3/4 type F
4
6803-2000-206
1
Finish plate, electrical
5
205552
1
Faceplate, switch, Decora®
6
50136
1
Receptacle, GFCI—Ivory (included with
assembly 675E07)
7
54743
1
Receptacle, GFCI—Red (included with
assembly 675E08)
DiamondCare® Recessed Wall Outlet and Electrical Accessories (####-###-####)
Page 5-19
7
Toggle Switch Finish Assembly
Chapter 5
T oggle Switch Finish Ass embly
Hkiwtg"7/320""Vqiing"Uykvej"Hkpkuj"Cuugodn{
T able 5-11. T oggle Swit ch Finish Asse mbly
Item
Number
Part Num ber
Quant ity
De sc ripti on
1
675E03
1
Toggle switch, frontbody assembly
2
6812-2001-002
2
Screw—oval PH SST #6 x 1-3/4 type F
3
6803-2000-206
1
Finish plate, electrical
4
205551
1
Faceplate, switch, toggle
5
56824
1
Switch, toggle, 3-way
Page 5-20
DiamondCare® Recessed Wall Outlet and Electrical Accessories (####-###-####)
Decora® Switch Finish Assembly
Chapter 5
Decora® Switc h Finish As sembly
Hkiwtg"7/330""Fgeqtc™"Uykvej"Hkpkuj"Cuugodn{
T able 5-12. Dec ora® Switc h Finish Asse mbly
Item
Number
Part Num ber
Quant ity
De sc ripti on
1
675E04
1
Decora® switch, frontbody assembly
2
6812-2001-002
2
Screw—oval PH SST #6 x 1-3/4 type F
3
6803-2000-206
1
Finish plate, electrical
4
205552
1
Faceplate, switch, Decora®
5
205555
1
Switch, Decora®, 3-way, 20A
DiamondCare® Recessed Wall Outlet and Electrical Accessories (####-###-####)
Page 5-21
7
Low Voltage Switch Finish Assembly
Chapter 5
L ow V olta ge Switch Finish Ass embly
Hkiwtg"7/340""Nqy"Xqnvcig"Uykvej"Hkpkuj"Cuugodn{
Tabl e 5-13. Low Volta ge Switc h Fi nish Assem bly
Item
Number
Part Num ber
Quant ity
De sc ripti on
1
675E05
1
Low voltage switch, frontbody assembly
2
6812-2001-002
2
Screw—oval PH SST #6 x 1-3/4 type F
3
6803-2000-206
1
Finish plate, electrical
4
205550
1
Faceplate, switch, low voltage
5
204662
1
Switch, rocker momentary
Page 5-22
DiamondCare® Recessed Wall Outlet and Electrical Accessories (####-###-####)
Blank Provision Finish Assembly
Chapter 5
Blank Provis ion Finis h As se mbly
Hkiwtg"7/350""Dncpm"Rtqxkukqp"Hkpkuj"Cuugodn{
Tabl e 5-14. Blank Provi si on Finish Assem bly
Item
Number
Part Num ber
Quant ity
De sc ripti on
1
675E06
1
Blank provision, frontbody assembly
2
6812-2001-002
2
Screw—oval PH SST #6 x 1-3/4 type F
3
6803-2000-206
1
Finish plate, electrical
4
205455
1
Faceplate, blank provision
DiamondCare® Recessed Wall Outlet and Electrical Accessories (####-###-####)
Page 5-23
7
Electrical Accessories Rough-In Assembly
Chapter 5
E le ctrica l Ac ces sorie s Rough-In As se mbly
Hkiwtg"7/360""Gngevtkecn"Ceeguuqtkgu"Tqwij/Kp"Cuugodn{
T able 5-15. E lec tric al Ac cessories Rough-In Asse mbly
Item
Number
Part Num ber
Quant ity
De sc ripti on
1
6803-8030-270
1
Electrical accessories rough-in assembly
2
6812-2540-006
1
Junction box, electrical
3
6803-2000-277
1
Backplate, electrical accessories
4
6812-2000-075
2
Screw, #8 x 5/8
5
6812-2000-000
4
Screw, pan PH SST #6-32 x 1-7/8
Page 5-24
DiamondCare® Recessed Wall Outlet and Electrical Accessories (####-###-####)
Recessed Wall Slide Finish Assembly
Chapter 5
Re cess ed Wall Slide Finish As sembly
Hkiwtg"7/370""Tgeguugf"Ycnn"Unkfg"Hkpkuj"Cuugodn{
Ta ble 5-16. Rec esse d Wa ll Sl ide Fini sh Assembl y
Item
Number
Part Num ber
Quant ity
De sc ripti on
1
6803-8030-263
1
Vacuum slide outlet frontbody assembly
2
6812-2001-002
2
Screw, oval PH SST #6 x 1-3/4 type F
3
6803-2000-207
1
Faceplate, vacuum slide, powder coated
DiamondCare® Recessed Wall Outlet and Electrical Accessories (####-###-####)
Page 5-25
7
Recessed Wall Blank Finish Assembly
Chapter 5
Re cess ed Wall Blank Finish Ass embly
Hkiwtg"7/380""Tgeguugf"Ycnn"Dncpm"Hkpkuj"Cuugodn{
Ta ble 5-17. Rec esse d Wa ll Blank Fini sh Assembl y
Item
Number
Part Num ber
Quant ity
De sc ripti on
1
6803-8030-264
1
Blank outlet frontbody assembly
2
0210-0559-300
4
O-ring, screw retainer
3
6803-2000-205
1
Faceplate, gas outlet, powder coated
4
6803-2000-163
1
Plate blank, wall outlet
5
6812-2001-003
2
Screw—pan PH SST 6-32 x 1-7/8
Page 5-26
DiamondCare® Recessed Wall Outlet and Electrical Accessories (####-###-####)
Recessed Wall Slide Rough-In Assembly
Chapter 5
Re cess ed Wall Slide R ough-In Ass embly
Hkiwtg"7/390""Tgeguugf"Ycnn"Unkfg"Tqwij/Kp"Cuugodn{
Ta ble 5-18. Rec esse d Wa ll Sl ide Rough-In Assembl y
Item
Number
Part Num ber
Quant ity
De sc ripti on
1
6803-8030-269
1
Vacuum slide outlet rough-in assembly
2
0203-0143-300
1
Caplug, #14 taper
3
6803-2000-276
1
Backplate, slide
4
6812-2000-075
2
Screw, #8 x 5/8
5
6803-2000-290
1
Dust cover
DiamondCare® Recessed Wall Outlet and Electrical Accessories (####-###-####)
Page 5-27
7
Wall-Mounted Slide Finish Assembly
Chapter 5
Wall-Mounted Slide Finis h Ass embly with Anchors
Hkiwtg"7/3:0""Ycnn/Oqwpvgf"Unkfg"Hkpkuj"Cuugodn{"ykvj"Cpejqtu
Ta ble 5-19. Wa ll-Mounte d Slide Finish Assem bly wit h Anchors
Item
Number
Part Num ber
Quant ity
De sc ripti on
1
6803-8030-268
1
Vacuum slide outlet frontbody assembly with
anchors
2
6812-2001-002
2
Screw, oval PH SST #6 x 1-3/4 type F
3
6803-2000-207
1
Faceplate, vacuum slide, powder coated
4
0402-1820-300
2
Anchor
Page 5-28
DiamondCare® Recessed Wall Outlet and Electrical Accessories (####-###-####)
Surface-Mounted Gas Outlet Enclosure
Chapter 5
Surface -M ounted Gas Outlet Enc losure
Hkiwtg"7/3;0""Uwthceg/Oqwpvgf"Icu"Qwvngv"Gpenquwtg
7
Tabl e 5-20. Surfa ce-Mounte d Gas Out let Enc losure
Item
Number
Part Num ber
Quant ity
De sc ripti on
1
6803-8030-271
1
Kit, exposed gas outlet
2
6803-2000-288
1
Bracket, surface-mount
3
0140-6124-106
2
Screw
4
6803-2000-289
1
Box, surface-mount outlet
DiamondCare® Recessed Wall Outlet and Electrical Accessories (####-###-####)
Page 5-29
Surface-Mounted Slide Enclosure
Chapter 5
Uwthceg/Oqwpvgf"Unkfg"Gpenquwtg
Hkiwtg"7/420""Uwthceg/Oqwpvgf"Unkfg"Gpenquwtg
T able 5-21. Surfac e-Mounted Sl ide E nclosure
Item
Number
Part Num ber
Quant ity
De sc ripti on
1
6803-8030-274
1
Kit, exposed slide
2
6803-2000-288
1
Bracket, surface-mount
3
6803-2000-290
1
Box, surface-mount slide
4
9100-1000-001
1
Slide, vacuum
5
9100-1000-000
1
Spacer, slide
6
6812-2000-970
2
Screw
Page 5-30
DiamondCare® Recessed Wall Outlet and Electrical Accessories (####-###-####)
Replacement Twist-Lock Barrel Assembly Repair Kits
Chapter 5
Re pla cement Twis t-L ock Barrel Ass embly R epair Kits
Hkiwtg"7/430""Tgrncegogpv"Vykuv/Nqem"Dcttgn"Cuugodn{"Tgrckt"Mkvu
T able 5-22. Re plac eme nt T wi st -Lock Barrel Assembl y Repa ir Kit s
Item
Number
Part Num ber
Quant ity
7
De sc ripti on
1
6803-7030-121
1
Loaded barrel—Diamond® key style
2
6803-7030-122
1
Loaded barrel—Latch index key style, with
Hill-Rom logo
3
6803-7030-123
1
Loaded barrel—Geometric key style
(excluding WAGD)
4
6803-7030-130
1
Loaded barrel—Latch index key style,
without company logo
DiamondCare® Recessed Wall Outlet and Electrical Accessories (####-###-####)
Page 5-31
Frontbody Repair Parts Kits
Chapter 5
Frontbody Re pair Parts Kits
Hkiwtg"7/440""Htqpvdqf{"Tgrckt"Rctvu"Mkvu
Ta ble 5-23. Frontbody Re pair Part s Ki ts
Ite m
Num be r
Part Numbe r
Quanti ty
De sc ription
1
6803-7030-117
1 pkg. for
10 outlets
Repair kit, frontbody—Diamond® key style
2
6803-7030-118
3
6803-7030-119
4
6803-7030-116
Page 5-32
1 pkg. for
10 outlets
1 pkg. for
10 outlets
1 pkg. for
10 outlets
Repair kit, frontbody—Latch index key
style
Repair kit, frontbody—Geomoetric key
style
Repair kit, frontbody—DISS key style
DiamondCare® Recessed Wall Outlet and Electrical Accessories (####-###-####)
Rough-In Assembly Repair Parts Kits
Chapter 5
Rough-In As se mbly Re pair Parts Kits
Hkiwtg"7/450""Tqwij/Kp"Cuugodn{"Tgrckt"Rctvu"Mkvu
T able 5-24. Rough-In Assembl y Repai r Parts Kit s
Item
Number
Part Num ber
1
1 pkg. for
6803-7030-125
10 outlets
Repair kit, rough-in—Vac/WAGD/AGSS (all
key styles)
2
6803-7030-124
1 pkg. for
10 outlets
Repair kit, rough-in—Pressure gases (all key
styles)
Quanti ty
Descri ption
DiamondCare® Recessed Wall Outlet and Electrical Accessories (####-###-####)
Page 5-33
7
DiamondCare® Conversion Kits
Chapter 5
DiamondCa re® Conversion Kits
Hkiwtg"7/460""FkcoqpfEctg™"Eqpxgtukqp"Mkvu
Tabl e 5-25. Di amondCa re® Conve rsi on Kits
It em Numbe r
Part Number
Qua nt ity
1
6803-7030-128w 1
2
6803-7030-126w 1
3
6803-7030-127w 1
4
6803-7030-129w 1
w
Descri pt ion
Kit, retro—Diamond®/DISS II and III wa ll
vacuum rough-in assemblies
Kit, retro—Diamond®/DISS II and III wa ll
pressure rough-in assemblies
Kit, retro—Diamond®/DISS II and III
console pressure rough-in assemblies
Kit, retro—Diamond®/DISS II and III
console vacuum rough-in assemblies
Rough-in assembly conversion only. A new DiamondCare®, Diamond®, or DISS frontbody
finish assembly must be separately ordered.
Page 5-34
DiamondCare® Recessed Wall Outlet and Electrical Accessories (####-###-####)
Chapter 6
General Procedures
Ejcrvgt"Eqpvgpvu
Cleaning......................................................................................................................6-2
Steam Cleaning.....................................................................................................6-2
Cleaning Hard to Clean Spots ..............................................................................6-2
Disinfection ..........................................................................................................6-2
Component Handling..................................................................................................6-3
Lubrication Requirements ..........................................................................................6-3
Service ........................................................................................................................6-4
Repair Policy and Procedure ......................................................................................6-5
Repair Kits..................................................................................................................6-6
General Service Procedures........................................................................................6-7
Tool and Supply Requirements ..................................................................................6-8
8
DiamondCare® Recessed Wall Outlet and Electrical Accessories (####-###-####)
Page 6-1
Cleaning
Chapter 6
Cleaning
WARNING:
Follow the product manufacturer’s instructions. Failure to do so could result
in personal injury or equipment damage.
CAUTION:
Do not use harsh cleaners/detergents such as scouring pads and heavy duty
grease removers, or solvents such as toluene, xylene, and acetone.
Equipment damage could occur.
CAUTION:
Do not use oil or grease on or around the outlet. Doing so could result in
equipment damage. Use only lubricants approved for oxygen service, such
as Krytox® 6PL205.
If there is no visible soilage with possible blood or body fluids, we recommend that you
clean the unit with a mild detergent and warm water. If disinfection is desired, you may use
a combination cleanser/disinfectant as explained in “Disinfection” below.
Steam Cleaning
Do not use any steam cleaning device on the DiamondCare® Recessed Wall Outlets.
Excessive moisture can damage mechanisms in this unit.
Cleaning H ard to Clean S po ts
To remove difficult spots or stains, we recommend that you use standard household
cleansers and a soft-bristled brush. To loosen heavy, dried-on soil, you may first need to
saturate the spot.
Disinfection
When there is visible soilage, we recommend that you disinfect the unit with a
tuberculocidal disinfectant. (For customers in the United States, the disinfectant should be
registered with the Environmental Protection Agency.)
Dilute disinfectants as specified on the manufacturer’s label.
DiamondCare® Recessed Wall Outlet and Electrical Accessories (####-###-####)
Page 6-2
8
Component Handling
Chapter 6
Component Handling
CAUTION:
When testing an outlet for correct operation, do not allow the piston in the
check valve to "snap" back into position. The shoulder on the piston can
break, causing leakage.
WARNING:
Particular caution must be taken to provide frequent inspection and service
of the air outlets where DiamondCare® outlets are used in an air system
supplied by a liquid ring air compressor that uses chlorinated water, and
having galvanized piping or a galvanized air receiver. Chemical reactions
occurring under those conditions may damage the pistons. Air outlets should
be examined at least annually, and pistons that show evidence of
deterioration should be replaced. Failure to do so could result in personal
injury or equipment damage.
L ubrication Requirements
WARNING:
Follow the product manufacturer’s instructions. Failure to do so could result
in personal injury or equipment damage.
CAUTION:
Do not use silicone-based lubricants. Equipment damage could occur.
8
DiamondCare® Recessed Wall Outlet and Electrical Accessories (####-###-####)
Page 6-3
Service
Chapter 6
Service
WARNING:
Only facility-authorized personnel should service the DiamondCare®
Recessed Wall Outlets. Service performed by unauthorized personnel could
result in personal injury or equipment damage.
For standard guidelines in properly maintaining the gas outlets, refer to CGA Pamphlet E-10
(1999 Edition), Maintenance of Medical Gas and Vacuum Systems in Health Care
Facilities.
Include the following when servicing the DiamondCare® Recessed Wall Outlets:
• Inspect the finish faceplate and replace if necessary.
• Inspect all labels and replace if necessary.
• Check the general aesthetics of the DiamondCare® Recessed Wall Outlets.
8
DiamondCare® Recessed Wall Outlet and Electrical Accessories (####-###-####)
Page 6-4
Repair Policy and Procedure
Chapter 6
Re pair Policy and Procedure
CAUTION:
No repair should ever be undertaken or attempted by anyone not meeting
the qualifications of or complying with the BeaconMedæs repair policy and
procedures. Failure to do so could result in equipment damage.
• Do not use malfunctioning equipment.
• To ensure full reliability, have all repairs and service done by an authorized
BeaconMedæs service representative. If this cannot be done, replacement and
service of those parts listed in this manual can be done by a competent, trained
individual having experience in the repair of devices of this nature.
• After any repair, test the equipment to ensure that it is functioning properly and
in accordance with the manufacturer\qs published specifications.
• Replace damaged parts with components manufactured or sold by
BeaconMedæs. Then test the unit to make sure that it complies with the
manufacturer\qs published specifications.
• Contact BeaconMedæs at 1-(888) 4-MEDGAS (463-3427) for assistance.
• If you send a damaged assembly to a BeaconMedæs service center, package it
securely in the original shipping container, if possible, and ship it prepaid.
Enclose a letter with the assembly describing the problem and the repairs felt
necessary.
• In cases not covered by the BeaconMedæs Limited Warranty Policy, repairs will
be made according to the BeaconMedæs current list price for the replacement
part(s), plus a reasonable labor charge.
8
DiamondCare® Recessed Wall Outlet and Electrical Accessories (####-###-####)
Page 6-5
Repair Kits
Chapter 6
Repa ir Kits
BeaconMedæs provides separate repair kits for these DiamondCare® frontbody and roughin assemblies:
• Replacement Twist-Lock Barrel Assembly
–
Diamond® Key Style
–
Latch Index Key Style
–
Geometric Key Style (excluding WAGD)
• Frontbody Repair Parts Kit
–
Diamond® Key Style
–
Latch Index Key Style
–
Geometric Key Style
–
DISS Key Style
• Rough-in Assembly Repair Parts Kit
–
Pressurized gases (all key styles)
–
Vacuum, WAGD, and AGSS (all key styles)
• DiamondCare® Conversion Kit
Diamond®/DISSII and III wall rough-in assemblies w
–
–
Pressure gases
–
Vacuum, WAGD, and AGSS
Diamond®/DISSII and III console rough-ins assemblies w
–
–
w
Pressure gases
– Vacuum, WAGD, and AGSS
Rough-in assembly conversion only. A new DiamondCare®, Diamond®, or
DISS frontbody finish assembly must be separately ordered.
DiamondCare® Recessed Wall Outlet and Electrical Accessories (####-###-####)
Page 6-6
8
6.1 General Service Procedures
Chapter 6
6.1
General Servic e Proce dures
CAUTION:
Only authorized and trained personnel should perform the service
procedures. (The service procedures in Chapter 4 can be followed by
individuals who have general knowledge and experience with devices of this
nature.) No repairs or service should be attempted by anyone not having
such qualifications.
WARNING:
Where DiamondCare® Recessed Wall Outlets are used in an air system
supplied by a liquid ring air compressor that uses chlorinated water, and has
galvanized piping or a galvanized air receiver, particular caution must be
taken to frequently inspect and maintain of the air outlets. Chemical
reactions occurring under those conditions may damage the pistons. Failure
to maintain the air outlets could result in personal injury or equipment
damaged.
1. Examine air outlets at least annually, and replace pistons that show evidence of
deterioration. If deterioration is noted, examine the outlets quarterly.
2. Use only genuine replacement parts manufactured or sold by BeaconMedæs for
all outlet repairs.
3. Read completely through each procedure before starting the procedure. Any
exceptions may result in failure to properly and safely complete the procedure
attempted.
CAUTION:
When testing an outlet for correct operation, do not allow the piston in the
check valve to "snap" back into position. The shoulder on the piston can
break, causing leakage.
DiamondCare® Recessed Wall Outlet and Electrical Accessories (####-###-####)
Page 6-7
8
Tool and Supply Requirements
Chapter 6
T ool and Supply Requirements
To service the DiamondCare® Recessed Wall Outlets, the following tools are required:
• Retaining ring removal/installation tool (appropriate type/size)
• #2 phillips head screwdriver
• Screwdriver
• Small screwdriver
• Needle nose pliers
• Hand-held power drill
Page 6-8
DiamondCare® Recessed Wall Outlet and Electrical Accessories (####-###-####)
Chapter 6
NOTE S:
8
DiamondCare® Recessed Wall Outlet and Electrical Accessories (####-###-####)
Page 6-9
Andersen Medical Gas
12 Place Lafifitte
Madisonville, LA 70447
http://www.TheMedicalGas.com
1-866-288-3783
Part No. MAN245 Rev. A
©2004 BeaconMedæs. All rights reserved.
Corporate Headquarters:
BeaconMedæs
PO Box 7064
13325A Carowinds Boulevard
Charlotte, NC 28241
Phone (704) 588-0854
Fax (704) 588-4949
Fo r te chn ical su pp or t or to
p lace an o rde r call:
1 888 4 MEDGAS
(1 888 463 3427)
Fax (866) 635 3296
www.beaconmedaes.com