1
Change for Life
Service Manual
02'(/ *-&$).51%'
*-&$).51%'
*-&$'.51%'
*-&$&.51%'
*-&$&.51%'
*-+$).51'$
*-+$).51%'
*-+$).51%'
*-+$).51'$
*-+$'.51%'
*-+$'.51'$
*-+$&.51%'
*-+$&.51'$
*-+$&.51%'
*-+$&.51'$
5HIULJHUDQW5$
GREE ELECTRIC APPLIANCES,INC.OF ZHUHAI
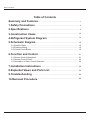
7DEOHRI&RQWHQWV
7DEOHRI&RQWHQWV
6XPPDU\DQG)HDWXUHV 6DIHW\3UHFDXWLRQV 6SHFL¿FDWLRQV &RQVWUXFWLRQ9LHZV 5HIULJHUDQW6\VWHP'LDJUDP 6FKHPDWLF'LDJUDP (OHFWULFDO'DWD (OHFWULFDO:LULQJ 3ULQWHG&LUFXLW%RDUG )XQFWLRQDQG&RQWURO 5HPRWH&RQWURO2SHUDWLRQV 5HPRWH&RQWURO3DQHO 'HVFULSWLRQRI(DFK&RQWURO2SHUDWLRQ ,QVWDOODWLRQ,QVWUXFWLRQV ([SORGHG9LHZVDQG3DUWV/LVW 7URXEOHVKRRWLQJ 5HPRYDO3URFHGXUH 6XPPDU\DQG)HDWXUHV
6XPPDU\DQG)HDWXUHV
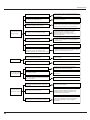
0RGHOV
*-&$).51%'
*-&$).51%'
*-&$'.51%'
*-&$&.51%'
*-&$&.51%'
*-+$).51%'
*-+$).51%'
*-+$'.51%'
*-+$&.51%'
*-+$&.51%'
*-+$).51'$
*-+$).51'$
*-+$'.51'$
*-+$&.51'$
*-+$&.51'$
5HPRWH&RQWUROOHU
<6)$
FAN
MODE
ON/OFF
-
+
CLOCK
TIMER ON
ENERGY
SAVER
TIMER OFF
LIGHT
SLEEP
6DIHW\3UHFDXWLRQV
6DIHW\3UHFDXWLRQV
Installing, starting up, and servicing air conditioner can be
hazardous due to system pressure, electrical components,
and equipment location, etc.
Only trained, qualified installers and service personnel are
allowed to install, start-up, and service this equipment.
Untrained personnel can perform basic maintenance functions such as cleaning coils. All other operations should
be performed by trained service personnel.
When handling the equipment, observe precautions in the
manual and on tags, stickers, and labels attached to the
equipment. Follow all safety codes. Wear safety glasses
andwork gloves. Keep quenching cloth and fire extinguisher
nearby when brazing.
Read the instructions thoroughly and follow all warnings or
cautions in literature and attached to the unit. Consult local
building codes and current editions of national as well as
local electrical codes.
Recognize the following safety information:
Warning
Incorrect handling could result in
personal injury or death.
Caution
Incorrect handling may result in
minor injury,or damage to product
or property.
Warning
All electric work must be performed by a licensed technician
according to local regulations and the instructions given in
this manual.
Before installing, modifying, or servicing system, main
electrical disconnect switch must be in the OFF position.
There may be more than 1 disconnect switch. Lock out
and tag switch with a suitable warning label.
Never supply power to the unit unless all wiring and tubing are completed, reconnected and checked.
This system adopts highly dangerous electrical voltage.
Incorrect connection or inadequate grounding can cause
personal injury or death. Stick to the wiring diagram and
all the instructions when wiring.
Have the unit adequately grounded in accordance with
local electrical codes.
Have all wiring connected tightly. Loose connection may
lead to overheating and a possible fire hazard.
All installation or repair work shall be performed by your dealer or a specialized subcontractor as there is the risk of fire,
electric shock, explosion or injury.
A large enough opening for the air conditioner.Installation
parts are supplied for double-hung windows.
Make sure the ceiling/wall is strong enough to bear the
weight of the unit.
Adequate wall support for weight of air conditioner.
Follow all the installation instructions to minimize the risk
of damage from earthquakes, typhoons or strong winds.
Avoid contact between refrigerant and fire as it generates
poisonous gas.
Apply specified refrigerant only. Never have it mixed with
any other refrigerant. Never have air remain in the
refrigerant line as it may lead to rupture and other hazards.
Make sure no refrigerant gas is leaking out when installation is completed.
Should there be refrigerant leakage, the density of refrigerant in the air shall in no way exceed its limited value,
or it may lead to explosion.
Keep your fingers and clothing away from any moving
parts.
Clear the site after installation. Make sure no foreign objects are left in the unit.
Always ensure effective grounding for the unit.
Caution
Never install the unit in a place where a combustible gas
might leak, or it may lead to fire or explosion.
Make a proper provision against noise when the unit is
installed at a telecommunication center or hospital.
Provide an electric leak breaker when it is installed in a
watery place.
Never wash the unit with water.
Handle unit transportation with care. The unit should not
be carried by only one person if it is more than 20kg.
Never touch the heat exchanger fins with bare hands.
Never touch the compressor or refrigerant piping without
wearing glove.
Do not have the unit operate without air filter.
Should any emergency occur, stop the unit and disconnect the power immediately.
Properly insulate any tubing running inside the room to
prevent the water from damaging the wall.
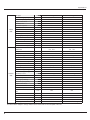
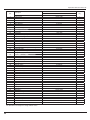
6SHFL¿FDWLRQV
6SHFL¿FDWLRQV
3DUDPHWHU
8QLW
9̚
*-+$).51%'
*-+$).51'$
&&
&&
+]
0RGHO
*-&$).51%'
3URGXFW&RGH
3RZHU
6XSSO\
9DOXH
5DWHG9ROWDJH
5DWHG)UHTXHQF\
&&
3KDVHV
&RROLQJ&DSDFLW\
:
+HDWLQJ&DSDFLW\
:
&RROLQJ3RZHU,QSXW
:
+HDWLQJ3RZHU,QSXW
:
&RROLQJ3RZHU&XUUHQW
$
+HDWLQJ3RZHU&XUUHQW
$
5DWHG,QSXW
:
5DWHG&XUUHQW
$
PK
$LU)ORZ9ROXPH+0/
'HKXPLGLI\LQJ9ROXPH
/K
((5
::
&23
::
P
7
7
$SSOLFDWLRQ$UHD
&OLPDWH7\SH
,VRODWLRQ
,
,
,3
,3
03D
03D
'LPHQVLRQ:;+;'
PP
;;
;;
'LPHQVLRQRI&DUWRQ%R[/;:;+
PP
;;
;;
'LPHQVLRQRI3DFNDJH/;:;+
PP
;;
;;
1HW:HLJKW
NJ
*URVV:HLJKW
NJ
5$
5$
0RLVWXUH3URWHFWLRQ
3HUPLVVLEOH([FHVVLYH2SHUDWLQJ3UHVVXUHIRU
WKH'LVFKDUJH6LGH
3HUPLVVLEOH([FHVVLYH2SHUDWLQJ3UHVVXUHIRU
WKH6XFWLRQ6LGH
5HIULJHUDQW
5HIULJHUDQW&KDUJH
NJ
6SHFL¿FDWLRQV
)DQ7\SH
&HQWULIXJDO
&HQWULIXJDO
'LDPHWHU/HQJWK';/
PP
ĭ;
ĭ;
)DQ0RWRU6SHHG+0/
UPLQ
:
)DQ0RWRU5/$
$
)DQ0RWRU&DSDFLWRU
ȝ)
,QSXWRI+HDWHU
:
2XWSXWRI)DQ0RWRU
,QGRRU
6LGH
(YDSRUDWRU)RUP
$OXPLQXP)LQFRSSHU7XEH
$OXPLQXP)LQFRSSHU7XEH
3LSH'LDPHWHU
PP
ĭ
ĭ
5RZ¿Q*DS
PP
&RLO/HQJWK/;';:
PP
;;
;;
039$
039$
6ZLQJ0RWRU0RGHO
2XWSXWRI6ZLQJ0RWRU
:
)XVH
$
6RXQG3UHVVXUH/HYHO+0/
G%$
6RXQG3RZHU/HYHO+0/
&RPSUHVVRU0DQXIDFWXUHU
G%$
=+8+$,/$1'$&2035(6625 =+8+$,/$1'$&2035(6625
&2/7'
&2/7'
7UDGHPDUN
&RPSUHVVRU0RGHO
4;$%&
4;$%&
5%(3
5%(3
5RWDU\
5RWDU\
$
&RPSUHVVRU5/$
$
&RPSUHVVRU3RZHU,QSXW
:
&RPSUHVVRU2LO
&RPSUHVVRU7\SH
/5$
2YHUORDG3URWHFWRU
,QWHUQDO
,QWHUQDO
7KURWWOLQJ0HWKRG
&DSLOODU\
&DSLOODU\
2SHUDWLRQ7HPS
&
a
a
$PELHQW7HPS&RROLQJ
&
a
a
$PELHQW7HPS+HDWLQJ
&
2XWGRRU &RQGHQVHU)RUP
6LGH
3LSH'LDPHWHU
a
$OXPLQXP)LQFRSSHU7XEH
$OXPLQXP)LQFRSSHU7XEH
PP
ĭ
ĭ
PP
&RLO/HQJWK/;';:
PP
;;
;;
)DQ0RWRU6SHHG+0/
USP
5RZV¿Q*DS
2XWSXWRI)DQ0RWRU
:
)DQ0RWRU5/$
$
)DQ0RWRU&DSDFLWRU
$LU)ORZ9ROXPHRI2XWGRRU
ȝ)
PK
6LGH
)DQ7\SH
$[LDOÀRZ
$[LDOÀRZ
PP
ĭ
ĭ
6RXQG3UHVVXUH/HYHO+0/
G%$
6RXQG3RZHU/HYHO+0/
G%$
$XWRPDWLF'HIURVWLQJ
)DQ'LDPHWHU
'HIURVWLQJ0HWKRG
7KHDERYHGDWDLVVXEMHFWWRFKDQJHZLWKRXWQRWLFH3OHDVHUHIHUWRWKHQDPHSODWHRIWKHXQLW
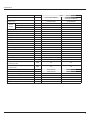
6SHFL¿FDWLRQV
3DUDPHWHU
8QLW
9̚
*-+$).51%'
*-+$).51'$
&&
&&
+]
0RGHO
*-&$).51%'
3URGXFW&RGH
3RZHU
6XSSO\
9DOXH
5DWHG9ROWDJH
5DWHG)UHTXHQF\
&&
3KDVHV
&RROLQJ&DSDFLW\
:
+HDWLQJ&DSDFLW\
:
&RROLQJ3RZHU,QSXW
:
+HDWLQJ3RZHU,QSXW
:
&RROLQJ3RZHU&XUUHQW
$
+HDWLQJ3RZHU&XUUHQW
$
5DWHG,QSXW
:
5DWHG&XUUHQW
$
$LU)ORZ9ROXPH+0/
P K
/K
((5
::
&23
::
7
7
'HKXPLGLI\LQJ9ROXPH
$SSOLFDWLRQ$UHD
P
&OLPDWH7\SH
,VRODWLRQ
,
,
,3
,3
03D
03D
'LPHQVLRQ:;+;'
PP
;;
;;
'LPHQVLRQRI&DUWRQ%R[/;:;+
PP
;;
;;
'LPHQVLRQRI3DFNDJH/;:;+
PP
;;
;;
1HW:HLJKW
NJ
*URVV:HLJKW
NJ
5$
5$
0RLVWXUH3URWHFWLRQ
3HUPLVVLEOH([FHVVLYH2SHUDWLQJ3UHVVXUHIRU
WKH'LVFKDUJH6LGH
3HUPLVVLEOH([FHVVLYH2SHUDWLQJ3UHVVXUHIRU
WKH6XFWLRQ6LGH
5HIULJHUDQW
5HIULJHUDQW&KDUJH
NJ
6SHFL¿FDWLRQV
)DQ7\SH
,QGRRU
6LGH
&HQWULIXJDO
'LDPHWHU/HQJWK';/
PP
ĭ;
ĭ;
)DQ0RWRU6SHHG+0/
UPLQ
2XWSXWRI)DQ0RWRU
:
)DQ0RWRU5/$
$
)DQ0RWRU&DSDFLWRU
ȝ)
,QSXWRI+HDWHU
:
$OXPLQXP)LQFRSSHU7XEH
$OXPLQXP)LQFRSSHU7XEH
ĭ
ĭ
(YDSRUDWRU)RUP
3LSH'LDPHWHU
PP
5RZ¿Q*DS
PP
&RLO/HQJWK/;';:
PP
;;
;;
039$
039$
6ZLQJ0RWRU0RGHO
2XWSXWRI6ZLQJ0RWRU
:
)XVH
$
6RXQG3UHVVXUH/HYHO+0/
G%$
6RXQG3RZHU/HYHO+0/
&RPSUHVVRU0DQXIDFWXUHU
G%$
=+8+$,/$1'$&2035(6625 =+8+$,/$1'$&2035(6625
&2/7'
&2/7'
7UDGHPDUN
&RPSUHVVRU0RGHO
&RPSUHVVRU2LO
&RPSUHVVRU7\SH
4;$%&
4;$%&
5%(3
5%(3
5RWDU\
5RWDU\
/5$
$
&RPSUHVVRU5/$
$
&RPSUHVVRU3RZHU,QSXW
:
2YHUORDG3URWHFWRU
,QWHUQDO
,QWHUQDO
7KURWWOLQJ0HWKRG
&DSLOODU\
&DSLOODU\
2SHUDWLRQ7HPS
&
a
a
$PELHQW7HPS&RROLQJ
&
a
a
$PELHQW7HPS+HDWLQJ
&
2XWGRRU &RQGHQVHU)RUP
6LGH
3LSH'LDPHWHU
a
$OXPLQXP)LQFRSSHU7XEH
$OXPLQXP)LQFRSSHU7XEH
PP
ĭ
ĭ
PP
&RLO/HQJWK/;';:
PP
;;
;;
)DQ0RWRU6SHHG+0/
USP
5RZV¿Q*DS
2XWSXWRI)DQ0RWRU
:
)DQ0RWRU5/$
$
)DQ0RWRU&DSDFLWRU
$LU)ORZ9ROXPHRI2XWGRRU
ȝ)
$[LDOÀRZ
$[LDOÀRZ
PP
ĭ
ĭ
6RXQG3UHVVXUH/HYHO+0/
G%$
6RXQG3RZHU/HYHO+0/
G%$
$XWRPDWLF'HIURVWLQJ
6LGH
)DQ7\SH
)DQ'LDPHWHU
'HIURVWLQJ0HWKRG
P K
7KHDERYHGDWDLVVXEMHFWWRFKDQJHZLWKRXWQRWLFH3OHDVHUHIHUWRWKHQDPHSODWHRIWKHXQLW
&HQWULIXJDO
6SHFL¿FDWLRQV
3DUDPHWHU
8QLW
9DOXH
9̚
*-+$'.51%'
*-+$'.51'$
&&
&&
+]
&RROLQJ&DSDFLW\
:
+HDWLQJ&DSDFLW\
:
&RROLQJ3RZHU,QSXW
:
+HDWLQJ3RZHU,QSXW
:
&RROLQJ3RZHU&XUUHQW
$
0RGHO
*-&$'.51%'
3URGXFW&RGH
3RZHU
6XSSO\
5DWHG9ROWDJH
5DWHG)UHTXHQF\
&&
3KDVHV
+HDWLQJ3RZHU&XUUHQW
$
5DWHG,QSXW
:
5DWHG&XUUHQW
$LU)ORZ9ROXPH+0/
'HKXPLGLI\LQJ9ROXPH
$
PK
/K
((5
::
&23
::
P
7
7
$SSOLFDWLRQ$UHD
&OLPDWH7\SH
,VRODWLRQ
,
,
,3
,3
03D
03D
'LPHQVLRQ:;+;'
PP
;;
;;
'LPHQVLRQRI&DUWRQ%R[/;:;+
PP
;;
;;
'LPHQVLRQRI3DFNDJH/;:;+
PP
;;
;;
1HW:HLJKW
NJ
*URVV:HLJKW
NJ
5$
5$
0RLVWXUH3URWHFWLRQ
3HUPLVVLEOH([FHVVLYH2SHUDWLQJ3UHVVXUHIRU
WKH'LVFKDUJH6LGH
3HUPLVVLEOH([FHVVLYH2SHUDWLQJ3UHVVXUHIRU
WKH6XFWLRQ6LGH
5HIULJHUDQW
5HIULJHUDQW&KDUJH
NJ
6SHFL¿FDWLRQV
)DQ7\SH
&HQWULIXJDO
&HQWULIXJDO
'LDPHWHU/HQJWK';/
PP
ĭ;
ĭ;
)DQ0RWRU6SHHG+0/
UPLQ
:
)DQ0RWRU5/$
$
)DQ0RWRU&DSDFLWRU
ȝ)
,QSXWRI+HDWHU
:
2XWSXWRI)DQ0RWRU
,QGRRU
6LGH
(YDSRUDWRU)RUP
$OXPLXP7XEH
$OXPLXP7XEH
3LSH'LDPHWHU
PP
ĭ
ĭ
5RZ¿Q*DS
PP
&RLO/HQJWK/;';:
PP
;;
;;
03('
03('
6ZLQJ0RWRU0RGHO
2XWSXWRI6ZLQJ0RWRU
:
)XVH
$
6RXQG3UHVVXUH/HYHO+0/
G%$
6RXQG3RZHU/HYHO+0/
&RPSUHVVRU0DQXIDFWXUHU
G%$
=+8+$,/$1'$&2035(6625 =+8+$,/$1'$&2035(6625
&2/7'
&2/7'
7UDGHPDUN
&RPSUHVVRU0RGHO
&RPSUHVVRU2LO
&RPSUHVVRU7\SH
/5$
$
4;$&%$
4;$&%$
5%(3
5%(3
5RWDU\
5RWDU\
&RPSUHVVRU5/$
$
&RPSUHVVRU3RZHU,QSXW
:
83+3$
83+3$
&DSLOODU\
&DSLOODU\
2YHUORDG3URWHFWRU
7KURWWOLQJ0HWKRG
2SHUDWLRQ7HPS
&
a
a
$PELHQW7HPS&RROLQJ
&
a
a
$PELHQW7HPS+HDWLQJ
&
2XWGRRU &RQGHQVHU)RUP
6LGH
3LSH'LDPHWHU
PP
a
$OXPLQXP)LQFRSSHU7XEH
$OXPLQXP)LQFRSSHU7XEH
ĭ
ĭ
5RZV¿Q*DS
PP
&RLO/HQJWK/;';:
PP
;;
;;
)DQ0RWRU6SHHG+0/
USP
2XWSXWRI)DQ0RWRU
:
)DQ0RWRU5/$
$
)DQ0RWRU&DSDFLWRU
$LU)ORZ9ROXPHRI2XWGRRU
ȝ)
PK
6LGH
)DQ7\SH
$[LDOÀRZ
$[LDOÀRZ
PP
ĭ
ĭ
6RXQG3UHVVXUH/HYHO+0/
G%$
6RXQG3RZHU/HYHO+0/
G%$
$XWRPDWLF'HIURVWLQJ
)DQ'LDPHWHU
'HIURVWLQJ0HWKRG
7KHDERYHGDWDLVVXEMHFWWRFKDQJHZLWKRXWQRWLFH3OHDVHUHIHUWRWKHQDPHSODWHRIWKHXQLW
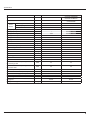
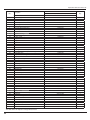
6SHFL¿FDWLRQV
3DUDPHWHU
8QLW
9̚
*-+$&.51%'
*-+$&.51'$
&&
&&
+]
0RGHO
*-&$&.51%'
3URGXFW&RGH
3RZHU
6XSSO\
9DOXH
5DWHG9ROWDJH
5DWHG)UHTXHQF\
&&
3KDVHV
&RROLQJ&DSDFLW\
:
+HDWLQJ&DSDFLW\
:
&RROLQJ3RZHU,QSXW
:
+HDWLQJ3RZHU,QSXW
:
&RROLQJ3RZHU&XUUHQW
$
+HDWLQJ3RZHU&XUUHQW
$
5DWHG,QSXW
:
5DWHG&XUUHQW
$
PK
/K
((5
::
&23
::
P
7
7
,
,
,3
,3
03D
03D
'LPHQVLRQ:;+;'
PP
;;
;;
'LPHQVLRQRI&DUWRQ%R[/;:;+
PP
;;
;;
'LPHQVLRQRI3DFNDJH/;:;+
PP
;;
;;
1HW:HLJKW
NJ
*URVV:HLJKW
NJ
5$
5$
$LU)ORZ9ROXPH+0/
'HKXPLGLI\LQJ9ROXPH
$SSOLFDWLRQ$UHD
&OLPDWH7\SH
,VRODWLRQ
0RLVWXUH3URWHFWLRQ
3HUPLVVLEOH([FHVVLYH2SHUDWLQJ3UHVVXUHIRU
WKH'LVFKDUJH6LGH
3HUPLVVLEOH([FHVVLYH2SHUDWLQJ3UHVVXUHIRU
WKH6XFWLRQ6LGH
5HIULJHUDQW
5HIULJHUDQW&KDUJH
NJ
6SHFL¿FDWLRQV
)DQ7\SH
&HQWULIXJDO
&HQWULIXJDO
'LDPHWHU/HQJWK';/
PP
ĭ;
ĭ;
)DQ0RWRU6SHHG+0/
UPLQ
:
)DQ0RWRU5/$
$
)DQ0RWRU&DSDFLWRU
ȝ)
,QSXWRI+HDWHU
:
2XWSXWRI)DQ0RWRU
,QGRRU
6LGH
(YDSRUDWRU)RUP
$OXPLQXP)LQFRSSHU7XEH
$OXPLQXP)LQFRSSHU7XEH
3LSH'LDPHWHU
PP
ĭ
ĭ
5RZ¿Q*DS
PP
&RLO/HQJWK/;';:
PP
;;
;;
03('
03('
6ZLQJ0RWRU0RGHO
2XWSXWRI6ZLQJ0RWRU
:
)XVH
$
6RXQG3UHVVXUH/HYHO+0/
G%$
6RXQG3RZHU/HYHO+0/
&RPSUHVVRU0DQXIDFWXUHU
G%$
=+8+$,/$1'$&2035(6625 =+8+$,/$1'$&2035(6625
&2/7'
&2/7'
7UDGHPDUN
&RPSUHVVRU0RGHO
&RPSUHVVRU2LO
&RPSUHVVRU7\SH
4;$))
4;$))
5%(3
5%(3
5RWDU\
5RWDU\
/5$
$
&RPSUHVVRU5/$
$
&RPSUHVVRU3RZHU,QSXW
:
2YHUORDG3URWHFWRU
,QWHUQDO
,QWHUQDO
7KURWWOLQJ0HWKRG
&DSLOODU\
&DSLOODU\
2SHUDWLRQ7HPS
&
a
a
$PELHQW7HPS&RROLQJ
&
a
a
$PELHQW7HPS+HDWLQJ
&
2XWGRRU &RQGHQVHU)RUP
6LGH
3LSH'LDPHWHU
a
$OXPLQXP)LQFRSSHU7XEH
$OXPLQXP)LQFRSSHU7XEH
PP
ĭ
ĭ
PP
&RLO/HQJWK/;';:
PP
;;
;;
)DQ0RWRU6SHHG+0/
USP
5RZV¿Q*DS
2XWSXWRI)DQ0RWRU
:
)DQ0RWRU5/$
$
)DQ0RWRU&DSDFLWRU
$LU)ORZ9ROXPHRI2XWGRRU
ȝ)
PK
6LGH
)DQ7\SH
$[LDOÀRZ
$[LDOÀRZ
PP
ĭ
ĭ
6RXQG3UHVVXUH/HYHO+0/
G%$
6RXQG3RZHU/HYHO+0/
G%$
$XWRPDWLF'HIURVWLQJ
)DQ'LDPHWHU
'HIURVWLQJ0HWKRG
7KHDERYHGDWDLVVXEMHFWWRFKDQJHZLWKRXWQRWLFH3OHDVHUHIHUWRWKHQDPHSODWHRIWKHXQLW
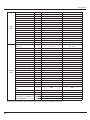
6SHFL¿FDWLRQV
3DUDPHWHU
8QLW
9̚
*-+$&.51%'
*-+$&.51'$
&&
&&
+]
0RGHO
*-&$&.51%'
3URGXFW&RGH
3RZHU
6XSSO\
9DOXH
5DWHG9ROWDJH
5DWHG)UHTXHQF\
&&
3KDVHV
&RROLQJ&DSDFLW\
:
+HDWLQJ&DSDFLW\
:
&RROLQJ3RZHU,QSXW
:
+HDWLQJ3RZHU,QSXW
:
&RROLQJ3RZHU&XUUHQW
$
+HDWLQJ3RZHU&XUUHQW
$
5DWHG,QSXW
:
5DWHG&XUUHQW
$
PK
/K
((5
::
&23
::
7
7
$LU)ORZ9ROXPH+0/
'HKXPLGLI\LQJ9ROXPH
$SSOLFDWLRQ$UHD
P
&OLPDWH7\SH
,VRODWLRQ
,
,
,3
,3
03D
03D
'LPHQVLRQ:;+;'
PP
;;
;;
'LPHQVLRQRI&DUWRQ%R[/;:;+
PP
;;
;;
'LPHQVLRQRI3DFNDJH/;:;+
PP
;;
;;
1HW:HLJKW
NJ
*URVV:HLJKW
NJ
5$
5$
0RLVWXUH3URWHFWLRQ
3HUPLVVLEOH([FHVVLYH2SHUDWLQJ3UHVVXUHIRU
WKH'LVFKDUJH6LGH
3HUPLVVLEOH([FHVVLYH2SHUDWLQJ3UHVVXUHIRU
WKH6XFWLRQ6LGH
5HIULJHUDQW
5HIULJHUDQW&KDUJH
NJ
6SHFL¿FDWLRQV
)DQ7\SH
,QGRRU
6LGH
&HQWULIXJDO
'LDPHWHU/HQJWK';/
PP
ĭ;
ĭ;
)DQ0RWRU6SHHG+0/
UPLQ
2XWSXWRI)DQ0RWRU
:
)DQ0RWRU5/$
$
)DQ0RWRU&DSDFLWRU
ȝ)
,QSXWRI+HDWHU
:
$OXPLQXP)LQFRSSHU7XEH
$OXPLQXP)LQFRSSHU7XEH
ĭ
ĭ
(YDSRUDWRU)RUP
3LSH'LDPHWHU
PP
5RZ¿Q*DS
PP
&RLO/HQJWK/;';:
PP
;;
;;
03('
03('
6ZLQJ0RWRU0RGHO
2XWSXWRI6ZLQJ0RWRU
)XVH
:
$
6RXQG3UHVVXUH/HYHO+0/
G%$
6RXQG3RZHU/HYHO+0/
&RPSUHVVRU0DQXIDFWXUHU
G%$
=+8+$,/$1'$&2035(6625 =+8+$,/$1'$&2035(6625
&2/7'
&2/7'
7UDGHPDUN
&RPSUHVVRU0RGHO
&RPSUHVVRU2LO
&RPSUHVVRU7\SH
/5$
$
4;$))
4;$))
5%(3
5%(3
5RWDU\
5RWDU\
&RPSUHVVRU5/$
$
&RPSUHVVRU3RZHU,QSXW
:
,QWHUQDO
,QWHUQDO
2YHUORDG3URWHFWRU
7KURWWOLQJ0HWKRG
&DSLOODU\
&DSLOODU\
2SHUDWLRQ7HPS
&
a
a
$PELHQW7HPS&RROLQJ
&
a
a
$PELHQW7HPS+HDWLQJ
&
a
$OXPLQXP)LQFRSSHU7XEH
$OXPLQXP)LQFRSSHU7XEH
ĭ
ĭ
2XWGRRU &RQGHQVHU)RUP
6LGH
3LSH'LDPHWHU
PP
5RZV¿Q*DS
PP
&RLO/HQJWK/;';:
PP
;;
;;
)DQ0RWRU6SHHG+0/
USP
:
)DQ0RWRU5/$
$
)DQ0RWRU&DSDFLWRU
$LU)ORZ9ROXPHRI2XWGRRU
ȝ)
PK
$[LDOÀRZ
$[LDOÀRZ
2XWSXWRI)DQ0RWRU
6LGH
)DQ7\SH
)DQ'LDPHWHU
PP
ĭ
ĭ
6RXQG3UHVVXUH/HYHO+0/
G%$
6RXQG3RZHU/HYHO+0/
G%$
$XWRPDWLF'HIURVWLQJ
'HIURVWLQJ0HWKRG
7KHDERYHGDWDLVVXEMHFWWRFKDQJHZLWKRXWQRWLFH3OHDVHUHIHUWRWKHQDPHSODWHRIWKHXQLW
&HQWULIXJDO
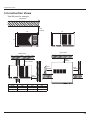
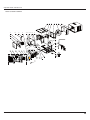
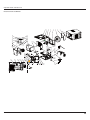
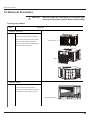
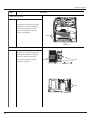
&RQVWUXFWLRQ9LHZV
&RQVWUXFWLRQ9LHZV
7DNH%SDQHOIRUH[DPSOH
( Front View)
Over
150 mm
W
D
H
(Top View)
(Side View)
Over
500 mm
Over 150mm
Over
150mm
Over
150mm
Over
500mm
0RGHO
.
.
.
:PP
+PP
'PP
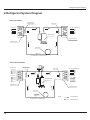
5HIULJHUDQW6\VWHP'LDJUDP
5HIULJHUDQW6\VWHP'LDJUDP
&RRORQO\PRGHOV
CENTRIFUGAL
OR CROSS FAN
AXIAL FAN
COOLED AIR
HOT DISCHARGED AIR
COMPRESSOR
OUTDOOR COILS
INDOOR COILS
CAPILLARY
REFRIGERANT FLOW DIRECTION
&RRODQGKHDWPRGHOV
COOLED AIR
CENTRIFUGAL
OR CROSS FAN
AXIAL FAN
HOT DISCHARGED AIR
HOT AIR
COOLED AIR
COMPRESSOR
INDOOR COILS
OUTDOOR COILS
CAPILLARY
NOTES:
REFRIGERANT FLOW DIRECTION
COOLING MODE
HEATING MODE
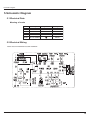
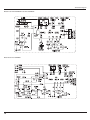
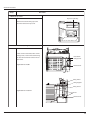
6FKHPDWLF'LDJUDP
6FKHPDWLF'LDJUDP
(OHFWULFDO'DWD
0HDQLQJRIPDUNV
Symbol
OG
VT
WH
YE
RD
Color symbol
ORANGE
VIOLET
WHITE
YELLOW
RED
YEGN YELLOW GREEN
Symbol
BN
BU
BK
Symbol
COMP
Color symbol
BROWN
BLUE
BLACK
Parts name
COMPRESSOR
PROTECTIVE
EARTH
(OHFWULFDO:LULQJ
0RGHOV*-&$).51%'*-&$).51%'
6FKHPDWLF'LDJUDP
0RGHOV*-&$'.51%'*-&$&.51%'
0RGHO*-&$&.51%'
1
5
4
6
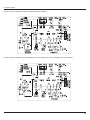
6FKHPDWLF'LDJUDP
0RGHOV*-+$).51%'*-+$).51%'*-+$).51'$
0RGHOV*-+$).51'$*-+$'.51%'*-+$'.51'$*-+$&.51%'*-+$&.51'$
6FKHPDWLF'LDJUDP
0RGHO*-+$&.51%'*-+$&.51'$
1
5
4
6
7KHVHFLUFXLWGLDJUDPVDUHVXEMHFWWRFKDQJHZLWKRXWQRWLFHSOHDVHUHIHUWRWKHRQHVXSSOLHGZLWKWKHXQLW
6FKHPDWLF'LDJUDP
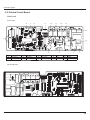
3ULQWHG&LUFXLW%RDUG
0DLQERDUG
Ɣ7239,(:
6
7
8
9
10
11
12
13
14
5
15
4
☿㒓䕧ܹ
ㅵ⏽ᛳ⏽ࣙ
亢ᴎ 催亢䗳ḷ ֱ䰽ㅵ
⦃๗ᛳ⏽ࣙ
亢ᴎ Ё亢䗳ḷ 9 ⬉⑤䕧ܹ
ㅵᛳ⏽ࣙ
亢ᴎ Ԣ亢䗳ḷ 3
㳖号఼
ᠿ亢
䳊㒓
2
1
ᰒ⼎ᵓষ
ಯ䗮䯔
⬉⑤ᵓ⬉⑤ষ
Ɣ%277209,(:
6FKHPDWLF'LDJUDP
'LVSOD\ERDUG
Ɣ7239,(:
16 15 1413
17 18
No.
1
Name
Board connection wire,
connect mainboard
1
2
Name
No.
Name
7
Mode selection button
13
No.
20
21
10 9 8
3
Medium
4
fan
speed
indicator
7
6
5
No.
Name
19
Filter cleaning button
2
“-“ decreasing button
8
Cooling indicator
14
Swing button
20
Filter cleaning indicator
3
Timer indicator
9
ON/OFF button
15
High fan speed indicator
21
“+” increasing button
4
Timer button
10
Dry indicator
16
Fan speed button
22
/
5
Heating indicator
11
Dual-8 nixie tube
17
Low fan speed indicator
23
/
6
Blow indicator
12
Infrared receiver
18
Auto mode
24
/
Ɣ%277209,(:
19
12 11
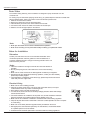
)XQFWLRQDQG&RQWURO
)XQFWLRQDQG&RQWURO
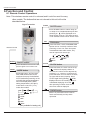
5HPRWH&RQWURO2SHUDWLRQV
Note: This wireless remote control is universal,and it could be used for many
other models. The buttons that are not relevant to this unit will not be
described below.
Signal Transmitter
SLEEP
SLEEP button
Press SLEEP button to select sleep on
or sleep off. It is defaulted sleep off after
powering on.
will be displayed once
sleep function is set on. The sleep function
is not available under FAN or AUTO mode.
FAN
FAN button
Press this button, AUTO,LOW,MED,HIGH
speed can be circularly selected. After
powering on the unit, auto fan speed
is defaulted.Under DRY mode, only
low fan speed can be set up.
Remote Control
AUTO
LOW
ON/OFF
HIGH
ON/OFF button
Press this button to turn on the unit,
press it again to turn off the unit.
MODE
MED
MODE button
Press this button, AUTO,COOL,
DRY,FAN,HEAt mode can be
selected circularly.It is defaulted
AUTO mode after powering on the
unit while the setting temperature
will not be displayed.The initial
setting temperature is 28℃(82 F)
under HEAT mode, 25℃ (77 F)
under other modes.
o
o
CLOCK
CLOCK button
Press this button, the clock can be set up,
blinks and displays.Within 5
seconds, the value can be adjusted by
pressing + or - button,if consecutively
press this button for more than 2 seconds,
the value will be fast increasing. Press
CLOCK again during blinking,
will be
displayed and the clock setting is done. It
is defaulted displaying 12:00 and
after powering on.Either clock time or
timer time could be displayed.
SWING button
AUTO
COOL
When it is pressed,the louvers start to
rotate automatically and stop when
repressed.
DRY
FAN
HEAT
(Only available for heating unit)
)XQFWLRQDQG&RQWURO
Note: This wireless remote control is universal,and it could be used for many
other models. The buttons that are not relevant to this unit will not be
described below.
+
+ button
Press this button to increase setting
temperature,hold for more than 2 seconds
to rapidly increase setting temperature.In
AUTO mode,setting temperature is not
adjustable.Setting temperature Range of
Celsius degree:16-30ć,Fahrenheit degree:
61-86 F.
o
-
Press this button to decrease setting
temperature,hold for more than 2 seconds
to rapidly decrease setting temperature.
In AUTO mode,setting temperature is
not adjustable.
Remote Control
ENERGY
SAVER
TIMER
ON
ENERGY SAVER button
TIMER ON button
At unit off,press TIMER ON button,HOUR
ON will blink and display,
will be
concealed in the TIMER ON setting.During
5 seconds blinking,the value can be
adjusted by pressing + or - button,every
press of this button,0.5hour will be increased
or decreased,by continuous pressing the +
or - button,2 seconds later,the value will be
changed quickly,0.5hour will be changed in
every 0.25second automatically by the
remote control.During blinking,press the
TIMER ON button to confirm the time.After
TIMER ON set up,with repressing the TIMER
ON button,the TIMER ON setting will be
canceled.After powered on,no timer is
defaulted, HOUR ON(OFF)will not display,
and only the clock is displayed.After the timer
reached the setting time,HOUR ON(OFF)
will conceal.Before setting the timer,please
adjust the clock to the current actual time.
Under the COOL and DRY mode,
press this button once, the unit will
enter ENERGY SAVER mode.Press
this button again, the unit will exit
ENERGY SAVER mode.
LIGHT
- button
LIGHT button
Press this button to turn ON or OFF
the light or display on the unit.
The light or display is defaulted on
after powering on the unit.
TIMER
OFF
TIMER OFF button
At unit on,press TIMER OFF button to enter
into TIMER OFF setting.The method of setting
up is the same as TIMER ON.
)XQFWLRQDQG&RQWURO
Guide for Operation - General Operation
1. After powering on,press ON/OFF button,the unit will start to run.(Note:When
it is powered on,the guide louver of indoor unit will close automatically.)
2. Press MODE button to select desired running mode.
3. Pressing + or - button, to set the desired temperature.
4. Press FAN button to set AUTO,LOW,MED or HIGH fan speed.
5. Pressing
button, to select the swing.
Guide for Operation - Optional Operation
1. Press SLEEP button, to set sleep.
2. Press TIMER ON and TIMER OFF button,to set the scheduled timer on
or timer off.
3. Press LIGHT button, to control the on and off of the light or display
on the unit.
4. Press ENERGY SAVER button to activate the function.
Introduction for Special Function
About AUTO mode
When AUTO mode is selected,the setting temperature will not be displayed on the
remote control,the unit will be in accordance with the room temperature,and automatically
select the suitable running method to make ambient comfortable.
About Lock
Press + and - buttons simultaneously to lock or unlock the keyboard of the remote control.
If the keyboard is locked,
will be displayed on it,press any button,
will blink
three times. If the keyboard is unlocked, the
will not display.
About Switch Between Fahrenheit and Centigrade
At unit off,press MODE and - button simultaneously to switch between ć and ̧.
)XQFWLRQDQG&RQWURO
Changing Batteries
1. Slightly press the place with
,and push the cover along the arrow.
2. Take out the used batteries. (As show in figure)
3. Insert two new AAA1.5V batteries,and pay attention to the polarity.
(As show in figure)
2
4. Push the back cover of remote control.(As show inf figure)
NOTE:
When changing the batteries, do not mix used and new batteries,
do not mix different batteries,otherwise, it can cause the malfunction
of the remote control.
1
3
Notices
If the remote control will not be used for a long time,please take out
batteries to prevent any damage from liquid leakage.
4
The operation should be in its receiving range.
It should be placed 1m away from the TV or stereo sound sets.
If the remote control can not work normally, please take out the
batteries,then reinsert 30S after, if it does not run normally,change the
batteries.
Be sure that there are no obstructions between receiver and remote
control,Don't drop or throw the remote control,Don't let any liquid get
into the remote control or put the remote control directly under the
sunlight or any place where is very hot.
Sketch map for
changing batteries
)XQFWLRQDQG&RQWURO
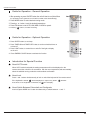
5HPRWH&RQWURO3DQHO
Note:If wireless remote controller is lost, open the surface panel and operate manually.
1
2
POWER BUTTON
Operation starts when pressing this button, and stops
when pressing this button again.
SWING BUTTON
Activate the automatic air swing function.
3
FAN SPEED BUTTON
Select the fan speed HIGH, MID, LOW and AUTO in sequence.
4
TEMP/TIMER BUTTON
Press the
keypad to increase the set (operating)
temperature of the unit.and Press the keypad to
decrease the set (operating) temperature of the unit.
The temperature seting range is from 16~30ć
Press the
keypad also to increase the selected time
in 1 hour increments,and Press the
keypad to
decrease the selected time in 1 hour decrements,The
time seting range is from 0~24 hours.
5
SIGNAL RECEIVER
6
MODE BUTTON
Select the operation mode, AUTO, HEAT, COOL, FAN,
DRY (for reverse cycle model) or AUTO,COOL,FAN, DRY
(for cooling only model).
7
FILTER BUTTON
This feature is a reminder to clean the Air Filter (See
Care and Cleaning) for more efficient operation and
cooling. The LED (light) will illuminate after 250 hours
of operation. To reset after cleaning the filter, press the
"Check Filter" button and the light will go off.
VENTILATION LEVER
When the slider at the:
CLOSE
VENT
OPEN
-"OPEN" position,the ventilation door
opens to allow air,smoke or odors to
be expelled from the room.
When the slider at the:
CLOSE
VENT
OPEN
-"CLOSE" position,the ventilation door
is closed and the air will be circulated
inside the room and conditioned.
Ventilation Lever
)XQFWLRQDQG&RQWURO
'HVFULSWLRQRI(DFK&RQWURO2SHUDWLRQ
1 Basic Function
1.1 Cooling mode
1.1.1 Cooling condition and process
a. When Tindoor amb. Tpreset+1
2
, the unit operates in cooling mode. Meanwhile, compressor and outdoor
fan operate and indoor fan operates at set fan speed.
b. When Tindoor amb. Tpreset-1
2
, compressor and outdoor fan stop operation, while indoor fan operates at
set fan speed.
c. When Tpreset-1
2
<Tindoor amb.<Tpreset+1
2
, the unit keeps original operation status.
61 ~86
1.1.2 In this mode, the set temperature range is 16 ~30
1.2 Dry Mode
Dry Conditions and Process
a. When Tamb.
Tpreset+2
b. When Tpreset-2
(4 ), the unit will operate in Cool mode, and the fan will run at low speed.
(4 ) Tamb. Tpreset+2
(4
), the unit will operate in Dry mode. In that case, the indoor fan will operate
at low speed. The compressor and the outdoor fan will stop for 6 min and operate for 4min circularly.
c. When Tamb.
Tpreset-4 (2 ), the compressor will stop working and the fan will operate at low speed.
Under this mode, the setting temperature range is 16~30
61~86
1.3 Energy saving mode
1.3.1 Drying condition and process
a. When Tindoor amb. Tpreset + 1
2
b. When Tindoor amb. Tpreset – 1
2
the compressor will be turned on and the fan will run at set fan speed.
, the compressor will stop operation and the indoor fan will also stop
operation after operating at set fan speed for 60s.
c.When Tpreset – 1
(2
)
Tindoor amb.
Tpreset + 1
1.3.2 In this mode, the set temperature range is 16
~30
2
61
, the unit will keep previous operation status.
~86
.
1.4 Heating mode
1.4.1 When Tindoor amb. Tpreset+1
, the unit will operate at heating mode. Meanwhile, 4-way valve and compressor will
operate. Fan will operate at cold air prevention condition;
1.4.2 When Tindoor amb. Tpreset + 3
6
, compressor will stop operation while 4-way valve will be energized. Fan will
operate at blowing residual heat mode.
1.4.3 When Tpreset + 1
Tindoor amb
Tpreset + 3
1.4.4 Under this mode, the temperature setting range is 16-30
the unit will keep its previous operation status;
(61-86 ).
1.5 Fan mode
a. In this mode, compressor and electric heating pipe will stop operation and fan will operate at set speed.
)XQFWLRQDQG&RQWURO
b. In this mode, the set temperature range is 16 ~30
61 ~86
.
1.6. Auto Mode
Working conditions and process
a. When Tamb. 26
(79
), the unit will operate in Cool mode. Tpreset=25
b. When Tamb. 22
(72
), the heat pump unit will operate at heating mode and the cooling only unit will operate at fan mode;
68
Tpreset=20
When 22
(72
77
;
) Tamb.
26
(79
) , the unit will maintain its previous running state. But if the unit is energized for the first
time, it will operate at fan mode.
2. Other function
2.1 Swing
When the fan operates, if swing is set, the swing motor will operate; When swing stops, the louver will stop in the
position at that time.
2.2 Buzzer
Upon energization or operation, the buzzer will give out sound.
2.3 Sleep function
a.In Cool, Energy-saving or Dry mode, 1 hour after setting Sleep function, Tpreset will increase 1 (2 ); 2hours
later, Tpreset will not increase 2
(4 ) totally. Then, the setting temperature will not change, but the upper limit of
setting temperature is 30 (86 ).
b. In heat mode, 1 hour after setting Sleep function, Tpreset will decrease 1 (2 ); 2hours later, Tpreset will not
decrease 2 (4 ) totally. Then, the setting temperature will not change, but the lower limit of setting temperature is
16
(61 ).
c. In Auto and Fan mode, there is no Sleep function.
d. If Sleep function has been set, the mode change will cancel the Sleep function.
2.4 Auto fan speed
a. Auto fan speed under heating mode or auto fan mode:
Tamb
Tpreset - 2
Tpreset-2
4
4
Tamb.
High speed;
Tpreset
Tamb. Tpreset
Medium speed;
Low speed;
b. Auto fan speed under cooling mode
Tamb Tpreset + 2
Tpreset
Tamb.
Tamb. Tpreset
4
Tpreset + 2
High speed;
4
Medium speed;
Low speed;
)XQFWLRQDQG&RQWURO
b. Auto fan speed under energy saving mode or fan mode is as that under cooling mode.
c. If under dry mode, the auto fan speed will be always low speed. Only LED lamp for low speed is on.
2. 5 Alarm for Cleaning Filter
After the cumulative running of fan reaches 250h, the LED lamp of cleaning filter is on to remind customer of cleaning filter.
2.6 Timer Function
a. Timer on: it can be set when the unit is turned off. Set time range of timer is 0.5h~24h. The interval of each setting
is 0.5h. When timer on is reached, the unit will operate at set mode.
b. Timer off: it can be set when the unit is operating. Set time range of timer is 0.5h~24h. The interval of each setting
is 0.5h.When timer off is reached, the unit will be turned off.
2.7 Memory Function
When the unit is energized again after power failure, it will resume the previous operation status. If the unit is
operating when power failure occurs, the compressor will be started up in 3 min later as the unit is energized again.
2.8 LED lamp, “Dual 8” NixieTube
a. When the unit is operating in cooling mode, LED lamp of cooling will be on.
b. When the unit is operating in fan mode, LED lamp of fan mode will be on and “dual 8” nixie tube will display
ambient temperature. The temperature can’t be adjusted.
c. When the unit is operating at energy-saving mode, there is no LED lamp that will be on and “dual 8”nixie tube will
display ambient temperature. The temperature can be adjusted.
d. Under fan mode, the LED lamp for fan mode will be on while under dry mode, the LED lamp for dry mode will be
on.
e. When fan speed is low, medium or high, the corresponding LED lamp (indicating low, medium or high speed) will
be on. If it is auto fan speed, the LED lamp of auto fan speed will be on.
d. When timer is set, the LED lamp of timer will be on. When the unit is under heating mode, the LED lamp for
heating mode will be on.
2.9 Set Temperature
a. The temperature can be set by button “ UP/DOWN” and the set temperature will be displayed on nixie tube. If
pressing “UP/DOWN” button for long time, the set temperature will be increased rapidly.
b.
or
can be switched on nixie tube by pressing buttons “UP” and “down” simultaneously for 3 seconds.
2.10 Button
a. ON/OFF button is used for turning on or turning off the unit. When the unit is turned off, press this button to turn on
the unit; when the unit is turned off, press this button to turn on the unit.
)XQFWLRQDQG&RQWURO
b. SWING button is used for controlling swing function. If swing function is set, press this button to turn it off. If it is
not set, press this button to turn it on.
c. FANSPEED button is used for adjusting fan speed. The fan speed will be circulated according to the sequence of
AUTO FAN, FANL, FANM, FANH, ATUO FAN.
d. UP, DOWN buttons are used for increasing and decreasing temperature and timer.
e. Mode button is used for mode switching. For heat pump unit, Mode will be circulated according to sequence of
AUTO, COOL, DRY, FAN, HEAT; The HEAT mode signal will be ineffective for cooling only unit and mode will be
circulated according to the sequence of AUTO, COOL, DRY, FAN.
f. Energy-saving mode can only be set by the energy-saving button on remote controller.
g. Sleep function can only be set by the Sleep button on remote controller.
3. Protection Function
3.1 Freeze Protection
When the unit operates at cooling mode, if freeze protection is detected, the compressor will stop operation and
indoor fan will operate at set speed. When freeze protection is removed, the unit will resume previous operation after
3 minutes later.
3.2 Defrosting
When the unit starts defrosting, “H1” is displayed and LED lamp for heating will be off for 3s and blinks once.
3.3Detection of temperature sensor malfunction
a) The ambient temperature sensor is open or short circuit: dual-8 displays F1, the cooling indicator lamp pauses 3s
and blinks 1 time; it is on 0.5s and off 0.5s during blinking.
b) The tube temperature sensor is open or short circuit: dual-8 displays F2, the cooling indicator lamp pauses 3s and
blinks 2 times; it is on 0.5s and off 0.5s during blinking.
c) If malfunctions happened together, the malfunction protection code will be circularly displayed by rotary method.
d) If there is malfunction for temperature sensor, when the unit is on, the compressor or electric heating pipe will stop
operation, the fan will stop when the compressor or electric pipe reaches the temperature point.
,QVWDOODWLRQ,QVWUXFWLRQV
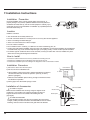
,QVWDOODWLRQ,QVWUXFWLRQV
Installation Precaution
Incorrect installation of the unit may lead to death, personal injury, or
property damage. Only trained, qualified installers and service personnel
are allowed to install, start-up, and service this equipment. Casualty, injury
or damage due to incorrect installation or installation by unqualified personel
will not be assumed by us.
Location
Install the unit where:
● The condensate can be easily drained out.
● It is with a minimum distance of 1m away from TV set or any other electric appliance.
● There is no leakage of inflammable gas.
● There is no other heat source or direct sunlight.
● It is out of reach of children.
● Do not install the unit in a laundry, or a bathroom or around a swimming pool, etc.
● Consult your seller before installation when the unit is to be installed in an area where salt-laden air prevails(close
to coastal areas, etc), the air contains sulphurous gas (in hot spring zones), or there are other special conditions.
● For window type air conditioner with a remote controller, contact your seller when it is to be installed in a place
where there is strong electromagnetic interference.
How to Install
● Choose a location where there is not any obstacle surrounding the unit.
● Prepare the installation hole a little bigger than the size of the unit.
● Choose the installation space according to the diagrams in Part 3 Construction Views.
Installation Procedure:
Horizontal line
1) Remove the sticker from the front panel.
2) Put the unit into the installation hole.
● When installing, make sure the unit is slanted downward to the back to
minimize the nosie and vibration of operation. (Slant by 6-10mm.)
6~10mm
(See the right figure)
● Make sure the installation place is strong enough to minimize the noise
and vibration of operation.
3) Fill the gaps in the cabinet with sponge or foam.
Installation of Accessories:
To install iron support
Make sure the installation hole is strong enough to support the air
conditioner. If not, install an iron support to hold the unit.The iron
support should be fixed on the outside of the building See the
(right figure)
To install sunshade baffle
To avoid dropping anything onto the unit or exposing the unit to direct
sunlight, contact your seller to install a sunshade baffle for the unit. When
installing, make sure the air inlet at the side grille will not be blocked.
Wall
Sunshade baffle
Wooden frame
Rubber plate
6~10mm
Support
Horizontal line
,QVWDOODWLRQ,QVWUXFWLRQV
Drain Water
To maximize cooling efficiency, the air conditioner is designed to spray condensate on to the
condenser coil.
For cooling only unit: Should the spraying sound annoy you, please adopt the method of outside drain
with the following steps, which may however cause a small loss of performance.
1. Slide out the unit from the cabinet.
2. Remove the rubber plug from the body base plate.
3. Install the drain pan to the corner of the cabinet with 2 screws.
4. Connect the drain hose to the outlet on the bottom of the drain pan.
5. Slide the unit into its original place in the cabinet.
Screws
Drain Hose
Drain Pan
Internal View
External View
Note:
● Drain pan and drain hose must be installed before operation.
● Drain hose or tubing can be purchased locally to satisfy your particular needs.
Notes for Installation
Relocation
Contact your seller when the unit is to be relocated. Relocation of the
unit shall be performed under the guidance or with the assistance of
a trained, qualified technician. Charges concerning relocation of the unit
shall be borne by the user.
Noise
● Install in a location firm enough to minimize the noise and vibration of
operation.
● Do not put anything in front of the outlet of the unit to avoid increasing
noise.
● Make sure the noise and the hot air discharged will not disturb your neighbors.
● Should there be any abnormal sound during operation, contact your seller instantly
please adopt a safety support.
● The temperature of refrigerant circuit will be high, please keep the interconnection
cable away from the copper tube.
Electrical Wiring
● Make sure the unit is reliably grounded.
● Adopt an exclusive circuit for the unit. Never apply removable socket, or the poor
contact between them may lead to overheating or fire.
● Never pull the power cord with excessive force.
● In a fixed circuit, make sure there is electricity leakage protection switch with leakage
current less than 30mA.
● Connection between air conditioner and its power cord, as well as between individual
elements should be in accordance with the wiring diagram on the unit.
● Make sure the air conditioner is installed in accordance with national wiring regulation.
● Adopt an all-pole disconnection switch with a minimum contact separation of 3mm in all poles
in a fixed wiring
● Make sure an air switch (thermal-magnetic breaker) is installed in the circuit.
● Damaged power cord should be replaced by the manufacturer, an authorized dealer
or a qualified person for fear of hazards.
● All electrical work should be performed in accordance with local wiring regulations.
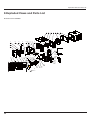
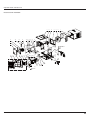
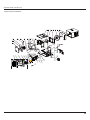
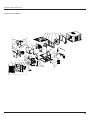
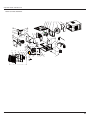
([SORGHG9LHZVDQG3DUWV/LVW
([SORGHG9LHZVDQG3DUWV/LVW
0RGHO*-&$).51%'
7
16
17
15
13 12 11 10
14
9
6
5
4
3
8
18
19
20
21
22
23
24
25
47
46
45
44
43
42
37
36 35 34 33
26
38
27
39
40
28
41
29
32
48
31
30
2
([SORGHG9LHZVDQG3DUWV/LVW
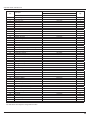
1R
'HVFULSWLRQ
3DUW&RGH
*-&$).51%'
3URGXFW&RGH
&&
&DELQHW$VV\
&RQGHQVHU$VV\
$[LDO)ORZ)DQ
5HDU&ODSERDUG
0RWRU6XSSRUW
)DQ0RWRU
7RS&RQQHFWLQJ3ODWH$VV\
)URQW&ODSERDUG6XE$VV\
%DVH3ODWH2I$LU)OXH
6WHS0RWRU
3URSHOOHUKRXVLQJ$VV\
3URSHOOHU+RXVLQJ
%DVHRI6ZLQJ/RXYHU
$LU'RRU/HYHU
&URVV%HDP
$LU/RXYHU
&HQWULIXJDOIDQ
)URQW&ODSERDUGRI3URSHOOHUKRXVLQJ
(YDSRUDWRU$VV\
&RPSUHVVRUDQG¿WWLQJV
&RPSUHVVRU*DVNHW
&DSLOODU\6XE$VV\
,QKDODWLRQ7XEH6XE$VV\
'LVFKDUJH7XEH
:DWHU7UD\
&KDVVLV6XEDVV\
'UDLQDJHKROHFDS
'UDLQDJH%R[
&KDVVLVFODPS
3RZHU&RUG
(OHFWULF%R[$VV\
6OHHYLQJ
0DLQ%RDUG
&DSDFLWRU&%%
&DSDFLWRU&%%
(OHFWULFER[
$PELHQW7HPSHUDWXUH6HQVRU
7HPSHUDWXUH6HQVRU
'LVSOD\%RDUG
/&'ERDUG5HPRWH&RQWURO
0HPEUDQH
)URQW3DQHO$VV\
*XLGHEODGHOHYHU
$LU/RXYHU
)URQW&DVH
)LOWHU6XE$VV\
)URQW3DQHO
5HPRWH&RQWUROOHU
3
4W\
7KHGDWDDERYHDUHVXEMHFWWRFKDQJHZLWKRXWQRWLFH
([SORGHG9LHZVDQG3DUWV/LVW
0RGHO*-&$).51%'
7
16
17
15
13 12 11 10
14
9
6
5
4
3
8
18
19
20
21
22
23
24
25
47
46
45
44
43
42
37
36 35 34 33
26
38
27
39
40
28
41
29
32
48
31
30
2
1
([SORGHG9LHZVDQG3DUWV/LVW
1R
'HVFULSWLRQ
3DUW&RGH
*-&$).51%'
3URGXFW&RGH
&&
&DELQHW$VV\
&RQGHQVHU$VV\
$[LDO)ORZ)DQ
5HDU&ODSERDUG
0RWRU6XSSRUW
)DQ0RWRU
7RS&RQQHFWLQJ3ODWH$VV\
)URQW&ODSERDUG6XE$VV\
%DVH3ODWH2I$LU)OXH
6WHS0RWRU
3URSHOOHUKRXVLQJ$VV\
3URSHOOHU+RXVLQJ
%DVHRI6ZLQJ/RXYHU
$LU'RRU/HYHU
&URVV%HDP
$LU/RXYHU
&HQWULIXJDOIDQ
)URQW&ODSERDUGRI3URSHOOHUKRXVLQJ
(YDSRUDWRU$VV\
&RPSUHVVRUDQG¿WWLQJV
&RPSUHVVRU*DVNHW
&DSLOODU\6XE$VV\
,QKDODWLRQ7XEH6XE$VV\
'LVFKDUJH7XEH
:DWHU7UD\
&KDVVLV6XEDVV\
'UDLQDJHKROHFDS
'UDLQDJH%R[
&KDVVLVFODPS
3RZHU&RUG
(OHFWULF%R[$VV\
6OHHYLQJ
0DLQ%RDUG
&DSDFLWRU&%%
&DSDFLWRU&%%
(OHFWULFER[
$PELHQW7HPSHUDWXUH6HQVRU
7HPSHUDWXUH6HQVRU
'LVSOD\%RDUG
/&'ERDUG5HPRWH&RQWURO
0HPEUDQH
)URQW3DQHO$VV\
*XLGHEODGHOHYHU
$LU/RXYHU
)URQW&DVH
)LOWHU6XE$VV\
)URQW3DQHO
5HPRWH&RQWUROOHU
3
4W\
7KHGDWDDERYHDUHVXEMHFWWRFKDQJHZLWKRXWQRWLFH
([SORGHG9LHZVDQG3DUWV/LVW
0RGHO*-&$'.51%'
7
15
14
16
13
6
5
4
3
12
17
11
10
18
9
8
22
21
23
24
25
41 40
39
26
38
27
42
43
49
48
47
46
45
28
44
29
30
37
50
36
35
34 33
32
31
2
1
([SORGHG9LHZVDQG3DUWV/LVW
1R
'HVFULSWLRQ
3URGXFW&RGH
&DELQHW$VV\
&RQGHQVHU$VV\
$[LDO)ORZ)DQ6XE$VV\
5HDU&ODSERDUG
0RWRU6XSSRUW
)DQ0RWRU
7RS&RYHU%RDUG6XEDVV\
)URQW&ODSERDUG6XE$VV\
%DVH3ODWH2I$LU)OXH
3URSHOOHU+RXVLQJ
$LU2XWOHW6XE$VV\
$LU'RRU/HYHU
6ZLQJOHYHU
6ZLQJ/HYHU
6WHS0RWRU
6ZLQJEODGH6XSSRUW
&UDQN
$LU/RXYHU
&HQWULIXJDOIDQ6XE$VV\
)URQW&ODSERDUGRI3URSHOOHUKRXVLQJ
(YDSRUDWRU$VV\
&RPSUHVVRUDQG¿WWLQJV
&RPSUHVVRU*DVNHW
&DSLOODU\6XE$VV\
,QKDODWLRQ7XEH6XE$VV\
'LVFKDUJH7XEH
:DWHU7UD\
&KDVVLV6XEDVV\
'UDLQDJHKROHFDS
'UDLQDJH%R[
&DELQHW)DVWHQHU
&KDVVLVFODPS
3RZHU&RUG
(OHFWULF%R[$VV\
&DSDFLWRU&%%
&DSDFLWRU&%%
(OHFWULFER[
0DLQ%RDUG
$PELHQW7HPSHUDWXUH6HQVRU
7HPSHUDWXUH6HQVRU
'LVSOD\%RDUG
/&'ERDUGUHPRWHFRQWURO
0HPEUDQH
)URQW3DQHO$VV\
*XLGHEODGHOHYHU
*XLGHEODGH
)URQW&DVH
)LOWHU6XE$VV\
)URQW3DQHO
5HPRWH&RQWUROOHU
3DUW&RGH
*-&$'.51%'
4W\
&&
3
7KHGDWDDERYHDUHVXEMHFWWRFKDQJHZLWKRXWQRWLFH
([SORGHG9LHZVDQG3DUWV/LVW
0RGHO*-&$&.51%'
8
16
15
17
14
7
6
5
4
3
13
18
12
11
19
10
9
23
22
24
25
26
42 41
40
27
39
28
43
44
50
49
48
47
46
29
45
30
31
38
51
37
36
35 34
33
32
2
([SORGHG9LHZVDQG3DUWV/LVW
1R
'HVFULSWLRQ
3URGXFW&RGH
&DELQHW$VV\
&RQGHQVHU$VV\
$[LDO)ORZ)DQ
5HDU&ODSERDUG
0RWRU6XSSRUW
)DQ0RWRU
0RWRU6XSSRUW
7RS&RYHU%RDUG6XEDVV\
)URQW&ODSERDUG6XE$VV\
%DVH3ODWH2I$LU)OXH
3URSHOOHU+RXVLQJ
$LU2XWOHW6XE$VV\
$LU'RRU/HYHU
6ZLQJOHYHU
6ZLQJ/HYHU
6WHS0RWRU
6ZLQJEODGH6XSSRUW
&UDQN
$LU/RXYHU
&HQWULIXJDO)DQ6XE$VV\
)URQW&ODSERDUGRI3URSHOOHUKRXVLQJ
(YDSRUDWRU$VV\
&RPSUHVVRUDQG¿WWLQJV
&RPSUHVVRU*DVNHW
&DSLOODU\6XE$VV\
,QKDODWLRQ7XEH6XE$VV\
'LVFKDUJH7XEH6XEDVV\
:DWHU7UD\
&KDVVLV6XEDVV\
'UDLQDJHKROHFDS
'UDLQDJH%R[
&DELQHW)DVWHQHU
&KDVVLVFODPS
3RZHU&RUG
(OHFWULF%R[$VV\
&DSDFLWRU&%%
&DSDFLWRU&%%
(OHFWULFER[
0DLQ%RDUG
$PELHQW7HPSHUDWXUH6HQVRU
7HPSHUDWXUH6HQVRU
'LVSOD\%RDUG
/&'ERDUGUHPRWHFRQWURO
0HPEUDQH
)URQW3DQHO$VV\
*XLGHEODGHOHYHU
*XLGHEODGH
)URQW&DVH
)LOWHU6XE$VV\
)URQW3DQHO
5HPRWH&RQWUROOHU
3DUW&RGH
*-&$&.51%'
4W\
&&
3
7KHGDWDDERYHDUHVXEMHFWWRFKDQJHZLWKRXWQRWLFH
([SORGHG9LHZVDQG3DUWV/LVW
0RGHO*-&$&.51%'
21
8
9
13 12 11 10
7
6
5
4
3
20
22
19
23
18
24
17
15
14
16
28
27
29
30
31
47 46
45
32
44
33
48
49
34
55
54
53
52
51
50
35
36
43
56
42
41
40 39
38
37
2
([SORGHG9LHZVDQG3DUWV/LVW
1R
'HVFULSWLRQ
3URGXFW&RGH
&DELQHW$VV\
&RQGHQVHU$VV\
$[LDO)ORZ)DQ
5HDU&ODSERDUG
0RWRU6XSSRUW
)DQ0RWRU
0RWRU6XSSRUW
7RS&RYHU%RDUG6XEDVV\
6RIW6WDUW'HYLFH
(OHFWULF%R[
&DSDFLWRU&%%
(OHFWULF%R[&RYHU
(OHFWULF%R[6XE$VV\
)URQW&ODSERDUG6XE$VV\
%DVH3ODWH2I$LU)OXH
3URSHOOHU+RXVLQJ
$LU2XWOHW6XE$VV\
$LU'RRU/HYHU
6ZLQJOHYHU
6ZLQJ/HYHU
6WHS0RWRU
6ZLQJEODGH6XSSRUW
&UDQN
$LU/RXYHU
&HQWULIXJDO)DQ6XE$VV\
)URQW&ODSERDUGRI3URSHOOHUKRXVLQJ
(YDSRUDWRU$VV\
&RPSUHVVRUDQG¿WWLQJV
&RPSUHVVRU*DVNHW
&DSLOODU\6XE$VV\
,QKDODWLRQ7XEH6XE$VV\
'LVFKDUJH7XEH6XE$VV\
:DWHU7UD\
&KDVVLV6XEDVV\
'UDLQDJHKROHFDS
'UDLQDJH%R[
&DELQHW)DVWHQHU
&KDVVLVFODPS
3RZHU&RUG
(OHFWULF%R[$VV\
3DUW&RGH
*-&$&.51%'
4W\
&&
3
([SORGHG9LHZVDQG3DUWV/LVW
&DSDFLWRU&%%
&DSDFLWRU&%%
(OHFWULFER[
0DLQ%RDUG
$PELHQW7HPSHUDWXUH6HQVRU
7HPSHUDWXUH6HQVRU
'LVSOD\%RDUG
/&'ERDUGUHPRWHFRQWURO
0HPEUDQH
)URQW3DQHO$VV\
*XLGHEODGHOHYHU
*XLGHEODGH
)URQW&DVH
)LOWHU6XE$VV\
)URQW3DQHO
5HPRWH&RQWUROOHU
7KHGDWDDERYHDUHVXEMHFWWRFKDQJHZLWKRXWQRWLFH
([SORGHG9LHZVDQG3DUWV/LVW
0RGHO*-+$).51%'
7
16
17
15
13 12 11 10
14
9
6
5
3
4
2
1
8
18
19
20
21
22
23
24
48
47
46
45
44
43
37
38
39
36 35 34 33
25
40
26
41
27
42
29
32
31
28
30
49
([SORGHG9LHZVDQG3DUWV/LVW
1R
'HVFULSWLRQ
3URGXFW&RGH
&&
&DELQHW$VV\
&RQGHQVHU$VV\
$[LDO)ORZ)DQ
5HDU&ODSERDUG
0RWRU6XSSRUW
)DQ0RWRU
7RS&RQQHFWLQJ3ODWH$VV\
)URQW&ODSERDUG6XE$VV\
%DVH3ODWH2I$LU)OXH
6WHS0RWRU
3URSHOOHUKRXVLQJ$VV\
3URSHOOHU+RXVLQJ
%DVHRI6ZLQJ/RXYHU
$LU'RRU/HYHU
&URVV%HDP
$LU/RXYHU
&HQWULIXJDOIDQ
)URQW&ODSERDUGRI3URSHOOHUKRXVLQJ
(YDSRUDWRU$VV\
&RPSUHVVRUDQG¿WWLQJV
&RPSUHVVRU*DVNHW
&DSLOODU\6XE$VV\
:D\9DOYH$VV\
:DWHU7UD\
&KDVVLV6XEDVV\
'UDLQDJH%R[
0DJQHW&RLO
'UDLQDJH9DOYH
&KDVVLVFODPS
3RZHU&RUG
(OHFWULF%R[$VV\
6OHHYLQJ
0DLQ%RDUG
&DSDFLWRU&%%
&DSDFLWRU&%%
(OHFWULFER[
$PELHQW7HPSHUDWXUH6HQVRU
7HPSHUDWXUH6HQVRU
7HPSHUDWXUH6HQVRU
'LVSOD\%RDUG
/&'ERDUG5HPRWH&RQWURO
0HPEUDQH
)URQW3DQHO$VV\
*XLGHEODGHOHYHU
$LU/RXYHU
)URQW&DVH
)LOWHU6XE$VV\
)URQW3DQHO
5HPRWH&RQWUROOHU
3
7KHGDWDDERYHDUHVXEMHFWWRFKDQJHZLWKRXWQRWLFH
3DUW&RGH
*-+$).51%'
4W\
([SORGHG9LHZVDQG3DUWV/LVW
0RGHO*-+$).51'$
7
16
17
15
13 12 11 10
14
9
6
5
4
3
2
8
18
19
20
21
22
23
24
48
47
46
45
44
43
37
38
39
36 35 34 33
25
40
26
41
27
42
29
32
31
28
30
49
([SORGHG9LHZVDQG3DUWV/LVW
1R
'HVFULSWLRQ
*-+$).51'$
3URGXFW&RGH
&&
&DELQHW$VV\
&RQGHQVHU$VV\
$[LDO)ORZ)DQ
5HDU&ODSERDUG
0RWRU6XSSRUW
)DQ0RWRU
7RS&RQQHFWLQJ3ODWH$VV\
)URQW&ODSERDUG6XE$VV\
%DVH3ODWH2I$LU)OXH
6WHS0RWRU
3URSHOOHUKRXVLQJ$VV\
3URSHOOHU+RXVLQJ
%DVHRI6ZLQJ/RXYHU
$LU'RRU/HYHU
&URVV%HDP
$LU/RXYHU
&HQWULIXJDOIDQ
)URQW&ODSERDUGRI3URSHOOHUKRXVLQJ
(YDSRUDWRU$VV\
&RPSUHVVRUDQG¿WWLQJV
&RPSUHVVRU*DVNHW
&DSLOODU\6XE$VV\
:D\9DOYH$VV\
:DWHU7UD\
&KDVVLV6XEDVV\
'UDLQDJH%R[
0DJQHW&RLO
'UDLQDJH9DOYH
&KDVVLVFODPS
3RZHU&RUG
(OHFWULF%R[$VV\
6OHHYLQJ
0DLQ%RDUG
&DSDFLWRU&%%
&DSDFLWRU&%%
(OHFWULFER[
$PELHQW7HPSHUDWXUH6HQVRU
7HPSHUDWXUH6HQVRU
7HPSHUDWXUH6HQVRU
'LVSOD\%RDUG
/&'ERDUG5HPRWH&RQWURO
0HPEUDQH
)URQW3DQHO$VV\
*XLGHEODGHOHYHU
$LU/RXYHU
)URQW&DVH
)LOWHU6XE$VV\
$LU,QWDNH3DQHO
5HPRWH&RQWUROOHU
3
7KHGDWDDERYHDUHVXEMHFWWRFKDQJHZLWKRXWQRWLFH
3DUW&RGH
4W\
([SORGHG9LHZVDQG3DUWV/LVW
0RGHO*-+$).51%'
7
16
17
15
13 12 11 10
14
9
6
5
4
3
2
1
8
18
19
20
21
22
23
24
48
47
46
45
44
43
37
38
39
36 35 34 33
25
40
26
41
27
29
42
32
31
28
30
49
([SORGHG9LHZVDQG3DUWV/LVW
1R
'HVFULSWLRQ
3URGXFW&RGH
&&
&DELQHW$VV\
&RQGHQVHU$VV\
$[LDO)ORZ)DQ
5HDU&ODSERDUG
0RWRU6XSSRUW
)DQ0RWRU
7RS&RQQHFWLQJ3ODWH$VV\
)URQW&ODSERDUG6XE$VV\
%DVH3ODWH2I$LU)OXH
6WHS0RWRU
3URSHOOHUKRXVLQJ$VV\
3URSHOOHU+RXVLQJ
%DVHRI6ZLQJ/RXYHU
$LU'RRU/HYHU
&URVV%HDP
$LU/RXYHU
&HQWULIXJDOIDQ
)URQW&ODSERDUGRI3URSHOOHUKRXVLQJ
(YDSRUDWRU$VV\
&RPSUHVVRUDQG¿WWLQJV
&RPSUHVVRU*DVNHW
&DSLOODU\6XE$VV\
:D\9DOYH$VV\
:DWHU7UD\
&KDVVLV6XEDVV\
'UDLQDJH%R[
0DJQHW&RLO
'UDLQDJH9DOYH
&KDVVLVFODPS
3RZHU&RUG
(OHFWULF%R[$VV\
6OHHYLQJ
0DLQ%RDUG
&DSDFLWRU&%%
&DSDFLWRU&%%
(OHFWULFER[
$PELHQW7HPSHUDWXUH6HQVRU
7HPSHUDWXUH6HQVRU
7HPSHUDWXUH6HQVRU
'LVSOD\%RDUG
/&'ERDUG5HPRWH&RQWURO
0HPEUDQH
)URQW3DQHO$VV\
*XLGHEODGHOHYHU
$LU/RXYHU
)URQW&DVH
)LOWHU6XE$VV\
)URQW3DQHO
5HPRWH&RQWUROOHU
3
7KHGDWDDERYHDUHVXEMHFWWRFKDQJHZLWKRXWQRWLFH
3DUW&RGH
*-+$).51%'
4W\
([SORGHG9LHZVDQG3DUWV/LVW
0RGHO*-+$).51'$
7
16
17
15
13 12 11 10
14
9
6
5
4
3
2
8
18
19
20
21
22
23
24
48
47
46
45
44
43
37
38
39
36 35 34 33
25
40
26
41
27
29
42
32
31
28
30
49
([SORGHG9LHZVDQG3DUWV/LVW
1R
'HVFULSWLRQ
3URGXFW&RGH
&&
&DELQHW$VV\
&RQGHQVHU$VV\
$[LDO)ORZ)DQ
5HDU&ODSERDUG
0RWRU6XSSRUW
)DQ0RWRU
7RS&RQQHFWLQJ3ODWH$VV\
)URQW&ODSERDUG6XE$VV\
%DVH3ODWH2I$LU)OXH
6WHS0RWRU
3URSHOOHUKRXVLQJ$VV\
3URSHOOHU+RXVLQJ
%DVHRI6ZLQJ/RXYHU
$LU'RRU/HYHU
&URVV%HDP
$LU/RXYHU
&HQWULIXJDOIDQ
)URQW&ODSERDUGRI3URSHOOHUKRXVLQJ
(YDSRUDWRU$VV\
&RPSUHVVRUDQG¿WWLQJV
&RPSUHVVRU*DVNHW
&DSLOODU\6XE$VV\
:D\9DOYH$VV\
:DWHU7UD\
&KDVVLV6XEDVV\
'UDLQDJH%R[
0DJQHW&RLO
'UDLQDJH9DOYH
&KDVVLVFODPS
3RZHU&RUG
(OHFWULF%R[$VV\
6OHHYLQJ
0DLQ%RDUG
&DSDFLWRU&%%
&DSDFLWRU&%%
(OHFWULFER[
$PELHQW7HPSHUDWXUH6HQVRU
7HPSHUDWXUH6HQVRU
7HPSHUDWXUH6HQVRU
'LVSOD\%RDUG
/&'ERDUG5HPRWH&RQWURO
0HPEUDQH
)URQW3DQHO$VV\
*XLGHEODGHOHYHU
$LU/RXYHU
)URQW&DVH
)LOWHU6XE$VV\
)URQW3DQHO
5HPRWH&RQWUROOHU
3
7KHGDWDDERYHDUHVXEMHFWWRFKDQJHZLWKRXWQRWLFH
3DUW&RGH
*-+$).51'$
4W\
([SORGHG9LHZVDQG3DUWV/LVW
0RGHO*-+$'.51%'
7
15
14
16
13
6
5
4
3
2
1
12
17
11
10
18
9
8
22
21
23
24
25
41 40
42
50
49
48
47
46
39
26
38
27
43
44
28
45
29
30
37
36
35
34 33
32
31
51
([SORGHG9LHZVDQG3DUWV/LVW
1R
'HVFULSWLRQ
*-+$'.51%'
3URGXFW&RGH
&&
&DELQHW$VV\
&RQGHQVHU$VV\
$[LDO)ORZ)DQ6XE$VV\
5HDU&ODSERDUG
0RWRU6XSSRUW
)DQ0RWRU
7RS&RYHU%RDUG6XEDVV\
)URQW&ODSERDUG6XE$VV\
%DVH3ODWH2I$LU)OXH
3URSHOOHU+RXVLQJ
$LU2XWOHW6XE$VV\
$LU'RRU/HYHU
6ZLQJOHYHU
6ZLQJ/HYHU
6WHS0RWRU
6ZLQJEODGH6XSSRUW
&UDQN
$LU/RXYHU
&HQWULIXJDOIDQ6XE$VV\
)URQW&ODSERDUGRI3URSHOOHUKRXVLQJ
(YDSRUDWRU$VV\
&RPSUHVVRUDQG¿WWLQJV
&RPSUHVVRU*DVNHW
&DSLOODU\6XE$VV\
:D\9DOYH$VV\
0DJQHW&RLO
:DWHU7UD\
&KDVVLV6XEDVV\
'UDLQDJH9DOYH
'UDLQDJH%R[
&DELQHW)DVWHQHU
&KDVVLVFODPS
3RZHU&RUG
(OHFWULF%R[$VV\
&DSDFLWRU&%%
&DSDFLWRU&%%
(OHFWULFER[
0DLQ%RDUG
$PELHQW7HPSHUDWXUH6HQVRU
7HPSHUDWXUH6HQVRU
7HPSHUDWXUH6HQVRU
'LVSOD\%RDUG
/&'ERDUGUHPRWHFRQWURO
0HPEUDQH
)URQW3DQHO$VV\
*XLGHEODGHOHYHU
*XLGHEODGH
)URQW&DVH
)LOWHU6XE$VV\
)URQW3DQHO
5HPRWH&RQWUROOHU
3
7KHGDWDDERYHDUHVXEMHFWWRFKDQJHZLWKRXWQRWLFH
3DUW&RGH
4W\
([SORGHG9LHZVDQG3DUWV/LVW
0RGHO*-+$'.51'$
7
15
14
16
13
6
5
4
3
2
12
17
11
10
18
9
8
22
21
23
24
25
41 40
42
50
49
48
47
46
39
26
38
27
43
44
28
45
29
30
37
36
35
34 33
32
31
51
([SORGHG9LHZVDQG3DUWV/LVW
1R
'HVFULSWLRQ
3URGXFW&RGH
&&
&DELQHW$VV\
&RQGHQVHU$VV\
$[LDO)ORZ)DQ6XE$VV\
5HDU&ODSERDUG
0RWRU6XSSRUW
)DQ0RWRU
7RS&RYHU%RDUG6XEDVV\
)URQW&ODSERDUG6XE$VV\
%DVH3ODWH2I$LU)OXH
3URSHOOHU+RXVLQJ
$LU2XWOHW6XE$VV\
$LU'RRU/HYHU
6ZLQJOHYHU
6ZLQJ/HYHU
6WHS0RWRU
6ZLQJEODGH6XSSRUW
&UDQN
$LU/RXYHU
&HQWULIXJDOIDQ6XE$VV\
)URQW&ODSERDUGRI3URSHOOHUKRXVLQJ
(YDSRUDWRU$VV\
&RPSUHVVRUDQG¿WWLQJV
&RPSUHVVRU*DVNHW
&DSLOODU\6XE$VV\
:D\9DOYH$VV\
0DJQHW&RLO
:DWHU7UD\
&KDVVLV6XEDVV\
'UDLQDJH9DOYH
'UDLQDJH%R[
&DELQHW)DVWHQHU
&KDVVLVFODPS
3RZHU&RUG
(OHFWULF%R[$VV\
&DSDFLWRU&%%
&DSDFLWRU&%%
(OHFWULFER[
0DLQ%RDUG
$PELHQW7HPSHUDWXUH6HQVRU
7HPSHUDWXUH6HQVRU
7HPSHUDWXUH6HQVRU
'LVSOD\%RDUG
/&'ERDUGUHPRWHFRQWURO
0HPEUDQH
)URQW3DQHO$VV\
*XLGHEODGHOHYHU
*XLGHEODGH
)URQW&DVH
)LOWHU6XE$VV\
)URQW3DQHO
5HPRWH&RQWUROOHU
3
7KHGDWDDERYHDUHVXEMHFWWRFKDQJHZLWKRXWQRWLFH
3DUW&RGH
*-+$'.51'$
4W\
([SORGHG9LHZVDQG3DUWV/LVW
0RGHO*-+$&.51%'
8
16
15
17
14
7
6
5
4
3
2
1
13
18
12
11
19
10
9
23
22
24
25
26
42 41
40
27
39
28
43
44
51
50
49
48
47
45
29
46
30
31
38
37
36
35 34
33
32
52
([SORGHG9LHZVDQG3DUWV/LVW
1R
'HVFULSWLRQ
3URGXFW&RGH
&&
&DELQHW$VV\
&RQGHQVHU$VV\
$[LDO)ORZ)DQ
5HDU&ODSERDUG
0RWRU6XSSRUW
)DQ0RWRU
0RWRU6XSSRUW
7RS&RYHU%RDUG6XEDVV\
)URQW&ODSERDUG6XE$VV\
%DVH3ODWH2I$LU)OXH
3URSHOOHU+RXVLQJ
$LU2XWOHW6XE$VV\
$LU'RRU/HYHU
6ZLQJOHYHU
6ZLQJ/HYHU
6WHS0RWRU
6ZLQJEODGH6XSSRUW
&UDQN
$LU/RXYHU
&HQWULIXJDO)DQ6XE$VV\
)URQW&ODSERDUGRI3URSHOOHUKRXVLQJ
(YDSRUDWRU$VV\
&RPSUHVVRUDQG¿WWLQJV
&RPSUHVVRU*DVNHW
&DSLOODU\6XE$VV\
:D\9DOYH$VV\
0DJQHW&RLO
:DWHU7UD\
&KDVVLV6XEDVV\
'UDLQDJH9DOYH
'UDLQDJH%R[
&DELQHW)DVWHQHU
&KDVVLVFODPS
3RZHU&RUG
(OHFWULF%R[$VV\
&DSDFLWRU&%%
&DSDFLWRU&%%
(OHFWULFER[
0DLQ%RDUG
$PELHQW7HPSHUDWXUH6HQVRU
7HPSHUDWXUH6HQVRU
7HPSHUDWXUH6HQVRU
'LVSOD\%RDUG
/&'ERDUGUHPRWHFRQWURO
0HPEUDQH
)URQW3DQHO$VV\
*XLGHEODGHOHYHU
*XLGHEODGH
)URQW&DVH
)LOWHU6XE$VV\
)URQW3DQHO
5HPRWH&RQWUROOHU
3
7KHGDWDDERYHDUHVXEMHFWWRFKDQJHZLWKRXWQRWLFH
3DUW&RGH
*-+$&.51%'
4W\
([SORGHG9LHZVDQG3DUWV/LVW
0RGHO*-+$&.51'$
8
16
15
17
14
7
6
5
4
3
2
1
13
18
12
11
19
10
9
23
22
24
25
26
42 41
40
27
39
28
43
44
51
50
49
48
47
45
29
46
30
31
38
37
36
35
34
33
32
52
([SORGHG9LHZVDQG3DUWV/LVW
1R
'HVFULSWLRQ
*-+$&.51'$
3URGXFW&RGH
&&
&DELQHW$VV\
&RQGHQVHU$VV\
$[LDO)ORZ)DQ
5HDU&ODSERDUG
0RWRU6XSSRUW
)DQ0RWRU
0RWRU6XSSRUW
7RS&RYHU%RDUG6XEDVV\
)URQW&ODSERDUG6XE$VV\
%DVH3ODWH2I$LU)OXH
3URSHOOHU+RXVLQJ
$LU2XWOHW6XE$VV\
$LU'RRU/HYHU
6ZLQJOHYHU
6ZLQJ/HYHU
6WHS0RWRU
6ZLQJEODGH6XSSRUW
&UDQN
$LU/RXYHU
&HQWULIXJDO)DQ6XE$VV\
)URQW&ODSERDUGRI3URSHOOHUKRXVLQJ
(YDSRUDWRU$VV\
&RPSUHVVRUDQG¿WWLQJV
&RPSUHVVRU*DVNHW
&DSLOODU\6XE$VV\
:D\9DOYH$VV\
0DJQHW&RLO
:DWHU7UD\
&KDVVLV6XEDVV\
'UDLQDJH9DOYH
'UDLQDJH%R[
&DELQHW)DVWHQHU
&KDVVLVFODPS
3RZHU&RUG
(OHFWULF%R[$VV\
&DSDFLWRU&%%
&DSDFLWRU&%%
(OHFWULFER[
0DLQ%RDUG
$PELHQW7HPSHUDWXUH6HQVRU
7HPSHUDWXUH6HQVRU
7HPSHUDWXUH6HQVRU
'LVSOD\%RDUG
/&'ERDUGUHPRWHFRQWURO
0HPEUDQH
)URQW3DQHO$VV\
*XLGHEODGHOHYHU
*XLGHEODGH
)URQW&DVH
)LOWHU6XE$VV\
)URQW3DQHO
5HPRWH&RQWUROOHU
3
7KHGDWDDERYHDUHVXEMHFWWRFKDQJHZLWKRXWQRWLFH
3DUW&RGH
4W\
([SORGHG9LHZVDQG3DUWV/LVW
0RGHO*-+$&.51%'
9
13 12 11 10
21
8
7
6
5
4
3
2
1
20
22
19
23
18
24
17
15
14
16
28
27
29
30
31
47
46
45
32
44
33
48
49
34
50
56
55
54
53
52
35
51
36
43
42
41
40 39
38
37
57
([SORGHG9LHZVDQG3DUWV/LVW
1R
'HVFULSWLRQ
3DUW&RGH
*-+$&.51%'
3URGXFW&RGH
&&
&DELQHW$VV\
&RQGHQVHU$VV\
$[LDO)ORZ)DQ
5HDU&ODSERDUG
0RWRU6XSSRUW
)DQ0RWRU
0RWRU6XSSRUW
7RS&RYHU%RDUG6XEDVV\
6RIW6WDUW'HYLFH
(OHFWULF%R[
&DSDFLWRU&%%
(OHFWULF%R[&RYHU
(OHFWULF%R[6XE$VV\
)URQW&ODSERDUG6XE$VV\
%DVH3ODWH2I$LU)OXH
3URSHOOHU+RXVLQJ
$LU2XWOHW6XE$VV\
$LU'RRU/HYHU
6ZLQJOHYHU
6ZLQJ/HYHU
6WHS0RWRU
6ZLQJEODGH6XSSRUW
&UDQN
$LU/RXYHU
&HQWULIXJDO)DQ6XE$VV\
)URQW&ODSERDUGRI3URSHOOHUKRXVLQJ
(YDSRUDWRU$VV\
&RPSUHVVRUDQG¿WWLQJV
&RPSUHVVRU*DVNHW
&DSLOODU\6XE$VV\
:D\9DOYH$VV\
0DJQHW&RLO
:DWHU7UD\
&KDVVLV6XEDVV\
'UDLQDJH9DOYH
'UDLQDJH%R[
&DELQHW)DVWHQHU
&KDVVLVFODPS
3RZHU&RUG
(OHFWULF%R[$VV\
3
4W\
([SORGHG9LHZVDQG3DUWV/LVW
&DSDFLWRU&%%
&DSDFLWRU&%%
(OHFWULFER[
0DLQ%RDUG
$PELHQW7HPSHUDWXUH6HQVRU
7HPSHUDWXUH6HQVRU
7HPSHUDWXUH6HQVRU
'LVSOD\%RDUG
/&'ERDUGUHPRWHFRQWURO
0HPEUDQH
)URQW3DQHO$VV\
*XLGHEODGHOHYHU
*XLGHEODGH
)URQW&DVH
)LOWHU6XE$VV\
)URQW3DQHO
5HPRWH&RQWUROOHU
7KHGDWDDERYHDUHVXEMHFWWRFKDQJHZLWKRXWQRWLFH
([SORGHG9LHZVDQG3DUWV/LVW
0RGHO*-+$&.51'$
21
8
9
13 12 11 10
7
6
5
4
3
20
22
19
23
18
24
17
15
14
16
28
27
29
30
31
47
46
45
32
44
33
48
49
34
50
56
55
54
53
52
35
51
36
43
57
42
41
40
39
38
37
2
([SORGHG9LHZVDQG3DUWV/LVW
1R
'HVFULSWLRQ
3DUW&RGH
*-+$&.51'$
3URGXFW&RGH
&&
&DELQHW$VV\
&RQGHQVHU$VV\
$[LDO)ORZ)DQ
5HDU&ODSERDUG
0RWRU6XSSRUW
)DQ0RWRU
0RWRU6XSSRUW
7RS&RYHU%RDUG6XEDVV\
6RIW6WDUW'HYLFH
(OHFWULF%R[
&DSDFLWRU&%%
(OHFWULF%R[&RYHU
(OHFWULF%R[6XE$VV\
)URQW&ODSERDUG6XE$VV\
%DVH3ODWH2I$LU)OXH
3URSHOOHU+RXVLQJ
$LU2XWOHW6XE$VV\
$LU'RRU/HYHU
6ZLQJOHYHU
6ZLQJ/HYHU
6WHS0RWRU
6ZLQJEODGH6XSSRUW
&UDQN
$LU/RXYHU
&HQWULIXJDO)DQ6XE$VV\
)URQW&ODSERDUGRI3URSHOOHUKRXVLQJ
(YDSRUDWRU$VV\
&RPSUHVVRUDQG¿WWLQJV
&RPSUHVVRU*DVNHW
&DSLOODU\6XE$VV\
:D\9DOYH$VV\
0DJQHW&RLO
:DWHU7UD\
&KDVVLV6XEDVV\
'UDLQDJH9DOYH
'UDLQDJH%R[
&DELQHW)DVWHQHU
&KDVVLVFODPS
3RZHU&RUG
(OHFWULF%R[$VV\
3
4W\
([SORGHG9LHZVDQG3DUWV/LVW
&DSDFLWRU&%%
&DSDFLWRU&%%
(OHFWULFER[
0DLQ%RDUG
$PELHQW7HPSHUDWXUH6HQVRU
7HPSHUDWXUH6HQVRU
7HPSHUDWXUH6HQVRU
'LVSOD\%RDUG
/&'ERDUGUHPRWHFRQWURO
0HPEUDQH
)URQW3DQHO$VV\
*XLGHEODGHOHYHU
*XLGHEODGH
)URQW&DVH
)LOWHU6XE$VV\
)URQW3DQHO
5HPRWH&RQWUROOHU
7KHGDWDDERYHDUHVXEMHFWWRFKDQJHZLWKRXWQRWLFH
7URXEOHVKRRWLQJ
7URXEOHVKRRWLQJ
No power supply
Switch is at the OFF position; or socket and plug
is loosened; or power wire has malfunction; or power
failure
Fuse is burned out
Replace the fuse
Supply voltage is too low
Inspect the suppy voltage. If it is lower 10% of the rated
voltage, please look for the reason, improve the power
supply condition and add the regulated power supply.
Failure of crystal oscillator or reset circuit
Replace those parts which has malfunction
A/C can't run
Wire connection is loosened or wrong wire
connection
Check the circuit and connect the wire according to the
electric diagram sticked on the unit
Transformer is broken
Replace the transformer
Controller is broken
Replace the controller
Receiver head is loosened
Receiver head is broken or the plug hasn't
connected well
Firstly, press the manual AUTO button, if it's normal,
then check whether the tailpiece installation and the wire
are correct or not; If it's correct, replace the tailpiece or
remote controller.
Remote controller has malfunction
The setting temperature is unsuitable
Too much dust on the filter
Replace the controller
Clean the filter
Heat exchanger is blocked
Clean the dust accumulated on thesurface of the
heat exchanger
The fan speed is set too low
Set the fan speed at high or medium fan speed
A/C can run but can't
cooling(or heating)
Fan can't run or the fan speed is low
1.Wrong wire connection; 2. whether the capacitor is open
or short-circuit; 3. the motor has malfunction; 4. main switch
has malfunction. Connect the wire or replace those parts
which has malfunction.
Refrigeration system is blocked
Check whether the system is blocked by observing the
Condensation of the evaporator and the pressure value
Of the highpressure manometer, and then take measures
to deal with the system.
7URXEOHVKRRWLQJ
Check leakage, carry out vacuum-pumping after
Refrigerant is insufficient or leaking
repairing leakage and charge refrigerant according
to requirements
The efficiency of compressor is low
Thermal insulation of the connection pipe between
indoor unit and outdoor unit is not good
Replace the compressor
Make sure that the heat insulation for the heavy tube and
the microtube is good. The joint and the exposed part of
the copper pipe should also be heat insulated well.
A/C can run but it can't
cooling(or heating)
When heating, the electric heater can't work
Outdoor temperature is too high
Whether cooling(heating) load is sufficient
The air tightness in room is not good.
People come in and go out frequently.There
are heating devices in the room when A/C is cooling
There are too much dust on condensate water tray,
and the exhaust outlet is blocked
1. the wire is loosened; 2.thermal fuse is broken;
3. temperature limiter is damaged; 4. electric
heater is damaged; 5. controller is broken.
correct the wire correctly or replace those parts
which has malfunction .
You can install the rain-proof and sun-proof board. If the
cooling air is still insufficient, you are suggested to
repalce the A/C
Check the preset cooling(heating) load
Keep the air tightness well. Try not to use the electric
appliances with a large quantity of heat
Get rid of dust on the water tray to make the exhaust
outlet smoothly
A/C is leaking
At the time of sending
fan, the fan's motor
can't be started up
The condensate drain pipe is bended or staved
Check the drain pupe. If it's damaged, please replace it.
Wrong wire connection
Check the circuit and connect the wire correctly
according to the electric circuit diagram
Fan capacitor is broken
Replace fan capacitor with the same mode and
specification
Motor winding is broken or short-circuit, or the
motor built-in temperature limiting device is broken
due to overheating
Compressor's capacitor is broken; wrong wire
connection
Replace capacitor; connect the wire correctly according
to the electric circuit diagram
Compressor's motor is burned out
Check with a multimeter if the enclosed motor
windings of compressor is with short or broken circuit
o r earthing.If so,it is needed to replace it with
the same type and specifications.
The compressor can run smoothly or is stucked.
Knock the compressor housing with a rubber bar
or with a hammer padding with a wood, the compressor
might be shocked and run. If not, change the
compressor.
Compressor can't run
(controller has output )
Replace those parts which has malfunction
7URXEOHVKRRWLQJ
Compressor is overheating
to activate the protector
Refigerant is insufficient or superabundance
Adjust the volume of the refrigerant
Capallary is blocked and the suction temperature
is rising
Replace capillary
The compressor can run smoothly or is stucked.
The discharge valve is damaged.
Replace the compressor
use the multimeter to check whether the contact point
of the compresor is conducted at the timer of nonsubheating. If it can't be conducted, please replace
the protector.
Malfunction of the protector
Swing motor's torque
is insufficient
Swing blade can't rotate
Check whether there's mistake for the wire. If there
isn't mistake for the wire , please replace the relative
parts with malfunction
Wrong wire connection
Controller is damaged(IC2003 is broken,
the swing relay can't sucted to close)
Check the reason, improve the power supply
condition and add the regulated power supply
Supply voltage is abnormal
Compressor is ON-OFF
frequently
The radiating for evaporator and condenser is not
good ; Poor air ventilation
The A/C's capacity isn't match with the area
of the room areas
Check whether defrosting is normal at first.
If the outdoor temperature is high at the time
of defrosting and the condenser has the
At the time of heating,
it's defrosting
frequently
phenomenon of freezing, which is the normal
Get rid of the dust on the evaporator and condenser,
remove the obstacles at the air outlet.
Select the A/C which is applicable to the room areas
The wire for defrosting temperature
sensor is broken or it isn't plugged
well
Plug it well or replace the
temperature snesor
Failure of temperature sensor
head's resistance value
Replace the temperature
sensor
Capacitor of defrost temperature
sensor loop on the controller is
leaking or short circuit.
Cut or replace the capacitor
which has malfunction
defrosting phenomenon. If it will defrost every
50mins and the condenser hasn’t the
phenomenon of freezing and the outdoor
temperature is high, which is the abnormal
phenomenon, and then you should check the
Replace the comtroller
Controller is broken
defrosting temperature sensor duct pilot.
Check whether it needs to defrost according to the above method. If the air outlet temperature is high and it doesn’t defrost,
which is the normal phenomenon; If the air outlet temperature is low and the condenser is freezing and it doesn’t defrost,
Heating but don't
defrosting
which is the abnormal phenomenon. Then please check whether the refrigerant is leaking at first. You can stop the unit to
defrost naturally or cooling compulsively. After the defrosting is finished, turn on the unit to heat and feel whether the indoor
air outlet temperature is normal or not by hand ( the air outlet temperature is more than 40
temperature is not hot, which means the refrigerant is leaking.
in general). If the air outlet
If the air outlet temperature is normal, please check the
defrost temperature sensor and loop, and replace the parts which has malfunction.
Remote reveiving distance is too short
Battery's electricity is insufficient
Replace the battery
7URXEOHVKRRWLQJ
LCD display flashes or when pressing
the transmit button, the entire screen is
displayed.
Battery's electricity is insufficient
Replace the battery
LCD display is found short of stroke
The LED frame hasn't fixed well
Fix the LED frame frame properly
Compressor hasn't installed well; the base isn't stable
Vibration and noise are
abnormal
Check whether the base is firm
The unit hasn't placed flatly and stably
Adjust the unit's position
Unit's support is unstable
Strenthen the support or refit it
There are foreign objects on the unit
Get rid of the foreign objects
Screws are loosened
Tighten the screws
Notice: As for the above malfunction analysis, there aren't malfunction related to heating for cooling only units.
5HPRYDO3URFHGXUH
5HPRYDO3URFHGXUH
:DUQLQJ%HVXUHWRZDLWIRUDPLQLPXPRIPLQXWHVDIWHU
WXUQLQJRIIDOOSRZHUVXSSOLHVEHIRUHGLVDVVHPEO\
&RROLQJRQO\PRGHOV
Procedure
Steps
1.Remove panel assy
Open t he air-inlet panel; remove the
filter; remove the screws in the middle,
at the left side and right side of the
air-inlet panel
panel; beat the clasp of cabinet slightly
and then remove the panel.
filter
screw
2.Remove cabinet
Loosen the clasp fixing chassis;
remove the screws fixing the rear part
of cabinet and then pull out the unit.
clasp fixing chassis
5HPRYDO3URFHGXUH
Steps
Procedure
screws
3.Remove electric box
Remove remote control plate, earthing
screw and temp sensor in turn. Then
remove electric box.
temp sensor
screws
electric box
temp sensor
earthing screw
5HPRYDO3URFHGXUH
Steps
Procedure
4.Remove top cover
top cover sub-assy
Remove the screws fixing top cover
and then remove the top cover.
5.Remove cross beam,swing louver ,air door lever
Take out the cross beam; take out the
swing louver; remove the screws fixing
air door lever and then remove the air
door lever.
Applicable for 07/09K
cross beam
swing louver
air door lever
swing motor
swing support
swing louver
Applicable for 12/18/21K
screw
air door lever
5HPRYDO3URFHGXUH
Steps
Procedure
6.Remove evaporator
Unsolder each connection pipe (Note:
discharge the refrigerant completely
before unsoldering). Remove the
screws fixing evaporator and then
remove the evaporator.
screw
evaporator
7.Remove evaporator
Unsolder each connection pipe (Note:
discharge the refrigerant completely
before unsoldering). Remove the
screws fixing condenser and then
condenser
screw
remove the condenser.
screw
5HPRYDO3URFHGXUH
Steps
Procedure
8.Remove axial flow blade
Remove the nuts of axial flow blade;
remove the washer and then remove
the axial flow blade.
nut
axial flow blade
9.Remove centrifugal blade
Remove the nuts of centrifugal blade
and then remove the centrifugal blade.
nut
centrifugal blade
5HPRYDO3URFHGXUH
Steps
Procedure
10.Remove motor
Remove the screws of motor support;
take out the motor support; remove
the screws of motor and then remove
the motor.
screw
motor
11.Remove compressor
Unsolder each connection pipe (Note:
discharge the refrigerant completely
before unsoldering). Remove the 3
foot nuts of compressor and then
remove the compressor.
foot nuts
compressor
welding joints
5HPRYDO3URFHGXUH
+HDWLQJDQGFRROLQJPRGHOV
Procedure
Steps
air-inlet panel
1.Remove panel assy
B9
D2
Open t he air-inlet panel; remove the
filter; remove the screws in the middle,
at the left side and right side of the
panel; beat the clasp of cabinet slightly
and then remove the panel.
filter
screw
2.Remove cabinet
Loosen the clasp fixing chassis;
remove the screws fixing the rear part
of cabinet and then pull out the unit.
clasp fixing chassis
5HPRYDO3URFHGXUH
Steps
Procedure
screws
3.Remove electric box
Remove remote control plate, earthing
screw and temp sensor in turn. Then
remove electric box.
temp sensor
screws
electric box
temp sensor
earthing screw
5HPRYDO3URFHGXUH
Steps
Procedure
4.Remove top cover
top cover sub-assy
Remove the screws fixing top cover
and then remove the top cover.
5.Remove cross beam,swing louver ,air door lever
Take out the cross beam; take out the
swing louver; remove the screws fixing
air door lever and then remove the air
door lever.
Applicable for 07/09K
cross beam
swing louver
air door lever
swing motor
swing support
swing louver
Applicable for 12/18/21K
screw
air door lever
5HPRYDO3URFHGXUH
Steps
Procedure
6.Remove evaporator
Unsolder each connecting pipe (Note
discharge refrigerant firstly) and then
remove
screws
fixing
evaporator.
Then remove evaporator.
screws
evaporator
7.Remove condenser
Unsolder each connecting pipe (Note:
discharge refrigerant firstly.) Remove
screws fixing condenser and then
remove condenser.
condenser
screws
screws
condenser
5HPRYDO3URFHGXUH
Steps
Procedure
8.Remove axial flow fan blade
Remove nut fixing axial flow fan blade
and the washer. Then remove axial
flow fan blade.
nut
axial flow fan blade
9.Remove centrifugal fan blade
Remove nut fixing centrifugal fan
blade and then remove centrifugal fan
blade.
nut
centrifugal fan blade
10.Remove 4-way valve assembly
Unsolder pipe of 4-way valve. Then
remove 4-way valve assembly.
4-way valve assembly
5HPRYDO3URFHGXUH
Steps
Procedure
11.Remove motor
Remove screws of motor support and
then remove motor support. Remove
screws of motor and then remove the
motor.
screws
12.Remove compressor
Unsolder each connecting pipe (Note:
discharge refrigerant firstly) and then
remove
3-hold
down
nuts
of
compressor. Remove compressor.
compressor
nuts
motor
-)
GREE ELECTRIC APPLIANCES, INC. OF ZHUHAI
Add: West Jinji Rd, Qianshan, Zhuhai, Guangdong, China, 519070
Tel: (+86-756) 8522218
Fax: (+86-756) 8669426
E-mail: [email protected] www.gree.com
7
For continuous improvement in the products, Gree reserves the right to modidy the product specification and appearance in this manual
without notice and without incurring any obligations.