1
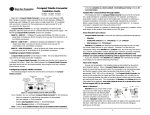
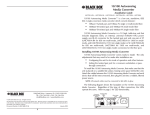
Time
> T-Belt
All About OHC
Timing Belts
Pushrod-actuated valves may have been simple,
but there was no way they could ever offer
the kind of performance available
from SOHC and DOHC designs.
Subaru went OHC two decades ago.
4
|
The End Wrench
>
w w w. e n d w r e n c h . c o m
ay back in the mid-’60s when we first heard of the
idea of driving a camshaft with a rubber belt, we
thought the idea was radical, maybe even implausible. It takes quite a bit of force to turn a cam, after all, and
isn’t perfect synchronization absolutely critical? How could
a belt possibly hope to achieve the precision necessary? Since
time immemorial, engineers had used gears or chains and
sprockets, which were relatively rigid and accurate. Why
mess with that and introduce such an incredible departure
from tradition?
Well, there were lots of good reasons, which we traditionalists were just going to have to accept. First, those belts
aren’t plain rubber.They’re reinforced with tough fiberglass
strands that don’t stretch, and their synchronous teeth are
very accurately made. Next, it’s always been an engineering
challenge to keep the long chains or gear trains necessary for
overhead cam engines quiet and trouble-free. Also, if there
was a failure of a chain, a sprocket or a gear, the oil tightness
of the engine would have to be violated to perform the
repair, and that meant there was always the potential of
comebacks for lube leaks. A timing belt is inherently quiet,
and its replacement is an external job.
W
Snap!
Against those positive points, however, must be weighed
a major negative:A belt may break unexpectedly at any given
moment, which will stop a car as thoroughly as a thrown rod
would (not a common occurrence with the tough Subaru
bottom end). With interference-type engines, which have
nasty collisions between pistons and valves, or perhaps
between intake and exhaust valves on DOHC designs, this
can mean a serious financial setback. Also, as one independent repair shop owner puts it, “Even if it’s a non-interference
engine, you’re still gonna be walking.”
Subaru went from OHV to OHC in 1985, and the
change allowed for vastly improved engine performance.
Generally, durability and dependability were good, but not
perfect. That 1.8L boxer, which remained in the Loyale
through ‘94 (the newer Impreza 1.8L is based on the singlebelt Legacy 2.2L), had two somewhat troublesome timing
belts. Techs used to say that they didn’t make it to the recommended replacement interval (60,000 miles), and that
you could tell the belt was ready to go when you heard a
knock at the distributor.
As a former Subaru trainer tells The End Wrench, “With
the old-style timing belts, the first symptom was distributor
knock. What you’re hearing is gear backlash, which sounds
more destructive than it really is. Pushing on the distributor
housing will isolate the source of the knock.” The newer
design engines use a hydraulically-actuated automatic
adjuster and a single belt with curvilinear teeth, which make
for much longer belt life (the shape creates less friction and
therefore runs cooler). In fact, since 1996 Subaru has said
you can go 105,000 miles before replacing the belt on a 2.5L
(the 2.2L Legacy motor offered through ‘98, however, has an
interval of 60,000).
Here’s the original 2.2L Legacy single-belt set-up. Note that the arrows on the cam sprockets are for piston position, not valve timing.
Spring 2005
•
Number 29
|
5
This is what the 2.2L hydraulic tensioner looks like inside.
8
|
The End Wrench
>
w w w. e n d w r e n c h . c o m
Simply stated, Subaru vehicles have fewer OHC timing
belt problems than other cars, just as they give less trouble
in general.The O.E. belts themselves are of the highest quality, and the sprockets are finely made and run true. The
hydraulic tensioner mechanism keeps just the right amount
of pressure on the backside of the belt. But this is no excuse
for exceeding the interval.
Subaru adopted the curvilinear belt configuration long ago because it builds up less
heat than the trapezoidal-type does.
Getting The Job
useful life. That means you’re seeing many high-mileage
specimens at your door, a large percentage of which are
owned by people who’ve never looked at
the maintenance recommendations and are often way
beyond the replacement interval — a breakdown just waiting
to happen.
Failure Factors
But there’s more to belt-change intervals than just
mileage. Heat is the main killer of rubber products in general and timing belts in particular. So, if you live in a hot
climate you can figure that you’ve got to do belt replacements before the recommended mileage is reached, certainly not after. That doesn’t mean that those of you who
live in relatively cold places can let your customers slide,
however.There’s summer most everywhere cars are in use,
after all.
So, the recommended replacement interval isn’t necessarily a figure cast in stone. Use common sense on a case-by-case
basis when it comes to timing belts. If the car is being operated at high speed in hot areas, time may be just as important
a factor as mileage.While nobody likes being accused of overselling, that customer who’s left stranded somewhere would
be a much greater blotch on your reputation.
Oil and antifreeze are also very destructive to timing
belt rubber. That little oil drip out of the front cover may
not be bothering the owner of the car much, but you’d be
doing him or her a favor by explaining how much timing
belt life is shortened by such contamination. Also, this
lends justification to the addition of seal replacement to the
belt job.
What Happened?
Although these replacement recommendations are
clearly stated in the owner’s manual maintenance section,
for some reason this is still a frequently-overlooked service
opportunity. It’s a pretty easy job to sell if you take the time
to explain to your patrons the consequences of putting it
off. As one shop owner says, “We highly recommend it, and
one of the things we do is watch our service intervals on
our computer. If it’s a 60,000 interval and he’s in here at
57,000, he’s got a printout and an estimate.”
Another independent service shop owner goes even further. “No matter what the car’s in for, if it’s got a timing belt
the tech writes ‘timing belt?’ on the work order, and the
office checks to see if we’ve ever put one on that car,” he says.
“If not and it’s getting near the recommended mileage, we
have a little talk with the car’s owner.” Also, when you call
this shop and you’re put on hold, a nice, professional voice
tells you, “Most manufacturers recommend that you replace
your overhead cam timing belt on a regular basis. Have you
had yours replaced?”
Although the 105,000-mile interval worries some people, the experience of the Subaru specialists we’ve talked to
is that they rarely if ever fail before that. Of course, Subaru
owners tend to put lots and lots of miles on their cars, so
that mileage may only represent, say, a third of the vehicle’s
Timing belt problems will result in a customer telling you
that his car (a) suddenly refused to fire up, (b) just stopped
dead, or (c) has little power or a weird idle. Here are some
sensible policies to follow whenever you’re presented with
one of these situations.
Naturally, diagnosis comes first. In the case of a no-start,
find out if the cams are turning. In some Subaru engines, you
can look down into the oil filler cap and watch the cam during
cranking. Otherwise, see if you can get an idea by looking
through the gaps in the belt covers. If there’s no movement,
you’ve uncovered the problem instantly.
Another simple check you can use on older models that have
plug wires is to blow the dust off your timing light, hook it up,
then crank. If there’s no flash, maybe the distributor shaft isn’t
turning because it’s no longer connected to the crank. If you’ve
got spark, but the marks are way out or wave all over the place,
you’ve found evidence of jumped time or loose sprockets.
Of course, direct inspection will give you the most definitive information.The belt may be broken, frayed, or have worn
or disintegrating teeth. If it’s chewed up on its inner surface,
check the pulleys.A small nick or corrosion can ruin the rubber
in no time.“We check all idlers and pulleys carefully and replace
them if there’s any roughness at all,” says one independent.
Spring 2005
•
Number 29
|
9
T-Belt Time
independent Subaru service specialist tells The End Wrench,
“I know you’re supposed to immediately do a disassembly
and inspection if a 2.5L snaps a belt. But you won’t do any
damage if you remove the spark plugs, rotate the crank
carefully so that all the pistons are at half-mast, then do a
cylinder leak-down test. That’ll tell you if any valves are
bent. Sometimes you luck out and the crankshaft stops
spinning before any damage is done. That would be good
news to the customer. Maybe for you, too, if you find
other types of service to be more profitable than internal
engine work.”
Those sprockets have to be in absolutely perfect condition or the best belt in
the world won’t last. Look them over carefully for nicks, corrosion, rough
areas, etc., and replace them if there’s any question. Of course, never turn
them with a chain wrench or anything else that could possibly gouge or
scratch the teeth.
Heavy Hitters
Unfortunately, you can’t make an accurate estimate
of the job until you find out whether or not the engine is
of the interference variety. If it is, the repair may have to
include pulling the heads for the installation of some
new valves.
Unlike most other Asian engines, Subaru 1.8L and 2.2L
engines are freewheeling — no bent valves if the belt should
break. We consider this good engineering practice and
the mark of a company that really believes in giving its
customers solid, long-lasting products. Of course, even
though there won’t be catastrophic internal engine damage,
the car will stop dead, perhaps stranding a family in an awkward situation, so replacement at the proper interval is still
very important.
Meanwhile, it was impossible to accomplish the freewheeling feature given the crowded combustion chamber of
the 2.5L boxer and still achieve maximum performance and
efficiency. So that motor is indeed “a hitter,” as we technicians put it.
But there’s more to the story. On the 16-valve DOHC
version, if the cams are out of synch there’s a good chance
the intake and exhaust valves will collide with each other,
perhaps bending them. So, turn those sprockets with as little
force as possible, and if you feel anything touch, go back the
other way.
Which brings us to an interesting question: Just because
it’s supposed to be a hitter, did it actually hit? And, if so,
did this collision do any valve damage? As one exceptional
10
|
The End Wrench
>
An old-fashioned cylinder leak-down test can help you find out if that snapped or
slipped belt has caused valve damage. Remove all the plugs, rotate the crankshaft
very gently until all the pistons are at half-mast, lock it there, turn the cams until
the valves are closed, and introduce compressed air through this gauge into each
spark plug hole in turn.
Another logical alternative is to hang a belt and do a
traditional compression test. “The first thing we tell the
customer is that we need to put on a new belt, then do a
compression test,” an award-winning independent says.
“You don’t have to reassemble it completely, but just put it
back together enough to crank it. We’ve found that
chances are pretty good that there’s no damage.” Another
shop owner corroborates, saying, “Hang a belt and do a
compression test.We always explain up front that this is an
estimate. If the compression test shows a problem, we stop
there and call the customer with our suggestions.”
One authority reports that about 25% of interference
engines will survive belt failure without serious damage, but
he adds as a warning that it takes very little drop off in engine
vacuum (due to slightly bent valves) and the consequent
MAP sensor voltage increase to trigger an emissions failure
due to an overly rich condition.
In Synch
Neck-snapping performance? You’re just not going to
get it if you’re even one tooth out. So, whenever you’ve
got what appears to be a valve timing problem, look up
w w w. e n d w r e n c h . c o m
the alignment marks (see sidebar). Remember that a onetooth mistake will commonly put timing off by about
15 degrees.
We don’t know what your experience has been, but
we’ve seen and heard about numerous out-of-synch cases
due to faulty assembly, some of which not only resulted in
poor performance, but also set DTCs (Diagnostic Trouble
Codes). One shop owner gives us an example: “We’ve
fixed lots of cars that didn’t run right after they’d had a
new belt installed,” he says. “We just did one the other day
that had been to two other shops with a complaint of poor
power. It had a code in the computer for the crankshaft
position sensor, but the sensor was sending out a perfect
signal. The idea just came to me that the timing might be
off.When we pulled the cover there was a brand new belt,
but it was one tooth out.We put it on right and it ran great
and the code never came back.”
Identifix often gets calls from techs stumped on a nostart with supposedly all the magic ingredients: Spark, fuel,
and compression at 110 psi.The problem is a skipped belt.
A properly timed car will typically crank out 175 psi. Two
teeth off will drop it to around 110 and the engine won’t
start.You might want to think about checking ignition timing while cranking the engine.
Also, faulty valve timing is a common cause of emissions
test failures for excessive CO.
Water Pump?
Concern for your patrons and simple logic both dictate
that you think about installing a new water pump whenever you’re replacing a timing belt on a Subaru. As one specialist who “eats, sleeps and breathes Subaru” puts it,
“We try to encourage customers to replace the water
pump when we do a timing belt because it represents a
real savings in labor costs. And the O.E. pump only costs
$85 to $92.”
Another shop owner adds, “In all cases where the water
pump is driven by the timing belt we recommend that the
pump be replaced at the same time, but we let the customer
make the decision.”
Wary of being accused of over-selling, an award-winning
independent takes a slightly different tack. “Our policy is
that we tell the customer that we’re not saying the water
pump is bad, but that we’ll examine it carefully,” he says.
“We’ll look at the weep hole and feel roughness or play in the
bearing. We don’t want them to think we just want to put
parts on. With interference-type engines, we’re really critical about pumps because if the bearing gets wobbly or seizes,
valves will be bent.”
Our opinion? Well, you could skip the new pump on
a 60,000-mile interval engine without being accused of
dereliction of duty, but most water pumps are getting pretty
Spring 2005
•
Number 29
|
11
T-Belt Time
near the end of their useful life by 105,000, so we definitely believe replacement is justified — it’s a valuable
service for the customer that’ll save him or her money in
the long run. It’ll also add profit for you.
■
Never bend a belt to a radius of less than 2.5 in.
■
Timing belt service is no place to economize with discount parts. As one specialist says, “We use nothing but
O.E. belts. If I ever have to send the car back to the
dealer for any reason, I want to be comfortable with
what I’ve installed.”
■
A high-performance, low-stretch T-belt is available from
SOA that cuts valve timing error from 1% (that can be
over three degrees) to .07%. That’s more accurate
than even a chain would be, so it should be popular with
tuners who are trying to wring every last horse out
of their engines. It carries a 70,000-mile replacement
recommendation. ■
Random Notes
We’ll conclude with some miscellaneous information
that you won’t find in any service manual:
■
A big thing to watch out for is damaging the tensioner
assembly when you compress its rod for installation, a
potential problem you avoid completely when you buy a
new tensioner to go with the fresh belt. It’ll come
retracted, so all you have to do is bolt it on, thread the
belt and pull the pin.
■
Always tighten the sprocket bolts to specifications. If they
loosen up it can cause hogged-out key-ways, hard-todiagnose drivability problems, and sometimes DTCs.
■
The screws that hold the 2.2L oil pump together tend to
come loose, which can direct pressure through the front
seal, thus saturating the belt. There’s no need to replace
the pump. Just reinstall the screws with high-strength
thread locker.
12
|
The End Wrench
>
w w w. e n d w r e n c h . c o m
Foolproof:
Step-by-Step R&R
f you follow the instructions below to the letter when
removing and reinstalling a late-model Subaru SOHC
timing belt, there’s little chance of a mistake — or a
comeback (of course, if you’ve got it off, you might as well
install a new one, which makes painting marks on the old
belt superfluous). Just do it:
I
1. Remove the radiator and air conditioner fans.
2. Remove the accessory belt cover, then the belt or belts.
3. Remove the accessory belt pulley from the crankshaft
nose. Use special tool ST 499977100 to lock the crank
in place.
4. Remove the left and right belt covers.
Spring 2005
•
Number 29
|
13
T-Belt Time
5. On manual transmission models, remove the the two
bolts that retain the timing belt guide above the crankshaft belt sprocket, then remove the guide.
6. If the alignment mark and/or the arrow indicating the
proper direction have faded away, paint on new marks
before disassembly as follows:
a. Using a special crankshaft socket (ST 499987500 or
equivalent), turn the crank until the mark on its
sprocket is aligned with the notch in the engine block,
the mark on the passenger’s side cam sprocket (c)
lines up with the seam between the cylinder head and
cam cap (d), and that the driver’s side cam sprocket
mark (e) and the belt cover notch (f) are in alignment.
b. Paint your own marks on the back of the belt corre-
sponding to the teeth that match the three points of
alignment. Even if you’re replacing the belt, the old
one can serve as a backup reference. Of course, if the
belt has snapped, forget it.
14
|
The End Wrench
>
w w w. e n d w r e n c h . c o m
Note: Here’s a great check — there should be exactly 44 teeth between the mark on
the crank sprocket and the one on the passenger’s side cam pulley, and 40.5 teeth
between the crank mark and the driver’s side cam mark.
7. Remove both lower t-belt idler pulleys
(one has teeth), then remove the belt
itself.
Spring 2005
•
Number 29
|
15
T-Belt Time
8. Remove the automatic belt tension adjuster assembly.
a. Using a vertical press (NOT a horizontal vise) and a
force of no more than 66 lbs., SLOWLY push the
adjuster rod down into the assembly — take at least
three minutes to allow the oil to bleed out. Go only far
enough to bring the end of the pin flush with the face
of the cylinder so that the stopper pin holes line up.
b. Insert a 2 mm (0.08 in.) diameter pin or Allen
wrench through the holes in the cylinder and adjuster
rod, and release the pressure.
10. Install the tensioner and tighten its bolt to 29 ft. lbs.
9. Before installing either a new or used belt, the automatic
(39 Nm).
tensioner must be retracted and pinned as follows:
11. Install the driver’s side idler pulley (the one with teeth)
and torque its bolt to 29 ft. lbs. (39 Nm).
Note: Make sure none of the pulleys has moved from its timing mark.
16
|
The End Wrench
>
w w w. e n d w r e n c h . c o m
12. Carefully install the belt making sure its arrow is point-
ing in the right direction of rotation.
Big Drag
13. Install the other idler pulley and torque its bolt to 29 ft.
lbs. (39 Nm).
14. Check the timing marks again, then pull the adjuster
locking pin.
15. On manual transmission models, install the timing belt
guide above the crankshaft sprocket. Adjust the clearance
at three places between the back of the belt and the guide
to 0.039 in. (1 mm), then tighten the attaching bolts to 7
ft. lbs. (10 Nm).
ne successful independent tells us about a case that can
teach technicians several good lessons.The car came in
with a stripped belt, so he put on a new one and tried
to start it. No go. He did a compression test and all the cylinders were low, but he was smart enough not to jump to conclusions. Instead, he tried to back up his findings with a
cylinder leak-down test. Lo and behold, no significant leakage anywhere.That said timing to him, but he checked again
and the marks were aligned perfectly.
The problem? One sprocket had sheared the Woodruff
key and rotated on the camshaft. When he put a wrench on
the cam and tried to turn it, he found it took a whole lot
more effort than he’d normally expect.
Then the story came out (which is strong evidence of the
importance of careful customer communications at the outset): The car’s owner had been to a quick lube, and the oil
light came on shortly thereafter as he was driving down the
highway. He stopped and added oil, then the same thing happened again. Finally, it just stopped running and found its
way to the repair shop on the hook.
A loose oil drain plug was the culprit. Apparently, the
head had been badly starved for oil and the cam seized in
its bearings, but freed up somewhat after everything
cooled off. ■
O
16. Install the belt covers.
17. Install the crankshaft accessory belt pulley, then the
accessory belt or belts and the safety cover.
18. Install the radiator and air conditioner fans. ■
Spring 2005
•
Number 29
|
17