1
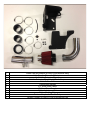
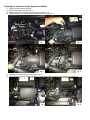
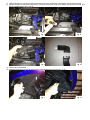
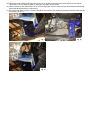
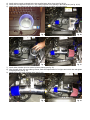
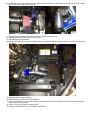
INSTALLATION INSTRUCITONS
Hyundai Veloster Cold Air intake
TurboKits.com – 1000 Old County Cir., Windsor Locks, CT 06096 – 860-676-2929
1
1
1
1
1
4
1
5
1
1
1
1
Intake Pipe with Bracket & Valve Cover Breather Bung
High Flow Air Filter with 3” Adapter
Cold Air Extension Pipe
Cold Air Extension Pipe Velocity Stack Adapter
Cold Air Box & Lid
Cold Air Box Screws
2.5” Worm Drive Clamp
3” Worm Drive Clamps
Rubber Isolator and Nut
Rubber Molding Strip
Reducer Coupler for Throttle Body
Straight Coupler for Filter to Cold Air Extension Pipe
Read This First
Study these instructions completely before proceeding. Engine damage may occur if any component within these instructions
is improperly installed. TurboKits.com or any of its distributors cannot be held responsible for damages as a result of negligent
or improper installation. This complete intake system can be installed using common tools and automotive procedures, but
installer must have a thorough knowledge of automotive engine operation and feel comfortable working on the vehicle. If in
doubt, contact TurboKits.com Support at http://www.turbo-kits.com/support/ between the hours of 10:00AM and 6:00PM EST,
Monday through Friday.
Remove the intake system from its carton and inspect for any obvious physical damage. All kit components are thoroughly
inspected and carefully packaged prior to shipment from the factory. If any shipping damage is evident, contact your supplier
and request that they process a claim with the shipper involved. Be sure to review the packing to verify that you have all
necessary system components to proceed. If any components are missing, contact TurboKits.com Support at
http://www.turbo-kits.com/support/.
Although this intake system has been designed to use many of the factory emissions controls, it is not “smog” legal in
California, and therefore recommended for “off road” use only. In other states, check local laws regarding aftermarket
modification to emission controlled vehicles.
The information contained in this publication was accurate and in effect at the time the publication was approved for printing
and is subject to change without notice or liability. TurboKits.com reserves the right to revise the information presented herein
or to discontinue the production of parts described at any time.
SAFETY REQUIREMENTS: It is recommended to follow these precautions.
• Always wear safety glasses & gloves.
• Turn the ignition switch to the OFF position & disconnect the battery.
• Always use properly rated jack stands when working under the vehicle.
• Prevent unexpected vehicle movement by using wheel chocks and/or parking brake.
• Operate the vehicle only in well ventilated areas.
• Do not smoke or use flammable items near or around the vehicle’s fuel system.
• Keep hands, clothing and other objects away from moving parts when engine is running.
SUPPLIES: It is recommended to have the following items before beginning installation.
• Hyundai factory service manual, for your model year Veloster
• 10mm Socket & Ratchet
• Pliers
• Phillips Screwdriver
• A large table or bench, and plenty of adjacent available workspace
• Standard selection of automotive tools, primarily metric sizes
• The ability to securely lift the vehicle at least a few feet off the ground
Test Before Starting: It is recommended to have the following items before beginning installation.
• Compression Test, this will tell you if the engine is healthy to begin with
• Disconnect the battery, this will reset the factory ECU
TERMS AND CONDITIONS
The following Terms and Conditions are effective November 1, 2006 and are subject to change without notice.
SHIPPING DAMAGE CLAIMS
A claim for damage in transit must be made by the customer directly to the shipping agency as soon as the damage is
discovered. TurboKits.com is not liable for the condition of the merchandise as handled by the shipper once the shipper has
accepted delivery from TurboKits.com.
RETURNED GOOD AUTHORIZATION TRACKING NUMBER
TurboKits.com will only accept product returns, repair orders / upgrades, and warranty requests that have been approved and
are returned with a corresponding Return Authorization (RA) tracking number. Contact TurboKits.com for approval and the
RA number. Write the RA number clearly on the outside of the package and include it inside the package. This is very
important in allowing us to properly identify and process your request. Failure to comply with this requirement will result in the
delay of processing or the product being returned to you.
RETURN POLICY
All returns & cancellations are up to the sole discretion of TurboKits.com. Return must be made within 15 days of receipt.
Please open and inspect all packages as soon as they are received. There will be a 20% cancellation / restocking fee
assessed to all returns. Installed parts are not eligible for return. "Custom Order" and "Made to Order" parts are sold "as is"
and are not eligible for return or cancellation. No goods will be accepted without prior return authorization from TurboKits.com.
Call for approval and RA (Return Authorization) number.
*No returns will be accepted without an RA number.
*No returns will be accepted after ninety (15) days from the original shipping date from TurboKits.com unless approved.
*All approved returns are subject to a 20% restocking charge NO EXCEPTIONS.
*The original invoice must accompany the return.
*Approved returns will be issued credit only.
REFUSED SHIPMENTS
Sending a shipment back to TurboKits.com does not automatically constitute the right to a refund or credit. TurboKits.com
may, at its discretion, require different payment means for any reshipped refused shipments. It is the customer's responsibility
to make all arrangements with TurboKits.com for disposition of the refused shipment. Customer is responsible for all outgoing
and return shipping and handling charges regardless of disposition of refused shipment.
WARRANTY PROGRAM
TurboKits.com will repair or replace any new TurboKits.com products that fail, including products used in racing or competition
applications, for a period of one year from the original date of purchase. Warranty is limited to TurboKits.com products and
does not include progressive or subsequential damage and does not cover removal or installation labor or associated parts.
Warranty is non-transferable and must be processed via the original purchaser from TurboKits.com. Contact TurboKits.com
for return approval, RA (Return Authorization) number, and shipping method PRIOR to sending the product to TurboKits.com.
Our Customer Service Representative will provide packaging and shipping instructions. Please include your invoice with the
shipment.
TurboKits.com highly recommends that the installation of mechanical or electrical parts be performed by trained professionals.
Improperly installed products may lead to unsafe and unreliable conditions.
Preparing the Vehicle for Intake System Installation
1)
2)
3)
4)
Remove negative battery terminal
Remove the engine cover (see fig. 1)
Remove valve cover breather hose using pliers (see fig. 2, 3)
Using Phillips driver, loosen and remove the air inlet hose (see fig. 4)
5) Unclamp and remove factory air box top (see fig. 5)
6) Using 10mm socket loosen and remove the (3) 10mm bolt holding the factory air box bottom in (see fig. 6)
7) Using Phillips driver, unlock push pins on the factory air scoop and remove, keep aside, you will use these later
8) Remove scoop from factory air box plumbing, it will just pull out with a little force. Detach the head of the scoop. That
will be reused later (see fig. 7,8,9,10)
9) Remove driver side wheel
10) Using the Philip driver, loosen and remove the undercarriage push pins (see fig. 11,12)
11) Using the Philip driver, loosen and remove the wheel well push pins (see fig. 13,14)
12) Remove the undercarriage / center units 4 driver side 10mm bolts and remove undercarriage (see fig. 15,16)
13) Remove the (1) factory silencer 10mm bolt from underneath. This allow for play in the silencer to get at the remaining
2 bolts (see fig. 17)
14) Locate and remove the hood release cable from the factory air box silencer (see fig. 18)
15) Moving the under carriage and wheel well covers out of the way, loosen and remove the factory air box silencer
10mm bolts. This is a lesson in patience, take your time and it will come lose
16) Remove factory air box silencer from car, if you have Fog lights, check to make sure you have disconnected the fog
light electrical harness from the silencer box.
17) If this has been done correctly, everything should be removed from the engine bay and wheel well and it will look like
this (see fig. 19,20,21)
**DANGER** WASH ANY DEBRIS OUT OF INTAKE PIPE WITH SOAP & WATER BEFORE INSTALLATION **DANGER**
Installing Intake System
1) Install TurboKits.com cold air box using the factory air box 10mm bolts and rubber mounts (see fig. 22, 23, 24, 25)
note: watch clutch cable for clearance, make sure you double check this spot after complete installation and
frequently during the initial drive test
2) Install the velocity stack to the end of the Cold Air Extension Pipe (see fig. 26)
3) Install 3” Coupler onto Cold Air Extension Pipe (see fig. 27)
4) Install reducer coupler to throttle body using supplied worm drive clamp (see fig. 28,29)
5) Install short ram pipe and air filter as 1 unit, coming together at the opening in the cold air box (see fig. 30,31)
6) Install worm drive clamp onto filter and adjust fitment before you tighten everything down
7) Install rubber vibration joint into mount by factory battery (see fig. 32)
8) Align & Install 10mm nut onto rubber grommet, make final adjustments for fit of pipe and cold air box and tighten
everything down (see fig. 33)
9) Install factory valve cover breather hose (see fig. 33)
10) Install cold 3” worm drive clamp onto other side of Cold Air Extension, install cold air extension pipe into filter , adjust
for fit and tighten clamps (see fig. 34,35)
11)
12)
13)
14)
Reinstall engine undercarriage, wheel well cover and undercarriage cover
Reinstall driver side wheel, torque to factory spec
Reinstall factory air duct elbow
Install Cold Air Box cover onto Cold Air Box using the supplies screws and the push pins removed from the factory air
box elbow
15) Reinstall negative battery terminal
16) Double check everything for fit and alignment!
17) Start Car, let idle for 5 minutes, take onto the road slowly cruise through the RPMs in the first 3 Gears (following all
local speed and safety laws!).
18) That’s it, your set, go have fun and be SAFE!
19) Oh yeah, remember to rock your TurboKits.com sticker ☺