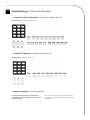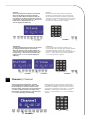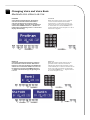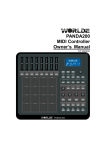
1
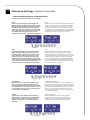
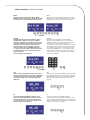
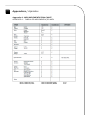
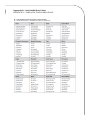
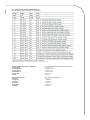
USB/MIDI Keyboard Controller with Rotary Encoders and Trigger Pads
User Manual / Manual do Usuário
Important Safe Instructions
1. Read these instructions before operating this apparatus.
2. Keep these instructions for future reference.
3. Heed all warnings to ensure safe operation.
4. Follow all instructions provided in this document.
Caution
Risk of Electric Shock
Do Not Open
To reduce the risk of electric shock, do not remove cover (or back).
No user serviceable parts inside. Refer servicing to qualified personnel.
5. Do not use this apparatus near water or in locations where
condensation may occur.
6. Clean only with dry cloth. Do not use aerosol or liquid
cleaners. Unplug this apparatus before cleaning.
7. Do not block any of the ventilation openings. Install in
accordance with the manufacturer’s instructions.
8. Do not install near any heat sources such as radiators, heat
registers, stoves, or other apparatus (including amplifiers) that
produce heat.
9. Do not defeat the safety purpose of the polarized or
grounding-type plug. A polarized plug has two blades with
one wider than the other. A grounding type plug has two
blades and a third grounding prong. The wide blade or
the third prong is provided for your safety. If the provided
plug does not fit into your outlet, consult an electrician for
replacement of the obsolete outlet.
10. Protect the power cord from being walked on or pinched
particularly at plug, convenience receptacles, and the point
where they exit from the apparatus.
11. Only use attachments/accessories by the manufacturer.
12. Unplug this apparatus during lighting storms or when
unused for long periods of time.
13. Refer all servicing qualified to service personnel. Servicing
is required when the apparatus has been damaged in any
way, such as power-supply cord or plug is damaged, liquid
has been spilled or objects have fallen into the apparatus, the
apparatus has been exposed to rain or moisture, does not
operate normally, or has been dropped.
14. Before installation, ensure that the voltage and frequency
of power outlet match the power requirements of the
loudspeaker.
15. Disconnect from main power before to make connections
in the loudspeaker.
16. Make sure that the power-cord is never crimped or
damaged by sharp edges. Never let the power-cord come into
contact with other cables. Only handle the power-cord by the
plug.
17. In case to replace the fuse, it must be changed by identical
rate and dimensions.
This symbol on the product or on its packaging indicates that this product
shall not be treated as household waste. Instead it shall be handed
over to the applicable collection point for the recycling of electrical
equipment. By ensuring this product is disposed of correctly, you will
help prevent potential negative consequences for the environment and
human health, which could otherwise be caused by inappropriate waste
handling of this product. The recycling of materials will help to conserve
natural resources. For more detailed information about recycling of this
product, please contact your local city office, your household waste
disposal service or the shop where you purchased the product.
Instruções de Segurança
1. Leia estas instruções antes de operar a unidade.
2. Mantenha estas instruções para referência futura.
3. Siga todos os avisos para assegurar a operação em
segurança.
4. Siga as instruções contidas neste documento.
Caution
Risco de Choque Elétrico
Não Abra
Para reduzir o risco de choque elétrico ou fogo,
não exponha este aparelho à chuva ou umidade.
5. Não utilize este aparelho próximo à água ou em locais onde
ocorra condensação.
6. Limpe usando apenas um pano seco e macio. Não utilize
limpadores em aerosol ou líquidos. Retire o aparelho da
tomada antes de efetuar a limpeza.
7. Não obstrua as aberturas de ventilação. Instale de acordo
com o recomendado pelo fabricante.
8. Não instale o aparelho perto de fontes de calor, tal como
radiadores, fogões, amplificadores e outros aparelhos que
produzam calor.
9. Não inutilize o dispositivo de segurança dos cabos
polarizados e do cabo de três pinos. O cabo polarizado possui
duas lâminas sendo uma, mais grossa que a outra. O cabo de
três pinos possui o pino central para segurança. Se o conector
proporcionado não entra em sua tomada, consulte um
eletricista para o uso de adaptadores ou a troca da tomada.
10. Proteja o cabo de força de ser pisado ou pinçado,
principalmente no conector e no ponto onde o cabo sai do
aparelho.
Este símbolo impresso no produto ou em sua embalagem indica que
este produto não deve ser tratado como lixo doméstico. Ao invés disso,
deve ser encaminhado para centros de coleta / reciclagem de materiais
eletrônicos. Ao garantir que este produto seja coletado da maneira
correta, você irá ajudar a prevenir conseqüências negativas para o
meio ambiente e para a saúde humana. A reciclagem pode ajudar
na preservação de diversos recursos naturais. Para mais informações
sobre centros de coleta e reciclagem de produtos eletrônicos, por favor,
acesse o site: www.lixoeletronico.org
O uso de controles, ajustes ou a execução de
procedimentos que não sejam os especificados neste
manual podem resultar em danos físicos e exposição à
radiação que pode ser prejudicial à saúde.
11. Use apenas acessórios especificados pelo fabricante.
12. Desconecte o aparelho da tomada durante tempestades
elétricas ou quando não for usá-lo por longos períodos.
13. Sempre encaminhe seu aparelho a uma assistência técnica
autorizada. O conserto é necessário sempre que o aparelho
tenha sido danificado de qualquer forma, tal como problemas
na fonte de alimentação, cabo de força, infiltração de líquidos
ou objetos, exposição do aparelho a chuva ou umidade ou
caso tenha sido sofrido alguma queda.
14. Antes de instalar o produto, garanta que a voltagem
selecionada é igual a voltagem da tomada na qual o produto
será plugado.
15. Desligue o aparelho e desconecte o cabo de força antes
de conectar qualquer outro equipamento / acessório em suas
entradas.
16. Assegure-se de que o cabo de energia não está danificado
ou descascado. Nunca utilize o equipamento caso o cabo de
energia esteja descascado ou com a fiação interna aparente.
Nunca desconecte o equipamento da tomada puxando-o pelo
cabo de energia. Sempre conecte e desconecte o equipamento
encaixando / desencaixando cuidadosamente o conector na
tomada.
17. Caso seja necessária a substituição do fusível, garanta que
um técnico realize a troca, utilizando para isso um fusível das
mesmas dimensões e capacidade elétrica.
O símbolo do raio dentro de um triângulo
representa o risco de voltagem perigosa, não
isolada, que pode ter magnitude suficiente para
produzir um choque elétrico severo.
O ponto de exclamação dentro de um triângulo
alerta o usuário quanto a presença de informações
importantes sobre operação na literatura que
acompanha o aparelho.
Introduction / Introdução
The eight fully assignable pads give you the ability
to trigger samples. The eight fully assignable
endless rotary encoders and sliders can be assigned
as135 controllers. The versatile and easy-to-use
Carbon keyboard is a great controller in the studio
and live on stage.
Os 8 pads totalmente endereçáveis proporcionam
o disparo de samples. Os 8 encoders (codificadores)
contínuos totalmente endereçáveis e os sliders
(deslizantes) podem ser endereçados como
controladores 135. O versátil teclado Carbon é fácil de
usar e é um grande controlador de estúdio e ao vivo,
no palco.
Functions / Funções
• 8 trigger pads with velocity
• 2xAssinable Pedal Interfaces (PEDAL A,PEDAL B), which can be assigned as 135 controllers
• 8xAssignable Dials. Each dial can establish an independent channel , and can be assigned as 135 controllers
• 8xAssignable Slider, each slider can be assigned as 135 controllers
• Assignable Pitch Bend Wheel and Modulation Wheel(Wheel P & Wheel M),which can be assigned as 135 controllers
• 6 Buttons for MMC.
• 1xMaster Volume Slider.
• 8 double Function button with shift, providing 15 functions like PROGRAM, CHANNEL, VEL-CURVE, OCTAVE,
TRANSPOSE, BANK M, BANK L, DUAL, SPLIT, MUTE, AFTER TOUCH, CONTROL ASSIGN and etc.
• 10xData entry and +/- button.
• Built-in Memory, which can store/load 6 groups of user’s parameter.
• 1xMIDI OUT,1X MIDI IN
• USB interface, adaptable to USB 2.0(FULL SPEED). Power supplied by USB and DC 9 V.
• Have the ability for future upgrading via USB
• Compatible with Windows XP/Vista/Windows7 and Mac OSX.
• Drive free and hot-plug supported.
• 8 pads disparadores com velocidade;
• 2 interfaces de pedal endereçáveis (Pedal A, Pedal B) que podem ser endereçadas como controladores 135;
• 8 dials endereçáveis. Cada dial pode ser ajustado como canal independente e pode ser endereçado como controlador 135;
• 8 deslizantes (slider) endereçáveis, que podem ser endereçados como controladores 135;
• Rodas Pitch Bend e Modulation (Wheel P e Wheel M), que podem ser endereçadas como controladores 135;
• 6 botões para MMC;
• 1 slider (deslizante) de Volume Master;
• 8 botões de função dupla com shift (alternador), fornecendo 15 funções como PROGRAM, CHANNEL, VEL-CRUVE, OCTAVE,
TRANSPOSE, BANK M, BANK L, DUAL, SPLIT, MUTE, AFTER TOUCH, CONTROL ASSIGN, etc.;
• 10 entradas de dados e botão +/• Memória integrada que pode guardar/carregar 6 grupos de parâmetros de usuários;
• 1 MIDI IN, 1 MIDI OUT;
• Interface USB, adaptável a USB 2.0 (FULL SPEED – VELOCIDADE COMPLETA). Fonte de alimentação por USB e DC 9V;
• Upgrade pode ser realizado através de USB;
• Compatível com Windows XP/Vista/Windows7 e Mac OSX
• Conta com driver grátis e suporte hot plug;
Controls and Connections / Controles e Conexões
1: LCD DISPLAY
2: Slider (49/61 only)
3: Encoders
4: Transport buttons
5: Assignable buttons (49/61 only)
6: Trigger Pads
7: Function buttons
8: Numeric keypad
9: Pitch Bend wheel
10: Modulation wheel
11: Keyboard with Aftertouch
12: Pedal A
13: Pedal B
14: MIDI OUT port
15: MIDI IN port
16: USB 2.0 port
17: DC power socket
18: Power switch
1. Display LCD
2. Slider-deslizante (somente no 49/61)
3. Encoders
4. Botões de Transposição
5. Botão Endereçável (somente no 49/61)
6. Pads Dispadores
7. Botões de Função
8. Teclado Numérico
9. Roda Pitch Bend
10. Roda Modulation
11. Teclado com Aftertouch
12. Pedal A
13. Pedal B
14. Porta MIDI OUT
15. Porta MIDI IN
16. Porta USB 2.0
17. Soquete DC Power
18. Chave Power
Setup / Ajustes
If you intend to connect your Carbon keyboard
to a computer, please read first the following
instructions. If you only intend to use your Carbon
keyboard to control a sound module or synthesizer
using the external MIDI OUT you should skip to
“MIDI Connections”
Caso você pretenda conectar seu teclado Carbon
em um computador, por favor, leia primeiramente
as instruções abaixo. Caso pretenda usar seu
teclado Carbon para controlar um módulo de som
ou sintetizador, usando a saída externa MIDI OUT,
consulte a seção “Conexões MIDI”
Minimum System Requirements:
If you are using your Carbon with a computer, the
following minimum system requirements apply:
Requisitos Mínimos de Sistema:
Caso esteja usando o Carbon com um computador,
aplicam-se os seguintes requisitos mínimos:
Windows
Windows
Pentium 3 800 MHz or higher
Pentium 3 800 MHz ou superior
(CPU requirement may be higher for laptops)
Requisito de CPU pode ser maior para laptops
256 MB RAM
256 MB RAM
DirectX 9.0b or higher
DirectX 9.0b ou mais recente
Windows XP (SP2) or higher
Windows XP (SP2) ou mais recente
(Windows 98, Me, NT or 2000 not supported)
Windows 98, Me, NT ou 2000 não são suportados.
Mac OS
Mac OS
Macintosh G3* 800/G4* 733 MHz or higher
Macintosh G3* 800/G4* 733 MHz ou mais recente
(CPU requirement may be higher for laptops)
Requisito de CPU pode ser maior para laptops
OS X 10.3.9 with 256 MB RAM
OS x 10.3.9 com 256 MB RAM
OS X 10.4.2 or greater with 512 MB RAM
OS x 10.4.2 ou mais recente com 512 MB RAM
*G3/G4 accelerator cards are not supported.
Cartões Aceleradores *G3/G4 não são suportados.
Using Carbon with your software
Usando Carbon com seu software
If you have connected external MIDI gear like
a drum machine or another keyboard to your
Carbon’s MIDI IN port, this gear can be interfaced
to the computer by selecting the listed Carbon
input port.
Se você conectou um equipamento externo MIDI como
uma bateria eletrônica ou outro teclado na porta MIDI
IN do Carbon, este equipamento pode ser interligado
ao computador, através da seleção da porta de entrada
do Carbon.
This way, your Carbon is acting as a MIDI to USB
interface.
Desta forma, seu Carbon está atuando como uma
interface MIDI para USB.
The port names are defined as USB Audio Device
when connecting to USB port. It will appear as
a single USB Composite Device in the Device
Manager.
Os nomes das portas são definidos como USB Audio
Device (Aparelho de Áudio USB) quando conectado a
uma porta USB. Aparecerá como um simples Aparelho
de Composição USB no gerenciador de aparelhos.
MIDI Connections / Conexões MIDI
The MIDI Out port accepts a standard 5-pin DINtype MIDI plug (available from most professional
audio retailers).
A porta MIDI Out aceita plug padrão 5 pinos DIN
tipo MIDI (disponível na maioria das lojas de áudio
profissional).
The MIDI Out port can be used to connect Carbon
to a hardware sequencer, an external synthesizer
or sound module, for example.
A porta MIDI Out pode ser usada para conectar
o Carbon a um sequenciador de hardware, um
sintetizador externo ou módulo de som, por exemplo.
Power Supply / Fonte de Alimentação
If you are using your Carbon with a computer via
its USB port, there is no need for an external power
supply. Your Carbon will draw its power from the
computer.
Se estiver usando seu Carbon com um computador
através de sua porta USB, não haverá necessidade de
fonte de alimentação externa. Seu Carbon irá extrair a
energia do computador.
However, if you are intending to use your Carbon
without connecting to a computer’s USB port, then
you will need to use an external power supply.
No power supply is included in the box, so please
select one that meets the following requirements:
Contudo, se pretender usar seu Carbon sem conectar a
uma porta USB de computador, então necessitará usar
uma fonte de alimentação externa. Não há fonte de
alimentação inclusa na embalagem. Então, por favor,
selecione uma que tenha os seguintes requisitos:
< 9 V DC
< 250 mA – 300 mA
< Center positive
< 9 V DC
< 250 mA – 300 mA
< Positivo Central
Basic MIDI Control From Your Carbon
Controle MIDI Básico do seu Carbon
Your Carbon controller will not make any sound
unless it is connected to a computer or other
external MIDI gear. This is because the
Carbon sends MIDI data when you play it and does
not produce sound on its own. Instead, it is used to
control a virtual instrument on your computer or a
MIDI sound module to generate sounds.
Seu controlador Carbon não produz qualquer som, a
não ser que esteja conectado a um computador ou
outro aparelho externo MIDI. Isto porque o Carbon
envia dados MIDI quando você toca e não produz som
por si próprio. Como alternativa, é usado para controlar
um instrumento virtual no seu computador ou um
módulo de som MIDI para gerar som.
This is a good place to introduce you to the way
we approach the differences between the Carbon
61 and 49 and the Carbon 25. The appearance and
functionality of the Carbon 61 and 49 are the same,
it’s just the size of the keyboard that is different, so
when we give instructions for these models, these
two are always grouped together. The Carbon 25
looks different and a number of its functions are
accessed in a different way, so for this model we
will always give you a separate set of instructions.
Esta é uma boa hora para lhe apresentar as
diferenças entre o Carbon 61, 49 e 25. A aparência e
funcionalidade do Carbon 61 e 49 são as mesmas –
apenas o tamanho do teclado é diferente – por isso,
quando apresentamos instruções para estes modelos,
estarão sempre juntas. O Carbon 25 possui aparência
diferente e algumas de suas funções são acessadas de
forma diferente. Por este motivo, as instruções serão
fornecidas separadamente.
Function Keys / Chaves de Funções
• Carbon 49 and 61 Functions / Funções do Carbon 49 e 61
Carbon 49/61 keys / Teclas do Carbon 49/61
• Carbon 25 Functions / Funções do Carbon 25
Carbon 25 keys / Teclas do Carbon 25
• Numeric Keypad / Teclado Numérico
Use the numeric keypad to enter values during
programming. The LCD display will show the values
as you enter them.
Use o teclado numérico para inserir valores durante a
programação. O display LCD mostrará os valores assim
que inseri-los
The Keyboard / O Teclado
When you play the keyboard, MIDI note messages
are sent. These messages are read by your
computer software or external MIDI gear and used
to generate sound accordingly.
Quando você toca o teclado, mensagens de nota MIDI
são enviadas. Estas mensagens são lidas pelo software
do seu computador ou equipamento MIDI externo e
usadas para gerar som.
• Velocity Curve / Curva de Velocidade
Every time you press a key, a MIDI note message
is sent with a velocity value between 0 and the
maximum; this value specifies how hard you
pressed the key. Since different people have
different playing styles, your Carbon offers a
number of different velocity curves. You should
experiment with the different velocity curves to
find the curve that best suits your playing style.
Toda vez que pressiona uma tecla, uma mensagem
de nota MIDI é enviada com um valor de velocidade
entre 0 e o máximo; este valor especifica qual a pressão
com a qual você pressionou a tecla. Uma vez que
pessoas diferentes possuem estilos de tocar diferentes,
seu Carbon oferece número diferente de curvas de
velocidade. Você deve experimentar as diferentes
curvas para encontrar aquela que melhor se adapta ao
seu estilo de tocar.
• To change the velocity curve / Para trocar a curva de velocidade
CURVE
Velocity Curve selection function button. When
this button is valid, the LCD displays the ‘VelCURVE’
and the number of current velocity curve. It can
be adjusted by +/- button or Numeric Button
and confirmed by Enter button. The initial value
is 1, adjusting scale is 1~6.The LCD displays the
following:
CURVE
Botão de função de seleção de curva de velocidade.
Quando este botão está válido, o LCD mostra
“VelCURVE” e o número da atual curva de velocidade.
Pode ser ajustada através do botão +/- ou Botão
NUMERIC e confirmada pelo botão Enter. O valor
inicial é 1 e a escala de ajuste é 1~6. O LCD mostra o
seguinte:
OCTAVE
Octave adjusting function button. This function
allows the keyboard to change the Pitch up/
down by octave. When this button is valid, the
LCD shows the ‘OCTAVE’ and the value of current
transposition. It can be adjusted by +/- button. The
initial value is 0,adjusting scale is -4~5.
The LCD displays the following:
OCTAVE
Botão de função de ajuste de oitava. Esta função
permite que o teclado mude o Pitch up/down pela
oitava. Quando este botão está válido, o LCD mostra
“OCTAVE” e o valor da transposição atual. Isto pode ser
ajustado pelo botão +/- . O valor inicial é 0 e a escala
de ajuste é -4~5. O LCD mostra o seguinte:
TRANSPOSE
Transpose adjusting function allows the keyboard
to change the Pitch up/down by semi-tone.
When this button is valid, the LCD displays the
‘x’pose’ and the value of current transpose. It can
be adjusted by +/-button. The initial value is 00,
adjusting scale is -12~12. The LCD displays the
following:
TRANSPOSE
Função de ajuste de transposição permite que o
teclado mude o Pitch up/down pelo semitom. Quando
este botão está válido, o LCD mostra “X POSE” e o
valor da transposição atual. Isto pode ser ajustado pelo
botão +/- . O valor inicial é 00 e a escala de ajuste é
-12~12. O LCD mostra o seguinte:
Channel / Channel
Channel selection function button, selecting
current MIDI channel. When this button is valid,
the LCD displays the ‘Channel’ and the current
channel number. The channel can be selected with
+/- Button or Numeric button and confirmed by
Enter button. The initial setting is 1,adjusting scale
is 1~16.The LCD displays the following:
Botão de função de seleção de canal, selecionando o
canal MIDI atual. Quando este botão está acionado, o
LCD mostra “CHANNEL” e o número do canal atual. O
canal pode ser selecionado com o botão +/- ou botão
NUMERIC e confirmado pelo botão Enter. O ajuste
inicial é 1 e a escala de ajuste é -1~16. O LCD mostra o
seguinte:
Changing Voice and Voice Bank
Mudando Voz e Banco de Voz
PROGRAM
Voice adjusting function button. adjusting the
voice of current channel. When this button is
valid, the LCD displays the ‘Program’ and the
current voice number. The voice can be adjusted or
selected with NUMERIC button or +/-Button. The
initial setting is 00,adjusting scale is 0~127.The LCD
displays the following:
PROGRAM
Botão de função de ajuste de voz, ajustando
a voz do canal atual. Quando este botão
está acionado, o LCD mostra “Program” e o
número de voz atual. A voz pode ser ajustada
ou selecionada com o botão NUMERIC ou +/-.
O ajuste inicial é 00, escala de ajuste é 0~127. O
LCD mostra o seguinte:
BANK L/M
Voice bank adjusting function button, adjusting
the voice bank of current channel. When these
buttons are valid, the LCD displays the ‘BANK L/M’
and the current voice bank number. The voice can
be adjusted or selected with NUMERIC button or
+/- Button. The initial setting is 00,adjusting scale
is 0~127.
BANK L/M
Botão de função de ajuste de banco de voz,
ajustando o banco de voz do canal atual.
Quando estes botões estão acionados, o LCD
mostra “BANK L/M” e o número do banco de voz
atual. A voz pode ser ajustada ou selecionada
com o botão NUMERIC ou +/-. O ajuste inicial é
00, escala de ajuste é 0-127.
MIDI Controller Messages / Mensagens de Controlador MIDI
There are 135 MIDI controller messages that are
used for controlling the MIDI-adjustable parameters
in your software or on your external MIDI gear.
Examples of these controllable parameters include
volume, pan, expression, reverb, chorus and
portamento.
Existem 135 mensagens de controlador MIDI que são
usadas para controlar os parâmetros MIDI-ajustáveis
no seu software ou no seu equipamento MIDI externo.
Exemplos destes parâmetros controláveis incluem
volume, pan, expression, reverb, chorus e portamento.
Each of the controls on your Carbon keyboard
is able to send any of the 128 standard MIDI
controller messages to control such parameters.
Please note that in order for these effects to work,
the MIDI device you are sending to must be able to
receive these messages. A full list of these control
messages is given in Appendix C.
Cada um dos controles no seu teclado Carbon está
apto para enviar qualquer das 128 mensagens
do controlador MIDI padrão para controlar tais
parâmetros. Por favor, note que a fim de que estes
efeitos funcionem, o aparelho MIDI ao qual você
está enviando deve estar apto para receber estas
mensagens. Uma lista completa destas mensagens de
controle está no Apêndice C.
For example, you may want to set the Modulation
wheel to control the reverb amount. This is done
by assigning controller 91 to the Modulation wheel.
Por exemplo, você quer ajustar a roda Modulation para
controlar o montante de reverb. Isto é feito através do
endereçamento do controlador 91 à roda Modulation.
Examples of other popular effects are listed in the
table below. (Please consult Appendix C for the full
list.)
Exemplos de outros efeitos populares estão listados
na tabela abaixo. Consulte o Apêndice C para a lista
inteira.
Effect / Efeito
Control Number / Nº de Controle
Modulation
1
Volume
7
Pan
10
Expression
11
Reverb depth
91
Chorus depth
93
There are many different types of virtual
instruments available and most of these respond
to MIDI controller messages, allowing you to
control a variety of parameters from your Carbon
keyboard. Please review the manual that came with
your software or external gear to see what these
controller numbers are.
Existem vários tipos diferentes de instrumentos virtuais
disponíveis e a maioria deles responde às mensagens
do controlador MIDI, permitindo que você controle
uma variedade de parâmetros do seu teclado Carbon.
Por favor, reveja os manuais que vêm com seu
software ou aparelho externo para verificar quais são
estes números de controladores.
• Programming the Controls / Programando os Controles
When programming a physical controller on your
Carbon, the controller that was last used will be
the first one selected for programming. To select a
different physical controller for programming,t.he
method is: Move the physical controller you wish to
program ,and press the assignable button.
When in assign, the LCD displays the following:
Quando programando um controlador físico no
seu Carbon, o controlador que foi usado por último
será o primeiro selecionado para programação. Para
selecionar um controlador fisicamente diferente
para programação, o método é: mova o controlador
físico que você deseja programar e pressione o botão
endereçável. Quando em endereçamento, o LCD
mostra o seguinte:
• Assignable Dial / Dial Endereçável
8 dials that can be assigned channel and controller
No. independently. First press the “assign”button.
Then operate the dial to select the dial, and the LCD
shows the controller number and the controller
value. Input the No. with NUMERIC button or
+/- button when the dial is selected. The numbers
are the controllers.you also need to use enter to
confirm the data.
8 dials podem endereçar canal e número de
controlador independentemente. Primeiramente,
pressione o botão “ASSIGN”. Então, opere o dial
para selecionar o dial e o LCD mostrará o número do
controlador e o valor do controlador. Insira o número
com o botão NUMERIC ou +/-, quando o dial for
selecionado. Os números são os controladores. Você
também precisa usar ENTER para confirmar os dados.
• Assignable Slider / Slider Endereçável
9 sliders that can be assigned controller No.
independently. First press the “assign” button
Then operate the slider, and the LCD shows the
controller number and the controller value. Input
the No. with NUMERIC button or +/-button when
the dial is selected, The numbers are the controllers.
You also need to use enter to confirm the data.
9 sliders podem endereçar número de controlador
independentemente. Primeiramente, pressione o botão
“ASSIGN”. Então, opere o slider e o LCD mostrará o
número do controlador e o valor do controlador. Entre
o número com o botão NUMERIC ou +/-, quando o
dial for selecionado. Os números são os controladores,
Você também precisa usar ENTER para confirmar os
dados.
• Assignable Wheel / Roda Endereçável
The modulation and pitch bend are the default
function of the 2 wheels. It can be assigned
controller No. independently. First press the
“assign”button. Then operate the wheel to select
the wheel, and the LCD shows the controller
number and the controller value. Input the No.
with NUMERIC button or +/- button when the dial
is selected. The numbers are the controllers.
You also need to use enter to confirm the data.
Modulação e Pitch Bend são a função padrão destas
duas rodas. Podem endereçar número de controlador
independentemente. Primeiramente, pressione o botão
“ASSIGN”. Então, opere para selecionar a roda e o
LCD mostrará o número do controlador e o valor do
controlador. Entre o número com o botão NUMERIC
ou +/-, quando o dial for selecionado. Os números são
os controladores. Você também precisa usar ENTER
para confirmar os dados.
• Assignable Pedal / Pedal Endereçável
2 pedal interfaces that can be assigned controller
No. independently.First press the “assign”button.
Then operate the pedal to select it, and the LCD
shows the controller number and the controller
value. Input the No. with NUMERIC button or +/button when the pedal is selected. You need to use
enter to confirm the data.
2 interfaces de pedal que podem endereçar número
de controlador independentemente. Primeiramente,
pressione o botão “ASSIGN”. Então, opere o pedal e
selecione. O LCD mostrará o número do controlador e
o valor do controlador. Entre o número com o botão
NUMERIC ou +/-, quando o pedal for selecionado. Os
números são os controladores. Você também precisa
usar ENTER para confirmar os dados.
• Master Volume / Volume Máster
It sends GM Master Volume message(F0 7F 7F 04
01 00 xx F7)
Envia a mensagem de Volume Master GM (F0 7F 04 01
00 xx F7)
• Pad Setting / Ajuste do Pad
Activate a pad, Press the Ctrl Assign button .The
LCD display will display the currently assigned
controller of the pad. The controller number 128 is
for pad note. Press shift” to edit the Pad note. Enter
the new pad number you want the pad to assigned
with the numeric button or +/- button.
Ative um pad, pressione o botão “CRTL ASSIGN”. O
display LCD mostrará o controlador do pad atualmente
endereçado. O controlador número 128 é para
nota pad. Pressione “SHIFT” para editar a nota Pad.
Entre com o número do pad novo que deseja ser
endereçado, com o botão NUMERIC ou +/-.
• Groups:A,B,C,D,E (49/61) / Grupos A, B, C, D, E (49/61)
The button can be assigned as a controller, Press
the ‘CTRL ASSIGN’ button, then press a button,
the LCD display ‘ctrldata1’, input the number of
the controller that you want to operate, press the
‘enter’ to confirm the value. The LCD will display
‘ctrldata2’,at this moment, you can input the value
that the controller should be send.
O botão pode ser endereçado como um controlador.
Pressione o botão “CRTL ASSIGN”, pressione um botão
e o LCD mostrará “crtldata1”. Entre o número do
controlador que você deseja operar, pressione “ENTER”
para confirmar o valor. O LCD mostrará “crtldata2”.
Neste momento, você pode fazer a entrada do valor
que o controlador deverá ser enviado.
Advanced Settings / Ajustes Avançados
• How to make good use of the keyboard
Como fazer bom uso do seu teclado
DUAL
Dual switch function button. When Dual is ON,
the LCD displays the ‘DUAL_ON’, Keyboard sends
MIDI info of two channels, with the voice/channel
of both channels adjustable. The 2nd voice and
channel of 2 layer can be adjusted currently (Dual
is ON). Dual and Split can not be used at the same
time. When Dual is ON, Split is OFF. The LCD
displays the following:off. O LCD mostra o seguinte:
DUAL
Botão de função da chave Dual. Quando Dual está on,
o LCD mostra “DUAL ON”. O teclado envia info MIDI
dos dois canais com voz/canal de ambos os canais
ajustados. A segunda voz e o canal do layer 2 podem
ser ajustados nesse momento (DUAL on). Dual e Split
não podem ser usados simultaneamente. Quando Dual
está on, Split está off. O LCD mostra o seguinte:
SPLIT
Keyboard Split ON/OFF function button. When
Split is ON, the LCD displays the’SPLIT_ON’. the
keyboard is split to right section and left section
by the split point, with each section use it’s own
channel. The voice /channel of both channels is
adjustable. The voice and channel of right section
can be adjusted currently(Split is ON),Dual and Split
can not be used at the same time. When Split is
ON,Dual is OFF. The LCD displays the following:
SPLIT
Botão de função de ligar/desligar a função Split.
Quando Split está on, o LCD mostra “SPLIT ON”. O
teclado é dividido em seção direita e seção esquerda
pelo ponto de divisão e cada seção usando seu próprio
canal. Voz/canal de ambos os canais são ajustáveis.
A voz e o canal da seção direita podem ser ajustados
neste momento (SPLIT on). Dual e Split não podem ser
usados simultaneamente. Quando Split está on, Dual
está off. O LCD mostra o seguinte:
SPLIT POINT
Default Split Point is the central C (MIDI No. 60).
User can choose the Split Point. Hold the Split
button, LCD shows CHO, reminding user to select
the SPLIT POINT. Press the key that needs to be the
new Split Point, LCD shows don, meaning this key
is set to be the new Split Point.
PONTO SPLIT (DIVISÃO)
O ponto de divisão padrão é o central C (MIDI nr 60).
Usuários podem escolher o ponto de divisão. Segure o
botão SPLIT. O LCD mostra CHO, lembrando o usuário
para selecionar o SPLIT POINT. Pressione a tecla que
deverá ser o novo ponto de divisão. O LCD mostra
don, significando que esta tecla está ajustada para ser
o novo ponto de divisão.
TOUCH
Channel After Touch ON/OFF function button.
When Touch is ON, the LCD shows ‘TOUCH ON’
and the system sends Channel After Touch info
when pressing the keys. The LCD displays the
following:
TOUCH (TOQUE)
Botão da função Aftertouch do Canal. Quando
“Touch” está on, o LCD mostra “TOUCH ON” e o
sistema envia a info Channel Aftertouch quando
pressionar as teclas. O LCD mostra o seguinte:
• Other controls / Outros Controles
MUTE
MUTE ON/OFF function button. When MUTE
function is ON, The LCD shows ‘MUTE ON’ no MIDI
info will be sent. The LCD displays the following:
MUTE
Botão da função MUTE ON/OFF. Quando a função
MUTE está on, o LCD mostra “MUTE ON” e nenhuma
info MIDI será enviada. O LCD mostra o seguinte:
ASSIGN
ASSIGN mode ON/OFF function button. When
ASSIGN mode is ON, The LCD shows ‘ASSIGN’,
default as assigning the controller number. that is
assignable. Operate the controller to be assigned
and select the very controller LCD shows the
controller No. of current controller. Input the
desired controller No. with NUMERIC button or
+/- button (e.g. when a dial is selected, LCD shows
the default No. 007. If you input 010, the dial is
assigned as PAN).
The LCD displays the following:
ASSIGN
Botão da função ON/OFF do modo ASSIGN.
Quando o modo “ASSIGN” está on, o LCD mostra
“ASSIGN”, padrão como endereçamento do número
de controlador, que é endereçável. Opere o
controlador a ser endereçado e selecione o verdadeiro
controlador. O LCD mostra o número de controlador
do controlador atual. Entre o controlador desejado
com o botão NUMERIC ou +/-. (ex: quando um dial
é selecionado, LCD mostra o padrão número 007. Se
você entrar 010, o dial é endereçado como PAN) O
LCD mostra o seguinte:
GM
GM:Press CHAN and BANK L buttons at the same
time(25)/GM ON button(49 and 61)to send GM ON
message (F0 7E 7F 09 01 F7).LCD shows ‘GM ON’
when the message is sent. The LCD displays the
following:
GM
Pressione os botões CHAN e BANK L simultaneamente
(25) / Botão GM ON (49 e 61) para enviar mensagem
GM ON (F0 7E 7F 09 01 F7). O LCD mostra “GM ON”
quando a mensagem é enviada. O LCD mostra o
seguinte:
GS
Press CTRL ASSIGN and BANK L buttons at the
same time(25)/GS ON botton (49 and 61)to send
GM ON message F0 41 10 42 12 40 00 7F 00 41
F7).LCD shows ‘GS ON’ when the message is sent.
The LCD displays the following:
GS
Pressione os botões CTRL ASSING e BANK L
simultaneamente (25) / Botão GS ON (49 e 61) para
enviar mensagem GM ON (F0 41 10 42 12 40 00 7f 00
41 F7). O LCD mostra “GS ON” quando a mensagem é
enviada. O LCD mostra o seguinte:
XG
Press CTRL ASSIGN and OCTAVE buttons at the
same time(25)/XG ON button (49 and 61)to send
GM ON message (F0 43 10 4C 00 00 7E 00 F7).LCD
shows ‘XG ON’ when the message is sent. The LCD
displays the following:
XG
Pressione os botões CTRL ASSING e OCTAVE
simultaneamente (25) / Botão XG ON (49 e 61) para
enviar mensagem GM ON (F0 43 10 4C 00 00 7E 00
F7). O LCD mostra “XG ON” quando a mensagem é
enviada. O LCD mostra o seguinte:
RESET
Press PROGRAM and SHIFT buttons at the same
time(25)/RESET button (49 and 61) to reset the
system restoring to factory setting, sending system
initial setting info at the same time.
RESET
Pressione os botões PROGRAM e SHIFT
simultaneamente (25)/Botão RESET (49 e 61)
para resetar a restauração do sistema de fábrica,
enviando info de estabelecimento inicial do sistema
simultaneamente.
SNAP SHOT
Press CHAN and PROG buttons at the same
time(25)/SNAP button (49 and 61) to send message
of all user settings. LCD shows SNAP when the
message is sent. The LCD displays the following:
SNAP SHOT
Pressione os botões CHAN e PROG simultaneamente
(25)/botão SNAP (49 e 61) para enviar mensagem de
todos os estabelecimentos de usuário. LCD mostra
SNAP quando a mensagem foi enviada. O LCD mostra
o seguinte:
• Memory and data call back / Memória e dados call back
MEMORY
Press the MEMORY button. The system enters the
storing state, it stores 6 groups setup value. Using
the NUMERIC button1~6 to select the memory
area. Press ENTER to store the control setting. The
LCD displays the following;
MEMÓRIA
Pressione o botão MEMORY. O sistema entra no
estado de armazenamento. Armazena 6 valores de
estabelecimentos de grupo. Use o botão NUMERIC 1-6
para selecionar a área de memória. Pressione ENTER
para armazenar o estabelecimento de controle. O LCD
mostra o seguinte:
RECALL
Press the RECALL button, The system enters the
recall state. Using the NUMERIC button 1~6 to
select the memory area. Press ENTER to recall the
parameters The LCD displays the following:
RECALL
Pressione o botão RECALL. O sistema entra o estado
recall (rechamada). Use os botões NUMERIC 1-6 para
selecionar a área de memória. Pressione ENTER para
rechamar os parâmetros. O LCD mostra o seguinte:
• Control Functions / Funções de Controle
SHIFT
Using SHIFT KEY to select the upper function of the
key. The LCD displays the following:
SHIFT
Use a chave SHIFT para selecionar a função superior da
tecla. O LCD mostra o seguinte:
ENTER
Press ENTER to confirm the data
ENTER
Pressione ENTER para confirmar os dados.
• Pad Control / Controle do Pad
PRESSURE CONTROL
Using the pressure control, the pads give you
a different type of performance option on your
Carbon. You can control parameters on your
software in a way that would not be possible on
a standard dial or slider. The pressure pads can be
used to make some very interesting effects.
As we’ve seen above, each pad can be assigned an
individual MIDI controller number. As you apply
more and more pressure to the pad, the value of
the controller you are sending will increase, until
the maximum value is reached. On release, the pad
will return to the minimum value.
PAD CURVE
The Pad Curve setting is used to set the response
curve of all eight pads. It is not possible to set the
response curve of the pads independently.
PADS NOTE SETTING
Press one pad, then press assign. After that you
shall press shift, then you can set the MIDI note by
numeric buttons or +/- buttons.
and press ENTER to confirm.
CONTROLE DE PRESSÃO
Usando o controle de pressão, os pads fornecerão tipo
diferente de opção de performance no seu Carbon.
Você pode controlar parâmetros no seu software de
forma não possível num dial padrão ou slider. Os pads
de pressão podem ser usados para alguns efeitos
muito interessantes. Como visto acima, cada pad pode
ser endereçado com um número de controlador MIDI
individual. Assim que você aplica mais e mais pressão
ao pad, o valor do controlador que você está enviando
aumentará, até que o valor máximo seja alcançado.
Soltando, o pad retornará ao valor mínimo.
CURVA DO PAD
O ajuste da curva do pad é usado para a curva de
resposta de todos os 8 pads. Não é possível ajustar a
curva de resposta dos pads independentemente.
AJUSTE DE PADS NOTE
Pressione um pad. Pressione novamente. Depois que
você pressionar SHIFT, você pode ajustar a nota MIDI
através do botão NUMERIC ou botões +/-. Pressione
ENTER para confirmar.
• MMC (MIDI Machine Control) / MMC (Controle de Máquina MIDI)
There are 6 buttons used for MMC-[|<<],[<<],[>>],[O]
,[stop],[play].It is common to set the 6 buttons as
Sequencer remote control buttons, it needs to be
working with sequencer software.
Existem 6 botões usados para MMC: |<<],[<<],[>>],[O]
,[stop],[play]. É comum estabelecer os 6 botões
como botões de controle remoto do seqüenciador.
Isto precisa ser trabalhado com o software do
seqüenciador.
• NRPN/RPN Setting / Ajuste NRPN/RPN
Assign the controller to 132~135,after that you can
set the NRPN OR RPN by numeric buttons.
Please consult Appendix D on Page 18 for full list.
Enderece o controlador para 132-135. Depois, você
pode ajustar o NRPN ou RPN através dos botões
NUMERIC. Por favor, consulte o Apêndice D para ter
acesso à lista completa.
Usage Examples / Exemplos de Uso
•Recording Your Performance on a Sequencer
Gravando sua Performance em um Sequenciador
A MIDI sequencer will allow you to record,
play back, store and edit MIDI data. Although
hardware sequencers exist, we will focus on the
more commonly used software sequencers in this
manual. Examples of popular software sequencers
are Pro ToolsTM, CubaseTM and LogicTM, although
there are many different sequencing applications
available for your computer. In order to use the
Carbon with your sequencer, you need to set
up the sequencer software so that the Carbon is
recognized as the sequencer’s MIDI input device.
Um seqüenciador MIDI permite gravar, reproduzir,
armazenar e editar dados de MIDI. Embora existam
sequenciadores de hardware, vamos nos concentrar,
neste manual, no mais comumente usado. Exemplos de
software de sequenciadores populares são: Pro ToolsTM,
CubaseTM LogicTM, embora existam muitas aplicações
diferentes de seqüenciamento disponíveis para o seu
computador. Para usar o Carbon com seu sequenciador,
você precisa configurar o software do seqüenciador para
que o Carbon seja reconhecido como o dispositivo de
entrada MIDI do seqüenciador.
You need to choose a MIDI output device that is
capable of making sound when MIDI data is sent
to it. This may be a soundcard on your computer,
a VST instrument or a sound module connected
to a MIDI port which is in turn connected to your
computer. Please consult your sequencer’s user
manual for more information on how this is done.
In this manual, section 1.3.1, “Using The Carbon
With Your software” details how the Carbon will
appear in the device listing of your sequencer.
With the Carbon set up to communicate with
the sequencer, data will go into the sequencer
and will be routed to a virtual synthesizer within
the sequencer software or sent to an external
sound module via a MIDI output port. The virtual
synthesizer or external sound module will turn the
MIDI data into audible sounds. You can then record
the incoming MIDI data and edit your performance
using your sequencer.
Você precisa escolher um dispositivo de saída MIDI,
capaz de fazer som quando os dados MIDI são enviaods
a ele. Pode ser um cartão de som no seu computador,
um instrumento VST ou um módulo de som conectado
a uma porta MIDI, que por sua vez é ligada ao
computador. Por favor, consulte o manual do usuário
do seu sequenciador para mais informações sobre
como isto é feito. Neste manual, a seção “Usando o
Carbon com o seu software” detalha como o Carbon vai
aparecer na lista de dispositivos do seu sequenciador.
Com o Carbon configurado para se comunicar com
o seqüenciador, os dados irão para o seqüenciador e
serão roteados para um sintetizador virtual dentro do
software do seqüenciador ou enviado para um módulo
de som externo através de uma porta de saída MIDI.
O sintetizador virtual ou módulo de som externo irão
transformar os dados MIDI em sons audíveis. Então, você
pode gravar os dados de entrada MIDI e editar o seu
desempenho usando seu sequenciador.
MIDI Information Specification
Especificações de Informação MIDI
•Program & Bank Changes Explained
Programa & Explicação de troca de banco
The original GM MIDI Specification was designed
to access only 128 different sounds using Program
Change messages (0-127).
A especificação original GM MIDI foi projetada para acessar
apenas 128 sons diferentes, utilizando mensagens de Troca
de Program-Program Change (0-127).
As MIDI devices grew to be more sophisticated and
contain more sounds, Bank Change messages were
included in the specification to allow for more than
128 sounds to be accessed. Within each bank there
are a possible 128 different sound patches that can
be accessed using the standard Program Change
command. Using the expanded 14-bit Bank Change
command, there are now 16,384 banks available—
each with 128 sounds patches. Technically speaking,
the first 7 bits of the 14-bit Bank Change message are
sent in a single byte known as the Bank LSB. The last 7
bits define another byte known as the Bank MSB. The
Bank LSB is the most commonly used. This allows for
128 bank changes, and often there is no need to send
a Bank MSB.
Como os dispositivos MIDI cresceram e tornaram-se mais
sofisticados e com mais sons, mensagens de troca de
programa foram incluídas nas especificações para pemissão
de acesso a mais de 128 sons. Em cada banco, existe
a possibilidade de 128 patches de som diferentes, que
podem ser acessados usando o comando padrão “Program
Change-Troca de Programa”. Usando o comando “14 bit
Bank Change”, existem agora 16.384 bancos disponíveis,
cada um com 128 patches de sons. Tecnicamente falando,
os 7 primeiros bits da mensagem “14 bit Bank Change”
são enviados em um simples byte, conhecido como “Bank
LSB”. Os últimos 7 bits definem outro byte, conhecido como
“Bank MSB”. O Banco LSB é o mais comumente utilizado. Ele
permite 128 mudanças de banco, e frequentemente não há
necessidade de enviar uma Bank MSB.
You will find almost all MIDI devices respond to
Program Change commands and many are organized
according to the GM listing. In all General MIDI
devices, the different sounds are always organized
in the same way from device to device, so the piano
sounds are in their particular place, the string sounds
are in their place, the drum sounds and so on. All GM
devices (both hardware and software sound modules)
are clearly labeled as such, so you know that their
sounds are organized in the General MIDI structure. So
when a GM device receives a MIDI Program Change, it
calls up a type of sound that you expect from the GM
sound set. All non-GM devices call up unique sounds
from their memory upon receiving MIDI Program
Changes. Since the sounds in a non-GM device are not
arranged in a particular order, you need to take a look
at the device itself to see which sound you want and
at which location in the memory it resides. Many VST
instruments such as Native Instruments’ FM7 or the
synth modules in Reason are non-GM devices.
Você vai encontrar quase todos os dispositivos MIDI
respondendo a comandos de mudança de programa e
muitos são organizados de acordo com a listagem GM. Em
todos os dispositivos MIDI, os diferentes sons são sempre
organizados da mesma forma - de dispositivo para dispositivo
- por isso os sons de piano estão em seus lugares particulares,
os sons de corda em seus lugares, os sons de bateria em
seus lugares, e assim por diante. Todos os dispositivos GM
(hardware e módulos de som de software) são claramente
denominados como tal, para que você saiba que os sons
são organizados na estrutura MIDI Geral. Assim, quando
um GM dispositivo recebe uma Troca de Programa MIDI,
convoca tipo de som que você espera, de um set de som
GM. Todos os dispositivos não-GM convocam sons únicos de
suas memórias, ao receber “MIDI Program Changes-Trocas
de Programa MIDI”. Ainda que os sons em um dispositivo
não-GM não estejam dispostos em ordem específica, você
precisa verificar o dispositivo, qual som deseja e em que local
na memória ele reside. Muitos instrumentos VST, como “FM7
Native Instruments” ou os módulos synth no Reason, são
dispositivos não-GM.
Bank Change messages are useful when calling
up sounds from a large library that may exist in a
particular sound module or software synth. For
example devices that are built with Roland’s GS
specification or Yamaha’s XG specification require you
to specify a Bank Change in order to access the extra
voices and effects that these devices provide.
Sending Program, Bank LSB and Bank MSB data is
made simple using the Carbon. Please consult section
2.4 to see how this is done.
Mensagens de troca de programa são úteis ao convocar
sons de uma grande biblioteca, que possa existir em um
módulo de som particular ou software synth. Por exemplo,
dispositivos construídos com especificação GS da Roland, ou
especificação XG da Yamaha, exigem que você especifique
uma Bank Change-Troca de Banco, a fim de acessar vozes
extras e efeitos que esses dispositivos oferecem. Programa
de envio, Bank LSB e Bank MSB de dados são feitos
simplesmente usando o Carbon. Consulte a seção específica
deste manual para verificar como fazê-lo
Troubleshooting / Resolução de alguns problemas
The Carbon has been designed to give you high
performance MIDI control. It has been tested under
a wide range of system and operating conditions.
However, there are virtually limitless numbers of
operating scenarios, any of which could affect your
system’s performance. Though this section cannot
cover all possible situations you may encounter, we
would like to offer some suggestions for dealing
with common problems.
If you are connecting to a computer, we
recommend that you avoid connecting too many
devices to your computer at the same time. The
more devices you have connected to the computer,
the greater the load on the computer’s CPU.
Although it is possible in theory to connect multiple
USB devices at the same time, doing so may
degrade your system’s performance.
O Carbon foi projetado para controle MIDI de alta
performance. Foi testado com vários sistemas e
condições de operação. Contudo, existe uma infinidade
de situações que podem afetar a performance de seu
sistema. Obviamente que esta seção não consegue
cobrir todas as situações possíveis, mas gostaríamos
de oferecer algumas sugestões para resolver alguns
problemas simples.
Se você estiver conectado a um computador,
recomendamos que evite ligar muitos dispositivos nele
ao mesmo tempo. Quanto mais dispositivos houver,
maior a chance de carga na CPU do computador.
Embora seja possível, em teoria, conectar vários
dispositivos USB ao mesmo tempo, pode prejudicar o
desempenho do seu sistema.
• My Carbon suddenly stopped working after
having performed well since installation on a
computer:
• Meu Carbon parou repentinamente de funcionar,
após ter operado muito bem desde a instalação no
computador. O que devo fazer?
>> Switch off the unit and leave it off for 10
seconds. Then restart your computer, power up
your Carbon and try again.
>> Desligue o aparelho e deixe-o desligado por 10
segundos. Reinicie o computador, ligue seu Carbon e
tente novamente.
• I have connected the Carbon to my computer.
When I press a key, there is a delay before I hear
any sound.
• Conectei o Carbon no meu computador. Quando
eu pressiono uma tecla, existe um delay antes de ouvir
qualquer som. O que devo fazer?
>> This delay is known as latency. Latency with
MIDI signals is caused at the computer and is not
coming from the Carbon. This may be due to the
CPU load of the soft-synth you are using. MIDI data
is simply control data. MIDI data is read by the
soft synth; the soft synth then completes a large
number of complex calculations in order to produce
the sound you hear, and all of this processing
activity takes time. If you already have adjusted the
appropriate parameters relating to latency on your
sound card, try re-installing the latest drivers for
the sound card, or try reducing the buffer sizes of
the sound card. If you are using a host application,
check its buffer size settings as most applications
allow for user adjustment to improve timing.
- Este atraso é conhecido como latência. Latência
com sinais MIDI é oriunda do computador e não do
Carbon. Isto pode ser devido à carga da CPU do softsynth você está usando. Dados MIDI são simplesmente
dados de controle. Dados MIDI estão prontos para o
soft-synth – que engloba grande número de cálculos
complexos para produzir o som que você ouve. E toda
esta atividade de processamento leva tempo. Caso já
tenha ajustado os parâmetros adequados relativos à
latência do seu cartão de som, tente re-instalar os
drivers mais recentes para o cartão de som, ou tente
reduzir o tamanho do buffer. Caso esteja usando um
aplicativo host, verifique se as configurações do
tamanho do buffer combinam com as que a maioria
das aplicações permitem, para ajuste do usuário
na melhora do timing.
• PC only: If your soundcard supports ASIO or
WDM, then please use these drivers. It is suggested
that you’d better not use the MME driver which is
older and less efficient in design and will have a
much higher latency. In the audio device settings,
please select the ASIO driver if available.
• Somente PC: se seu cartão de som suporta ASIO
ou WDM, então, por favor use os respectivos drivers.
Sugere- se não usar o driver MME que é mais antigo e
menos eficiente. Nas configurações de dispositivo de
áudio, selecione o driver ASIO, se disponível.
Appendices / Apêndice
Appendix A - MIDI IMPLEMENTATION CHART
APÊNDICE A – TABELA DE IMPLEMENTAÇÃO MIDI
Mode 1: OMNI ON, POLY Mode 3: OMNI OFF, POLY Mode 2: OMNI ON, MONO Mode 4: OMNI OFF, MONO
0: Yes
X: No
Appendix B – Useful MIDI Data Tables
APÊNDICE B – TABELAS DE DADOS MIDI USUAIS
BI – General MIDI Instruments-Program Change Numbers
B1 – INSTRUMENTOS MIDI – NÚMEROS DE TROCA DE PROGRAMA
B2 - Roland GS And Yamaha XG NRPN Messages
B2 – MENSAGENS NRPN ROLAND GS E YAMAHA XG
* added by Yamaha XG; % changed from Delay to Variation by Yamaha XG
* adicionado pela Yamaha GS, % trocada a partir do Delay para Variação pela Yamaha XG.
B3-General MIDI Drums-Note assignments
0. Small Room
1: Medium Room
2: Large Room
3: Medium Hall
4: Large Hall
8: Plate
B3 – DRUMS MIDI – ENDEREÇAMENTO DE NOTAS
0: Small room
1: Medium room
2: Large room
3: Medium hall
4: Large hall
8: Plate
B4-Gm2 Chorus Types
0. Chorus1
1: Chorus 2
2: Chorus 3
3: Chorus 4
4: FB Chorus
5: Flanger
B4 – TIPOS DE CHORUS GM2
0: Chorus1
1: Chrorus2
2: Chrorus 3
3: Chorus 4
4: FB Chorus
5: Flanger
B5 - General MIDI Drums-Note assignments
B5 - DRUMS MIDI – ENDEREÇAMENTO DE NOTAS
Appendix C - General MIDI Controller Numbers (MIDI CC’s)
APÊNDICE C – NÚMEROS CONTROLADORES MIDI (MID CC)
Appendix D – Assignable Controller Numbers to Linear Controllers
APÊNDICE D – NÚMEROS CONTROLADORES ENDEREÇÁVEIS A
CONTROLADORES LINEARES
This table applies to the following controls on your Carbon:
Esta tabela se aplica aos seguintes controles do seu Carbon:
Sliders
Aftertouch strip
Pitch bend wheel
Modulation wheel
Expression pedal
Sliders
Aftertouch
Roda Pitch bend
Roda Modulation
Pedal de expressão
Appendix E-Assignable Controller Numbers to Non-Linear Controllers
APÊNDICE E – NÚMEROS CONTROLADORES ENDEREÇÁVEIS A
CONTROLADORES NÃO-LINEARES
This table applies to the following controls on your Carbon:
Esta tabela se aplica aos seguintes controles do seu Carbon:
Assignable buttons 49/61 only)
Transport controls
Sustain pedal
Botões Rndereçáveis (somente 49/61)
Controles de Transposição
Pedal Sustain.
Appendix F – Assignable Controller Numbers to Rotary Encoders
APÊNDICE F – NÚMEROS CONTROLADORES ENDEREÇÁVEIS A
CODIFICADORES GIRATÓRIOS
This table only applies to the Rotary encoders on your Carbon
Esta tabela se aplica aos controles giratórios de seu Carbon.
Appendix G – Assignable Controller Numbers to Pressure Pads
APÊNDICE G – NÚMEROS CONTROLADORES ENDEREÇÁVEIS A PADS DE PRESSÃO
This table only applies to the pressure Pads on your Carbon.
Esta tabela se aplica aos pads de pressão de seu Carbon.
Appendix H - Factory Presets
APÊNDICE H – PRESETS DE FÁBRICA
Appendix I - Hexadecimal Conversion Chart
APÊNDICE I – TABELA DE CONVERSÃO HEXADECIMAL
www.waldman-music.com
Distribuidor Exclusivo:
CNPJ 09.305.552/0001-82
www.equipo.com.br
Designed by Waldman R&D
MADE IN P.R.C.