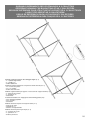
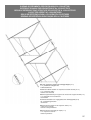
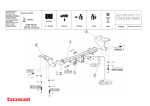
1
MANUALE TECNICO
PANNELLO TETTO PIANO
UK
TECHNICAL HANDBOOK
PANEL FLAT ROOF
FR
MANUEL TECHNICIEN
PANNEAU TOIT PLAN
DE
HANDBUCH TECHNIKER
BRETT EBENES DACH
E
MANUAL TÉCNICO
EL PANEL TECHO PLANO
P
MANUAL TÉCNICO
PAINEL TECTO PLANO
COD. 120208
IT
1
IT
INDICE:
A t ten zio ne
N orme su lla sicu rez z a
Disegno di riferimento per staffaggio singolo collettore
Disegno di riferimento per staffaggio di n. 2 collettori
Fornitura
Schema di montaggio per singolo e doppio collettore
Mod ula rità
Disegno di riferimento per staffaggio di n. 3 collettori
Disegno di riferimento per staffaggio di n. 5 collettori
S chema di mo ntag gio per 3 e 5 c ollet t or i
Disegno di riferimento per staffaggio di n. 4 collettori
S chema di mo ntag gio per 4 c ollet t or i
C olle ga men to coll et t or i
C aricame nto impia nt o
UK
INDEX:
Impo rta nt
S afe ty re gu latio n
R efe ren ce dra wing f or br ac k et ing s ingle c ollec t o r
R efe ren ce dra wing f or br ac k et ing of no. 2 c ollec t o r s
P arts sup plie d
A sse mbly dia gra m f or s ingle and double c ollec to r
Mod ula rity
R efe ren ce dra wing f or br ac k et ing of no. 3 c ollec t o r s
R efe ren ce dra wing f or br ac k et ing of no. 5 c ollec t o r s
A sse mbly dia gra m f or 3 and 5 c ollec t or s
R efe ren ce dra wing f or br ac k et ing of no. 4 c ollec t o r s
A sse mbly dia gra m f or 4 c ollec t or s
C olle cto r co nn ection
S yste m ch arg ing
FR
INDEX:
A t ten tion
N orme s p ou r la séc ur it é
D essin de réfé ren c e per s t r uc t ur e de s uppor t s i m p l e c o l l e c t e u r
D essin de réfé ren c e pour s t r uc t ur e de s uppor t d e n . 2 c o l l e c t e u r s
F ournitu re
S chéma de mon ta ge pour s im ple et double c olle c t e u r
Mod ula rité
D essin de réfé ren c e pour s t r uc t ur e de s uppor t d e n . 3 c o l l e c t e u r s
D essin de réfé ren c e pour s t r uc t ur e de s uppor t d e n . 5 c o l l e c t e u r s
S chéma de mon ta ge pour 3 et 5 c ollec t eur s
D essin de réfé ren c e pour s t r uc t ur e de s uppor t d e n . 4 c o l l e c t e u r s
S chéma de mon ta ge pour 4 c ollec t eur s
R acco rde men t de s c ollec t eur s
C ha rge men t insta llat ion
DE
INHALTVERZEICHNIS:
Wichtig
S iche rhe its- un d U nf alls c hut z v or s c hr ift en
Layou t für Ge rüst Single- Kollek t or
Layou t für Ge rüst Nr. 2 Kollek t or en
Lie feru ng
Mon ta ge pla n fü r Single- und Zwillings k ollek t or
Mod ula no rdn un g
Layou t für Ge rüst Nr. 3 Kollek t or en
Layou t Fü r Gerü st Nr. 5 Kollek t or en
Mon ta ge pla n fü r 3 und 5 Kollek t or en
Layou t für Ge rüst Nr. 4 Kollek t or en
Mon ta ge pla n fü r 4 Kollek t or en
K olle kto ren ve rbin dung
A uffü llen de r An lage
E
ÍNDICE:
A t en ció n
N orma s pa ra la se gur idad
D ib ujo de refe ren c ia par a la f ijac ión de un c olec t o r
D ib ujo de refe ren c ia par a la f ijac ión de 2 c olec t o r e s
S umin istro
E sque ma d e mo ntaje par a c olec t or s im ple y dob l e
Mod ula rida d
D ib ujo de refe ren c ia par a la f ijac ión de 3 c olec t o r e s
D ib ujo de refe ren c ia par a la f ijac ión de 5 c olec t o r e s
E sque ma d e mo ntaje par a 3 y 5 c olec t or es
D ib ujo de refe ren c ia par a la f ijac ión de 4 c olec t o r e s
E sque ma d e mo ntaje par a 4 c olec t or es
C on exión de los c olec t or es
C arg a d e la insta lac ión
P
ÍNDICE:
A t en çã o
N orma s d e seg ura nç a
D esen ho de refe rênc ia par a f ix aç ão c olet or único
D esen ho de refe rênc ia par a f ix aç ão de n. 2 c ole t o r e s
F or ne cime nto
E sque ma d e mo ntagem par a c olet or únic o e dup l o
Mod ula rida de
D esen ho de refe rênc ia par a f ix aç ão de n. 3 c ole t o r e s
D esen ho de refe rênc ia par a f ix aç ão de n. 5 c ole t o r e s
E sque ma d e mo ntagem par a 3 e 5 c olet or es
D esen ho de refe rênc ia par a f ix aç ão de n. 4 c ole t o r e s
E sque ma d e mo ntagem par a 4 c olet or es
C on exão co leto res
C arg a in stala çã o
2
3
4
6
7
8
10
21
22
23
24
27
28
30
I
3
4
6
7
8
10
21
22
23
24
27
28
30
I
3
4
6
7
8
10
21
22
23
24
27
28
30
I
3
4
6
7
8
10
21
22
23
24
27
28
30
I
3
4
6
7
8
10
21
22
23
24
27
28
30
I
3
4
6
7
8
10
21
22
23
24
27
28
30
I
IT
ATTENZIONE: Le presenti istruzioni di montaggio contengono informazioni essenziali ed importanti per un sicuro e perfetto
montaggio del set su qualsiasi superficie d’appoggio.
L’intera documentazione tecnica è soggetta all’obbligo di custodia e si deve sempre accompagnare al prodotto.
Tutti i dati e le istruzioni contenute nel presente manuale si riferiscono al livello tecnologico attuale.
Si prega di consultare sempre le istruzioni contenute nel presente manuale al momento dell’installazione dei collettori.
Le attività descritte in queste istruzioni di montaggio esigono conoscenze specialistiche corrispondenti ad una completa e
comprovata formazione professionale nel settore dell’installazione di impianti. Di conseguenza si consiglia di eseguire le
operazioni di montaggio descritte soltanto se si è in possesso dei requisiti tecnici indicati.
Le istruzioni sono rappresentazioni schematiche; a causa di possibili errori nella descrizione e nella stampa, e di possibili
modifiche tecniche non soggette a modifica, si declina ogni responsabilità per la correttezza dei contenuti.
UK
IMPORTANT: These assembly instructions contain essential information in order to assure the safe and efficient assembly
of the set on any support surface.
It is compulsory to always preserve all the technical documentation which must always accompany the product.
All the information and instructions container in this manual refer to the technological level.
Always consult the instructions contained in this manual on installation of the collectors.
The operations described in the present assembly instructions require specialist knowledge and pre-suppose training and
specialisation in the plant installation sector. Therefore we advise the the assembly operations are to be undertaken only if the
necessary technical requirements are present.
The instructions are represented in a schematic form; due to possible errors in description and in printing and due to any
possible technical modifications we decline all liability as regards the accuracy of the content.
FR
ATTENTION: Les présentes instructions de montage contiennent des informations essentielles et importantes pour un
montage parfait et sécurisé de l’équipement sur toute surface d’appui.
L’ensemble de la documentation technique est sujette à l’obligation de conservation et devra toujours accompagner le produit.
Toutes les données et les instructions contenues dans le présent manuel te se réfèrent au niveau technologique actuel.
Toujours consulter les instructions du présent manuel lors de l’installation des collecteurs. Les activités décrites dans ces instructions
de montage requièrent une formation professionnelle attestée et complète dans le secteur de l’installation d’équipements.
En conséquence, il est conseillé de n’effectuer les opérations de montage décrites que si l’on est en possession des connaissances
techniques indiquées. Les instructions sont des représentations schématiques: à cause d’erreurs toujours possibles dans la
description et l’impression, ainsi que des éventuelles modifications techniques, nous déclinons toute responsabilité sur l’exactitude des
contenus.
DE
WICHTIG: Vorliegende Montageanleitung enthält wesentliche Informationen für die sichere und genaue Montage des Sets
auf jegliche Stützfläche.
Der Benutzer muss die ganze technische Dokumentation, welche immer mit dem Produkt mitgeliefert wird, gut aufbewahren.
Im vorliegenden Handbuch sind nur technologische Angaben und Anleitungen enthalten. Bei der Installation der Kollektoren
immer die Anweisungen des vorliegenden Handbuches beachten. Die in vorliegenden Montageanweisungen enthaltenen Arbeiten
bedürfen genauer Sachkenntnissen, welche durch eine komplette und prüfbare Ausbildung für die Installation von Anlagen erworben
wurden. Deshalb empfiehlt es sich die beschriebenen Montagearbeiten nur durchzuführen, wenn man die angegebenen technischen
Kenntnisse besitzt. Die Anweisungen beziehen sich auf schematischen Darstellungen; auf Grund von ggf. vorkommenden
Beschreibungs-oder Druckfehlern und möglichen technischen Änderungen, übernehmen wir keine Verantwortung für die
Richtigkeit der Inhalte.
E
ATENCIÓN: Las presentes instrucciones de montaje contienen informaciones esenciales e importantes para un montaje
seguro y perfecto del set sobre cualquier superficie de apoyo.
La documentación técnica en su totalidad está sujeta a la obligación de custodia y tiene que acompañar siempre al producto.
Todos los datos y las instrucciones contenidas en el presente manual se refieren al nivel tecnológico. Se ruega consultar
siempre las instrucciones contenidas en el presente manual en el momento de la instalación de los colectores. Las actividades
descritas en estas instrucciones de montaje exigen poseer conocimientos especializados correspondientes a una completa y
comprobada formación profesional en el sector de la instalación de equipos. Por lo tanto, se aconseja efectuar las operaciones
de montaje descritas solamente si se poseen los requisitos técnicos indicados. Las instrucciones son representaciones
esquemáticas; debido a posibles errores en la descripción y en la impresión, y a posibles modificaciones técnicas, declinamos
cualquier responsabilidad por la rectitud de los contenidos.
P
ATENÇÃO: Estas instruções de montagem contém informações essenciais e importantes para uma protegida e perfeita
montagem do set sobre qualquer superfície de apoio. Toda a documentação técnica deve ser guardada e deve sempre
acompanhar o produto.
Todos os dados e as instruções deste manual se referem ao nível tecnologico. Consultar sempre as instruções contidas neste
manual no momento da instalação dos coletores. As atividades descritas nestas instruções de montagem necessitam de um
conhecimento especialistico resultado de uma completa e comprovada formação profissional no setor das instalações.
Portanto aconselhamos executar as operações de montagem descritas somente se tiver as condições técnicas indicadas.
As instruções são representações esquemáticas; por causa de possíveis erros na descrição e na impressão, e de possíveis
modificações técnicas declinamos qualquer responsabilidade para a exatidão dos conteúdos.
3
IT
Norme per la sicurezza
Questa parte spiega come sono strutturate le indicazioni delle presenti istruzioni di montaggio e manutenzione e suggerisce
generali indicazioni di sicurezza per un esercizio sicuro e senza disfunzioni. Le specifiche indicazioni di sicurezza ed utilizzo per
il montaggio sono riportate negli schemi di montaggio. Leggete attentamente le indicazioni di sicurezza prima di iniziare il
montaggio dei sostegni. L’inosservanza delle indicazioni di sicurezza può comportare gravi danni alle persone con conseguenze
anche mortali oltre a danni materiali ed ambientali. I diversi set di montaggio vanno utilizzati per gli usi specifici a cui sono
destinati; l’utilizzo errato dei vari componenti non assicura la minima sicurezza. Il carico di neve ammesso per il sostegno
regolabile per le diverse inclinazioni di montaggio è di 2,8 kN/m2. I sostegni sono altresì verificati per i carichi derivati dal vento.
Montare gli staffaggi solo su coperture sufficientemente robuste, tenendo conto del carico addizionale determinato dal collettore
solare e dagli staffaggi stessi. Sono stati studiati e creati diversi tipi di staffaggio adattabili ad ogni tipo di superficie d’appoggio,
al fine di ottenere le inclinazioni volute.
UK
Safety regulations
This section explains how the present assembly and maintenance instructions are organized and recommends general safety
precautions to assure safe and efficient use. The specific use and safety instructions are indicated in the assembly diagrams.
Carefully read the safety instructions before beginning support assembly. Failure to follow the safety instructions may cause
serious damage and risk to persons of even a mortal nature as well as materials and environmental damage. The various
assembly sets are to be used for the specific purposes for which they are intended; incorrect use of the various components will
not assure minimum safety requirements. The weight of snow permitted for adjustable support for the various assembly
inclinations is of 2,8 kN/m2. The supports have also been tested for the various wind load situations.
The brackets are to be mounted only on coverings that are sufficiently strong, bearing in mind the additional load caused by the
solar collector and the brackets themselves. Various kinds of brackets have been created and designed that are suited to all kinds
of support surfaces, in order to obtain the required inclinations.
FR
Normes pour la sécurité
Cette section explicite la structure des présentes instructions de montage et d’entretien et suggère des consignes générales de
sécurité pour une exploitation sécurisée et sans dysfonctionnements. Les consignes spécifiques de sécurité et de montage sont
reportées sur les schémas de montage. Lire attentivement les indications de sécurité avant de monter les soutiens.
L’inobservation des consignes de sécurité peut provoquer de graves dommages aux personnes, voire la mort, ainsi que des
dommages au matériel et à l’environnement. Les différents équipements de montage sont utilisés pour les usages spécifiques
auxquels ils sont destinés. Une mauvaise utilisation des différentes pièces ne garantit pas une sécurité minimale. La charge de
neige admise pour le soutien réglable dans les différentes inclinaisons de montage est de 2,8 kN/m2. Les soutiens sont
également calculés pour les charges de vent. Ne monter les ancrages que sur des couvertures suffisamment robustes, en
tenant compte de la charge additionnelle créée par le collecteur solaire et les ancrages. Différents types d’ancrage ont été
étudiés et fabriqués afin qu’ils puissent s’adapter à tout type de surface et qu’ils permettent toutes les inclinaisons.
DE
Sicherheits- und Unfallschutzvorschriften
In diesem Abschnitt wird der Aufbau der Angaben der vorliegenden Montage- und Wartungsanleitung beschrieben und es
werden allgemeine Sicherheitsangaben für einen sicheren und fehlerhaften Betrieb gemacht. Die genauen
Sicherheits- und Verwendungsangaben für die Montage entnehmen Sie den Montagenpläne. Vor Beginn der Montage des
Rahmentragwerkes, bitten wir Sie die Sicherheitsangaben aufmerksam zu lesen, Die Nichteinhaltung der Sicherheitsangaben
kann zu schweren, auch tödlichen Folgen führen sowie Sach- oder Umweltschäden verursachen. Die verschiedenen
Montagesets dürfen nur für den vorgesehenen Zweck verwendet werden: eine falsche Verwendung der Bestandteile ist unsicher.
Die zugelassene Schneelast auf den regelbaren Rahmentragwerke beträgt 2,8 kN/m2. Die Rahmentragwerke sind auch auf
Windlasten geprüft. Die Rahmentragwerke auf genügend starke Abdeckungen montieren und dabei auch auf die zusätzliche
Last achten, welche durch den Kollektor und durch die Rahmentragwerke selbst gegeben ist. Es wurden verschiedene
Rahmentragwerke entwickelt, die auf jegliche Fläche angepasst werden können, damit die gewünschte Neigung erzielt werden kann.
E
Normas para la seguridad
Esta parte explica cómo están estructuradas las indicaciones de las presentes instrucciones de montaje y mantenimiento y
sugiere indicaciones generales de seguridad para un ejercicio seguro y sin averías. Le indicaciones específicas de seguridad y
empleo para el montaje se presentan en los esquemas de montaje. Lean atentamente las indicaciones de seguridad antes de
comenzar el montaje de los soportes. La no observación de las indicaciones de seguridad puede comportar graves daños para
las personas con consecuencias inclusive mortales, además de daños materiales y ambientales. Los diversos set de montaje
deben ser utilizados para los usos específicos para los cuales están destinados; el empleo incorrecto de los varios
componentes no asegura la mínima seguridad. La carga de nieve admitida para el soporte regulable para las diferentes
inclinaciones de montaje es de 2,8 kN/m2. Los soportes están además comprobados para las cargas derivadas del viento. Monte
las sujeciones sólo sobre coberturas suficientemente robustas, teniendo en cuenta la carga adicional determinada por el
colector solar y por las sujeciones mismas. Se han estudiado y creado diversos tipos de sujeción adaptables a cada tipo de
superficie de apoyo, con el objetivo de obtener las inclinaciones deseadas.
P
Normas de segurança
Esta parte explica como estão estruturadas as indicações destas instruções de montagem e manutenção e sugere indicações
gerais de segurança para um trabalho protegido e sem problemas. As particulares indicações de segurança e utilização para a
montagem estão indicadas nos esquemas de montagem. Ler atentamente as indicações de segurança antes de iniciar a
montagem dos suportes. Não observar as indicações de segurança pode causar graves prejuízos às pessoas também com
efeitos mortais além de danos materiais e ambientais. Os diferentes set de montagem devem ser utilizados para os usos
particulares para os quais foram destinados; a utilização errada dos vários componentes não garante a mínima segurança.
A carga de neve admissível para o suporte regulável para as diferentes inclinações de montagem é de 2,8 kN/m2. Os suportes
foram também contralados para as cargas devidas ao vento. Montar as fixações exclusivamente sobre coberturas suficientemente
resistentes, considerando a carga adicional determinada pelo coletor solar e pelas fixações. Foram projetados e fabricados
diferentes tipos de fixação adaptáveis a qualquer tipo de superfície de apoio, para obter as inclinações desejadas.
4
NORME SULLA SICUREZZA - SAFETY REGULATIONS - NORMES POUR LA SECURITE - SICHERHEITS
UND UNFALLSCHUTZVORSCHRIFTEN - NORMAS PARA LA SEGURIDAD - NORMAS DE SEGURANÇA
Indossare scarpe di sicurezza antiscivolo.
Wear anti-slip safety footwear.
Porter des chaussures de sécurité antidérapantes.
Rutschfeste Arbeitschuhe tragen.
Vestir zapatos de seguridad antideslizamiento.
Calçar sapatos de segurança anti-escorregamento.
Occorre utilizzare soltanto attrezzature e materiali
rispondenti alle normative di sicurezza.
Only materials and equipment that complies with
current safety standards are to be used.
Il faut utiliser uniquement des outillages et des matériaux
qui répondent aux réglementations de sécurité.
Nur mit Werkzeugen und Werkstoffen arbeiten, die den
Sicherheitsnormen entsprechen.
Prestare attenzione alle linee elettriche aeree non
protette e agli impianti elettrici murali; seguire le fasce
di rispetto prescritte dalla normativa vigente.
Pay attention to the non-protected aerial lines and the
wall mounted wiring systems, and follow the parameters
as envisaged in the current law.
Prêter attention aux lignes électriques aériennes non
protégées et aux installations électriques murales.
Respecter les espaces de sécurité prescrits par la
réglementation en vigueur.
Vorsicht bei elektrischen Hängeleitungen oder
elektrischen Leitungen unter Putz; vorgeschriebene
Normen beachten.
Prestar atención a las líneas eléctricas aéreas no
protegidas y a las instalaciones eléctricas de pared;
seguir las bandas de respeto recomendadas por la
normativa vigente.
Prestar atenção às linhas elétricas aéreas não
protegidas e aos equipamentos elétricos de parede;
seguir as áreas de respeito prescritas pela lei vigente.
Usare il casco di protezione nelle fasi di montaggio.
Always wear of protective helmet during the assembly
stages.
Utiliser le casque de protection dans les phases de
montage.
Auf Montagearbeiten Schutzhelm tragen.
Usar el casco de protección en las fases de montaje.
Usar o capacete de proteção nas fases de montagem.
Es necesario utilizar solamente equipos y materiales que
satisfagan las normativas de seguridad.
È necessário utilizar somente equipamentos e
materiais correspondentes às normas de segurança.
Indossare guanti di protezione durante le diverse
operazioni di montaggio.
Wear protective goggles during the drilling operations.
Porter des gants de protection lors des différentes
opérations de montage.
Arbeithandschuhe auf den Montagearbeiten tragen.
Vestir guantes de protección durante las diversas
operaciones de montaje.
Usar luvas de proteção durante as diferentes
operações de montagem.
Individuare opportune precauzioni al fine di evitare le
cadute dall’alto. Nel caso di utilizzo di scale, accertarsi
della loro efficienza.
Always take sufficient precautions to avoid the risk of
any falls from great heights. When using ladders
always make sure of their efficiency beforehand.
Prendre les précautions nécessaires permettant
d’éviter toute chute. Si l’on emploie des échelles,
s’assurer de leur bon état.
Vorsicht bei den Arbeiten auf dem Dach, es können
Unfälle durch Sturzgefahr entstehen und Leitern
müssen einwandfrei sein.
Individualizar oportunas precauciones con el objetivo
de evitar las caídas desde las alturas. En el caso de
utilizar escaleras, asegurarse de su eficiencia.
Tomar todas as precauções para evitar quedas do alto.
No caso de uso de escadas, controlar sua eficiência.
Fissare i dispositivi di sicurezza anticaduta a parti
stabili della struttura. Prevedere l’adozione di tuta con
imbracatura e appositi dissipatori di energia.
Secure the anti-fall safety devices to the stable parts of
the structure. Always assure the adoption of a worksuit
with harness and special energy discharger devices.
Fixer les dispositifs de sécurité antichute à des parties
stables de la structure. Prévoir l’adoption de combinaison
avec des bretelles et des dissipateurs d’énergie
spéciaux.
Sicherheitsgurte an die Unfallverhütungs-Vorrichtungen
befestigen. Arbeitsanzug mit Verseilung und
Elektro-Verzehrer tragen.
Indossare occhiali di protezione durante le operazioni
di foratura.
Always wear protective gloves during the various
assembly operations.
Porter des lunettes de protection lors des opérations de
perçage.
Auf Schweissarbeiten Schutzbrille tragen.
Vestir gafas de protección durante las operaciones de
perforación.
Usar óculos de proteção durante as operações de
perfuração.
Fijar los dispositivos de seguridad anti-caída a partes
estables de la estructura. Prever la adopción de mono
con eslingado y apropiados disipadores de energía.
Fixar os dispositivos de segurança anti-queda às
partes estáveis da estrutura. Avaliar o uso de fato
armadura e apósitos dissipadores de energia.
5
DISEGNO DI RIFERIMENTO PER STAFFAGGIO SINGOLO COLLETTORE
REFERENCE DRAWING FOR BRACKETING SINGLE COLLECTOR
DESSIN DE REFERENCE PER STRUCTURE DE SUPPORT SIMPLE COLLECTEUR
LAYOUT FÜR GERÜST SINGLE-KOLLEKTOR
DIBUJO DE REFERENCIA PARA LA FIJACIÓN DE UN COLECTOR
DESENHO DE REFERÊNCIA PARA FIXAÇÃO COLETOR ÚNICO
6
DISEGNO DI RIFERIMENTO PER STAFFAGGIO DI N. 2 COLLETTORI
REFERENCE DRAWING FOR BRACKETING OF N. 2 COLLECTORS
DESSIN DE REFERENCE POUR STRUCTURE DE SUPPORT DE N. 2 COLLECTEURS
LAYOUT FÜR GERÜST NR. 2 KOLLEKTOREN
DIBUJO DE REFERENCIA PARA LA FIJACIÓN DE 2 COLECTORES
DESENHO DE REFERÊNCIA PARA FIXAÇÃO DE N. 2 COLETORES
7
FORNITURA, PARTS SUPPLIED, FOURNITURE, LIEFERUNG, SUMINISTRO, FORNECIMENTO
8
01 Profilo asolato zincato
04 Profilo base zincato
06 Diagonale zincata
05 Traversa base zincata
04 Galvanized base profile
06 Galvanized diagonal section
05 Galvanized base cross-piece
01 Galvanized slotted profile
04 Profil base zingué
06 Diagonale zinguée
05 Traverse base zinguée
01 Profil avec boutonnière zingué
04 Verzinktes Basisprofil
06 Verzinktes Diagonalprofil
05 Querstück mit verzinktes Basis
01 Verzinktes gelochtes Profil
04 Perfil base galvanizado
06 Diagonal galvanizada
05 Travesaño base galvanizado
01 Perfil ranurado galvanizado
04 Perfil base galvanizado
06 Diagonal galvanizada
05 Travessa base galvanizada
01 Perfil com junção galvanizado
02 Profilo a T alluminio
07 Puntone verticale
04/N Angolare zincato
03/N Morsetto portante zincato
02 Aluminium T profile
07 Vertical point element
04/N Galvanized angle
03/N Galvanized supporting clamp
02 Profil en T aluminium
07 Poinçon vertical
04/N Cornière zingué
03/N Borne portante zinguée
02 Alu-T-Profil
07 Vertikalstrebe
04/N Verzinktes Winkelstück
03/N Verzinkte Trägerklemme.
02 Perfil en T aluminio
07 Puntal vertical
04/N Angular galvanizado
03/N Sujetador portante galvanizado
02 Perfil em T alumínio
07 Escora vertical
04/N Angular galvanizado
03/N Braço de suporte galvanizado
02/NDado martelletto molla
01/N Dado martelletto
05/N Vite 8 mm
07/N Dado 8 mm
02/N Spring hammer nut
01/N Hammer nut
05/N Screw 8 mm
07/N Nut 8 mm
06/N Washer 8 mm
02/N Ecrou marteau ressort
01/N Ecrou marteau
05/N Vis 8 mm
07/N Ecrou 8 mm
06/N Rondelle 8 mm
02/N Federhammermutter.
01/N Hammermutter
05/N 8 mm Schraube
07/N 8 mm Mutter
06/N 8 mm Unterlegring
02/N Tuerca martillo muelle
01/N Tuerca martillo
05/N Tornillo 8 mm
07/N Tuerca 8 mm
09/N Arandela 8 mm
02/N Porca martelo mola
01/N Porca martelo
05/N Parafuso 8 mm
07/N Porca 8 mm
06/N Arruela 8 mm
06/N Rondella 8 mm
PROLUNGA, EXTENSION, RALLONGE, VERLÄNGERUNGEN,
PROLONGACIÓN, EXTENSÃO
11 Profilo a T alluminio
11 Aluminium T profile
11 Profil en T aluminium
11 Alu-T-Profil
11 Perfil en T aluminio
11 Perfil em T alumínio
10 Piastra giunzione pannello 2,5 m2 10 Piastra giunzione pannello 2,0 m2
verticale
verticale
10 Panel connection plate 2,5 m2
10 Panel connection plate 2,0 m2
vertical
vertical
10 Plaque jonction panneau 2,5 m2
10 Plaque jonction panneau 2,0 m2
vertical
vertical
10 Plattenvertikalverbindung
10 Plattenvertikalverbindung 2,0 m2
2,5 m2
2
10 Placa unión panel 2,0 m2 vertical
10 Placa unión panel 2,5 m
vertical
10 Chapa junção painel 2,0 m2
10 Chapa junção painel 2,5 m2
vertical
vertical
Giunzione doppia
Double joint
Jonction double
Doppelverbindung
Unión doble
Junção dupla
OPZIONALE, OPTIONAL, OPTION, OPTIONEN, OPCIONAL, FACULTATIVO
03 Piedino filettato 10 mm
08/N Dado 10 mm
09/N Rondella 10 mm
03 Threaded foot 10 mm
08/N Nut 10 mm
09/N Washer 10 mm
03 Pied fileté 10 mm
08/N Ecrou 10 mm
09/N Rondelle 10 mm
03 Gewindefuss
08/N 10 mm Mutter
09/N 10 mm Unterlegring
03 Pie roscado 10 mm
08/N Tuerca 10 mm
09/N Arandela 10 mm
03 Pezinho roscado 10 mm
08/N Porca 10 mm
09/N Arruela 10 mm
ATTEZZATURA NECESSARIA, NECESSARY EQUIPMENT, OUTILLAGE NECESSAIRE,
MONTAGE-WERKZEUGE, HERRAMIENTAS NECESARIAS, EQUIPAMENTO NECESSÁRIO
Chiave inglese 13
Livella a bolla d’aria
Metro lineare
Adjustable spanner 13
Spirit level gauge
Linear tape measure
Clé anglaise 13
Niveau à bulle d’air
Mètre linéaire
Engländer 13
Wasserwaage
Metermass
Llave inglesa 13
Nivel de burbuja de aire
Metro lineal
Chave inglesa 13
Nível de bolha de ar
Metro linear
9
SCHEMA DI MONTAGGIO PER SINGOLO E DOPPIO COLLETTORE
ASSEMBLY DIAGRAM FOR SINGLE AND DOUBLE COLLECTOR
SCHEMA DE MONTAGE POUR SIMPLE ET DOUBLE COLLECTEUR
MONTAGEPLAN FÜR SINGLE- UND ZWILLINGSKOLLEKTOR
ESQUEMA DE MONTAJE PARA COLECTOR SIMPLE Y DOBLE
ESQUEMA DE MONTAGEM PARA COLETOR ÚNICO E DUPLO
Per i sistemi di fissaggio su superfici piane senza piedini è
consigliabile applicare dei tasselli di ancoraggio nei quattro fori
che rimarrano liberi, in questo modo si garantirà una perfetta
stabilità al suolo del telaio.
For fixture systems on flat surfaces without foot rests we
recommend the application of some fixture pegs inside the four
free slots, to assure perfect stability of the frame on the round.
Pour les systèmes de fixation sur des surfaces plates sans pieds
il est conseillé d’appliquer des tasseaux d’ancrage dans les
quatre trous qui resteront libres, ainsi on garantira une parfaite
stabilité au sol du châssis.
Sollten die Platten auf glatten Flächen ohne Stützfüsse montiert
werden ist es ratsam, diese an den vier frei verbleibenden
Löchern mit Dübeln zu verankern, damit eine perfekte Stabilität
mit dem Rahmenboden gewährleistet werden kann.
Para los sistemas de fijación sobre superficies planas sin pies, es
aconsejable aplicar unos tarugos de fijación en los cuatro
agujeros que quedarán libres; de esta manera se garantizará una
perfecta estabilidad al piso del bastidor.
Para os sistemas de fixação sobre superfícies planas sem
pezinhos é aconselhavel aplicar buchas de fixação nos quatro
furos que ficam livres, assim se garante uma perfeita
estabilidade ao solo da armação.
Per i sistemi di fissaggio su superfici piane con piedini è
consigliabile applicare delle zavorre di rinforzo come da
immagine a fianco, in questo modo si garantirà una perfetta
stabilità al suolo del telaio. (Zavorra consigliata: 100 kg per ogni
pannello).
For fixture systems on flat surfaces with foot rests we recommend
the application of reinforcement ballasts, as shown in the diagram
at the side, to assure perfect stability of the frame on the round.
(Recommended ballast: 100 kg for each panel)
Pour les systèmes de fixation sur des surfaces plates avec des
pieds, il est conseillé d’appliquer des masses de lestage de
renfort selon l’image ci-contre, ainsi on garantira une parfaite
stabilité au sol du châssis (masses de lestage conseillées: 100 kg
pour chaque panneau).
50kg
50kg
Sollten die Platten auf glatten Flächen mit Stützfüssen montiert
werden, ist es ratsam diese mit Ballaststücken (siehe Abb.)
zu verstärken, damit eine perfekte Stabilität mit dem Rahmenboden
gewährleistet werden kann. (Empfohlenes Gewicht des Verstärkungsteils: 100 kg je Platte).
Para los sistemas de fijación sobre superficies planas con pies,
es aconsejable aplicar unos contrapesos de refuerzo, tal como se
ilustra en la imagen del costado; de esta manera se garantizará
una perfecta estabilidad del bastidor al piso. (Contrapeso
aconsejado: 100 kg por cada panel).
Para os sistemas di fixação sobre superfícies planas com
pezinhos é aconselhavel aplicar lastros de reforço como na
imagem ao lado, assim se garante uma perfeita estabilidade ao
solo da armação. (Lastro aconselhado: 100 kgs. para cada painel)
10
Posizionare i due angolari (04) al suolo assicurandosi che il lato
con tre fori rimanga nella parte posteriore.
Position the two angle elements (04) on the round assuring that
the side with the three slots remains at the rear.
Positionner les deux cornières (04) au sol en vérifiant que le côté
avec les trois trous reste dans la partie arrière.
Die beiden Winkelstäbe (04) aufstellen und prüfen, dass die Seite
mit den drei Löchern hinten liegt.
Posicionar los dos angulares (04) en el piso, asegurándose de
que el lado con tres agujeros quede en la parte posterior.
Posicionar os dois angulares (04) ao solo controlando que o lado
com três furos fique na parte posterior.
Applicare i profili (05) e fissarli tramite bullone+dado+rondella 8
mm nel ultimo foro posteriore (A) e nel secondo foro anteriore
(B). Inserire i bulloni dal basso verso l’alto.
Attenzione: è opportuno montare il telaio su una base
perfettamente in piano.
A
B
Apply the profiles (05) and fix them using bolt +nut + 8 mm
washer in the last rear slot (A) and in the second front slot (B).
Insert the bolts from bottom to top.
Important: assemble the frame on a perfectly flat base.
Appliquer les profils (05) et les fixer au moyen de boulon + écrou
+ rondelle 8 mm dans le dernier trou arrière (A) et dans le second
trou avant (B) . Insérer les boulons de bas en haut.
Attention il faut monter le châssis sur une base parfaitement
horizontale.
Profile (05) anbringen und mit 8 mm Schraubenbolzen + Mutter
+ Unterlegringen in das letzte hintere Loch (A) und in das zweite
vordere Loch (B) befestigen.
Achtung: wichtig ist, dass der Rahmen an einer perfekt ebenen
Stelle montiert wird.
Aplicar los perfiles (05) y fijarlos mediante bulón + tuerca +
arandela de 8 mm en el último agujero trasero (A) y en el
segundo agujero delantero (B). Introducir los bulones desde
abajo hacia arriba. Atención, es oportuno montar el bastidor
sobre una base perfectamente horizontal.
Aplicar os perfis (05) e fixá-los por meio de parafuso com
porca+porca+arruela 8 mm no último furo posterior (A) e no
segundo furo anterior (B) . Introduzir os parafusos com porca do
baixo para o alto.
Atenção é oportuno montar a armação sobre uma base
perfeitamente em plano.
Assicurarsi di ottenere la simmetria del telaio con angoli a 90°.
Make sure that a frame symmetry is obtained with 90° angles.
Vérifier que la symétrie du châssis a des angles à 90°.
90°
Wichtig ist, dass die Symmetrie des Rahmens einen 90°- Winkel
bildet.
Asegurarse de obtener la simetría del bastidor con ángulos a 90°.
Controlar de obter a simetria da armação com ângulos a 90°.
11
OPTIONALE - OPTIONAL - OPTION - OPTIONEN - OPCIONAL - FACULTATIVO
Passaggio opzionale: applicare i piedini di appoggio (03) nella
parte anteriore nel primo foro (Fig A).
Parte posteriore: i due fori indicati nella figura B, determinano
l’inclinazione del telaio 45° o 60°, che verrà specificata nei
passaggi successivi, applicare quindi il piedino nel foro dove non
sarà presente il profilo che determinerà l’inclinazione.
Esempio: se vorrete ottenere il telaio con inclinazione a 45°,
dovrete applicare il piedino nel foro che rimarrà libero quindi
quello indicato con 60° (fig. B).
Optional passage: apply the support feet (03) on the front part
into the first slot (Fig A).
Rear part: the two slots shown in figure B, show the frame inclination at 45° or 60°,to be specified in the subsequent stages,
then apply the foot into the slot in which the profile that determines the inclination, will not be present.
Example: to achieve a frame with inclination of 45°, you must
apply the foot into the slot that is free and then that indicated with
60° (fig. B).
A
B
45°
60°
Passage optionnel: appliquer les pieds d’appui (03) dans la
partie avant dans le premier trou (Fig. A).
Partie arrière: les deux trous indiqués dans la figure B, déterminent l’inclinaison du châssis de 45° ou de 60°, qui sera spécifiée
dans les passages successifs, appliquer donc le pied dans le trou
où ne sera pas présent le profil qui déterminera l’inclinaison.
Exemple: si vous voulez que le châssis ait une inclinaison de
45°, vous devrez appliquer le pied dans le trou qui restera libre
donc celui indiqué par 60° (fig. B).
Vorgang option: Stützfüsse (03) in das erste Loch des
Vorderteils montieren (Bild A)
Hinteres Teil: mit den beiden Löchern aus Abb. B wird die
Rahmenneigung entweder 45° oder 60° festgelegt. Diese wird in
den nächsten Vorgängen beschrieben. Stützfuss in das Loch, an
welchem kein Profil, welches die Schräge bestimmt liegt,
montieren.
Beispiel: wenn ein Rahmen mit 45°-Neigung erwünscht ist, muss
der Stützfuss in das freie Loch dass heißt das mit 60°
bezeichnete Loch montiert werden (Bild B).
Pasaje opcional: aplicar los pies de apoyo (03) en la parte
delantera en el primer agujero (Fig. A).
Parte trasera: los dos agujeros indicados en la figura B,
determinan la inclinación del bastidor 45° ó 60°, que será
especificada en los pasos sucesivos; aplicar entonces el pie en
el agujero donde no estará presente el perfil que determinará la
inclinación.
Ejemplo: si desearán obtener el bastidor con una inclinación a
45°, deberán aplicar el pie en el agujero que quedará libre,
entonces, aquel indicado con 60° (fig. B).
Passagem facultativa: aplicar os pezinhos de apoio (03) na
parte anterior no primeiro furo (Fig A).
Parte posterior: os dois furos indicados na figura B, determinam
a inclinação da armação 45° ou 60°, que será indicada nas
passagens sucessivas, aplicar então o pezinho no furo onde não
está presente o perfil que determina a inclinação.
Exemplo: se se quiser obter a armação com inclinação de 45°,
aplicar o pezinho no furo que fica livre depois o indicado com 60°
(fig. B).
12
Applicare nel primo foro della parte anteriore del telaio, gli
angolari in dotazione (04N) utilizzando il bullone+rondella+dado
8 mm. Fissarli all’esterno del profilo come da disegno, si
consiglia di non avvitarli completamente per permettere la
regolazione successiva.
To the first slot of the front part of the frame apply the angle
pieces supplies (04N) using the bolt + washer + 8 mm nut.
Fix them to the exterior of the profile as shown in the diagram, we
advise not to tighten them completely to permit subsequent
adjustment.
Appliquer dans le premier trou de la partie avant du châssis, les
cornières fournies (04N) au moyen de boulon + rondelle + écrou
8 mm. Les fixer à l’extérieur du profil comme illustré sur le
dessin, il est conseillé de ne pas les visser complètement pour
permettre un réglage ultérieur.
Die zur Lieferung gehörenden Winkelstücke (04N) mit dem 8mm
Bolzen+Unterlegring+Mutter-Satz in das erste Loch an der
Rahmenvorderseite setzen und von Außen an das Profil
befestigen (Siehe Zeichnung). Damit eine spätere Regelung
möglich ist, sollten diese nicht ganz fest angezogen werden.
Aplicar en el primer agujero de la parte delantera del bastidor los
angulares entregados (04N) utilizando el bulón + arandela +
tuerca de 8 mm. Fijarlos en el exterior del perfil tal como se
ilustra en el dibujo; se aconseja no atornillarlos completamente
para permitir la regulación sucesiva.
Aplicar no primeiro furo da parte anterior da armação, os
angulares em dotação (04N) utilizando o parafuso com porca +
arruela + porca 8 mm. Fixá-los no externo do perfil como no
desenho, aconselhamos não parafusá-los completamente para
permitir a regulação sucessiva.
A
Applicare i due angolari (07) in senso verticale nella parte
posteriore del telaio, fissandoli nel foro (A) telaio a 45°, (C) telaio
a 60°, utilizzando bullone+rondella+dado 8 mm in dotazione.
Assicurarsi che i profili mantengano un angolo di 90° rispetto alla
base d’appoggio con (07) in (A) come da (fig. B) e minore di 90°
con (07) in (C).
Apply the two angle elements (07) in a vertical sense to the rear
of the frame, fixing them into the slot (A) frame at 45°, (C) frame
at 60°, using the bolt + washer + 8 mm nut supplied. Assure that
the profiles maintain an angle of 90° in relation to the support
base with (07) in (A) as per (fig. B) and under 90° with (07) in (C).
Appliquer les deux cornières (07) en sens vertical dans la partie
arrière du châssis, en les fixant dans le trou (A) châssis à 45°, (C)
châssis à 60°, au moyen de boulon+rondelle+écrou 8 mm fournis.
Vérifier que les profils maintiennent un angle de 90° par rapport
à la base d’appui avec (07) en (A) selon (fig. B) et inférieur à 90°
avec (07) en (C).
Die beiden Winkelstücke (07) vertikal an den hinteren Rahmen
setzen und mit dem zur Lieferung gehörenden 8 mm Bolzen +
Unterlegring + Mutter-Satz an das Rahmenloch (A) zu 45° (C)
Rahmen zu 60° befestigen. Wichtig ist, dass die Profile den 90°Winkel zum Auflageboden bei (07) in (A) siehe Abb. und bei (07)
in (C) niedriger als 90° einhalten.
Aplicar los dos angulares (07) en sentido vertical en la parte
trasera del bastidor, fijándolos en el agujero (A) bastidor a 45°,
(C) bastidor a 60°, utilizando bulón + arandela + tuerca de 8 mm
entregados. Asegurarse de que los perfiles mantengan un ángulo de 90° respecto de la base de apoyo con (07) en (A) tal
como se ilustra en la (fig. B) y menor de 90° con (07) en (C).
Aplicar os dois angulares (07) no sentido vertical na parte
posterior da armação, fixándo-os no furo (A) armação de 45°,
(C) armação de 60° utilizando parafuso com porca + arruela +
porca 8 mm em dotação.
Controlar que os perfis mantenham um ângulo de 90° em relação
à base de apoio com (07) em (A) como da (fig. B) e menor de 90°
com (07) em (C).
13
=
Fissare e regolare le due diagonali (06) di rinforzo posteriori.
Utilizzare i fori di regolazione ad asola per ottenere la stessa
misura sia nella parte inferiore che quella superiore. (fig. A)
Fix and ad just the two rear reinforcement diagonals (06).
Use the slotted adjustment slot to achieve the same measurement
on both the top and bottom part. (fig. A)
=
Fixer et régler les deux diagonales (06) de renfort arrière.
Utiliser les trous de réglage à boutonnière pour obtenir la même
mesure à la fois dans la partie inférieure et dans la partie
supérieure. (fig. A)
Die beiden Diagonalprofile (06) der hinteren Verstärkungen
regeln und befestigen. Die Regelung an den Löchern so
vornehmen, dass an der Unter- und Oberseite der gleiche
Abstand entsteht. (Bild A)
Fijar y regular las dos diagonales (06) de refuerzo traseras.
Utilizar los agujeros de regulación de ranura para obtener la
misma medida tanto en la parte inferior como en aquella superior.
(fig. A)
Fixar e regular as duas diagonais (06) de reforço posteriores.
Utilizar os furos de regulação para obter a mesma medida seja
na parte inferior que na superior. (fig.A)
Applicare gli angolari (04N) ai due profili verticali della parte
posteriore del telaio, fissarli all’esterno utilizzando i bulloni+
rondella+dado 8 mm in dotazione.
Si consiglia di non avvitarli completamente per permettere la
regolazione successiva.
Apply the angle elements (04N) to the two vertical profiles of the
rear part f the frame, fixing them to the exterior using bolts +
washer + 8 mm nut supplied. We advise you not to tighten them
completely to permit subsequent adjustment.
Appliquer les cornières (04N) aux deux profils verticaux de la
partie arrière du châssis, les fixer à l’extérieur au moyen de
boulons + rondelle + écrou 8 mm fournis.
Il est conseillé de ne pas les visser complètement pour permettre
un réglage ultérieur.
Winkelstücke (04N) an die beiden Vertikalprofile am hinteren
Rahmenteil setzen und von Außen mit dem zur Lieferung
gehörenden 8mm Bolzen+Unterlegring+Mutter befestigen. Damit
eine spätere Regelung möglich ist, sollten diese nicht ganz fest
angezogen werden.
Aplicar los angulares (04N) en los dos perfiles verticales de la
parte trasera del bastidor, fijarlos en el exterior utilizando los
bulones + arandela + tuerca de 8 mm entregados.
Se aconseja no atornillarlos completamente para permitir la
regulación sucesiva.
Aplicar os angulares (04N) aos dois perfis verticais da parte
posterior da armação, fixá-los no externo utilizando os parafusos
com porca + arruela + porca 8 mm em dotação.
Aconselhamos não parafusá-los completamente para permitir a
regulação sucessiva.
14
Applicare i profili (01) appoggiandoli a terra all’esterno degli
angolari della parte inferiore, fissandoli al primo foro utilizzando
il bullone+dado a martello 8 mm.
Il dado dovrà avere la parte zigrinata rivolta verso l’interno del
profilo. (A)
Prima di avvitare completamente il bullone, spingere il profilo
verso l’alto e centrarlo all’asola dell’angolare. (B)
Apply the profiles (01) placing them on the ground outside the
angle pieces of the lower part, fixing them to the first slot using the
bolt + nut + 8 mm hammer. The nut must have the scored part
positioned towards the interior of the profile. (A)
Before completely tightening the bolt, push the profile upwards
and centre it to the angle piece slot. (B)
Appliquer les profils (01) en les posant à terre à l’extérieur des
cornières de la partie inférieure, en les fixant au premier trou en
utilisant le boulon + écrou à marteau 8 mm.
L’écrou devra avoir la partie moletée tournée vers l’intérieur du
profil. (A)
Avant de visser complètement le boulon, pousser le profil vers le
haut et le centrer sur la boutonnière de la cornière. (B)
Profile (01) außerhalb der Winkelstücke des unteren Teils auf den
Boden legen und diese mit 8 mm Bolzen+Hammermutter an das
erste Loch befestigen. Die Mutter muss mit dem gerändelten Teil
im Profilinneren (A) liegen. Profil nach oben schieben und mit
dem Loch des Winkelstücks zentrieren (B) danach Bolzen fest
anziehen.
Aplicar los perfiles (01) apoyándolos en el piso en el exterior de
los angulares de la parte inferior, fijándolos al primer agujero
utilizando el bulón + tuerca de martillo de 8 mm.
La tuerca deberá tener la parte moleteada dirigida hacia el
interior del perfil. (A)
Antes de atornillar completamente el bulón, empujar el perfil
hacia arriba y centrarlo en la ranura del angular. (B)
B
Aplicar os perfis (01) apoiandó-os a terra na parte exterior dos
angulares da parte inferior, fixándo-os no primeiro furo utilizando
o parafusos com porca+porca com orelhas 8 mm.
A porca deve ter a parte roscada orientada para o interno do perfil.
(A) Antes de apertar completamente o parafuso, empurrar o
perfil para o alto e centrá-lo com a asa do angular. (B)
Ripetere l’operazione nella parte superiore fissando i profili (01)
agli angolari nei fori di riferimento, assicurandosi poi che tutti i
bulloni siano avvitati correttamente.
Ripetere l’operazione con l’altro profilo.
Repeat the operation for the top part fixing the profiles (01) to the
angle pieces in the reference slots, and making sure that the bolts
are correctly tightened. Repair the operation with the other
profile.
Répéter l’opération dans la partie supérieure en fixant les profils
(01) aux cornières dans les trous de référence, en vérifiant
ensuite que tous les boulons soient vissés correctement.
Répéter l’opération avec l’autre profil.
Vorgang am oberen Teil wiederholen und die Profile (01) in die
Bezugslöcher an den Winkelstücken befestigen; dabei muss
beachtet werden, dass alle Bolzen exakt verschraubt sind.
Gleiche Handhabung mit dem anderen Profil vornehmen.
Repetir la operación en la parte superior fijando los perfiles (01)
en los angulares en los agujeros de referencia, asegurándose
luego de que todos los bulones esté atornillados correctamente.
Repetir la operación con el otro perfil.
Repetir a operação na parte superior fixando os perfis (01)
aos angulares nos furos de referência, controlando depois que
todos os parafusos estejam apertados corretamente. Repetir a
operação com o outro perfil.
15
Applicare nella parte inferiore i quattro dadi a molla (02N)
all’interno del profilo. È opportuno farlo scorrere fino a raggiungere
il contatto con il dado montato precedentemente (1). Nella parte
superiore verrà invece regolato nei passaggi successivi. Le parti
zigrinate devono essere a contatto (fig. A).
02
N
On the lower part apply the four spring nuts (02N) inside the
profile, We recommend that you slide it until it makes contact with
the previously mounted nut (1).Adjustment in the top part will be
undertaken in subsequent steps. The scored parts must have
contact. (fig. A).
Appliquer dans la partie inférieure les quatre écrous à ressort
(02N) à l’intérieur du profil. Il faut le faire coulisser jusqu’à entrer
en contact avec l’écrou monté précédemment (1). Dans la partie
supérieure il sera par contre réglé dans les passages successifs.
Les parties moletées doivent être en contact (fig. A).
Die vier Federmuttern (02N) an dem unteren Teil in das Profil
setzen. Wichtig ist, dass dieses bis zur Berührung mit der
vorhergehend montierten Mutter (1) geschoben werden. Die
Regelung des unteren Teils wird in den nächsten Vorgängen
beschrieben. Die anderen gerändelten Teile müssen einen
Kontakt bilden (Bild A).
1
A
Aplicar en la parte inferior las cuatro tuercas de muelle (02N) en
el interior del perfil. Es oportuno hacerlo deslizar hasta alcanzar
el contacto con la tuerca montada precedentemente (1). En la
parte superior será en cambio regulado en los pasos sucesivos.
Las partes moleteadas deben estar en contacto (fig. A).
Aplicar na parte inferior as quatro porcas de mola (02N) no
interno do perfil. É bom fazé-lo deslizar até alcançar o contato
com a porca montada anteriormente (1). Na parte superior vem,
ao contrário, regulado nas passagens sucessivas. As partes
roscadas devem ficar a contato (fig. A).
Applicare le staffe di sostegno (03N) nella parte inferiore ai dadi
a molla precedentemente installati, senza bloccare i dadi
completamente per permettere poi l’inserimento della staffa
successiva. La parte piegata dev’essere rivolta verso il basso
come da immagine a fianco (A).
Apply the support bracket (03N) to the part below the spring nuts
previously installed, without fully securing the nuts to permit
insertion of subsequent racket. The folded part must be positioned
downwards as shown in the illustration at the side (A).
Appliquer les brides de support (03N) dans la partie inférieure
aux écrous à ressort précédemment installés, sans bloquer les
écrous complètement pour permettre ensuite l’insertion de la
bride successive. La partie pliée doit être tournée vers le bas
comme illustré dans l’image ci-contre (A).
Trägerbügel 03N) unterhalb der vorhergehend montierten
Federmuttern einsetzen; dabei beachten, dass die Muttern nicht
fest angezogen werden, damit danach der nächste Bügel
eingesetzt werden kann. Der gebogene Teil muss nach unten
zeigen. (Siehe Abbildung A).
Aplicar los estribos de sujeción (03N) en la parte inferior de las
tuercas de muelle precedentemente instaladas, sin bloquear
completamente las tuercas, para permitir luego la introducción
del estribo sucesivo. La parte plegada tiene que estar dirigida
hacia abajo, tal como se ilustra en la imagen del costado (A).
Aplicar os grampos de suporte (03N) na parte inferior das porcas
de mola anteriormente montadas, sem bloquear as porcas
completamente para permitir depois a introdução do grampo
sucessiva. A parte dobrada deve ser orientada para o baixo como
na imagem ao lado (A).
16
Applicare il profilo a T (02) nella parte inferiore del telaio
all’interno delle apposite staffe, assicurandosi di mantenere la
stessa distanza da ambo le parti (B).
Attenzione: il profilo è dotato di due fori asolati che devono essere
rivolti verso l’esterno (A).
Utilizzare una livella a bolla d’aria per valutare che il profilo abbia
un’asse orizzontale (B).
Serrare il dado da 8 mm garantendo la perfetta tenuta del
profilo.
Assicurarsi che la staffa di serraggio appoggi completamente
sul telaio, e non altrepassi il profilo (C).
Apply a T profile (02) to the lower part of the frame inside the
relative brackets, assuring that the same distance is maintained
on both sides (B). Important: the profile is fitted with two slots
which must be positioned facing outwards (A).
Use a spirit level to make sure that the profile has a horizontal
axis (B). Tightne the 8 mm nut to assure the perfect hold of the
profile. Assure that the fixture bracket fully rests on the frame and
that it does not exceed the profile (C).
Appliquer le profil en T (02) dans la partie inférieure du châssis
à l’intérieur des brides spécialement prévues, en vérifiant de
maintenir la même distance des deux parties (B).
Attention: le profil est doté de deux trous avec boutonnière qui
doivent être tournés vers l’extérieur (A).
Utiliser un niveau à bulle d’air pour vérifier que le profil ait un axe
horizontal (B).
Serrer l’écrou de 8 mm en garantissant la parfaite tenue du profil.
Vérifier que la bride de serrage repose complètement sur le
châssis, et ne dépasse pas le profil (C).
=
B
=
A
C
T-Profil (02) an den unteren Rahmen in die vorgesehenen Bügel
setzen; dabei muss darauf geachtet werden, dass auf beiden
Seiten der gleiche Abstand vorhanden ist. (B)
Achtung: das Profil ist mit zwei Löchern, die nach außen
gerichtet sein müssen, ausgerüstet. (A)
Mit einer Wasserwaage prüfen, ob die horizontale Profilachse
vorhanden ist. (B)
8 mm Mutter anziehen, damit das Profil fest sitzt. Prüfen, ob der
Klemmbügel vollständig auf dem Rahmen ruht und nicht über das
Profil herausragt. (C)
Aplicar el perfil en T (02) en la parte inferior del bastidor en el
interior de los correspondientes estribos, asegurándose de
mantener la misma distancia de ambas partes (B).
Atención: el perfil tiene dos agujeros ranurados que tienen que
estar dirigidos hacia el externo (A).
Utilizar un nivel de burbuja de aire para evaluar que el perfil tenga
un eje horizontal (B). Apretar la tuerca de 8 mm garantizando la
perfecta sujeción del perfil.
Asegurarse de que el estribo de apretado se apoye
completamente sobre el bastidor y que no sobrepase el perfil (C).
Aplicar o perfil em T (02) na parte inferior da armação no interno
dos apósitos grampos, controlar de manter a mesma distância
em ambas as partes (B).
Atenção: o perfil está dotado de dois furos que devem ficar
orientados para o externo (A).
Utilizar um nível de bolha de ar para controlar que o perfil tenha
um eixo horizontal (B).
Apertar a porca de 8 mm garantindo a perfeita vedação do perfil.
Controlar que o grampo de suporte apóie completamente sobre
a armação,e não ultrapasse o perfil (C).
OK
NO
17
Utilizzando il metro, rilevare la misura di 214,5 cm utilizzando
come punto di partenza l’interno del profilo a T precedentemente
montato, ed effettuare un segno di riferimento, (A), così facendo
si otterrà lo spazio per l’alloggiamento del collettore solare.
Attenzione: il profilo è dotato di due fori asolati che devono
essere rivolti verso l’esterno (B).
Applicare il profilo a T (C) come nel passaggio precedente, senza
bloccare però completamente i bulloni, questo permetterà
l’inserimento del collettore.
C
Use a measure to record a measurement of 214,5 cm, the
starting point to be taken being the interior of the T-profile
previously mounted, and then make a reference mark, (A), this
will give the space for the fitting of the solar collector.
Important: the profile is fitted with two slots that must be positioned
towards the exterior (B).
Apply the T profile (C) as in the previous step, without however
fully locking the bolts, to permit collector insertion.
A
C
C
214,5 cm
=
=
A l’aide d’un mètre, relever la mesure de 214,5 cm en utilisant
comme point de départ l’intérieur du profil en T précédemment
monté, et effectuer un signe de référence, (A), ainsi faisant on
obtiendra l’espace pour le logement du collecteur solaire.
Attention: le profil est doté de deux trous avec boutonnière qui
doivent être tournés vers l’extérieur (B).
Appliquer le profil en T (C) comme dans le passage précédent,
sans bloquer toutefois complètement les boulons, ce qui permettra
l’insertion du collecteur.
Mit einem Metermaß 214,5 cm vermessen; dabei vom Inneren
des vorhergehend montierten T-Profils ausgehen; Maß markieren
(A); damit wird der Einbauraum des Kollektors erzielt.
Achtung: das Profil ist mit zwei Löchern, die nach außen gerichtet
sein müssen, ausgerüstet (B).
T-Profil wie vor beschrieben einsetzen (C); Bolzen aber nicht fest
anziehen, damit die Platte eingesetzt werden kann.
Utilizando el metro, medir 214,5 cm utilizando como punto de
partida el interior del perfil en T montado precedentemente,
y efectuar una marca de referencia (A); de esta manera se
obtendrá el espacio para el alojamiento del colector solar.
Atención: el perfil tiene dos agujeros ranurados que tienen que
estar dirigidos hacia el exterior (B).
Aplicar el perfil en T (C) como en el punto precedente, pero
sin bloquear completamente los bulones; ello permitirá la
introducción del colector.
B
Com o metro, medir 214,5 cm utilizando como ponto de partida
o interno do perfil em T anteriormente montado, e efetuar uma
marca de referência, (A), fazendo assim se obtem o espaço para
o alojamento do coletor solar.
Atenção: o perfil está dotado de dois furos que devem ficar
orientados para o externo (B).
Aplicar o perfil em T (C) como na passagem anterior, sem
bloquear porém completamente os parafusos, isto permite a
introdução do coletor.
18
A
Importante: prima di inserire il pannello, effettuare il
serraggio di tutti i bulloni presenti nel telaio.
Inserire il pannello all’interno del telaio, facendolo appoggiare sul
profilo nella parte inferiore.
Posizionare il pannello con l’attacco sonda in alto (A)
Important: before panel insertion undertake to tighten all the
bolts present on the frame.
Insert the panel inside the frame, making it rest on the profile on
the lower part. Position the panel with probe attachment at the
top (A).
Important: avant d’insérer le panneau, serrer tous les
boulons présents dans le châssis.
Insérer le panneau à l’intérieur du châssis, en l’appuyant sur le
profil dans la partie inférieure.
Positionner le panneau avec l’attache de la sonde en haut (A).
Wichtig: Bevor die Platte eingesetzt wird, müssen alle
Bolzen des Rahmens fest angezogen werden.
Platte jetzt in den Rahmen legen und mit der unteren Seite in das
Profil setzen. Der Sondenanschluss muss nach oben gerichtet
sein (A).
Importante: antes de introducir el panel, habrá que apretar
todos los bulones presentes en el bastidor.
Introducir el panel en el interior del bastidor, haciéndolo apoyar
sobre el perfil en la parte inferior. Posicionar el panel con la unión
sonda arriba (A)
Importante: antes de introduzir o painel, apertar bem todos
os parafusos que se encontram na armação.
Introduzir o painel no interno da armação, apoiandó-o sobre o
perfil na parte inferior.
Posicionar o painel com a junção sonda no alto (A).
Sollevare il pannello (A) e far scorrere il profilo (B) assicurandosi
che ci sia contatto su tutta la lunghezza del collettore e che sia in
perfetto piano utilizzando la livella a bolla d’aria.
Serrare i dadi con forza in modo da bloccare completamente il
profilo a T (C).
Lift the panel (A) and slide in the profile (B) assuring that there is
contact along the entire length of the collector and that it is
perfectly level by using the spirit gauge.
Securely fasten the nuts so as to fully secure the T-profile (C).
A
Soulever le panneau (A) et faire coulisser le profil (B) en
contrôlant qu’il y ait contact sur toute la longueur du collecteur et
qu’il soit parfaitement horizontal en utilisant le niveau à bulle d’air.
Serrer les écrous de façon à bloquer complètement le profil en
T (C).
B
C
Platte (A) anheben und in das Profil (B) schieben; dabei
beachten, dass der Kontakt über die gesamte Plattenlänge
entsteht. Perfekt glatte Auflage mit der Wasserwaage prüfen.
Muttern fest anziehen, damit T-Profil blockiert ist (C).
Levantar el panel (A) y hacer deslizar el perfil (B) asegurándose
de que haya contacto en todo el largo del colector y que esté
perfectamente horizontal, utilizando el nivel de burbuja de aire.
Apretar las tuercas con fuerza como para bloquear
completamente el perfil en T (C).
Levantar o painel (A) e fazer deslizar o perfil (B) controlando que
esteja em contato sobre todo o comprimento do coletor e que
esteja perfeitamente em plano utilizando o níivel de bolha de ar.
Apertar as porcas com força bloqueando completamente o
perfil em T (C).
19
Centrare l’inserto filettato del pannello il più possibile all’asola sul
profilo a T (A).
Come ultimo passaggio, applicare i 4 bulloni+rondella 8 mm nella
parte superiore e inferiore del pannello in corrispondenza dei fori
asolati (B), ciò permetterà il bloccaggio completo del pannello al
telaio.
A
B
Centre the threaded insert of the panel as near as possible to the
slot on the T profile T (A).
The last stage is the application of the 4 bolts + 8 mm washer on
the top and bottom of the panel in the vicinity of the slots (B), to
permit the total fastening of the panel to the frame.
Centrer l’insert fileté du panneau le plus possible sur la
boutonnière placée sur le profil en T (A).
Comme dernier passage, appliquer les 4 boulons + rondelle 8
mm dans la partie supérieure et inférieure du panneau en
correspondance des trous avec boutonnière (B), ce qui
permettra le blocage complet du panneau au châssis.
Die Gewindeeinlage der Platte genau auf das Loch des T-Profils
ausrichten (A). Zuletzt werden die Nr. 4 8 mm Bolzen + Unterlegring am oberen und unteren Plattenteil in die Löcher (B) befestigt, damit die Platte exakt an den Rahmen blockiert ist.
Gewindeanschluss der Platte so weit wie möglich an das Loch
des T-Profils annähern. (Bild A) Danach die Nr. 4 8 mm Bolzen+Unterlegring oben und unten in Platte in Lochhöhe (Bild B)
einsetzen und die Platte an den Rahmen blockieren.
Centrar el inserto roscado del panel lo más posible en la ranura
en el perfil en T (A).
Como último paso, aplicar los 4 bulones + arandela de 8 mm en
la parte superior e inferior del panel en correspondencia de los
agujeros ranurados (B); ello permitirá el bloqueo completo del
panel al bastidor.
Centrar o separador roscado do painel quanto mais possível com
o furo do perfil em T (A).
Como última passagem, aplicar os 4 parafusos com porca +
arruela 8 mm na parte superior e inferior do painel em
correspondência dos furos (B), isto permite o bloqueio completo
do painel à armação.
OTTENUTO IL TELAIO PER UN SINGOLO O DOPPIO PANNELLO È ORA POSSIBILE RICAVARE IL KIT PER 3, 4
O 5 PANNELLI A PARTIRE DA PAG. 22.
ONCE THE FRAME HAS BEEN OBTAINED FOR A SINGLE OR DOUBLE PANEL IT IS POSSIBLE TO PREPARE THE
KIT FOR 3, 4 OR 5 PANELS STARTING FROM PAGE 22.
APRÈS AVOIR OBTENU LE CHÂSSIS POUR UN SIMPLE OU DOUBLE PANNEAU IL EST MAINTENANT
POSSIBLE D’OBTENIR LE KIT POUR 3, 4 OU 5 PANNEAUX À PARTIR DE PAGE 22.
NACHDEM DER RAHMEN FÜR EINE SINGLE-PLATTE ODER FÜR EINE ZWILLINGSPLATTE
ZUSAMMENGESTELLT WURDE, KANN AUF SEITE 22 AUCH DER BAUSATZ FÜR 3, 4 ODER 5 PLATTEN
ENTNOMMEN WERDEN.
OBTENIDO EL BASTIDOR PARA UN PANEL SIMPLE O DOBLE, ES AHORA POSIBLE OBTENER EL KIT PARA 3,
4 Ó 5 PANELES A PARTIR DE LA PÁG. 22.
REALIZADA A ARMAÇÃO PARA UM PAINEL ÚNICO OU DUPLO É AGORA POSSÍVEL REALIZAR O KIT PARA 3,
4 OU 5 PAINEIS A PARTIR DA PÁG. 22.
20
Modularità, Modularity, Modularité, Modulanordnung, Modularidad, Modularidade
SCHEMA DI RIFERIMENTO PER STAFFAGGIO DI UN
SINGOLO COLLETTORE.
1
REFERENCE DIAGRAM FOR BRACKETING SINGLE
COLLECTOR
SCHEMA DE REFERENCE POUR STRUCTURE DE SUPPORT
D’UN SIMPLE COLLECTEUR.
BÜGELBAUSATZ FÜR EINEN KOLLEKTOR
ESQUEMA DE REFERENCIA PARA LA FIJACIÓN DE UN
SÓLO COLECTOR.
ESQUEMA DE REFERÊNCIA PARA FIXAÇÃO DE UM
COLETOR ÚNICO.
SCHEMA DI RIFERIMENTO PER STAFFAGGIO DI N. 2
COLLETTORI.
REFERENCE DIAGRAM
COLLECTORS.
2
FOR
BRACKETING
NO.
2
SCHEMA DE REFERENCE POUR STRUCTURE DE SUPPORT
DE N. 2 COLLECTEURS.
BÜGELBAUSATZ FÜR NR. 2 KOLLEKTOREN
ESQUEMA DE REFERENCIA PARA LA FIJACIÓN DE 2
COLECTORES.
ESQUEMA DE REFERÊNCIA PARA FIXAÇÃO DE N. 2
COLETORES.
SCHEMA DI RIFERIMENTO PER STAFFAGGIO DI N. 3
COLLETTORI.
REFERENCE DIAGRAM
COLLECTORS.
3
FOR
BRACKETING
NO.
3
SCHEMA DE REFERENCE POUR STRUCTURE DE SUPPORT
DE N. 3 COLLECTEURS.
BÜGELBAUSATZ FÜR NR. 3 KOLLEKTOREN
ESQUEMA DE REFERENCIA PARA LA FIJACIÓN DE 3
COLECTORES.
ESQUEMA DE REFERÊNCIA PARA FIXAÇÃO DE N. 3
COLETORES.
4
SCHEMA DI RIFERIMENTO PER STAFFAGGIO DI N. 4
COLLETTORI.
REFERENCE DIAGRAM FOR BRACKETING NO. 4
COLLECTORS.
SCHEMA DE REFERENCE POUR STRUCTURE DE SUPPORT
DE N. 4 COLLECTEURS.
BÜGELBAUSATZ FÜR NR. 4 KOLLEKTOREN
ESQUEMA DE REFERENCIA PARA LA FIJACIÓN DE 4
COLECTORES.
ESQUEMA DE REFERÊNCIA PARA FIXAÇÃO DE N. 4
COLETORES.
SCHEMA DI RIFERIMENTO PER STAFFAGGIO DI N. 5
COLLETTORI.
REFERENCE DIAGRAM FOR BRACKETING NO. 5
COLLECTORS.
5
SCHEMA DE REFERENCE POUR STRUCTURE DE SUPPORT
DE N. 5 COLLECTEURS.
BÜGELBAUSATZ FÜR NR. 5 KOLLEKTOREN
ESQUEMA DE REFERENCIA PARA LA FIJACIÓN DE 5
COLECTORES.
ESQUEMA DE REFERÊNCIA PARA FIXAÇÃO DE N. 5
COLETORES.
21
DISEGNO DI RIFERIMENTO PER STAFFAGGIO DI N. 3 COLLETTORI
REFERENCE DRAWING FOR BRACKETING OF NO. 3 COLLECTORS
DESSIN DE REFERENCE POUR STRUCTURE DE SUPPORT DE N. 3 COLLECTEURS
LAYOUT FÜR GERÜST NR. 3 KOLLEKTOREN
DIBUJO DE REFERENCIA PARA LA FIJACIÓN DE 3 COLECTORES
DESENHO DE REFERÊNCIA PARA FIXAÇÃO DE N. 3 COLETORES
Materiale aggiuntivo rispetto allo staffaggio singolo (n. 2)
• n. 4 piastre di giunzione
• n. 2 profili a “T”
• relativa bulloneria
Additional material needed as compared to single bracket (no. 2)
• no. 4 connection plates
• no. 2 “T” profiles
• relative nuts and bolts
Matériel supplémentaire par rapport à la structure de support simple (n. 2)
• n. 4 plaques de jonction
• n. 2 profils en “T”
• boulonnerie
Zusätzliche Bauteile zum Trägergerüst einer Single-Platte (N.2)
• Nr. 4 Verbindungsplatten
• Nr. 2 T-Profile
• Schrauben
Material adicional respecto de la fijación simple (n. 2)
• 4 placas de unión
• 2 perfiles en “T”
• bulones correspondientes
Material adicional para fixação única (n. 2)
• n. 4 chapas de junção
• n. 2 perfis em “T”
• relativos parafusos
22
DISEGNO DI RIFERIMENTO PER STAFFAGGIO DI N. 5 COLLETTORI
REFERENCE DRAWING FOR BRACKETING OF NO. 5 COLLECTORS
DESSIN DE REFERENCE POUR STRUCTURE DE SUPPORT DE N. 5 COLLECTEURS
LAYOUT FÜR GERÜST NR. 5 KOLLEKTOREN
DIBUJO DE REFERENCIA PARA LA FIJACIÓN DE 5 COLECTORES
DESENHO DE REFERÊNCIA PARA FIXAÇÃO DE N. 5 COLETORES
Materiale aggiuntivo rispetto allo staffaggio doppio (n. 2)
• n. 4 piastre di giunzione
• n. 2 profili a “T”
• relativa bulloneria
Additional material needed as compared to double bracket (no. 2)
• no. 4 connection plates
• no. 2 “T” profiles
• relative nuts and bolts
Matériel supplémentaire par rapport à la structure de support double (n. 2)
• n. 4 plaques de jonction
• n. 2 profils en “T”
• boulonnerie
Zusätzliche Bauteile zum Trägergerüst einer Zwillingsplatte (N 2)
• Nr. 4 Verbindungsplatten
• Nr. 2 T-Profile
• Schrauben
Material adicional respecto de la fijación doble (n. 2)
• 4 placas de unión
• 2 perfiles en “T”
• bulones correspondientes
Material adicional para fixação dupla (n. 2)
• n. 4 chapas de junção
• n. 2 perfis em “T”
• relativos parafusos
23
SCHEMA DI MONTAGGIO PER 3 E 5 COLLETTORI - ASSEMBLY DIAGRAM FOR 3 AND 5 COLLECTORS
SCHEMA DE MONTAGE POUR 3 ET 5 COLLECTEURS - MONTAGEPLAN FÜR 3 UND 5 KOLLEKTOREN
ESQUEMA DE MONTAJE PARA 3 Y 5 COLECTORES - ESQUEMA DE MONTAGEM PARA 3 E 5 COLETORES
La procedura descritta di seguito vale per il montaggio di staffaggi per 3 e 5 collettori
The following procedure applies for the assembly of brackets for 3 and 5 collectors
La procédure décrite ci-après est valable pour le montage de structure de supports pour 3 et 5 collecteurs
Nachstehend beschriebene Montagevorgängen gelten für 3 und 5 Kollektoren
El procedimiento descrito a continuación es válido para el montaje de fijaciones para 3 y 5 colectores
O processo aqui descrito vale para a montagem de fixações para 3 e 5 coletores
1. Avvitare la piastra di giunzione (A) al profilo inferiore del
collettore singolo o doppio già esistente (B), utilizzando parte
della bulloneria fornita.
1. Screw the connection plate (A) to the lower profile of the
pre-existing single or double collector (B), using part of the nuts
and bolts provided.
1. Visser la plaque de jonction (A) au profil inférieur du collecteur
simple ou double déjà existant (B), en utilisant partie de la
boulonnerie fournie.
1. Verbindungsplatte (A) an das untere Profil der vorhandenen
Single- oder Zwillingsplatte (B) mit den zur Lieferung gehörenden Schrauben blockieren.
1. Atornillar la placa de unión (A) al perfil inferior del colector
simple o doble ya existente (B), utilizando una parte de los
bulones entregados.
1. Parafusar a chapa de junção (A) ao perfil inferior do coletor
único ou duplo já existente (B), utilizando parte dos parafusos
fornecidos.
2. Ripetere l’operazione del punto precedente per l’altra piastra
di giunzione (A) fissandola al profilo inferiore dell’altro staffaggio
già montato (B).
2. Repeat the operation from the previous point for the other connection plate (A) fixing it to the lower profile of the other previously mounted bracket (B).
2. Répéter l’opération du point précédent pour l’autre plaque de
jonction (A) en la fixant au profil inférieur de l’autre structure de
support déjà montée (B).
2. Gleicher Vorgang gilt auch für die andere Verbindungsplatte
(A); diese muss an das untere Profil des bereits montieren
Trägergerüstes (B) befestigt werden.
2. Repetir la operación del punto precedente para la otra placa de
unión (A) fijándola en el perfil inferior de la otra fijación ya
montada (B).
2. Repetir a operação para a outra chapa junção (A) fixándo-a ao
perfil inferior da outra fixação jà montada (B).
3. Avvitare il profilo a “T” (C) alla piastra di giunzione (A) come
indicato in figura. Ripetere l’operazione anche per l’altra piastra
di giunzione.
3. Screw the “T” profile (C) to the connection plate (A) as
indicated in the diagram. Repeat the operation for the other
connection plate also.
3. Visser le profil en “T” (C) à la plaque de jonction (A) comme
illustré dans la figure. Répéter l’opération également pour l’autre
plaque de jonction.
3. T-Profil (C) an die Verbindungsplatte (A) wie aus Bild
hervorgeht schrauben. Vorgang auch mit der anderen
Verbindungsplatte vornehmen.
3. Atornillar el perfil en “T” (C) en la placa de unión (A) tal como
se indica en la figura. Repetir la operación también para la otra
placa de unión.
3. Parafusar o perfil em “T” (C) à chapa de junção (A) como
indicado na figura. Repetir a operação também com a outra
chapa de junção.
24
4. Serrare il profilo a “T” (C) alle piastre di giunzione (A) come in
figura prestando molta attenzione ad ottenere un perfetto
allineamento delle tre traverse inferiori.
4. Lighten the “T” profile (C) to the connection plate (A) as shown
in the diagram being very careful to obtain perfect alignment
of the lower cross-pieces.
4. Serrer le profil en “T” (C) aux plaques de jonction (A) comme
illustré dans la figure en prêtant très attention à obtenir un
parfait alignement des trois traverses inférieures.
4. T-Profil (C) an die Verbindungsplatten (A) festschrauben (siehe
Bild); dabei aufpassen, dass zu den drei unteren Querträgern
eine exakte Anfluchtung erfolgt ist.
4. Apretar el perfil en “T” (C) a las placas de unión (A) tal como
se indica en la figura prestando mucha atención a obtener una
perfecta alineación de los tres travesaños inferiores.
4. Parafusar o perfil em “T” (C) às chapas de junção (A) como na
figura prestando muita atenção a obter um perfeito
alinhamento das três travessas inferiores.
5. Per la parte superiore dello staffaggio collegare la piastra di
giunzione (A) al profilo del collettore singolo o doppio già
esistente (B) utilizzando parte della bulloneria fornita.
5. On the upper part of the bracket connect the connection plate
(A) to the profile of the pre-existing single or double collector (B)
using part of the nuts an bolts provided.
5. Pour la partie supérieure de la structure de support raccorder
la plaque de jonction (A) au profil du collecteur simple ou double
déjà existant (B) en utilisant partie de la boulonnerie fournie.
5. Für das obere Gerüst muss die Verbindungsplatte (A) mit den
zur Lieferung gehörenden Schrauben an das Profil der
vorhandenen Single- oder Zwillingsplatte (B) befestigt werden.
5. Para la parte superior de la fijación, conectar la placa de unión
(A) al perfil del colector simple o doble ya existente (B) utilizando
una parte de los bulones entregados.
5. Para a parte superior da fixação conectar a chapa de junção
(A) ao perfil do coletor único ou duplo jà existente (B) utilizando
parte dos parafusos fornecida.
6. Ripetere l’operazione sopra indicata per l’altra piastra di
giunzione (A) fissandola al profilo superiore dell’altro staffaggio
già montato (B).
6. Repeat the above operation for the other connection plate (A)
by fixing it to the upper profile of the other pre-assembled
bracket (B).
6. Répéter l’opération indiquée ci-dessus pour l’autre plaque de
jonction (A) en la fixant au profil supérieur de l’autre structure de
support déjà montée (B).
6. Vorgang auch mit der anderen Verbindungsplatte (A)
wiederholen und diese an das obere Profil des anderen bereits
montierten Gerüstes (B) befestigen.
6. Repetir la operación indicada más arriba para la otra placa de
unión (A) fijándola en el perfil superior de la otra fijación ya
montada (B).
6. Repetir a operação acima indicada com a outra chapa de junção
(A) fixándo-a ao perfil superior da outra fixação jà montada (B).
25
7. Unire le due piastre di giunzione (A) tramite il profilo a “T” come
indicato in figura utilizzando parte della bulloneria fornita,
prestando molta attenzione ad ottenere un perfetto
allineamento delle tre traverse superiori.
7. Join the two connection plates(A)using the “T” profile as
indicated in the diagram using part of the nuts and bolts supplied,
and being careful to obtain the perfect alignment of the three
upper cross-pieces.
7. Assembler les deux plaques de jonction (A) au moyen du
profil en “T” comme indiqué dans la figure en utilisant partie de la
boulonnerie fournie, en prêtant très attention à obtenir un
parfait alignement des trois traverses supérieures.
7. Beide Verbindungsplatten (A) mit dem T-Profil und den zur
Lieferung gehörenden Schrauben wie aus Abbildung
hervorgeht zusammenfügen.
7. Unir las dos placas de unión (A) mediante el perfil en “T” tal
como se indica en la figura utilizando una parte de los bulones
entregados, prestando mucha atención a obtener una
perfecta alineación de los tres travesaños superiores.
7. Unir as duas chapas de junção (A) por meio do perfil em “T”
como indicado na figura utilizando parte dos parafusos fornecida,
prestando muita atenção a obter um perfeito alinhamento
das três travessas superiores.
DOPO AVER ULTIMATO LA STRUTTURA DI SUPPORTO INSERIRE I PANNELLI SEGUENDO LE PROCEDUR
RIPORTATE A PAG. 19.
AFTER COMPLETION OF THE SUPPORT STRUCTURE INSERT THE PANELS ACCORDING TO THE PROCEDURES
INDICATED AT PAGE 19.
APRES AVOIR TERMINE LA STRUCTURE DE SUPPORT INSERER LES PANNEAUX EN SUIVANT LES PROCEDURES
REPORTEES A LA PAGE 19.
NACHDEM DAS TRÄGERGERÜST MONTIERT WURDE, PLATTEN GEMÄSS DEN AUF SEITE 19 BESCHRIEBENEN
VORGÄNGEN EINSETZEN.
LUEGO DE HABER TERMINADO LA ESTRUCTURA DE SOPORTE, INTRODUCIR LOS PANELES SIGUIENDO LOS
PROCEDIMIENTOS PRESENTADOS EN LA PÁG. 19.
DEPOIS DA ULTIMAÇÃO DA ESTRUTURA DE SUPORTE INTRODUZIR OS PAINEIS SEGUINDO OS PROCESSOS
INDICADOS NA PÁG. 19.
26
DISEGNO DI RIFERIMENTO PER STAFFAGGIO DI N. 4 COLLETTORI
REFERENCE DRAWING FOR BRACKETING OF No. 4 COLLECTORS
DESSIN DE REFERENCE POUR STRUCTURE DE SUPPORT DE N. 4 COLLECTEURS
LAYOUT FÜR GERÜST NR. 4 KOLLEKTOREN
DIBUJO DE REFERENCIA PARA LA FIJACIÓN DE 4 COLECTORES
DESENHO DE REFERÊNCIA PARA FIXAÇÃO DE N. 4 COLETORES
Materiale aggiuntivo rispetto allo staffaggio doppio (n. 2)
• n. 2 piastrine di collegamento
• relativa bulloneria
Additional material needed as compared to double bracket (no. 2)
• n. 2 connection plates
• relative nuts and bolts
Matériel supplémentaire par rapport à la structure de support double (n. 2)
• n. 2 plaquettes de raccordement
• boulonnerie
Zusätzliche Bauteile zum Trägergerüst einer Zwillingsplatte (N.2)
• Nr. 2 Verbindungslaschen
• Schrauben
Material adicional respecto de la fijación doble (n. 2)
• 2 placas de conexión
• bulones correspondientes
Material adicional para fixação dupla (n. 2)
• n. 2 chapas de conexão
• relativos parafusos
27
SCHEMA DI MONTAGGIO PER 4 COLLETTORI - ASSEMBLY DIAGRAM FOR 4 COLLECTORS
SCHEMA DE MONTAGE POUR 4 COLLECTEURS - MONTAGEPLAN FÜR 4 KOLLEKTOREN
ESQUEMA DE MONTAJE PARA 4 COLECTORES - ESQUEMA DE MONTAGEM PARA 4 COLETORES
La procedura descritta di seguito vale per il montaggio di staffaggi per 4 collettori. Montare le due strutture doppie di supporto e procedere
secondo le istruzioni di seguito riportate.
The described procedure applies for the assembly of brackets for 4 collectors. Assemble the two double support structures and proceed
according to the instructions provided below.
La procédure décrite ci-après est valable pour le montage de structure de supports pour 4 collecteurs Monter les deux structures doubles
de support et procéder selon les instructions reportées ci-après.
Nachstehend beschriebene Vorgänge gelten für die Gerüstmontage von 4 Kollektoren. Die beiden Strukturen mit doppeltem Träger und
nachstehende Anweisungen befolgen.
El procedimiento descrito a continuación es válido para el montaje de fijaciones para 4 colectores. Montar las dos estructuras dobles de
soporte y proceder según las instrucciones siguientes.
O processo aqui descrito vale para a montagem de fixações para 4 coletores. Montar as duas estruturas duplas de suporte e operar
conforme as instruções aqui elencadas.
1. Avvicinare ed allineare i due staffaggi doppi. Applicare la
piastrina di collegamento (A) ai profili a “T” inferiori dei collettori
doppi già esistenti (B) utilizzando parte della bulloneria fornita.
1. Approach and align the two double brackets. Apply the
connection plate (A) to the lower “T” profiles of the pre-existing
double collectors (B) using part of the nuts and bolts supplied.
1. Approcher et aligner les deux structures de support doubles.
Appliquer la plaquette de raccordement (A) aux profils en “T”
inférieurs des collecteurs doubles déjà existants (B) en utilisant
une partie de la boulonnerie fournie.
1. Die beiden Doppelgerüste anfluchten. Verbindungslasche
(A) mit den zur Lieferung gehörenden Schrauben an die T-Profile der bereits vorhandenen Zwillingskollektoren (B) montieren.
1. Acercar y alinear las dos fijaciones dobles. Aplicar la placa
de conexión (A) en los perfiles en “T” inferiores de los colectores
dobles ya existentes (B) utilizando una parte de los bulones
entregados.
1. Aproximar e alinhar as duas fixações duplas. Aplicar a
chapa de conexão (A) aos perfis em “T” inferiores dos coletores
duplos já existentes (B) utilizando parte dos parafusos fornecida.
2. Ripetere l’operazione del punto precedente unendo i profili a
“T” superiori dei collettori doppi (B) con l’altra piastrina di
collgamento (A) come indicato in figura.
2. Repeat the operation from the previous point by joining the
upper “T” profiles of the double collectors (B) with the other connection plate (A) as shown in the diagram.
2. Répéter l’opération du point précédent en unissant les profils
en “T” supérieurs des collecteurs doubles (B) avec l’autre plaquette de raccordement (A) comme illustré dans la figure.
2. Vorgang für die oberen T-Profile der Zwillingskollektoren (B)
wiederholen indem die andere Verbindungslasche (A) wie aus
Bild ersichtlich montiert wird.
2. Repetir la operación del punto precedente uniendo los perfiles
en “T” superiores de los colectores dobles (B) con la otra placa
de conexión (A) tal como se indica en la figura.
2. Repetir a operação unindo os perfis em “T” superiores dos
coletores duplos (B) com a outra chapa de conexão (A) como
indicado na figura.
28
3. Prestare molta attenzione ad ottenere un perfetto
allineamento delle tre traverse inferiori e superiori.
3. Be sure to achieve perfect alignment of the three lower and
upper cross-pieces.
3. Prêter très attention à obtenir un parfait alignement des trois
traverses inférieures et supérieures.
3. Wichtig ist ,dass die drei unteren und oberen Querträger exakt
angefluchtet sind.
3. Prestar mucha atención a obtener una perfecta alineación de
los tres travesaños inferiores y superiores.
3. Prestar muita atenção a obter um perfeito alinhamento das
três travessas inferiores e superiores.
DOPO AVER ULTIMATO LA STRUTTURA DI SUPPORTO INSERIRE I PANNELLI SEGUENDO LE PROCEDURE
RIPORTATE A PAG. 19.
AFTER COMPLETION OF THE SUPPORT STRUCTURE INSERT THE PANELS ACCORDING TO THE PROCEDURES
INDICATED AT PAGE 19.
APRES AVOIR TERMINE LA STRUCTURE DE SUPPORT INSERER LES PANNEAUX EN SUIVANT LES PROCEDURES
REPORTEES A LA PAGE 19.
NACHDEM DAS TRÄGERGERÜST MONTIERT WURDE, PLATTEN GEMÄSS DEN AUF SEITE 19 BESCHRIEBENEN
VORGÄNGEN EINSETZEN.
LUEGO DE HABER TERMINADO LA ESTRUCTURA DE SOPORTE, INTRODUCIR LOS PANELES SIGUIENDO LOS
PROCEDIMIENTOS PRESENTADOS EN LA PÁG. 19.
DEPOIS DA ULTIMAÇÃO DA ESTRUTURA DE SUPORTE INTRODUZIR OS PAINEIS SEGUINDO OS PROCESSOS
INDICADOS NA PÁG. 19.
29
COLLEGAMENTO COLLETTORI - COLLECTOR CONNECTION - RACCORDEMENT DES
COLLECTEURS - KOLLEKTORENVERBINDUNG
CONEXIÓN DE LOS COLECTORES
CONEXÃO COLETORES
COLLEGAMENTI:
il collegamento dei collettori con 2
attacchi, è sempre da sx verso dx, e gli attacchi devono sempre
essere posizionati nella parte alta.
CONNECTIONS: The connection of the collectors with two
attachments is always from left to right and the attachments must
always be positioned on the upper part.
RACCORDEMENTS:
le raccordement des collecteurs
avec 2 attaches, est toujours de gauche à droite, et les attaches
doivent toujours être placées dans la partie haute.
VERBINDUNGEN: Die Verbindung der Kollektoren mit 2
Anschlüssen muss immer von links nach rechts erfolgen und die
Anschlüsse müssen am oberen Teil liegen.
CONEXIONES: la conexión de los colectores con 2
uniones es siempre de izq. hacia der. y las uniones deben ser
colocadas siempre en la parte alta.
CONEXÕES:
a conexão dos coletores com 2 junções, é
sempre da es para a dr, e as junções devem sempre estar
posicionadas na parte alta.
COLLEGAMENTI: è possibile collegare un massimo di 5
collettori in serie, per collegamenti maggiori è opportuno
effettuare un collegamento a ritorno inverso, come da immagine.
Sonda di rilievo temperatura (A).
CONNECTIONS: It is possible to connect a maximum of 5
collectors in series, for larger connections an inverse return
connection should be made as shown in the illustration.
Temperature recording probe (A).
RACCORDEMENTS:
Il est possible de raccorder un
maximum de 5 collecteurs en série, pour des raccordements
supérieurs il faut effectuer un raccordement avec retour inverse,
comme illustré dans l’image.
Sonde de relevé température (A).
A
VERBINDUNGEN:
es können der Reihenfolge nach bis
zu maximal 5 Kollektoren angeschlossen werden. Für weitere
Anschlüsse muss, wie aus Bild Temperaturmesssonde (A)
ersichtlich, ein umgekehrter Rücklaufanschluss vorgesehen sein.
CONEXIONES: se puede conectar un máximo de 5
colectores en serie; para conexiones mayores es oportuno efectuar
una conexión de retorno inverso, como se ilustra en la imagen.
Sonda de detección temperatura (A).
CONEXÕES: é possível conectar um máximo de 5
coletores em série, para conexões maiores é bom efetuar uma
conexão de retorno inverso, como na imagem.
Sonda indicadora temperatura (A).
A
30
COLLEGAMENTI: il collegamento del collettore con 4
attacchi è sempre dal basso verso l’alto e da sx verso dx, gli altri
due attacchi (A) devono essere occlusi. Il sensore sonda (B) deve
essere posizionato nella parte alta del collettore.
CONNECTIONS:
the connection of the collector with 4
attachments is always from bottom to top and from left to right,
the other two attachments must be blocked (A). The probe
sensor (B) must be positioned on the top part of the collector.
A
RACCORDEMENTS: Le raccordement du collecteur avec
4 attaches est toujours du bas vers le haut et de gauche à droite, les
deux autres attaches (A) doivent être bouchées. Le capteur de la
sonde (B) doit être positionné dans la partie haute du collecteur
B
VERBINDUNGEN:
Die Verbindung des Kollektors mit 4
Anschlüssen muss immer von links nach rechts erfolgen und die
anderen beiden Anschlüsse (A) müssen verschlossen werden.
Die Sonde (B) muss an oberen Teil des Kollektors liegen.
CONEXIONES:
la conexión del colector con 4 uniones es
siempre desde abajo hacia arriba y de izq. hacia der., las otras
dos uniones (A) deben ser ocluidas. El sensor sonda (B) tiene
que ser posicionado en la parte alta del colector.
A
CONEXÕES: a conexão do coletor com 4 junções é sempre
do baixo para o alto e da es para dr, as outras duas junções (A)
devem ficar fechadas. O sensor sonda (B) deve estar
posicionado na parte alta do coletor.
COLLEGAMENTI: è possibile collegare un massimo di 5
collettori in serie, per collegamenti maggiori è opportuno
effettuare un collegamento a ritorno inverso, come da immagine.
Ingresso dal basso verso l’alto. La lettera (A) indica l’inserimento
di un tappo per occludere l’ingresso e l’uscita dei collettori. Sonda
di rilievo temperatura (B).
CONNECTIONS: It is possible to connect a maximum of 5
collectors in series, for greater connections it is advisable to make
an inverse return connection, as shown in the illustration. Entry
from bottom to top. Letter (A) indicates the insertion of a plug to
block the collector entry and exit. Temperature recording probe
(B).
RACCORDEMENTS:
Il est possible de raccorder un
maximum de 5 collecteurs en série, pour des raccordements
supérieurs il faut effectuer un raccordement avec retour inverse,
comme illustré dans l’image Entrée du bas vers le haut. La lettre
(A) indique l’insertion d’un bouchon pour obstruer l’entrée et la
sortie collecteurs. Sonde de relevé température (B).
A
A
A
B
A
VERBINDUNGEN:
Es können der Reihenfolge nach bis
zu 5 Kollektoren angeschlossen werden. Für weitere Anschlüsse
muss, wie aus Bild hervorgeht, ein umgekehrter Rücklaufanschluss vorgesehen sein. Eingang von unten nach oben.
Buchstabe A zeigt an, wo der Stöpsel eingesetzt werden muss,
um Ein- und Ausgang der Kollektoren zu blockieren.
Temperaturmesssonde (B).
CONEXIONES: se puede conectar un máximo de 5 colectores en serie; para conexiones mayores es oportuno efectuar
una conexión de retorno inverso, como se ilustra en la imagen.
Entrada de abajo hacia arriba. La letra (A) indica la introducción
de un tapón para ocluir la entrada y la salida de los colectores.
Sonda de detección temperatura (B).
CONEXÕES: é possível conectar um máximo de 5
coletores em série, para conexões maiores é bom efetuar uma
conexão de retorno inverso, como na imagem.
Entrada do baixo para o alto. A lettra (A) indica a introdução de
uma tampa para fechar a entrada e a saída dos coletores. Sonda
indicadora temperatura (B).
31