1
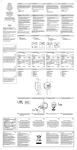
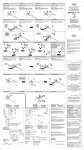
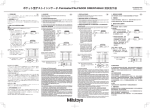
1.Einleitung
Digitales Höhen-Messgerät
Digital Height Gage
Pied de Hauteur Digital
Misuratore di altezze
La colonne de mesure digitale 814 SR est un instrument
de précision destiné à des applications très diverses pour
l’emploi en production ou en salle de métrologie.
Vor Inbetriebnahme des Höhen-Messgeräts, empfehlen wir
Ihnen, die Bedienungsanleitung aufmerksam zu lesen.
In order to achieve the best use of this instrument it is most
important that you read the operating instructions first.
Lieferumfang:
The Digital Height Gage consists of:
Pour pouvoir exploiter toutes les possibilités de votre
appareil, il faut absolument que vous commenciez par lire
sa notice d’emploi.
– Digitales Höhenmessgerät 814 SR
–Batterie
–Bedienungsanleitung
– Digital Height Gage 814 SR
–Battery
– Operating instructions
Das Höhen-Messgerät verlangt keine umfangreiche Pflege.
Um gleichbleibende Messgenauigkeit und Funktionstüchtigkeit zu gewährleisten, sollte aber auf folgendes geachtet
werden:
• Höhen-Messgerät vor Staub, Wasser oder Öl schützen.
• Maßstab stets sauber und trocken halten. Dazu diesen von Zeit zu Zeit mit einem trockenen Tuch reinigen.
• Ein verschmutztes Gehäuse mit einem trockenen,
weichen Tuch reinigen. Bei starker Verschmutzung mit
einem in neutralem Lösungsmittel leicht angefeuchteten
Tuch abwischen. Flüchtige organische Lösungsmittel
wie Verdünner sind zu vermeiden, da diese Flüssigkeiten das Gehäuse beschädigen können.
Mahr GmbH
Standort Esslingen
Reutlinger Str. 48, 73728 Esslingen
Tel.: +49 711 9312 600, Fax: +49 711 9312 756
[email protected], www.mahr.com
1113
The Digital Height Gage 814 SR is used for scribing
and marking workpieces and for measuring heights and
distances.
2. Wichtige Hinweise vor Inbetriebnahme
03759032
1.Introduction
Das digitale Höhen-Messgerät 814 SR wird zum Anreißen
und Markieren von Werkstücken und zur Messung von
Höhen und Abständen eingesetzt.
Digimar 814 SR
Bedienungsanleitung
Operating Instructions
Instruction de Service
Manuale di Istruzioni
1.Introduction
• Bei Nichtbenutzung Schnittstelle mit der entsprechenden Abdeckung verschließen.
• Beim Öffnen des Gerätes erlischt der Gewährleistungsanspruch.
3. Sicherheitshinweis
Per ottenere i migliori risultati dallo strumento, è importante leggere prima il manuale di istruzioni.
La fornitura di base comprende:
– Misuratore di altezze 814 SR
–Batteria
– Manuale di istruzioni
Livraison:
– colonne de mesure digital 814 SR
–pile
– Instructions de service
2. Consignes importantes avant la première mise en service
2. Note importanti prima della messa in
funzione
The Digital Height Gage requires no extensive care. In
order to ensure constant accuracy and operational reliability the following should be observed:
La colonne de mesure ne demande pas d’entretien intensif.
Pour garantir une précision de mesure et un fonctionnement constant, il faut respecter les instructions suivantes:
Il misuratore di altezze non richiede particolari cure, per
garantire una costante accuratezza e affidabilità
osservare le seguenti note:
• Protect the Digital Height Gage from dust, water or oil.
• Protégez la colonne de mesure contre la poussière, l’eau et l’huile.
• Proteggere lo strumento da polvere, acqua e olio.
• Keep the beam free from dust and dirt by periodically
cleaning it with a dry, clean cloth.
• Clean a dirty housing with a dry, soft cloth. Remove
heavy soiling with a cloth wetted with a neutral reacting
solvent. Volatile organic solvents like thinners are not to
be used, as these liquids can damage the housing.
• Protect the data output opening with the respective
cover when not in use.
• Unauthorized opening of the instrument forfeits the
warrenty.
• Maintenez la colonne de mesure sèche et propre en la
nettoyant de temps en temps avec un chiffon sec.
• Mantenere la guida esente da polvere o altro,
pulendola periodicamente con un panno asciutto
e pulito.
• Nettoyez le boîtier avec un chiffon sec et doux. En cas
de salissure importante nettoyez la colonne avec un
chiffon légèrement humecté d’un détergent neutre.
Evitez des détergents organiques volatiles tels que les
diluants, car ils peuvent endommanger le boîtier.
• Pulire il coperchio dalla sporcizia usando un panno
morbido e asciutto. In caso di sporco persistente,
utilizzare un solvente neutro. Non utilizzare solventi
organici, potrebbero danneggiare il coperchio in modo
irreparabile.
• Protéger la sortie de données avec le couvercle approprié si celle-ci n’est pas utilisée.
• Proteggere il connettore di uscita dati con l’apposita
chiusura quando non viene utilizzato.
We wish you a satisfactory and long service with your
Digital Height Gage. Should you have any questions regarding the instrument, contact us and we shall be pleased to
answer them.
• Une ouverture ou intervention sur l’instrument annulerait aussitôt toute garantie de Mahr.
3. Safety Information
3.Sécurité
• L’apertura dello strumento senza autorizzazione ne fa
immediamente decadere la garanzia.
Vi auguriamo un soddisfacente e lungo utilizzo del
misuratore di altezze. Se avete qualsiasi dubbio sull’utilizzo
dello strumento, non esitate a contattarci; saremo ben lieti
di soddisfare ogni Vostra richiesta.
Nous vous souhaitons une pleine satisfaction dans
l’utilisation de votre colonne de mesure. Nos conseillers
techniques sont à votre entière disposition pour répondre à
toutes vos questions.
Battery
• not rechargeable
• do not incinerate
• dispose off as prescribed
Batterie
• Nicht wiederaufladbar
• Nicht ins Feuer werfen
• Vorschriftsgemäß entsorgen
We reserve the right to make changes to our products,
especially due to technical improvements and further developments. All illustrations and technical data are therefore
without guarantee.
Il Misuratore di altezze è uno strumento di misura versatile;
può essere utilizzato in produzione e in sala metrologica.
2. Important hints prior to using the Digital
Height Gage
Wir wünschen Ihnen viel Erfolg beim Einsatz Ihres HöhenMessgeräts. Falls Sie Fragen haben, stehen Ihnen unsere
technischen Berater gerne zur Verfügung.
Änderungen an unseren Erzeugnissen, besonders aufgrund
technischer Verbesserungen und Weiterentwicklungen, müssen wir uns vorbehalten.
Alle Abbildungen und Zahlenangaben usw. sind daher ohne
Gewähr.
1.Introduzione
3. Avvertenze di sicurezza
Batteria
• non ricaricabile
• non gettare nel fuoco
• smaltire secondo le prescrizioni
Pile
• Non rechargeable
• Ne pas la jeter au feu
• s’en débarrasser conformément
aux réglements
Nous nous réservons le droit de modifier l’exécution de tous
nos appareils, en fonction des évolutions techniques.
Les caractéristiques techniques et illustrations ne sont données qu’à titre indicatif.
Ci riserviamo il diritto di modificare i ns. prodotti in
funzione di miglioramenti o evoluzioni tecniche.
Le caratteristiche tecniche e le illustrazioni sono
esclusivamente a titolo indicativo.
© by Mahr GmbH
!
Keine Elektrosigniereinrichtungen verwenden!
4. Batterie einlegen bzw. wechseln
!
Do not use an electric marking tool on caliper!
4. Inserting resp. changing of battery
!
!
Ne pas utiliser de marqueur électrique !
4. Insertion ou changement de pile
Non utilizzare penne elettriche per la marcatura!
4. Inserimento o Sostituzione batteria
Printed in Germany
A
Batterie einlegen
Insert battery
Introduire une pile
Inserire la batteria
Messgerät einschalten nach Batteriewechsel
Switch on measuring instrument after change of
battery
Mise en marche de l’instrument après des changement
de pile
Accensione strumento dopo la sostituzione della
batteria.
B
5. Beschreibung
5.Description
5.Description
5.Descrizione
1Beam
2Slide
3 Fine adjustment device
4Base
5 Locking screw for fine adjustment device
6 Hand wheel
7 Locking lever for the slide
8 Battery compartment
9Display
10 Button ON/0-ABS
11 Button mm/inch-Lock
12 Button PR-SET PR
13Clamp
14 Measuring and scribing point
15 Data output
16 Fine adjustment screw
1Règle
2Coulisse
3 Dispositif de réglage fin
4Socle
5 Vis de blocage pour le dispositif de réglage fin
6Manivelle
7 Levier de blocage de la coulisse
8 Logement de pile
9Affichage
10 Bouton ON/0-ABS
11 Bouton mm/inch-Lock
12 Bouton PR-SET PR
13 Dispositif de serrage
14 Pointe de mesure et de traçage
15 Sortie de données
16 Vis de réglage fin
1Guida
2Cursore
3 Regalazione Fine
4Base
5 Vite di Regolazione fine
6Volantino
7 Leva di bloccaggio del Cursore
8 Vano Batteria
9Display
10 Tasto ON/0-ABS
11 Tasto mm/inch-Lock
12 Tasto PR-SET PR
13 Fissaggio Punta
14 Punta di Misura e Tracciatura
15 Uscita Dati
16 Vite di Regolazione fine
6. Anwendung
6.Application
6.Application
6.Applicazione
Anreissen von Werkstücken
Scribing and marking workpieces
Traçage de pièces
Operazione di Tracciatura
– Mess- und Anreissspitze über Handrad 6 oder durch
Verschieben per Hand auf Referenz (z.B. Messplatte)
positionieren und Anzeige durch Drücken der Taste 12
auf „0,00“ setzen
– Position the measuring and scribing point using the
hand wheel 6 or moving per hand to set the reference
(e.g. on a base plate) and set the display to „0,00“ by
pressing key 12
– Positionner la pointe de mesure et de traçage par la
manivelle 6 ou à la main sur la référence (par exemple
marbre) et mettre l’affichage à „0,00“ en appuyant la
touche 12
–
–Schieber 2 über Handrad 6 oder durch Verschieben
per Hand grob positionieren (gewünschter Wert
+/-1 mm)
– Roughly position the slide 2 either using the hand wheel
6 or moving per hand (desired value +/-1 mm)
– Positionnement approximatif de la coulisse 2 par la
manivelle 6 ou à la main (valeur souhaitée +/-1 mm)
– Tramite il cursore 2 o la manovella 6 posizionare la
punta a tracciare vicino al valore (precisione +/-1 mm)
–Feststellschraube 5 der Feineinstelleinrichtung klemmen
– Lock into place the locking screw 5 of the fine adjustment device
– Serrer vis de blocage 5 du dispositif de réglage fin
– Bloccare la vite 5 della regolazione fine
– Positionnement final de la coulisse 2 par la vis de
réglage fin 16 à la valeur souhaitée
– Regolare il cursore 2 tramite la vite di regolazione fine
16 sul valore desiderato
– Serrer la coulisse 2 par le levier de blocage 7 .
– Bloccare il cursore 2 tramite la leva del cursore 7 .
1Schiene
2Schieber
3Feineinstelleinrichtung
4Fuß
5 Feststellschraube Feineinstellvorrichtung
6Handrad
7 Feststellhebel Schieber
8Batteriefach
9Anzeige
10 Taste ON/0-ABS
11 Taste mm/inch-Lock
12 Taste PR-SET PR
13 Klemmstück
14 Mess- und Anreissspitze
15Datenausgang
16Feineinstellschraube
–Feststellschraube 5 der Feineinstellvorrichtung und
Feststellhebel Schieber 7 öffnen
–Schieber 2 über Feineinstellschraube 16 auf gewünschten Wert fein positionieren
– Loosen the locking screw 5 of the fine adjustment
device and the locking lever of the slide 7
– Finely position the slide 2 using the fine adjustment
screw 16 to the desired value
–Schieber 2 über Feststellhebel 7 klemmen.
– Clamp the slide 2 using the the locking lever 7 into
position.
Das Anreissen des Werkstücks kann jetzt durchgeführt werden.
– Desserrer la vis de blocage 5 du dispositif de réglage
fin et le levier de blocage de la coulisse 7
Maintenant le traçage des pièces peut être executé.
– Sbloccare la vite di bloccaggio 5 della regolazione fine
e della leva del cursore 7
Marking the workpiece can now be accomplished.
Posizionare la punta a tracciare usando il volantino 6
o muovendola manualmente al punto di Riferimento
(es. sul piano di Riferimento) e selezionare il display
premendo il tasto 12 a „0,00“
Ora è possibile eseguire le operazioni di tracciatura del pezzo.
Messen von Werkstücken
Measuring workpieces
Mesure de pièces
Operazione di Misurazione
– Mess- und Anreissspitze über Handrad 6 oder durch
Verschieben per Hand auf Referenz (z.B. Messplatte)
positionieren und Anzeige auf „0,00“ setzen
– Position the measuring and scribing point using the
hand wheel 6 or moving per hand to set the reference
(e.g. on a base plate) and set the display to „0,00“
– Positionner la pointe de mesure et de traçage par la
manivelle 6 ou à la main sur la référence (par exemple
marbre) et mettre l’affichage à „0,00“
– Mess- und Anreissspitze über Handrad auf Werkstück
positionieren
– Use the hand wheel to position the measuring and
scribing point on the workpiece
– Positionner pointe de mesure et de traçage par manivelle sur la pièce
–
– Messwert auf Anzeige ablesen.
– Read off the measured value of the display.
– Lecture de la valeur de mesure sur l’affichage.
Messen mit Fühlhebelmessgeräten
Measuring with a Test Indicator
Mesure avec comparateurs à levier
Misurazioni tramite Indicatore a leva
Nullsetzen
Zero setting
Mise à zéro
Azzeramento
–Schieber 2 über Handrad 6 oder durch Verschieben
per Hand grob nahe der Referenz (z.B. Messplatte)
positionieren (gewünschter Wert +/- 1 mm)
– Position the measuring and scribing point using the
hand wheel 6 or moving per hand to set the reference
e.g. on a base plate (desired value +/- 1 mm)
– Positionnement approximatif de la coulisse 2 par la
manivelle 6 ou à la main près de la référence (par
exemple marbre - valeur souhaitée +/- 1 mm)
– Posizionare il cursore 2 tramite volantino 6 o
manualmente al punto di riferimento (es. piano)
grossolanamente (precisione +/- 1 mm)
–Feststellschraube 5 der Feineinstelleinrichtung klemmen
– Lock into place the locking screw 5 of the fine adjustment device
– Serrer la vis de blocage 5 du dispositif de réglage fin
– Bloccare la vite 5 della regolazione fine
–Schieber 2 über Feineinstellschraube 16 fein positionieren bis Fühlhebelmessgerät auf „0“ steht
– Finely position the slide 2 using the fine adjustment
screw 16 until the Test Indicator is at „0“
– Positionnement final de la coulisse 2 par la vis de
réglage fin 16 jusqu’à ce que le comparateur à levier
soit à „0“.
– Posizionare tramite la regolazione fine 16 il cursore 2
sino a leggere „0“ sul comparatore a leva
– Anzeige des Höhenmessgerätes durch Verschieben
per Hand auf Referenz (z.B. Messplatte) positionieren
und Anzeige auf „0,00“ setzen.
– Set the display of the Height Gage by moving per hand
to set the reference (e.g. on a base plate) and set the
display to „0,00“
– Mettre l’affichage de la colonne de mesure à la main
sur la référence (par exemple marbre) et mettre
l’affichage à „0,00“
Messen
Measuring
Mesure
Misurazione
–Schieber 2 über Handrad 6 oder durch Verschieben
per Hand grob nahe des Messobjekts positionieren
– Roughly position the slide 2 either using the hand wheel
6 or moving per hand until it is close to the workpiece
to be measured
– Positionnement approximatif de la coulisse 2 par la
manivelle 6 ou à la main près de la surface à mesurer
– Posizionare il cursore 2 tramite volantino 6 o
manualmente sul punto da misurare grossolanamente
– Serrer la vis de blocage du dispositif de réglage fin 5
– Bloccare la vite 5 della regolazione fine
– Positionnement final de la coulisse 2 par la vis de
réglage fin 16 jusqu’à ce que le comparateur à levier
soit à „0“
– Posizionare tramite la regolazione fine 16 il cursore 2
sino a leggere „0“ sul comparatore a leva
–Feststellschraube 5 der Feineinstellvorrichtung und
Feststellhebel Schieber 7 öffnen
Elektrische Altgeräte der Type 814 SR, die nach dem
23. März 2006 durch Mahr in den Verkehr gebracht
werden, können an uns zurückgegeben werden. Wir
führen diese Geräte einer umweltgerechten Entsorgung zu. Die EU-Richtlinien 2002/95/EG RoHS und
2002/96/EG WEEE bzw. das ElektroG finden dabei
ihre Anwendung.
Old electronic equipment of the type 814 SR, which
where brought from Mahr after the 23. March 2006 can
be returned to us for disposal. We will dispose/recycle
our products without causing any harm or damage to
the environment in accordance to the EU-Directives
2002/95/EC RoHS (the Restriction of the use of certain
Hazardous Substances) and 2002/96/EC WEEE (Waste
Electrical and Electronic Equipment) as well as German
National - Electrical and Electronic Equipment Act, FRG.
Selon les directives européennes EU 2002/95/EG RoHS
et 2002/96/EG WEEE ou ElectroG, tous les appareils de
mesure électriques, de type 814 SR, vendus à partir du
23 mars 2006 par Mahr, pourront être renvoyés pour le
traitement écologiques des déchets.
In applicazione alle Direttive UE 2002/95/CE RoHs,
2002/96/CE WEEE e ElektroG, tutti gli strumenti
elettronici mod. 814 SR, venduti dalla MAHR a
partire dal 23 Marzo 2006, potranno esserci resi per lo
smaltimento / riciclo.
Anbringen des Halters 27 Sp mit einem Fühlhebelmessgerät an Stelle der Mess- und Anreisspitze
– Feststellschraube der Feineinstelleinrichtung 5 klemmen
– Schieber über Feineinstellschraube 16 fein positionieren bis Fühlhebelmessgerät auf „0“ steht
– Messwert auf Anzeige ablesen.
– Loosen the locking screw 5 of the fine adjustment
device and the locking lever of the slide 7
Fasten a holder 27 Sp with a Test Indicator in place
of the measuring and scribing point
– Lock into place the locking screw 5 fine adjustment
device
– Finely position the slide using the fine adjustment
screw 16 until the Test Indicator is at „0“
– Read off the measured value of the display.
– Desserrer la vis de blocage 5 du dispositif de réglage
fin et le levier de blocage 7
Montage du support 27 Sp avec un comparateur à
levier au lieu de la pointe de mesure et de traçage
– Lecture de la valeur de mesure sur l’affichage.
– Sbloccare la vite di bloccaggio 5 della regolazione fine
e della leva del cursore 7
Posizionare la punta a tracciare usando il volantino 6
o muovendola manualmente al punto di Riferimento
(es. sul piano di Riferimento) e selezionare il display
premendo a „0,00“
– Tramite la manovella posizionare la punta a tracciare
sul pezzo da misurare
– Leggere il valore misurato sul display.
Fissare il supporto 27 Sp con comparatore a leva
al posto della punta a tracciare
– Settare il display del Truschino a muovendola manualmente al punto di Riferimento (es. sul piano di
Riferimento) e selezionare il display premendo a „0,00“
– Leggere sul display del Truschino il valore misurato.
7. Technische Daten
7. Technical Data
7. Données techniques
7. Dati tecnici
Messspanne
350 mm (14“)
600 mm (24“)
Ziffernschrittwert mm / inch
0,01 mm /.0005“
0,01 mm /.0005“
Fehlergrenze 0,04 mm (.0015“)
0,05 mm (.002“)
Schienenquerschnitt
35 x 15 mm
Ausladung Mess- und Anreißspitze
87 mm
Anzeige
LCD, Ziffernhöhe 12 mm
Max. Verfahrgeschwindigkeit
1,5 m/s
Messsystem
induktiv
BatterieLithium 3V, Typ CR 2032, 230 mAh
Betriebszeit ca. 2 Jahre (2000 Betr.-Std/Jahr)
Temperaturbereich - Betrieb
+ 10°C . . . + 40°C
Temperaturbereich - Lagerung
- 10°C . . . + 60°C
Schutzart (nach IEC 60529)
IP40
Datenausgang
RS 232C, Digimatic, USB
Gewicht kg
7
8
Bestell-Nr.
4126100
4126101
Range
350 mm (14“)
600 mm (24“)
Resolution mm / inch
0,01 mm /.0005“
0,01 mm /.0005“
Error limit
0,04 mm (.0015“)
0,05 mm (.002“)
Beam cross section
35 x 15 mm
Projection of scriber point
87 mm
Display
LCD, height of digits 12 mm
Max. measuring speed
1,5 m/s
Measuring system
inducitive
Battery Lithium 3V,
type CR 2032, 230 mAh
Operating time approx. 2 years (2000 op. hrs/yr)
Operating temperature
+ 10°C . . . + 40°C
Storage temperature
- 10°C . . . + 60°C
Protection class (acc. IEC 60529)
IP40
Data output
RS 232C, Digimatic, USB
Weight kg
7
8
Order no.
4126100
4126101
Capacité
350 mm (14“)
600 mm (24“)
Résolution mm / pouce
0,01 mm /.0005“
0,01 mm /.0005“
Limite d’erreur 0,04 mm (.0015“)
0,05 mm (.002“)
Dimension de la règle
35 x 15 mm
Portée maximum de la pointe de
mesure et de traçage
87 mm
Affichage LCD
hauteur des chiffres 12 mm
Vitesse de déplacement maximum
1,5 m/s
Système de mesure
inducitif
Pile Lithium 3V, type CR 2032, 230 mAh
Durée de vie
environ 2 ans (2000 h d’opération/an)
Température d’utilisation
+ 10°C . . . + 40°C
Température de stockage
- 10°C . . . + 60°C
Protection (selon IEC 60529)
IP40
Sortie de données
RS 232C, Digimatic, USB
Poids kg
7
8
N° de cde.
4126100
4126101
Campo di misura 350 mm (14“)
600 mm (24“)
Risoluzione mm / inch
0,01 mm /.0005“
0,01 mm /.0005“
Errore Limite 0,04 mm (.0015“)
0,05 mm (.002“)
Sezione della guida
35 x 15 mm
Sporgenza punta di Tracciatura
87 mm
Display
LCD, Alt. cifre 12 mm
Max. Velocità di misura
1,5 m/s
Sistema di misura
inducitivo
BatterieLithium 3 V, Tipo CR 2032, 230 mAh
Durata batterie ca. 2 Anni (2000 Op./ora/anno)
Temperatura - Lavoro
+ 10°C . . . + 40°C
Temperatura - Stok.
- 10°C . . . + 60°C
Gr. Protezione (IEC 60529)
IP40
Uscita Dati
RS 232C, Digimatic, USB
Peso kg
7
8
Codice-No.
4126100
4126101
8. Funktionen
8.Functions
8.Fonctions
8.Funzioni
Einschalten
ON
Marche
ON
mm <-> inch Umschaltung
Change from mm<->inch
Sélection mm <-> pouce
Commutazione mm<->inch
Ausschalten
OFF
Arrêt
OFF
Preset aufrufen
Ordering a PRESET value
Rappel du PRESET
Richiamare valore di PRESET
Preset eingeben
Entering a PRESET value
Programmation d’un PRESET
Inserire valore di PRESET
A
B
2
oder
or
ou
oppure
mm
A
Digimar 814 SR
ON 0
Digimar 814 SR
PR
>1sec
ABS
mm/in
2
ON
ABS
mm/in
PR
PR
SET PR
SET PR
>1sec 1
Hinweis
Bei Wechsel mm<->inch wird der gespeicherte
PRESET-Wert auf „0“ gesetzt.
mm
D
E
F
2
PR
Sleep mode (nach 10 min. Nichtbenutzung)
Sleep mode (after 10 min of pausing)
Mode veille (après 10 min sans utilisation)
2
mm
PR
ON
ABS
mm/in
PR
PR
SET PR
SET PR
0
ON
0
ABS
mm/in
>1sec 1
mm
Digimar814 SR
Digimar814 SR
Autospegnim. (dopo 10 min. di non utilizzo)
>1sec 1
ABSOLUT-RELATIV-measuring mode
Mode de mesure ABSOLU-RELATIV
ASSOLUTO-RELATIVO-Funzione di misura
Mit dem Höhenmessgerät kann, je nach Messaufgabe, in
2 verschiedenen Betriebsarten gemessen werden.
The Digital Height Gage allows 2 different operating modi
depending on the measuring task.
Ce colonne de mesure digitale permet de mesurer selon
deux modes différents selon le problème à résoudre.
Col Misuratore di altezze, è possibile, in funzione del tipo
di misura, selezionare entrambi questi modi operativi.
ABSOLUT-Messmodus
Dieser Messmodus bezieht sich immer auf den aktuellen
PRESET-Wert.
Vorteil der ABSOLUT-Messung: In der Anzeige ist immer
das Istmaß (ABSOLUT-Maß) sichtbar.
ABSOLUT-measuring mode
The measuring mode is always related to the actual
PRESET-value.
Advantage of the ABSOLUTE-mode: The display always
shows the actual dimension (ABSOLUTE-dimension).
Mode de mesure ABSOLU
Ce mode se réfère toujours à la valeur PRESET (préréglée) valide.
Avantage de la mesure ABSOLUE : c’est toujours la valeur
réelle (ABSOLUE) qui est affichée.
ASSOLUTO- Funzione di Misura
Questo modo di misura si riferisce sempre al valore
PRESETTATO.
Vantaggi delle misurazioni con funzione ASSOLUTO-viene
visualizzato Il valore reale (quota ASSOLUTA)
RELATIV-Messmodus
-Kurzes Drücken der ON/0-Taste nullt die Ziffern- und
Skalenanzeige in jeder beliebigen Messposition (Relativ- oder Vergleichsmessung). Im Display wird „REL“
angezeigt.
RELATIVE-measuring mode
-Pressing the ON/0-button zeros the digital and analogue
display in any of the measuring positions (relative- or
comparative measuring).
The display shows „REL“.
Mode de mesure RELATIF
-Une brève pression sur le bouton ON/0 annule les
affichages numérique et analogique quelle que soit la
position de mesure arbitraire (mesure relative ou comparative). Le symbole „REL“ apparaît dans l’affichage.
RELATIVO-Funzione di misura
-Il visualizzatore può essere selezionato sul valore „0“
indipendentemente dalla posizione del perno di misura. Il
simbolo „REL“. è visualizzato
Umschaltung Absolut - Relativ
Change-over Absolute mode - Relative
Commutation mode absolu - relatif
Cambio tra ASSOLUTO-RELATIVO
9. Sortie de données
Datenkabel 16 EXd
Best.-Nr. 4102411
Data cable 16 EXd
Order no. 4102411
Câble de données 16 EXd N° cde. 4102411
Cavo dati 16 EXd
Codice 4102411
Digimatic
Pin No.
1
2
3
4
5
6
7
8
9
9. Uscita dati
Opto RS232C
USB (Com-Port Emulation)
Datenkabel 16 EXr
Best.-Nr. 4102410
Data cable 16 EXr
Order no. 4102410
Câble de données 16 EXr N° cde. 4102410
Cavo dati 16 EXr
Codice 4102410
Datenkabel 16 EXu
Data cable 16 EXu
Câble de données 16 EXu
Cavo dati 16 EXu
Funktion - Function - Fonctions - Funzione
Txd
Rxd
DTR
RTS
Datenausgang - data output - Sortie de données - Uscita dati
-Vdd
Anforderung - Request - Demande - Richiesta
N.C.
N.C.
+Vdd
N.C.
N.C.
DATA
1 6
172 ms ≤ T1 ≤ 338 ms
66 µs≤ T2 ≤ 120 µs
T3 = 104 µs
66 µs≤ T4 ≤ 144 µs
T5 =abhängig von der Leistung des angeschlossenen Datenverarbeitungsgerätes
T5 =depends on the performance of the data processing unit
T5 =dépendant des performances de l’unté de traitement des données
T5 =subordinato alla potenza dell’apparecchio di elaborazione dati collegato
T6 ≥ 408 ms
189 ms ≤ T7 ≤ 355 ms
Datenübertragungsformat:
Data transmission format:
Format de transmission des données:
Formato trasmissione dati:
Reihenfolge - sequence - séquence - Sequenza
alle
all
toutes
tutti
“F” (1111)
Dezimalpunkt
decimal point
choix de décimal
Punto decimale
X.X.X.X.X X
Zeichen
sign
signes
Segno
+: 0(0000)
-: 8(0001)
2 (0100)
3 (1100)
4 (0010)
5 (1010)
Eingangsbeschaltung:
Electronic circuit for input:
Circuit électronique pour entrées:
Circuito d’ingresso:
/REQUEST
3V
MSD
LSD
Messdaten
meas. data
Valeur
mesurée
Dati di
misurazione
Opto
RS232C
Virtual COM-Interface-Driver:
The Driver and instructions are supplied with the
16 EXu cable.
DataRequest(DTR)
+Vdd
R1
Einheit
unit
unité
Unità
mm: 0(0000)
inch. 1(1000)
Umax : 25 V
Imax : 150 mA
R2
-Vdd
DataOut(TxD)
+Vdd
-Vdd
Datenübertragung auf Anforderung von einem
Peripheriegerät
Data transmission by request of peripheral
equipment
Transmission de données par demande de
l’équipement périphérique
Trasmissione dati con richiesta da una periferica
C1
100 ms ≤ T1 ≤ 1000 ms
15 ms ≤ T2 ≤ 160 ms
35 ms ≤ T3 ≤ 40 ms
300 ms ≤ T4
Maßeinheit:
Unit:
unité:
Unità di misura:
[mm]:
[inch]:
SIGN D0 D1 D2
.
p. es. movimento troppo veloce
1
RESET
Digimar814 SR
ON
Maßeinheit:[mm]:
Unit:
unité
Unità di misura
. D3 D4 CR
D2 D3 D4 D5 CR
2
3
oder / or / ou / oppure:
OFF: >1sec ON: <1sec
+ VDD von / from / de / di RTS
- VDD von / from / de / di TxD
R1 = 600 K - 800 K
R2 = 910 K
C1 = 1 nF
EG-Konformitätserklärung
Bestätigung der Rückführbarkeit
Wir erklären in alleiniger Verantwortung, dass das Produkt in seinen Qualitätsmerkmalen den in unseren Verkaufsunterlagen (Bedienungsanleitung, Prospekt, Katalog)
angegebenen Normen und technischen Daten entspricht.
Wir bestätigen, dass die bei der Prüfung dieses Produktes
verwendeten Prüfmittel, abgesichert durch unser Qualitätssicherungssystem, auf nationale Normale rückführbar
sind.
Wir danken Ihnen für das uns mit dem Kauf dieses Produktes entgegengebrachte Vertrauen.
PR
SET PR
mm
[inch]:
Über RS232 Port des Peripheriegerätes
via RS232 port of the peripheral equipment
au-dessus RS232 port des périphéries
mediante Porta RS232 dall’apparecchio periferico
0
ABS
mm/in
<1sec
Daten im ASCII-Format:
Data in ASCII format:
Données en format ASCII:
Dati in formato ASCII:
SIGN D0 D1
p. e. translation trop rapide
Il Driver emula una Porta-Com supplementare per ogni
cavo collegato. L‘applicazione software comunica con lo
strumento nello stesso modo di una normale Porta-Com
hardware.
Parametri di trasmissione:
1 bit di start; 7 bits di lunghezza parola; parità=pari; 2 bits di stop; 4800 Bauds
Spannungsversorgung:
Power supply:
Puissance:
Alimentazione:
Le programme de gestion émule un Com-Port
supplémentaire pour chaque câble branché. Le logiciel
d’application communique avec l’instrument de la même
manière qu’un Hardware Com-Port.
Porta COM-Virtuale per interfaccia:
Driver e istruzioni sono forniti con il
cavo 16 EXu.
Paramétres de transmission:
1 start bit; 7 data bits; parité paire; 2 stop bits; 4800 bauds
GND
CMOS
Datenübertragung durch DATA-Taste am Kabel (siehe Bild oben rechts).
Data transmission via DATA button on the cable (see picture on the right,
top side).
Transmission de données par le bouton du câble (voir schéma en haut
á droite).
Trasferimento dati mediante tasto DATA sul cavo (fig. in alto a destra).
Übertragungsparameter:
1 Startbit; 7 Bit Wortbreite; gerade Parität; 2 Stoppbits; 4800 Bauds
Daten im ASCII-Format:
Data in ASCII format:
Données en format ASCII:
Dati in formato ASCII:
i. e. moved too quickly
Programme de gestion COM virtuel pour l’interface:
Les programmes de gestion et la description sont inclus
dans la livraison du câble 16 EXu.
t
z.B. zu schnell verschoben
The Driver emulates for every connected cable an
additional virtual COM-Port. The application software
communicates to the instrument in exactly the same
manner as a normal hardware COM-Port.
t
Transmission parameter:
1 startbit; 7 bit databits; even parity; 2 stopbits; 4800 bauds
Ausgangsbeschaltung:
Electronic circuit for output:
Circuit électronique pour sorties:
Circuito d’uscita:
DATA+CLOCK
3V
Der Treiber emuliert für jedes angeschlossene Kabel einen
zusätzlichen virtuellen Com-Port. Die Anwendungssoftware
kommuniziert darüber mit dem Gerät in der gleichen Weise
wie mit einem Hardware Com-Port.
5 9
T7
T6
CLOCK
T5 T1 T2 T3 T4
Best.-Nr. 4102357
Order no. 4102357
N° cde. 4102357
Codice 4102357
Virtueller COM-Schnittstellentreiber:
Die Treiber und Beschreibung sind im Lieferprogramm des
Kabels 16 EXu enthalten.
/READY
DATA
/REQUEST
Fehlermeldung
Error
Erreur
Segnalazione d’errore
Digimatic
10 9
2 1
Pin No. I/O Funktion - Function - Fonctions - Funzione
1
GND
O= Ausgang
O DATA
2
output
sortie
O CLOCK
3
uscita
O /READY
4
I /REQUEST
5
I = Eingang
6
N.C.
input
entrée
7
N.C.
ingresso
8
N.C.
9
N.C.
10
N.C.
9. Data output
Nota
Cambiando mm<->pollici si azzera il valore di PRESET memorizzato.
9. Datenausgang
Note
Change of mm<->inch resets the stored PRESET
value.
Note
Presser la touche mm<->inch rappelle le PRESET
ABSOLUT-RELATIV-Messmodus
Referenz für Absolut-Modus setzen (Preset aktivieren)
Setting of reference for Absolute- mode (Ordering a
PRESET value)
Placer la référence pour des mode absolu (Rappel de
la présélection)
Settaggio ref. per modalità ASSOLUTO (richiamo
Preset)
<1sec
0
0
>1sec 1
PR
SET PR
mm
ON 0
B
ABS
mm/in
SET PR
1
mm
PR
Digimar814 SR
ABS
mm/in
ON
2
Digimar814 SR
C
mm
PR
Confirmation of traceability
We declare under our sole responsibility that this product
is in conformity with standards and technical data as
specified in our sales documents (operating instructions,
leaflet, catalogue).
We certify that the measuring equipment used to check
this product, and guaranteed by our Quality Assurance, is
traceable to national standards.
Thank you very much for your confidence in purchasing
this product.
Confirmation sur la traçabilité
Nous déclarons sous notre seule responsabilité que sa
qualité est conforme aux normes et données techniques
contenues dans nos documents de vente (instructions de
service, documentation, catalogue).
Nous attestons que l’équipement utilisé pour la vérification de ce produit est valablement raccordé aux normes
nationales, dont le raccordement est assuré par notre
système de qualité.
Nous vous remercions de la confiance témoignée par
l’achat de ce produit.
Conferma di rintracciabilità
Dichiariamo sotto la ns. unica responsabilità, che
questi prodotti sono conformi alle norme e dati
tecnici standard come specificato nei ns. documenti di
vendita (manuale di istruzioni, documentazione, catalogo.)
Certifichiamo che gli strumenti utilizzati per
testare questi prodotti e garantiti dal ns. Sistema di
Qualità, sono riferibili alle Norme Nazionali
Grazie per aver acquistato questo prodotto
Dieses Messgerät entspricht der Niederspannungsrichtlinie
2006/95/EG und der Richtlinie über die elektromagnetische
Verträglichkeit 2004/108/EG.
EC Declaration of Conformity
This measuring instrument conforms to the Low Voltage
Directive 2006/95/EG and the Directive 2004/108/EG which
concerns Electromagnetic compatibility.
Déclaration de conformité CE
Cet instrument de mesure est conforme aux basse tension
suivant la Directive 2006/95/EG et la Directive 2004/108/EG
concernant la compatibilité électromagnétique.
Dichiarazione di conformitá
Questo strumento di misura è conforme alla Direttiva Bassa
Tensione 2006/95/CE ed alla Direttiva 2004/108/CE relativa
alla Compatibilità Elettromagnetica.