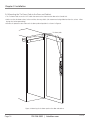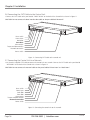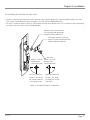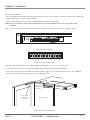
1
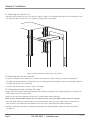
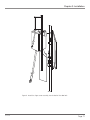
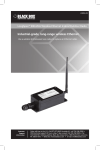
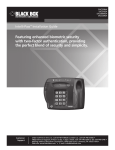
SAC550CAB SAC550CABNB SAC550CABL SAC550CABS Intelli-Pass Biometric Access Control for Cabinets The cabinet lock that’s highly secure, BLACK BOX yet opens at the touch of a fingertip. ® SAC550CAB includes battery backup. Customer Support Information SAC550CAB Order toll-free in the U.S.: Call 877-877-BBOX (outside U.S. call 724-746-5500) FREE technical support 24 hours a day, 7 days a week: Call 724-746-5500 or fax 724-746-0746 Mailing address: Black Box Corporation, 1000 Park Drive, Lawrence, PA 15055-1018 Web site: www.blackbox.com • E-mail: [email protected] Trademarks Used in this Manual Trademarks Used in this Manual Black Box and the Double Diamond logo are registered trademarks, and Intelli-Pass and Elite are trademarks, of BB Technologies, Inc. Any other trademarks mentioned in this manual are acknowledged to be the property of the trademark owners. We‘re here to help! If you have any questions about your application or our products, contact Black Box Tech Support at 724-746-5500 or go to blackbox.com and click on “Talk to Black Box.” You’ll be live with one of our technical experts in less than 30 seconds. Page 2 724-746-5500 | blackbox.com SAC550CAB FCC and IC RFI Statements Federal Communications Commission and Industry Canada Radio Frequency Interference Statements This equipment generates, uses, and can radiate radio-frequency energy, and if not installed and used properly, that is, in strict accordance with the manufacturer’s instructions, may cause interference to radio communication. It has been tested and found to comply with the limits for a Class A computing device in accordance with the specifications in Subpart B of Part 15 of FCC rules, which are designed to provide reasonable protection against such interference when the equipment is operated in a commercial environment. Operation of this equipment in a residential area is likely to cause interference, in which case the user at his own expense will be required to take whatever measures may be necessary to correct the interference. Changes or modifications not expressly approved by the party responsible for compliance could void the user’s authority to operate the equipment. This digital apparatus does not exceed the Class A limits for radio noise emission from digital apparatus set out in the Radio Interference Regulation of Industry Canada. Le présent appareil numérique n’émet pas de bruits radioélectriques dépassant les limites applicables aux appareils numériques de la classe A prescrites dans le Règlement sur le brouillage radioélectrique publié par Industrie Canada. SAC550CAB Page 3 NOM Statement Instrucciones de Seguridad (Normas Oficiales Mexicanas Electrical Safety Statement) 1. Todas las instrucciones de seguridad y operación deberán ser leídas antes de que el aparato eléctrico sea operado. 2. Las instrucciones de seguridad y operación deberán ser guardadas para referencia futura. 3. Todas las advertencias en el aparato eléctrico y en sus instrucciones de operación deben ser respetadas. 4. Todas las instrucciones de operación y uso deben ser seguidas. 5. El aparato eléctrico no deberá ser usado cerca del agua—por ejemplo, cerca de la tina de baño, lavabo, sótano mojado o cerca de una alberca, etc. 6. El aparato eléctrico debe ser usado únicamente con carritos o pedestales que sean recomendados por el fabricante. 7. El aparato eléctrico debe ser montado a la pared o al techo sólo como sea recomendado por el fabricante. 8. Servicio—El usuario no debe intentar dar servicio al equipo eléctrico más allá a lo descrito en las instrucciones de operación. Todo otro servicio deberá ser referido a personal de servicio calificado. 9. El aparato eléctrico debe ser situado de tal manera que su posición no interfiera su uso. La colocación del aparato eléctrico sobre una cama, sofá, alfombra o superficie similar puede bloquea la ventilación, no se debe colocar en libreros o gabinetes que impidan el flujo de aire por los orificios de ventilación. 10. El equipo eléctrico deber ser situado fuera del alcance de fuentes de calor como radiadores, registros de calor, estufas u otros aparatos (incluyendo amplificadores) que producen calor. 11. El aparato eléctrico deberá ser connectado a una fuente de poder sólo del tipo descrito en el instructivo de operación, o como se indique en el aparato. 12. Precaución debe ser tomada de tal manera que la tierra fisica y la polarización del equipo no sea eliminada. 13. Los cables de la fuente de poder deben ser guiados de tal manera que no sean pisados ni pellizcados por objetos colocados sobre o contra ellos, poniendo particular atención a los contactos y receptáculos donde salen del aparato. 14. El equipo eléctrico debe ser limpiado únicamente de acuerdo a las recomendaciones del fabricante. 15. En caso de existir, una antena externa deberá ser localizada lejos de las lineas de energia. 16. El cable de corriente deberá ser desconectado del cuando el equipo no sea usado por un largo periodo de tiempo. 17. Cuidado debe ser tomado de tal manera que objectos liquidos no sean derramados sobre la cubierta u orificios de ventilación. 18. Servicio por personal calificado deberá ser provisto cuando: A: El cable de poder o el contacto ha sido dañado; u B: Objectos han caído o líquido ha sido derramado dentro del aparato; o C: El aparato ha sido expuesto a la lluvia; o D: El aparato parece no operar normalmente o muestra un cambio en su desempeño; o E: El aparato ha sido tirado o su cubierta ha sido dañada. Page 4 724-746-5500 | blackbox.com SAC550CAB Table of Contents Chapter Page 1. Specifications .................................................................................................................................................................................... 6 2. Overview .................................................................................................................................................................................... 6 2.1 Introduction.............................................................................................................................................................................. 6 2.2 What’s Included........................................................................................................................................................................ 6 2.3 Compatible Products................................................................................................................................................................. 6 3. Installation .................................................................................................................................................................................... 7 3.1 Determining Which Lock Pawl to Use........................................................................................................................................ 7 3.2 Mounting the Control Unit........................................................................................................................................................ 8 3.3 Mounting the Door Interface Box.............................................................................................................................................. 8 3.3.1 Mounting the Door Interface Box: Step 1...................................................................................................................... 8 3.3.2 Mounting the Door Interface Box: Step 2...................................................................................................................... 9 3.3.3 Mounting the Door Interface Box: Step 3.....................................................................................................................10 3.3.4 Mounting the Door Interface Box: Step 4.....................................................................................................................12 3.3.5 Mounting the Door Interface Box: Step 5.....................................................................................................................12 3.4 Mounting the Tie-Down Pads to the Door and Cabinet............................................................................................................14 3.5 Routing the CAT5 Cable between the Door Interface Box and the Control Unit........................................................................15 3.6 Connecting the CAT5 Cable to the Control Unit.......................................................................................................................16 3.7 Connecting the Control Unit to a Network...............................................................................................................................16 3.8 Installing the Pawl on the Door Lock........................................................................................................................................17 3.9 Using the Inputs.......................................................................................................................................................................18 3.10 Using the Door Contact Inputs.................................................................................................................................................18 3.11 Using the Alarm Output...........................................................................................................................................................19 3.12 Using the Back Door Output.....................................................................................................................................................21 3.13 Connecting Power to the Control Unit..................................................................................................................................... 22 SAC550CAB Page 5 Chapter 1: Specifications/Chapter 2: Overview 1. Specifications Operating Temperature: 32 to 158° F (0 to 70° C) Connectors: Chassis: (1) RJ-45 network, (1) RJ-45 front door, (1) RJ-45 rear door, (1) 6-position terminal block, (1) 12-position terminal block 2. Overview 2.1 Introduction The Intelli-Pass Biometric Access Control for Cabinets eliminates keys that can be lost, stolen, or duplicated, so there’s no need to remember combinations. The lock opens only when an authorized user touches the fingerprint scanner—one fingertip provides cabinet access. LEDs on front of the handle monitor status. Plus, you can manage the lock across your network as part of the Intelli-Pass biometric access control system. The lock continues to operate normally even if your network fails—network communication isn’t required for fingerprint verification. The controller unit and an optional backup battery are housed in a compact, 1U rackmount chassis. 2.2 What’s Included • (1) rackmount Control Unit, with optional backup battery (SAC550CAB has a backup battery; SAC550CABNB does not) • (2) patch cords • (1) power supply (100–240 VAC) • (1) power cord • (1) cabinet handle with integrated electronic lock • (1) door interface box (biometric module with fingerprint reader) • (1) bag of handle mounting hardware and plastic cover • (3) keys • (4) cage nuts and screws • (1) door sensor • (4) zip ties • (5) self-adhesive tie-downs • (1) CD-ROM containing software and software manual • This user’s manual 2.3 Compatible Products This product works with: • Elite™ Cabinets • Door Handle with Integrated Lock (SAC550CABL) • Security Sensor (SAC550CABS) Page 6 724-746-5500 | blackbox.com SAC550CAB Chapter 3: Installation 3. Installation NOTE: Before installing your Intelli-Pass for Cabinets, read through this entire chapter, because some steps are not reversible. For example, you might not be able to remove the high-bond tape once it’s installed. NOTE: If you’re installing the handle on an Elite Cabinet, use the panel from the Elite Cabinet handle you are replacing and skip to Section 3.2. 3.1 Determining Which Lock Pawl to Use • All cabinets vary, so we offer a wide range to pawls to suit the particular dimensions of your cabinet. • Two simple measurements determine which pawl you need. • Obtain the measurements as shown in Figure 1 and then contact Black Box Technical Support at 724-746-5500 or [email protected]. Rear lock surface that sits on the front of the door Measurement 1 Measurement 2 Inside of door frame (surface that pawl contacts) Frame edge (NOT door edge) Vertical center of lock Figure 1. Measurements 1 and 2. SAC550CAB Page 7 Chapter 3: Installation 3.2 Mounting the Control Unit • Mount the access control unit into a 19" cabinet as shown in Figure 2. We recommend that you mount the control unit near the top of the cabinet. However, this isn't required if enough space is not available. Figure 2. Access control unit mounted into a 19" cabinet. 3.3 Mounting the Door Interface Box • If you are installing the access control unit in a cabinet that already has a lock installed, first remove the existing lock. • The Door Interface Box provides an interface between the Control Unit and the fingerprint scanner. It also provides all power and signal connections to the electric lock. • Install the Door Interface Box as shown in Figures 3 through 8. 3.3.1 Mounting the Door Interface Box: Step 1 • Before removing the double-sided high bond tape from the Door Interface Box, find a suitable location on the inside of the cabinet door to mount the interface box. • Make sure that the selected location will not cause the cabinet door to close incorrectly. NOTE: For glass-paneled cabinet doors with very narrow frames, the only suitable location may be on the glass. • Once you decide where you intend to mount the Door Interface Box, make sure that the door surface is clean and free from any debris. (We recommend using alcohol to clean the surface.) Allow drying time before proceeding. • Remove the protective cover from the double-sided high bond tape located along the edge of the Door Interface Box (see Figure 3). Page 8 724-746-5500 | blackbox.com SAC550CAB Chapter 3: Installation High-bond tape Figure 3. Remove the protective cover from the high-bond tape. 3.3.2 Mounting the Door Interface Box: Step 2 • Attach the Door Interface Box to the inside door surface. Only apply a slight amount of pressure to the high-bond tape until you are sure that the Door Interface Box will not prevent the cabinet door from closing. • Once you are sure that the door will close properly and the finger sensor can attach to the lock, apply more pressure to the high bond tape. The more pressure applied, the greater the bond. IMPORTANT: Make sure that the interface box is located close enough to the lock opening in the door, so that the finger sensor on the ribbon cable can go through the door and connect into the lock (see Figure 4). Open slot for lock: 1" x 5.9" (2.5 cm x 15 cm) Figure 4. Apply pressure to the high-bond tape. SAC550CAB Page 9 Chapter 3: Installation 3.3.3 Mounting the Door Interface Box: Step 3 • Push the finger-sensor assembly through the door lock opening as shown in Figure 5. • Attach the finger-sensor assembly into the back of the door lock as shown in Figure 6. Make sure that the angle of the fingersensor assembly and the angle of the door lock are as shown in Figure 6. Figure 5. Push the finger-sensor assembly through the door lock opening. Page 10 724-746-5500 | blackbox.com SAC550CAB Chapter 3: Installation Figure 6. Attach the finger-sensor assembly into the back of the door lock. SAC550CAB Page 11 Chapter 3: Installation 3.3.4 Mounting the Door Interface Box: Step 4 • Situate the lock on the outside of the cabinet door, so that the ribbon cable attached to the finger-sensor assembly is at the top of the locking opening. See Figure 7. Lock wire Figure 7. Ribbon cable positioned at top of the locking opening. 3.3.5 Mounting the Door Interface Box: Step 5 • Secure the lock to the door using the top mounting bracket and the bottom mounting bracket as shown in Figure 8. Do not over-tighten the screws in the bottom mounting bracket because this may jam the lock mechanism. • Attach the lock wire coming out of the door interface box to the back of the lock as shown in Figure 7. The wire will only plug in one way. Page 12 724-746-5500 | blackbox.com SAC550CAB Chapter 3: Installation Top mounting bracket Mounting screw, 0.6" (1.4 cm) long Bottom mounting bracket orientation according to required lock plug operation (clockwise/counter-clockwise) Lock/unlock Installation of bottom mounting bracket (4) mounting screws, 1" (2.5-cm) long Lock/ unlock Orientation of the lock plug corresponding with the orientation of the bottom mounting bracket Figure 8. Secure the lock to the door. SAC550CAB Page 13 Chapter 3: Installation 3.4 Mounting the Tie-Down Pads to the Door and Cabinet • The Tie-Down Pads secure the CAT5 cable that connects the Door Interface Box to the Control Unit. • Make sure that the door surface is clean and free from any debris. (We recommend using alcohol to clean the surface. Allow drying time before proceeding.) • Remove the protective cover from each tie-down pad and position it as shown in Figure 9. Tie-down pads Figure 9. Mounting the tie-down pads to the door and cabinet. Page 14 724-746-5500 | blackbox.com SAC550CAB Chapter 3: Installation 3.5 Routing the CAT5 Cable between the Door Interface Box and the Control Unit • Route the supplied CAT5 cable as shown in Figure 10. Secure the CAT5 cable to the tie-down pads using the supplied cable ties. • Connect the CAT5 cable to the door interface box. CAT5 cable (required) Loop (allowing door to open and close freely) Figure 10. Routing the cable. SAC550CAB Page 15 Chapter 3: Installation 3.6 Connecting the CAT5 Cable to the Control Unit • Connect the CAT5 cable to the port labeled "FRONT DOOR" on the back of the Control Unit as shown in Figure 11. CAUTION: Do not connect the door interface box cable to the port labeled “Network.” Reset switch Power input Back door Front door Alarm output Tamper and door contacts Network connection Power switch Figure 11. Connecting CAT5 cable to the control unit. 3.7 Connecting the Control Unit to a Network • Use the other supplied CAT5 cable to connect the control unit to a network. Connect the CAT5 cable to the port labeled “NETWORK” on the back of the Control Unit as shown in Figure 12. CAUTION: Do not connect the network cable to the ports labeled “Front Door” or “Back Door.” Reset switch Power input Back door Front door Alarm output Tamper and door contacts Network connection Power switch Figure 12. Connecting the control unit to the network. Page 16 724-746-5500 | blackbox.com SAC550CAB Chapter 3: Installation 3.8 Installing the Pawl on the Door Lock • Section 3.1 describes how to determine which pawl you will need, depending on the make and model of cabinet. (For help with the lock, contact Black Box Technical Support at 724-746-5500 or [email protected].) • The pawl is installed as shown in Figure 13. Pay particular attention to the rotation limiter. This is installed as shown, depending on whether you have a right- or left-hand opening door. Rotation limiter: Orient to match the required handle operaration (clockwise/counter-clockwise) Pawl (order separately): Orient to match the required handle operation (clockwise/counter-clockwise) Pawl screw Option 1: To install Option 2: To install rotation limiter rotation limiter (viewed from back) (viewed from back) Left-hand mounting Right-hand mounting To open: Turn handle 90° counter-clockwise if viewed from front To open: Turn handle 90° clockwise (viewed from front) Figure 13. Installing the pawl on the door lock. SAC550CAB Page 17 Chapter 3: Installation 3.9 Using the Inputs • The access control unit provides inputs for up to four security sensors. You can connect the security sensors to the cabinet side, floor, or roof panels. A security sensor is included. * You can order additional security sensors from Black Box (part number SAC550CABS). NOTE: Do not use ordinary reed switches because they will cause the product to go into a continuous alarm condition. • Pins 1 thru 8 of the tamper switches terminal block are used for the security sensors, as shown in Figures 14 and 15. Figure 14. Tamper switches. Figure 15. Tamper switches detail. • Security sensors connect to any of the following pairs of connector pins: 1 & 2, 3 & 4, 5 & 6 or 7 & 8. • If the tamper switch inputs are not being used, do not connect anything to the unused pairs of pins. • To use one of the security sensors, follow the example shown in Figure 16. The example connects to Pins 1 & 2. Additional security sensors can be connected to any of the remaining pairs of pins. Security sensor (switch part, with wire) Security sensor (magnet part, no wire) Back of cabinet Figure 16. Using a security sensor. Page 18 724-746-5500 | blackbox.com SAC550CAB Chapter 3: Installation 3.10 Using the Door Contact Inputs • The access control unit works with up to two sets of door contacts. The door contacts can be connected to a door that can legitimately be opened following a successful fingerprint identification. This would typically be the front or back door of the cabinet. • Use a standard reed switch (not supplied) with the door contact inputs. • Pins 9 thru 12 are used for the door contacts, as shown in Figures 17 and 18. Figure 17. Door contacts. Figure 18. Door contacts detail. • Door Contacts are connected to either of the following pairs of connector pins: 9 & 10 or 11 & 12. • If all the door contacts are not being used, you must leave the factory-installed jumper wire in place, as show in Figure 18. • To use one of the Door Contacts, follow the example shown in Figure 19. The example connects to Pins 9 & 10, an additional Door Contact can be connected to Pins 11 & 12. SAC550CAB Page 19 Chapter 3: Installation Door contact (switch part, with wire) Door contact (magnet part, no wire) Figure 19. Using a door contact. 3.11 Using the Alarm Output • Certain events create an alarm condition. These events are: - A door/panel with a security sensor attached was opened. - A door/panel with a door contact switch was opened without a valid fingerprint identification. - A door/panel with a door contact switch was opened and left open for longer than the propped-door delay (set via the DAS software). - A duress finger was used to open a cabinet. This will be a silent alarm at the cabinet but will still trigger the alarm output. • The alarm output provides a method to connect the access control unit to a third-party product, to alert it that an alarm condition has occurred. • The alarm output terminals are shown in Figures 20 and 21. Figure 20. Alarm output terminals. Page 20 724-746-5500 | blackbox.com SAC550CAB Chapter 3: Installation Figure 21. Alarm output terminals detail. 3.12 Using the Back Door Output • In addition to the front door lock that contains the fingerprint reader, the access control unit can also be used to simultaneously open the back door of a cabinet, following a successful fingerprint identification. • Additional locks can be purchased from Black Box (part number SAC550CABL). The lock is supplied with a 10" (25.4 cm) cable with a RJ-45 connector on one end (this connects as shown in Figure 22), and a lock connector on the other end. The cable is shown in Figure 23. Figure 22. Back door output. • Mount the lock as shown in Figure 9, then attach the supplied cable (see Figure 23). Figure 23. Attaching cable to lock. SAC550CAB Page 21 Chapter 3: Installation 3.13 Connecting Power to the Control Unit • Connect the supplied power supply as shown in Figure 24. • Plug the power supply into a standard power outlet or preferably an uninterruptible power supply (UPS). Figure 24. Connect power supply to the control unit. Page 22 724-746-5500 | blackbox.com SAC550CAB NOTES SAC550CAB Page 23 Black Box Tech Support: FREE! Live. 24/7. Tech support the way it should be. Great tech support is just 30 seconds away at 724-746-5500 or blackbox.com. About Black Box Black Box Network Services is your source for more than 118,000 networking and infrastructure products. You’ll find everything from cabinets and racks and power and surge protection products to media converters and Ethernet switches all supported by free, live 24/7 Tech support available in 30 seconds or less. © Copyright 2011. All rights reserved. SAC550CAB, rev. 1 724-746-5500 | blackbox.com