1
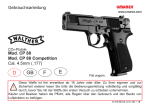
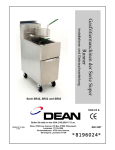
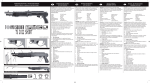
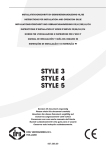
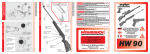
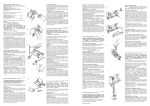
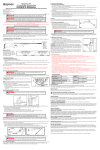
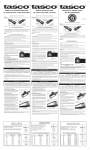
O
p
e
r
a
t
English
i
o
n
M
a
n
u
a
l
POWERLINE MODEL
617X/622X SERIES
C O 2
S e m i a u t o m a t i c
617X
.177cal. (4.5mm) LEAD AIRGUN PELLET
.177 cal BB (4.5 mm) STEEL AIRGUN SHOT
12gm CO2 cylinder only
622X
.22 cal. (5.5mm) LEAD AIRGUN PELLET
12gm CO2 cylinder only
By Daisy
WARNING:
NOT A TOY. ADULT SUPERVISION REQUIRED. MISUSE
OR CARELESS USE MAY CAUSE SERIOUS INJURY OR DEATH. MAY BE DANGEROUS
UP TO 268YARDS (238 METERS).
THIS IS A HIGH POWER AIR GUN RECOMMENDED FOR USE BY THOSE 16 YEARS OF AGE
OR OLDER. READ ALL INSTRUCTIONS BEFORE USING. THE PURCHASER AND USER
SHOULD CONFORM TO ALL LAWS GOVERNING USE AND OWNERSHIP OF AIR GUNS.
WARNING: THIS GUN CAN CAUSE DEATH IF CARELESSLY USED OR MISUSED.
READ AND FOLLOW THE INSTRUCTIONS CAREFULLY. DO NOT INSTALL A CLIP WHICH
CONTAINS AMMUNITION INTO THE GUN UNTIL YOU ARE READY TO SHOOT. IF YOU DO
INSTALL A CLIP WHICH CONTAINS AMMUNITION INTO THE GUN AND THEN DECIDE NOT
TO SHOOT, EITHER MANUALLY REMOVE THE CLIP FROM THE GUN OR SHOOT THE
REMAINING AMMUNITION AT A SAFE TARGET. AN UNLOADED, NON-PRESSURIZED GUN
WHICH IS “ON” SAFETY IS SAFEST. ACCIDENTS HAPPEN FAST, AND ACCIDENTALLY
INJURING OR KILLING SOMEONE IS A TERRIBLE THING. PLEASE SHOOT SAFELY.
This safety alert symbol indicates important safety messages in this manual. When you see
this symbol, be alert to the possibility of personal injury and carefully read the message that
follows.
The Model 617X/622X CO2 PowerLine pistol shoots with much more muzzle energy than
most BB and pellet guns. Use extreme caution when operating this gun.
Although your new PowerLine pistol is not a firearm, it has lethal potential and should be
treated with the caution and respect due any conventional firearm. Like a firearm, your
PowerLine pistol, when musused or carelessly used, can kill or seriously injure the shooter or
other persons. Always remember, the first and most important safety feature of any gun is
the shooter. All safeties are mechanical devices and the shooter is the only part of the
system that can make a gun safe–or unsafe. DON’T DEPEND ON MECHANICAL
SAFETIES–think ahead and avoid situations that might lead to accidents.
Guns differ in their operation, and you are never ready to fire any gun until you are
thoroughly familiar with it. Read the following operating instructions and WITHOUT LOADING
ANY AMMUNITION, proceed through the operating steps, dry firing your gun with CO2 only
several times at a safe target. This will enable you to learn to operate the PowerLine
617X/622X properly and safely.
PRIOR TO OPERATION
PUT “ON SAFETY”–POSITION SAFETY LEVER TO COVER RED DOT (refer to page 5).
REAR SIGHT
BARREL HOUSING LATCH
HAMMER
MUZZLE
SAFETY
TRIGGER
GRIP
FIG. 1
FRONT SIGHT
PUNCTURE SCREW
2
OPERATION STEPS
WARNING: Be sure gun is always pointed in a safe direction.
Insert CO2 cylinder.
Step 1. Put "ON" safety - red dot covered.
Step 4. Aim at safe target.
Step 2. Load
Step 5. Take "OFF" safety - red dot showing.
Step 3. Cock hammer.
Step 6. Fire.
Gun can continue to be shot until the ammunition clip or the CO2 cylinder needs to be
replaced. The Model 617X/622X will obtain a minimum of 60 shots per CO2 cylinder. Refer to
section on CO2 characteristics on page 7.
NEVER STORE A LOADED GUN
At the end of a shooting session, as a safety precaution, always put “ON” safety (refer to
page 5), remove CO2 cylinder (refer to page 6), remove clip from pistol (refer to page 5), and
remove any ammunition from the clip. (refer to page 5). Store in a safe place to prevent
unauthorized use.
INSERT CO2 CYLINDER
1.
2.
3.
4.
Put "ON" safety - red dot covered.
Remove left grip cover by lifting the grip cover tab (Figure 2).
Turn puncture screw counterclockwise until there is enough room to insert a CO2 cylinder.
Insert the large end of the CO2 cylinder into the lower portion of the grip. Hold the gun in
an inverted position with the grip pointing up and the muzzle pointing away from you as
shown (Figure 2B). Position the small end of the CO2 cylinder inside the retainer so that
the CO2 cylinder touches the puncture pin (Figure 2A).
5. While continuing to hold gun in an inverted position, replace the left grip cover, point the
muzzle in a safe direction and turn the puncture screw clockwise to puncture the CO2
cylinder. Continue turning the screw RAPIDLY until finger tight. NOTE: A slight seepage of
CO2 gas may occur until puncture screw is tight.
PUNCTURE PIN
FIG. 2
FIG. 2A
RETAINER
GRIP COVER
FIG. 2B
PUNCTURE
SCREW
GRIP COVER TAB
WARNING:
Be sure the muzzle is pointed in a safe direction when puncturing a CO2
cylinder. In the event that a seal temporarily leaks while a CO2 cylinder is being punctured,
the CO2 gas may escape through the barrel. If ammunition is lodged in the barrel from prior
shooting, this could result in a projectile being shot.
WARNING: Use only 12 gram CO2 cylinders.
Any attempt to use other types of gas
cylinders could be extremely dangerous and could result in serious injury. Gasses other than
CO2 could result in an explosion or rupture of the gun.
3
NOTE:
Model 622X shoots .22 caliber (5.5 mm)
pellets only.
The Model 617X shoots .177 caliber (4.5
mm) pellets and/or BBs.
FIG. 3
LOAD ROTARY CLIP
1. Open breech of pistol by pulling back the barrel
housing latch. While holding the pistol muzzle down.
pull upward on barrel housing to open breech (Fig.5).
2. Remove rotary clip and Insert a total of six projectiles
into the rotary clip ( M o d e l 6 2 2 x : . 2 2 c a l .
pellets only Model 617X: .177 cal.
p e l l e t s a n d / o r B B s ) (Figure 3).
HOW TO OPERATE
WARNING: Be sure gun is always pointed in a
SAFETY
HAMMER
FIG. 4
safe direction.
Step 1. PUT "ON" SAFE - RED DOT
COVERED.
Rotate the safety toward the "SAFE" position (See
Figure 4). With the safety in this position, the trigger
CAN be pulled although the gun will not discharge any
CO2 or pellet. NOTE: The safety is not automatic. It
will only do its job when you do yours. REMEMBER,
THE BEST SAFETY IS GOOD GUN HANDLING.
Step 2. LOAD
FIG. 5
Pull back the barrel housing latch while holding the
pistol muzzle down, pull upward on barrel housing to
open breech (Figure 5). Insert a loaded clip fully into
breech of barrel (Figure 6). Close barrel housing.
Step 3. COCK HAMMER
Point the gun in a safe direction. Pull the hammer back
fully so that the hammer will stay cocked when released.
Step 4. AIM AT SAFE TARGET
To be a consistent marksman, use the correct sight
picture each time you fire the pistol (Figure 7).
CAUTION:
Due to the power of this CO2 gas
gun, use extra caution in selecting a safe target
backstop. The Model 617X/622X should not be used
with B•B gun target backstops when shooting pellets.
Pick targets that cannot be penetrated or that will not
cause a ricochet because of their hard surfaces. Use
only targets and traps that are designed for use with
high-powered pellet guns. The Model 617X should not
be used with target traps designed for pellets when
shooting BBs. Do not shoot at the surface of water.
4
FIG. 6
CORRECT SIGHT PICTURE
REAR
SIGHT
FIG. 7
BULLSEYE
FRONT
SIGHT
Step 5. TAKE "OFF" SAFE - RED DOT SHOWING.
When you are certain that the target, backstop and sur-rounding
area are safe, rotate the safety toward the "FIRE" position (Figure
8). Your gun is now ready to shoot. Pulling the trigger now will
shoot a projectile out of the gun. In this condition, your gun
should be handled with extreme care.
Step 6. FIRE
FIG. 8
The pistol can be safely fired after properly completing the operating steps mentioned above.
After making sure the gun is pointed in a safe direction, gently but firmly, squeeze the trigger.
If you desire to continue shooting, the operation steps can be repeated until the CO2 cylinder
requires replacement. If a projectile does not fire after completing the operation steps, keep
the gun pointed in a safe direction and make the following checks.
1. Safety is pointing to "FIRE".
2. Put safety "ON" (point to "SAFE") and check to see that a CO2 cylinder with sufficient CO2
gas is installed and tightened up against the puncture pin.
3. Refer to the section on "CO2 Characteristics" (See Page 7).
WARNING: If the pistol still fails to shoot a projectile after checking the three items
above and repeating the operation steps, there is a malfunction in the pistol. This could
represent a dangerous condition. There could be ammunition in the pistol even though it did
not shoot out. This could cause the user to mistakenly believe the pistol is unloaded. (Refer
to "PISTOL MALFUNCTION" section to correct the problem).
DECIDE NOT TO SHOOT
Should you decide not to shoot after the hammer is cocked, UNLOAD THE GUN:
A. Put "ON" safety - RED DOT COVERED. (refer to page 5)
B. Remove the Rotary Clip. (refer to page 5)
C. Remove the CO2 Cylinder. (refer to page 6)
PISTOL MALFUNCTION
The instructions given below are to be used when the pistol fails to shoot ammunition out of
the barrel, or when the pistol is jammed.
1. REMOVE CO2 CYLINDER
A. Put "ON" safety - RED DOT COVERED.
B. With the left hand grip cover still in place, slowly turn puncture screw counterclockwise
until any remaining CO2 gas is discharged.
C. Remove left hand grip cover by lifting the grip cover tab.
D. Remove CO2 cylinder from the pistol.
2. REMOVE THE ROTARY CLIP
3. CLEAR JAMMED AMMUNITION
A. Insert a cleaning rod into the open end of the barrel and gently tap the jammed
ammunition out of the breech end of the barrel.
4. SHOOT AMMUNITION OUT
A. Insert a new CO2 cylinder (See Page 4).
B. Shoot gun according to the operation steps beginning on Page 4.
WARNING: If the pistol still fails to shoot ammunition out of the barrel, the pistol should
have the CO2 cylinder removed, and the pistol should be sent directly to Daisy Outdoor Products
Service Department.
5
CO2 CHARACTERISTICS
There are occasions when a CO2 pistol may be subjected to abnormal conditions that can
produce effects on the pistols performance. These conditions include operation and/or
storage of the pistol at temperatures that are considerably higher or lower than normal
outdoor temperatures (60˚-70˚F), as well as conditions of rapid fire.
1. High temperatures can produce pressure in the CO2 cylinder that is considerably higher
than normal operating pressure. Such increased pressure may prevent the pistol from
firing and may result in permanent damage to the gun. The maximum operating or storage
temperature should not exceed 105˚F (40˚C). This temperature can easily be reached if
the gun is left directly in the sun on a bright, sunny day. Therefore, the shooter should not
expose the pistol to high temperature conditions or direct sunlight for any extended period
of time.
2. Rapid firing of the gun will cause temperature reductions in the pistol and CO2 gas. This
will result in lower pellet velocities and may even lower gas pressure enough so that the
pistol will not fire. This condition can be especially apparent when shooting in cold
weather. This condition can be avoided by allowing more time between shots. This permits
the gas to increase in temperature and pressure and produce normal velocities.
3. During rapid fire, the muzzle velocity of each shot can be expected to decrease. This can
be detrimental to shooting accuracy. Also, the faster the gun is shot, the fewer shots you
will get per CO2 cylinder.
4. Care should be exercised to insure that the gun is not shot with a CO2 cylinder that is low
in pressure.
CAUTION: Shooting the gun with low CO2 pressure could result in ammunition lodging
in the barrel.
DRY-FIRE
In order to dry-fire the Model 617X/622X, the barrel must be empty (See "How To Unload
Pellets," below) then proceed to cock and fire the gun.
HOW TO UNLOAD AMMUNITION
1. Put "ON" safety-RED DOT COVERED.
2. Take "OFF" safety and shoot gun in a safe direction to remove ammunition left in the gun.
(or refer to Steps 1 & 2 under PISTOL MALFUNCTION, page 6).
STORAGE
Store your pistol unloaded. Put safety "ON", remove CO2 cylinder and unload the
ammunition. Keep pistol away from children and untrained shooters. Store ammunition and
CO2 cylinders separately from the pistol to keep them from untrained shooters.
WARNING: A CO2 cylinder contains gas under pressure, whether or not it has been
inserted into a gun. If exposed to high temperatures (such as inside of a closed car in direct
sunlight), it could explode. Be sure to store all cylinders in a cool place.
Protect your pistol from moisture and dirt. When not shooting, remove the CO2 cylinder,
clean gun and wrap it in a smooth, dry cloth. Or, store the pistol in the package it came in
when new.
6
PROPER CARE
With care and periodic cleaning, your Model 617X/622X will provide many years of shooting
enjoyment. As is the case with conventional firearms, abuse, neglect and continued
exposure to the elements will impair the performance of any air gun. Learn to take care of
your Model 617X/622X and it will serve you well.
CAUTION: Never attempt to clean the Model 617X/622X until the safety is "ON", the
pistol is empty of ammunition and the CO2 cylinder has been removed.
EXTERIOR PARTS
All the black plastic parts may be cleaned with a damp rag and mild soap or detergent. Avoid
using strong detergent, abrasive cleaning compounds or solvents that may scratch or
otherwise damage surfaces.
LUBRICATION
Your Model 617X/622X was lubricated when built and should not require any additional
lubrication.
MODIFICATION
CAUTION: The components of the gun were engineered to deliver optimum
performance. Any modification or tampering with a gun may cause a malfunction and may
make it unsafe to use. Any change in performance (such as a lowered trigger force and
shortened trigger travel) indicates possible wear, and such gun should be inspected,
replaced or properly repaired by qualified personnel. Any gun that has been dropped should
be checked by qualified personnel to ensure that its function has not been effected.
WARNING: A GUN THAT IS NOT OPERATING PROPERLY MAY BE DANGEROUS. IT
SHOULD BE KEPT SAFELY FROM USE BY ANYONE UNTIL REPAIRED OR DESTROYED. DO
NOT TRY TO TAKE THE GUN APART. IT IS DIFFICULT TO REASSEMBLE, AND IMPROPER
REASSEMBLY CAN CAUSE A HAZARDOUS CONDITION.
REPAIR OF POWERLINE GUNS
GUNS IN WARRANTY LIMITED ONE-YEAR WARRANTY
For one year from date of purchase, Daisy will repair or replace and return this gun, free of
charge, if defective in material or workmanship. Service is available by returning the gun to Daisy
Outdoor Products (refer to important note below). Attach to the gun, your name, address, and
telephone number, description of problem and proof of date of retail purchase (sales slip).
Package and send transportation prepaid to Daisy. This Warranty gives you specific legal rights,
and you may also have other rights which may vary from state to state.
IMPORTANT: You can return your inoperative pistol to Daisy for repair via the U.S. Mail or
United Parcel Service. Be sure to put “ON” safety, remove CO2 cylinder and unload Ammo
from the Quick Change Clip before returning the gun to Daisy. You must include your street
address for Daisy to send your pistol directly back to you through UPS delivery.
GUNS OUT OF WARRANTY
If your Daisy needs repair, please call 1-800-713-2479 for repair charges. Daisy will repair
the gun or replace it with a reconditioned gun of the same model, if available; otherwise, with
a model of equivalent quality.
Daisy Outdoor Products
Service Department
11823 Lime Kiln Rd.
Neosho, MO 64850 U.S.A.
7
POWERLINE MODEL 617/622X PISTOL SPECIFICATIONS
ACTION
CALIBER
CO2 powered semi-automatic
– 617X
– 622X
AMMO CAPACITY
.177cal. (4.5 mm) lead pellet or BB
.22 cal. (5.5 mm) lead pellet
6-Shot rotary clip
MAXIMUM SHOOTING DISTANCE*
– 617X
– 622X
268 yds. (238 meters)
235 yds. (215 meters)
MAXIMUM VELOCITY
– 617X
– 617X
– 622X
485 fps (148 mps) - BBs
425 fps (130 mps) - Pellets
400 fps (122 mps) - Pellets
MUZZLE ENERGY
4.9 ft. lb. (6.6 J)
BARREL
5.35 in. rifled steel
SAFETY
Rotary hammer block
SIGHTS
TRUGLO® fiber optic front; fixed open rear
WEIGHT
1.3 lbs. (.59 kg) empty
OVERALL LENGTH
8.5 in. (216 mm)
POWER SOURCE
Daisy 12gm CO2 small neck cylinder
* With the muzzle pointed upward at the optimum angle
CAUTION: CO2 cylinders may explode at temperatures above 160˚F (71˚ C)
8
CLUBS AND COMPETITION
(United States customers)
Throughout its history, Daisy Outdoor Products has supported many safety
education and competitive target shooting programs. These programs have extended
opportunities for hundreds of thousands of young shooters and adults to learn the
responsibilities and skills that the shooting sports demand. Today, the company
continues to provide teaching aids, special airguns, and turn-key kits so that camps,
schools, and civic groups have the right materials to properly teach safe shooting skills.
PROGRAM MATERIALS & EQUIPMENT
Daisy Outdoor Products
Special Market Programs
400 West Stribling Drive
Rogers, AR 72756
PROGRAM INFORMATION
National Guard Junior
Marksmanship Program
Details available from:
MGMTU
Camp Robinson
North Little Rock, AR 72118-2200
AMERICAN LEGION JUNIOR
SHOOTING SPORTS PROGRAM
Details available from:
The American Legion
P.O. Box 1055
Indianapolis, IN 46206
DAISY/JAYCEES SHOOTING
EDUCATION PROGRAM
Details available from:
The United States Junior
Chamber of Commerce
P.O. Box 7
Tulsa, OK 74121-0007
4-H SHOOTING SPORTS
Contact your County Extension Agent
JUNIOR OLYMPIC SHOOTING PROGRAM
AND NRA JUNIOR CLUBS
Details available from:
National Rifle Association Competitions Div.
1600 Rhode Island Ave., N.W.
Washington, D.C. 20036
9
By Daisy
Daisy Outdoor Products
R o g er s , A R 7 2757- 0 2 2 0 U .S .A .
(501) 636-1200
800-643-3458
www.daisy.com
REV. 07/03
PRINTED IN U.S.A.
PART NO.138331-000
M a n u a l
d e
o
p
e
r
a
c
i
ó
n
MODELO POWERLINE
SERIE 617X/622X
Pistola
semiautomática
de
CO2
617X
PERDIGONES DE PLOMO CALIBRE 0.177 (4.5 mm)
BALINES DE BB, Cal., 0.177 (4.5 mm), de acero
Cilindro de CO2 de 12 gramos únicamente
622X
PERDIGONES DE PLOMO CALIBRE 0.22 (5.5 mm)
Cilindro de CO2 de 12 gramos únicamente
ADVERTENCIA:
By Daisy
NO ES UN JUGUETE. SE REQUIERE LA SUPERVISIÓN DE UN
ADULTO. EL USO INDEBIDO O NEGLIGENTE PUEDE CAUSAR GRAVES LESIONES O LA MUERTE.
PUEDE SER PELIGROSA HASTA UNA DISTANCIA DE 268 YARDAS (238 METROS).
ÉSTA ES UNA PISTOLA DE AIRE COMPRIMIDO DE ALTA POTENCIA RECOMENDADA PARA
PERSONAS DE 16 Ó MÁS AÑOS DE EDAD. LEA TODAS LAS INSTRUCCIONES ANTES DE USARLA.
EL COMPRADOR Y EL USUARIO DEBEN CUMPLIR TODAS LAS LEYES SOBRE EL USO Y LA
PROPIEDAD DE PISTOLAS Y RIFLES DE AIRE COMPRIMIDO.
ADVERTENCIA:
ESTE PISTOLA PUEDE CAUSAR LESIONES GRAVES, E INCLUSO LA MUERTE
SI SE USA SIN CUIDADO O SE MANEJA MAL. LEA Y SIGA CUIDADOSAMENTE LAS INSTRUCCIONES. NO
INSTALE UN CARGADOR QUE CONTENGA PERDIGONES EN LA PISTOLA HASTA QUE USTED ESTÉ LISTO
PARA DISPARAR. SI USTED INSTALA UN CARGADOR QUE CONTENGA PERDIGONES EN LA PISTOLA Y
ENTONCES DECIDE NO DISPARAR, EXTRAIGA MANUALMENTE EL CARGADOR DE LA PISTOLA O DISPARE LOS
PERDIGONES RESTANTES CONTRA UN BLANCO SEGURO. UNA PISTOLA DESCARGADA Y SIN PRESIÓN Y
CON EL SEGURO PUESTO ES LA MÁS SEGURA. LOS ACCIDENTES OCURREN RÁPIDAMENTE Y ES TERRIBLE
LESIONAR O MATAR A ALGUIEN POR ACCIDENTE. POR FAVOR DISPARE CON SEGURIDAD.
Este símbolo de alerta de seguridad llama la atención respecto a importantes mensajes de seguridad en este
manual. Cuando usted vea este símbolo, manténgase alerta ante la posibilidad de que ocurran lesiones
personales y lea cuidadosamente el mensaje que siga al símbolo.
Los PowerLine Modelos 617X/622X los pistola de PowerLine disparan con más energía en la salida
que la mayoría de los rifles de perdigones y BB. Use máxima precaución cuando manipula este arma de
fuego. Aunque su nuevo PowerLine no es un arma de fuego, puede resultar mortal, y deberá tratarse con
la precaución y respeto que merecen las armas de fuego convencionales. Como arma de fuego, su
PowerLine, si se usa indebidamente o con negligencia, puede matar o herir seriamente a la persona que
dispara o a otras personas. Recuerde siempre que el primer y más importante aspecto de la seguridad es
el tirador. Los seguros son dispositivos mecánicos y el tirador es la única parte del sistema que puede
hacer que una arma sea segura...o insegura. NO DEPENDA DE LOS SEGUROS MECÁNICOS; sino que
piense hacia adelante para evitar situaciones que pudieran ocasionar accidentes.
Cada pistola o rifle es diferente en cuanto a su modo de funcionamiento y usted nunca estará listo para
disparar cualquier pistola o rifle hasta que esté completamente familiarizado con su uso. Lea las siguientes
instrucciones de operación y SIN CARGAR NINGÚN PERDIGÓN, practique llevando a cabo los pasos de
operación, dispare en frío su pistola con CO2 varías veces a un blanco seguro. Así podrá aprender a dominar
su pistola modelo Power Line 617X/622X en forma correcta y segura.
ANTES DE DISPARAR
ACTIVE EL SEGURO, COLOQUE LA PALANCA DE SEGURIDAD DE FORMA QUE CUBRA EL INDICADOR
ROJO (lea la explicación en la página 14).
MIRA POSTERIOR
SEGURO DE LA CAJA DEL CAÑÓN
PERCUTOR
BOCA DEL
CAÑÓN
SEGURO
GATILLO
EMPUÑADURA
FIGURA 1
MIRA DELANTERA
TORNILLO DE PERFORACIÓN
2
PASOS DE OPERACIÓN
ADVERTENCIA:
Asegúrese de que su pistola esté siempre apuntando en una dirección segura.
Inserte el cilindro de CO2.
Paso 1. Active el seguro, de forma que
cubra el indicador rojo
Paso 2. Cargue la pistola
Paso 3. Amartille el percutor
Paso 4. Apunte a un blanco seguro
Paso 5. Desactive el seguro; podrá ver el
indicador rojo
Paso 6. Dispare
Puede seguir disparando la pistola hasta que el cargador de perdigones esté vacío o sea necesario
reemplazar el cilindro de CO2. Con el Modelo 617X/622X obtendrá un mínimo de 60 disparos por cada
cilindro de CO2. Consulte la sección sobre las características de CO2 en la página 16.
NUNCA GUARDE UNA PISTOLA CARGADA.
Al final de cada sesión de tiro, como una precaución de seguridad, active siempre el seguro (vea la
página 14), saque el cilindro de CO2 (vea la página 15), saque el cargador de la pistola (vea la página
14), y saque cualquier perdigón del cargador (vea la página 14). Guarde la pistola en un lugar seguro
para impedir que pueda usarse sin autorización.
INSERTE EL CILINDRO DE CO2
1. Active el seguro, de forma que cubra el indicador rojo.
2. Saque la cubierta izquierda de la empuñadura levantando la lengüeta de la cubierta de la
empuñadura (Figura 2).
3. Gire el tornillo de perforación hacia la izquierda hasta que quede suficiente espacio para insertar un
cilindro de CO2.
4. Inserte el extremo de mayor tamaño del cilindro de CO2 en la parte inferior de la empuñadura. Sostenga
la pistola en posición invertida con la empuñadura apuntando hacia arriba y la boca del cañón apuntando
lejos de usted como se muestra en la figura (Figura 2B). Coloque el extremo pequeño del cilindro de CO2
dentro del sujetador, de tal manera que el cilindro de CO2 toque el pasador de perforación (vea la Figura 2A).
5. Mientras sigue sosteniendo la pistola en posición invertida, vuelva a colocar la cubierta de la
empuñadura en su sitio, apunte la boca del cañón en una dirección segura y gire el tornillo de
perforación hacia la derecha para perforar el cilindro de CO2. Siga girando RÁPIDAMENTE el
tornillo hasta que quede apretado al tacto. NOTA: Puede ocurrir una leve fuga del gas de CO2 hasta
que el tornillo de perforación esté bien apretado.
PASADOR DE
PERFORACIÓN
FIGURA 2
FIGURA 2A
SUJETADOR
CUBIERTA DE LA
EMPUÑADURA
FIGURA 2B
TORNILLO DE PERFORACIÓN
LENGÜETA DE LA CUBIERTA
DE LA EMPUÑADURA
ADVERTENCIA: Asegúrese de que la boca del cañón esté apuntando en una dirección segura al
perforar el cilindro de CO2. En caso de que un sello deje escapar temporalmente el gas mientras se está
perforando el cilindro de CO2, el gas de CO2 puede escapar a través del cañón. Si hay un perdigón en el
cañón de una tanda anterior de disparos, esta situación puede provocar el disparo del perdigón.
3
ADVERTENCIA:
Use únicamente cilindros de CO2
que sean del tipo de 12 gramos. Puede ser extremadamente peligroso
intentar usar cualquier otro tipo de cilindros de gas, lo cual puede
causar graves lesiones. El uso de otros gases, aparte del CO2, podría
provocar explosiones o destrozar la pistola.
NOTA: El Modelo 622x dispara perdigones calibre .22 (5.5 mm)
solamente. El Modelo 617X dispara perdigones calibre .177 (4.5 mm)
y/o BBs.
FIGURA 3
CARGA DEL CARGADOR
ROTATIVO
1.
2.
SEGURO
Abra la culata de la pistola tirando hacia atrás del seguro de la
caja del cañón. Manteniendo la punta del cañón hacia abajo, tire
hacia arriba de la caja del cañón para abrir la culata (Figura 5).
Saque el cargador e inserte un total de seis proyectiles en el
cargador rotatorio (Modelo 622X: .solamente perdigones calibre
.22) El Modelo 617X: perdigones calibre .177 y/o BBs) (Fig. 3)
CÓMO MANEJAR LA PISTOLA
ADVERTENCIA: Asegúrese de que la pistola esté
PERCUTOR
FIGURA 4
siempre apuntando en una dirección segura.
Paso 1. ACTIVE EL SEGURO, DE FORMA QUE EL INDICADOR
ROJO QUEDE CUBIERTO.
Haga girar el seguro hacia la posición "SAFE" (vea la Figura 4). Con el
seguro en esta posición, SE PUEDE TIRAR DEL GATILLO aunque la
pistola no descargará ni el gas de CO2 ni ningún perdigón. NOTA: La
seguridad no es algo automático. El seguro cumplirá sus funciones
únicamente cuando usted cumpla las suyas. RECUERDE: LA MEJOR
SEGURIDAD CONSISTE EN MANEJAR BIEN LA PISTOLA.
Paso 2. CARGUE LA PISTOLA
Tire hacia atrás del seguro de la caja del cañón mientras sostiene la
pistola con la boca del cañón apuntando hacia abajo: tire hacia arriba
de la caja del cañón para abrir la culata (Figura 5). Inserte un cargador
totalmente lleno en la culata del cañón (Figura 6). Cierre la caja del
cañón.
FIGURA 5
Paso 3. AMARTILLE EL PERCUTOR
Apunte la pistola en una dirección segura. Tire del percutor totalmente
hacia atrás, de tal manera que el percutor permanezca amartillado al
soltarlo.
Paso 4. APUNTE A UN BLANCO SEGURO
Para disparar con puntería uniforme, use la forma correcta de la mira
cada vez que dispare la pistola (Figura 7).
¡CUIDADO!:
Debido a la potencia de este rifle de gas
CO2, use mucha precaución al seleccionar un respaldo para el blanco
seguro. El Modelo 617/622X no deberá usarse con respaldos para el
blanco de rifle BB cuando dispara perdigones. Escoja blancos que no
puedan ser penetrados o que no causarán rebotes debido a su
superficie dura. Use solamente blancos y trampas que estén
diseñados para usarse con rifles de perdigones de alta potencia. El
Modelo 617X no deberá usarse con trampas de blanco diseñadas
para perdigones cuando se disparan BBs. No dispare a la superficie
del agua.
4
FIGURA 6
CORRECTA ALINEACIÓN DE LA MIRA
MIRA
POSTERIOR
FIGURA 7
DIANA
MIRA
DELANTERA
Paso 5. DESACTIVE EL SEGURO, VERÁ EL INDICADOR ROJO.
Cuando usted tenga la seguridad de que el blanco, la plancha de
contención y el área circundante están libres de peligro, haga girar el
seguro hacia la posición "FIRE" (Figura 8). Su pistola estará lista para
disparar en ese momento. Si tira del gatillo entonces, disparará un
perdigón de la pistola. En este estado usted debe manejar su pistola
con extrema cautela.
Paso 6. DISPARE
FIGURA 8
La pistola puede dispararse con seguridad después de completar los
pasos mencionados anteriormente. Después de asegurarse de que la pistola esté apuntando en una dirección
segura, oprima suavemente (pero con firmeza) el gatillo. Si desea seguir disparando, se pueden repetir los
pasos de esta operación hasta que deba reemplazarse el cilindro de CO2. Si un perdigón no se dispara
después de completar los pasos descritos de operación, mantenga la pistola apuntando en una dirección
segura y compruebe lo siguiente:
1. El seguro está apuntando a "FIRE".
2. Active el seguro (apúntelo a "SAFE") y compruebe que el cilindro de CO2 tenga suficiente gas de CO2 y
esté bien apretado contra el pasador de perforación.
3. Consulte la sección "Características del gas de CO2" (lea la explicación en la página 16).
ADVERTENCIA:
Si la pistola sigue sin disparar un perdigón después de dar los tres pasos de
verificación, esto indica que hay un desperfecto en la pistola. Esto podría representar una condición peligrosa.
Podría haber un perdigón en la pistola aun cuando no se logró disparar un perdigón. Esto podría inducir al
usuario a creer erróneamente que la pistola está descargada. (Consulte la sección "Desperfectos de la
pistola" para corregir el problema).
SI USTED DECIDE NO DISPARAR
Si usted decide no disparar la pistola después de amartillar el percutor. DESCARGUE LA PISTOLA:
A.
Active el seguro, DE FORMA QUE EL INDICADOR ROJO QUEDE CUBIERTO
(lea la explicación en la página 14).
B.
Retire el cargador rotativo (lea la explicación en la página 14).
C.
Retire el cilindro de CO2 (lea la explicación en la página 15).
DESPERFECTOS DE LA PISTOLA
The instructions given below are to be used when the pistol fails to shoot a pellet out of the barrel,
or when the pistol is jammed.
1. RETIRE EL CILINDRO DE CO2
A.
Active el seguro, DE FORMA QUE EL INDICADOR ROJO QUEDE CUBIERTO.
B.
Dejando la cubierta de la empuñadura izquierda en su sitio, gire lentamente el tornillo de
perforación hacia la izquierda, hasta descargar el resto deL gas de CO2.
C. Retire la cubierta de la empuñadura izquierda levantando la lengüeta de la cubierta de la
empuñadura.
D. Retire el cilindro de CO2 de la pistola.
2. RETIRE EL CARGADOR ROTATIVO.
3. SAQUE EL PERDIGÓN ENCASQUILLADO.
A.
Inserte una varilla de limpieza en el extremo abierto del cañón y saque el perdigón encasquillado
dando ligeros golpes a la pistola para sacarlo por la culata o por el extremo de la boca del cañón.
4. DISPARE EL PERDIGÓN
A.
Inserte un nuevo cilindro de CO2 (vea la página 13).
B.
Dispare la pistola siguiendo los pasos de operación descritos a partir de la página 13.
ADVERTENCIA:
Si todavía no se puede disparar un perdigón por el cañón de la pistola, esto
indica que se debe sacar el cilindro de CO2 y enviar la pistola directamente al Daisy Outdoor Products
Service Department (Departamento de servicio para productos Daisy de uso al aire libre).
5
CARACTERÍSTICAS DEL CO2
Hay ocasiones cuando una pistola de CO2 puede estar sometida a condiciones anormales que pueden
producir efectos negativos sobre el rendimiento de la pistola. Entre estas condiciones está el manejo o el
almacenamiento de la pistola a temperaturas que son superiores o inferiores a las temperaturas ambiente
típicas (60-70°F ó 15-21°C), así como condiciones en las que la pistola se dispara rápidamente.
1. Las altas temperaturas pueden ejercer una mayor presión sobre el cilindro de CO2 por encima de la
presión operativa normal. Esta mayor presión puede impedir que la pistola dispare y puede provocar
daños permanentes a la pistola. La temperatura máxima de operación o almacenamiento no debe ser
mayor de 105ºF (40ºC). Se puede llegar fácilmente a las temperaturas máximas de operación y
funcionamiento si se deja la pistola directamente bajo el Sol en un día caluroso. Por consiguiente, el
tirador no debe exponer la pistola a condiciones de alta temperatura ni dejarla bajo la luz solar directa
durante ningún período extenso de tiempo.
2. Disparar rápidamente la pistola causará una reducción de la temperatura en la pistola y en el gas CO2.
Esto ocasionará velocidades menores al disparar los perdigones y puede incluso disminuir la presión del
gas hasta el punto en que la pistola simplemente no disparará. Esta condición se hace más evidente
cuando se dispara en clima frío, pero puede evitarse dejando pasar más tiempo entre cada disparo. Esto
permite que el gas CO2 aumente su temperatura y su presión, y produzca así velocidades normales.
3. Durante los disparos en rápida sucesión, se puede esperar que disminuya la velocidad inicial de cada
disparo. Esto puede tener efectos perjudiciales sobre la precisión de tiro. Asimismo, mientras más rápido
se dispare la pistola, menos disparos usted podrá realizar con el mismo cilindro de CO2.
4. Se debe tener cuidado para garantizar que la pistola no se dispare con un cilindro de CO2 que tenga
baja presión.
¡CUIDADO!:
Si se dispara una pistola que tenga una baja presión en el cilindro de CO2, un
perdigón podría quedar alojado en el cañón y dispararse luego accidentalmente.
DISPAROS EN FRÍO
Para poder disparar en frío la pistola Modelo 617X/622X, el cañón debe estar vacío (vea abajo la sección
"Cómo descargar los perdigones"), seguidamente proceda a amartillar y disparar la pistola.
CÓMO DESCARGAR PERDIGONES
1. Active el seguro, DE FORMA QUE EL INDICADOR ROJO QUEDE CUBIERTO.
2. Desactive el seguro y dispare la pistola en una dirección segura para remover cualquier perdigón que
haya quedado en la pistola (o consulte los Pasos 1 & 2 en la sección DESPERFECTOS DE LA PISTOLA,
página 15).
ALMACENAMIENTO
Almacene su pistola siempre descargada. Active siempre el "SEGURO", extraiga el cilindro de CO2 y saque
el perdigón. Mantenga la pistola fuera del alcance de niños y tiradores sin entrenamiento. Almacene los
perdigones, y los cilindros de CO2 separadamente de la pistola para evitar que caigan en manos de tiradores
sin entrenamiento.
ADVERTENCIA:
Un cilindro de CO2 contiene gas bajo presión, independientemente de que el cilindro esté insertado o no en
una pistola. Este cilindro puede explotar si se le expone a altas temperaturas (como las temperaturas que se
producen en un vehículo cerrado y estacionado directamente bajo la luz solar). Asegúrese de guardar todos
sus cilindros en un lugar fresco.
Proteja su pistola contra la humedad y el sucio. Cuando no la esté disparando, saque el cilindro de CO2,
limpie la pistola y envuélvala en un paño liso y seco. Como alternativa, guarde la pistola en el mismo
empaque en el que llegó nueva a sus manos.
6
CUIDADO APROPIADO
Con cuidado y limpiezas periódicas, su pistola Modelo 617X/622X le brindará muchos años de disfrute como
tirador. Como ocurre con cualquier arma convencional de fuego, los abusos, el descuido y la continua
exposición a la intemperie disminuirán el rendimiento de cualquier rifle o pistola de aire comprimido. Aprenda
a cuidar su pistola Modelo 617X/622X y ella le brindará un buen servicio.
¡CUIDADO!:
Nunca intente limpiar la pistola Modelo 617X/622X sin activar primero el seguro y
sacar el cilindro de CO2 y todos los perdigones.
PIEZAS EXTERNAS
Todas las piezas plásticas negras pueden limpiarse con un paño húmedo y un jabón o detergente suave.
Evite usar detergentes fuertes, compuestos limpiadores abrasivos o solventes que puedan arañar o dañar de
otro modo las superficies.
LUBRICACIÓN
Su pistola Modelo 617X/622X fue lubricada adecuadamente durante su fabricación y no requiere ninguna
lubricación adicional.
MODIFICACIÓN
¡CUIDADO!: Los componentes de esta pistola fueron diseñados por ingenieros para dar un
rendimiento óptimo. Cualquier modificación o manipulación de una pistola puede causar su mal
funcionamiento y hacer que ya no se pueda usar la pistola con seguridad. Cualquier cambio en el rendimiento
o el funcionamiento como, por ejemplo, una menor fuerza en el gatillo o un recorrido más corto del gatillo,
indica el posible desgaste, modificación o manipulación indebida. Dicha pistola debe revisarse, reemplazarse
o repararse apropiadamente a cargo de un personal calificado. Cualquier pistola que se haya caído
golpeándose contra el suelo debe ser revisada por un personal calificado con el fin de asegurarse de que su
funcionamiento no haya sido afectado por la caída.
ADVERTENCIA: UNA PISTOLA QUE NO ESTÉ FUNCIONANDO CORRECTAMENTE
PUEDE SER PELIGROSA. SE DEBE IMPEDIR SU USO POR PARTE DE CUALQUIER PERSONA
HASTA SU REPARACIÓN O DESTRUCCIÓN. NO TRATE DE DESARMAR LA PISTOLA. ES DIFÍCIL
VOLVER A ARMARLA Y SI SE COMETE ALGÚN ERROR AL VOLVER A ARMARLA, ESE ERROR
PUEDE PROVOCAR UNA CONDICIÓN PELIGROSA.
REPARACIÓN DE LAS PISTOLAS DAISY
LAS PISTOLAS TIENEN UNA GARANTÍA LIMITADA DE UN AÑO
Durante un año contado a partir de la fecha de compra, Daisy reparará o reemplazará esta pistola,
gratuitamente, si tiene algún defecto en materiales o fabricación. Prestamos servicio de reparación si se
devuelve la pistola a Daisy Manufacturing Co. (vea abajo la nota importante). Adjunte a la pistola su nombre,
dirección y número telefónico, la descripción del problema y el comprobante de la fecha de compra al por
menor (comprobante de compra). Embale la pistola y envíela a Daisy Manufacturing Co. con los gastos
pagados de transporte. Esta garantía le otorga derechos legales específicos y usted también puede tener
otros derechos que pueden variar de un estado a otro.
IMPORTANTE: Usted puede devolver su pistola inservible a Daisy para su reparación a través del Servicio
Postal de los Estados Unidos o a través del servicio expreso de United Parcel Service. Asegúrese de activar
el seguro, sacar el cilindro de CO2 y descargar las municiones del Cargador de cambio rápido antes de
devolver esta pistola a Daisy. Usted debe incluir la información sobre su domicilio para que Daisy pueda
devolverle la pistola directamente a través del servicio de entregas de United Parcel Service (UPS).
PISTOLAS SIN GARANTÍA
Si su pistola Daisy necesita reparación, llame al teléfono de Servicio al Cliente 1-800-713-2479 para saber
cuáles son los costos de la reparación. Daisy reparará o reemplazará la pistola con problemas con una pistola
reacondicionada del mismo modelo, si hay disponibilidad de pistolas del mismo modelo; de lo contrario la
reemplazará con un modelo de pistola de calidad equivalente.
Daisy Outdoor Products
Service Department
11823 Lime Kiln Rd.
Neosho, MO 64850 U.S.A.
7
ESPECIFICACIONES DE LA PISTO
LA POWERLINE MODELO 617X/622X
ACCIÓN
CALIBRE
Pistola semiautomática de gas de CO2
– 617X
– 622X
Perdigones calibre 0.177 (4.5 mm) de plomo y balines
Perdigones calibre 0.22 (5.5 mm) de plomo
CAPACIDAD DE MUNICIONES
Cargador rotativo de 6 perdigones
DISTANCIA MÁXIMA DE DISPARO* – 617X
– 622X
268 yardas (238 m)*
235 yardas (215 m)*
VELOCIDAD MÁXIMA
485 pies por segundo (148 metros por segundo) - balines
425 pies por segundo (130 metros por segundo) - de plomo
400 pies por segundo (122 metros por segundo) - de plomo
– 617X
– 617X
– 622X
ENERGÍA INICIAL
4.9 pies lb. (6.6 J)
CAÑÓN
Acero tipo rifle de 5.35 pulgadas (136 mm)
SEGURIDAD
Bloqueo del percutor rotativo
MIRAS
Frontal TRUGLO® de fibra óptica; mira posterior fija y abierta
PESO
1.3 lb. (0.6 kg) con la pistola vacía
LONGITUD TOTAL
8.5 pulg. (216 mm)
FUENTE DE POTENCIA
Cilindro Daisy de CO2 de 12 gramos con cuello pequeño
* Con la boca del cañón apuntando hacia arriba en un ángulo óptimo
¡CUIDADO!: Los cilindros de CO2 pueden explotar a temperaturas superiores a 160°F
(71°C).
8
G u i d e
d e
l ’ u t i l i s a t e u r
MODELE POWERLINE
SÉRIE 617X/622X
Revolver semi-automatique à CO2
617X
PLOMBS POUR CARABINE À AIR COMPRIMÉ de calibre .177 pouce (4,5 mm)
BILLES BB D'ACIER de calibre .177 (4,5 mm)
Cartouche de CO2 de 12 grammes uniquement
622X
PLOMBS POUR CARABINE À AIR COMPRIMÉ de calibre .22 pouce (5,5 mm)
Cartouche de CO2 de 12 grammes uniquement
AVERTISSEMENT :
By Daisy
CECI N’EST PAS UN JOUET. LA SURVEILLANCE D’UN ADULTE EST
RECOMMANDÉE. L’USAGE ABUSIF OU NÉGLIGENT RISQUE DE CAUSER DES BLESSURES
GRAVES OU LA MORT. CONSTITUE UN DANGER JUSQU’À 238 MÈTRES.
CETTE ARME À AIR COMPRIMÉ EST UNE ARME À GRANDE PUISSANCE DONT L’EMPLOI EST
RECOMMANDÉ AUX PERSONNES GÉES DE 16 ANS OU PLUS. PRIÈRE DE LIRE TOUTES LES
INSTRUCTIONS AVANT D’UTILISER CETTE ARME. L’ACHETEUR ET L’UTILISATEUR DOIVENT SE
CONFORMER AUX LOIS RÉGISSANT L’EMPLOI ET LA POSSESSION D’ARMES À AIR COMPRIMÉ.
AVERTISSEMENT :
CETTE ARME À FEU PEUT CAUSER DES BLESSURES GRAVES OU LA
MORT EN CAS D’UTILISATION ABUSIVE OU NÉGLIGENTE. VEUILLEZ LIRE ET SUIVRE LES INSTRUCTIONS À LA
LETTRE. NE PAS INSTALLER UN CHARGEUR RENFERMANT DES MUNITIONS DANS L’ARME AVANT D’ÊTRE PRÊT À
TIRER. SI VOUS INTRODUSEZ UN CHARGEUR RENFERMANT DES MUNITIONS DANS L’ARME ET DÉCIDEZ DE NE
PAS TIRER, VOUS DEVEZ ENLEVER LE CHARGEUR DE L’ARME MANUELLEMENT OU UTILISER LES MUNITIONS
RESTANT DANS LE CHARGEUR EN TIRANT SUR UNE CIBLE SÛRE. UNE ARME NON CHARGÉE ET NONCOMPRIMÉE , DONT LE CRAN DE SÉCURITÉ EST ENGAGÉ, EST TOUJOURS PLUS SÛRE. UN ACCIDENT EST VITE
ARRIVÉ, ET LE FAIT DE BLESSER OU DE TUER QUELQU’UN ACCIDENTELLEMENT EST IRRÉMÉDIABLE. UTILISEZ
VOTRE ARME AVEC PRUDENCE.
Ce symbole d’avertissement relatif à la sécurité indique des avis de sécurité importants contenus dans ce
manuel. Lorsque vous apercevez ce symbole, soyez attentif à la possibilité de blessures corporelles et lisez
bien le message qui suit.
Les Modele 617X/622X les PowerLine tirent avec beaucoup plus d’énergìe initiale que les armes à balles
BB ou à plombs. Il faut donc manipuler cette carabine avec une prudence extrême. Bien que la PowerLine ne
soit pas une arme à feu, elle peut être mortelle et doit être traitée avec tout le respect dû à une arme à feu
traditionnelle. Tout comme une arme à feu, lorsque votre PowerLine est mal utilisée ou utilisée imprudemment,
elle risque de tuer ou de blesser gravement le tireur ou quelqu’un d’autre. Il ne faut jamais oublier que, dans
toute arme à feu, la sécurité repose entre les mains du tireur. Tout dispositif de sûreté est mécanique et la
personne qui tire est seule à pouvoir rendre une arme sûre – ou dangereuse. NE PAS DÉPENDRE DES
DISPOSITIFS DE SÉCURITÉ – il faut avoir la vue longue et éviter les situations qui peuvent causer des
accidents.
Les armes obéissent à des modes de fonctionnement très variés et il convient d’être parfaitement rompu
au maniement d’une arme avant de commencer à l’utiliser. Lisez la notice d’utilisation suivante et SANS
CHARGER DE MUNITIONS, pratiquez le maniement de votre arme à CO2 en suivant son mode d’utilisation
pas à pas et tirez plusieurs fois à vide en direction d’une cible sûre. Ceci vous permettra d’apprendre à utiliser
le Power Line 617X/622X correctement et en toute sécurité.
AVANT L’EMPLOI
ENGAGEZ LE « CRAN DE SÛRETÉ » : PLACEZ LE LEVIER DE SÉCURITÉ DE FAÇON À RECOUVRIR LE
POINT ROUGE (reportez-vous à la page 22).
HAUSSE
VERROU DE CANON
CHIEN
BOUCHE
CRAN DE SÛRETÉ
DÉTENTE
CROSSE
FIG. 1
GUIDON
VIS PERFORANTE
2
MODE D’UTILISATION
AVERTISSEMENT : Veiller à toujours pointer l’arme dans une direction sûre.
la cartouche de CO2.
Étape 1. ENGAGEZ le cran de sûreté (« ON »)
- point rouge non visible.
Étape 2. Chargez l’arme.
Étape 3. Armez le chien.
Introduisez
Étape 4. Pointez l’arme sur une cible sûre.
Étape 5. RELCHEZ le cran de sûreté (« OFF ») point rouge visible.
Étape 6. Faites feu.
Vous pouvez continuer de tirer jusqu’à ce qu’il soit nécessaire de remplacer le chargeur de munitions
ou la cartouche de CO2. Le modèle 617X/622X vous permet de tirer au moins 60 coups par cartouche
de CO2. Reportez-vous à la section relative aux caractéristiques du CO2 à la page 24.
NE JAMAIS ENTREPOSER UNE ARME CHARGÉE
À la fin d’une séance de tir, par précaution, engagez toujours le cran de sûreté (reportez-vous à la page
22), retirez la cartouche de CO2 (reportez-vous à la page 23), retirez le chargeur du pistolet (reportez-vous à
la page 22), et retirez les munitions se trouvant dans le chargeur (reportez-vous à la page 22). Entreposez le
pistolet dans un endroit sûr pour éviter toute utilisation non autorisée.
INTRODUIRE LA CARTOUCHE DE CO2
1. ENGAGEZ le cran de sûreté (« ON ») - point rouge non visible.
2. Retirez la plaquette de crosse gauche en soulevant la languette prévue à cet effet (Figure 2).
3. Faites pivoter la vis perforante dans le sens contraire des aiguilles d’une montre jusqu’à ce qu’il y ait
suffisamment de place pour introduire une cartouche de CO2.
4. Introduisez le bout large de la cartouche de CO2 dans la partie inférieure de la crosse. Tenez le
pistolet à l’envers, la crosse dirigée vers le haut et la bouche dans la direction opposée de l’endroit
où vous vous trouvez comme illustré (Figure 2B). Placez le petit bout de la cartouche de CO2 à
l’intérieur de la patte de fixation de façon à ce que la cartouche de CO2 bute contre la broche de
perforation (Figure 2A).
5. Tout en continuant de tenir le pistolet à l’envers, remettez la plaquette de crosse gauche en place,
pointez la bouche du pistolet dans une direction sûre et faites pivoter la vis perforante dans le sens
des aiguilles d’une montre pour percer la cartouche de CO2. Continuez de visser RAPIDEMENT (à
la main seulement) jusqu’à ce que la vis soit vissée à fond. REMARQUE : Une légère fuite de CO2
risque de se produire tant que la vis perforante n’est pas vissée à fond.
BROCHE DE PERFORATION
FIG. 2
PATTE DE FIXATION
FIG. 2A
PLAQUETTE DE CROSSE
FIG. 2B
VIS PERFORANTE
LANGUETTE DE LA PLAQUETTE DE CROSSE
AVERTISSEMENT :
Lorsque vous percez une cartouche de CO2, veillez à pointer la bouche
du canon dans une direction sûre. En effet, si une fuite de gaz se produit momentanément dans un joint
pendant la perforation d’une cartouche de CO2, une certaine quantité de gaz risque de s’échapper du canon.
Hors, si une munition est restée coincée dans le canon au cours de la séance de tir précédente, celle-ci risque
soudain d’être expulsée.
3
AVERTISSEMENT :
Utilisez uniquement des
cartouches de CO2 de 12 grammes. Toute tentative visant à utiliser
un autre type de cartouche de gaz pourrait s’avérer extrêmement
dangereuse et entraîner des blessures graves. L’utilisation d’un autre
gaz que le CO2 peut provoquer une explosion ou faire éclater le
pistolet.
REMARQUE : Le Modèle 622X ne tire que des plombs de calibre
0,22 (5,5 mm). Le Modèle 617X tire des plombs de calibre 0,177 (4,5
mm) et/ou de calibre BB.
FIG. 3
CHARGEZ LE CHARGEUR ROTATIF
1. Ouvrez la culasse du pistolet en tirant le verrou du bâti du canon
vers l’arrière. Tout en maintenant la bouche du pistolet vers le bas,
tirez vers le haut le bâti du canon pour ouvrir la culasse (Figure 5).
2. Retirez le chargeur rotatif et introduisez à l’intérieur six projectiles
(Modèle 622X : plombs de cal. 0,22 uniquement. Modèle 617X :
plombs de cal. 0,177 et/ou de cal. BB) (Figure 3).
MANIEMENT DU RÉVOLVER
AVERTISSEMENT : Veiller à toujours pointer le
CRAN DE
SÛRETÉ
CHIEN
FIG. 4
revolver dans une direction sûre.
Étape 1. ENGAGEZ LE CRAN DE SÛRETÉ
(« ON ») - POINT ROUGE NON VISIBLE.
Faites pivoter le cran de sûreté jusqu’à ce qu’il se mette à la position
de « SÉCURITÉ » (Voir la figure 4). Une fois le cran de sûreté en
position de sécurité, même si l’on appuie sur la détente, le revolver
n’expulsera pas de CO2 ni de plomb. REMARQUE : Le cran de sûreté
n’est pas automatique. Il fonctionnera uniquement si vous avez su
l’engager correctement. SOUVENEZ-VOUS QUE LE DISPOSITIF DE
SECURITE LE PLUS FIABLE REPOSE SUR LE MANIEMENT
SECURITAIRE DE L’ARME.
FIG. 5
Étape 2. CHARGEZ
Tirez le verrou du bâti du canon vers l’arrière tout en tenant la bouche du
pistolet vers le bas ; tirez le bâti du canon vers le haut pour ouvrir la
culasse (Figure 5). Introduisez un chargeur complet à l’intérieur de la
culasse du canon (Figure 6). Refermez le bâti du canon.
Étape 3. ARMEZ LE CHIEN
Pointez le revolver dans une direction sûre. Tirez le chien à fond vers
l’arrière jusqu’à ce qu’il reste sous tension lorsque vous le relâchez.
Étape 4. VISEZ UNE CIBLE SÛRE
Pour devenir tireur d’élite, vous devez utiliser un champ de visée à
point à chaque coup de pistolet (Figure 7).
PRÉCAUTIONS :
Étant donné la puissance de ce
revolver à CO2, vous devez faire montre d’une extrême prudence en
choisissant une butte de tir sur cible sûre. Le Modèle 617X/622X ne
doit pas être utilisé avec des buttes de tir sur cible destinées au tir à la
carabine à air comprimé. Choisissez des cibles impénétrables ou qui
ne risquent pas de faire ricocher les plombs en raison de leur surface
dure. Utilisez uniquement des cibles et des trappes spécialement
conçues pour l’emploi d’armes à plombs à grande puissance. Ne pas
tirer en direction de l’eau.
4
FIG. 6
CHAMP DE VISÉE À POINT
HAUSSE
POINT DE MIRE
GUIDON
FIG. 7
Étape 5. RELÂCHEZ LE CRAN DE SÛRETÉ
(« OFF ») - POINT ROUGE VISIBLE.
Lorsque vous êtes certain de pouvoir utiliser la cible, la butte et le
périmètre de tir en toute sécurité, faites pivoter le cran de sûreté
pour le mettre dans la position « FEU » (Figure 8). Votre revolver
est maintenant prêt à tirer. Le fait d’appuyer sur la détente aura
désormais pour effet d’expulser un projectile. Dans ces conditions,
votre revolver doit être manié avec d’infinies précautions.
Étape 6. TIREZ
FIG. 8
Après avoir effectué toutes les étapes du mode d’utilisation donné précédemment, vous pouvez faire feu
en toute sécurité. Prenez bien soin de pointer le revolver dans une direction sûre et appuyez légèrement
mais fermement sur la détente. Si vous désirez continuer de tirer, répétez les étapes du mode de
fonctionnement jusqu’à ce que la cartouche de CO2 soit épuisée ou que vous deviez la remplacer. Si vous
avez effectué toutes les étapes du mode de fonctionnement sans pour autant parvenir à tirer un projectile,
faites les vérifications suivantes tout en prenant soin de pointer le revolver dans une direction sûre.
1. Le cran de sûreté est dirigé vers « FEU ».
2. ENGAGEZ le cran de sûreté (dans la position « SÉCURITÉ ») et vérifiez que le revolver contient
bien une cartouche de CO2, que celle-ci est suffisamment pleine et qu’elle bute correctement contre
la broche de perforation.
3. Reportez-vous à la section intitulée « Caractéristiques du CO2 » (voir page 24).
AVERTISSEMENT :
Si, après avoir effectué les trois vérifications précédentes et refait les
étapes du mode d’utilisation, vous ne réussissez toujours pas à tirer un projectile, il est probable que le
revolver est défectueux. Ceci peut constituer un danger pour la sécurité. En effet, le revolver peut contenir une
munition même si aucun coup n’est parti. Mais l’utilisateur pourrait croire à tort que le revolver n’est pas
chargé. (Reportez-vous à la section intitulée « Mauvais fonctionnement du revolver » pour tenter de remédier
au problème).
SI VOUS DÉCIDEZ DE NE PAS TIRER
Si vous décidez de ne pas tirer après avoir armé le chien du revolver, DÉCHARGEZ-LE :
A. ENGAGEZ le cran de sûreté (« ON ») - POINT ROUGE NON VISIBLE. (reportez-vous à la page 22)
B. Retirez le chargeur rotatif (reportez-vous à la page 22)
C. Retirez la cartouche de CO2 (reportez-vous à la page 23)
FONCTIONNEMENT DEFECTUEUX DU REVOLVER
Suivez les instructions suivantes si le revolver n’expulse aucune munition hors du canon ou s’il s’est enrayé.
1. RETIREZ LA CARTOUCHE DE CO2
A.
B.
ENGAGEZ le cran de sûreté (« ON ») - POINT ROUGE NON VISIBLE
En laissant la plaquette de crosse gauche en place, faites pivoter lentement la vis perforante dans le
sens contraire des aiguilles d’une montre jusqu’à ce que le CO2 restant soit expulsé.
C. Retirez la plaquette de crosse gauche en la soulevant à l’aide de la languette prévue à cet effet.
D. Retirez la cartouche de CO2 du revolver.
2. RETIREZ LE CHARGEUR ROTATIF
3. DÉGAGEZ LA MUNITION BLOQUÉE
A.
Enfoncez une baguette de nettoyage à l’intérieur de la bouche du canon et tapez légèrement sur la
baguette pour débloquer la munition et l’expulser hors de la culasse ou de l’extrémité de la bouche du
canon.
4. TIREZ LA MUNITION
A.
B.
Insérez une cartouche de CO2 neuve (voir page 21).
Tirez en suivant les étapes du mode d’utilisation débutant à la page 21.
AVERTISSEMENT : Si le revolver ne parvient toujours pas à tirer une munition hors du canon, vous
devez retirer la cartouche de CO2 et envoyer le revolver directement au service technique des produits de
plein air de Daisy (Daisy Outdoor Products).
5
CARACTERISTIQUES DU CO2
Il arrive de temps en temps qu’un revolver au CO2 soit soumis à des conditions d’emploi anomales pouvant
affecter sa performance. Parmi ces conditions, citons par exemple l’utilisation et/ou l’entreposage de l’arme à
des températures extérieures nettement supérieures ou inférieures à la normale [15,6°-21,1° (C60°-70°F)], ou
encore l’utilisation de l’arme dans des conditions de tir rapide.
1. Les températures élevées peuvent produire, dans la cartouche de CO2, une pression bien supérieure à la
pression de service normale. Une telle hausse de pression est susceptible d’empêcher le revolver de tirer
normalement et risque de l’endommager de manière irréversible. La température de fonctionnement ou
d’entreposage maximum ne doit pas dépasser 40° C (105°F). Ce seuil de température peut être
facilement atteint si le revolver est laissé au soleil lors d’une belle journée ensoleillée. Par conséquent, le
tireur doit s’efforcer de ne pas soumettre le revolver à des températures élevées et de ne pas l’exposer à
la lumière directe du soleil pendant de longues périodes.
2. Une grande cadence de tir produit des réductions de température à l’intérieur du revolver et de la
cartouche de CO2. Ceci peut entraîner une réduction de la vitesse des plombs, voire une baisse de la
pression du gaz, et empêcher le revolver de fonctionner normalement. Cette situation peut survenir
particulièrement lors du tir par temps froid. Vous pouvez éviter le problème en laissant un intervalle de
temps plus important entre chaque coup. Ceci permet à la température et à la pression du gaz
d’augmenter et produit des vitesses normales d’expulsion des plombs.
3. Pendant le tir rapide, la vitesse initiale (à la bouche) de chaque coup de feu diminuera. Ceci peut avoir un
impact nuisible sur la précision du tir. Par ailleurs, plus la vitesse de tir sera élevée, plus le nombre de
coups sera faible pour chaque cartouche de CO2 utilisée.
4. Gardez-vous de tirer si le revolver contient une cartouche de CO2 dont la pression est faible.
PRECAUTION :
Si vous tirez avec une cartouche de CO2 dont la pression est faible, un plomb
peut accidentellement rester coincé à l’intérieur du canon.
TIR À VIDE
Pour tirer à vide avec le modèle 617X/622X, vérifiez que le canon est vide (voir ci-dessous la section «
Comment extraire les plombs »), puis armez le revolver et tirez.
COMMENT EXTRAIRE LES MUNITIONS
1. ENGAGEZ le cran de sûreté (« ON ») - POINT ROUGE NON VISIBLE
2. RELÂCHEZ le cran de sûreté (« OFF ») et tirez dans une direction sûre pour expulser une munition restée
dans le revolver. (Ou reportez-vous aux étapes 1 et 2 de la section « FONCTIONNEMENT
DÉFECTUEUX DU REVOLVER », page 23).
ENTREPOSAGE
Entreposez votre revolver après l’avoir déchargé. Engagez le cran de sûreté (« ON ») (point rouge non
visible), retirez la cartouche de CO2 et retirez les munitions. Gardez le revolver hors de la portée des enfants
et des tireurs inexpérimentés. Rangez les munitions et les cartouches de CO2 séparément du pistolet afin de
les tenir hors de portée des tireurs inexpérimentés.
AVERTISSEMENT :
Qu’elle soit ou non à l’intérieur d’un revolver, une cartouche de CO2
contient toujours du gaz sous pression. Si elle est exposée à des températures élevées (comme par exemple
à l’intérieur d’un véhicule fermé et garé au soleil), elle risque d’exploser. Veillez à entreposer toutes vos
cartouches dans un endroit frais. Protégez votre revolver contre l’humidité et la poussière. Lorsque vous ne
tirez pas, retirez la cartouche de CO2 du revolver, nettoyez ce dernier et enveloppez-le d’un tissu doux et sec.
Si vous préférez, entreposez le revolver dans son emballage d’origine.
6
ENTRETIEN NORMAL
Régulièrement entretenu et nettoyé, le Modèle 617X/622X vous donnera beaucoup de satisfaction pendant de
nombreuses années. Cela dit, tout comme pour les armes classiques, l’emploi abusif, la négligence et
l’exposition permanente aux intempéries d’une arme à gaz aura pour effet d’en compromettre la performance.
Apprenez donc à entretenir votre Modèle 617X/622X et vous en retirez de nombreuses satisfactions.
PRECAUTION :
Ne jamais procéder au nettoyage du Modèle 617X/622X avant d’avoir «
ENGAGE » le cran de sûreté, de s’être assuré que le revolver ne contient aucune munition et d’avoir vérifié
que la cartouche de CO2 a bien été retirée.
PIECES EXTERIEURES
Les pièces noires en plastique peuvent être nettoyées avec un chiffon humide et de l’eau savonneuse ou un
détergent à vaisselle. Évitez d’utiliser des détersifs puissants, des produits de nettoyage à action abrasive ou
des solvants qui risquent de rayer ou d’abîmer les surfaces pendant le nettoyage.
LUBRIFICATION
Votre Modèle 617X/622X a été huilé en usine durant la phase de fabrication et ne requiert aucune lubrification
supplémentaire.
MODIFICATION
PRECAUTION : Les composants de cette arme ont été mis au point pour assurer une
performance optimale. La modification ou l’altération d’une arme peut entraîner un défaut de fonctionnement
et des conditions d’utilisation dangereuses. La modification des caractéristiques de fonctionnement (telles que
la diminution de la force de détente ou la réduction de la course de la détente) sont des marques possibles
d’usure, et une arme ainsi modifiée doit être inspectée, remplacée ou correctement réparée par un personnel
qualifié. Une arme que l’on a laissé choir doit être examinée par un personnel qualifié pour vérifier que son
fonctionnement n’a pas été compromis.
AVERTISSEMENT : UNE ARME QUI NE FONCTIONNE PAS CORRECTEMENT PEUT
CONSTITUER UN DANGER. ELLE NE DOIT PAS ÊTRE LAISSÉE À LA PORTÉE D’INDIVIDUS
SUSCEPTIBLES DE L’UTILISER AVANT D’AVOIR ÉTÉ RÉPARÉE OU ELLE DOIT ÊTRE DÉTRUITE.
N’ESSAYEZ PAS DE DEMONTER CETTE ARME. ELLE EST DIFFICILE A REMONTER ET UN
REMONTAGE DEFECTUEUX PEUT CONSTITUER UN DANGER POUR LA SECURITE.
RÉPARATION DES ARMES DAISY
ARMES COUVERTES PAR LA GARANTIE GARANTIE LIMITEE DE UN AN
Daisy s’engage à réparer ou à remplacer gratuitement cette arme dans l’éventualité d’un vice de forme ou
d’un défaut de fabrication, ce pendant une période de un an à partir de la date d’achat. Pour faire réparer
votre arme, renvoyez-la à Daisy Outdoor Products (reportez-vous à la note importante ci-après). Veuillez
joindre vos nom, adresse et numéro de téléphone, une explication du problème et le reçu muni de la date
d’achat (ticket de caisse). Faites un colis et envoyez-le port payé à Daisy. Cette garantie vous donne des
droits légaux spécifiques et vous pouvez jouir d’autres droits qui varient d’un état à l’autre.
IMPORTANT : Vous pouvez renvoyer votre revolver défectueux à Daisy pour réparation par la poste ou
par United Parcel Service. Avant de renvoyer l’arme à Daisy, n’oubliez pas d’engager le cran de sûreté (« ON
»), de retirer la cartouche de CO2 et d’extraire toute munition pouvant se trouver à l’intérieur du chargeur à
chargement rapide. Vous devez fournir votre adresse postale afin que Daisy puisse vous retourner l’arme
directement par UPS.
ARMES NON COUVERTES PAS LA GARANTIE
Si vous avez besoin de faire réparer votre arme Daisy, appelez le service clientèle au 1-800-713-2479 pour
obtenir les coûts de réparation. Daisy réparera ou remplacera l’arme par une arme remise en état du même
modèle, dans la mesure où un tel modèle est disponible, ou bien par un autre modèle de qualité égale.
Daisy Outdoor Products
Service Department
11823 Lime Kiln Road
Neosho, MO 64850 U.S.A.
7
SPECIFICATIONS
DU REVOLVER POWERLINE MODELE 617X/622X
ACTION
CALIBRE
Action semi-automatique à CO2
– 617X
– 622X
Balles BB en Plomb de calibre .177 (4,5 mm)
Plomb de calibre .22 (5,5 mm)
CAPACITÉ DE MUNITIONS
Chargeur rotatif de 6 coups
DISTANCE DE VISEE MAXIMALE* – 617X
– 622X
238 m (268 yds.)
215 m (235 yds.)
VITESSE MAXIMALE
148 mps (485 fps) de Balles BB
130 mps (425 fps) de Plomb
122 mps (400 fps) de Plomb
– 617X
– 617X
– 622X
ENERGIE INITIALE
6.6 J (4.9 ft. lb.)
CANON
Acier rayé de 13, 5 cm (5.35 in.)
CRAN DE SURETE
Sécurité anti-chute rotative
DISPOSITIFS DE VISEE
Guidon en fibres optiques TRUGLO‚ ; hausse à cran de mire fixe
POIDS
0,59 kg (1.3 lbs) vide
LONGUEUR TOTALE
216 mm (8,5 in)
SOURCE D’ENERGIE
Cartouche de CO2 Daisy de 12 grammes à petit col
* Avec la bouche pointée vers le haut à l’angle optimal
PRECAUTION :
à 71° C (160°F)
Les cartouches de CO2 risquent d’exploser à des températures supérieures
8
B
e
t
r
i
e
b
s
a
n
l
e
i
t
u
n
g
POWERLINE MODELL
DER REIHE 617X/622X
C O 2
S e l b s t l a d e r
617X
Bleikugeln Für Luftpistolen mit Kaliber 0,177 (4,5 mm)
Für Schrot vom Kaliber 0,177 (4,5mm) Stahl-Luftgewehr-Schrot
12 g CO2-Zylinder verwenden
622X
Bleikugeln Für Luftpistolen mit Kaliber 0,22 (5,5 mm)
12 g CO2-Zylinder verwenden
WARNUNG:
By Daisy
KEIN SPIELZEUG. BEAUFSICHTIGUNG DURCH ERWACHSENE IST
ERFORDERLICH. MISSBRAUCH ODER FAHRLÄSSIGER GEBRAUCH KÖNNEN ZU SCHWEREN
VERLETZUNGEN ODER ZUM TOD FÜHREN. DIE GEFAHRENZONE ERSTRECKT SICH ÜBER 238 METER.
DIES IST EINE HOCHLEISTUNGS-LUFTPISTOLE FÜR DEN GEBRAUCH DURCH PERSONEN MIT EINEM
ALTER VON MINDESTENS 16 JAHREN. ALLE ANWEISUNGEN VOR DEM GEBRAUCH LESEN. KÄUFER
UND BENUTZER MÜSSEN ALLE GESETZE FÜR DEN GEBRAUCH UND BESITZ VON LUFTPISTOLEN
BEFOLGEN.
WARNUNG:
BEI UNVORSICHTIGEM GEGRAUCH ODER MISSBRAUCH KAN DIESES GEWEHR SCHWERE
ODER GAR TODLICHE VERLETZUNGEN VERURSACHEN. ALLE ANWEISUNGEN SORGFÄLTIG LESEN UND BEFOLGEN.
EIN LADESTREIFEN MIT MUNITION DARF ERST BEI SCHIESSBEREITSCHAFT EINGELEGT WERDEN. FALLS EIN
LADESTREIFEN EINGELEGT WURDE UND ANSCHLIESSEND DOCH NICHT GESCHOSSEN WERDEN SOLL, ENTWEDER
DEN LADESTREIFEN MANUELL AUS DER PISTOLE NEHMEN ODER DIE RESTLICHE MUNITION AUF EIN SICHERES ZIEL
VERSCHIESSEN. DER SICHERSTE ZUSTAND BESTEHT BEI UNGELADEN PISTOLE OHNE DRUCKBEAUFSCHLAGUNG IM
GESICHERTEN ZUSTAND. UNFÄLLE PASSIEREN SCHNELL, UND ES IST SCHRECKLICH, WENN JEMAND
UNBEABSICHTIGT VERLETZT ODER GETÖTET WIRD. BITTE MIT VORSICHT SCHIESSEN.
Dieses Warnsymbol weist auf wichtige Sicherheitsinformationen in dieser Anleitung hin. Dieses Symbol
erscheint, wenn die Möglichkeit einer Körperverletzung besteht, und die zugehörige Information muss
aufmerksam gelesen werden.
Die Modelle 617X/622X PowerLine schießen mit wesentlich stärkerer Mündungsenergie als die meisten
anderen Schrot- und BB-Luftgewehre. Der Gebrauch dieses Gewehrs muss mit größter Vorsicht erfolgen.
Obgleich Ihr neues PowerLine Feuerwaffe ist, kann sie tödlich sein und sollte mit der gleichen Vorsicht und dem
gleichen Respekt wie jede herkömmliche Feuerwaffe behan-delt werden. Ihr PowerLine wie jede Feuerwaffe bei
unsachgemäßem oder fahrlässigem Gebrauch den Schützen oder andere Personen töten oder ernsthaft
verletzen. Denken Sie immer daran, dass der erste und wichtigste Sicherheitsfaktor eines jeden Gewehrs der
Schütze ist. Sämtliche Sicherheitsvorrichtungen sind mechanische Geräte, und der Schütze allein kann ein
Gewehr sicher – oder gefährlich – machen. VERLASSEN SIE SICH NIE AUF MECHANISCHE
SICHERHEITSVORRICHTUNGEN - handeln Sie klug, und vermeiden Sie Situationen, die zu Unfällen führen
können.
Pistolen funktionieren auf verschiedene Weise, und keine Pistole sollte abgefeuert werden, bevor man nicht
vollständig mit ihr vertraut ist. Die folgenden Bedienungsanweisungen müssen gelesen werden, und die Schritte
müssen OHNE LADEN DER MUNITION nachverfolgt werden, wobei die Pistole mehrere Male zur Probe nur
mit CO2 auf ein sicheres Ziel abgefeuert wird. Auf diese Weise können Sie den Gebrauch der Power Line
617X/622X richtig und sicher lernen.
VOR DEM GEBRAUCH
„SICHERN" – DEN SICHERUNGSHEBEL ÜBER DEN ROTEN ANZEIGER STELLEN (siehe Seite 30).
HINTERES VISIER
LAUFGEHÄUSESPERRE
HAHN
MÜNDUNG
SICHERUNGSHEBEL
ABZUG
GRIFF
ABB. 1
VORDERES VISIER
GRIFFDURCHSTICHSCHRAUBE
2
BEDIENUNGSSCHRITTE
WARNUNG: Dafür sorgen, dass die Pistole immer in eine sichere Richtung zeigt.
Den CO2-Zylinder einsetzen.
Schritt 1. „Sichern" – Der rote Anzeiger ist bedeckt.
Schritt 2. Laden
Schritt 3. Den Hahn spannen.
Schritt 4. Auf ein sicheres Ziel richten.
Schritt 5. „Entsichern" – Der rote Anzeiger ist sichtbar
Schritt 6. Schießen.
Die Pistole kann weiterhin abgefeuert werden, bis der Ladestreifen mit der Munition der CO2-Zylinder ausgewechselt
werden muss. Das Modell 617X/622X kann mit einem CO2-Zylinder mindestens 60 Schüsse ausführen. Siehe den
Abschnitt über die CO2 Eigen schaften auf Seite 32.
NIEMALS EINE GELADENE PISTOLE AUFBEWAHREN
Als Vorsichtsmaßnahme wird die Pistole am Ende der Schießübung immer GESICHERT (siehe Seite 30), der
CO2-Zylinder wird herausgenommen (siehe Seite 31), der Ladestreifen wird aus der Pistole genommen (siehe Seite
30), und es wird alle Munition aus dem Ladestreifen genommen (siehe Seite 30). An einem sicheren Ort
aufbewahren, um unbefugte Benutzung zu verhindern.
DEN CO2-ZYLINDER EINLEGEN
1. „Sichern" – Der rote Anzeiger ist bedeckt.
2. Den linken Griffdeckel abnehmen, indem die Griffdeckelsperre abgehoben wird (Abbildung 2).
3. Die Durchstichschraube entgegen dem Uhrzeigersinn drehen, bis genug Platz zum Einlegen eines CO2Zylinders vorhanden ist.
4. Das größere Ende des CO2-Zylinders in den unteren Teil des Griffs einlegen. Die Pistole umgekehrt mit dem
Griff nach oben und der Mündung von sich weg halten (siehe Abbildung 2B). Das kleinere Ende des CO2Zylinders in den Halter einlegen, so daß der CO2-Zylinder die Durchstichschraube berührt (Abbildung 2A).
5. Die Pistole immer noch umgekehrt halten und den linken Griffdeckel wieder anbringen. Die Mündung in eine
sichere Richtung halten und die Durchstichschraube im Uhrzeigersinn drehen, um den CO2-Zylinder zu
durchstechen. Es wird SCHNELL weitergedreht, bis sie handfest angezogen ist. HINWEIS: Bis die
Durchstichschraube fest ist, kann ein wenig Gasleckage auftreten
DURCHSTICHSCHRAUBE
ABB. 2
ABB. 2A
HALTER
GRIFFDECKEL
Abb. 2B
DURCHSTICHSCHRAUBE
WARNUNG:
GRIFFDECKELSPERRE
Beim Durchstechen eines CO2-Zylinders die Mündung immer in eine sichere Richtung
weisen. Bei einer temporären Leckage der Dichtung beim Durchstechen des CO2-Zylinders kann CO2-Gas durch
den Lauf entweichen. Befindet sich noch Munition von der vorherigen Schießübung im Lauf, könnte diese
herausgeschossen werden.
3
WARNUNG:
Nur CO2-Zylinder von 12 Gramm verwenden.
Der Versuch, andere Größen von CO2-Zylindern zu verwenden, kann
äußerst gefähr lich sein. Die Verwendung anderer Gase als CO2 kann zur
Explosion oder zum Bersten der Pistole führen.
HINWEIS: Für Modell 622X nur 0,22 (5,5 mm) Kaliber Kugeln
verwenden. Für Modell 617X 0,177 (4,5 mm) Kaliber Kugeln und/oder
Schrot verwenden.
ABB. 3
DEN LADESTREIFEN FÜLLEN
1.
2.
Das Lager der Pistole öffnen, indem die Laufgehäusesperre
zurückgezogen wird. Die Mündung nach unten halten und das
Laufgehäuse nach oben ziehen, um das Lager zu öffnen (Abb.5).
Den Ladestreifen herausnehmen und insgesamt sechs Projektile
einsetzen. (Modell 622x: nur 0,22 Kaliber; Modell 617x: 0,177 Kaliber
Kugeln und/oder Schrot) (Abbildung 3).
BEDIENUNG
WARNUNG: Die Pistole muss immer in eine sichere
Richtung zeigen.
SICHERUNG
HAHN
ABB. 4
Schritt 1.
„SICHERN" – DER ROTE
ANZEIGER IST BEDECKT.
Die Sicherung auf die Position „SICHER" drehen (siehe Abbildung 4). Bei
dieser Position der Sicherung KANN der Abzug gedrückt werden, die
Pistole entlädt jedoch kein CO2 und keine Kugel. HINWEIS: Die Sicherung
ist nicht automatisch. Sie funktioniert nur, wenn der Schütze richtig
vorgeht. NICHT VERGESSEN, DASS DIE BESTE SICHERUNG IN DER
RICHTIGEN HANDHABUNG DER PISTOLE BESTEHT.
Schritt 2.
LADEN
Schritt 3.
DEN HAHN SPANNEN
Schritt 4.
AUF EIN SICHERES ZIEL ZIELEN
Die Mündung der Pistole nach unten richten und die Laufgehäusesperre
zurückziehen; das Laufgehäuse nach oben ziehen, um das Lager zu
öffnen (Abbildung 5). Einen vollen Ladestreifen in das Lager des Laufs
einlegen (Abbildung 6). Das Laufgehäuse schließen.
ABB. 5
Die Pistole in eine sichere Richtung richten. Den Hahn vollständig
zurückziehen, so daß er beim Loslassen in der gespannten Stellung
bleibt.
Ein konstanter Schütze benutzt bei jedem Schuss mit der Pistole das
richtige Visierbild (siehe Abb. 7).
VORSICHT:
Auf Grund der Energie der CO2-Pistole muss die
Wahl eines sicheren Zielanschlags mit Vorsicht erfolgen. Das Modell
617X/622X sollte nicht an Zielanschlägen für normale Luftpistolen
verwendet werden. Die gewählten Ziele müssen sowohl undurchdringlich
sein als auch Abprallen auf Grund der Härte der Oberfläche verhindern. Es
dürfen nur Ziele und Fallen verwendet werden, die für den Gebrauch von
Hochleistungs-Bleikugelpistolen vorgesehen sind. Modell 617X sollte nicht
mit Zielanschlägen für Schrotkugeln verwendet werden, wenn BBs
abgeschossen werden. Es darf nicht ins Wasser geschossen werden.
4
ABB. 6
RICHTIGES VISIERBILD
HINTERES
VISIER
ABB. 7
DAS SCHWARZE
VORDERES
VISIER
Schritt 5. „ENTSICHERN" – DER ROTE
ANZEIGER IST SICHTBAR
Wenn Sie sich vergewissert haben, dass das Ziel, der Anschlag und die
Umgebung sicher sind, die Sicherung auf die Position „SCHIESSEN"
drehen (Abbildung 8). Ihre Pistole ist jetzt schussbereit. Durch Betätigen
des Abzugs wird ein Projektil abgefeuert. Die Bedienung muss jetzt mit
äußerster Vorsicht erfolgen.
Schritt 6.
SCHIESSEN
ABB. 8
Nachdem die oben erwähnten Schritte der Bedienung durchgeführt wurden, kann die Pistole jetzt sicher geschossen
werden. Nachdem dafür gesorgt ist, dass die Pistole auf ein sicheres Ziel zeigt, wird sachte aber fest der Abzug
gedrückt. Soll weiter geschossen werden, können die Bedienungsschritte wiederholt werden, bis der CO2-Zylinder
ausgetauscht werden muss. Falls nach der Ausführung der Bedienungsschritte kein Projektil herauskommt, die
Pistole auf ein sicheres Ziel halten und folgende Prüfungen vornehmen.
1. Die Sicherung zeigt auf „SCHIESSEN".
2. Die Sicherung auf „SICHER" stellen und nachsehen, ob ein CO2-Zylinder mit ausreichend CO2-Gas eingesetzt
ist und fest an der Durchstichschraube anliegt.
3. Im Abschnitt „CO2-Eigenschaften" nachschlagen (siehe Seite 32).
WARNUNG:
Falls die Pistole nach der Prüfung der obigen drei Punkte immer noch kein Projektil
abfeuert, liegt eine Funktionsstörung der Pistole vor. Dabei kann es sich um einen gefährlichen Zustand handeln. In
der Pistole könnte sich Munition befinden, selbst wenn keine Bleikugeln abgefeuert wurden. Das kann den Benutzer
irrtümlicherweise zu der Annahme führen, dass die Pistole entladen ist. (Im Abschnitt „Funktionsstörungen der
Pistole" nachschlagen, um das Problem zu beheben.)
SOLL NICHT GESCHOSSEN WERDEN
Sollte nach dem Spannen des Hahns beschlossen werden, doch nicht zu schießen, DIE PISTOLE ENTLADEN:
A. Sichern" – DER ROTE ANZEIGER IST BEDECKT (siehe Seite 30).
B. Den Ladestreifen herausnehmen (siehe Seite 30)
C. Den CO2-Zylinder herausnehmen (siehe Seite 31).
FUNKTIONSSTÖRUNG DER PISTOLE
Die nachfolgenden Anweisungen sind zu befolgen, wenn keine Munition aus der Pistole herauskommt oder wenn
eine Bleikugel gehemmt ist.
1. DEN CO2-ZYLINDER HERAUSNEHMEN.
A. Sichern" – DER ROTE ANZEIGER IST BEDECKT
B. Mit dem linken Griffdeckel noch aufgesetzt die Durchstichschraube langsam entgegen dem Uhrzeigersinn
drehen, bis alles restliche CO2-Gas entwichen ist.
C. Den linken Griffdeckel abnehmen, indem die Griffdeckelsperre angehoben wird.
D. Den CO2-Zylinder aus der Pistole nehmen.
2. DEN LADESTREIFEN HERAUSNEHMEN.
3. DIE HEMMENDE MUNITION ENTFERNEN.
A. Einen Pistolenputzer in das offene Ende des Laufs einführen und die hemmende Munition vorsichtig aus
dem Lager oder der Mündung des Laufs herausklopfen.
4. DIE MUNITION HERAUSSCHIESSEN
A. Einen neuen CO2-Zylinder einlegen (siehe Seite 29).
B. Die Pistole wie in den Betriebsschritten ab Seite 29 beschrieben schießen.
WARNUNG:
Wird immer noch keine Munition aus dem Lauf geschossen, den CO2-Zylinder
herausnehmen und die Pistole direkt an das Daisy Outdoor Products Service Department schicken.
5
CO2-EIGENSCHAFTEN
Unter bestimmten außergewöhnlichen Umständen kann die Leistungsfähigkeit einer CO2-Pistole beeinträchtigt
werden. Dazu gehören Gebrauch bzw. Aufbewahrung der Pistole bei Temperaturen, die höher oder niedriger als
typische Außentemperaturen (18 - 22°C) sind, sowie schnelles Feuern.
1. Hohe Temperaturen können im CO2-Zylinder einen Druck erzeugen, der beträchtlich über dem normalen
Betriebsdruck liegt. Ein derartiger Druckanstieg kann das Abfeuern der Pistole unterbinden und kann die
Pistole dauerhaft beschädigen. Die maximale Betriebs- oder Aufbewahrungstemperatur kann leicht erreicht
werden, wenn die Pistole an einem hellen, sonnigen Tag direkt in der Sonne gelassen wird. Deshalb sollte der
Schütze die Pistole nicht über längere Zeit hohen Temperaturen oder direkter Sonne aussetzen.
2. Schnelles Abfeuern der Pistole erzeugt einen Temperaturabfall in der Pistole und dem CO2-Gas. Dadurch wird
die Geschwindigkeit der Bleikugeln verringert, und der Gasdruck kann so weit sinken, dass die Pistole nicht
schießt. Dieser Zustand kann vermieden werden, indem mehr Zeit zwischen den Schüssen gegeben wird.
Dadurch können Temperatur und Druck des CO2-Gases ansteigen, um normale Geschwindigkeiten zu
erzeugen.
3. Bei schnellem Abfeuern ist zu erwarten, dass die Mündungsgeschwindigkeit jedes Schusses kleiner wird.
Dadurch kann die Schussgenauigkeit nachteilig beeinflusst werden. Je schneller die Pistole gefeuert wird,
umso weniger Schüsse stehen pro Zylinder zur Verfügung.
4. Es muss dafür gesorgt werden, dass die Pistole nicht abgefeuert wird, wenn der Druck im CO2-Zylinder
niedrig ist.
VORSICHT:
Ein Abfeuern der Pistole bei niedrigem CO2-Druck kann dazu führen, dass die Munition nicht
aus dem Lauf ausgestoßen wird.
TROCKENFEUERN
Um das Modell 617X/622X trockenzufeuern muss der Lauf leer sein (siehe „Herausnehmen von Bleikugeln" weiter
unten). Dann wird der Hahn gespannt und die Pistole gefeuert.
ENTFERNEN VON MUNITION
1. „Sichern" – DER ROTE ANZEIGER IST BEDECKT
2. „Entsichern" und die Pistole in eine sichere Richtung abfeuern, um die in der Pistole verbliebene Munition zu
entfernen (oder die Schritte 1 und 2 im Abschnitt „FUNKTIONSSTÖRUNGEN DER PISTOLE" auf Seite 31
befolgen).
AUFBEWAHRUNG
Die Pistole im entladenen Zustand aufbewahren. SICHERN, den CO2-Zylinder herausnehmen und die Munition
entfernen. Die Pistole von Kindern und ungeschulten Schützen fern halten. Munition und CO2-Zylinder getrennt von
der Pistole auf-be-wahren, um sie von ungeschulten Schützen fern zu halten.
WARNUNG:
Ein CO2-Zylinder enthält unter Druck stehendes Gas, unabhängig davon, ob er in die
Pistole eingesetzt ist oder nicht. Unter hohen Temperaturen (wie zum Beispiel in einem verschlossenen Auto in
direkter Sonne) kann er explodieren. Es ist dafür zu sorgen, dass alle Zylinder an einem kühlen Ort aufbewahrt
werden.
Die Pistole vor Feuchtigkeit und Schmutz schützen. Bei Nichtbenutzung den CO2-Zylinder herausnehmen, die
Pistole reinigen und in ein glattes, trockenes Tuch einwickeln. Oder die Pistole in der originalen Versandpackung
aufbewahren.
6
SACHGEMÄSSE PFLEGE
Mit Pflege und regelmäßigem Reinigen wird das Modell 617X/622X über viele Jahre Freude am Schießen bereiten.
Wie auch bei herkömmlichen Feuerwaffen führen Missbrauch, Vernachlässigung und ständige Wettereinwirkung zur
Beeinträchtigung der Leistungs-fähigkeit jeder Luftpistole. Lernen Sie, wie es gepflegt wird, und das Modell
617X/622X wird Ihnen gute Dienste leisten.
VORSICHT:
Das Modell 617X/622X darf erst gereinigt werden, wenn es GESICHERT ist, die Pistole
keine Munition enthält und der der CO2-Zylinder herausgenommen wurde.
ÄUSSERE TEILE
Alle schwarzen Kunststoffteile können mit einem feuchten Tuch und milder Seife oder mildem Reinigungs mittel
gereinigt werden. Keine starken Reinigungsmittel, Scheuermittel oder Lösungs mittel verwenden, um Kratzer und
andere Oberflächenschäden zu vermeiden.
SCHMIEREN
Das Modell 617X/622X wurde im Werk geschmiert und sollte kein weiteres Abschmieren benötigen.
MODIFIKATION
VORSICHT: Die Komponenten der Pistole wurden im Hinblick auf optimale Leistung konstruiert und
hergestellt. Alle Modifikationen oder unbefugte Abänderungen der Pistole können zu Funktionsstörungen führen und
den Gebrauch gefährlich machen. Alle Änderungen im Betriebsverhalten (wie zum Beispiel kleinere Zugkraft für die
Betätigung des Abzugs und kürzerer Weg des Abzugs) deuten auf möglichen Verschleiß hin. Solche Pistolen sollten
inspiziert, ersetzt oder von qualifiziertem Personal sachgemäß repariert werden. Alle Pistolen, die heruntergefallen
sind, sollten von qualifiziertem Personal geprüft werden um sicherzustellen, dass ihre Funktion nicht beeinträchtigt
wurde.
WARNUNG: EINE FEHLERHAFTE PISTOLE KANN GEFÄHRLICH SEIN. SIE MUSS SICHER VON
JEGLICHEM GEBRAUCH FERNGEHALTEN WERDEN, BIS SIE REPARIERT ODER ZERSTÖRT WIRD. DIE
PISTOLE DARF NICHT AUSEINANDERGENOMMEN WERDEN. DER ZUSAMMENBAU IST SCHWIERIG, UND
FALSCHER ZUSAMMENBAU KANN GEFÄHRLICH SEIN.
REPARATUR DER DAISY PISTOLEN
PISTOLEN MIT GARANTIE BESITZEN EINE EINJÄHRIGE,
BESCHRÄNKTE GARANTIE
Für ein Jahr vom Kaufdatum bietet Daisy kostenlose Reparatur oder Ersatz sowie Rücksendung im Falle von
Material- oder Verarbeitungsmängeln. Der Kundendienst steht zur Verfügung, wenn die Pistole an Daisy Outdoor
Products zurückgeschickt wird (siehe nachstehenden wichtigen Hinweis). Der Pistole müssen Name, Adresse und
Telefonnummer, eine Beschreibung des Problems und der datierte Kaufbeleg (Quittung) beigefüht sein. Die
Sendung muss verpackt und frachtfrei an Daisy geschickt werden. Die Garantie gewährt bestimmte Rechte, und
möglicher weise besitzen Sie weitere, von Staat zu Staat unterschiedliche Rechte.
WICHTIG: Die fehlerhafte Pistole kann mit der Post oder United Parcel Service an Daisy zur Reparatur
zurückgeschickt werden. Vor der Rücksendung an Daisy muss die Pistole GESICHERT, der CO2-Zylinder
herausgenommen und die Munition aus dem Schnellladestreifen entfernt werden. Ihre Straßenadresse muss
beigefügt werden, damit Daisy die Pistole direkt via UPS zurückschicken kann.
PISTOLEN MIT ABGELAUFENER GARANTIE
Falls Ihre Daisy repariert werden muss, rufen Sie bitte die Nummer 1-501-636-1200 (gebührenfrei innerhalb der
USA) an, um die Reparaturkosten zu erfragen. Daisy repariert die Pistole oder ersetzt sie durch eine überholte
Pistole des gleichen Modells, falls verfügbar, oder andernfalls durch ein Modell vergleichbarer Qualität.
Daisy Outdoor Products
Service Department
112823 Lime Kiln Rd.
Neosho, MO 64850 U.S.A.
7
TECHNISCHE DATEN DER POWERLINE PISTOLE MODELL
617X/622X
WIRKUNG
KALIBER
Halbautomatische Pistole mit CO2-Antrieb
– 617X
– 622X
4,5 mm Bleikugel, Stahl-Luftgewehr-Schrot
5,5 mm Bleikugel
MUNITIONSKAPAZITÄT
Ladestreifen mit 6 Schuss
MAXIMALE SCHUSSWEITE*
– 617X
– 622X
238 m
215 m
MÜNDUNG MAXIMALE
– 617X
– 617X
– 622X
148 m/s - Stahl-Luftgewehr-Schrot
130 m/s - Bleikugel
122 m/s - Bleikugel
MÜNDUNGSENERGIE
6,6 J
LAUF
136 mm Gewehrstahl
SICHERUNG
Drehhahnblock
VISIERE
TRUGLO“ Faseroptik vorne; Feststehend offen hinten
GEWICHT
0,59 kg Leergewicht
GESAMTLÄNGE
216 mm
ENERGIEQUELLE
Daisy 12 g CO2-Zylinder mit kleinem Hals
* Mit der Mündung unter optimalem Winkel nach oben gerichtet.
VORSICHT: CO2-Zylinder können bei Temperaturen über 71°C explodieren.
8