1
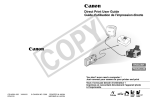
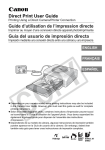
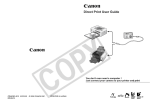
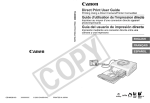
Direct Print User Guide
Guía del usuario de impresión directa
Y
P
O
C
ENGLISH
ESPAÑOL
You don’t even need a computer !
Just connect your camera to your printer and print
¡No necesita un ordenador!
Simplemente conecte la cámara a la impresora e imprima
ENGLISH
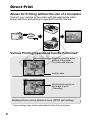
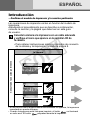
Introduction
—Confirm Your Printer Model and the Section that Applies to You
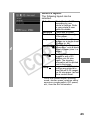
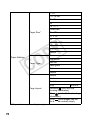
Operations differ according to your printer model.
According to the procedure below, confirm the section and page
you should read in this user guide.
Connect the camera to the printer with an appropriate cable
and confirm the icon displayed in the camera's LCD monitor.
• For instructions on camera and printer connection methods,
please refer to page 8.
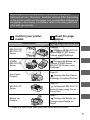
Confirming the section that applies to you
Icons displayed in the camera's LCD monitor
Y
P
O
C
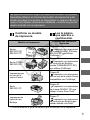
• If one of the aforementioned icons does not appear, the connected printer
cannot be used.
• When the printer is ready for printing, the
button lights in blue. The
button blinks during printing.
Depending on the camera model, the screens that will be
displayed will vary. Moreover, available settings differ depending
on the printer model and the paper size (unavailable settings will
not appear in the menu). For details, refer to the user guide that
came with your printer.
Confirm your printer
model.
Read the page
below.
Printer model
Refer to the sections indicated
SELPHY ES/
SELPHY CP
Series
Y
P
O
C
Page 10
" Printing with SELPHY ES
Series/SELPHY CP Series
Printers using PictBridge"
Page 32
PIXMA/
SELPHY DS
Series
Non-Canon
Printers*
" Printing with Bubble Jet
Printers (PIXMA Series/
SELPHY DS Series) using
PictBridge"
Page 52
" Printing with Non-Canon,
PictBridge Compliant Printers"
Page 53
SELPHY CP
Series
" Printing with SELPHY CP
Series Printers using Canon
Direct Print"
Page 71
Bubble Jet
Printers
" Printing with Bubble Jet
Printers using Bubble Jet
Direct"
* Please also refer to the user guide that came with your printer.
1
For the latest information regarding connections between Canon
printers and cameras, please refer to the following URL:
http://web.canon.jp/Imaging/BeBit-e.html
http://www.canon.com/pictbridge
PictBridge Compliance
This camera complies with the industry standard “PictBridge”*.
This allows you to also connect your camera to non-Canon
PictBridge compliant printers and print images with simple
operations using the camera buttons.
Y
P
O
C
* PictBridge: PictBridge is an industry standard for direct printing that
allows you to print images without using a computer by directly
connecting digital cameras and digital camcorders (hereafter “camera”)
to a printer, regardless of the devices’ brand and model.
Disclaimer
• No part of this guide may be reproduced, transmitted, transcribed, stored
in a retrieval system, or translated into any language in any form, by any
means, without the prior written permission of Canon.
• Canon reserves the right to change the specifications of the hardware
described herein at any time without prior notice.
• While every effort has been made to ensure that the information contained
in this guide is accurate and complete, no liability can be accepted for any
errors or omissions.
• Canon makes no warranties for damages resulting from corrupted or lost
data due to a mistaken operation or malfunction of the camera, the
software, the memory cards, personal computers, peripheral devices, or
use of non-Canon memory cards.
Copyright © 2008 Canon Inc. All rights reserved.
2
Table of Contents
Direct Print . . . . . . . . . . . . . . . . . . . . . . . . . . . . . . . . . . . . . . . 6
Allows for Printing without the Use of a Computer . . . . 6
Various Printing Operations Can Be Performed . . . . . . . 6
You Can Also Perform the Following Printing Operations . .7
Printing Movies (Movie Print) . . . . . . . . . . . . . . . . . . . . . . 7
Printing Multiple Images on a Sheet of Paper . . . . . . . . . 7
ID Photo Print. . . . . . . . . . . . . . . . . . . . . . . . . . . . . . . . . . 7
Connecting the Camera to the Printer. . . . . . . . . . . . . . . . . 8
Disconnecting the Camera and the Printer. . . . . . . . . . . . . 9
Printing with SELPHY ES Series/SELPHY CP Series Printers
using PictBridge. . . . . . . . . . . . . . . . . . . . . . . . . . . . . . . . . . . . . .10
Y
P
O
C
Printing . . . . . . . . . . . . . . . . . . . . . . . . . . . . . . . . . . . . . . .
Easy Print. . . . . . . . . . . . . . . . . . . . . . . . . . . . . . . . . . . .
Print after Changing the Print Settings. . . . . . . . . . . . . .
Selecting Print Settings . . . . . . . . . . . . . . . . . . . . . . . . . .
Setting the Date and the File Number Printing Option . . . .
Setting the Print Effect . . . . . . . . . . . . . . . . . . . . . . . . . .
Setting the Number of Copies . . . . . . . . . . . . . . . . . . . .
Setting the Printing Area (Trimming) . . . . . . . . . . . . . . .
Selecting the Paper Settings . . . . . . . . . . . . . . . . . . . . .
Printing Multiple Images on a Sheet of Paper . . . . . .
Printing by Specifying the Print Size
(ID Photo Print) . . . . . . . . . . . . . . . . . . . . . . . . . . . . .
Printing Images in the Fixed Size . . . . . . . . . . . . . . .
Printing Movies (Movie Print) . . . . . . . . . . . . . . . . . . . . .
Single-frame . . . . . . . . . . . . . . . . . . . . . . . . . . . . . . .
Sequence-frame . . . . . . . . . . . . . . . . . . . . . . . . . . . .
Specifying and Printing Multiple Images
(Setting the DPOF Print Settings) . . . . . . . . . . . . . . . . . .
List of Messages . . . . . . . . . . . . . . . . . . . . . . . . . . . . . . .
10
10
11
13
13
14
14
15
19
21
22
24
25
25
26
28
31
3
Printing with Bubble Jet Printers (PIXMA Series/
SELPHY DS Series) using PictBridge . . . . . . . . . . . . . . . . . 32
Printing . . . . . . . . . . . . . . . . . . . . . . . . . . . . . . . . . . . . . . . .32
Easy Print . . . . . . . . . . . . . . . . . . . . . . . . . . . . . . . . . . . .32
Print after Changing the Print Settings . . . . . . . . . . . . . .33
Selecting Print Settings. . . . . . . . . . . . . . . . . . . . . . . . . . .35
Setting the Date and the File Number Printing Option . .35
Setting the Print Effect. . . . . . . . . . . . . . . . . . . . . . . . . . .36
Setting the Number of Copies . . . . . . . . . . . . . . . . . . . . .37
Setting the Printing Area (Trimming) . . . . . . . . . . . . . . . .38
Selecting the Paper Settings . . . . . . . . . . . . . . . . . . . . . .42
Printing Multiple Images on a Sheet of Paper. . . . . . .44
Printing Movies (Movie Print) . . . . . . . . . . . . . . . . . . . . .46
Specifying and Printing Multiple Images
(Setting the DPOF Print Settings). . . . . . . . . . . . . . . . . . .47
List of Messages . . . . . . . . . . . . . . . . . . . . . . . . . . . . . . . .50
Y
P
O
C
Printing with Non-Canon, PictBridge Compliant Printers . . . 52
Printing . . . . . . . . . . . . . . . . . . . . . . . . . . . . . . . . . . . . . . . .52
Printing with SELPHY CP Series Printers using
Canon Direct Print. . . . . . . . . . . . . . . . . . . . . . . . . . . . . . . . . 53
If you use Canon Compact Photo Printer SELPHY
CP750/CP740/CP730/CP720/CP710/CP510 . . . . . . . . . . 53
4
Printing . . . . . . . . . . . . . . . . . . . . . . . . . . . . . . . . . . . . . . . .53
Easy Print . . . . . . . . . . . . . . . . . . . . . . . . . . . . . . . . . . . .53
Print after Changing the Print Settings . . . . . . . . . . . . . .54
Selecting Print Settings. . . . . . . . . . . . . . . . . . . . . . . . . . .55
Setting the Number of Copies . . . . . . . . . . . . . . . . . . . . .55
Setting the Print Style (Image, Borders and Date) . . . . .55
Setting the Printing Area (Trimming) . . . . . . . . . . . . . . . .57
Printing by Specifying the Print Size (ID Photo Print) . . . . .61
Printing Movies (Movie Print) . . . . . . . . . . . . . . . . . . . . .64
Single-frame . . . . . . . . . . . . . . . . . . . . . . . . . . . . . . . .64
Sequence-frame . . . . . . . . . . . . . . . . . . . . . . . . . . . . .65
Specifying and Printing Multiple Images
(Setting the DPOF Print Settings). . . . . . . . . . . . . . . . . . .67
List of Messages . . . . . . . . . . . . . . . . . . . . . . . . . . . . . . . .70
Printing with Bubble Jet Printers using Bubble Jet Direct . .71
Printing . . . . . . . . . . . . . . . . . . . . . . . . . . . . . . . . . . . . . . . 71
Setting the Print Style . . . . . . . . . . . . . . . . . . . . . . . . . . 72
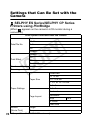
Settings that Can Be Set with the Camera. . . . . . . . . . . . . . . . .74
SELPHY ES Series/SELPHY CP Series Printers
using PictBridge . . . . . . . . . . . . . . . . . . . . . . . . . . . . . . 74
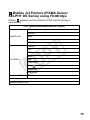
Bubble Jet Printers (PIXMA Series/SELPHY DS Series)
using PictBridge. . . . . . . . . . . . . . . . . . . . . . . . . . . . . . . 75
SELPHY CP Series Printers using Canon Direct Print
Bubble Jet Printers using Bubble Jet Direct . . . . . . . 77
Y
P
O
C
Conventions Used in this Guide
Indicates precautions and restrictions for correct camera
operation.
Indicates additional topics that complement the basic operating
procedures.
* The button in this guide referred to as the FUNC./SET button
may be indicated as the SET button depending on the
camera model.
5
Direct Print
Allows for Printing without the Use of a Computer
Connect your camera to the printer with the appropriate cable.
Image selection and printing is operated from the camera.
Y
P
O
C
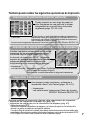
Various Printing Operations Can Be Performed*
Prints to cover the entire
surface of the paper.
Or, prints with a border.
02/02/2008
Add the date.
Specify which portion of
the image to print.
(Trimming)
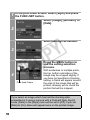
Multiple pictures can be printed at once. (DPOF print setting)
* Some settings may not be selectable for Non-Canon printers.
6
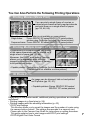
You Can Also Perform the Following Printing Operations
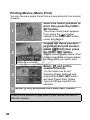
Printing Movies (Movie Print)
You can print a single frame of movies or
extract movie frames at fairly regular intervals
and print them on a single sheet of paper
(pp. 25, 46, 64).
• Capable printers (This function is not available on some printers.)
Single-frame:
Canon SELPHY ES series/SELPHY CP series printers,
printers using PictBridge (Including non-Canon printers)
Sequence-frame: Canon SELPHY ES series/SELPHY CP series printers
Y
P
O
C
Printing Multiple Images on a Sheet of Paper
Compositions of multiple images you specify
of the same dimensions can be printed on a
single sheet of paper (pp. 21, 44).
Moreover, the DPOF print setting* function
allows you to separately print different
images by specifying the number of frames
to be printed per image.
• Capable printers: Printers using PictBridge (Including non-Canon printers)
(This function is not available on some printers.)
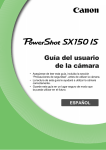
ID Photo Print
An image can be trimmed, laid out and printed
as ID photos (pp. 22, 61).
• Capable printers:Canon SELPHY ES series/
SELPHY CP series printers
Depending on the printer model, additional printing operations are available
as follows:
• Printing images in a fixed size (p. 24)
• Printing images with the shooting information (p. 43)
* DPOF print settings
This function allows you to preset the images and the number of copies using
the camera button controls. The settings are recorded to a memory card.
Please refer to the Camera User Guide for instructions on setting procedure.
This guide explains how to print images with DPOF print settings.
DPOF=Digital Print Order Format
7
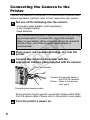
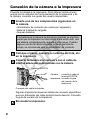
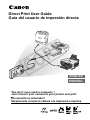
Connecting the Camera to the
Printer
Connect the camera to the printer. For instructions on printer and
camera operation methods, refer to their respective user guides.
Set one of the following into the camera.
• Compact power adapter (sold separately)
• Fully charged battery
• New batteries
If the camera battery power is depleted while printing, printing
may be interrupted. To prevent this, use a fully charged
battery or new battery. When using the camera for extended
periods of time, use of the compact power adapter is
recommended.
Y
P
O
C
Place paper, ink cassette/cartridge, etc. into the
printer.
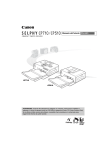
Connect the camera to the printer with the
appropriate interface cable supplied with the camera.
DIGITAL terminal
Camera: Connect the cable to
the DIGITAL terminal.
Printer: Refer to the printer’s
user guide.
Connecting the interface cable
Some printers require specific connection cables which differ
from the above cable. Please refer to the printer’s user guide.
Turn the printer’s power on.
8
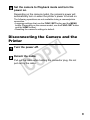
Set the camera to Playback mode and turn the
power on.
Depending on the camera model, the camera’s power will
automatically turn on when the printer’s power is turned on.
The following operations are not available during a camera/printer
connection.
• Language settings that use the FUNC./SET button and the MENU
button (Depending on the camera model, use the FUNC./SET button
and the JUMP button).
• Resetting the camera’s settings to default.
Disconnecting the Camera and the
Printer
Y
P
O
C
Turn the power off.
Detach the cable.
Pull out the cable while holding the connector plug. Do not
pull out by the cable.
9
Printing with SELPHY ES Series/
SELPHY CP SeriesPrinters using
PictBridge
Printing
Easy Print
You can print images by pressing only one button after connecting
the camera to the printer.
1
2
10
Make sure that
displays in
the upper left corner of the
LCD monitor.
Y
P
O
C
Display the images you wish to print and press the
button.
If you wish to change the print settings, see Print after
Changing the Print Settings (p. 11).
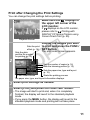
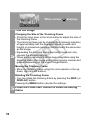
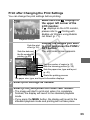
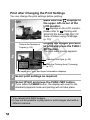
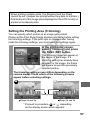
Print after Changing the Print Settings
You can change the print settings before printing.
Make sure that
displays in
the upper left corner of the
LCD monitor.
If
displays on the LCD monitor,
please refer to
Printing with
SELPHY CP Series Printers using
Canon Direct Print (p. 53).
1
Playback Screen
Y
P
O
C
Sets the print
effect (p. 14)
Sets the date
and the file number
for printing (p. 13)
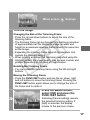
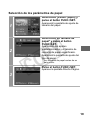
2
Display the images you wish
to print and press the FUNC./
SET button.
The print order screen appears.
Sets the number of copies (p. 14)
Sets the trimming portion (p. 15)
Sets the paper size, type and layout
(p. 19)
Starts the printing process
Print Order Screen
The paper size, type, and layout information displays.
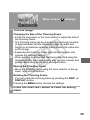
3
Select print settings as needed.
Select [Print] and press the FUNC./SET button.
4
• The image will start to print and, when it is completely
finished, the display will revert to the standard playback
mode.
• If you press the MENU button, the display will revert to the
standard playback mode and printing will not take place.
11
• You cannot print RAW images.
• It may not be possible to play back or print images shot with a
different camera.
• You may not be able to print if the memory card holds a large
number of images (about 1000).
Cancel Printing
• To cancel printing between images, press the FUNC./SET
button.
A confirmation dialog will display. Select [OK] and press the
FUNC./SET button. The printer will stop printing the current
image and eject the paper.
Printing Errors
• An error message appears if an error occurs for some reason
during the printing process. When the error is resolved, printing
will automatically resume. If printing does not resume, select
[Continue] and press the FUNC./SET button. If [Continue]
cannot be selected, select [Stop], press the FUNC./SET button
and restart the print job. See List of Messages (p. 31) for
details.
Y
P
O
C
12
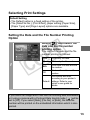
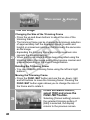
Selecting Print Settings
Default Setting
• The Default option is a fixed setting of the printer.
• The [Date/File No.], [Print Effect], paper setting [Paper Size],
[Paper Type] and [Page Layout] options are available.
Setting the Date and the File Number Printing
Option
Select [ ], then select the
date and the file number
printing option.
Y
P
O
C
You can set the date and the file
number printing as follows:
Date
Prints only the date.
File No. Prints only the file number.
1
Both
Prints both the date and the
file number.
Off
Prints neither date nor file
number.
Print effects will differ
according to your printer’s
Default settings. Refer to your
printer’s user guide for
details.
If you select an image which has had the shooting date embedded
in it using a camera with a Postcard Date Imprint mode, [ ] will be
set to [Off]. If you select [Date], [File No.] or [Both], the date/file
number will be printed on the embedded information which is also
printed.
13
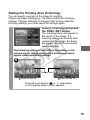
Setting the Print Effect
This function uses the camera’s shooting information to optimize
the image data, yielding high quality prints. You can select the
following print effects.
Default
Print effects will differ according to your printer’s settings. Refer
to your printer’s user guide for details.
On
Uses the camera’s shooting information to deliver optimum
prints.
Off
Prints without any effects.
Red-Eye1 Prints with red-eye corrected.
Y
P
O
C
Select [ ] and choose a
print effect option.
1
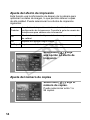
Setting the Number of Copies
Select [ ] and set the
number of prints.
1
14
1 to 99 copies can be set.
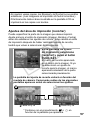
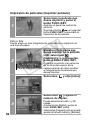
Setting the Printing Area (Trimming)
You can specify a portion of the image for printing.
Please set [Paper Settings] (p. 19) before setting the trimming
settings. If [Paper Settings] is changed after having made the
trimming settings, you must select the settings again.
Select [Trimming] and press
the FUNC./SET button.
The trimming frame will appear at
the center of the image. If a
trimming setting has already been
selected for the image, the frame
will appear around the previously
selected portion.
1
Y
P
O
C
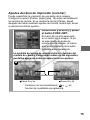
The trimming setting screen differs depending on the
camera model. Check which of the following screens
appear before selecting settings.
a
b
Trimming Frame
Steps 2a and 3a
Steps 2b and 3b
* Proceed to procedure a or b depending
on the display screen which appears.
15
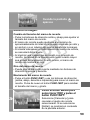
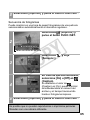
When screen a displays
Trim the image.
2a
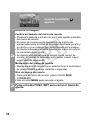
Changing the Size of the Trimming Frame
• Press the zoom lever or the zoom button to adjust the size of
the trimming frame.
• The trimming frame can be changed to a minimum selection
of approximately half the displayed image (in width and
height) or a maximum selection that is virtually the same size
as the image.
• Expanding the trimming frame beyond its maximum size
cancels the trimming setting.
• When printing an image that has been magnified using the
trimming option, the image quality may become coarser and
grainier depending on the level of magnification.
Y
P
O
C
Moving the Trimming Frame
• Move the trimming frame using the omni selector or the up,
down, right and left buttons.
Rotating the Trimming Frame
• You can rotate the trimming frame by pressing the DISP. (or
DISPLAY) button.
Pressing the MENU button cancels the settings.
the FUNC./SET button to close the setting
3a Press
menu.
16
When screen b displays
Trim the image.
2b
Changing the Size of the Trimming Frame
• Press the up and down buttons to adjust the size of the
trimming frame.
• The trimming frame can be changed to a minimum selection
of approximately half the displayed image (in width and
height) or a maximum selection that is virtually the same size
as the image.
• Expanding the trimming frame beyond its maximum size
cancels the trimming setting.
• When printing an image that has been magnified using the
trimming option, the image quality may become coarser and
grainier depending on the level of magnification.
Y
P
O
C
Rotating the Trimming Frame
• You can rotate the trimming frame using the left and right
buttons.
Moving the Trimming Frame
• Press the FUNC./SET button and use the up, down, right
and left buttons to move the trimming frame. Pressing the
FUNC./SET button again allows you to change the size of
the frame and to rotate it.
3b
Press the MENU button,
select [OK] and press the
FUNC./SET button.
Selecting [Cancel setting] cancels
the selected trimming setting. If
[Edit] is selected, the display
returns to the previous screen.
17
• The trimming setting only applies to one image.
• The trimming setting is canceled with the following operations.
• When you set the trimming settings for another image.
• When you close the Print mode (when you turn the camera
power off, change the camera mode, or detach the
connection cable).
• All or part of the shooting date which has been embedded in
images using a camera with the Postcard Date Imprint mode
may not be printed properly depending on the trimming setting.
• Images smaller than 640 × 480 pixels cannot be trimmed.
Y
P
O
C
• The paper size and page layout settings determine the shape of
the trimming frame.
• Please use the LCD monitor to set the trimming settings. The
trimming frame may not display correctly on a TV screen.
18
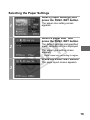
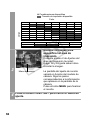
Selecting the Paper Settings
Select [Paper Settings] and
press the FUNC./SET button.
1
The paper size setting screen
appears.
Select a paper size* and
press the FUNC./SET button.
2
Y
P
O
C
The default settings and specified
paper cassette size are displayed.
The paper type setting screen
appears.
* Paper sizes vary according to region.
Press the FUNC./SET button.
The page layout screen appears.
3
19
Select a layout.
The following layout can be
selected.
4
Default
Print effects will differ
according to your printer’s
settings. Refer to your
printer’s user guide for
details.
Bordered
Prints with a border.
Borderless Prints right to the edges
of the paper.
Y
P
O
C
N-up
Prints 2, 4 or 8 images on
a single sheet of paper
(p. 21).
ID Photo
Specifies the print size
and print portion of an
image as an ID photo
(p. 22).
Fixed Size* Prints by specifying the
print size of the image on
a sheet of paper (p. 24).
* A layout cannot be selected when
printing on card size paper.
20
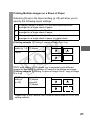
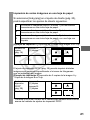
Printing Multiple Images on a Sheet of Paper
Selecting [N-up] in the layout setting (p. 20) will allow you to
specify the following layout settings.
2
2 images (height 2 x width 1) of the same dimensions are
arranged on a single sheet of paper.
4
4 images (height 2 x width 2) of the same dimensions are
arranged on a single sheet of paper.
8
8 images (height 4 x width 2) of the same dimensions are
arranged on a single sheet of paper or a label sheet.
[Printing example 1] Printing 3 copies of image A in 2-up
Y
P
O
C
Number of
Image A:
copies (p. 14) [3] copies
Layout
2
DPOF print setting (p. 28) allows you to separately print different
images by specifying the number of frames to be printed per image.
[Printing example 2] Printing 2 copies of image A and 1 copy of image
B in 4-up
DPOF print
settings*
(p. 28)
Image A:
[2] copies
Image B:
[1] copies
Layout
4
* Please refer to the Camera User Guide for instructions on DPOF print
setting method.
21
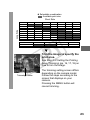
Printing by Specifying the Print Size (ID Photo Print)
Selecting [ID Photo] in the layout setting (p. 20) will allow you
to specify the print size and print portion of an image as an ID
photo*.
* Images printed with the ID Photo Print function may not be allowed
as a formal certificate photo. Refer to the party (organization) or
administration requiring the photo.
The print size can be specified for only L (Large) resolution
images in the camera connected to the printer.
Y
P
O
C
Select [ID Photo], then press
the FUNC./SET button.
T
Specify the print size by
selecting the length of the
long side and the short side,
then press the FUNC./SET
button.
Specify the size by selecting the
length of the long side first, then
the short side. See the next table
for selectable combinations of the
long side length and the short side
length.
22
z Selectable combination
: Available print size
Short Side
Long Side
20 mm
25 mm
30 mm
35 mm
40 mm
45 mm
50 mm
25 mm
30 mm
35 mm
40 mm
45 mm
50 mm
55 mm
60 mm
70 mm
1.4 inch
1.8 inch
2.0 inch
1.5 inch
1.8 inch
Y
P
O
C
2.0 inch
T
Trim the image to specify the
print area.
See Step 2 of Setting the Printing
Area (Trimming) (pp. 16, 17, 18) on
how to trim the image.
Trimming Frame
The trimming setting screen differs
depending on the camera model.
Follow the steps according to the
screen that displays on your
camera.
Pressing the MENU button will
cancel trimming.
23
Printing Images in the Fixed Size
Selecting [Fixed Size] in the layout setting (p. 20) will allow
you to print by specifying the print size of the image on a
sheet of paper.
Select the fixed print size
required.
Depending on the paper size, you
can select print sizes as follows:
Paper size
5
24
Print size
Y
P
O
C
Credit Card
You cannot select
the print size.
9 × 13 cm
(L size)
89 mm × 55 mm
Default
10 × 14.8 cm
(Postcard size)
7 cm × 10 cm
Default
4 in. × 8 in./
10 × 20 cm
(Wide size)
4 in. × 6 in.
7 cm × 10 cm
Default
Select a layout and press the FUNC./SET button.
This ends the paper settings operations.
The display returns to the print order screen.
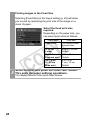
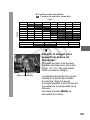
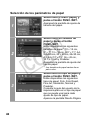
Printing Movies (Movie Print)
Select the movie you want to
print, then press the FUNC./
SET button.
1
The movie control panel appears.
If you press the
button
instead of the FUNC./SET button,
movie print begins.
Single-frame
Y
P
O
C
You can choose a single frame from a movie and print it on a sheet
of paper.
2
Display the frame you wish
to print on the LCD monitor,
select
(Print), then press
the FUNC./SET button.
Movie Control Panel
Refer to Viewing Movies section of
the Camera User Guide on how to
display the movie frame you wish
to print.
Select
[Single].
and choose
3
Select
and set the
number of prints.
4
1 to 99 copies can be set.
Selecting [Paper Settings] and
pressing the FUNC./SET button
will allow [Paper Size], [Paper
Type] and [Page Layout] to be
selected.
25
5
Select [Print] and press the FUNC./SET button.
Sequence-frame
You can print movie frames selected automatically at fairly regular
intervals on a sheet of paper.
Select
(Print) and press
the FUNC./SET button.
2
Y
P
O
C
Movie Control Panel
Select
and choose
[Sequence].
3
If necessary, select [On],
[Off] or [Default] in
(Caption).
4
5
26
If you set
(Caption) to [On], you
can print the file number and the
elapsed time of the frame at the
same time.
Selecting [Paper Settings] and
pressing the FUNC./SET button
will allow [Paper Size] or [Paper
Type] to be selected.
Select [Print] and press the FUNC./SET button.
It may not be possible to play back or print movies shot with a
different camera.
• The number of printed movie frames per sheet of paper with
[Sequence] is determined by the paper size shown as follows:
(Depending on the number of seconds in the movie, there are
cases when the number of frames indicated below will not be
printed.)
• Card size: 20 frames
• L size: 42 frames
• Postcard size: 63 frames
• Wide size: 84 frames
Y
P
O
C
27
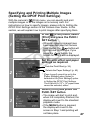
Specifying and Printing Multiple Images
(Setting the DPOF Print Settings)
With the camera’s
(Print) menu, you can specify and print
multiple images or all the images on a memory card. For
instructions on how to specify images, please refer to Setting the
DPOF Print Settings section of the Camera User Guide. In this
section, we will explain how to print images after specifying them.
In the
(Print) menu, select
[Print] and press the FUNC./
SET button.
1
• When an image or images have
been specified (see the Camera
User Guide), the
button will
light up blue. At this time, if you
press the
button, the
screen for Step 2 will be displayed.
Y
P
O
C
Set the print effect and paper
settings as required.
Sets the Print Effect (p. 14)
2
Selects the Paper Settings* (p. 19)
* [Page Layout] cannot be set in the
[Paper Settings] when [Index] is
selected in the [Print Settings] option
in Setting the DPOF Print Settings.
Select [Print] and press the
FUNC./SET button.
3
28
• The image will start to print and,
when it is completely finished, the
display will revert to the standard
playback mode.
• If the MENU button is pressed,
the display will revert to the
screen in Step 1 and printing will
not take place.
• To print the date, set the [Date] setting in [Print Settings] on the
screen in Setting the DPOF Print Settings to [On]. You cannot
set the date to print in Step 2.
• When the print type is set to [Index], the [Date] and [File No.]
cannot be printed at the same time.
• The ID photo print function cannot be used.
• You cannot print movies.
• The maximum number of images printed on one page in the
Index print type depends on the selected paper size.
• Card size: 20 images
• L size: 42 images
• Postcard size: 63 images
• Wide size: 84 images
Y
P
O
C
29
Cancel Printing
• To cancel printing between images printed, press the FUNC./
SET button. A confirmation dialog appears. Select [OK] and
press the FUNC./SET button. The printer will stop printing the
current image and eject the paper.
Restarting Printing
• Select [Resume] and press the FUNC./SET button. The
remaining images can be printed.
• Printing cannot be restarted under the following circumstances.
• If the print settings have been changed before restarting.
• If the image for which the print settings were set has been
deleted before restarting.
• If there is very little free space on the memory card when
printing is canceled, it may not be possible to restart printing.
• If printing is canceled because the camera battery is depleted, it
may not be possible to restart printing.
(Replace with a fully charged battery pack or new batteries,
then turn the camera power on again. If you intend to use an
extended period of time, you are recommended to power the
camera with a compact power adapter (sold separately).)
Printing Errors
• An error message appears if an error occurs for some reason
during the printing process. When the error is resolved, printing
will automatically resume. If printing does not resume, select
[Continue] and press the FUNC./SET button. If [Continue]
cannot be selected, select [Stop], press the FUNC./SET button
and restart the print job. See List of Messages (p. 31) for
details.
Y
P
O
C
30
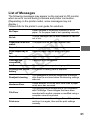
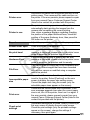
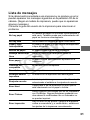
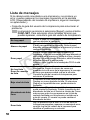
List of Messages
The following messages may appear on the camera’s LCD monitor
when an error occurs during a camera and printer connection.
(Depending on the printer model, some messages may not
display.)
Please refer to the printer’s user guide for solutions.
No Paper
Paper cassette is incorrectly inserted or out of
paper. Or the paper feed is not operating correctly.
No Ink
The ink cartridge has not been inserted or has run
out of ink.
Paper and ink do not
match
The paper and ink are from different sets.
Paper Jam
The paper jammed during printing.
Print output tray is
full
Paper Error
Cartridge not
compatible
Ink Error
Y
P
O
C
Recharge the printer
battery
Remove paper from the print output tray.
The paper is not correctly set in the printer.
Cartridge is not compatible.
The ink cassette is experiencing a problem.
The printer’s battery pack is depleted.
Readjust trimming
You attempted to print the image with a different
style than the one used when the trimming settings
were set.
Hardware Error
Check whether or not an error other than a paper
or ink error has occurred.
File Error
You tried to print an image that is not compatible
with PictBridge. Some images that have been
recorded with another camera or modified using a
computer cannot be printed.
Print error
There is an error in the settings. Turn off the printer
and turn it on again, then set the print settings
correctly.
31
Printing with Bubble Jet Printers
(PIXMA Series/SELPHY DS Series)
using PictBridge
Printing
Easy Print
You can print images by pressing only one button after connecting
the camera to the printer.
1
2
32
Make sure that
displays in
the upper left corner of the
LCD monitor.
Y
P
O
C
Display the images you wish to print and press the
button.
If you wish to change the print settings, see Print after
Changing the Print Settings (p. 33).
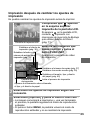
Print after Changing the Print Settings
You can change the print settings before printing.
Make sure that
displays in
the upper left corner of the
LCD monitor.
1
If
displays on the LCD monitor,
please refer to
Printing with
Bubble Jet Printers using Bubble
Jet Direct (p. 71).
Playback Screen
Y
P
O
C
Sets the print
effect (p. 36)
Sets the date and
the file number for
printing (p. 35)
2
Display the images you wish
to print and press the FUNC./
SET button.
The print order screen appears.
Sets the number of copies (p. 37)
Sets the trimming portion (p. 38)
Sets the paper size, type and layout
(p. 42)
Starts the printing process
Print Order Screen
The paper size, type, and layout information displays.
3
Select print settings as needed.
Select [Print] and press the FUNC./SET button.
4
• The image will start to print and, when it is completely
finished, the display will revert to the standard playback
mode.
• If you press the MENU button, the display will revert to the
standard playback mode and printing will not take place.
33
• You cannot print RAW images.
• It may not be possible to play back or print images shot with a
different camera.
• You may not be able to print if the memory card holds a large
number of images (about 1000).
Cancel Printing
• To cancel printing between images, press the FUNC./SET
button.
A confirmation dialog will display. Select [OK] and press the
FUNC./SET button. The printer will stop printing the current
image and eject the paper.
Printing Errors
• An error message appears if an error occurs for some reason
during the printing process. When the error is resolved, printing
will automatically resume. If printing does not resume, select
[Continue] and press the FUNC./SET button. If [Continue]
cannot be selected, select [Stop], press the FUNC./SET button
and restart the print job. See List of Messages (p. 50) for
details.
• On printers equipped with an operation panel, an error number
or message displays on the panel. Please refer to the printer
user guide for the remedies corresponding to the error numbers
or messages.
Y
P
O
C
34
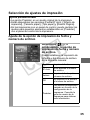
Selecting Print Settings
Default Setting
• The Default option is a fixed setting of the printer.
• The [Date/File No.], [Print Effect], paper setting [Paper Size],
[Paper Type] and [Page Layout] options are available.
• On printers equipped with an operation panel, you can change
the settings for those items set to [Default] using the printer's
operation panel.
Setting the Date and the File Number Printing Option
Y
P
O
C
Select [ ], then select the
date and the file number
printing option.
You can set the date and the file
number printing as follows:
1
Date
Prints the date.
File No.
Prints only the file number.
Both
Prints both the date and
the file number.
Off
Prints neither date nor file
number.
Default
Print effects will differ
according to your printer’s
settings. Refer to your
printer’s user guide for
details.
35
If you select an image which has had the shooting date
embedded in it using a camera with a Postcard Date Imprint
mode, [ ] will be set to [Off]. If you select [Date], [File No.] or
[Both], the date/file number will be printed on the embedded
information which is also printed.
Setting the Print Effect
This function uses the camera’s shooting information to optimize
the image data, yielding high quality prints. You can select the
following print effects. However, your desired printing results may
not be obtained depending on the image.
Y
P
O
C
Default
Print effects will differ according to your printer’s settings. Refer
to your printer’s user guide for details.
On
Uses the camera’s shooting information to deliver optimum
prints.
Off
Prints without any effects.
Vivid
Prints more vibrant colors, such as the green of trees or the
blue of the sea or sky, than the [On] option.
NR
Prints with a noise reduction effect.
Vivid+NR
Prints using both the [Vivid] and [NR] options.
Face
Brightly prints a person’s face that has become dark because of
backlighting, etc.
Red-Eye1 Prints with red-eye color corrected.
Red-Eye2 Prints using 3 setting; [Face], [Red-Eye1], and [NR]
Select [ ] and choose a
print effect option.
1
36
Setting the Number of Copies
Select [ ] and set the
number of prints.
1
1 to 99 copies can be set.
Y
P
O
C
37
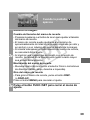
Setting the Printing Area (Trimming)
You can specify a portion of the image for printing.
Please set [Paper Settings] (p. 42) before setting the trimming
settings. If [Paper Settings] is changed after having made the
trimming settings, you must select the settings again.
Select [Trimming] and press
the FUNC./SET button.
The trimming frame will appear at
the center of the image. If a
trimming setting has already been
selected for the image, the frame
will appear around the previously
selected portion.
1
Y
P
O
C
The trimming setting screen differs depending on the
camera model. Check which of the following screens
appear before selecting settings.
a
b
Trimming Frame
Steps 2a and 3a
Steps 2b and 3b
* Proceed to procedure a or b depending
on the display screen which appears.
38
When screen a displays
Trim the image.
2a
Changing the Size of the Trimming Frame
• Press the zoom lever or the zoom button to adjust the size of
the trimming frame.
• The trimming frame can be changed to a minimum selection
of approximately half the displayed image (in width and
height) or a maximum selection that is virtually the same size
as the image.
• Expanding the trimming frame beyond its maximum size
cancels the trimming setting.
• When printing an image that has been magnified using the
trimming option, the image quality may become coarser and
grainier depending on the level of magnification.
Y
P
O
C
Moving the Trimming Frame
• Move the trimming frame using the omni selector or the up,
down, right and left buttons.
Rotating the Trimming Frame
• You can rotate the trimming frame by pressing the DISP. (or
DISPLAY) button.
Pressing the MENU button cancels the settings.
the FUNC./SET button to close the setting
3a Press
menu.
39
When screen b displays
Trim the image.
2b
Changing the Size of the Trimming Frame
• Press the up and down buttons to adjust the size of the
trimming frame.
• The trimming frame can be changed to a minimum selection
of approximately half the displayed image (in width and
height) or a maximum selection that is virtually the same size
as the image.
• Expanding the trimming frame beyond its maximum size
cancels the trimming setting.
• When printing an image that has been magnified using the
trimming option, the image quality may become coarser and
grainier depending on the level of magnification.
Y
P
O
C
Rotating the Trimming Frame
• You can rotate the trimming frame using the left and right
buttons.
Moving the Trimming Frame
• Press the FUNC./SET button and use the up, down, right
and left buttons to move the trimming frame. Pressing the
FUNC./SET button again allows you to change the size of
the frame and to rotate it.
3b
40
Press the MENU button,
select [OK] and press the
FUNC./SET button.
Selecting [Cancel setting] cancels
the selected trimming setting. If
[Edit] is selected, the display
returns to the previous screen.
• The trimming setting only applies to one image.
• The trimming setting is canceled with the following operations.
• When you set the trimming settings for another image.
• When you close the Print mode (when you turn the camera
power off, change the camera mode, or detach the
connection cable).
• All or part of the shooting date which has been embedded in
images using a camera with the Postcard Date Imprint mode
may not be printed properly depending on the trimming setting.
• Images smaller than 640 × 480 pixels cannot be trimmed.
Y
P
O
C
• The paper size and page layout settings determine the shape of
the trimming frame.
• Please use the LCD monitor to set the trimming settings. The
trimming frame may not display correctly on a TV screen.
41
Selecting the Paper Settings
Select [Paper Settings] and
press the FUNC./SET button.
1
The paper size setting screen
appears.
Select a paper size and press
the FUNC./SET button.
2
Y
P
O
C
The following paper sizes* are
available: 4" × 6", 5" × 7",
13 × 18 cm, 8.5" × 11", A4,
CreditCard, 8" × 10", 10" × 12", A3,
A3+/13" × 19", 14" × 17", 4" × 7.1"
and Default.
The paper type setting screen
appears.
* Paper sizes vary according to region.
Select a paper type and
press the FUNC./SET button.
3
42
The following paper types are
available: Photo, Fast Photo, Fine
Art, Semi-gloss, Plain and Default.
Please refer to the printer user
guide for the kind of paper that may
be used for each paper type
setting.
The Page Layout screen appears.
Select a layout.
The following layout can be
selected.
Default
4
Print effects will differ
according to your
printer’s settings. Refer
to your printer’s user
guide for details.
Bordered
Prints with a border.
Borderless Prints right to the edges
of the paper.
N-up
Prints 2, 4, 9 or 16
images on a single sheet
of paper (p. 44)
Prints the shooting
Bordered
information* onto a blank
sheet of paper (size L or
larger).
Prints DPOF print set
20-up
images in sets of 20
images onto A4 size
paper. The shooting
information will be printed
next to the image.
Images with DPOF print
35-up
settings are printed at a
size that will fit 35 images
per A4 size paper, laid out
like a contact sheet.
Y
P
O
C
* Prints the camera name, shooting
mode, shutter speed, aperture value,
exposure compensation, ISO speed,
etc., from the Exif information.
43
Printing Multiple Images on a Sheet of Paper
• Selecting [4" x 6"] in the paper size setting (p. 42) will allow
you to specify the following layout settings.
2
2 images (height 2 x width 1) of the same dimensions are
arranged on a single sheet of paper.
4
4 images (height 2 x width 2) of the same dimensions are
arranged on a single sheet of paper.
9
9 images (height 3 x width 3) of the same dimensions are
arranged on a single sheet of paper.
16
16 images (height 4 x width 4) of the same dimensions are
arranged on a single sheet of paper.
Y
P
O
C
[Printing example 1] Printing 3 copies of image A in 2-up
Number of
Image A:
copies (p. 37) [3] copies
Layout
2
DPOF print setting (p. 47) allows you to separately print different
images by specifying the number of frames to be printed per image.
[Printing example 2] Printing 3 copies of image A and 2 copies of
image B in 9-up
DPOF print
settings*
(p. 47)
Image A:
[3] copies
Image B:
[2] copies
Layout
9
* Please refer to the Camera User Guide for instructions on DPOF print
setting methods.
44
5
Select a layout and press the FUNC./SET button.
This ends the paper settings operations.
The display returns to the print order screen.
• Images will print with borders, even if [Borderless] was selected
with the camera in the following cases:
•When [Plain] is selected in the camera's [Paper Type] (cannot be
selected depending on the connected printer model)
•With printers equipped with an operation panel, when [Plain] is selected
with the printer and [Default] is selected in the camera's [Paper Type].
Y
P
O
C
45
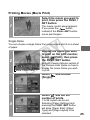
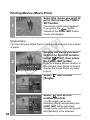
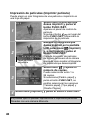
Printing Movies (Movie Print)
You can choose a single frame from a movie and print it on a sheet
of paper.
Select the movie you want to
print, then press the FUNC./
SET button.
1
2
The movie control panel appears.
If you press the
button
instead of the FUNC./SET button,
movie print begins.
Display the frame you wish
to print on the LCD monitor,
select
(Print), then press
the FUNC./SET button.
Y
P
O
C
Refer to Viewing Movies section of the
Camera User Guide on how to display
the movie frame you wish to print.
Movie Control Panel
Select
and set the
number of prints.
3
4
1 to 99 copies can be set.
Selecting [Paper Settings] and
pressing the FUNC./SET button
will allow [Paper Size], [Paper
Type] and [Page Layout] to be
selected.
Select [Print] and press the FUNC./SET button.
It may not be possible to play back or print movies shot with a
different camera.
46
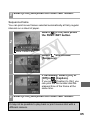
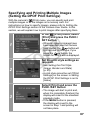
Specifying and Printing Multiple Images
(Setting the DPOF Print Settings)
With the camera’s
(Print) menu, you can specify and print
multiple images or all the images on a memory card. For
instructions on how to specify images, please refer to Setting the
DPOF Print Settings section of the Camera User Guide. In this
section, we will explain how to print images after specifying them.
In the
(Print) menu, select
[Print] and press the FUNC./
SET button.
1
• When an image or images have
been specified (see the Camera
User Guide), the
button will
light up blue. At this time, if you
press the
button, the
screen for Step 2 will be displayed.
Y
P
O
C
Set the print effect and paper
settings as required.
Sets the Print Effect (p. 36)
2
Selects the Paper Settings* (p. 42)
* [Page Layout] cannot be set in the
[Paper Settings] when [Index] is
selected in the [Print Settings] option
in Setting the DPOF Print Settings.
The A3 and A3+/13" × 19" paper sizes
cannot be selected, either.
Select [Print] and press the
FUNC./SET button.
3
• The image will start to print and,
when it is completely finished, the
display will revert to the standard
playback mode.
• If the MENU button is pressed,
the display will revert to the
screen in Step 1 and printing will
not take place.
47
• To print the date, set the [Date] setting in [Print Settings] on the
screen in Setting the DPOF Print Settings to [On]. You cannot
set the date in Step 2.
• When the print type is set to [Index], both the [Date] and [File
No.] cannot be printed depending on the printer.
• Depending on the printer, the [File No.] cannot be printed when
the print type is set to [Standard].
• You cannot print movies.
Y
P
O
C
48
Cancel Printing
• Press the FUNC./SET button to cancel while printing. A
confirmation dialog appears. Select [OK] and press the FUNC./
SET button. The printer will stop printing the current image and
eject the paper.
Restarting Printing
• Select [Resume] and press the FUNC./SET button. The
remaining images can be printed.
• Printing cannot be restarted under the following circumstances.
• If the print settings have been changed before restarting.
• If the image for which the print settings were set has been
deleted before restarting.
• If there is very little free space on the memory card when
printing is canceled, it may not be possible to restart printing.
• If printing is canceled because the camera battery is depleted, it
may not be possible to restart printing.
(Replace with a fully charged battery pack or new batteries,
then turn the camera power on again. If you intend to use an
extended period of time, you are recommended to power the
camera with a compact power adapter (sold separately).)
Printing Errors
• An error message appears if an error occurs for some reason
during the printing process. When the error is resolved, printing
will automatically resume. If printing does not resume, select
[Continue] and press the FUNC./SET button. If [Continue]
cannot be selected, select [Stop], press the FUNC./SET button
and restart the print job. See List of Messages (p. 50) for
details.
• On printers equipped with an operation panel, an error number
or message displays on the panel. Please refer to the printer
user guide for the remedies corresponding to the error numbers
or messages.
Y
P
O
C
49
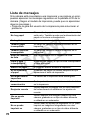
List of Messages
The following messages may appear on the camera LCD monitor if
an error occurs during a camera and printer connection.
(Depending on the printer, some messages may not appear.)
• Please refer to the printer’s user guide for the appropriate
remedies.
: Printing restarts if you select [Continue] and press the
FUNC./SET button. For the remedies to other messages
that might appear, refer to your printer’s user guide.
No Paper
Set paper in the printer, then execute printing again.
Paper Jam
The paper jammed during printing. Select [Stop] to
cancel printing. Remove the jammed paper, reset
some other paper in the printer, then print again.
Paper Error
50
Y
P
O
C
Either the paper is not set correctly in the printer, or
paper that differs from the setting has been set in the
printer. Confirm the type and size of paper being used.
Also open the paper output tray if it is closed.
In addition, close the CD-R tray guide when it is open.
No Ink
Ink Cassete Error
The ink tank has run out of ink or there is no ink tank in
the printer. The number of times that the printer’s error
lamp blinks, and the error message displayed, will
indicate the appropriate remedy for the error. Please
refer to the printer’s user guide for the remedy.
Low ink level
The ink tank needs to be replaced soon. Prepare a
new ink tank. If you select [Continue] in the error
screen, you can restart printing.
Ink absorber full
You can restart printing if you select [Continue] in the
error screen. Please request replacement of the ink
absorber from your nearest Canon Customer Support
center listed in the contact list provided with the printer
or in the user guide. The ink absorber cannot be
replaced by the user.
Ink Error
There is a problem with the ink. If the printer’s error
lamp is blinking and an error message is displayed,
please refer to the printer’s user guide to ascertain the
problem and its remedy.
Printer error
Disconnect the cable from the printer and turn off the
printer power. Then reconnect the cable and turn on
the printer. If the error persists, please request a repair
from your nearest Canon Customer Support Center
(listed in the contact list provided with the printer).
Printer in use
The printer is warming up or in use. The printer
automatically starts printing the images from the
camera after completing the current printing.
Also, when a message displays regarding checking
the position of the paper thickness lever, check the
position of the paper thickness lever, then press the
OK button on the printer.
Paper lever error
Adjust the paper thickness lever to the proper position.
Printer cover open
No print head
Hardware Error
File Error
Y
P
O
C
Close the printer cover securely.
If the printer’s error lamp is blinking and an error
message is displayed, please refer to the printer’s user
guide to ascertain the problem and its remedy.
If the printer’s error lamp is blinking and an error
message is displayed, please refer to the printer’s user
guide to ascertain the problem and its remedy.
You tried to print an image that is not compatible with
PictBridge. Some images that have been recorded
with another camera or modified using a computer
cannot be printed.
Incompatible paper
size
Paper of a different size than the specified paper size
is set to the printer. Select [Continue] on the error
screen to display the paper size setting screen.
Correct the paper size using the screen (only the
selectable paper sizes appear on the screen).
Print error
Check that the correct paper size is selected. If this
error message appears even when the correct paper
size is set, turn off the printer, then turn it on again. If
the error persists, please request a repair from your
nearest Canon Customer Support Center (listed in the
contact list provided with the printer).
Check print
settings
Unprintable settings are included. Select [Continue] on
the error screen to display the print order screen.
Check the print settings (only the printable settings
appear on the screen), change the settings if
necessary, then print again.
51
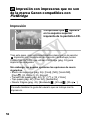
Printing with Non-Canon,
PictBridge Compliant Printers
Printing
1
Make sure that
displays in
the upper left corner of the
LCD monitor.
Y
P
O
C
After this step, follow the procedures in the section
Printing with
Bubble Jet Printers (PIXMA Series/SELPHY DS Series) using
PictBridge (p. 32) to print your images.
However, the following menu options cannot be set.
• Print Effect (p. 36): [Vivid], [NR], [Vivid+NR], [Face ], [RedEye1], [Red-Eye2]
• Paper Size (p. 42): [5" × 7"] or [13 ×18cm]
• Paper Type (p. 42): [Fine Art], [Semi-gloss]
• Page Layout (p. 43):[Bordered ], [20-up ], [35-up ]
Please also refer to the user guide that came with your printer.
52
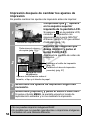
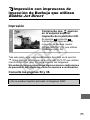
Printing with SELPHY CP Series
Printers using Canon Direct Print
If you use Canon Compact Photo Printer
SELPHY CP750/CP740/CP730/CP720/CP710/
CP510
In the following cases, select
from [Print Method] in the
camera’s [Set up] menu:
• When printing (wide) size images shot using a Canon digital
camera onto wide-size paper.
• When printing images of human subjects after red-eye
correction.
After this, see Printing with SELPHY ES Series/SELPHY CP
Series Printers using PictBridge (p. 10).
Printing
Easy Print
Y
P
O
C
You can print images by pressing only one button after connecting
the camera to the printer.
1
2
Make sure that
displays in
the upper left corner of the
LCD monitor.
Display the images you wish to print and press the
button.
If you wish to change the print settings, see Print after
Changing the Print Settings (p. 54).
53
Print after Changing the Print Settings
You can change the print settings before printing.
Make sure that
displays in
the upper left corner of the
LCD monitor.
1
Playback Screen
If
displays on the LCD monitor,
please refer to
Printing with
SELPHY ES Series/SELPHY CP
Series Printers using PictBridge
(p. 10).
Display the images you wish
to print and press the FUNC./
SET button.
Y
P
O
C
Selects the Number of
Copies (p. 55)
The print order screen appears.
2
Sets the Print Style (p. 55)
Sets the Printing Area (Trimming)
(p. 57)
Print Order Screen
The paper size, type, and layout information displays.
3
4
Select print settings as required.
Select [Print] and press the FUNC./SET button.
If you press the MENU button, the display will revert to the
standard playback mode and printing will not take place.
• You cannot print RAW images.
• It may not be possible to play back or print images shot with a
different camera.
54
Cancel Printing
• You cannot stop printing when printing only one copy of an
image. If you are printing more than one copy or more than one
image, you can cancel the rest of the printing by pressing the
FUNC./SET button. Once the current print is finished, a
confirmation dialog appears. Select [OK] and press the FUNC./
SET button.
Printing Errors
• An error message appears if an error occurs for some reason
during the printing process. Select [Stop] or [Resume] and
press the FUNC./SET button. See List of Messages (p. 70) for
details.
The [Resume] option may not appear with some types of errors.
In that case, select [Stop].
Y
P
O
C
Selecting Print Settings
Setting the Number of Copies
1
Select [
] and set the number of prints.
1 to 99 copies can be set.
Setting the Print Style (Image, Borders and Date)
Image
Borders
Date
Standard
Prints one image per page.
Multiple*1
Prints eight copies of the same
image on one page.
ID Photo*2
Prints a specified print size (p. 61).
Borderless
Prints right to the edges of the paper.
Bordered
Prints with a border.
On
Adds the date to the print.
Off
Prints without the date.
*1 This option can only be selected when printing on card size paper.
*2 This option can be selected when printing large size images.
55
1
In the print order screen, select [Style] and press
the FUNC./SET button.
Select [Image], [Borders], or
[Date].
2
Select settings as needed.
3
Y
P
O
C
Press the MENU button to
end the setting selection
process.
4
Print Area Frame
With borderless or multiple prints,
the top, bottom and sides of the
image may be cropped slightly. If
you have not specified a trimming
setting, a frame will appear around
the area of the image that will be
printed, allowing you to check the
portion that will be cropped.
If you select an image which has had the shooting date
embedded in it using a camera with a Postcard Date Imprint
mode, [Date] in the [Style] menu will be set to [Off]. If you set
[Date] to [On], dates will appear twice on the printed image.
56
• When printing multiple prints, the [Borders] and the [Date]
cannot be set. (Images are printed without any date or borders.)
• Practically all of the image area displayed on the LCD monitor is
printed on bordered prints.
Setting the Printing Area (Trimming)
You can specify which portion of an image gets printed.
Please set the Print Style (Image, Borders and Date) before setting
the trimming settings. If the print style is changed after having
made the trimming settings, you must select the settings again.
Y
P
O
C
In the print order screen,
select [Trimming] and press
the FUNC./SET button.
The trimming frame will appear at
the center of the image. If a
trimming setting has already been
selected for the image, the frame
will appear around the previously
selected portion.
1
The trimming setting screen differs depending on the
camera model. Check which of the following screens
appear before selecting settings.
a
b
Trimming Frame
Steps 2a and 3a
Steps 2b and 3b
* Proceed to procedure a or b depending
on the display screen which appears.
57
When screen a displays
Trim the image.
2a
Changing the Size of the Trimming Frame
• Press the zoom lever or the zoom button to adjust the size of
the trimming frame.
• The trimming frame can be changed to a minimum selection
of approximately half the displayed image (in width and
height) or a maximum selection that is virtually the same size
as the image.
• Expanding the trimming frame beyond its maximum size
cancels the trimming setting.
• When printing an image that has been magnified using the
trimming option, the image quality may become coarser and
grainier depending on the level of magnification. If this
happens, the trimming frame displays in red.
Y
P
O
C
Moving the Trimming Frame
• Move the trimming frame using the omni selector or the up,
down, right and left buttons.
Rotating the Trimming Frame
• You can rotate the trimming frame by pressing the DISP. (or
DISPLAY) button.
Pressing the MENU button cancels the settings.
the FUNC./SET button to close the setting
3a Press
menu.
58
When screen b displays
Trim the image.
2b
Changing the Size of the Trimming Frame
• Press the up and down buttons to adjust the size of the
trimming frame.
• The trimming frame can be changed to a minimum selection
of approximately half the displayed image (in width and
height) or a maximum selection that is virtually the same size
as the image.
• Expanding the trimming frame beyond its maximum size
cancels the trimming setting.
• When printing an image that has been magnified using the
trimming option, the image quality may become coarser and
grainier depending on the level of magnification. If this
happens, the trimming frame displays in red.
Y
P
O
C
Rotating the Trimming Frame
• You can rotate the trimming frame using the left and right
buttons.
Moving the Trimming Frame
• Press the FUNC./SET button and use the up, down, right
and left buttons to move the trimming frame. Pressing the
FUNC./SET button again allows you to change the size of
the frame and to rotate it.
3b
Press the MENU button,
select [OK] and press the
FUNC./SET button.
Selecting [Cancel setting] cancels
the selected trimming setting. If
[Edit] is selected, the display
returns to the previous screen.
59
• The trimming setting only applies to one image.
• The trimming setting is canceled with the following operations.
• When you set the trimming settings for another image.
• When you close the Print mode (when you turn the camera
power off, change the camera mode, or detach the
connection cable).
• All or part of the shooting date which has been embedded in
images using a camera with the Postcard Date Imprint mode
may not be printed properly depending on the trimming setting.
• Images smaller than 640 × 480 pixels cannot be trimmed.
Y
P
O
C
• The selected image and border settings determine the shape of
the trimming frame.
• Please use the LCD monitor to set the trimming settings. The
trimming frame may not display correctly on a TV screen.
60
Printing by Specifying the Print Size (ID Photo
Print)
You can specify the print size and print a portion of an image as an
ID photo*.
* Images printed with the ID Photo Print function may not be allowed as a
formal certificate photo. Refer to the party (organization) or administration
requiring the photo.
The print size can be specified for only L (Large) resolution
images in the camera connected to the printer.
1
In the print order screen,
select [Style] and press the
FUNC./SET button.
Y
P
O
C
Select [Image], then select
[ID Photo]. Specify the print
size by selecting the length
of the long side and the short
side, then press the FUNC./
SET button.
2
Specify the size by selecting the
length of the long side first, then
the short side. See the next table
for selectable combinations of the
long side length and the short side
length.
Press the MENU button to exit
without making any trimming
settings.
61
z Selectable combination
: Available print size
Short Side
Long Side
20 mm
25 mm
30 mm
35 mm
40 mm
45 mm
50 mm
25 mm
30 mm
35 mm
40 mm
45 mm
50 mm
55 mm
60 mm
70 mm
1.4 inch
1.8 inch
2.0 inch
1.5 inch
1.8 inch
Y
P
O
C
2.0 inch
Trim the image to specify the
print area.
See Step 2 of Setting the Printing
Area (Trimming) (pp. 58, 59) on
how to trim the image.
3
Trimming Frame
4
62
The trimming setting screen differs
depending on the camera model.
Follow the steps according to the
screen that displays on your
camera.
Press the MENU button to end
trimming.
Press the FUNC./SET button to close the setting
menu.
• The print size setting only applies to one image.
• The print size setting is canceled with the following operations:
• When you set the print size settings for another image.
• When you close the Print mode (when you turn the camera
power off, change the camera mode, or detach the
connection cable).
• The shape of the trimming frame varies depending on the
specified print size.
• Use the LCD monitor to specify the print size settings. The
trimming frame may not display correctly on a TV screen.
Y
P
O
C
63
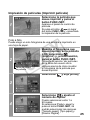
Printing Movies (Movie Print)
Select the movie you want to
print, then press the FUNC./
SET button.
1
The movie control panel appears.
If you press the
button
instead of the FUNC./SET button,
movie print begins.
Single-frame
Y
P
O
C
You can choose a single frame from a movie and print it on a sheet
of paper.
2
Display the frame you wish
to print on the LCD monitor,
select
(Print), then press
the FUNC./SET button.
Movie Control Panel
Refer to Viewing Movies section of
the Camera User Guide on how to
display the movie frame you wish
to print.
Select
[Single].
and choose
3
Select
and set the
number of prints.
4
64
1 to 99 copies can be set.
Selecting [Style] and pressing the
FUNC./SET button will allow
[Image] (only card size can be set)
and [Borders] to be selected.
5
Select [Print] and press the FUNC./SET button.
Sequence-frame
You can print movie frames selected automatically at fairly regular
intervals on a sheet of paper.
Select
(Print) and press
the FUNC./SET button.
2
Y
P
O
C
Movie Control Panel
Select
and choose
[Sequence].
3
If necessary, select [On] or
[Off] in
(Caption).
4
5
If you set
(Caption) to [On], you
can print the file number and the
elapsed time of the frame at the
same time.
Select [Print] and press the FUNC./SET button.
It may not be possible to play back or print movies shot with a
different camera.
65
• The number of printed movie frames per sheet of paper with
[Sequence] is determined by the paper size shown as follows:
(Depending on the number of seconds in the movie, there are
cases when the number of frames indicated below will not be
printed.)
• Card size: 20 frames
• L size: 42 frames
• Postcard size: 63 frames
• Wide size: 63 frames
Y
P
O
C
66
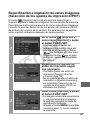
Specifying and Printing Multiple Images
(Setting the DPOF Print Settings)
With the camera’s
(Print) menu, you can specify and print
multiple images or all the images on a memory card. For
instructions on how to specify images, please refer to Setting the
DPOF Print Settings section of the Camera User Guide. In this
section, we will explain how to print images after specifying them.
In the
(Print) menu, select
[Print] and press the FUNC./
SET button.
1
• When an image or images have
been specified (see the Camera
User Guide), the
button will
light up blue. At this time, if you
press the
button, the
screen for Step 2 will be displayed.
Y
P
O
C
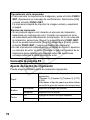
Set the print style settings as
required.
2
• See Setting the Print Style
(Image, Borders and Date)
(p. 55).
• A print style cannot be set if [Print
Settings] on the screen in Setting
the DPOF Print Settings is set to
[Index].
Select [Print] and press the
FUNC./SET button.
3
• The image will start to print and,
when it is completely finished, the
display will revert to the standard
playback mode.
• If the MENU button is pressed,
the display will revert to the
screen in Step 1 and printing will
not take place.
67
• To print the date, set the [Date] setting in [Print Settings] on the
screen in Setting the DPOF Print Settings to [On]. You cannot
set the date to print with the [Style] menu in Step 2.
• When the print type is set to [Index], the [Date] cannot be
printed.
• When the print type is set to [Standard], the [File No.] cannot be
printed.
• The ID photo print function cannot be used.
• The maximum number of images printed on one page in the
Index print type depends on the selected paper size.
• Card size: 20 images
• L size: 42 images
• Postcard size: 63 images
• Wide size: 63 images
Y
P
O
C
Cancel Printing
• To cancel printing between images printed, press the FUNC./
SET button.
Once the current print is completed, a confirmation dialog
appears. Select [OK] and press the FUNC./SET button.
Restarting Printing
• Select [Resume] and press the FUNC./SET button. The
remaining images can be printed.
• Printing cannot be restarted under the following circumstances.
• If the print settings have been changed before restarting.
• If the image for which the print settings were set has been
deleted before restarting.
• If there is very little free space on the memory card when
printing is canceled, it may not be possible to restart printing.
• If printing is canceled because the camera battery is depleted, it
may not be possible to restart printing.
(Replace with a fully charged battery pack or new batteries,
then turn the camera power on again. If you intend to use an
extended period of time, you are recommended to power the
camera with a compact power adapter (sold separately).)
68
Printing Errors
• An error message appears if an error occurs for some reason
during the printing process. Select [Stop] or [Resume] and
press the FUNC./SET button.
* The [Resume] option may not appear with some types of
errors. In that case, select [Stop].
Y
P
O
C
69
List of Messages
The following messages may appear on the camera’s LCD monitor
when an error occurs during a camera and printer connection.
(Depending on the printer model, some messages may not
display.)
• Please refer to the printer’s user guide for solutions.
No Paper
Paper cassette is incorrectly inserted or out of
paper. Or the paper feed is not operating correctly.
No Ink
The ink cartridge has not been inserted or has run
out of ink.
Incompatible paper
size
Wrong paper size is loaded in the printer.
Incompatible ink
size
Wrong ink cassette size is loaded in the printer.
The ink cassette is experiencing a problem.
Paper and ink do not
match
The paper and ink are from different sets.
Paper Jam
The paper jammed during printing.
Paper has been
changed
70
Y
P
O
C
Ink Cassette Error
Paper size was changed after the print style was
displayed.
Recharge the printer
battery
The printer’s battery pack is depleted.
Communication
Error
The printer is experiencing a data transmission
error.
Readjust trimming
You attempted to print the image with a different
style than the one used when the trimming settings
were set.
Cannot Print!
You attempted to print an image that was
photographed with another camera, one recorded
in a different data type, or one that has been edited
on a computer.
Could not print xx
images
You attempted to use the DPOF print settings to
print xx images that were photographed with
another camera, that have been recorded in a
different data type, or that have been edited on a
computer.
Printing with Bubble Jet
Printers using Bubble Jet Direct
Printing
Make sure that
displays in
the upper left corner of the
LCD monitor.
1
If
displays, refer to
Printing
with Bubble Jet Printers (PIXMA
Series/SELPHY DS Series) using
PictBridge (p. 32).
Y
P
O
C
After this step, follow the procedures in the section
Printing with
SELPHY CP Series Printers using Canon Direct Print (p. 53) to
print your images.
However, please note that some menus and precautions
differ, as listed below.
See pages 54 and 68.
• You cannot print movies or RAW images.
71
Cancel Printing
• To cancel printing between images printed, press the FUNC./
SET button. A confirmation dialog appears. Select [OK] and
press the FUNC./SET button.
The printer will stop printing the current image and eject the
paper.
Printing Errors
• An error message appears if an error occurs for some reason
during the printing process. When the error is resolved, printing
will automatically resume. If printing does not resume, select
[Continue] and press the FUNC./SET button. If [Continue]
cannot be selected, select [Stop], press the FUNC./SET button
and restart the print job.
• With printers equipped with an operation panel, the error
number displays on the panel. Please refer to the printer user
guide for the remedies corresponding to the error numbers.
Y
P
O
C
See page 55.
Setting the Print Style
You can select from among the following print styles.
Select the paper size from the following:
[Card #1], [Card #2], [Card #3], [LTR] or [A4].
For usable paper types, please refer to the
printer user guide.
Paper
Borders
Date
72
Borderless
Prints right to the edges of the paper.
Bordered
Prints with a border.
On
Adds the date to the print.
Off
Prints without the date.
• The ID photo print function cannot be used.
• If you select an image which has had the shooting date
embedded in it using a camera with a Postcard Date Imprint
mode, [Date] in the [Style] menu will be set to [Off]. If you set
[Date] to [On], dates will appear twice on the printed image.
See page 68.
• To print the date, set the [Date] setting in [Print Settings] on the
screen in Setting the DPOF Print Settings to [On]. You cannot
set the date to print with the [Style] menu in Step 2.
• When the print type is set to [Index], the [Date] and [File No.]
cannot be printed at the same time.
• When the print type is set to [Standard], the [File No.] cannot be
printed.
• The ID photo print function cannot be used.
Y
P
O
C
73
Settings that Can Be Set with the
Camera
SELPHY ES Series/SELPHY CP Series
Printers using PictBridge
(When
appears on the camera’s LCD monitor during a
connection)
Print Options Selectable with the Camera
Date
File No.
Date/File No.
Y
P
O
C
Both
Off
Default
Default
Print Effect
On
Off
Red-Eye1
Number of Prints
Trimming
1 to 99
CreditCard
9 × 13 cm
Paper Size
10 × 14.8 cm
4" × 8" or 10 × 20 cm*
Default
Paper Settings
Default
Bordered
Page Layout
Borderless
N-up
ID Photo
Fixed Size
Movies
(Movie Print)
74
Single
Sequence
* Compatible with SELPHY CP series only.
2/4/8
Bubble Jet Printers (PIXMA Series/
SELPHY DS Series) using PictBridge
(When
appears on the camera’s LCD monitor during a
connection)
Print Options Selectable with the Camera
Date
File No.
Date/File No.
Both
Off
Default
Y
P
O
C
Default
On
Off
Vivid
Print Effect
NR
Vivid+NR
Face
Red-Eye1
Red-Eye2
Number of Prints
1 to 99
Trimming
Movies (Movie Print)
75
4" × 6"
13 × 18 cm
5" × 7"
A4
8.5" × 11"
CreditCard
Paper Size*
8" × 10"
10" × 12"
A3
A3+/13" × 19"
Y
P
O
C
14" × 17"
4" × 7.1"
Default
Paper Settings
Photo
Fast Photo
Paper Type
Fine Art
Semi-gloss
Plain
Default
Default
Bordered
Borderless
N-up
Page Layout
2/4/9/16
Bordered
(print with the
shooting information)
20-up
(print with the shooting
information)
35-up
(print images laid out
like a 35mm contact sheet)
* Paper sizes vary according to region.
76
SELPHY CP Series Printers using Canon Direct Print
Bubble Jet Printers using Bubble Jet Direct
(When
or
connection)
appears on the camera’s LCD monitor during a
Print Options Selectable with the Camera
{
{
1 image
{
–
Multiple
{*1
–
ID Photo
{
–
Card #1, Card #2,
Card #3, Letter (LTR)
or A4
–*2
{
Bordered
{
{
Borderless
{
{
{
{
{
{
Single
{
–
Sequence
{
–
Number of Prints 1 to 99
Y
P
O
C
Image
Style
Paper
Borders
Date
Trimming
Movies
(Movie Print)
SELPHY
Bubble Jet
CP Series
Printers
Printers
using
using
Bubble Jet
Canon
Direct
Direct Print
*1 This option can only be selected when [CreditCard] size paper is set.
*2 Paper size will be set automatically according to the paper cassette set to
the printer.
77
ESPAÑOL
Introducción
—Confirme el modelo de impresora y la sección pertinente
Las operaciones de impresión varían en función del modelo de
impresora.
Atendiendo al procedimiento que se describe a continuación,
consulte la sección y la página que debe leer en esta guía
de usuario.
Conecte la cámara a la impresora con un cable adecuado
y verifique el icono que aparece en la pantalla LCD de
la cámara.
Y
P
O
C
• Para obtener instrucciones sobre los métodos de conexión
de la cámara y la impresora, consulte la página 8.
Consulta de la sección pertinente
Iconos que aparecen en la pantalla LCD de
la cámara
• Si uno de los iconos anteriormente mencionados no aparece, la impresora
conectada no puede utilizarse.
• Cuando la impresora esté lista para imprimir, el botón
se iluminará
en color azul. El botón
parpadea durante la impresión.
Las pantallas variarán según el modelo de cámara. Los ajustes
disponibles difieren en función del modelo de impresora y del
tamaño de papel (los ajustes no disponibles no aparecerán en el
menú). Para obtener información detallada, consulte la guía del
usuario incluida con la impresora.
Confirme su modelo
de impresora.
Modelo de impresora
Series
SELPHY ES/
SELPHY CP
Series PIXMA/
SELPHY DS
Impresoras que
no son de la
marca Canon*
Lea la página
que aparece a
continuación.
Consulte las secciones
indicadas
Página 10
“ Impresión con impresoras
de la serie SELPHY ES/serie
SELPHY CP que utilizan
PictBridge”
Página 32
“ Impresión con impresoras
de inyección de Burbuja
(series PIXMA/SELPHY DS)
que utilizan PictBridge”
Y
P
O
C
Página 52
“ Impresión con impresoras
que no son de la marca Canon
compatibles con PictBridge”
Serie
SELPHY CP
Página 53
“ Impresión con impresoras
de la serie SELPHY CP que
utilizan Canon Direct Print”
Impresoras de
inyección de
Burbuja
Página 71
“ Impresión con impresoras
de inyección de Burbuja que
utilizan Bubble Jet Direct”
* Consulte también la guía del usuario que se incluye con la impresora.
1
Para obtener la información más reciente relativa a las
conexiones entre las impresoras y las cámaras Canon,
consulte la siguiente dirección URL:
http://web.canon.jp/Imaging/BeBit-e.html
http://www.canon.com/pictbridge
Compatibilidad con PictBridge
Esta cámara cumple con el estándar del sector “PictBridge”*.
Esto le permite conectar también la cámara a impresoras
compatibles con PictBridge que no sean de la marca Canon
e imprimir imágenes con operaciones sencillas mediante los
botones de la cámara.
Y
P
O
C
* PictBridge: PictBridge es un estándar del sector para impresión directa
que permite imprimir imágenes sin usar un ordenador, conectando
directamente las cámaras y videocámaras digitales (en adelante
“cámara”) a una impresora, independientemente de la marca y del
modelo de los dispositivos.
Aspectos legales
• Queda prohibida la reproducción, transmisión, transcripción o
almacenamiento en sistemas de consulta y traducción a cualquier idioma,
en cualquier forma y por cualquier medio sin la previa autorización escrita
de Canon.
• Canon se reserva el derecho a cambiar en cualquier momento y sin previo
aviso las especificaciones del hardware aquí descrito.
• A pesar de que no se han escatimado esfuerzos para garantizar que la
información de esta guía sea precisa y completa, Canon no se hace
responsable de los errores u omisiones que pudiera haber.
• Canon no asume ninguna responsabilidad por los daños ocasionados
por datos defectuosos o perdidos debido a una operación errónea o a
un mal funcionamiento de la cámara, el software, las tarjetas de memoria,
los ordenadores o los dispositivos periféricos, o al uso de tarjetas de
memoria que no sean de la marca Canon.
Copyright © 2008 Canon Inc. Todos los derechos reservados.
2
Tabla de contenido
Impresión directa. . . . . . . . . . . . . . . . . . . . . . . . . . . . . . . . . . 6
Permite imprimir sin un ordenador . . . . . . . . . . . . . . . . . 6
Pueden realizarse varias operaciones de impresión . . . . . . 6
También puede realizar las siguientes operaciones
de impresión . . . . . . . . . . . . . . . . . . . . . . . . . . . . . . . . . . . . 7
Impresión de películas (Imprimir película) . . . . . . . . . . . . 7
Impresión de varias imágenes en una hoja de papel . . . 7
Impresión Foto Carnet . . . . . . . . . . . . . . . . . . . . . . . . . . . 7
Conexión de la cámara a la impresora . . . . . . . . . . . . . . . . 8
Desconexión de la cámara y la impresora . . . . . . . . . . . . . 9
Impresión con impresoras de la serie SELPHY ES/serie
SELPHY CP que utilizan PictBridge . . . . . . . . . . . . . . . . . . . . .10
Y
P
O
C
Impresión . . . . . . . . . . . . . . . . . . . . . . . . . . . . . . . . . . . . .
Impresión sencilla . . . . . . . . . . . . . . . . . . . . . . . . . . . . .
Impresión después de cambiar los ajustes de impresión. .
Selección de ajustes de impresión. . . . . . . . . . . . . . . . .
Ajuste de la opción de impresión de fecha y
número de archivo . . . . . . . . . . . . . . . . . . . . . . . . . . . . .
Ajuste del efecto de impresión. . . . . . . . . . . . . . . . . . . .
Ajuste del número de copias . . . . . . . . . . . . . . . . . . . . .
Ajustes del área de impresión (recortar) . . . . . . . . . . . .
Selección de los parámetros de papel. . . . . . . . . . . . . .
Impresión de varias imágenes en una hoja de papel .
Impresión con un tamaño específico
(Impresión Foto Carnet). . . . . . . . . . . . . . . . . . . . . . . .
Impresión de imágenes en Tam. Fijo . . . . . . . . . . . . .
Impresión de películas (Imprimir película) . . . . . . . . . . .
Foto a foto . . . . . . . . . . . . . . . . . . . . . . . . . . . . . . . . . .
Secuencia de fotogramas . . . . . . . . . . . . . . . . . . . . . .
Especificación e impresión de varias imágenes
(Selección de los ajustes de impresión DPOF) . . . . . . .
Lista de mensajes . . . . . . . . . . . . . . . . . . . . . . . . . . . . . .
10
10
11
13
13
14
14
15
19
21
22
24
25
25
26
28
31
3
Impresión con impresoras de inyección de Burbuja
(series PIXMA/SELPHY DS) que utilizan PictBridge . . . 32
Impresión . . . . . . . . . . . . . . . . . . . . . . . . . . . . . . . . . . . . . .32
Impresión sencilla . . . . . . . . . . . . . . . . . . . . . . . . . . . . . .32
Impresión después de cambiar los ajustes
de impresión . . . . . . . . . . . . . . . . . . . . . . . . . . . . . . . . . .33
Selección de ajustes de impresión . . . . . . . . . . . . . . . . .35
Ajuste de la opción de impresión de fecha y
número de archivo. . . . . . . . . . . . . . . . . . . . . . . . . . . . . .35
Ajuste del efecto de impresión . . . . . . . . . . . . . . . . . . . .36
Ajuste del número de copias . . . . . . . . . . . . . . . . . . . . . .37
Ajustes del área de impresión (recortar) . . . . . . . . . . . . .38
Selección de los parámetros de papel . . . . . . . . . . . . . .42
Impresión de varias imágenes en una hoja de papel . . 44
Impresión de películas (Imprimir película). . . . . . . . . . . .46
Especificación e impresión de varias imágenes
(Selección de los ajustes de impresión DPOF). . . . . . . .47
Lista de mensajes . . . . . . . . . . . . . . . . . . . . . . . . . . . . . . .50
Y
P
O
C
Impresión con impresoras que no son de la marca
Canon compatibles con PictBridge. . . . . . . . . . . . . . . . 52
Impresión . . . . . . . . . . . . . . . . . . . . . . . . . . . . . . . . . . . . . .52
Impresión con impresoras de la serie SELPHY CP que
utilizan Canon Direct Print. . . . . . . . . . . . . . . . . . . . . . . . 53
Si utiliza la impresora Canon Compact Photo Printer
SELPHY CP750/CP740/CP730/CP720/CP710/CP510 . . 53
Impresión . . . . . . . . . . . . . . . . . . . . . . . . . . . . . . . . . . . . . .53
Impresión sencilla . . . . . . . . . . . . . . . . . . . . . . . . . . . . . .53
Impresión después de cambiar los ajustes de impresión . .54
Selección de ajustes de impresión . . . . . . . . . . . . . . . . .55
Ajuste del número de copias . . . . . . . . . . . . . . . . . . . . . .55
Ajuste del estilo de impresión
(Imagen, Bordes y Fecha) . . . . . . . . . . . . . . . . . . . . . . . .55
Ajustes del área de impresión (recortar) . . . . . . . . . . . . .57
Impresión con un tamaño específico
(Impresión Foto Carnet) . . . . . . . . . . . . . . . . . . . . . . . . .61
4
Impresión de películas (Imprimir película) . . . . . . . . . . .
Foto a foto . . . . . . . . . . . . . . . . . . . . . . . . . . . . . . . . . .
Secuencia de fotogramas . . . . . . . . . . . . . . . . . . . . . .
Especificación e impresión de varias imágenes
(Selección de los ajustes de impresión DPOF) . . . . . . .
Lista de mensajes . . . . . . . . . . . . . . . . . . . . . . . . . . . . . .
64
64
65
67
70
Impresión con impresoras de inyección de Burbuja
que utilizan Bubble Jet Direct . . . . . . . . . . . . . . . . . . . 71
Impresión . . . . . . . . . . . . . . . . . . . . . . . . . . . . . . . . . . . . . 71
Ajuste del estilo de impresión . . . . . . . . . . . . . . . . . . . . 72
Y
P
O
C
Ajustes que se pueden establecer con la cámara . . . . . . 74
Impresoras de la serie SELPHY ES/serie
SELPHY CP que utilizan PictBridge . . . . . . . . . . . . . . 74
Impresoras de inyección de Burbuja (series
PIXMA/SELPHY DS) que utilizan PictBridge . . . . . . . 75
Impresoras de la serie SELPHY CP que utilizan la
función de Canon Direct Print
Impresoras de inyección de Burbuja que utilizan
Bubble Jet Direct . . . . . . . . . . . . . . . . . . . . . . . . . . . . . 77
Convenciones empleadas en esta guía
Indica las precauciones y restricciones para el funcionamiento
correcto de la cámara.
TIndica otros temas que complementan a los procedimientos de
funcionamiento básicos.
*El botón al que se hace referencia en esta guía como botón
FUNC./SET puede aparecer como botón SET dependiendo del
modelo de la cámara.
5
Impresión directa
Permite imprimir sin un ordenador
Conecte la cámara a la impresora con el cable adecuado. La
selección de imágenes y la impresión se realizan desde la cámara.
Y
P
O
C
Pueden realizarse varias operaciones de
impresión*
Imprime en toda la
superficie del papel.
O bien, imprime con
un borde.
02/02/2008
Añada la fecha.
Especifique la parte de
la imagen que desea
imprimir. (recortar)
Pueden imprimirse varias imágenes a la vez.
(Ajustes de impresión DPOF)
6
* Es posible que no puedan seleccionarse algunos ajustes para las
impresoras que no son de la marca Canon.
También puede realizar las siguientes operaciones de impresión
Impresión de películas (Imprimir película)
Puede imprimir en una hoja de papel un
sólo fotograma de una película o extraer
fotogramas de una película a intervalos
regulares (págs. 25, 46 o 64).
• Impresoras con esta función (Esta función no está disponible en algunas impresoras.)
Foto a foto:
Impresoras Canon de la serie SELPHY ES/serie SELPHY CP,
impresoras que utilizan PictBridge (incluidas las impresoras
que no sean de la marca Canon)
Secuencia de fotogramas:Impresoras Canon de la serie SELPHY ES/serie SELPHY CP
Y
P
O
C
Impresión de varias imágenes en una hoja de papel
Pueden imprimirse composiciones de varias
imágenes de las mismas dimensiones en
una única hoja de papel (págs. 21 o 44).
La función de impresión DPOF* le permite
imprimir de manera independiente distintas
imágenes especificando el número de
fotogramas que se imprimirán por imagen.
• Impresoras
con esta función: Impresoras que utilizan PictBridge (incluidas las impresoras
que no sean de la marca Canon)
Esta función no está disponible en algunas impresoras.
Impresión Foto Carnet
Una imagen puede recortarse, ordenarse e
imprimirse como Foto Carnet (págs. 22 o 61).
• Impresoras
con esta función: Impresoras Canon de la serie
SELPHY ES/serie SELPHY CP
Algunos modelos de impresora ofrecen otras operaciones de impresión:
• Impresión de imágenes en tamaño fijo (pág. 24)
• Impresión de imágenes con la información de disparo (pág. 43)
* Ajustes de impresión DPOF
Esta función le permite preestablecer las imágenes y el número de copias con los botones de la
cámara. Los ajustes se graban en una tarjeta de memoria.
Consulte la Guía del usuario de la cámara para obtener instrucciones acerca de cómo realizar este
procedimiento. En esta guía se explica cómo imprimir imágenes con los ajustes de impresión DPOF.
DPOF=Digital Print Order Format (Formato de orden de impresión digital)
7
Conexión de la cámara a la impresora
Conecte la cámara a la impresora. Para obtener instrucciones
acerca de los métodos de funcionamiento de la impresora y de
la cámara, consulte sus guías del usuario respectivas.
Inserte uno de los componentes siguientes en
la cámara.
• Alimentador de corriente (se vende por separado)
• Batería totalmente cargada
• Nuevas baterías
Si la batería de la cámara se descarga mientras se imprime,
puede que la impresión se interrumpa. Para evitar esto, use
una batería completamente cargada u otra nueva. Cuando
haga un uso de la cámara durante un largo período de
tiempo, se recomienda usar el alimentador de corriente.
Y
P
O
C
Coloque el papel, cassette o cartucho de tinta, etc.
en la impresora.
Conecte la cámara a la impresora con el cable de
interfaz adecuado suministrado con la cámara.
Terminal DIGITAL
Cámara:
conecte el cable al
terminal DIGITAL.
Impresora: consulte la guía
del usuario de la
impresora.
Conexión del cable de interfaz
Algunas impresoras requieren cables de conexión específicos
que son diferentes del cable anteriormente descrito. Consulte
la guía de usuario de la impresora.
Encienda la impresora.
8
Seleccione el modo de reproducción de la cámara
y enciéndala.
En función del modelo de cámara, ésta se encenderá
automáticamente al encender la impresora.
Las operaciones siguientes no están disponibles cuando la cámara está
conectada a una impresora.
• Los ajustes de idioma que usan los botones FUNC./SET y MENU (en
algunos modelos de cámara, deberá utilizar los botones FUNC./SET y
JUMP).
• Volver a seleccionar los ajustes de la cámara como predeterminados.
Desconexión de la cámara y la
impresora
Y
P
O
C
Apague la cámara.
Desconecte el cable.
Extraiga el cable mientras sujeta el enchufe del conector.
No tire del cable.
9
Impresión con impresoras de la
serie SELPHY ES/serie SELPHY CP
que utilizan PictBridge
Impresión
Impresión sencilla
Puede imprimir las imágenes con sólo presionar un botón después
de conectar la cámara a la impresora.
1
2
10
Compruebe que
aparece
en la esquina superior
izquierda de la pantalla LCD.
Y
P
O
C
Muestre las imágenes que desee imprimir y pulse
el botón
.
Si desea modificar los ajustes de impresión, consulte Impresión
después de cambiar los ajustes de impresión (pág. 11).
Impresión después de cambiar los ajustes de
impresión
Es posible cambiar los ajustes de impresión antes de imprimir.
Compruebe que
aparece
en la esquina superior
izquierda de la pantalla LCD.
1
Pantalla de reproducción
Y
P
O
C
Establece el efecto de
impresión (pág. 14).
Establece la fecha
y el número de
archivo que se van
a imprimir (pág. 13).
2
Si aparece
en la pantalla LCD,
consulte
Impresión con
impresoras de la serie SELPHY CP
que utilizan Canon Direct Print
(pág. 53).
Muestre las imágenes que
desee imprimir y pulse el
botón FUNC./SET.
Aparecerá la pantalla de orden de
impresión.
Establece el número de copias (pág. 14)
Establece la zona de recorte (pág. 15)
Establece el tamaño, tipo y diseño del
papel (pág. 19)
Inicia el proceso de impresión
Pantalla de orden de impresión
Aparece la información sobre el tamaño,
el tipo y el diseño de papel.
3
Seleccione los ajustes de impresión según sea
necesario.
Seleccione [Imprimir] y pulse el botón FUNC./SET.
4
• La imagen comenzará a imprimirse y, una vez terminado
el proceso, la pantalla regresará al modo de reproducción
estándar.
• Si pulsa el botón MENU, la pantalla volverá al modo de
reproducción estándar y no se realizará la impresión.
11
• No se pueden imprimir imágenes RAW.
• Es posible que no puedan reproducirse o imprimirse imágenes
tomadas con una cámara diferente.
• Es posible que no pueda imprimir si la tarjeta de memoria
contiene un gran número de imágenes (alrededor de 1000).
Cancelación de la impresión
• Para cancelar la impresión de imágenes, pulse el botón FUNC./
SET.
Aparecerá un mensaje de confirmación. Seleccione [OK] y
pulse el botón FUNC./SET. La impresora dejará de imprimir la
imagen actual y expulsará el papel.
Errores de impresión
• Si se produce algún error durante el proceso de impresión,
aparecerá un mensaje de error. Cuando se resuelva el error,
se reanudará automáticamente la impresión. Si la impresión
no se reanuda, seleccione [Seguir] y pulse el botón FUNC./
SET. Si no se puede seleccionar [Seguir], seleccione [Parar],
pulse el botón FUNC./SET y reinicie el trabajo de impresión.
Consulte Lista de mensajes (pág. 31) para obtener más
información.
Y
P
O
C
12
Selección de ajustes de impresión
Ajuste predeterminado
• La opción Predeter. es un ajuste original de la impresora.
• Están disponibles las opciones [Fecha/Nº Arch.], [Efecto de
impresión], [Tamaño papel], [Tipo papel] y [Diseño Página].
Ajuste de la opción de impresión de fecha y
número de archivo
Seleccione [ ] y, a
continuación, la opción
de impresión de fecha y
número de archivo.
Y
P
O
C
Puede establecer la impresión de
la fecha y del número de archivo
de la siguiente manera:
1
Fecha
Sólo imprime la fecha.
Nº Arch.
Sólo imprime el número
de archivo.
Ambos
Imprime tanto la fecha como
el número de archivo.
Off
No imprime ni la fecha ni el
número de archivo.
Los efectos de impresión
variarán en función de la
configuración de la
Predeter. impresora. Consulte la guía
de usuario de la impresora
para obtener más
información.
Si selecciona una imagen con la fecha de disparo incrustada con
una cámara en un modo de Impresión en tamaño postal, la opción
[ ] se establecerá en [Off]. Si selecciona las opciones [Fecha],
[Nº Arch.] o [Ambos], se imprimirán la fecha y el número de archivo
en la información incrustada, a su vez también impresa.
13
Ajuste del efecto de impresión
Esta función usa la información de disparo de la cámara para
optimizar los datos de imagen, lo que permite obtener copias
de alta calidad. Puede seleccionar los efectos de impresión
siguientes:
Predeter.
Los efectos de impresión variarán en función de la
configuración de la impresora. Consulte la guía de usuario de
la impresora para obtener más información.
On
Usa la información de disparo de la cámara para crear copias
de calidad.
Off
Imprime sin agregar ningún efecto.
Y
P
O
C
O. Rojos1 Imprime con el efecto de ojos rojos corregido.
1
Seleccione [ ] y elija
una opción de efecto de
impresión.
Ajuste del número de copias
Seleccione [ ] y elija el
número de copias.
1
14
Puede seleccionar entre 1 a
99 copias.
Ajustes del área de impresión (recortar)
Puede especificar la impresión de una parte de la imagen.
Configure la opción [Parám. papel] (pág. 19) antes de establecer
los ajustes de recorte. Si se cambia la opción [Parám. papel]
después de haber realizado ajustes de recorte, tendrá que volver
a seleccionar dichos ajustes.
Seleccione [recortar] y pulse
el botón FUNC./SET.
El marco de recorte aparecerá
en el centro de la imagen. Si ya
se seleccionó un ajuste de
recorte para la imagen, el marco
aparecerá alrededor de la parte
seleccionada previamente.
1
Y
P
O
C
La pantalla del ajuste de recorte variará en función del
modelo de cámara. Compruebe cuáles de las siguientes
pantallas aparecen antes de seleccionar los ajustes.
a
b
Marco de recorte
Pasos 2a y 3a
Pasos 2b y 3b
* Continúe con el procedimiento a o b en
función de la pantalla que aparezca.
15
Cuando la pantalla a
aparece
Recorte la imagen.
2a
Cambio del tamaño del marco de recorte
• Presione la palanca o el botón de zoom para ajustar el tamaño
del marco de recorte.
• El marco de recorte puede ajustarse a un mínimo de
aproximadamente la mitad de la imagen mostrada (en alto y
en ancho) o a un máximo del mismo tamaño de la imagen.
• Si intenta sobrepasar el límite máximo del marco de recorte,
se cancelará dicho ajuste.
• Al imprimir una imagen que se amplió con la opción de
recorte, la calidad de la imagen será menor cuanto mayor
sea el nivel de ampliación.
Y
P
O
C
Movimiento del marco de recorte
• Mueva el marco de recorte con el selector Omni o los botones
de dirección (arriba, abajo, derecha e izquierda).
Giro del marco de recorte
• Para girar el marco de recorte, pulse el botón DISP.
(o DISPLAY).
Pulse el botón MENU para cancelar el ajuste.
el botón FUNC./SET para cerrar el menú de
3a Pulse
ajuste.
16
Cuando la pantalla b
aparece
Recorte la imagen.
2b
Cambio del tamaño del marco de recorte
• Pulse los botones de dirección arriba y abajo para ajustar
el tamaño del marco de recorte.
• El marco de recorte puede ajustarse a un mínimo de
aproximadamente la mitad de la imagen mostrada (en alto y
en ancho) o a un máximo del mismo tamaño de la imagen.
• Si intenta sobrepasar el límite máximo del marco de recorte,
se cancelará dicho ajuste.
• Al imprimir una imagen que se amplió con la opción de
recorte, la calidad de la imagen será menor cuanto mayor
sea el nivel de ampliación.
Y
P
O
C
Giro del marco de recorte
• Puede girar el marco de recorte mediante los botones de
dirección izquierda y derecha.
Movimiento del marco de recorte
• Pulse el botón FUNC./SET y use los botones de dirección
(arriba, abajo, derecha e izquierda) para mover el marco de
recorte. Pulse de nuevo el botón FUNC./SET para cambiar
el tamaño del marco y girarlo.
Pulse el botón MENU,
seleccione [OK] y pulse
el botón FUNC./SET.
3b
Seleccione [Cancelar p.] para
cancelar el ajuste de recorte
seleccionado. Si se selecciona
[Editar], se mostrará el contenido
de la pantalla anterior.
17
• El ajuste de recorte sólo se aplica a una imagen.
• El ajuste de recorte se cancela con las operaciones siguientes:
• Cuando se establecen los ajustes de recorte para otra imagen.
• Cuando se cierra el modo de impresión (al apagar la cámara,
cambiar de modo o desconectar el cable de conexión).
• Dependiendo de los ajustes de recorte seleccionados, puede
que toda la fecha de disparo (o parte de ella) que se ha
incrustado en las imágenes tomadas con una cámara que
incluye el modo Impresión en tamaño postal no se imprima
correctamente.
• Las imágenes más pequeñas de 640 × 480 píxeles no se
pueden recortar.
Y
P
O
C
• Los ajustes de tamaño de papel y diseño de página determinan
la forma del marco de recorte.
• Use la pantalla LCD para establecer los ajustes de recorte.
Puede que el marco de recorte no se muestre correctamente
en una pantalla de televisión.
18
Selección de los parámetros de papel
Seleccione [Parám. papel] y
pulse el botón FUNC./SET.
1
Aparecerá la pantalla de ajuste de
tamaño del papel.
Seleccione un tamaño de
papel* y pulse el botón
FUNC./SET.
2
Y
P
O
C
Aparecerán los ajustes
predeterminados y el tamaño de
cassette de papel especificado.
Aparecerá la pantalla de ajuste del
tipo de papel.
* Los tamaños de papel varían de un
país a otro.
Pulse el botón FUNC./SET.
Aparece la pantalla Diseño Página.
3
19
Seleccione un diseño.
Se pueden seleccionar los diseños
siguientes:
4
Predeter.
Los efectos de impresión
variarán en función de la
configuración de la
impresora. Consulte la
guía de usuario de la
impresora para obtener
más información.
Bordeado
Imprime con un borde.
Sin bordes Imprime la imagen sin
bordes.
Y
P
O
C
Imág./pág
Imprime 2, 4 u 8
imágenes en una única
hoja de papel (pág. 21).
Foto
Carnet
Especifica como Foto
Carnet el área de una
imagen que desea
imprimir y el tamaño
de impresión (pág. 22).
Tam. Fijo* Imprime especificando el
tamaño de impresión de
la imagen en una hoja de
papel (pág. 24).
* No se puede seleccionar un diseño al
imprimir en papel tamaño tarjeta.
20
Impresión de varias imágenes en una hoja de papel
Si selecciona [Imág./pág] en el ajuste de diseño (pág. 20),
podrá especificar los ajustes de diseño siguientes.
2
Se colocan 2 imágenes (altura 2 x ancho 1) de las mismas
dimensiones en una única hoja de papel.
4
Se colocan 4 imágenes (altura 2 x ancho 2) de las mismas
dimensiones en una única hoja de papel.
8
Se colocan 8 imágenes (altura 4 x ancho 2) de las mismas
dimensiones en una única hoja de papel o en una hoja con
etiqueta.
Y
P
O
C
[Ejemplo de impresión 1] Impresión de 3 copias de la imagen A en 2-up
Número de
copias
(pág. 14)
Diseño
Imagen A:
[3] copias
2
El ajuste de impresión DPOF (pág. 28) permite imprimir distintas
imágenes por separado especificando el número de fotogramas
que se imprimirán por imagen.
[Ejemplo de impresión 2] Impresión de 2 copias de la imagen A y
1 copia de la imagen B en 4-up
Ajustes de
impresión
DPOF*
(pág. 28)
Imagen A:
[2] copias
Imagen B:
[1] copias
Diseño
4
* Consulte la Guía del usuario de la cámara para obtener instrucciones
acerca del método de ajustes de impresión DPOF.
21
Impresión con un tamaño específico (Impresión Foto Carnet)
Al seleccionar [Foto Carnet] en el ajuste de diseño, (pág. 20)
podrá especificar como Foto Carnet* el tamaño y el área de
una imagen que desea imprimir y el tamaño de impresión.
* Es posible que las imágenes obtenidas mediante la función
de impresión Foto Carnet no sean admitidas como válidas
para certificados oficiales. Consulte al organismo que solicite
la fotografía.
Se puede especificar el tamaño de impresión sólo para
imágenes de resolución L (grande) almacenadas en la
cámara conectada a la impresora.
Y
P
O
C
Seleccione [Foto Carnet] y,
a continuación, pulse el
botón FUNC./SET.
T
Para especificar el tamaño
de impresión, seleccione
el tamaño del largo, a
continuación el del corto
y pulse el botón FUNC./SET.
Para especificar el tamaño,
seleccione primero el tamaño del
largo y, a continuación, el del corto.
En la tabla siguiente puede ver las
combinaciones disponibles para la
longitud de los lados corto y largo.
22
z Combinaciones disponibles
: Tamaño de impresión disponible
Corto
Largo
20 mm
25 mm
30 mm
35 mm
40 mm
45 mm
50 mm
25 mm
30 mm
35 mm
40 mm
45 mm
50 mm
55 mm
60 mm
70 mm
1.4 pda
1.8 pda
2.0 pda
1.5 pda
1.8 pda
Y
P
O
C
2.0 pda
T
Recorte la imagen para
especificar el área de
impresión.
Consulte el paso 2 de Ajustes
del área de impresión (recortar)
(págs. 16, 17 y 18) para saber
cómo recortar la imagen.
Marco de recorte
La pantalla del ajuste de recorte
variará en función del modelo
de cámara. Siga los pasos
correspondientes a la información
que aparece en la pantalla de la
cámara.
Al pulsar el botón MENU se
cancelará el recorte.
23
Impresión de imágenes en Tam. Fijo
Si selecciona [Tam. Fijo] en el ajuste de diseño (pág. 20),
podrá imprimir especificando el tamaño de impresión de la
imagen en una hoja de papel.
Seleccione el tamaño de
impresión fijo deseado.
Dependiendo del tamaño del
papel, podrá seleccionar los
tamaños de impresión que se
detallan a continuación:
Y
P
O
C
Tamaño del
papel
Tamaño de
impresión
5.4 × 8.6 cm
No se puede
seleccionar
el tamaño de
impresión.
9 × 13 cm
(Tamaño L)
89 mm × 55 mm
Predeter.
10 × 14.8 cm
7 cm × 10 cm
(Tamaño postal) Predeter.
4 pda × 8 pda/
4 pda × 6 pda
10 × 20 cm
7 cm × 10 cm
(Tamaño ancho) Predeter.
5
Seleccione un diseño y pulse el botón FUNC./SET.
Con esto finalizan las operaciones de parámetros
del papel.
Volverá a mostrarse la pantalla de orden de impresión.
24
Impresión de películas (Imprimir película)
Seleccione la película que
desee imprimir y pulse el
botón FUNC./SET.
1
Aparece el panel de control de
película.
Si pulsa el botón
en lugar
del botón FUNC./SET, comenzará
la impresión de la película.
Foto a foto
Puede elegir un solo fotograma de una película e imprimirlo en
una hoja de papel.
2
Y
P
O
C
Muestre el fotograma que
desea imprimir en la pantalla
LCD, seleccione
(Imprimir) y, a continuación,
pulse el botón FUNC./SET.
Panel de control
de película
Consulte la sección Ver películas
de la Guía del usuario de la
cámara acerca de cómo mostrar
el fotograma de la película que
desea imprimir.
Seleccione
y elija [única].
3
Seleccione
y ajuste el
número de copias.
4
Puede seleccionar entre 1 a
99 copias.
Si selecciona [Parám. papel] y
pulsa el botón FUNC./SET, se
podrán seleccionar las opciones
[Tamaño papel], [Tipo papel] y
[Diseño Página].
25
5
Seleccione [Imprimir] y pulse el botón FUNC./SET.
Secuencia de fotogramas
Puede imprimir en una hoja de papel fotogramas de una película
seleccionados automáticamente a intervalos regulares.
Seleccione
(Imprimir) y
pulse el botón FUNC./SET.
2
Y
P
O
C
Panel de control
de película
Seleccione
[Secuenc.].
3
y elija
Si es necesario, seleccione [On],
[Off] o [Predeter.] en
(Caption).
4
5
26
Si establece el valor de
(Caption) en [On], puede imprimir
simultáneamente el número del
archivo y el tiempo transcurrido
hasta el fotograma impreso.
Si selecciona [Parám. papel] y
pulsa el botón FUNC./SET, se
podrán seleccionar las opciones
[Tamaño papel] o [Tipo papel].
Seleccione [Imprimir] y pulse el botón FUNC./SET.
Es posible que no puedan reproducirse o imprimirse películas
filmadas con una cámara diferente.
• El número de fotogramas de una película que se imprime en
cada hoja con [Secuenc.] depende del tamaño de papel, como
se indica a continuación:
(Dependiendo del número de segundos de la película, es
posible que no se imprima el número de fotogramas indicado
a continuación.)
• Tamaño tarjeta: 20 fotogramas
• Tamaño L: 42 fotogramas
• Tamaño postal: 63 fotogramas
• Tamaño ancho: 84 fotogramas
Y
P
O
C
27
Especificación e impresión de varias imágenes
(Selección de los ajustes de impresión DPOF)
El menú
(Imprimir) de la cámara permite seleccionar e
imprimir algunas o todas las imágenes de una tarjeta de memoria.
Para obtener instrucciones acerca de cómo especificar imágenes,
consulte la sección Selección de los ajustes de impresión DPOF
de la Guía del usuario de la cámara. En esta sección se explica
cómo imprimir imágenes después de seleccionarlas.
En el menú
(Imprimir),
seleccione [Imprimir] y pulse
el botón FUNC./SET.
1
Y
P
O
C
• Una vez especificadas las imágenes
(consulte la Guía del usuario de la
cámara), el botón
se
iluminará en color azul. Si pulsa el
botón
en este momento,
aparecerá la pantalla del paso 2.
Establezca el efecto de
impresión y los parámetros de
papel según sea necesario.
Establece el efecto de impresión
(pág. 14).
2
Selecciona los ajustes de papel*
(pág. 19)
* La opción [Diseño Página] no se
puede establecer en [Parám. papel] si
se selecciona [Indice] en la opción
[Ajustes impresión] en la Selección de
los ajustes de impresión DPOF.
Seleccione [Imprimir] y pulse
el botón FUNC./SET.
3
28
• La imagen comenzará a imprimirse
y, una vez terminado el proceso,
la pantalla regresará al modo de
reproducción estándar.
• Si pulsa el botón MENU, la pantalla
volverá al paso 1 y no se realizará
la impresión.
• Para imprimir la fecha, establezca el ajuste [Fecha] del menú
[Ajustes impresión] de la pantalla Selección de los ajustes de
impresión DPOF a [On]. No se puede establecer la fecha que
se desea imprimir en el paso 2.
• Cuando se ajusta el tipo de impresión en [Indice], no se pueden
imprimir la [Fecha] y el [Nº Arch.] al mismo tiempo.
• No es posible utilizar la función de impresión Foto Carnet.
• No se pueden imprimir películas.
• El número máximo de imágenes impresas en una página del tipo
de impresión Índice depende del tamaño de papel seleccionado.
• Tamaño tarjeta: 20 imágenes
• Tamaño L: 42 imágenes
• Tamaño postal: 63 imágenes
• Tamaño ancho: 84 imágenes
Y
P
O
C
29
Cancelación de la impresión
• Para cancelar la impresión de imágenes, pulse el botón FUNC./
SET. Aparecerá un mensaje de confirmación. Seleccione [OK]
y pulse el botón FUNC./SET. La impresora dejará de imprimir la
imagen actual y expulsará el papel.
Reinicio de la impresión
• Seleccione [Resumen] y pulse el botón FUNC./SET. Ahora
podrá imprimir las imágenes restantes.
• La impresión no se puede reiniciar bajo las circunstancias
siguientes:
• Si los ajustes de impresión se han cambiado antes de reiniciar.
• Si la imagen para la que se establecieron los ajustes de
impresión se eliminó antes de reiniciar.
• Si había muy poco espacio libre en la tarjeta de memoria
cuando se canceló la impresión, es posible que no se pueda
reiniciar la impresión.
• Si la impresión se canceló porque la batería de la cámara está
descargada, es posible que no se pueda reiniciar la impresión.
(Sustitúyala por una batería completamente cargada o por baterías
nuevas y, a continuación, encienda nuevamente la cámara. Si va a
utilizarla durante un período de tiempo prolongado, se recomienda
alimentar la cámara con un alimentador de corriente (se vende por
separado).)
Errores de impresión
• Si se produce algún error durante el proceso de impresión,
aparecerá un mensaje de error. Cuando se resuelva el error,
se reanudará automáticamente la impresión. Si no se reanuda
la impresión, seleccione [Seguir] y pulse el botón FUNC./SET.
Si no se puede seleccionar [Seguir], seleccione [Parar], pulse
el botón FUNC./SET y reinicie el trabajo de impresión. Consulte
Lista de mensajes (pág. 31) para obtener más información.
Y
P
O
C
30
Lista de mensajes
Si la cámara está conectada a una impresora y se produce un error,
pueden aparecer los mensajes siguientes en la pantalla LCD de la
cámara. (Según el modelo de impresora, puede que no aparezcan
algunos mensajes.)
Consulte la guía del usuario de la impresora para solucionar el
problema.
No hay papel
El cassette de papel no se instaló correctamente o
está vacío. También puede que la alimentación del
papel no funcione correctamente.
No hay tinta
No se insertó el cartucho de tinta o está vacío.
Papel y tinta
incompatibles
Atasco de papel
Y
P
O
C
El tamaño de papel y el tipo de tinta corresponden
a tipos diferentes.
El papel se atascó durante la impresión.
Bandeja salida impr.
llena
Retire el papel de la bandeja de salida de
impresión.
Error papel
El papel no está correctamente ajustado en la
impresora.
Cartucho no
compatible
Error tinta
Recargar batería
impresora
El cartucho no es compatible.
Hay un problema con el cartucho de tinta.
La batería de la impresora está descargada.
Reajustar recorte
Intenta imprimir la imagen con un estilo diferente del
seleccionado al establecer los ajustes de recorte.
Error Hard
Compruebe si se ha producido un error que no
esté relacionado con el papel o la tinta.
Error Fichero
Intentó imprimir una imagen que no es compatible
con PictBridge. Algunas imágenes grabadas con
otra cámara o modificadas con un ordenador no
se pueden imprimir.
Error impresión
Hay un error en los ajustes. Apague la impresora,
vuelva a encenderla y, a continuación, establezca
los ajustes de la impresora correctamente.
31
Impresión con impresoras de
inyección de Burbuja (series PIXMA/
SELPHY DS) que utilizan PictBridge
Impresión
Impresión sencilla
Puede imprimir las imágenes con sólo presionar un botón después
de conectar la cámara a la impresora.
1
2
32
Compruebe que
aparece
en la esquina superior
izquierda de la pantalla LCD.
Y
P
O
C
Muestre las imágenes que desee imprimir y pulse
el botón
.
Si desea modificar los ajustes de impresión, consulte Impresión
después de cambiar los ajustes de impresión (pág. 33).
Impresión después de cambiar los ajustes de
impresión
Es posible cambiar los ajustes de impresión antes de imprimir.
Compruebe que
aparece
en la esquina superior
izquierda de la pantalla LCD.
1
Pantalla de reproducción
Y
P
O
C
Establece el efecto de
impresión (pág. 36).
Establece la fecha y del
número de archivo para
impresión (pág. 35)
2
Si aparece
en la pantalla LCD,
consulte
Impresión con
impresoras de inyección de Burbuja
que utilizan Bubble Jet Direct
(pág. 71).
Muestre las imágenes que
desee imprimir y pulse el
botón FUNC./SET.
Aparecerá la pantalla de orden
de impresión.
Establece el número de copias (pág. 37)
Establece la zona de recorte (pág. 38)
Establece el tamaño, tipo y diseño
del papel (pág. 42)
Pantalla de orden
Inicia el proceso de impresión
de impresión
Aparece la información sobre el tamaño,
el tipo y el diseño de papel.
3
Seleccione los ajustes de impresión según sea
necesario.
Seleccione [Imprimir] y pulse el botón FUNC./SET.
4
• La imagen comenzará a imprimirse y, una vez terminado
el proceso, la pantalla regresará al modo de reproducción
estándar.
• Si pulsa el botón MENU, la pantalla volverá al modo de
reproducción estándar y no se realizará la impresión.
33
• No se pueden imprimir imágenes RAW.
• Es posible que no puedan reproducirse o imprimirse imágenes
tomadas con una cámara diferente.
• Es posible que no pueda imprimir si la tarjeta de memoria
contiene un gran número de imágenes (alrededor de 1000).
Cancelación de la impresión
• Para cancelar la impresión de imágenes, pulse el botón FUNC./
SET.
Aparecerá un mensaje de confirmación. Seleccione [OK] y pulse
el botón FUNC./SET. La impresora dejará de imprimir la imagen
actual y expulsará el papel.
Errores de impresión
• Si se produce algún error durante el proceso de impresión,
aparecerá un mensaje de error. Cuando se resuelva el error,
se reanudará automáticamente la impresión. Si no se reanuda
la impresión, seleccione [Seguir] y pulse el botón FUNC./SET.
Si no se puede seleccionar [Seguir], seleccione [Parar], pulse
el botón FUNC./SET y reinicie el trabajo de impresión. Consulte
Lista de mensajes (pág. 50) para obtener más información.
• En las impresoras equipadas con un panel de control, aparece
en el mismo un mensaje o número de error. Consulte la guía
del usuario de la impresora para obtener información sobre las
soluciones correspondientes a cada mensaje o número de error.
Y
P
O
C
34
Selección de ajustes de impresión
Ajuste predeterminado
• La opción Predeter. es un ajuste original de la impresora.
• Están disponibles las opciones [Fecha/Nº Arch.], [Efecto de
impresión], [Tamaño papel], [Tipo papel] y [Diseño Página].
• En las impresoras con un panel de control, puede cambiar los
ajustes para aquellos elementos establecidos en [Predeter.]
con el panel de control de la impresora.
Ajuste de la opción de impresión de fecha y
número de archivo
Y
P
O
C
Seleccione [ ] y, a
continuación, la opción de
impresión de fecha y número
de archivo.
Puede establecer la impresión de
la fecha y del número de archivo
de la siguiente manera:
1
Fecha
Imprime la fecha.
Nº Arch.
Sólo imprime el número
de archivo.
Ambos
Imprime la fecha y el
número de archivo.
Off
No imprime ni la fecha ni
el número de archivo.
Predeter.
Los efectos de impresión
variarán en función de la
configuración de la
impresora. Consulte la
guía de usuario de la
impresora para obtener
más información.
35
Si selecciona una imagen con la fecha de disparo incrustada con
una cámara en un modo de Impresión en tamaño postal, la opción
[ ] se establecerá en [Off]. Si selecciona las opciones [Fecha],
[Nº Arch.] o [Ambos], se imprimirán tanto la fecha como el
número de archivo en la información incrustada, a su vez
también impresa.
Ajuste del efecto de impresión
Esta función usa la información de disparo de la cámara para
optimizar los datos de imagen, lo que permite obtener copias
de alta calidad. Puede seleccionar los efectos de impresión
siguientes. No obstante, puede que no obtenga los resultados de
impresión deseados dependiendo de la imagen.
Y
P
O
C
Los efectos de impresión variarán en función de la
configuración de la impresora. Consulte la guía de usuario de
la impresora para obtener más información.
Usa la información de disparo de la cámara para crear copias
On
de calidad.
Off
Imprime sin agregar ningún efecto.
Imprime en colores más vivos que la opción [On], como el
Vivid
verde de los árboles o el azul del mar y el cielo.
NR
Imprime con un efecto de reducción de ruido.
Vivid+NR Imprime sumando el efecto de las opciones [Vivid] y [NR].
Imprime con mayor claridad la cara de una persona que aparece
Cara
oscura a causa de una foto tomada a contraluz, etc.
O. Rojos1 Imprime con el efecto de ojos rojos corregido.
O. Rojos2 Imprime mediante 3 ajustes; [Cara], [O. Rojos1] y [NR]
Predeter.
Seleccione [ ] y elija una
opción de efecto de impresión.
1
36
Ajuste del número de copias
Seleccione [ ] y elija el
número de copias.
1
Puede seleccionar entre 1 a
99 copias.
Y
P
O
C
37
Ajustes del área de impresión (recortar)
Puede especificar la impresión de una parte de la imagen.
Configure la opción [Parám. papel] (pág. 42) antes de establecer
los ajustes de recorte. Si se cambia la opción [Parám. papel]
después de haber realizado ajustes de recorte, tendrá que volver
a seleccionar dichos ajustes.
Seleccione [recortar] y pulse
el botón FUNC./SET.
El marco de recorte aparecerá
en el centro de la imagen. Si ya
se seleccionó un ajuste de
recorte para la imagen, el marco
aparecerá alrededor de la parte
seleccionada previamente.
1
Y
P
O
C
La pantalla del ajuste de recorte variará en función del
modelo de cámara. Compruebe cuáles de las siguientes
pantallas aparecen antes de seleccionar los ajustes.
a
b
Marco de recorte
Pasos 2a y 3a
Pasos 2b y 3b
* Continúe con el procedimiento a o b en
función de la pantalla que aparezca.
38
Cuando la pantalla a
aparece
Recorte la imagen.
2a
Cambio del tamaño del marco de recorte
• Presione la palanca o el botón de zoom para ajustar el tamaño
del marco de recorte.
• El marco de recorte puede ajustarse a un mínimo de
aproximadamente la mitad de la imagen mostrada (en alto y
en ancho) o a un máximo del mismo tamaño de la imagen.
• Si intenta sobrepasar el límite máximo del marco de recorte,
se cancelará dicho ajuste.
• Al imprimir una imagen que se amplió con la opción de
recorte, la calidad de la imagen será menor cuanto mayor
sea el nivel de ampliación.
Y
P
O
C
Movimiento del marco de recorte
• Mueva el marco de recorte con el selector Omni o los botones
de dirección (arriba, abajo, derecha e izquierda).
Giro del marco de recorte
• Para girar el marco de recorte, pulse el botón DISP.
(o DISPLAY).
Pulse el botón MENU para cancelar el ajuste.
el botón FUNC./SET para cerrar el menú de
3a Pulse
ajuste.
39
Cuando la pantalla b
aparece
Recorte la imagen.
2b
Cambio del tamaño del marco de recorte
• Pulse los botones de dirección arriba y abajo para ajustar el
tamaño del marco de recorte.
• El marco de recorte puede ajustarse a un mínimo de
aproximadamente la mitad de la imagen mostrada (en alto y
en ancho) o a un máximo del mismo tamaño de la imagen.
• Si intenta sobrepasar el límite máximo del marco de recorte,
se cancelará dicho ajuste.
• Al imprimir una imagen que se amplió con la opción de
recorte, la calidad de la imagen será menor cuanto mayor
sea el nivel de ampliación.
Y
P
O
C
Giro del marco de recorte
• Puede girar el marco de recorte mediante los botones de
dirección izquierda y derecha.
Movimiento del marco de recorte
• Pulse el botón FUNC./SET y use los botones de dirección
(arriba, abajo, derecha e izquierda) para mover el marco de
recorte. Pulse de nuevo el botón FUNC./SET para cambiar
el tamaño del marco y girarlo.
Pulse el botón MENU,
seleccione [OK] y pulse el
botón FUNC./SET.
3b
40
Seleccione [Cancelar p.] para
cancelar el ajuste de recorte
seleccionado. Si se selecciona
[Editar], se mostrará el contenido
de la pantalla anterior.
• El ajuste de recorte sólo se aplica a una imagen.
• El ajuste de recorte se cancela con las operaciones siguientes:
• Cuando se establecen los ajustes de recorte para otra imagen.
• Cuando se cierra el modo de impresión (al apagar la cámara,
cambiar de modo o desconectar el cable de conexión).
• Dependiendo de los ajustes de recorte seleccionados, puede
que toda la fecha de disparo (o parte de ella) que se ha
incrustado en las imágenes tomadas con una cámara que
incluye el modo Impresión en tamaño postal no se imprima
correctamente.
• Las imágenes más pequeñas de 640 × 480 píxeles no se
pueden recortar.
Y
P
O
C
• Los ajustes de tamaño de papel y diseño de página determinan
la forma del marco de recorte.
• Use la pantalla LCD para establecer los ajustes de recorte.
Puede que el marco de recorte no se muestre correctamente
en una pantalla de televisión.
41
Selección de los parámetros de papel
Seleccione [Parám. papel] y
pulse el botón FUNC./SET.
1
Aparecerá la pantalla de ajuste de
tamaño del papel.
Seleccione un tamaño de
papel y pulse el botón
FUNC./SET.
2
Y
P
O
C
Están disponibles los siguientes
tamaños de papel*: 10 × 15 cm,
5" × 7", 13 × 18 cm, 8.5" × 11", A4,
5.4×8.6 cm, 20 × 25 cm, 25×30 cm,
A3, A3+/13" × 19", 36 × 43 cm,
10.1 × 18 cm y Predeter.
Aparecerá la pantalla de ajuste del
tipo de papel.
* Los tamaños de papel varían de un
país a otro.
Seleccione un tipo de papel y
pulse el botón FUNC./SET.
3
42
Están disponibles los siguientes
tipos de papel: Foto, Foto Rapid,
Fine Art, Semibrillo, Normal y
Predeter.
Consulte la guía del usuario de la
impresora para ver el tipo de papel
que se puede usar para cada
ajuste de tipo de papel.
Aparece la pantalla Diseño Página.
Seleccione un diseño.
Se pueden seleccionar los diseños
siguientes:
Predeter.
4
Los efectos de impresión
variarán en función de la
configuración de la
impresora. Consulte la
guía de usuario de la
impresora para obtener
más información.
Bordeado
Imprime con un borde.
Sin bordes Imprime la imagen sin
bordes.
Imág./pág
Imprime 2, 4, 9 ó 16
imágenes en una única
hoja de papel (pág. 44).
Imprime la información
Bordeado
de disparo* en una hoja
de papel en blanco
(tamaño L o mayor).
Imprime imágenes de
20-up
impresión DPOF en
grupos de 20 imágenes en
papel tamaño A4. La
información de disparo se
imprimirá junto a la
imagen.
Las imágenes con ajustes
35-up
de impresión DPOF se
imprimen de forma que
encajen 35 imágenes en
un papel tamaño A4,
dispuesta como una hoja
de contacto.
* Imprime el nombre de la cámara,
el modo de disparo, la velocidad
del obturador, el valor de abertura,
la compensación de exposición,
la velocidad ISO, etc. de la
información de Exif.
Y
P
O
C
43
Impresión de varias imágenes en una hoja de papel
• Si selecciona [10 x 15 cm] en el ajuste de tamaño de papel
(pág. 42), podrá especificar los siguientes ajustes de diseño.
2
Se colocan 2 imágenes (altura 2 x ancho 1) de las
mismas dimensiones en una única hoja de papel.
4
Se colocan 4 imágenes (altura 2 x ancho 2) de las
mismas dimensiones en una única hoja de papel.
9
Se colocan 9 imágenes (altura 3 x ancho 3) de las
mismas dimensiones en una única hoja de papel.
16
Se colocan 16 imágenes (altura 4 x ancho 4) de las
mismas dimensiones en una única hoja de papel.
Y
P
O
C
[Ejemplo de impresión 1] Impresión de 3 copias de la imagen A en 2-up
Número
de copias
(pág. 37)
Diseño
Imagen A:
[3] copias
2
El ajuste de impresión DPOF (pág. 47) permite imprimir distintas
imágenes por separado especificando el número de fotogramas
que se imprimirán por imagen.
[Ejemplo de impresión 2] Impresión de 3 copias de la imagen A y
2 copias de la imagen B en 9-up
Ajustes de
impresión
DPOF*
(pág. 47)
Imagen A:
[3] copias
Imagen B:
[2] copias
Diseño
9
* Consulte la Guía del usuario de la cámara para obtener instrucciones
acerca de los métodos de ajuste de impresión DPOF.
44
5
Seleccione un diseño y pulse el botón FUNC./SET.
Con esto finalizan las operaciones de parámetros
del papel.
Volverá a mostrarse la pantalla de orden de impresión.
• Las imágenes se imprimirán con bordes, incluso si estuviese
seleccionada la opción [Sin bordes] con la cámara en los
siguientes casos:
• Cuando está seleccionada la opción [Normal] en la opción [Tipo papel]
de la cámara (no se puede seleccionar dependiendo del modelo de
impresora conectada).
• En el caso de impresoras equipadas con un panel de control, al
seleccionar [Normal] con la impresora y la opción [Predeter.] está
seleccionada en la opción [Tipo papel] de la cámara.
Y
P
O
C
45
Impresión de películas (Imprimir película)
Puede elegir un solo fotograma de una película e imprimirlo en
una hoja de papel.
Seleccione la película que
desee imprimir y pulse el
botón FUNC./SET.
1
2
Aparece el panel de control de
película.
Si pulsa el botón
en lugar del
botón FUNC./SET, comenzará la
impresión de la película.
Muestre el fotograma que
desea imprimir en la pantalla
LCD, seleccione
(Imprimir)
y, a continuación, pulse el
botón FUNC./SET.
Y
P
O
C
Panel de control
de película
Consulte la sección Ver películas
de la Guía del usuario de la cámara
acerca de cómo mostrar el fotograma
de la película que desea imprimir.
Seleccione
y ajuste el
número de copias.
3
4
Puede seleccionar entre 1 a
99 copias.
Si selecciona [Parám. papel] y
pulsa el botón FUNC./SET, se
podrán seleccionar las opciones
[Tamaño papel], [Tipo papel] y
[Diseño Página].
Seleccione [Imprimir] y pulse el botón FUNC./SET.
Es posible que no puedan reproducirse o imprimirse películas
filmadas con una cámara diferente.
46
Especificación e impresión de varias imágenes
(Selección de los ajustes de impresión DPOF)
El menú
(Imprimir) de la cámara permite seleccionar e
imprimir algunas o todas las imágenes de una tarjeta de memoria.
Para obtener instrucciones acerca de cómo especificar imágenes,
consulte la sección Selección de los ajustes de impresión DPOF
de la Guía del usuario de la cámara. En esta sección se explica
cómo imprimir imágenes después de seleccionarlas.
En el menú
(Imprimir),
seleccione [Imprimir] y pulse
el botón FUNC./SET.
1
• Una vez especificadas las
imágenes (consulte la Guía del
usuario de la cámara), el botón
se iluminará en color azul.
Si pulsa el botón
en este
momento, aparecerá la pantalla
del paso 2.
Y
P
O
C
Establezca el efecto de
impresión y los parámetros de
papel según sea necesario.
2
Establece el efecto de impresión
(pág. 36).
Selecciona los ajustes de papel*
(pág. 42)
* La opción [Diseño Página] no se
puede establecer en [Parám. papel] si
se selecciona [Indice] en la opción
[Ajustes impresión] en la Selección de
los ajustes de impresión DPOF.
Tampoco se pueden seleccionar los
tamaños de papel A3 y A3+/13" × 19".
Seleccione [Imprimir] y pulse
el botón FUNC./SET.
3
• La imagen comenzará a imprimirse
y, una vez terminado el proceso,
la pantalla regresará al modo de
reproducción estándar.
• Si pulsa el botón MENU, la pantalla
volverá al paso 1 y no se realizará
la impresión.
47
• Para imprimir la fecha, establezca el ajuste [Fecha] del menú
[Ajustes impresión] de la pantalla Selección de los ajustes de
impresión DPOF a [On]. No se puede establecer la fecha que
se desea imprimir en el paso 2.
• Dependiendo de la impresora, cuando el tipo de impresión se
ajusta en [Indice], tanto [Fecha] como [Nº Arch.] no se pueden
imprimir.
• Dependiendo de la impresora, el [Nº Arch.] no se podrá imprimir
cuando el tipo de impresión se establezca en [Estándar].
• No se pueden imprimir películas.
Y
P
O
C
48
Cancelación de la impresión
• Pulse el botón FUNC./SET para cancelar la impresión.
Aparecerá un mensaje de confirmación. Seleccione [OK] y
pulse el botón FUNC./SET. La impresora dejará de imprimir la
imagen actual y expulsará el papel.
Reinicio de la impresión
• Seleccione [Resumen] y pulse el botón FUNC./SET. Ahora podrá
imprimir las imágenes restantes.
• La impresión no se puede reiniciar bajo las circunstancias
siguientes:
• Si los ajustes de impresión se han cambiado antes de reiniciar.
• Si la imagen para la que se establecieron los ajustes de
impresión se eliminó antes de reiniciar.
• Si había muy poco espacio libre en la tarjeta de memoria cuando
se canceló la impresión, es posible que no se pueda reiniciar la
impresión.
• Si la impresión se canceló porque la batería de la cámara está
descargada, es posible que no se pueda reiniciar la impresión.
(Sustitúyala por una batería completamente cargada o por baterías
nuevas y, a continuación, encienda nuevamente la cámara. Si va a
utilizarla durante un período de tiempo prolongado, se recomienda
alimentar la cámara con un alimentador de corriente (se vende
por separado).)
Errores de impresión
• Si se produce algún error durante el proceso de impresión,
aparecerá un mensaje de error. Cuando se resuelva el error,
se reanudará automáticamente la impresión. Si no se reanuda
la impresión, seleccione [Seguir] y pulse el botón FUNC./SET.
Si no se puede seleccionar [Seguir], seleccione [Parar], pulse
el botón FUNC./SET y reinicie el trabajo de impresión. Consulte
Lista de mensajes (pág. 50) para obtener más información.
• En las impresoras equipadas con un panel de control, aparece
en el mismo un mensaje o número de error. Consulte la guía
del usuario de la impresora para obtener información sobre las
soluciones correspondientes a cada mensaje o número de error.
Y
P
O
C
49
Lista de mensajes
Si la cámara está conectada a una impresora y se produce un
error, pueden aparecer los mensajes siguientes en la pantalla
LCD. (Dependiendo del modelo de impresora, algunos mensajes
no aparecerán.)
• Consulte la guía del usuario de la impresora para solucionar el
problema.
: La impresión se reinicia si selecciona [Seguir] y pulsa el botón
FUNC./SET. Para solucionar otros mensajes de error que
puedan aparecer, consulte la guía del usuario de la impresora.
No hay papel
Atasco de papel
Error papel
No hay tinta
Error de cassette
de tinta
Y
P
O
C
Bajo nivel de tinta
Absorbedor de tinta
lleno
Error tinta
50
Inserte el papel en la impresora y, a continuación,
vuelva a ejecutar la impresión.
El papel se atascó durante la impresión. Seleccione
[Parar] para cancelar la impresión. Quite el papel
atascado, ponga más papel en la impresora y vuelva a
realizar la impresión.
El papel no está correctamente ajustado en la
impresora, o bien se ha insertado un papel diferente al
configurado en la impresora. Verifique el tipo y tamaño
de papel que está usando. Asimismo, abra la bandeja
de salida de papel si está cerrada.
Además, cierre la guía de la bandeja de CD-R si está
abierta.
El depósito de tinta está vacío o no está instalado en
la impresora. Según el número de veces que
parpadee la luz de error de la impresora y el mensaje
de error que aparezca sabrá cuál es la solución.
Consulte la guía del usuario de la impresora para
solucionar el problema.
El depósito de tinta deberá reemplazarse en breve.
Prepare un nuevo depósito de tinta. Si selecciona
[Seguir] en la pantalla de error, podrá reiniciar la
impresión.
Si selecciona [Seguir] en la pantalla de error,
podrá reiniciar la impresión. Solicite la sustitución del
absorbedor de tinta en el Servicio a clientes de Canon
más cercano entre los que aparecen en la lista de
contacto facilitada con la impresora o incluida en la
guía del usuario. El usuario no puede cambiar el
absorbedor de tinta.
Hay un problema con la tinta. Si la luz de error de
la impresora parpadea y aparece un mensaje de error,
consulte la guía del usuario de la impresora para
identificar el problema y su solución.
Error de impresora
Impresora en uso
Error de papel
Tapa impresora
abierta
No cabezal
impresión
Error Hard
Error Fichero
Desconecte el cable de la impresora y apáguela.
A continuación, vuelva a conectar el cable y encienda
la impresora. Si el error continúa, consulte al Servicio
a clientes de Canon más cercano (enumerado en la
lista de contacto suministrada con la impresora).
La impresora está calentándose o en uso. La
impresora comienza a imprimir automáticamente las
imágenes de la cámara tras finalizar la impresión en
curso.
Por otro lado, cuando se muestra un mensaje sobre la
comprobación de la posición de la palanca de grosor
del papel, compruebe la posición de la palanca de
grosor del papel y, a continuación, pulse el botón OK
de la impresora.
Ajuste la palanca de espesor del papel en la posición
correcta.
Cierre la tapa de la impresora correctamente.
Y
P
O
C
Tamaño papel
incompatible
Error impresión
Chequear opciones
impresión
Si la luz de error de la impresora parpadea y aparece
un mensaje de error, consulte la guía del usuario de la
impresora para identificar el problema y su solución.
Si la luz de error de la impresora parpadea y aparece
un mensaje de error, consulte la guía del usuario de la
impresora para identificar el problema y su solución.
Intentó imprimir una imagen que no es compatible con
PictBridge. Algunas imágenes grabadas con otra
cámara o modificadas con un ordenador no se pueden
imprimir.
El ajuste de la impresora establece un tamaño de
papel diferente al especificado. Seleccione [Seguir] en
la pantalla de error para ver la pantalla de ajuste del
tamaño de papel. Modifique el tamaño de papel (sólo
aparecen los tamaños de papel que puede
seleccionar).
Compruebe que se ha seleccionado el tamaño de
papel correcto. Si aparece este mensaje de error y se
había seleccionado el tamaño de papel correcto,
apague la impresora y vuelva a encenderla. Si el error
continúa, consulte al Servicio a clientes de Canon más
cercano (enumerado en la lista de contacto
suministrada con la impresora).
No es posible imprimir con los ajustes seleccionados.
Seleccione [Seguir] en la pantalla de error para ver
la pantalla de orden de impresión. Compruebe los
ajustes de impresión (en la pantalla sólo aparecen
los ajustes admitidos), cámbielos si es necesario y
vuelva a realizar la impresión.
51
Impresión con impresoras que no son
de la marca Canon compatibles con
PictBridge
Impresión
1
Compruebe que
aparece
en la esquina superior
izquierda de la pantalla LCD.
Y
P
O
C
Tras este paso, siga los procedimientos descritos en la sección
Impresión con impresoras de inyección de Burbuja (series
PIXMA/SELPHY DS) que utilizan PictBridge (pág. 32) para
imprimir las imágenes.
Sin embargo, no pueden ajustarse las opciones de menú
siguientes.
• Efecto de impresión (pág. 36): [Vivid], [NR], [Vivid+NR],
[Cara ], [O. Rojos1], [O. Rojos2]
• Tamaño del papel (pág. 42): [5" × 7"] o [13 ×18cm]
• Tipo papel (pág. 42): [Fine Art], [Semibrillo]
• Diseño Página (pág. 43): [Bordeado ], [20-up ], [35-up ]
Consulte también la guía del usuario que se incluye con la
impresora.
52
Impresión con impresoras de la
serie SELPHY CP que utilizan Canon
Direct Print
Si utiliza la impresora Canon Compact Photo
Printer SELPHY CP750/CP740/CP730/CP720/
CP710/CP510
En los casos siguientes, seleccione
desde [Mét. impresión] en
el menú [Configuración] de la cámara:
• Cuando imprima imágenes de tamaño (panorám.) disparadas
con una cámara digital Canon en papel de tamaño ancho.
• Cuando imprima imágenes de personas después de la
corrección de los ojos rojos.
Tras este paso, consulte la sección Impresión con impresoras
de la serie SELPHY ES/serie SELPHY CP que utilizan PictBridge
(pág. 10).
Impresión
Y
P
O
C
Impresión sencilla
Puede imprimir las imágenes con sólo presionar un botón después
de conectar la cámara a la impresora.
1
2
Compruebe que
aparece
en la esquina superior
izquierda de la pantalla LCD.
Muestre las imágenes que desee imprimir y pulse
el botón
.
Si desea modificar los ajustes de impresión, consulte
Impresión después de cambiar los ajustes de
impresión (pág. 54).
53
Impresión después de cambiar los ajustes de
impresión
Es posible cambiar los ajustes de impresión antes de imprimir.
Compruebe que
aparece
en la esquina superior
izquierda de la pantalla LCD.
1
Pantalla de reproducción
Si aparece
en la pantalla LCD,
consulte
Impresión con
impresoras de la serie SELPHY
ES/serie SELPHY CP que utilizan
PictBridge (pág. 10).
Y
P
O
C
Selecciona el número
de copias (pág. 55)
Muestre las imágenes que
desee imprimir y pulse el
botón FUNC./SET.
Aparecerá la pantalla de orden de
impresión.
2
Establece el estilo de impresión
(pág. 55)
Establece el área de impresión
(recortar) (pág. 57)
Pantalla de orden
de impresión
Aparece la información sobre el
tamaño, el tipo y el diseño de papel.
3
4
54
Seleccione los ajustes de impresión según sea
necesario.
Seleccione [Imprimir] y pulse el botón FUNC./SET.
Si pulsa el botón MENU, la pantalla volverá al modo de
reproducción estándar y no se realizará la impresión.
• No se pueden imprimir imágenes RAW.
• Es posible que no puedan reproducirse o imprimirse imágenes
tomadas con una cámara diferente.
Cancelación de la impresión
• No se puede detener la impresión cuando se imprime únicamente
una copia de una imagen. Si imprime más de una copia o más de
una imagen, puede cancelar el proceso de impresión presionando
el botón FUNC./SET. Una vez terminada la impresión actual,
aparecerá un mensaje de confirmación. Seleccione [OK] y pulse el
botón FUNC./SET.
Errores de impresión
• Si se produce algún error durante el proceso de impresión,
aparecerá un mensaje de error. Seleccione [Parar] o [Resumen]
y pulse el botón FUNC./SET. Consulte Lista de mensajes
(pág. 70) para obtener más información.
Puede que la opción [Resumen] no aparezca con algunos tipos
de error. En tal caso, seleccione [Parar].
Y
P
O
C
Selección de ajustes de impresión
Ajuste del número de copias
1
Seleccione [
] e indique el número de copias.
Puede seleccionar entre 1 a 99 copias.
Ajuste del estilo de impresión (Imagen, Bordes
y Fecha)
Imagen
Bordes
Fecha
Estándar
Imprime una imagen por página.
Múltiple*1
Imprime ocho copias de la misma
imagen en la página.
Foto Carnet*2
Imprime en un tamaño especificado
(pág. 61).
Sin bordes
Imprime la imagen sin bordes.
Bordeado
Imprime con un borde.
On
Agrega la fecha a la copia impresa.
Off
Imprime sin incluir la fecha.
*1 Esta opción sólo se puede seleccionar al imprimir en papel tamaño tarjeta.
*2 Esta opción se puede seleccionar al imprimir imágenes de gran tamaño.
55
1
En la pantalla de orden de impresión, seleccione
[Estilo] y pulse el botón FUNC./SET.
Seleccione [Imagen],
[Bordes] o [Fecha].
2
Seleccione los ajustes
según sea necesario.
3
Y
P
O
C
Pulse el botón MENU para
finalizar el proceso de
selección de ajustes.
4
En las copias múltiples o sin
bordes, las partes superior e
inferior de la imagen pueden
aparecer ligeramente recortadas.
Si no especificó un ajuste de
Marco del área de impresión recorte, aparecerá un marco
alrededor del área de impresión
de la imagen seleccionada,
permitiéndole comprobar la
parte que se va a recortar.
Si selecciona una imagen con la fecha de disparo incrustada con
una cámara en un modo de Impresión en tamaño postal, la
opción [Fecha] del menú [Estilo] se establecerá en [Off]. Si
establece la opción [Fecha] en [On], las fechas aparecerán dos
veces en la imagen impresa.
56
• Al imprimir varias copias, los [Bordes] y la [Fecha] no se podrán
establecer. (Las imágenes se imprimen sin fecha ni bordes.)
• Prácticamente toda el área mostrada en la pantalla LCD se
imprimirá en las copias con bordes.
Ajustes del área de impresión (recortar)
Puede especificar la parte de la imagen que desea imprimir.
Ajuste primero el estilo de impresión (Imagen, Bordes y Fecha)
antes de establecer los ajustes de recorte. Si se cambia el estilo
de impresión después de haber realizado ajustes de recorte,
tendrá que volver a seleccionar dichos ajustes.
Y
P
O
C
En la pantalla de orden
de impresión, seleccione
[recortar] y pulse el botón
FUNC./SET.
El marco de recorte aparecerá
en el centro de la imagen. Si ya
se seleccionó un ajuste de
recorte para la imagen, el marco
aparecerá alrededor de la parte
seleccionada previamente.
1
La pantalla del ajuste de recorte variará en función del
modelo de cámara. Compruebe cuáles de las siguientes
pantallas aparecen antes de seleccionar los ajustes.
a
b
Marco de recorte
Pasos 2a y 3a
Pasos 2b y 3b
* Continúe con el procedimiento a o b en
función de la pantalla que aparezca.
57
Cuando la pantalla a
aparece
Recorte la imagen.
2a
Cambio del tamaño del marco de recorte
• Presione la palanca o el botón de zoom para ajustar el tamaño
del marco de recorte.
• El marco de recorte puede ajustarse a un mínimo de
aproximadamente la mitad de la imagen mostrada (en alto y
en ancho) o a un máximo del mismo tamaño de la imagen.
• Si intenta sobrepasar el límite máximo del marco de recorte,
se cancelará dicho ajuste.
• Al imprimir una imagen que se amplió con la opción de
recorte, la calidad de la imagen será menor cuanto mayor
sea el nivel de ampliación. Si esto ocurre, el marco de
recorte se mostrará en rojo.
Y
P
O
C
Movimiento del marco de recorte
• Mueva el marco de recorte con el selector omni o los botones
de dirección (arriba, abajo, derecha e izquierda).
Giro del marco de recorte
• Para girar el marco de recorte, pulse el botón DISP.
(o DISPLAY).
Pulse el botón MENU para cancelar el ajuste.
el botón FUNC./SET para cerrar el menú de
3a Pulse
ajuste.
58
Cuando la pantalla b
aparece
Recorte la imagen.
2b
Cambio del tamaño del marco de recorte
• Pulse los botones de dirección arriba y abajo para ajustar el
tamaño del marco de recorte.
• El marco de recorte puede ajustarse a un mínimo de
aproximadamente la mitad de la imagen mostrada (en alto y
en ancho) o a un máximo del mismo tamaño de la imagen.
• Si intenta sobrepasar el límite máximo del marco de recorte,
se cancelará dicho ajuste.
• Al imprimir una imagen que se amplió con la opción de
recorte, la calidad de la imagen será menor cuanto mayor
sea el nivel de ampliación. Si esto ocurre, el marco de
recorte se mostrará en rojo.
Y
P
O
C
Giro del marco de recorte
• Puede girar el marco de recorte mediante los botones de
dirección izquierda y derecha.
Movimiento del marco de recorte
• Pulse el botón FUNC./SET y use los botones de dirección
(arriba, abajo, derecha e izquierda) para mover el marco de
recorte. Pulse de nuevo el botón FUNC./SET para cambiar
el tamaño del marco y girarlo.
Pulse el botón MENU para
seleccionar [OK] y pulse el
botón FUNC./SET.
3b
Seleccione [Cancelar p.] para
cancelar el ajuste de recorte
seleccionado. Si se selecciona
[Editar], se mostrará el contenido
de la pantalla anterior.
59
• El ajuste de recorte sólo se aplica a una imagen.
• El ajuste de recorte se cancela con las operaciones siguientes:
• Cuando se establecen los ajustes de recorte para otra imagen.
• Cuando se cierra el modo de impresión (al apagar la cámara,
cambiar de modo o desconectar el cable de conexión).
• Dependiendo de los ajustes de recorte seleccionados, puede
que toda la fecha de disparo (o parte de ella) que se ha
incrustado en las imágenes tomadas con una cámara que
incluye el modo Impresión en tamaño postal no se imprima
correctamente.
• Las imágenes más pequeñas de 640 × 480 píxeles no se pueden
recortar.
Y
P
O
C
• Los ajustes de imagen y borde seleccionados determinan la
forma del marco de recorte.
• Use la pantalla LCD para establecer los ajustes de recorte.
Puede que el marco de recorte no se muestre correctamente
en una pantalla de televisión.
60
Impresión con un tamaño específico
(Impresión Foto Carnet)
Puede especificar como Foto Carnet* el área de una imagen que
desea imprimir y el tamaño de impresión.
* Es posible que las imágenes obtenidas mediante la función de impresión
Foto Carnet no sean admitidas como válidas para certificados oficinales.
Consulte al organismo que solicite la fotografía.
Se puede especificar el tamaño de impresión sólo para imágenes
de resolución L (grande) almacenadas en la cámara conectada a
la impresora.
1
2
Y
P
O
C
En la pantalla de orden de
impresión, seleccione
[Estilo] y pulse el botón
FUNC./SET.
Seleccione [Imagen] y [Foto
Carnet]. Para especificar
el tamaño de impresión,
seleccione el tamaño del
largo, a continuación el del
corto y pulse el botón FUNC./
SET.
Para especificar el tamaño,
seleccione primero el tamaño del
largo y, a continuación, el del corto.
En la tabla siguiente puede ver las
combinaciones disponibles para la
longitud de los lados corto y largo.
Pulse el botón MENU para salir sin
realizar ninguna configuración de
recorte.
61
z Combinaciones disponibles
: Tamaño de impresión disponible
Corto
Largo
20 mm
25 mm
30 mm
35 mm
40 mm
45 mm
50 mm
25 mm
30 mm
35 mm
40 mm
45 mm
50 mm
55 mm
60 mm
70 mm
1.4 pda
1.8 pda
2.0 pda
1.5 pda
1.8 pda
Y
P
O
C
2.0 pda
Recorte la imagen para
especificar el área de
impresión.
Consulte el paso 2 de Ajustes del
área de impresión (recortar)
(págs. 58 y 59) para saber cómo
recortar la imagen.
3
4
62
Marco de recorte
La pantalla del ajuste de recorte
variará en función del modelo de
cámara. Siga los pasos
correspondientes a la información
que aparece en la pantalla de la
cámara.
Pulse el botón MENU para finalizar
el recorte.
Pulse el botón FUNC./SET para cerrar el menú de
ajuste.
• El ajuste de tamaño de impresión sólo se aplica a una imagen.
• El ajuste de tamaño de impresión se cancela con las operaciones
siguientes:
• Cuando se establecen los ajustes de tamaño de impresión
para otra imagen.
• Cuando se cierra el modo de impresión (al apagar la cámara,
cambiar de modo o desconectar el cable de conexión).
• La forma del marco de recorte varía según el tamaño de
impresión especificado.
• Use la pantalla LCD para especificar los ajustes de tamaño
de impresión. Puede que el marco de recorte no se muestre
correctamente en una pantalla de televisión.
Y
P
O
C
63
Impresión de películas (Imprimir película)
Seleccione la película que
desee imprimir y pulse el
botón FUNC./SET.
1
Aparece el panel de control de
película.
Si pulsa el botón
en lugar del
botón FUNC./SET, comenzará la
impresión de la película.
Foto a foto
Y
P
O
C
Puede elegir un solo fotograma de una película e imprimirlo en
una hoja de papel.
2
Muestre el fotograma que
desea imprimir en la pantalla
LCD, seleccione
(Imprimir) y, a continuación,
pulse el botón FUNC./SET.
Consulte la sección Ver películas
de la Guía del usuario de la
Panel de control de película cámara acerca de cómo mostrar
el fotograma de la película que
desea imprimir.
Seleccione
y elija [única].
3
Seleccione
y ajuste el
número de copias.
4
64
Puede seleccionar entre 1 y 99
copias.
Al seleccionar [Estilo] y pulsar el
botón FUNC./SET podrá
seleccionar [Imagen] (sólo se puede
ajustar el tamaño carné) y [Bordes].
5
Seleccione [Imprimir] y pulse el botón FUNC./SET.
Secuencia de fotogramas
Puede imprimir en una hoja de papel fotogramas de una película
seleccionados automáticamente a intervalos regulares.
Seleccione
(Imprimir) y
pulse el botón FUNC./SET.
2
Y
P
O
C
Panel de control de película
Seleccione
[Secuenc.].
3
y elija
En caso de que sea necesario,
seleccione [On] u [Off] en
(Caption).
4
5
Si establece el valor de
(Caption) en [On], puede imprimir
simultáneamente el número del
archivo y el tiempo transcurrido
hasta el fotograma impreso.
Seleccione [Imprimir] y pulse el botón FUNC./SET.
Es posible que no puedan reproducirse o imprimirse películas
filmadas con una cámara diferente.
65
• El número de fotogramas de una película que se imprime en
cada hoja con [Secuenc.] depende del tamaño de papel, como
se indica a continuación:
Dependiendo del número de segundos de la película, es
posible que no se imprima el número de fotogramas indicado
a continuación.
• Tamaño tarjeta: 20 fotogramas
• Tamaño L: 42 fotogramas
• Tamaño postal: 63 fotogramas
• Tamaño ancho: 63 fotogramas
Y
P
O
C
66
Especificación e impresión de varias imágenes
(Selección de los ajustes de impresión DPOF)
El menú
(Imprimir) de la cámara permite seleccionar e
imprimir algunas o todas las imágenes de una tarjeta de memoria.
Para obtener instrucciones acerca de cómo especificar imágenes,
consulte la sección Selección de los ajustes de impresión DPOF
de la Guía del usuario de la cámara. En esta sección se explica
cómo imprimir imágenes después de seleccionarlas.
En el menú
(Imprimir),
seleccione [Imprimir] y pulse
el botón FUNC./SET.
1
Y
P
O
C
• Una vez especificadas las
imágenes (consulte la Guía del
usuario de la cámara), el botón
se iluminará en color azul.
Si pulsa el botón
en este
momento, aparecerá la pantalla
del paso 2.
Establezca los ajustes de
estilo de impresión según
sea necesario.
2
• Consulte Ajuste del estilo de
impresión (Imagen, Bordes
y Fecha) (pág. 55).
• No se puede ajustar un estilo de
impresión si [Ajustes impresión]
en la pantalla Selección de los
ajustes de impresión DPOF se
establece en [Indice].
Seleccione [Imprimir] y pulse
el botón FUNC./SET.
3
• La imagen comenzará a imprimirse
y, una vez terminado el proceso,
la pantalla regresará al modo de
reproducción estándar.
• Si pulsa el botón MENU, la pantalla
volverá al paso 1 y no se realizará
la impresión.
67
• Para imprimir la fecha, establezca el ajuste [Fecha] del menú
[Ajustes impresión] de la pantalla Selección de los ajustes de
impresión DPOF a [On]. No se puede ajustar la impresión de la
fecha con el menú [Estilo] del paso 2.
• Cuando el tipo de impresión se ajusta en [Indice], la [Fecha] no
se puede imprimir.
• Cuando el tipo de impresión se ajusta en [Estándar], el [Nº Arch.]
no se puede imprimir.
• No es posible utilizar la función de impresión Foto Carnet.
• El número máximo de imágenes impresas en una página del tipo de
impresión Índice depende del tamaño de papel seleccionado.
• Tamaño tarjeta: 20 imágenes
• Tamaño L: 42 imágenes
• Tamaño postal: 63 imágenes
• Tamaño ancho: 63 imágenes
Y
P
O
C
Cancelar la impresión
• Para cancelar la impresión de imágenes, pulse el botón FUNC./
SET.
Una vez terminada la impresión actual, aparecerá un mensaje de
confirmación. Seleccione [OK] y pulse el botón FUNC./SET.
Reinicio de la impresión
• Seleccione [Resumen] y pulse el botón FUNC./SET. Ahora podrá
imprimir las imágenes restantes.
• La impresión no se puede reiniciar bajo las circunstancias
siguientes:
• Si los ajustes de impresión se han cambiado antes de reiniciar.
• Si la imagen para la que se establecieron los ajustes de impresión
se eliminó antes de reiniciar.
• Si había muy poco espacio libre en la tarjeta de memoria cuando se
canceló la impresión, es posible que no se pueda reiniciar la impresión.
• Si la impresión se canceló porque la batería de la cámara está
descargada, es posible que no se pueda reiniciar la impresión.
(Sustitúyala por una batería completamente cargada o por baterías
nuevas y, a continuación, encienda nuevamente la cámara. Si va a
utilizarla durante un período de tiempo prolongado, se recomienda
alimentar la cámara con un alimentador de corriente (se vende por
separado).)
68
Errores de impresión
• Si se produce algún error durante el proceso de impresión,
aparecerá un mensaje de error. Seleccione [Parar] o [Resumen]
y pulse el botón FUNC./SET.
* Puede que la opción [Resumen] no aparezca con algunos
tipos de error. En tal caso, seleccione [Parar].
Y
P
O
C
69
Lista de mensajes
Si la cámara está conectada a una impresora y se produce un error,
pueden aparecer los mensajes siguientes en la pantalla LCD de la
cámara. (Según el modelo de impresora, puede que no aparezcan
algunos mensajes.)
• Consulte la guía del usuario de la impresora para solucionar el
problema.
No hay papel
El cassette de papel no se instaló correctamente o
está vacío. También puede que la alimentación del
papel no funcione correctamente.
No hay tinta
No se insertó el cartucho de tinta o está vacío.
Tamaño papel
incompatible
Tamaño cartucho
incompatible
Se cargó un cartucho de tinta incorrecto en la
impresora.
Error de cassette
de tinta
Hay un problema con el cassette de tinta.
Papel y tinta
incompatibles
Atasco de papel
Se ha cambiado
el papel
70
Y
P
O
C
Se cargó un tamaño de papel incorrecto en la
impresora.
El tamaño de papel y el tipo de tinta corresponden
a tipos diferentes.
El papel se atascó durante la impresión.
El tamaño de papel se cambió después de que
apareciera el estilo de impresión.
Recargar batería
impresora
La batería de la impresora está descargada.
Error de
comunicación
Se ha producido un error de transmisión de datos
en la impresora.
Reajustar recorte
Intenta imprimir la imagen con un estilo diferente
del seleccionado al establecer los ajustes de
recorte.
¡No se puede
imprimir!
Intentó imprimir una imagen tomada con otra
cámara, grabada en un tipo de datos diferente
o editada en un ordenador.
No se puede
imprimir xx
Intentó usar los ajustes de impresión DPOF para
imprimir xx imágenes fotografiadas con otra
cámara, grabadas en un tipo de datos diferente
o editadas en un ordenador.
Impresión con impresoras de
inyección de Burbuja que utilizan
Bubble Jet Direct
Impresión
Compruebe que
aparece
en la esquina superior
izquierda de la pantalla LCD.
1
Si aparece , consulte
Impresión con impresoras de
inyección de Burbuja (series
PIXMA/SELPHY DS) que utilizan
PictBridge (pág. 32).
Y
P
O
C
Tras este paso, siga los procedimientos descritos en la sección
Impresión con impresoras de la serie SELPHY CP que utilizan
Canon Direct Print (pág. 53) para imprimir las imágenes.
Sin embargo, tenga en cuenta que algunos menús e indicaciones
de precaución son diferentes, como se enumera a continuación.
Consulte las páginas 54 y 68.
• No se pueden imprimir películas ni imágenes RAW.
71
Cancelación de la impresión
• Para cancelar la impresión de imágenes, pulse el botón FUNC./
SET. Aparecerá un mensaje de confirmación. Seleccione [OK]
y pulse el botón FUNC./SET.
La impresora dejará de imprimir la imagen actual y expulsará
el papel.
Errores de impresión
• Si se produce algún error durante el proceso de impresión,
aparecerá un mensaje de error. Cuando se resuelva el error,
se reanudará automáticamente la impresión. Si no se reanuda
la impresión, seleccione [Seguir] y pulse el botón FUNC./SET.
Si no se puede seleccionar [Seguir], seleccione [Parar], pulse
el botón FUNC./SET y reinicie el trabajo de impresión.
• En las impresoras equipadas con un panel de control, aparece
un número de error en éste. Consulte la guía del usuario de la
impresora para obtener información sobre las soluciones
correspondientes a cada número de error.
Y
P
O
C
Consulte la página 55.
Ajuste del estilo de impresión
Puede elegir entre los estilos de impresión siguientes:
Seleccione el tamaño de papel entre los
siguientes:
[Tarjetas 1], [Tarjetas 2], [Tarjetas 3], [LTR]
o [A4].
Para saber el tipo de papel que debe utilizar,
consulte la guía del usuario de la impresora.
Papel
Bordes
Fecha
72
Sin bordes
Imprime la imagen sin bordes.
Bordeado
Imprime con un borde.
On
Agrega la fecha a la copia impresa.
Off
Imprime sin incluir la fecha.
• No es posible utilizar la función de impresión Foto Carnet.
• Si selecciona una imagen con la fecha de disparo incrustada con
una cámara en un modo de Impresión en tamaño postal, la
opción [Fecha] del menú [Estilo] se establecerá en [Off].
Si establece la opción [Fecha] en [On], las fechas aparecerán
dos veces en la imagen impresa.
Consulte la página 68.
• Para imprimir la fecha, establezca el ajuste [Fecha] del menú
[Ajustes impresión] de la pantalla Selección de los ajustes de
impresión DPOF a [On]. No se puede ajustar la impresión de la
fecha con el menú [Estilo] del paso 2.
• Cuando se ajusta el tipo de impresión en [Indice], no se pueden
imprimir la [Fecha] y el [Nº Arch.] al mismo tiempo.
• Cuando el tipo de impresión se ajusta en [Estándar], el
[Nº Arch.] no se puede imprimir.
• No es posible utilizar la función de impresión Foto Carnet.
Y
P
O
C
73
Ajustes que se pueden establecer
con la cámara
Impresoras de la serie SELPHY ES/serie
SELPHY CP que utilizan PictBridge
(Cuando
conexión)
aparece en la pantalla LCD de la cámara durante una
Opciones de impresión que se pueden seleccionar con la cámara
Fecha
Nº Arch.
Fecha/Nº Arch.
Ambos
Y
P
O
C
Off
Predeter.
Predeter.
Efecto de
impresión
On
Off
O. Rojos1
Número de copias 1 a 99
Recortar
5.4 × 8.6 cm
9 × 13 cm
Tamaño papel
10 × 14.8 cm
4" × 8" o 10 × 20 cm*
Predeter.
Parám. papel
Predeter.
Bordeado
Diseño Página
Sin bordes
Imág./pág
Foto Carnet
Tam. Fijo
Única
Películas
(Imprimir película) Secuenc.
* Compatible sólo con la Serie SELPHY CP.
74
2/4/8
Impresoras de inyección de Burbuja (series
PIXMA/SELPHY DS) que utilizan PictBridge
(Cuando
conexión)
aparece en la pantalla LCD de la cámara durante una
Opciones de impresión que se pueden seleccionar con la cámara
Fecha
Nº Arch.
Fecha/Nº Arch.
Ambos
Off
Predeter.
Y
P
O
C
Predeter.
On
Off
Vivid
Efecto de
impresión
NR
Vivid+NR
Cara
O. Rojos1
O. Rojos2
Número de copias 1 a 99
Recortar
Películas (Imprimir película)
75
10 × 15 cm
13 × 18 cm
5" × 7"
A4
8.5" × 11"
5.4 × 8.6 cm
Tamaño papel*
20 × 25 cm
25 × 30 cm
A3
A3+/13" × 19"
Y
P
O
C
36 × 43 cm
10.1 × 18 cm
Predeter.
Foto
Parám. papel
Foto Rapid
Tipo papel
Fine Art
Semibrillo
Normal
Predeter.
Predeter.
Bordeado
Sin bordes
Imág./pág
Diseño Página
2/4/9/16
Bordeado
(impresión con la
información de disparo)
20-up
(impresión con la
información de disparo)
35-up
(imágenes de impresión
dispuestas como una hoja de
contacto de 35 mm)
* Los tamaños de papel varían de un país a otro.
76
Impresoras de la serie SELPHY CP que
utilizan la función de Canon Direct Print
Impresoras de inyección de Burbuja que
utilizan Bubble Jet Direct
(Cuando
o
una conexión)
aparece en la pantalla LCD de la cámara durante
Impresoras
de la serie
SELPHY
CP que
utilizan
Canon
Direct Print
Impresoras
de
inyección
de Burbuja
que utilizan
Bubble Jet
Direct
{
{
{
–
{*1
–
Foto Carnet
{
–
Tarjetas 1, Tarjetas 2,
Tarjetas 3, Letter
(LTR) o A4
–*2
{
Bordeado
{
{
Sin bordes
{
{
{
{
{
{
Única
{
–
Secuenc.
{
–
Opciones de impresión que se pueden
seleccionar con la cámara
Número de
copias
Y
P
O
C
1 a 99
1 imagen
Imagen Múltiples
Estilo
Papel
Bordes
Fecha
Recortar
Películas
(Imprimir
película)
*1 Esta opción sólo se puede seleccionar si se ha seleccionado el tamaño
del papel [5.4×8.6 cm].
2
* El tamaño de papel se establecerá automáticamente según el cassette
de papel establecido para la impresora.
77
NOTA
Y
P
O
C
78
NOTA
Y
P
O
C
79
NOTA
Y
P
O
C
80
NOTA
Y
P
O
C
81
NOTA
Y
P
O
C
82
Y
P
O
C
CDI-M388-010
DPUG15
XXXXXX
© CANON INC. 2008
PRINTED IN JAPAN
IMPRESO EN JAPÓN