1
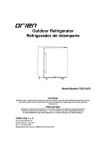
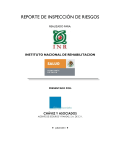
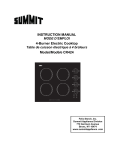
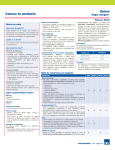
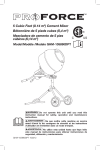
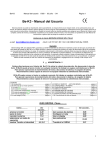
Outdoor Refrigerator Refrigerador de intemperie Model/Modelo SPR6-OS CAUTION: BEFORE USE, PLEASE READ AND FOLLOW ALL SAFETY RULES AND OPERATING INSTRUCTIONS. THIS APPLIANCE IS NOT DESIGNED FOR THE STORAGE OF MEDICINE OR OTHER MEDICAL PRODUCTS. PRECAUCIÓN: ANTES DE USAR ESTE APARATO, LEA Y SIGA TODAS LAS REGLAS DE SEGURIDAD E INSTRUCCIONES DE OPERACIÓN. ESTE APARATO NO ESTÁ DISEÑADO PARA EL ALMACENAMIENTO DE MEDICAMENTOS U OTROS PRODUCTOS MEDICINALES. SUMMIT® APPLIANCE DIVISION Felix Storch, Inc. 770 Garrison Avenue Bronx, NY 10474 Website: www.summitappliance.com 1 Table of Contents Important Safeguards ........................................................................................... 3 Location of Parts ................................................................................................... 4 Technical Specifications ....................................................................................... 4 Energy-Saving Tips............................................................................................... 5 Installation........................................................................................................5 - 6 Operating Your Refrigerator.............................................................................7 - 9 Care and Cleaning ................................................................................................ 9 Troubleshooting .................................................................................................. 10 Limited Warranty................................................................................................. 11 2 IMPORTANT SAFEGUARDS Read all instructions before using this appliance. When using this appliance, always exercise basic safety precautions, including the following: 1. Use this appliance only for its intended purpose as described in this instruction manual. 2. This refrigerator/beverage cooler must be properly grounded in accordance with the installation instructions before it is used. See grounding instructions in the Installation section. Do not use an extension cord. 3. This model can either be built-in or free-standing. Built-in units vent at the bottom front, and airflow at the front of this vent must be unimpeded to make the air flow freely and promote low power consumption. 4. If the unit is placed on a countertop or stand, the front surface of the door must be 3” or more back from the edge of the countertop or stand in order to avoid accidental tipping of the appliance during normal usage. 5. Never unplug the unit by pulling on the power cord. Always grip the plug firmly and pull straight out from the outlet. 6. Repair or replace immediately all electric service cords that have become frayed or otherwise damaged. Do not use a cord that shows cracks or abrasion damage along its length or at either the plug or connector end. 7. Do not use any electric device or any sharp instrument in defrosting your refrigerator. 8. Unplug your unit before cleaning or before making any repairs. NOTE: We strongly recommended that any servicing be performed by a qualified individual. SAVE THESE INSTRUCTIONS! DANGER! Risk of child entrapment! Before discarding your old refrigerator: Take off the doors Leave the shelves in place so that children may not easily climb inside. 3 Locations of Parts Light Upper door hinge Thermostat Ventilator fan Door handle Glass shelving Can dispenser Wire basket Casters (4) Lower door hinge Locking bracket Automatic light switch Technical Specifications Model SPR6-OS Capacity 4.77 ft3 (135 liters) Ambient Temperature Range 25F - 109F Electrical Rating 115V ~ 60Hz Rated Current 1.3A Refrigerant R134a 2.7 oz. Stainless steel, suitable for outdoor use Housing 4 Energy-Saving Tips Do not place your refrigerator next to a heating vent, a range or in direct sunlight. Keep the door closed as much as possible, especially in hot, humid weather. Cover foods to reduce moisture buildup inside the appliance. Installation This refrigerator is designed to be either free-standing or built-in. It has a fan at the bottom of the unit to direct compressor-generated heat away from the compressor and through vents in the back of the unit. The airflow from the vents at the back of the system must be unimpeded. Allow a minimum clearance of 4” at the back of the unit to ensure proper air circulation. The adjacent cabinets and counter top can be built around the unit as long as no top trim or counter top is installed lower than the top of the upper door hinge. For built-in operation, once the unit is positioned, the leveling legs should be turned to level the refrigerator. Installation should be such that the cabinet can be moved for servicing if necessary. If you wish the unit to be mobile, the four supplied rolling casters can be attached to the bottom of the unit. These casters can be locked into place when the refrigerator is in the desired location. Note: The unit can be free-standing with either the leveling legs or the rolling casters. The door handle is connected to the left edge of the door with four screws. To reverse the door opening, use a Phillips-head screwdriver to remove the handle from the left edge of the door, and then screw it onto the right. It will be necessary to switch the locations of the upper and lower door hinges. To do this, follow these steps: 1. Remove the screw on top of the refrigerator that holds the triangular hinge cover, using a Phillips screwdriver. 2. Remove the two hex nuts holding the upper hinge bracket to the top of the refrigerator, using an adjustable wrench or a 5/16” hex socket driver. Lift off the bracket, being careful not to lose the small black gasket on the hinge pin. 3. Lift the door off the lower hinge bracket and tilt the refrigerator backwards. 5 4. Unscrew the lower hinge bracket using the 5/16” hex socket driver. Screw it firmly into the corresponding screw holes on the opposite corner of the unit. 5. Set the refrigerator back on its feet and remove two black rubber plugs from the corner of the upper surface. These plugs should be placed into the holes left after removing the upper hinge plate. 6. Set the door onto the bottom hinge bracket and fix it in place by inserting the upper hinge (with its gasket) and screwing the upper hinge bracket into position. Test that the door opens and shuts properly and is correctly aligned before fully tightening the screws. 7. Screw the hinge cover into place. Electrical Connection IMPORTANT! For your personal safety, this appliance must be properly grounded. In the event of an electrical short circuit, grounding reduces the risk of shock by providing an escape route for the electric current. This appliance is equipped with a cord having a grounding wire with a grounding plug. The plug must be inserted into an outlet that is properly grounded and installed. Consult a qualified electrician or service center if you do not completely understand the grounding instructions. If doubt exists as to whether the appliance is properly grounded, have a qualified electrician check the circuit to make sure the outlet is properly grounded. DO NOT UNDER ANY CIRCUMSTANCES CUT OR REMOVE THE THIRD (GROUND) PRONG FROM THE POWER CORD. Use of Extension Cords Avoid the use of an extension cord because of potential safety hazards under certain conditions. 6 Operating Your Refrigerator IMPORTANT: Do not plug in the unit for at least 24 hours after unit is set in place. Failure to do so may result in the unit working improperly. This refrigerator/beverage cooler has a rotary temperature control knob (thermostat) marked with the settings COLD, 2, 3, 4, 5, 6, COLDEST in order of increasing coldness. In addition, this model employs a heater inside the cabinet, and is designed for outdoor use. When the temperature is colder than the temperature setting, the heater works automatically to maintain the temperature setting. Note: To prevent excessive strain on the compressor, do not leave the unit at the COLDEST setting for more than an hour at a time. OPERATING INSTRUCTIONS Turning on the Unit The refrigerator turns on automatically when it is plugged in. Note: If you unplug the refrigerator or the power is cut off accidentally, allow 8 minutes before restarting it or plugging it back in. It will not operate properly in less than 8 minutes. Temperature Setting Initially set the thermostat to setting 4. The compressor will run continuously for a few hours and only after the temperature inside the appliance becomes stable will the compressor run normally (i.e., turn on and off periodically). When the unit is operated for the first time, it is suggested that you not put foods in until the compressor is running normally. Adjusting the thermostat counter-clockwise will make the compressor run for a longer time with a shorter compressor stop time, and the temperature inside the appliance will be colder. The setting should be regulated according to ambient conditions and the desired temperature. The compressor will run for a while after each regulation before reaching a steady temperature. Please note: Cold air falls and warmer air rises, and there will be a small temperature variation from the bottom of the unit to the top. The temperature at the bottom of the unit will always be slightly colder. 7 Operating the Internal Light This appliance has an internal light to make it easier for you to see the foods you have stored. When the door is open, the light will be on and when it is closed, the light will be off. Defrosting Cycle The defrosting cycle is 12 hours. After running for 12 hours, the compressor stops for 40 minutes, but the inner fan motor runs for 40 minutes to remove frost at the same time. The defrosting water will flow into the tray on the compressor. Although the water will be evaporated by the heat of the compressor, you should check the tray regularly to avoid the water overflowing to the floor. ALARM Mode The unit will make a beeping sound when the thermostatic sensor has malfunctioned. When this happens, the unit works and stops regularly. Contact your authorized service facility for sensor replacement. Shelving and Wire Basket The shelves in your unit can be moved to different levels to suit your food storage needs. There is a can dispenser in the door, and the door shelves provide storage for small and large items and a bottle storage area for tall bottles. The removable wire basket is convenient for storing and transporting a wide variety of foods and beverages. Replacement of the lamp Warning: To avoid an electric shock, unplug the unit when replacing the lamp bulb. Bulb Lamp socket Lamp cover Screw The lamp base is E26; rated power of the lamp is 15W. Use a bulb of the same rating when replacing. When replacing the light bulb, remove the screws on the lamp shield to release the shield. Then replace with the same size and type bulb and fix the shield back into place. 8 WARNING! Do not open the electrical control box on the upper rear panel of this appliance since this will break the waterproof seal around the control box. When this box is serviced by a professional, a waterproof sealant must be applied to the box after maintenance. Care and Cleaning IMPORTANT! Unplug the refrigerator before performing any maintenance operation. Cleaning the Outside Clean the outside of your unit with mild soapy water. Dry thoroughly with a soft cloth. To clean the door gasket, use only mild soapy water. Never use harsh detergents or scouring pads to clean any part of your refrigerator. Cleaning the Inside Remove all foods, plus shelves and basket. Wash inside with plain water and baking soda solution (about two tablespoons of baking soda to a quart of water). Then rinse and dry. Do not use cleansers such as soaps, detergents, scouring power or spray cleaners which can cause odors inside the refrigerator. Wash the shelves and basket in mild detergent solution and dry with a soft cloth. To help prevent odors, leave an open box of baking soda in the refrigerator. Change the box every three months. Do not wash any plastic parts from your refrigerator in the dishwasher. NEVER USE ACIDS, GASOLINE OR PAINT THINNER FOR CLEANING ANY PART OF THE REFRIGERATOR. Never use boiling water which can deform plastic parts. 9 Troubleshooting Refrigerator does not turn on Not plugged in. Fuse blown or circuit breaker tripped. Noise or vibration Check that unit is level. If not, adjust leveling legs. Turns on and off frequently This is normal. Small refrigerators cycle more frequently than larger ones. Seems to run too long Check for proper clearances. Frequent door openings let cold air escape. Refrigerator too warm Check if door is fully closed. Check setting of regulator. Have you put large amounts of warm food into the refrigerator recently? Are the shelves overcrowded? Odor in cabinet Foods with strong odors should be tightly covered. Check for spoiled food. Interior may need cleaning. Keep an open box of baking soda in refrigerator. (Replace every 3 months.) 10 SUMMIT® Limited Warranty SUMMIT® Appliances warrants this product to be free from defects in materials and workmanship for a period of one year from the date of original purchase or delivery. Any parts determined to be defective will be replaced by SUMMIT® at no charge to you. Plastic parts and outer cabinets are warranted to be manufactured to commercially acceptable standards and free from defects at the time of delivery. The compressor (part only) is further warranted for an additional four years to the original purchaser only. This limited warranty does not apply to: 1. 2. 3. 4. 5. Improper installation. Customer misuse, negligence or damage. Incorrect electrical current. Products with the serial number altered or removed. Products sold or used outside the fifty United States or the District of Columbia. 6. Household appliances used in commercial applications 7. Damage to this product from accidents, alterations, failure to follow instructions, fire, floods, earthquakes, war, civil disturbance or Acts of God. SUMMIT® is not liable for consequential or incidental damage. SUMMIT® APPLIANCE DIVISION Felix Storch, Inc. 770 Garrison Avenue Bronx, NY 10474 Website: www.summitappliance.com . 11 Indice Información de seguridad importante.................................................................. 13 Ubicación de piezas............................................................................................ 14 Especificaciones técnicas ................................................................................... 14 Consejos para ahorrar energía ........................................................................... 15 Instalación....................................................................................................15 - 16 Operación de su refrigerador .......................................................................17 - 19 Cuidado y limpieza.............................................................................................. 20 Identificación y resolución de problemas ............................................................ 21 Garantía limitada................................................................................................. 22 12 INFORMACIÓN DE SEGURIDAD IMPORTANTE Lea todas las instrucciones antes de usar este aparato. Al usar este aparato, observe siempre precauciones de seguridad básicas, entre ellas las siguientes: 1. Sólo use este aparato para su uso destinado, según se describe en este manual de instrucciones. 2. Este refrigerador/enfriador de bebidas debe estar debidamente puesto a tierra de acuerdo con las instrucciones de instalación antes de usarse. Véanse las instrucciones de puesta a tierra en la sección de Instalación. No use un cable de extensión. 3. Este modelo puede estar incorporado o autónomo. La ventilación de las unidades incorporadas se encuentra en el fondo en la parte delante, y el flujo de aire delante de este registro de ventilación no debe interrumpirse a fin de asegurar un flujo libre de aire y propiciar un bajo consumo de energía. 4. Si la unidad se coloca sobre un mostrador o estante, la superficie delantera de la puerta debe estar a 3" o más de distancia del borde del mostrador o estante a fin de evitar el vuelco accidental del aparato durante el uso normal. 5. Nunca desenchufe la unidad, halando el cable eléctrico. Siempre agarre el enchufe firmemente y sáquelo directamente del tomacorriente. 6. Repare o reemplace inmediatamente todos los cables de servicio eléctrico deshilachados o de otra manera dañados. No use un cable que exhibe grietas o abrasiones a su largo ni en los extremos de conexión o de enchufe. 7. No use ningún aparato eléctrico o instrumento afilado para descongelar su refrigerador. 8. Desenchufe su unidad antes de limpiarla o antes de efectuar cualquier reparación. 9. NOTA: Recomendamos enfáticamente que cualquier servicio sea realizado por una persona calificada. ¡GUARDE ESTAS INSTRUCCIONES! ¡PELIGRO! Riesgo de atrapamiento de niños. Antes de desechar su refrigerador viejo: Quite las puertas. Deje las repisas en posición para que los niños no puedan montarse fácilmente adentro. 13 Ubicación de piezas Luz Termostato Bisagra superior de la puerta Ventilador Pomo de puerta Repisas de vidrio Depósito de latas Cesta de alambre Roldanas (4) Placa para sujeción Bisagra de puerta inferior Conmutador automático de luz Especificaciones técnicas Modelo SPR6-OS Capacidad 4.77 pies3 (135 litros) Gama de temperatura ambiental 25F - 109F Capacidad nominal eléctrica 115V ~ 60Hz Corriente nominal 1.3A Refrigerante R134a 2.7 oz. Acero inoxidable, apropiado para uso a la intemperie Caja 14 Consejos para ahorrar energía No coloque su refrigerador al lado de un registro de calefacción, una cocina o a la luz solar directa. Mantenga la puerta cerrada tanto como sea posible, en especial durante el tiempo caluroso y húmedo. Cubra los alimentos para reducir la acumulación de humedad dentro del aparato. Instalación Este refrigerador está diseñado para instalación incorporada o como unidad autónoma. Viene dotado de con un ventilador en el fondo de la unidad para dirigir el calor generado por el compresor fuera del compresor y a través de los ventiladores en la parte trasera de la unidad. El flujo de aire de los ventiladores en la parte trasera de la unidad debe dejarse sin obturar. Tenga en cuenta que un espacio libre mínimo de 4" (10 cm) al parte de atrás de la unidad asegure la circulación de aire apropiada. Los gabinetes adyacentes y la cima del mostrador se pueden construir alrededor de la unidad con tal que no se instale nada más bajo que la cima de la bisagra de puerta superior. Para la operación incorporada, una vez situada la unidad, deben girarse las patas de nivelación para nivelar el refrigerador. La instalación debe ser de tal manera que el gabinete se pueda mover para darle mantenimiento a la unidad si necesario. Si desea que la unidad sea móvil, pueden instalarse en el fondo de la unidad las roldanas pivotantes provistas. Estas roldanas pivotantes pueden enclavarse en posición una vez que el refrigerador se encuentre en el lugar deseado. Nota: La unidad puede ser autónoma, ya sea con las patas de nivelación o roldanas pivotantes. El pomo de la puerta se conecta al borde izquierdo de la puerta con cuatro tornillos. Para invertir el lado de abertura de la puerta, use un destornillador hexagonal para quitar el pomo del borde izquierdo y entonces enrósquelo en el borde derecho de la puerta. Será necesario cambiar el lugar de las bisagras superior e inferior de la puerta. Para hacerlo, siga estos pasos: 1. Quite el tornillo en la parte superior del refrigerador que sostiene la tapa triangular de la bisagra, usando un destornillador hexagonal. 2. Quite las dos tuercas hexagonales que sostienen la ménsula de la bisagra superior a la parte superior del refrigerador, usando una llave hexagonal de 5/16”. Levante y quite la ménsula, teniendo cuidado de 15 no perder la empaquetadura pequeña negra en el pasador de la bisagra. 3. Levante la puerta fuera de la ménsula de bisagra inferior e incline el refrigerador hacia atrás. 4. Desenrosque la ménsula de bisagra inferior usando la llave hexagonal de 5/16". Enrósquelo firmemente en los agujeros de tornillo correspondientes en la esquina opuesta de la unidad. 5. Vuelva a parar el refrigerador y quite los dos tapones de goma negros de la esquina en la superficie superior. Estos tapones deben colocarse dentro de los agujeros a la izquierda después de quitar la placa de bisagra superior. 6. Coloque la puerta sobre la ménsula de bisagra inferior y sujétala en posición insertando la bisagra superior (con su empaquetadura) y enroscando la ménsula de bisagra superior en posición. Pruebe la puerta para averiguar que se abra y cierre correctamente y que esté correctamente alineada antes de apretar plenamente los tornillos. 7. Enrosque la tapa de bisagra en posición. Conexión eléctrica ¡IMPORTANTE! Para su seguridad personal, este aparato debe estar debidamente puesto a tierra. En caso de un corto circuito eléctrico, la puesta a tierra reduce el riesgo de shock, al proporcionar un alambre de escape para la corriente eléctrica. Este aparato está dotado de un cable con un alambre a tierra con enchufe de puesta a tierra. El enchufe debe insertarse en un tomacorriente debidamente puesto a tierra e instalado. Consulte con un electricista calificado si no entiende completamente estas instrucciones de puesta a tierra. En caso de duda de que el aparato está debidamente puesto a tierra, haga que un electricista calificado compruebe el circuito para asegurar que el tomacorriente esté debidamente puesto a tierra. BAJO NINGUNA CIRCUNSTANCIA CORTE NI QUITE LA TERCERA PATA (A TIERRA) DEL CABLE ELÉCTRICO. Uso de cables de extensión Evite el uso de un cable de extensión, debido a potenciales peligros de seguridad bajo ciertas condiciones. 16 Operación de su refrigerador IMPORTANTE: No enchufe la unidad durante por lo menos 24 horas después de colocarse la unidad en posición. La falta de hacerlo podrá conducir al funcionamiento indebido de la unidad. Este refrigerador/enfriador de bebidas tiene un botón rotatorio para el control de la temperatura marcado con los ajustes COLD (FRIO), 2, 3, 4, 5, 6, COLDEST (MAS FRIO) en orden de frío creciente. Además, este modelo emplea un calentador dentro del gabinete y está diseñado para uso a la intemperie. Cuando la temperatura está más fría que el ajuste de temperatura, el calentador funciona automáticamente para mantener el ajuste de temperatura. Nota: Para prevenir el esfuerzo excesivo en el compresor, no deje la unidad en su ajuste más frío, COLDEST, por más de una hora a la vez. INSTRUCCIONES DE OPERACIÓN Encendido de la unidad El refrigerador se enciende automáticamente cuando se enchufa. Nota: Si usted desenchufa el refrigerador o se desconecta la electricidad accidentalmente, espere 8 minutos antes de rearrancarlo o enchufarlo de nuevo. No funcionará correctamente dentro de menos de 8 minutos. Ajuste de temperatura Fije la temperatura inicialmente en el ajuste 4. El compresor funcionará continuamente durante unas horas y sólo funcionará normalmente (es decir, se encenderá y apagará periódicamente) una vez que la temperatura dentro del aparato se estabilice. Cuando la unidad se opera por primera vez, se sugiere no colocar comestibles adentro hasta que el compresor esté funcionando normalmente. Si se ajusta el termostato hacia la izquierda, el compresor funcionará por un período más prolongado con tiempo de parada de compresor más corto, y la temperatura adentro de la unidad será más fría. El ajuste debe regularse de acuerdo con las condiciones ambientales y la temperatura deseada. El compresor funcionará durante un rato después de cada regulación antes de alcanzar una temperatura estable. Nota: El aire frío baja y el aire más caliente sube, y habrá una pequeña variación de temperatura de abajo en la unidad hasta arriba. La 17 temperatura en la parte de abajo de la unidad siempre será ligeramente más fría. Operación de la luz interna Este aparato cuenta con una luz interna para que le sea más fácil ver los alimentos que ha guardado. Cuando la puerta está abierta, la luz estará encendida y cuando se cierra, la luz se apagará. Descongelación durante la operación El ciclo de descongelación es 12 horas. Después de operar durante 12 horas, el compresor deja de funcionar durante 40 minutos, pero el motor del ventilador interior opera durante 40 minutos para quitar la escarcha al mismo tiempo. El agua de descongelación se acumulará en la bandeja en el compresor. Si bien el calor del compresor evaporará el agua, usted debe comprobar la bandeja regularmente para evitar el derrame de agua en el piso. Modo de ALARMA La unidad emitirá un sonido de pitido en caso de un malfuncionamiento del sensor termostático. Cuando esto sucede, la unidad funciona y se detiene regularmente. Comuníquese con su centro de servicio autorizado para el reemplazo del sensor. Repisas y cesta de alambre Las repisas en su unidad pueden moverse a distintos niveles para adaptarse a sus necesidades de almacenamiento de alimentos. La puerta tiene un depósito de latas, y las repisas de la puerta permiten el almacenamiento de artículos grandes y pequeños y un área de almacenamiento de botellas para las botellas altas. La cesta de alambre removible es conveniente para guardar y transportar una extensa diversidad de alimentos y bebidas. Reemplazo de la lámpara Advertencia: Para evitar un shock eléctrico, desenchufe la unidad para reemplazar el bombillo. Bombillo Receptáculo de lámpara Tapa de lámpara Tornillo 18 El receptáculo de la lámpara es E26; la capacidad nominal de la lámpara es 15 vatios. Use un bombillo de la misma capacidad nominal cuando lo reemplaza. Para reemplazar el bombillo, quite los tornillos en el protector de la lámpara para soltarlo. Luego, reemplace el bombillo con otro del mismo tamaño y tipo y ponga el protector de nuevo en posición. ¡ADVERTENCIA! No abra la caja de control eléctrica que se encuentra en la parte superior del panel trasero de este aparato ya que esto romperá el sello impermeable alrededor de la caja del control. Cuándo un profesional le da mantenimiento a esta caja, un sellador impermeable debe ser aplicado a la caja después del mantenimiento. 19 Cuidado y limpieza ¡IMPORTANTE! Desenchufe el refrigerador antes de realizar cualquier operación de mantenimiento. Limpieza del exterior Limpie el exterior de su unidad con agua jabonosa suave. Seque minuciosamente con un paño suave. Para limpiar la empaquetadura de la puerta, use agua jabonosa suave solamente. Nunca use detergentes abrasivos ni estropajos para limpiar cualquier parte de su refrigerador. Limpieza del interior Quite todos los alimentos, además de las repisas y la cesta. Lave el interior con una solución de agua y polvo de hornear (alrededor de dos cucharadas de polvo de hornear por cuarto de agua). Luego enjuague y seque. No use limpiadores tales como jabones, detergentes, polvo de limpieza o aerosoles de limpieza que pueden ocasionar olores dentro del refrigerador. Lave las repisas y la cesta en una solución detergente suave y seque con un paño suave. Para ayudar a evitar olores, deje una caja abierta de polvo de hornear dentro del refrigerador. Cambie la caja cada tres meses. No lave ninguna pieza plástica de su refrigerador en el lavaplatos. NUNCA USE ÁCIDOS, GASOLINA O DISOLVENTE DE PINTURA PARA LIMPIAR NINGUNA PARTE DEL REFRIGERADOR. Nunca use agua hirviendo, que podrá deformar las piezas de plástico. 20 Identificación y resolución de problemas El refrigerador no se enciende No está enchufado. Fusible disparado o interruptor disparado. Ruido o vibración Compruebe que la unidad esté nivelada. Si no lo está, ajuste las patas de nivelación. Se enciende y se apaga frecuentemente Esto es normal. El ciclo de los refrigeradores pequeños es más frecuente que el de las unidades más grandes. Parece operar durante demasiado tiempo Compruebe las distancias de separación apropiadas. Si se abre frecuentemente la puerta, se deja escapar el aire frío. Refrigerador demasiado caliente Compruebe que la puerta esté plenamente cerrada. Compruebe el ajuste del regulador. ¿Ha puesto cantidades grandes de alimentos calientes dentro del refrigerador recientemente? ¿Están las repisas muy llenas? Olor en el gabinete Los alimentos con olores fuertes deben taparse herméticamente. Compruebe si hay alimentos podridos. Puede ser necesario limpiar el interior. Guarde una caja abierta de polvo de hornear en el refrigerador (cambie cada 3 meses). 21 Garantía limitada de SUMMIT® SUMMIT® Appliances garantiza este producto para ser libre de defectos en materias y destreza por un período de un año de la fecha de la compra original o de la entrega. Cualquier pieza que es determinada a ser defectuosa será reemplazada por SUMMIT® sin carga a usted. Las piezas plásticas y los gabinetes exteriores se garantizan para ser fabricados a estándares comercialmente aceptables y libres de defectos al tiempo de la entrega. El compresor (la pieza sólo) es garantizado además por un adicionales cuatro años al comprador original sólo. Esta garantía limitada no aplica a: 1. 2. 3. 4. 5. La instalación impropia. El maltrato, la negligencia o el daño del cliente. La corriente eléctrica inexacta. Los productos con el número de serie cambiado o quitado. Los productos vendidos o usados fuera de los cincuenta Estados Unidos o el Distrito de Columbia. 6. Los aparatos caseros usados en aplicaciones comerciales. 7. Daño a este producto por accidentes, las modificaciones, el fracaso de seguir las instrucciones, el fuego, las inundaciones, los terremotos, la guerra, los alborotos civiles o los actos de la naturaleza. SUMMIT® no es responsable para el daño consequente ni casual. SUMMIT® APPLIANCE DIVISION Felix Storch, Inc. 770 Garrison Avenue Bronx, NY 10474 Sitio de Internet: www.summitappliance.com 22 SPR6-OS OM-ES-2 23