1
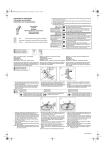
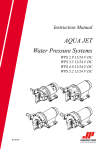
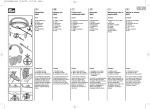
NA07D402_WALKING FOOT.fm Page 1 Wednesday, July 4, 2007 4:49 PM
Instruction for accessories
Information zum Zubehör
Instructies voor de accessoires
• Read the Instruction Manual of your sewing machine carefully before using this foot and
always follow the instructions.
• Lesen sie die Anleitung ihrer Nähmaschine genau bevor sie diesen Nähfuß verwenden
und folgen sie dann dieser.
WALKING FOOT
DOPPELTRANSPORTFUß
LOOPVOET
Pied mobile double entraînement
PIEDINO DOPPIO TRASPORTO
ARRASTRE POR PATA
• Lees de handleiding van Uw machine zorgvuldig voordat U deze voet gaat gebruiken en
volg altijd de instructies op.
Caution
An incorrect operation
could result in an injury or
damage to the machine.
Vorsicht
GB
DE
NL
USE:
Designed for use with hard to handle fabric that may not
have enough feeding to sew (e.g. coated fabric, leather,
knit jersey, etc..), the upper feed dog on the foot provides dependable feed enabling you to sew the fabric
smoothly.
Anwendung: Dieser Nähfuß wurde für schwierige und zum verschieben neigenden Materialien entwickelt ( z.B. Leder, Mantel stoffe, Samt, Karostoffe u.s.w.) Der
Doppeltransporteur am Nähfuß unterstützt zuverlässig
den Stofftransport und erleichtert auf diese Weise das
perfekte Nähen.
Gebruik:
Ontworpen voor gebruik van moeilijk te verwerken materialen die niet genoeg transport krijgen en daardoor
moeilijk te naaien zijn(o.a. leder, breiwerk, etc.). Het
boventransport van de loopvoet geeft U het nodige
transport dat U instaat stelt om deze materialen
makkelijk te kunnen naaien.
Eine fehlerhafte Bedienung
kann zu Verletzungen oder
zu Beschädigungen an der
Maschine führen.
Waarschuwing
Onjuist gebruik kan leiden tot letsel of schade
aan de machine.
Remove the power plug from the outlet when changing the presser feet.
Not doing so could cause an injury.
Before sewing, be sure to turn the handwheel toward you
slowly to check that the needle does not touch the presser
foot. Not doing so could cause an injury.
Schalten sie die Maschine beim Füßchenwechseln aus.
Nichtbefolgung kann zu Verletzungen führen.
Bevor sie zu nähen beginnen drehen sie das Handrad langsam
zu sich, um zu sehen, daß die Nadel den Nähfuß nicht berührt.
Nichtbefolgung kann zu Verletzungen führen.
Verwijder altijd de stekker uit het stopcontact wanneer U
van persvoet verwissel.
Wanneer U dit niet doet, kan U zich verwonden.
Voordat U gaat naaien, controleert U eerst of de naald de
persvoet niet raakt.
Dit doet U door het handwiel rustig naar U toe te draaien.
Wanneer U dit niet doet, kan U zich verwonden.
■ Sewing machine settings:
■ Nähmaschinen Einstellung:
■ Naaimachine instellingen:
Fabric : For medium ~ heavy weight fabrics
Stitch selection :
Straight stitch (center and left needle positions)
(length : 2 ~ 5 mm)
Zigzag stitch (length : 2 ~ 5 mm, width : 2 ~ 5 mm)
Sewing speed : Slow speed ~ Medium speed
Stoff : mittlere und dicke Stoffe (Karo)
Sticheinstellung:
Geradstich (Nadelpossition mitte und links)
(Länge : 2 ~ 5 mm)
Zickzackstich (Länge : 2 ~ 5 mm, Breite : 2 ~ 5 mm)
Nähgeschwindikeit: langsam bis mittlere Geschwindigkeit
Note: This foot can be used only for a straight stitch or a
zigzag stitch.
Only use straight stitch and zig zag to prevent needle breakage.
OPGELET: Deze loopvoet is alleen te gebruiken met
ANMERKUNG: Dieser Doppeltransportfuß kann nur beim
Gerad- oder Zick-Zack stich eingesetzt werden.
een rechte stiksteek of een zigzagsteek.
Gebruik geen andere steeksoort want dit
Verwenden sie diesen Fuß nicht bei anderen
kan tot naaldbreuk leiden.
Stichprogrammen, denn dies kann zum Nadelbruch führen.
■ Setting
■ Einsetzen
■ Plaatsing
1
Holder for needle clamp
Führungshebel für Nadelbefestigung
Houder voor naaldklem
Materiaal : Voor middel tot zware stoffen.
Steekkeuze:
Rechte steek (Naaldpositie: Midden en links).
(Lengte : 2 ~ 5 mm)
Zigzagsteek (Lengte : 2 ~ 5mm, Breedte : 2 ~ 5mm)
Naaisnelheid : Langzaam ~ Gemiddelde snelheid.
2
3
4
5
Holder for presser bar
Nähfußhalter
Houder voor persvoetstang
2-1. Rotate the handwheel toward you and raise the nee- 2-1. Handrad zu sich drehen bis die Nadel in höchster Po- 2-1. Plaats de naald in zijn hoogste stand door aan het
sition ist. Und dann ziehen Sie bitte den Stecker aus
handwiel te draaien en dan verwijderd U de stekker
dle to its highest position. Remove the power plug
der Steckdose.
uit het stopcontact.
from the outlet.
2-2. Set the pattern selecting dial: straight stitch or zigzag
stitch.
2-2. Stellen sie den Musterwählknopf auf Gerade-oder
Zick-Zack- Stich.
2-2. Zet de patroonknop op: rechte steek of een zigzagsteek.
2-3. Lift the presser foot lever to raise the presser foot.
2-3. Bringen Sie mit dem Füßchenheber den Nähfuß in
obere Position.
2-3. Zet de persvoet omhoog doormiddel van de persvoethendel.
3.
Loosen the screw of the presser foot holder by using
needle plate screw driver and remove the foot holder. 3.
4.
Attach the holder for needle clamp to the needle
clamp.
5-1. Attach the holder for presser bar to the presser bar.
Tighten the screw of the presser foot holder by using
needle plate screw driver.
5-2. Lower the presser foot.
4.
Nun lösen Sie die Schraube des Nähfußhalters an
der Maschine mit Hilfe des Schraubendrehers und
entfernen den Nähfußhalter.
Nun setzen Sie wie abgebildet den Führungshebel
des Doppeltransportfußes auf die Nadelhalterung.
5-1. Nun montieren sie den Doppeltransportfuß an die
Nähfußhalterung und schrauben sie diesen fest.
3.
Draai de schroef van de persvoethouder los met de
naaldplaatschroevendraaier.
4.
Plaats de houder voor de naaldklem om de naaldklem.
5-1. Plaats de houder voor de persvoetstang aan de persvoetstang en draai de schroef vast.
5-2. Zet de persvoet naar beneden.
5-2. Senken sie nun wieder den Nähfuß.
5-3. Draai langzaam het handwiel naar U toe en let op dat
de naald de loopvoet niet raakt.
5-3. Drehen Sie nun das Handrad vorsichtig zu sich und
vergewissern Sie sich, dass die Nadel nicht den DopLET OP: Plaats de normale persvoethouder terug en
NOTE: When refitting the presser foot holder ensure that
peltransportfuß berührt.
schroef hem vast.
the fixing screw is fully tightened by using the needle plate screwdriver.
Achtung: Schrauben sie den Nähfußhalter wieder fest.
5-3. Rotate the handwheel slowly toward you and make
sure that the needle does not hit this foot.
679132-CCA30-A
NA07D402_WALKING FOOT.fm Page 2 Wednesday, July 4, 2007 4:49 PM
• Veuillez lire le mode d'emploi de votre machine avant l'utilisation de ce pied de biche et
Mode d'emploi des accessoires
Istruzioni per accessori
Guía para los accesorios
bien suivre les instructions.
• Leggete le istruzioni sul manuale della vostra macchina per cucire attentamente prima
di usare questo piedino e seguite sempre le istruzioni.
• Lea el manual de instrucciones cuidadosamente antes de usar el prensatelasy siga
siempre sus indicaciones.
WALKING FOOT
DOPPELTRANSPORTFUß
LOOPVOET
Pied mobile double entraînement
PIEDINO DOPPIO TRASPORTO
ARRASTRE POR PATA
FR
IT
ES
Utilisation: Spécialement étudié pour assurer un parfait maintien et
entraînement de tissus difficiles ( ex : tissus doublés, cuir,
tricots, jersey, etc…), le pied mobile assure un entraînement fiable.
USO:
Progettato per l’uso con tessuti difficili da lavorare che possono non essere abbastanza facili da trasportare (es. tessuti
rivestiti, pelle, jersey, ecc.). La griffa superiore sul piedino
fornisce un migliore trasporto che permetterà di cucire tutti i
tessuti in modo più agevole.
Uso:
Diseñada para usarse con materiales gruesos y pesados
que no pueden deslizarse facilmente para coser (como
abrigos, piel, jerseys de género de punto, ....) El diente superior sobre la pata le permite un arrastre mejor para coser
de una forma más fina e igualada.
Précaution
Une manoeuvre incorrecte peut causer des
blessures ou endommager la machine.
Attenzione
Qualsiasi operazione non
corretta potrebbe causare lesioni o guasti della macchina.
Precaución
El uso incorrecto de la
máquina puede provocarle lesiones o daños
a la máquina.
Retirez le cordon électrique de la machine avant de changer
votre pied de biche.
Sinon il y a risque de blessure.
Avant de coudre, veillez à touner le volant vers vous afin
que l'aiguille ne touche pas le pied de biche.
Sinon il y a risque de blessure.
Togliete la spina dalla presa elettrica quando cambiate il piedino.
In caso contrario sussiste il rischio di lesioni.
Prima di iniziare la cucitura assicurarsi che l'ago non tocchi
sul piedino facendo girare la macchina a mano.
In caso contrario sussiste il rischio di lesioni.
Sace el enchufe de corriente cuando cambie el prensatelas.
No efectuar esta operación le podría causar daños físicos.
Antes de empezar a coser, asegúrese de girar el volante
hacia Usted suavemente para comprobar que la aguja
no toque el presantelas. No efectuar esta operación le
podría causar daños físicos.
■ Point utilisé
■ Utilizzare questo programma
■ Ajustes para la máquina:
Tissu : Pour tissus de texture moyenne ou épaisse.
Sélection de points:
point droit (Positions aiguille centrée et gauche.).
(Longueur : 2 ~ 5 mm)
Point zigzag (Longueur : 2 ~ 5 mm, Largeur : 2 ~ 5mm)
Vitesse de couture: Vitesse lente -Vitesse moyenne.
NOTE: Ce pied ne peut être uniquement utilisé qu’avec le
point droit et le zigzag.
Surtout, ne pas utiliser d’autres points ; ce qui aurait pour effet de casser l’aiguille.
■ Installation
■ Posizionamento
■ Instalación
1
Tessuto : per tessuti con peso medio-pesante.
SELEZIONE PROGRAMMA:
punto dritto (posizioni dell'ago centrale e sinistra).
(lunghezza : 2 ~ 5 mm)
Punto zig-zag (lunghezza : 2 ~ 5 mm, larghezza : 2 ~ 5mm)
Velocita' di cucitura:utilizzare una velocita' bassa o media
durante la lavorazione.
NOTA BENE: Questo piedino doppio trasporto può essere utilizzato soltanto con punto dritto o punto zig zag.
Non utilizzare con altri tipi di punti che possono provocare la rottura dell'ago.
Attache pour le support aiguille
Supporto per morsetto dell'ago
Soporte para el morsete (portaagujas)
Tejido : Para tejidos medios y gruesos.
Selección de puntada:
Puntada recta (Centre y deje las posiciones de aguja)
(Longitud : 2 ~ 5 mm)
Zigzag (Longitud : 2 ~ 5 mm, ancho: 2 ~ 5mm)
Velocidad: Baja - media
NOTAS: Esta pata de arrastre puede utilizarse únicamente
para puntadas rectas o para puntadas en zig-zag.
No la utilice con ningún otro tipo de puntadas
ya que podría causar la rotura de la aguja.
2
3
4
5
Attache pour le barre aiguille
Supporto per barra pressione
del piedino
Soporte para el prensatelas
2-1. Ruotare il volantino verso di voi e alzate l’ago nella
2-1. Amenez l’aiguille en position haute et coupez l’alisua posizione più alta, e togliete la spina dalla presa
mentation électrique. Puis retirez la fiche d'alimentadi corrente.
tion de la machine.
2-1. Haga girar el volante hacia usted y suba la aguja hasta su posición más elevada, y después quite el enchufe de la corriente eléctrica.
2-2. Sélectionnez un point droit ou un zigzag sur le bouton 2-2. Selezionate il punto dritto oppure il punto zig zag.
sélecteur de points.
2-3. Sollevare la barra del piedino per alzare il piedino.
2-3. Relevez le levier presseur.
3. Allentare la vite del gambo del piedino usando il cacciavite in dotazione e rimuovere il gambo.
3. Dévissez la vis de maintien du support de pied de
biche à l’aide du tournevis de plaque aiguille et ôtez
4. Applicare il supporto del piedino doppio transporto al
le support.
morsetto dell’ago.
4. Accrochez l’attache du support aiguille au support
5-1. Attaccare il supporto della barra pressione del piediaiguille de la machine.
no alla barra pressione del piedino. Stringere la vite
della barra pressione del piedino usando il cacciavite
5-1. Fixez l’attache de barre aiguille sur la barre aiguille,
in dotazione.
serrez la vis à l’aide du tournevis de plaque aiguille.
2-2. Seleccione el diseño con el selector: puntada recta o
puntada en zig-zag.
5-2. Abaissez le levier du pied.
5-3. Avant de coudre, assurez vous que l’aiguille ne bute
pas sur le pied en tournant manuellement et lentement le volant vers vous.
NOTE: Remettez le support de pied de biche d'origine à
sa place et vissez le.
5-2. Abbassare il piedino.
2-3. Eleve la palanca del prensatelas para levantarlo.
3.
Afloje el tornillo del soporte del prensatelas mediante
el destornillador del placa agujas y saque el soporte
de la pata.
4.
Atornille el soporte del morsete con el morsete (Portaagujas).
5-1. Atornille el soporte del barra agujas al barra agujas.
Y luego apriete el tornillo del prensatelas mediante el
destornillador del placa aguja.
5-2. Baje el prensatelas.
5-3. Ruotare il volantino lentamente verso di voi e assicurarsi che l’ago non tocchi il piedino doppio traspor- 5-3. Haga girar el volante suavemente hacia usted y
asegúrese que la aguja no se golpee contra la pata
to.
de arrastre.
NOTA: Avvitare il gambo del piedino nella posizione inNOTA: Afloje el tornillo del soporte del prensatelas y
iziale e stringere la vite.
colóquelo en su posición y atorníllelo.
679132-CCA30-A