1
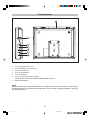
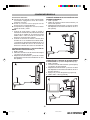
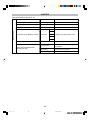
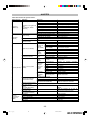
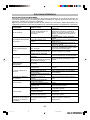
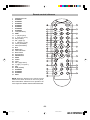
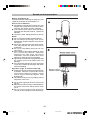
Equipo TV Digital Terrestre Portátil
Manual de Instrucciones
BMT-76-TDT
Por favor, lea este manual de instrucciones antes de conectar o utilizar este equipo TV,
y guárdelo para futuras consultas.
Bmt-76.p65
1
06-4-10, 19:31
ÍNDICE
Medidas de seguridad ................................. 3
Funcionamiento del menú DVB-T ............ 13
Precauciones ................................................. 4
1. Menú principal ........................................... 13
Características ............................................... 4
2. Programas ................................................. 13
Accesorios ...................................................... 5
3. Búsqueda .................................................. 14
Panel frontal .................................................... 5
4. Ajustes ...................................................... 15
Panel posterior .............................................. 6
5. Guía de programación electrónica (EPG) . 17
Mando a distancia .......................................... 7
Conexiones básicas .................................. 8-9
AJUSTES ......................................................... 18
Preparación del mando a distancia ......... 10
Tabla del interfaz de ajustes TV ............... 18
Tabla del interfaz de ajustes DVB-T ......... 19
Funcionamiento ............................................ 11
Instalación rápida ......................................... 11
Sólo para referencia ................................... 20
Funcionamiento del menú ......................... 11
Mantenimiento ........................................... 20
Funcionamiento del menú TV ................... 11
Terminología .............................................. 20
1. MENÚ PRINCIPAL TV .................................. 11
Especificaciones ....................................... 21
2. BRILLO ....................................................... 11
Guía de solución de problemas ................ 22
3. CONTRASTE .............................................. 11
4. BÚSQUEDA AUTOMÁTICA ........................ 11
5. BÚSQUEDA MANUAL ............................... 12
6. AJUSTES PERSONALES ........................... 12
7. TABLA DE PROGRAMACIÓN .................... 12
8. FUNCIONAMIENTORÁPIDO ...................... 12
-2Bmt-76.p65
2
06-4-10, 19:32
MEDIDAS DE SEGURIDAD
Apreciado cliente:
Le agradecemos la adquisición de este equipo TV portátil digital terrestre. Le aconsejamos que lea
atentamente este manual de instrucciones y preste especial atención a las precauciones antes de
poner en funcionamiento este aparato.
Nota:
Este aparato sólo funciona mediante alimentación AC~230 V, 50 Hz.
Advertencia:
Para evitar el riesgo de incendio o descarga eléctrica, no exponga este equipo a la lluvia ni a la
humedad.
Para reducir el riesgo de incendio, descarga eléctrica, o molestas interferencias, utilice solamente
accesorios recomendados.
Este aparato cumple con todas las normas internacionales en vigor.
Por favor, lea atentamente las siguientes medidas de seguridad antes de utilizarlo.
SOBRECARGA: Nunca sobrecargue el enchufe de alimentación, ni utilice alargadores o adaptadores
inadecuados ya que podría provocar un incendio o descarga eléctrica.
LÍQUIDOS:
Este aparato no debe quedar expuesto a gotas ni salpicaduras de ningún tipo de
líquido. No lo sitúe en ambientes con un elevado grado de humedad (por ejemplo:
sótanos).
LIMPIEZA:
Desconecte este aparato de la fuente de alimentación antes de proceder a su
limpieza. Límpielo con un paño suave, humedecido con agua. No utilice disolventes.
VENTILACIÓN:
Para permitir la ventilación evite tapar las ranuras de la cubierta del aparato. Tampoco
lo exponga a la luz solar directa o a fuentes de calor. No coloque otros equipos
electrónicos sobre el televisor.
ACCESORIOS:
Para evitar daños no deseados, utilice sólo los accesorios recomendados por el
fabricante.
CONEXIÓN A UNA ANTENA:
Antes de conectar o desconectar este aparato a/desde la antena, asegúrese de
desconectarlo de la fuente de alimentación. DE LO CONTRARIO, PODRÍA DAÑAR LA
ANTENA Y EL APARATO.
CONEXIÓN A UN EQUIPO TV:
Antes de conectar o desconectar el cable del televisor a/desde el aparato, asegúrese
de desconectarlo de la fuente de alimentación. DE LO CONTRARIO, PODRÍA DAÑAR
LA ANTENA Y EL APARATO.
TOMA DE TIERRA:
El cable de la antena debe conectarse al sistema de toma de tierra de la antena.
La toma de tierra debe cumplir la normativa local sobre seguridad eléctrica.
SITUACIÓN:
Este aparato ha sido diseñado para uso interior. No lo exponga a tormentas, lluvia ni
a la luz solar directa.
-3Bmt-76.p65
3
06-4-10, 19:32
Precauciones
Antes de utilizar este aparato, lea atentamente
las siguientes precauciones.
Bajo ninguna circunstancia intente desmontar
el aparato usted mismo.
Protección del adaptador de alimentación
Para evitar el funcionamiento incorrecto del
aparato, accidentes provocados por descargas
eléctricas, incendios o lesiones personales, por
favor, siga las siguientes indicaciones:
Cuando conecte o desconecte el adaptador
de alimentación, manténgalo firme.
No conecte / desconecte el adaptador con las
manos mojadas.
Mantenga el adaptador alejado de aparatos
que emitan calor.
No coloque ningún objeto pesado sobre el
adaptador.
No intente reparar o modificar el adaptador
usted mismo, de ninguna forma.
Quite periódicamente el polvo, suciedad, etc.
acumulados en el enchufe del adaptador.
Si por cualquier causa el aparato cae o resulta
dañado de cualquier otra forma, asegúrese
de desconectar la alimentación y el adaptador
inmediatamente.
Si sale humo, huele de forma extraña o se
escuchan ruidos provenientes del aparato,
desconecte la alimentación y el adaptador
inmediatamente.
Mantenga el aparato lejos del agua y de
objetos imantados
Mantenga el televisor alejado de floreros,
duchas, fregaderos, etc. Si el agua penetra
en el interior del aparato, pueden producirse
serios daños.
Nunca sitúe objetos imantados junto al aparato
(por ejemplo: altavoces).
Situación
Evite colocar el aparato en lugares donde se den
las siguientes circunstancias:
Luz solar directa o fuentes de calor como
radiadores, cocinas, etc.
Altas temperaturas (superiores a 35°C) o
niveles de humedad elevados (superiores al
90%).
Exceso de polvo.
Campos magnéticos o electrostáticos intensos.
Vibraciones, impactos o superficies
inclinadas.
De lo contrario, las partes internas pueden sufrir
daños.
Características:
Sección DVB-T
MPEG-2 / DVB-T compatible
Selección automática del ancho de banda (7
MHz ó 8 MHz).
Salida de texto OSD & VBI.
SCPC / MCPC compatible
Guía electrónica de programación (EPG).
Alimentación de la antena 5 V – DC.
Búsqueda automática / manual/ Búsqueda NIT
(Tabla de Información de Red)
Posición
Sitúe el televisor en posición horizontal, y no
coloque ningún objeto pesado sobre el mismo.
No lo coloque sobre un amplificador u otros
equipos que puedan producir calor.
Se producen interferencias TV mientras
se sintoniza un canal.
Si la salida AV está conectada al equipo TV,
debido a las condiciones de recepción del
televi sor, es posible que, en algunas
ocasiones, se visualicen interferencias en la
pantalla durante la sintonización de un canal
di gita l terr es tre. Es to no s ign ifi ca u n
funcionamiento incorrecto del aparato. Si esto
ocurre, apague el aparato.
Sección TV
Podrá recibir programas en los sistemas: PAL
I/BG/DK y SECAM L/L1/BG/DK.
Periodos de no utilización
Apague el aparato cuando no vaya a utilizarlo.
Desconecte el adaptador de la toma AC cuando
no vaya a utilizar el aparato durante un
prolongado periodo de tiempo.
Equipo completo
Admite subtítulos en varios idiomas.
Interfaz de entrada/salida audio/vídeo.
Interfaz gráfico de fácil manejo para el usuario.
Pantalla TFT, 16:9 de 7 pulgadas.
Dos altavoces internos (1 W)
No introduzca los dedos ni objetos
extraños en el interior del aparato
Tocar con las manos u otros objetos cualquier
parte interna del aparato puede resultar
peligroso y, además, causar serios daños al
aparato.
-4Bmt-76.p65
4
06-4-10, 19:32
Accesorios
Por favor, asegúrese de que los siguientes accesorios acompañen al aparato:
Adaptador de alimentación
Mando a distancia
Manual de instrucciones
Cable audio y vídeo
una unidad
una unidad
una unidad
una unidad
Panel frontal
1.
Sensor del mando a distancia.
2.
Botones de dirección (arriba / CH, abajo / CH, izquierda / VOL-, derecha / VOL+).
3.
Botón de confirmación (OK).
4.
Botón del menú.
5.
Botón de salida / fuente.
6.
Botón de encendido.
-5Bmt-76.p65
5
06-4-10, 19:32
Panel posterior
1.
2.
3.
4.
Toma de entrada DC de 12 V.
Toma de salida de los auriculares.
Toma de entrada AV.
Toma de actualización
5.
6.
Toma de salida AV.
Toma de entrada de la antena (75S).
Admite funcionamiento con antena mediante salida DC de 5 V.
7.
Antena telescópica.
NOTA:
Por favor, desenchufe el cable de alimentación y sitúelo de forma adecuada cuando no vaya a utilizar
el aparato durante un prolongado periodo de tiempo. De lo contrario, podría sufrir daños y provocar
descargas eléctricas.
-6Bmt-76.p65
6
06-4-10, 19:32
Mando a distancia
1.
2.
3.
4.
5.
6.
7.
8.
9.
10.
11.
12.
13.
14.
15.
16.
17.
18.
19.
20.
21.
22.
23.
24.
25.
26.
27.
28.
29.
30.
31.
32.
33.
34.
Botón de modo de espera
Botón numérico 1
Botón numérico 2
Botón numérico 4
Botón numérico 5
Botón numérico 7
Botón numérico 8
Botón numérico 0
Teletexto (TTX)
Menú
(arriba) / P+(CH+)
(izquierda) / P+ (CH+)
Botón de confirmación (OK)
Página arriba (PG-)
(abajo) / P- (CH-)
Botón TV / radio (TV/ R)
Información (INFO)
EPG
Botón ROJO
Botón AMARILLO
Botón AZUL
Botón BLANCO
Botón VERDE
Botón de modo (MODE)
Botón de audio
Último
Página abajo (PG+)
(derecha) / Incremento del volumen (V+)
Salida
Subtítulos (SUB)
Botón numérico 9
Botón numérico 6
Botón numérico 3
Anulación del sonido (MUTE)
NOTA: Cuando los botones del mando a distancia
tengan asignadas las mismas funciones que los
botones del panel frontal, podrá utilizarlos
indistintamente.
-7Bmt-76.p65
7
06-4-10, 19:32
CONEXIONES BÁSICAS
Conexiones básicas:
Compruebe si el aparato u otros equipos están
conectados. Apáguelos antes de realizar
cualquier conexión.
Antes de conectar otros equipos lea las
instrucciones correspondientes.
Compruebe los códigos de color al conectar
cables de audio y vídeo.
NOTA:
1. Cuando la señal audio / vídeo se reciba a
través de la entrada AV, sólo habrá señal audio
a través de la salida AV. Únicamente habrá
salida audio / vídeo cuando la conexión se
efectúe a través de este aparato.
2. Cuando la conexión se efectúe a través de la
entrada AV no se visualizará el interfaz OSD,
y el aparato se ajustará automáticamente en el
modo de entrada AV como si la conexión se
efectuara a través de la toma de entrada AV.
CONEXIÓN DURANTE LA UTILIZACIÓN DE UNA
ANTENA INTERIOR (B)
1. DVB-T portátil.
2. Cable de conexión entre la antena interior y la
antena del aparato.
3. Adaptador de alimentación. (Conecte el cable
del adaptador a la toma de entrada DC de 12 V
del aparato).
CONEXIONES DURANTE LA UTILIZACIÓN DE
UNA ANTENA TELESCÓPICA (A)
1. DVB-T portátil.
2. Cable de conexión entre la antena telescópica
y la antena de este aparato.
3. Adaptador de alimentación. (Conecte el cable
del adaptador a la toma de entrada DC de 12 V
del aparato).
CONEXIÓN DE LA SALIDA AV (AUDIO/ VÍDEO)
A UN EQUIPO TV (u otros dispositivos) (C)
1. DVB-T portátil.
2. Conexión entre la antena interior (o telescópica)
y la antena de este aparato.
3. Adaptador de alimentación. (Conecte el cable
del adaptador a la toma de entrada DC de 12 V
de este aparato.)
4. Equipo TV (u otros dispositivos) (opcional).
5. Cable audio / vídeo (opcional).
-8Bmt-76.p65
8
06-4-10, 19:32
CONEXIONES BÁSICAS
CONEXIÓN A UN PC PARA ACTUALIZACIÓN
(F)
1. Ordenador personal (opcional).
2. Accesorio de actualización (opcional)
3. Cables (opcional) de conexión del accesorio
de actualización y el DVB-T portátil.
4. Cables (opcional) para conexión entre el puerto
RS232 del accesorio de actualización y el
ordenador.
5. DVB-T portátil.
6. Adaptador de alimentación (conéctelo a la toma
de entrada DC de este aparato)
CONEXIÓN A UN REPRODUCTOR DVD (D)
1. DVB-T
2. Adaptador de alimentación. (Conecte el cable
del adaptador a la toma de entrada DC de 12 V
de este aparato).
3. Reproductor DVD (opcional).
4. Cable audio/ vídeo (opcional).
CONEXIONES DURANTE LA UTILIZACIÓN DE
AURICULARES (E)
1. DVB-T portátil.
2. Conexión entre la toma de la antena interior (o
telescópica) y la antena del aparato.
3. Adaptador de alimentación (conecte el cable
del adaptador y la toma de entrada DC de 12V).
4. Auriculares (opcional).
-9Bmt-76.p65
9
06-4-10, 19:32
Preparación del mando a distancia
Instalación de las pilas (A)
Inserte las pilas siguiendo las indicaciones de
polaridad [positiva (+) y negativa (-)] tal como se
muestra en la ilustración A.
Duración de las pilas
Las pilas normalmente duran alrededor de un
año. No obstante, esto dependerá de la
frecuencia y la forma en que se utilice el mando
a distancia.
Si el mando a distancia falla incluso estando
cerca del receptor DVB, cambie las pilas.
Utilice pilas (2 unidades) de tamaño AAA,
UM-4.
Notas:
No utilice pilas recargables (Ni-Cd).
No intente recargar las pilas, ni las cortocircuite,
desmonte, caliente o tire al fuego.
Evite que el mando a distancia se caiga, no lo
pise ni lo someta a golpes. Esto podría provocar
daños en los componentes del mando y un
funcionamiento incorrecto.
No mezcle pilas viejas con pilas nuevas.
Cuando no vaya a utilizar el mando durante un
prolongado periodo de tiempo, retire las pilas.
De lo contrario, podría producirse vertido del
electrolito con el consiguiente funcionamiento
incorrecto o incluso un incendio si
determinadas sustancias entraran en contacto
con el electrolito.
Si se ha vertido electrolito, limpie el interior de
mando e instale unas pilas nuevas.
Si el electrolito llega a tocar alguna parte de su
piel, lávela inmediatamente con agua limpia.
Funcionamiento del mando a distancia (B)
Apunte con el mando a distancia hacia el
sensor de señal del aparato. La distancia de
funcionamiento es de unos 5 metros aprox.,
en un ángulo de 60 grados (Vea la Ilustración
B)
Este intervalo puede cambiar ligeramente
según la luz de la habitación.
Note:
No dirija luces brillantes hacia el sensor de
señal.
Cuando utilice el mando a distancia, asegúrese
de que no haya ningún obstáculo entre el
mando y el sensor.
No utilice simultáneamente el mando a distancia
junto con los mandos de otros equipos.
Sensor del mando a distancia
Distancia de 5 metros
-10Bmt-76.p65
10
06-4-10, 19:32
Funcionamiento
Instalación rápida:
Conecte este aparato y los otros equipos según lo establecido en el apartado “CONEXIONES BÁSICAS”:
1. Sitúe el selector de encendido en posición de encendido. El aparato accederá automáticamente al
modo DVB-T.
2 Para acceder al menú TV, pulse el botón MENÚ. Utilice los botonespara seleccionar “búsqueda
automática” (AUTO SCAN), y pulse el botón OK para confirmar la búsqueda automática de programas
TV. La barra de información le indicará el progreso de búsqueda automática, desde el principio
hasta el final, mediante porcentajes.
3. Para salir del interfaz del menú, pulse el botón de salida (EXIT). Utilice los botonespara seleccionar
el canal deseado.
4. Para poder seleccionar entre los modos TV y DVB-T, mantenga presionado el botón de salida (EXIT)
durante más de 2 segundos.
5. En el modo DVB-T, pulse MENÚ para acceder al menú DVB-T. Si utiliza este aparato por primera vez
o el software se acaba de actualizar, deberá acceder al menú de ajustes (SETUP) y seleccionar la
opción de recuperación de los valores de fábrica (Factory Restore). Después, pulse el botón OK
para confirmar la operación.
6 Acceda al menú de búsqueda (SCAN), y seleccione “búsqueda automática” (AUTO SCAN) dentro
de los tipos de búsqueda. Después, pulse OK para que la función de búsqueda automática comience.
7 Finalizada la búsqueda, salga del menú principal y pulse OK para visualizar la Lista de Programas.
Utilice los botonespara seleccionar un programa, y vuelva a pulsar OK para poder disfrutar de
la programación digital terrestre.
Para más información sobre esta operación, lea las siguientes instrucciones.
Funcionamiento del menú:
Sección 1: Funcionamiento del menú TV.
1. Menú TV
Para acceder al interfaz del menú TV, pulse el botón MENÚ. Dispondrá de 6 opciones:
Brillo (BRIGHTNESS)
Contraste (CONTRAST)
Búsqueda automática (AUTO SCAN)
Búsqueda manual (MANUAL SCAN)
Ajuste de frecuencia (ADJUST FRE)
Tabla de programación (PROGRAM TABLE)
En la parte inferior de la pantalla se visualizará una barra de estado que le mostrará el estado actual y
algunos consejos de funcionamiento.
2. Brillo (BRIGHTNESS)
Seleccione el submenú de brillo (BRIGHTNESS).
La barra de estado indica el ajuste del brillo. Utilice
los botones para ajustar el brillo dentro del
intervalo 1-60.
Nota:el ajuste del brillo sólo surte efecto en
programas TV y no en el menú ni en las opciones
OSD o DVB-T.
3. Contraste (CONTRAST)
Si selecciona la opción de contraste, la barra de
estado le mostrará el ajuste del contraste
(CONTRAST ADJUST). Podrá ajustar el contraste
de la pantalla, dentro del intervalo 1-60, mediante
los botones.
Nota:el ajuste del contraste sólo surte efecto en
programas de TV y no en el menú ni en las
opciones OSD o DVB-T.
4. Búsqueda automática (AUTO SCAN)
Seleccione el submenú de búsqueda automática (AUTO SCAN). La barra de estado mostrará el
mensaje “para búsqueda automática, pulse el botón OK” (AUTO SCAN PRESS OK KEY). Pulse OK para
que la búsqueda automática comience. La barra de estado indicará “búsqueda automática” (AUTO
SCANNING) y la barra de progreso de la búsqueda mostrará el proceso desde el 1% hasta el 100%.
Tan pronto como un programa TV sea localizado, se sintonizará automáticamente durante dos segundos.
-11Bmt-76.p65
11
06-4-10, 19:32
Funcionamiento
Una vez finalizada la búsqueda automática, el
sistema volverá al primer programa localizado. La
barra de estado indicará “fin de localización
automática” (AUTO SCANNED).
5. Búsqueda manual (MANUAL SCAN)
Seleccione el submenú de búsqueda manual
(MANUAL SCAN) que se visualizará en la barra
de estado. Cuando la barra de estado indique
“búsqueda manual” (MANUAL SCANNING), vaya
a la opción de modo audio y utilice los botones
para seleccionar un modo audio entre los
siguientes: BG / I / DK / L / L1. Efectúe una
búsqueda manual hacia delante o hacia atrás
mediante los botones. Una vez localizado un
programa, la búsqueda se parará. Podrá volver a iniciar una búsqueda manual pulsando los botones.
6. Ajuste de frecuencia (ADJUST FRE)
Cuando la señal se vuelva débil o la antena no
esté en buenas condiciones, algunos canales no
podrán sintonizarse correctamente. En estos
casos, podrá utilizar esta función para conseguir
que las imágenes sean de mayor calidad.
Cuando la barra de estado indique “ajuste de
frecuencia” (FREQUENCE ADJUST), seleccione
la opción “ajuste de frecuencia” (ADJUST FRE) y
obtenga una correcta sintonización utilizando los
botones . Podrá ajustar la frecuencia dentro del intervalo 0-60.
7. Tabla de programación (PROGRAM TABLE)
Seleccione el submenú de tabla de programación
(PROGRAM TAB). La barra de estado mostrará la
tabla de programación. Pulse el botónpara
cambiar. La barra de estado indicará “OKconfirmar, amarillo-borrar, blanco-mover” (‘OKENT, YELL-DEL, WHIT-MOVE’).
Utilice los botones para seleccionar un
programa, y después pulse OK para confirmar y
ver el programa seleccionado.
Pulsando el botón amarillo podrá borrar un
programa. Cuando en la barra de estado se muestre la indicación “¿borrar? OK-OK salir-cancelar”
(DELETE? OK-OK EXIT-CANCEL), pulse el botón OK para borrar el programa y pulse el botón de salida
(EXIT) para cancelar la función de borrado.
Pulsando el botón blanco, podrá mover el programa a cualquier posición y cambiar el orden. La barra
de estado visualizará “mover programa” (MOVE PROGRAM); ahora podrá mover el programa deseado
pulsando el botón OK. Utilice los botonespara mover el programa a la posición deseada. Pulse OK
para confirmar o salir.
8. Funcionamiento rápido
Selección de canal mediante los botones numéricos: introduzca directamente el número del
canal deseado y espere 2 segundos o pulse el botón OK. El aparato sintonizará el canal deseado.
Notas: En el modo TV, introduzca los dígitos desde el mando a distancia para seleccionar directamente
un canal. En el caso de que pulse el botón numérico 0, el sistema accederá por defecto al canal número
1; para evitar errores, también accederá al último número de programa en el caso de que haya
introducido un valor superior al de los programas memorizados. Por ejemplo: supongamos que, después
de la búsqueda, el aparato memoriza 10 programas. En el caso de que pulse el botón numérico 0, el
sistema accederá al programa 1. En el caso, de que introduzca el número 11 u otro superior, el sistema
accederá al programa número 10.
Para retornar al último canal sintonizado: pulse el botón “último” (LAST).
-12Bmt-76.p65
12
06-4-10, 19:32
Funcionamiento
Cambio de canal en secuencia: utilice los botonespara cambiar de canal, hacia delante o hacia
atrás, de uno en uno.
Ajuste del volumen: pulse los botonespara ajustar el nivel del volumen.
Anulación del sonido: pulse el botón de anulación del sonido (MUTE) del mando a distancia para activar
o desactivar el sonido.
Sección 2: Funcionamiento del menú DVB-T
Consejos de funcionamiento del menú
Cuando aparezca el símbolo “” a la derecha de una opción del menú, podrá pulsar el botóndel
mando a distancia para visualizar la lista de opciones. Después utilice los botonespara acceder a
la opción deseada. Para confirmar pulse el botón OK o salga de la lista pulsando el botón.
1. Menú principal
Pulse el botón MENÚ para navegar por el menú principal, que incluye 4 submenús:
Programa (SERVICE)
Búsqueda (SCAN)
Ajustes (SETUP)
Guía de programación electrónica (EPG)
Pulse los botonespara seleccionar una opción del menú. Después, pulse el botón OK para confirmar
y acceder al submenú. Pulse el botón de salida (EXIT) para volver al menú principal.
Nota:pulsando el botón de salida (EXIT) podrá acceder al menú anterior desde el menú actual. Si pulsa
este botón repetidas veces, al final saldrá del menú principal.
Botones de acceso rápido:
Guía de programación electrónica (EPG): pulse este botón para visualizar la información de la guía
de programación electrónica (EPG) del programa actual (sólo si la opción dispone de información
EPG).
Teletexto (TTX): pulse este botón para visualizar la información del teletexto del programa actual
(sólo si el programa actual dispone de teletexto).
Subtítulos (SUB): pulse este botón para activar o desactivar los subtítulos de la pantalla (sólo si el
programa actual dispone de subtítulos).
Información (INFO): pulse este botón para visualizar la información del programa actual.
TV / R: pulse este botón para cambiar entre canales de TV / radio.
ROJO, VERDE, AMARILLO, AZUL, BLANCO: cada uno de estos botones tiene asignada una función
relacionada con el color.
Último (LAST): pulse este botón para volver al último programa visualizado.
Modo (MODE): pulse este botón para cambiar el formato de la imagen en pantalla según el siguiente
orden: 4:3 Letter box / 4:3 Pan & Scan / 4:3 Encuadre completo / 16:9.
AUDIO: pulse este botón para cambiar el canal de audio. Dispondrá de las siguientes opciones:
estéreo, canal izquierdo / canal derecho.
Modo de espera (STANDBY): pulse este botón para activar el modo de espera (STANDBY). Vuelva
a pulsarlo para volver al funcionamiento normal.
Anulación del sonido (MUTE): pulse este botón para activar o desactivar la función de anulación del
sonido.
2. Programa (SERVICE)
En la ventana de programa se visualizará la lista
de programas. Pulse el botón TV / R para visualizar
la lista de programas de TV o de radio. Después,
pulse el botón Pg+ / Pg- para resaltar por orden
las opciones siguientes. Podrá memorizar un
máximo de 600 canales.
Pulse los botones / para seleccionar un
programa. Después pulse el botón OK para ver el
programa seleccionado y visualizar la información
disponible.
2.1 Añadir a favoritos
Los botones de colores, que aparecen en la parte inferior de la ventana de programa, sirven para
añadir un programa a la lista de favoritos: noticias (rojo), películas (verde), deportes (amarillo) y música
(azul). Pulse cualquiera de estos botones para acceder a la lista de favoritos correspondiente.
Pulse los botonespara seleccionar un programa. Después pulse el botón de color correspondiente,
-13Bmt-76.p65
13
06-4-10, 19:32
Funcionamiento
de la parte inferior de la ventana, para añadir el programa seleccionado a la lista de favoritos. A partir
de este momento, junto al programa aparecerá la marca del color correspondiente. También podrá
borrar un programa de la lista de favoritos, volviendo a pulsar el botón de color. Después la marca de
color desaparecerá.
Cuando no se visualice el menú en la pantalla, pulse los botones de colores para visualizar la lista de
favoritos correspondiente.
Pulse el botón blanco para mover el programa favorito seleccionado. Pulse los botonespara
seleccionar un programa y el botón blanco para resaltarlo. Después pulse los botonespara mover
el programa hacia arriba o hacia abajo. Por último, pulse el botón OK para terminar de mover el
programa hasta la posición deseada.
2.2 Editar programa
Cuando termine la lista del menú, pulse el botón
OK para visualizar la lista de programas. En la
parte inferior de la ventana aparecerán 3 botones
de color: mover (rojo), bloquear (verde), borrar
(amarillo).
Pulse el botón rojo para mover el programa:
pulse los botones para seleccionar el
programa deseado. Después pulse el botón rojo
para resaltarlo y utilice los botonespara
moverlo hacia arriba o hacia abajo. Para terminar,
pulse el botón de confirmación OK.
Pulse el botón verde para bloquear el programa: pulse los botonespara seleccionar el
programa. Después, pulse el botón verde para visualizar la ventana del Código PIN e introdúzcalo
mediante los botones numéricos. Para terminar, pulse el botón OK y el programa quedará bloqueado (a
la izquierda aparecerá el símbolo de bloqueo .) Antes de visualizar un programa deberá introducir el
Código PIN correcto. Para desactivar el bloqueo, pulse otra vez el botón verde; de esta forma se
visualizará la ventana para poder introducir el código PIN. El programa quedará desbloqueado y el
símbolo de bloqueo desaparecerá. El código PIN por defecto es “0000”.
Pulse el botón amarillo para borrar un programa: pulse los botonespara seleccionar un
programa. Después pulse el botón amarillo y se visualizará el mensaje: “¿seguro que desea eliminarlo?
” (ARE YOU SURE TO DELETE IT?). Pulse el botón OK para confirmar el borrado o pulse el botón de
salida (EXIT) para cancelar la función de borrado y salir.
3. Búsqueda (SCAN)
Desde el submenú de búsqueda (SCAN) podrá realizar una búsqueda de canales y algunos ajustes.
Tipo de búsqueda: búsqueda manual / búsqueda automática / búsqueda NIT
Canal: introduzca el número del canal mediante los botones numéricos del mando a distancia.
Actualizaciones (UPDATE MODE): añadir (APPEND) / reemplazar (REPLACE)
Si selecciona la opción “añadir” (APPEND), el nuevo canal se añadirá al final de la lista de canales.
Nota: los canales que ya formen parte de la lista no podrán volver a añadirse como nuevos.
Si selecciona la opción “reemplazar” (REPLACE), todos los canales serán sustituidos por los que se
localicen en la última búsqueda.
3.1 Búsqueda manual
Si selecciona la opción de búsqueda manual,
introduzca primero el número del canal. Después
seleccione la opción de actualización (UPDATE
MODE) y pulse el botón OK. En la pantalla se
visualizará el mensaje “por favor, espere…”
(please wait...), comenzando después la
búsqueda. Podrá pulsar el botón de salida (EXIT)
para detener la búsqueda y salir de esta opción.
Cuando la búsqueda finalice, en la pantalla se visualizará el número de canales localizados. Pulse el
botón de salida (EXIT) para terminar.
3.2 Búsqueda automática
Seleccione la opción de búsqueda automática (AUTO SCAN) y después la opción de actualización
(UPDATE MODE). Por último, pulse el botón OK. Durante la búsqueda, en la pantalla se visualizará el
-14Bmt-76.p65
14
06-4-10, 19:32
Funcionamiento
mensaje “búsqueda en proceso” (scan process).
Podrá pulsar el botón de salida (EXIT) para detener
la búsqueda y salir de esta opción.
Durante el proceso se visualizará el progreso de
la búsqueda en porcentajes. Los canales TV y
los de radio se visualizarán en dos columnas
respectivamente.
Al finalizar la búsqueda se visualizará el número
de canales localizados. Pulse el botón de salida
(EXIT) para terminar.
3.3 Búsqueda NIT (Tabla de información de red)
Durante la búsqueda NIT (Tabla de información
de red), introduzca el número del canal deseado,
seleccione la opción de actualización (UPDATE
MODE) y pulse el botón OK. En la pantalla se
visualizará el mensaje “por favor, espere…”
(please wait...) y la búsqueda comenzará. Pulse
el botón de salida (EXIT) para terminar.
Durante el proceso se visualizará el progreso de
la búsqueda en porcentajes. Los canales TV y
los de radio se visualizarán en dos columnas
respectivamente.
Al finalizar la búsqueda se visualizará el número
de canales localizados. Pulse el botón de salida
(EXIT) para terminar.
4. Ajustes (SETUP)
En este directorio hay 9 submenús: (vea la
siguiente imagen).
Ajuste AV (AV SETUP)
Ajuste del idioma (LANGUAGE SETUP)
Ajuste de la hora (TIME SETUP)
Ajuste de la contraseña (PASSWORD SETUP)
Recuperación de valores de fábrica
(FACTORY RESTORE)
Lista de reservas
Pantalla Ajuste
Setup LCN
Versión
-15Bmt-76.p65
15
06-4-10, 19:32
Funcionamiento
4.1 Ajuste AV (AV SETUP)
Menú de ajuste AV.
Tipo de pantalla: 4:3 Letter box / 4:3 Pan & Scan /
4:3 Encuadre completo / 16:9.
Pistas de audio: estéreo / izquierda / derecha.
4.2 Ajuste del idioma (LANGUAGE SETUP)
Menú de ajuste del idioma: inglés / español.
4.3 Ajuste de la hora (TIME SETUP)
Zona horaria: GMT-11 ~ GMT+11
Apagado automático: desactivado / 5 minutos /
10 minutos / 20 minutos / 30 minutos / 60 minutos
Cuando seleccione el tiempo de apagado
automático, pulse el botón OK para empezar la
cuenta atrás. Cuando la cuenta atrás termine, el
aparato se apagará automáticamente.
Horario de verano: encendido / apagado.
Nota:cuando el aparato esté en modo de espera o apagado, la función de apagado automático
quedará desactivada.
4.4 Ajuste de la contraseña (PASSWORD SETUP)
Utilice los botones numéricos del mando a
distancia para introducir la contraseña antigua.
Después, introduzca la nueva y vuelva a
introducirla para confirmar. Pulse el botón OK, la
contraseña se activará y el ajuste de la contraseña
terminará. La contraseña puede tener de 0 a 8
dígitos.
Nota: la contraseña de acceso por defecto es
“0000”
4.5 Recuperación de valores de fábrica (FACTORY RESTORE)
Seleccione la opción de recuperación de valores de fábrica. Pulse el botón OK y en la pantalla se
visualizará el mensaje “recuperación de valores de fábrica” (factory restore). Vuelva a pulsar el botón
OK para confirmar o pulse el botón de salida (EXIT) para salir de esta opción.
Si utiliza este aparato por primera vez o acaba de actualizar el software, deberá recuperar los valores
de fábrica.
4.6 Lista de reservas (BOOKING LIST)
Seleccione la opción de lista de reservas y pulse el botón OK para acceder al menú. En la pantalla se
visualizará la siguiente información:
Número del canal, lista de canales, hora de visualización, número del programa y hora del programa.
Pulse el botón para eliminar el programa reservado.
4.7
Pantalla Ajuste
Ajuste pantalla brillo, constraste
-16Bmt-76.p65
16
06-4-10, 19:32
Funcionamiento
4.8 Ajuste del LCN
Elija esta opción para ajustar el estado On/Off
(Encendido o Apagado) del LCN.
Si se elige On (Encendido), el sistema mostrará
automáticamente una lista de los canales en un
orden natural según sea el flujo de señal; y
Si se elige Off (Apagado), el sistema mostrará automáticamente una lista de los canales en su orden
habitual.
Presione la tecla de OK para confirmar y la tecla de Exit (Salida) para salir de la operación.
Nota: Antes de que proceda a ajustar el estado del LCN, por favor ajuste primero los valores de la
configuración de fábrica (Restore Factory), ajuste el LCN, y entonces Escaneo de canales, por
ejemplo. Cuando el LCN está en estado de On, y Vd. desea cerrar la función LCN, por favor ajuste
primero la opción Restore Factory (valores de la configuración de fábrica) y ajuste el LCN al estado de
Off (Apagado), entonces escanee los servicios.
4.9 Versión
Seleccione la opción de versión, y después pulse el botón OK para visualizar la versión del software
instalado. Para salir de esta opción, vuelva a pulsar el botón OK o pulse el botón de salida (EXIT).
5. Guía de programación electrónica (EPG)
Seleccione la opción EPG del menú principal para visualizar la información del programa.
Seleccione un programa mediante los botones, y después utilice los botonespara navegar
por el menú. Pulse el botón para reservar un programa. Pulse el botón OK para visualizar información
detallada. Para cancelar y salir, pulse el botón de salida (EXIT).
La lista de programas reservados se visualizará en un listado en el menú de ajustes. (Vea la siguiente
imagen).
-17Bmt-76.p65
17
06-4-10, 19:32
AJUSTES
Tabla del interfaz de ajustes de TV
Menú principal
Submenú
Descripción
Brillo (BRIGHTNESS)
Ajuste de brillo
Contraste (CONTRAST)
Ajuste del contraste
Búsqueda automática (AUTO SCAN)
Canales TV de búsqueda automática
Menú principal
BG
I
Búsqueda manual (MANUAL SCAN)
Modo audio
DK
Canales TV de búsqueda manual
L
L1
Ajuste de frecuencia (ADJUST FRE)
TABLA DE PROGRAMACIÓN
(PROGRAM TAB)
Ajuste correcto de frecuencia
Confirmar (OK)
Para confirmar una operación y ver
el programa
Borrar (DEL)
Para borrar un programa
Mover (MOVE)
Para mover un programa
-18Bmt-76.p65
18
06-4-10, 19:32
AJUSTES
Tabla del interfaz de ajustes DVB-T
Menú principal
Submenú
Programa
(SERVICE)
Programa TV / Programa de
radio
(TV SERVICE / RADIO
SERVICE)
Tipo de búsqueda
(SCAN TYPE)
Búsqueda
(SCAN)
Canal (CHANNEL)
Modo de actualización
(UPDATE MODE)
Ajustes AV (AV SETUP)
Ajuste del idioma
(LANGUAGE SETUP)
Ajustes (SETUP)
Ajuste de la hora (TIME
SETUP)
Ajuste de la contraseña
(PASSWORD SETUP)
Guía de
programación
electrónica
(EPG)
Opciones
Descripción
TV / Radio
Opciones TV / radio
Mover (MOVE)
Para mover un programa
Bloquear (LOOK)
Para bloquear un programa
Borrar (DELETE)
Para borrar un programa
Noticias (rojo)
Favoritos: noticias
Películas (verde)
Favoritos: películas
Deportes (amarillo)
Favoritos: deportes
Música (azul)
Favoritos: música
Búsqueda manual (MANUAL SCAN)
Para búsqueda manual
Búsqueda automática (AUTO SCAN)
Para búsqueda automática
Búsqueda NIT (NIT SCAN)
Para búsqueda NIT
Opciones de canal (CHANNEL OPTIONS) (sólo disponible en búsqueda manual y
NIT)
Añadir (APPEND)
Añadir
Reemplazar (REPLACE)
Cambiar
4:3 Letter Box
4:3 Letter Box
Formato de
4:3 Pan & Scan
4:3 Pan & Scan
pantalla
4:3 Encuadre completo
4:3 Encuadre completo
(TV SHAPE)
(FULL FRAME)
16:9 Panorámica
16:9 Panorámica
Pista de
Estéreo (STEREO)
Sonido estéreo
audio
Izquierda (LEFT)
Sonido a través de la pista izquierda
(AUDIO
Derecha (RIGHT)
Sonido a través de la pista derecha
TRACK)
Inglés (ENGLISH)
Interfaz en inglés
Menú
Español (SPANISH)
Interfaz en español
Zona horaria
GMT- 11 ~ GMT
(TIME
Zona horaria
+11GMTZONE)
Desactivado (NO
Función de apagado automático
SLEEP)
desactivada
Tiempo de
5 Min.
5 minutos
apagado
10 Min.
10 minutos
automático
(SLEEP
20 Min.
20 minutos
TIME)
30 Min.
30 minutos
60 Min.
60 minutos
Horario de
Activado (ON)
Horario activado
verano
(SUMMER
Desactivado (OFF)
Horario desactivado
TIME)
Contraseña antigua (OLD
Contraseña antigua
PASSWORD)
Contraseña nueva (NEW PASSWORD) Contraseña nueva
Vuelva a introducir la contraseña nueva
Vuelva a introducir la contraseña
(RETYPE NEW PASSWORD)
Ajuste de protección infantil
Niveles disponibles: 0, 5, 8, 12, 16
(RATTING SETUP)
Recuperación de valores de
fábrica
(FACTORY RESTORE )
Lista de reservas
(BOOKING LIST)
Versión del software
(SOFTWARE VERSION)
Programas
Búsqueda (BROWSE)
Reserva (BOOKING)
Información detallada (DETAIL INFO)
Salir (EXIT)
Para restaurar los valores originales de
fábrica
Lista de reservas de la guía de
programación electrónica (EPG)
Versión del software
Para programas
Para búsqueda
Para reservas
Para información detallada
Para salir
-19Bmt-76.p65
19
06-4-10, 19:32
SÓLO PARA REFERENCIA
Mantenimiento
Asegúrese de apagar el aparato y desconectarlo de la toma de la red eléctrica antes de cualquier
operación de mantenimiento
Mantenga el aparato limpio.
Si la superficie está muy sucia, límpiela con un paño suave y seco. No utilice alcohol, gasolina ni otros
productos químicos. No utilice la aspiradora para quitar el polvo.
En caso de necesidad, consulte con un servicio técnico cualificado.
Terminología
DVB MPEG-2
DVB es la abreviatura de Digital Video Broadcasting (Difusión de Señales Digitales de Vídeo). DVB-T
corresponde al tipo de transmisión terrestre.
MPEG es la abreviatura de Motion Picture Experts Group, grupo de expertos en estándares
internacionales para la compresión de audio y vídeo digital. Los estándares MPEG-2 se aplican
principalmente a la compresión de señales de televisión digital.
Subtítulos
Los subtítulos se refieren a las líneas de escritura que aparecen en la parte inferior de la pantalla y que
suelen ser la traducción o transcripción de los diálogos. Están grabados en los discos DVD y se
visualizan hasta en 32 idiomas.
FEC
FEC es la abreviatura de Forward Error Correction (corrección de errores sin canal de retorno), se
aplica a la corrección de posibles errores en la señal de transmisión entre la antena y el receptor.
PID
El código PID (Identificación de proceso) es el número de identificación de la señal de audio y de vídeo
en la corriente de datos digitales de la señal DVB MPEG-2. Estos códigos hacen posible la transmisión
de la señal de audio y vídeo a una dirección específica.
-20Bmt-76.p65
20
06-4-10, 19:33
SÓLO PARA REFERENCIA
ESPECIFICACIONES
Sintonizador de alta frecuencia
Frecuencia de entrada
Ancho de banda de frecuencia intermedia (IF)
Conector de entrada de radio frecuencia (RF)
Impedancia de entrada
: 48.25 ~ 863.25 MHz
: 7 u 8 MHz
: Tipo IEC169 – 2, hembra
: 75S
Modo de desmodulación TV
Sistema: PAL I / BG / DK, SECAM L / L’ / BG / DK
Modo de desmodulación DVB-T
Forma de onda
Desmodulación
Modo de transmisión
Intervalo de protección
Velocidad de transmisión de código
Decodificación audio y vídeo DVB-T
Decodificación vídeo
Resolución vídeo
: COFDM
: QPSK, QAM16, QAM64
: 2 K, 8 K
: 1/4, 1/8, 1/16, 1/32
: 1/2, 2/3, 3/4, 5/6, 7/8
: Compatible con ISO/IEC13818-2 y MPEG2 (MP@ML)
: 720 × 576
Velocidad de transmisión de código
de entrada vídeo
Texto
Decodificación audio
Pistas audio
Frecuencia de muestreo audio
:15 Mbit/s Máx.
: Compatible con DVB-TXTETSI / EN300472
: ISO/IEC13813 - 3
: Estéreo, canal izquierdo y canal derecho.
: 32, 44.1, 48 kHz
TFT - LCD
Pantalla
Formato de pantalla
Resolución
: TFT - LCD analógica, 7 pulgadas
: 16:9
: 480 x 234
Especificaciones del adaptador
Alimentación de entrada: AC 90 ~ 264 V, 50/60 Hz
Voltaje de salida
: DC 12 V / 1,5 A
Consumo
: <15 W
Requisitos medioambientales
Temperatura de funcionamiento
Humedad de funcionamiento
: 0 – 40º C
: <90 %
Otros:
Peso
Dimensiones
: < 1,5 kg
: 262 mm × 66 mm × 230 mm
El peso y las dimensiones pueden variar ligeramente.
Las especificaciones pueden cambiar sin previo aviso.
-21Bmt-76.p65
21
06-4-10, 19:33
SÓLO PARA REFERENCIA
GUÍA DE SOLUCIÓN DE PROBLEMAS
Compruebe la siguiente lista de problemas que pueden presentarse en el uso diario del aparato, así
como las posibles causas. Los problemas pueden resolverse con algunos ajustes menores. Si no se
solucionan, consulte con un técnico cualificado.
Algunos de los circuitos integrados pueden quedar dañados por una caída o subida electrostática. Las
medidas de protección contra choques estáticos son esenciales durante la comprobación y reparación.
PROBLEMAS
Posibles causas
No se enciende
El cable de alimentación o el
enchufe no están bien
conectados
La antena no está bien ajustada
La búsqueda de programas
no funciona
El uso de la antena no es
correcto
Los parámetros son incorrectos
El cable de salida vídeo no está
bien conectado
No se visualiza ninguna
imagen
El modo de salida vídeo del
aparato es diferente al modo de
entrada vídeo de la pantalla
El cable de salida está mal
conectado
El modo de salida vídeo del
aparato no coincide con el modo
de entrada de la pantalla
No hay color
Al cambiar de canal la
imagen aparece
distorsionada
Soluciones recomendadas (como
referencia)
Conecte firmemente el cable de
alimentación al enchufe y encienda el
aparato. Si sigue sin funcionar, vuelva a
apagarlo y pruebe otra vez dentro de 5 10 minutos.
Vuelva a ajustarla o utilice una antena
externa
Utilice una antena con una impedancia de
salida de 75 Ω
Introduzca los parámetros correctos de
frecuencia y banda
Conecte el cable de salida correctamente.
Si sigue sin visualizarse la imagen, puede
que la antena esté estropeada
Reinicie el aparato o la pantalla
Conecte correctamente el cable de salida
Reinicie el sistema del aparato o de la
pantalla
Es normal
El mando a distancia no
funciona
El sonido y los subtítulos
no coinciden
No hay sonido
No hay sonido
Se producen importantes
distorsiones en la imagen o
la señal no se recibe con
normalidad
Las pilas no están colocadas
correctamente
Las pilas están agotadas
Está fuera del intervalo de
funcionamiento
Hay una luz brillante apuntando
al sensor
La pista de sonido no es
correcta
La función de anulación del
sonido está activada
El volumen es demasiado bajo
El cable no está conectado
correctamente
Puede que se haya producido un
cortocircuito
La función de anulación del
sonido está activada
La función de apagado
automático está activada
Vuelva a colocar las pilas en la posición
correcta
Cámbielas
Utilice el mando dentro del intervalo de
funcionamiento
Las interferencias son muy
intensas
Adapte la antena o reduzca las
interferencias
Cambie la posición del aparato
Pulse el botón de audio para cambiar la
pista
Desactívela
Súbalo
Conéctelo correctamente
Vuelva a conectar el cable de salida audio
y encienda el aparato
Desactívela
Encienda el aparato
-22Bmt-76.p65
22
06-4-10, 19:33
TABLE OF CONTENTS
Safety information ....................................... 24
DVB-T Menu operation ............................... 33
Precautions ................................................... 25
1. Main Menu .................................................. 33
Features ........................................................ 25
2. Service ....................................................... 34
Accessories ................................................. 26
3. Scan ........................................................... 35
Front Panel Reference ............................... 26
4. Setup .......................................................... 36
Rear Panel Reference ................................. 27
5. EPG ............................................................. 37
Remote Control Reference ....................... 28
Basic connection ................................... 29-30
SETUP ............................................................. 38
Remote control preparation ..................... 31
TV Setup interface ..................................... 38
DVB-T Setup interface ............................... 39
Operation ....................................................... 32
Short-cut installation operation ............... 32
For reference only ...................................... 40
Menu operation ........................................... 32
Unit Maintenance ........................................ 40
TV Menu operation ..................................... 32
Definition Of Terms ..................................... 40
1. TV Main Menu ............................................. 32
Specification ............................................... 41
2. BRIGHTNESEE ............................................ 32
Troubleshooting .......................................... 42
3. CONTRAST ................................................. 32
4. AUTO SACAN ............................................ 32
5. MANUAL SCAN .......................................... 33
6. ADJUST FRE ............................................... 33
7. PROGRAM TABLE ...................................... 33
8. SHORT-CUT operation ............................... 33
-23Bmt-76.p65
23
06-4-10, 19:33
SAFETY INFORMATION
Dear customer:
We are really pleased and honored to take this opportunity to thank you for purchasing this Portable
Digital Terrestrial TV Set. We strongly suggest that you study carefully the operation instruction and
pay special attention to the precautions before attempting to operate the unit.
Note:
Only when the power supply is AC~230V, 50Hz can this unit be used.
Warning:
To avoid the risk of fire or electric shock, do not expose this equipment to rain or moisture.
To reduce the chance of fire, electric shock, or annoying interference, use only the recommended
accessories.
This PDT totally meets the existing related international common standards.
Please peruse the following safety precautions when you attempt to operate it.
OVERLOADING: Never overload a supply jack, and unsuitable power cord or adapters might lead to
fire or electric shock accident.
LIQUIDS:
The PDT must not be exposed to drips or splashes of any liquid or surroundings of
high humidity, e.g. the basement.
CLEANING:
Disconnect the PDT from power supply before wiping it with a piece of slightly damp
cloth in stead of solvents.
VENTILATION:
The slots on the cover of the PDT must be left uncovered for the sake of ventilation.
Do not expose it to direct sunlight or a heater, nor stack any electronic equipment on
it.
ACCESSORIES: Use the accessories only that are recommended herein by the manufacturer of this
PDT so as to avoid any unwanted disaster or damage to it.
CONNECTION TO THE ANTENNA:
Before connecting or disconnecting the PDT to/from the antenna, sure to cut off its
power supply. FAILURE TO DO SO CAN DAMAGE THE ANTENNA AND THIS UNIT.
CONNECTION TO A TV SET:
Before connecting or disconnecting the TV cable to/from the PDT, sure to cut off the
power supply. FAILURE TO DO SO CAN DAMAGE THE TV SET AND THIS UNIT.
EARTHING:
The antenna cable Must BE connected to the system earth of the antenna and the
earthing system must comply with local criteria for electrical safety.
LOCATION:
The PDT is designed for indoor use only. Do not expose it to lightning, rain or direct
sunlight in open air.
-24Bmt-76.p65
24
06-4-10, 19:33
Precautions
Peruse the following precaution information prior
to operating this unit.
Power adapter protection
To avoid any malfunctions of the unit, or accidents
of electric shock, fire or personal injury, please
observe the following:
Hold the power adapter firmly when connecting
or disconnecting it.
Do not connect/ disconnect the power adapter
with wet hands.
Keep the power adapter away from heating
appliances.
Never lay any heavy object on the power
adapter.
Do not attempt to repair or reconstruct the
power adapter in any way by yourself.
Remove periodically the dust, dirt, etc. on the
plug of the adapter.
If the unit by any chance has been dropped or
otherwise damaged, sure to cut off the power
and disconnect the adapter immediately.
If smoke, odd smell or noises found arise from
the unit, cut off the power and disconnect the
adapter at once.
Placement
Avoid placing the unit in areas with:
Direct sunlight or heat sources like heating
radiators and ovens
High temperature (over 35°C) or high humidity
(over 90%)
Excessive dust
Strong magnetic or electro-static field, or
Vibration, impact or wherever the surface is
tilted
Otherwise the internal parts may be damaged.
Non-use time
Switch the unit off when it is spare.
Unplug the adapter from the AC jack when the
unit shall be idle for a long period of time.
Stacking
Lay the unit on a horizontal plane, without
anything heavy on it.
Do not lay it on an amplifier or other equipments
that may get hot.
TV Interference while a broadcast is being
received
If the AV out is connected to a TV set, due to
the receiving condition of the TV set,
sometimes interference may appear on the
screen during a TV broadcast with this DVBT on. This does not mean the malfunction of
the unit or the TV set. In that case, turn off the
unit when watching a TV program.
Features:
DVB-T section
MPEG-2 / DVB-T compatible
Automatic selection of bandwidth 7MHz or
8MHz
OSD & VBI text output
SCPC/MCPC compatible
Electron Program Guide (EPG)
5V dc antenna supply
Auto scan /Manual/NIT(Network Information
Table) Scan
TV section
Can receive programs in PAL I/BG/DK system
and SECAM L/L1/BG/DK system
Complete unit
supports multi-language subtitle
Audio/video in/out interface
User-friendly graphical interface
7 inches , 16:9TFT LCD
Two internal speakers (1W)
Don’t put fingers or other foreign objects
inside
Touching any internal part of the unit by hand
or other objects proves to be dangerous, and
may cause serious damage to the unit.
Never attempt to disassemble this unit by
yourself under any circumstance.
Free from water and magnetic objects
Keep the unit away from flower vases, tubs,
sinks, etc. If water spills into the unit, serious
damage could occur.
Never place magnetic objects, e.g. speakers,
adjacent to the unit.
-25Bmt-76.p65
25
06-4-10, 19:33
Accessories
Please make sure the following accessories:
Power adapter
Remote control
Instruction Book
Audio and video cable
one
one
one
one
piece
piece
piece
piece
Front panel reference
1.
Remote control sensor
2.
Direction buttons (UP/CH, DOWN/CH, LEFT/ VOL-, RIGHT/ VOL+)
3.
OK button 4. Menu button
5.
Exit/ Source button
6.
Power button
-26Bmt-76.p65
26
06-4-10, 19:33
Rear Panel Reference
1.
2.
3.
4.
12V DC in socket
Headphone-out socket
AV-in socket
Update socket
5.
6.
AV-out socket
Aerial-in socket (75S)
Support powered antenna with 5V DC output.
7.
Telescopic Antenna
NOTE:
Please unplug and keep the power cord orderly when the unit shall be idle for a long time in case that
the power cord may get scratched and lead to electric leak and shock.
-27Bmt-76.p65
27
06-4-10, 19:33
Remote control reference
1.
2.
3.
4.
5.
6.
7.
8.
9.
10.
11.
12.
13.
14.
15.
16.
17.
18.
19.
20.
21.
22.
23.
24.
25.
26.
27.
28.
29.
30.
31.
32.
33.
34.
AWAKE BUTTON
NUMBER 1
NUMBER 2
NUMBER 4
NUMBER 5
NUMBER 7
NUMBER 8
NUMBER 0
TTX (TELETEXT)
MENU
(UP) /P+(CH+)
( left ) /p+ (CH+)
OK (confirm)
PG- ( page up )
(down)/ P- (CH-)
TV/ R (TV/ Radio)
INFO (information)
EPG
RED button
YELLOW button
BLUE button
WHITE button
GREEN button
MODE
AUDIO
LAST
PG+ (page down)
(right) / V+(VOL+)
EXIT
SUB( subtitle)
NUMBER 9
NUMBER 6
NUMBER 3
MUTE
NOTE: When the buttons on the remote control
function the same as those on the front panel,
either alternative shall be fine for operation. No
more respective details shall be attached below.
-28Bmt-76.p65
28
06-4-10, 19:33
BASIC CONNECTION
Basic connection:
Ensure that this unit and other equipment to be
connected, are turned off before undertaking
connection
R ea d thr ou gh th e i ns tr uc ti on s b efo r e
connecting other equipments
Ensure that you observe the color-coding
when connecting audio and video cords
NOTE:
1. When video/ audio signal is input through AV
IN, there shall be only audio signal output
through AV OUT; only when signal comes from
this DVB-T, shall the video and audio signal be
output.
2. In the state of AV IN there shall be no OSD
displayed, and this unit shall be automatically
set in AV IN state as soon as the AV IN socket
is connected.
CONNECTION WHILE USING AN INDOOR
ANTENNA (B)
1. Portable DVB-T
2. Connecting cable between the indoor antenna
and the aerial of this unit.
3. Power adapter (Just connect the outlet of the
adapter with the 12V DC IN socket of this unit.)
CONNECTION WHILE USING A TELESCOPIC
ANTENNA (A)
1. Portable DVB-T
2. Connecting cable between the telescopic
antenna and the aerial of this unit.
3. Power adapter (It shall be ok to connect the
outlet of the adapter with the 12V DC IN socket
of this unit.)
CONNECT OUTPUTING AV (AUDIO/ VIDEO) TO
A TV SET ( or other devices) (C)
1. Portable DVB-T.
2. Connection between the indoor antenna (or
telescopic antenna) and the AERIAL of this
unit.
3. Power adapter (Just connect the outlet of the
adapter with the 12V DC IN socket of this unit.)
4. TV set (or other devices) (optional)
5. Audio/Video cable (optional)
-29Bmt-76.p65
29
06-4-10, 19:33
BASIC CONNECTION
CONNECTING TO A DVD PLAYER (D)
1. DVB-T
2. POWER ADAPTER (Just connect the outlet of
the adapter with the 12V DC IN socket of this
unit.)
3. DVD player (optional)
4. Audio/ video cable (optional)
CONNECTION TO PC FOR UPGRADE (F)
1. Personal Computer(optional)
2. Upgrade Board (optional)
3. Cables(optional)connecting the Upgrade board
and Portable DVB-T
4. Cables(optional) between RS232 ports of
Upgrade board and computer.
5. Portable DVB-T
6. Power adapter( connecting it to the DC IN
socket of this unit)
ONNECTION WHILE USING A HEADPHONE (E)
1. Portable DVB-T
2. Connection between the indoor antenna (or
telescopic antenna) socket and the AERIAL.
3. Power adapter (connecting the outlet of
adapter and the 12V DC-IN socket)
4. Headphone (optional)
-30Bmt-76.p65
30
06-4-10, 19:33
Remote control preparation
Battery installation (A)
Insert the batteries observing the positive(+) and
negative(-) polarities as per illustration A .
Service life of batteries
The batteries normally last for about one year
despite that it depends on how often and in
what way the remote control is operated.
If the remote control fails to work even when
operated near the DVB receiver, replace the
batteries.
Use size 7 (AAA, UM-4) batteries (2 pieces).
Notes:
Do not use rechargeable (Ni-Cd) batteries.
Do not attempt to recharge, short circuit,
disassemble, heat the batteries or throw them
into the fire.
Do not drop, tramp or impact the remote control.
This may damage the parts and lead to
malfunction.
Do not mix used battery with new one ever
when using.
If the remote control shall be spared for a long
time, remove the batteries. Otherwise,
electrolyte may leak, which may lead to
malfunction, even fire accident when some
substance contacts with the electrolyte.
Wipe away the electrolyte having leaked inside
the remote control, and replace with new
batteries.
If any electrolyte happens to touch some parts
of your skin, wash it off thoroughly with clean
water immediately.
Operation range of remote control (B)
Pointing the remote control to the signal sensor,
it shall be effective to operate the remote
control within a distance of about 5 meters
and an angle of about 60 degrees. (See
illustration B)
The effective range may vary slightly with the
brightness of the room.
Note:
Do not point bright light to the remote control
sensor.
Make sure that there is not any shield between
the remote control unit and the sensor when
use it.
Do not use this remote control and remote
controls of other equipments simultaneously.
-31Bmt-76.p65
31
06-4-10, 19:33
Operation
Shortcut installation operation:
Connect this unit and other equipments related according to “BASIC CONNECTION”:
1. Turn on the POWER switch, then the unit shall get to DVB-T status automatically.
2. Press MENU button to enter the TV Menu, then usebutton to select AUTOSCAN, and push OK
button to confirm autoscan of TV programs, when a information bar shall indicate the progress of
autoscan from the very beginning to the end by percentage of completeness.
3. Press EXIT to retreat from the menu interface. Usebutton to select a channel and enjoy it.
4. Pressing EXIT long enough (over 2 seconds) shall enable to switch between TV state and DVB-T
state.
5. In DVB-T state, press MENU to enter the DVB-T Menu. If this unit is used for the first time or the
software has just been undated, you shall have to get to the SETUP menu, then choose Factory
Restore before pressing OK to confirm the operation.
6. Enter into the SCAN menu, and choose AUTO SCAN in Scan Type options, then press OK to start
Auto-scan operation.
7. After scan, exit from the main menu, then press OK to pop up the Service List, and usebutton
to choose a program service before pressing OK again to enjoy DVB-T programs.
Read the following instruction for details about particular operation.
Menu operation:
Section 1: TV Menu operation
1. TV Menu
Press MENU button to enter the TV Menu interface where there are 6 option items available:
BRIGHTNESS
CONTRAST
AUTOSCAN
MANUALSCAN
ADJUST FRE
PROGRAM TABLE
At the bottom of the screen, there exists a status bar indicating the current working status and
operation tips.
2. BRIGHTNESS
Select the submenu of BRIGHTNESS, where the
status bar indicates BRIGHTNESS ADJUST, and
use thebutton to conduct the adjustment of
brightness whose range is 1-60.
Note: Adjustment of brightness shall impact only
the TV program instead of the OSD and DVB-T
menu and programs.
3. CONTRAST
If choose Contrast item, the status bar shall show
‘CONTRAST ADJUST’, then you can adjust the
c ontr as t of di sp lay whi ch i s w ithi n 1-6 0
withbutton.
Note: Adjustment of brightness shall impact only
the TV program instead of the OSD and DVB-T
menu and programs.
4. AUTOSCAN
Select AUTOSCAN submenu, the status bar
shows ‘AUTO SCAN PRESS OK KEY’, then press
OK to start auto scan with the status bar indicating
‘AUTO SCANNING’ and the scan progress bar
indicating the process from 1% to 100% of
completeness.
As soon as a TV program is scanned, it shall be
automatically played for two seconds, and get
back to the first scanned program to start playing
with. The status bar shows AUTO SCANNED.
-32Bmt-76.p65
32
06-4-10, 19:33
Operation
5. MANUAL SCAN
Select MANUAL SCAN submenu which is also
shown in the status bar. Get to the option of audio
mode, with the status bar indicating ‘MANUAL
SCANNING’, then usebutton to choose one
incidental sound mode out of BG/I/DK/L/L1, and
scan manually forward or backward
withbutton. Once a program is detected the
scan process shall stop; then you may start
MANUAL SCAN again by pressingbutton.
6. ADJSUT FRE
When the signal is rather weak or the aerial is not
in good condition, some channels can’t be
accurately tuned, then you can use such function
operation to adapt the pictures to its best quality.
Select the ADJUST FRE item with the status bar
indicating FREQUENCE ADJUST, then conduct fine
tuning withbutton. The frequency can be
adjusted within 0-60.
7. PROGRAM TABLE
Select the PROGRAM TAB submenu, then the
status bar will show ‘PROGRAM TAB’. Press
button to shift to program table, where the status
bar indicates ‘OK-ENT, YELL-DEL, WHIT-MOVE.’
Usebutton to select a program then press
OK to confirm and play it.
By pressing the yellow button you can delete a
program. When the status bar shows’ DELETE?
OK-OK EXIT-CANCEL’, press OK to delete the
program, and press EXIT to cancel DELETE
operation.
By pressing the white button you shall be able to
move a program to any position and change their orders. The status bar shall display ‘MOVE PROGRAM’,
and then you can move the desired program by pressing OK, followed by usingto move it to
expected position. Press OK to confirm or EXIT to quit.
8. Shortcut operation
Channel switch with number buttons: .direct input the desired channel no., wait for 2 seconds or press
OK button, the unit will go to the chosen channel.
Remarks: for the channel chosen function via directly input the digits on the remote control in the TV
status, the system is default to channle number 1 in case you press the 0 button; also the lastest
programme number in case you input the value more than the programmes you saved to avoid
misunderstanding. For example, the unit saved 10 programmes after scan, in case you input 0 button,
the system will change to programme 1, in case you input 11 or bigger figures, the system will change
to programme 10.
Get back to a channel: pressing LAST button shall turn back to the channel played last time.
Sequential channel switch: usebutton to get to the previous or next channel one by one.
Volume adjustment: you can adjust the volume of the set by pressingbutton.
Mute adjustment: Pressing MUTE button on the remote control to switch on/ off the mute status.
Section 2: DVB-T Menu operation
Tips for Menu operation
You can press thebutton on the remote control to pop up the option list when there appears a
symbolon the right of a menu item, then useto move to your desired option item before confirming
by pressing OK button, or you can exit from the list without making any choice with button.
1. Main Menu
Press MENU key to brows the Main Menu which includes 4 submenu items on the screen.:
Service
Scan
Setup
EPG
-33Bmt-76.p65
33
06-4-10, 19:33
Operation
Pressbuttons to select a menu item, then OK button to confirm it and enter into the Submenu. Press
EXIT button to return to the Main Menu.
Note: By pressing EXIT button can return to the previous menu from the current menu, and if you press
this button repeatedly, you can at last quit the Main Menu.
Shortcut keys:
EPG: Press this button to show the EPG (electronic program guide) information of the current
service (if there is EPG information in the current service).
TTX: Press this button to show the text information of the current service (if the current service
supports).
SUB: Press this button to turn on or off the subtitle on the screen (if the current service supports).
INFO: Press this button to present the information of the current service
TV/R: Press this button to switch between TV/ radio channels.
RED, GREEN, YELLOW, BLUE, WHITE: These buttons are used for corresponding color function
operation.
LAST: Press this button to return to the service you received last time.
MODE: Press this button to shift the MODE orderly from 4:3 Letter Box/ 4:3 Pan& Scan /4:3 Full
Frame to 16:9
AUDIO: Press this button to switch the audio channel between Stereo/Left channel/Right channel.
STANDBY: Press this button to stay in STANDBY state, and press it again to recover the working
state.
MUTE: Press this button to turn on or off mute function.
2. Service
The Service window shows the service list.
Press TV/R button to switch service lists on TV
or radio, and press Pg+ / Pg- button to turn over
the channel pages up/down. There are maximum
600 channels in total that can be stored.
Press/ button to choose a service, then OK
button to play the target service and the service
information shall be displayed.
2.1 Service add to favor
The four color buttons at the bottom of service window are defined as favor list buttons: News(red),
Movie(green), Sports(yellow) and Music(blue). You can press any one to enter the corresponding
favor list.
Pressbutton to choose one service, then push a colored button recommended at the bottom of the
window to add the selected service up to the favor list accordingly, and soon after that one relative
colored icon shall appear on the right of the service. Meanwhile, you can remove one service from your
favor list by pushing the corresponding colored button if you want to. As a result, the colored icon shall
vanish.
When no more menu is displayed on the screen, press the colored buttons to display the service favor
lists correspondingly.
Press the white button to move the chosen favor service: First pressbutton to choose the service,
then white button to highlight it, and next usebutton again to move the service up/down, at last
press OK button to complete the move to the final designated position.
2. 2 Service Edit
When no more menu on the screen, press OK
button to display the service list, and there shall
be three colored buttons at the bottom of a window
defined as service editing button: Move(red), Lock
(green),and Delete (yellow).
Press Red button to move the service:
pressbutton to choose the service, then the
red button to highlight it and usebutton to move
the service up/down, and finally press OK button
to perform the motion.
Press Green button to lock the service: pressbutton to choose the service, then the green
-34Bmt-76.p65
34
06-4-10, 19:33
Operation
button to display the PIN CODE dialogue window, and input the correct pin code with the numeral
buttons; finally press OK button to lock the selected service with an icon (lock) appearing on the left.
You shall have to enter the correct pin code before you can enjoy your program. If you want to cancel
the Lock operation, press green button again to pop out the widow, and enter the correct pin code, then
the service shall be unlocked and the icon shall disappear. The default password is “0000”.
Press Yellow button to delete the service: Pressbutton to choose a service, then the yellow
button to pop out the message box “Are you sure to delete it?”, and at last press OK button to confirm
the deletion, or EXIT button to cancel it and quit.
3. SCAN
You can perform the scan of channels when you enter this SCAN submenu and conduct some setup
operation.
SCAN type: Manual Scan/ Auto Scan/ Nit Scan
Channel: Input the channel number with numeral buttons on the remote control.
Update mode: Append/ Replace
If you choose Append, the new channel will be added at the end of the channel list.
Note: The channels that have existed shall not be added as new ones.
If you select Replace, all the existing channels shall be replaced by latest scanned ones.
3.1 Manual Scan
If select Manual Scan, first enter the right channel
number, then choose an Update mode, and next
press OK button, after that the screen shall display
a Message Box saying please wait… and at last
it shall start scanning. You can press EXIT button
to stop and exit.
The screen shall show N channel found when
the scan has been finished (N refers to the
number of channels). Press EXIT button to quit.
3.2 Auto Scan
Select Auto Scan, then choose an Update mode,
and next press OK button, and after that the
screen shall present a Message Box indicating
Scan Process as scan goes on. You can press
EXIT button any time to exit.
The Message Box of Scan Process shows the
scan progress by percentage. TV channels and
radio channels shall be displayed in two columns
respectively.
There shall be such words N channel found (N
refers to the number of channels) on the screen
as soon as the scan is over. Press EXIT button to
quit.
3.3 NIT Scan
When Select NIT Scan, input the proper channel
number, and choose a proper Update mode, then
press Ok button. In no time a message Please
wait…shall appear in the Message Box and then
scan shall begin. You can push EXIT button to
quit.
The Message Box of Scan Process shows the
scan progress by percentage. TV channels and
radio channels shall be displayed in two columns respectively.
-35Bmt-76.p65
35
06-4-10, 19:33
Operation
The screen shall display N channel found (N
refers to the number of channels) as soon as the
scan is over, then push EXIT button to quit.
4 Setup
There are 9 submenus under this directory: (See
the attached photo below)
AV Setup
Language Setup
Time Setup
Password Setup
Factory Restore
Booking List
Screen Adjust
LCN Setup
Version
4.1 AV Setup
AV setup menu:
TV Shape: 4:3 Letter Box/ 4:3 Pan& Scan/4:3 Full
frame/16:9
Audio Track: Stereo/ Left/ Right
4.2 Language Setup
Language setup menu: English/ Spanish
4.3 Time Setup
Time Zone: GMT-11 ~ GMT+11
Sleep Time: No Sleep/ 5 Mins/ 10 Mins/ 20 Mins/ 30
Mins/ 60 Mins
When choose one Sleep Time, press OK button to
start counting time; when it is the Sleep Time, the
unit shall switch to sleep state.
Summer Time: On / Off.
Note: When the unit stays in sleep or standby state, the set sleep time shall turn invalid.
4.4 Password Setup
Use the numeral buttons on the remote control to
input the former password, then input a new
password, and retype it to confirm. Press OK
button, then the new password shall get enabled,
and the password setup is done. You may enter
0-8 numbers for your password. ( Note: The
original password at factory is “0000”)
4.5 Factory Restore
Choose Factory Restore. If press OK button, the screen shall show the Message Box ‘factory
restore,’ then press OK button to confirm it, or press EXIT to exit.
You shall have to restore the factory setup if this unit is used for the first time or the software has been
upgraded.
-36Bmt-76.p65
36
06-4-10, 19:33
Operation
4.6 Booking List
When choose Booking List, press OK button to enter the Booking List menu, with the screen displaying
the Program information:
Channel number, Channel list, Play time, Event time Channel No. and Channel list.
By pressing
button you can remove the booked program.
4.7 Screen Adjust
Adjust screen brightness, contrast
4.8 LCN (Logical Channel Name) Setup
Choose this item to setup the On / Off state of
LCN.
If choose On, the system shall automatically list
the channels in a natural order according to the
signal flow; and If choose Off, the system shall
automatically list the channels in their usual order.
Push OK button to confirm and Exit button to exit
the operation.
Note: Before you setup the LCN status, please setup the Restore factory first, and setup LCN, and
then Scan for the channels. e.g. When the LCN is in On status, you want to close the LCN function.
Please setup Restore Factory first and setup LCN to Off status, then scan the services.
4.9 Version
Choose this Version item, then push OK button to display the version of the software, and push OK
again or Exit to exit.
5 Electronic Program Guide (EPG)
Select EPG under the Main Menu to display the program information.
Usebutton to select an event, and usebutton to browse,
button to book programs. Press
OK button to display the detailed information. If you want to cancel and quit, press EXIT button
The list of booked programs shall be displayed on the Booking List in the Setup menu. (See the picture
attached below for instance.)
-37Bmt-76.p65
37
06-4-10, 19:33
SETUP
TV SETUP interface table:
Main Menu
Sub Menu
Description
BRIGHTNESS
Brightness adjustment
CONTRAST
Contrast adjustment
AUTOSCAN
Auto scanning TV channels
Main menu
BG
I
Audio
mode
MANUALSCAN
DK
Scan TV channels manually
L
L1
ADJUSTFRE
Fine adjustment of frequency
PROGRAMTAB
OK
Confirm an operation to play
DEL
Delete a program
MOVE
Move a program
-38Bmt-76.p65
38
06-4-10, 19:33
SETUP
DVB-T SETUP interface table:
Main menu Submenu
Service
TV Service/Radio
Service
Scan Type
Scan
Channel
Update Mode
Options
TV/Radio
Description
TV/Radio option
Move
Lock
Delete
News red
Movie green
Sports yellow
Music
blue
Manual Scan
Move a service
Lock a service
Delete a service
Favor type News
Favor type Movie
Favor type Sports
Favor type Music
Manual Scan
Auto Scan
Auto Scan
Nit Scan
Nit Scan
Channel options available only for manual scan and NIT scan
Append
Replace
TV Shape
AV Setup
Main Menu
Audio Track
Language Setup
Menu
Time Zone
Setup
Time Setup
Sleep Time
Summer Time
Password Setup
Rating Setup
10 Mins
20 Mins
30 Mins
60 Mins
On
Off
Old Password
New Password
Retype new password
Any level of 0, 5, 8,12, 16 is available.
10 Mins
20 Mins
30 Mins
60 Mins
on
off
Old Password
New Password
Confirm the new password
Restore the original factory
setup
Factory Restore
Booking List
Software Version
EPG
4:3 Letter Box
4:3 Pan & Scan
4:3 Full Frame
16:9
Stereo
Left
Right
English
Spanish
GMT-11~GMT+11
No Sleep
5 Mins
Append
Replace
4:3 Letter Box
4:3 Pan & Scan
4:3 Full Frame
16:9 wide frame
Stereo track
Left track
Right track
English
Spanish
Time Zone
No sleep
5 Mins
EPG Booking List
Version of software
events
Browse
Booking
Detailed information
Exit
Events ←→
Browse ↑↓
Booking
Detail Info
Exit
-39Bmt-76.p65
39
06-4-10, 19:33
For reference only
Device Maintenance
Be sure to turn the unit off and disconnect the AC power cord before maintenance each time.
Keep the unit clean. If the surface is extremely dirty, wipe it with a piece of dry soft cloth in stead of
alcohol, benzene or other chemicals. Do not use compressed airflow to remove dust, either.
Consult the designated technician to maintain the unit when failures arise.
DEFINITION OF TERMS
DVB MPEG-2
DVB is the abbreviation of Digital Video Broadcasting, which is a standardization group. DVB-T
corresponds to the type of transmission (T=Terrestrial, meaning on the ground). MPEG is the abbreviation
of Motion Picture Experts Group, a working group which defines international standards for audio and
video digital compression. The MPEG 2 standards are mainly applied in the compression of digital TV
signals.
Subtitles
Subtitle refers to the printed lines appearing at the bottom of the screen which are generally the
translation or transcription of the dialogues. They are recorded on DVD discs and displayed in one of
up to 32 languages.
FEC
FEC stands for Forward Error Correction, applied to correct signal transmission errors between
antennas and the receiver.
PID
The PID code (Packed Identification) is the identification number of audio and video signal in the digital
data flow/stream of DVB MPEG-2 signal. With such codes, the audio and video signal can be transmitted
to a specific address.
-40Bmt-76.p65
40
06-4-10, 19:33
For reference only
Specifications
High Frequency Tuner
Input Frequency
IF Bandwidth
RF Input Connector
Input impedance
: 48.25~863.25MHz
: 7 or 8MHz
: IEC169 - 2 type, Female
: 75S
TV demodulation mode
System: PAL I/ BG/DK; SECAM L/L’/ BG/DK
DVB-T demodulation mode
Waveform
: COFDM (Code Orthogonal Frequency Division Multiplexing)
Demodulation
: QPSK, QAM16, QAM64
Transmission Mode
: 2K, 8K
Guard interval
: 1/4,1/8,1/16,1/32
Code rate
: 1/2,2/3,3/4,5/6,7/8
DVB-T video, audio decoding
Video decoding
: ISO/IEC13818-2 and MPEG2 (MP@ML) Compatible
Video resolution
: 720×576
Video input code rate
: 15Mbit/s Max.
Text
: support DVB-TXTETSI/EN300472
Audio decode
: ISO/IEC13818 - 3
Audio Track
: Stereo, Left channel, Right channel.
Audio Sample frequency
: 32, 44.1, 48KHz
TFT LCD
Display monitor
Display scale
Display resolution
: Analogue TFT LCD, 7inches
: 16: 9
: 480 X 234
Power Adapter Specification
Input Power
: AC 90~264V, 50/60Hz
Output Voltage
: DC 12V / 1.5A
Power Consumption
: <15W
Environment Requirement
Working Temperature
: 0-40°C
Working Humidity
: <90%
Others:
Weight
Dimension
: <1.5 Kg
: 262 mm×66 mm×230mm
Weight and dimensions are not absolutely exact values.
Specifications are subject to change (by manufacturer) without notice.
-41Bmt-76.p65
41
06-4-10, 19:33
For reference only
Troubleshooting:
Look through the chart below listing some possible problems and the corresponding causes you may
confront in daily use of this unit before requesting service. Some simple checks or minor adjustment of
the unit on your part may help resolve the problems. If the serious failures arise, please hand it over to
a professional technician.
Since some critical ICs of this unit are apt to fall victim of high electrostatic voltage, any protective
measures against static shock are vital when examination and repair is under way.
Troubles
Possible Causes
No power
The power cord or the plug has not
been well connected
Can not scan
program
The antenna is not adjusted well
Suggested Solutions (for reference)
Plug the power cord into the outlet tightly and
turn on the power; if there is still no power, cut
off the power again, and try it again in 5-10
minutes.
Re-adjust the antenna or use an outdoor aerial
Use antenna incorrectly
Use an antenna with 75 Ω impedance input
Wrong parameter input
Input correct Frequency, Bandwidth parameter
Connect the output cord correctly; if still no
picture, the antenna might have been
damaged.
Video-out cord incorrectly
connected
No picture
No color
Image distortion at
channel shift
The remote control
fails to work
Sound and subtitle
language doesn’t
match.
No sound at all
The video-out mode of the unit is
different from the in-mode of the
monitor
Output cord connected incorrectly
The video output mode of the unit
doesn’t match the video-in mode
of the monitor
Serious distortion or
can not receive
signal normally
Connect the output cord correctly
Reset the working system of either unit
normal
Batteries incorrectly installed
Re-install the battery correctly
Batteries exhausted
Beyond the effective operation
range
The remote sensor is pointed to by
bright light
Replace the battery
Operate within a normal range
Place the unit elsewhere for a change
The sound track is wrong
Press the Audio button to switch the sound
track
The unit is set in mute state
Cancel the mute
Volume is set at a too low level
Turn up the volume
Cable connected incorrectly
In mute state
Connect the cable correctly
Re-connect the sound-out cable, and reboot
the unit
Cancel the mute
Stay asleep
Reboot the unit
Too much interferential signal
Adapt the antenna to reduce interference.
There might be a short circuit
No sound by chance
Reset the working mode of this unit or monitor
-42Bmt-76.p65
42
06-4-10, 19:34