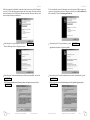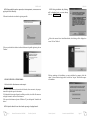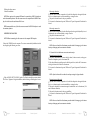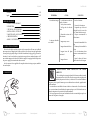
1
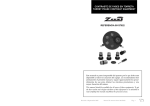
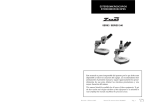
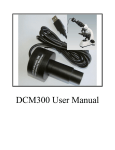
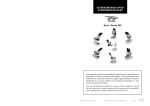
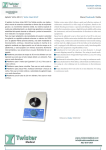
VIDEO CÁMARA OCULAR USB EYEPIECE VIDEO CAMERA USB Este manual es parte inseparable del aparato por lo que debe estar disponible a todos los usuarios del equipo. Le recomendamos leer atentamente el presente manual y seguir rigurosamente los procedimientos de uso para obtener las máximas prestaciones y una mayor duración del mismo. This manual should be available for all users of these equipments. To get the best results and a higher duration of this equipment it is advisable to read carefully this manual and follow the processes of use. Revisión 1 Junio-2006 Manual de instrucciones 59150060 Pág. 1 CASTELLANO Gracias por haber adquirido este equipo. Deseamos sinceramente que disfrute de la videocámara ocular ZUZI USB 1.3 Mp. Le recomendamos que cuide el equipo conforme a lo expuesto en este manual. ZUZI desarrolla sus productos según las directrices del marcado CE y haciendo hincapié en la ergonomía y seguridad del usuario. La calidad de los materiales empleados en la fabricación y el correcto proceder le permitirán disfrutar del equipo por muchos años. El uso incorrecto o indebido del equipo puede dar lugar a accidentes, descargas eléctricas, cortocircuitos, fuegos, lesiones, etc. Lea el punto de Mantenimiento, donde se recogen aspectos de seguridad. LEA DETALLADAMENTE ESTE MANUAL DE INSTRUCCIONES ANTES DE OPERAR CON ESTE EQUIPO CON EL FIN DE OBTENER LAS MÁXIMAS PRESTACIONES Y UNA MAYOR DURACIÓN DEL MISMO. ENGLISH ANEXO I: CERTIFICADO CE AUXILAB S.L. CE DECLARATION OF CONFORMITY EYEPIECE VIDEOCAMERAS of Auxilab,S.L for the Directive of machines (89/392/CEE modified) and the regulations adopted for its transposition NAME OF THE MANUFACTURER / IMPORTER: AUXILAB, S.L. ADDRESS: Tenga especialmente presente lo siguiente: Este manual es parte inseparable de la videocámara ocular ZUZI, por lo que debe estar disponible para todos los usuarios del equipo. Debe manipularse siempre con cuidado evitando los movimientos bruscos, golpes, caídas de objetos pesados o punzantes; evitar el derrame de líquidos en su interior Nunca desmonte el equipo para repararlo usted mismo, además de perder la garantía podría producir un funcionamiento deficiente de todo el equipo. Cualquier duda puede ser aclarada por su distribuidor (instalación, puesta en marcha, funcionamiento). Usted puede también mandarnos sus dudas o sugerencias a la siguiente dirección de correo del Servicio Técnico ZUZI ([email protected]) o bien llamando al Tel: 807117040 (0.30 Euros/min). Este equipo está amparado por la Ley de garantías y bienes de consumo (10/2003). No se consideran en garantía las revisiones del equipo. La manipulación del equipo por personal no autorizado provocará la pérdida total de la garantía. Los accesorios, así como la pérdida de los mismos, no están cubiertos por dicha garantía. Tampoco estarán cubiertos por el periodo de garantía las piezas en su desgaste por uso natural. Asegúrese de guardar la factura de compra para tener derecho de reclamación o prestación de la garantía. En caso de enviar el equipo al Servicio Técnico adjuntar factura o copia de la misma como documento de garantía. Rellene y envíe la garantía antes de los 15 días después de la compra. El fabricante se reserva los derechos a posibles modificaciones y mejoras sobre este manual y equipo. ¡ATENCIÓN! NO SE ADMITIRÁ NINGÚN APARATO PARA REPARAR QUE NO ESTÉ DEBIDAMENTE LIMPIO Y DESINFECTADO. Pág. 2 Manual de instrucciones 59150060 Revisión 1 Junio-06 Polígono Morea Norte, 8 31191 Beriáin (Navarra) WE STATE THAT: EYEPIECE VIDEOCAMERAS Models 59140052, 59140060, 59150060 Are designed and manufactured according to: Directive 89/392/CEE, including the modifications and the national regulations that transpose them. Directive 73/23/CEE, modified over the electric security. Directive 89/336/CEE, modified over the electromagnetic compatibility. And that the following harmonized rules have applied (or part of them): UNE 292-1, UNE 292-2,UNE 292-2/A1, UNE 614-1, UNE 1050, UNE 294, UNE 894-1 UNE 894-2, UNE 60204, UNE 61010-1. BERIAIN 05th June 2006 Signed by: ALFONSO AINCIBURU SANZ DIRECTOR/MANAGER Polígono Morea Norte, 8 31191 Beriain (Navarra) - Spain. Tel. 948 310 513 Fax 948 312 071 Internet: www.auxilab.es · Email: [email protected] Version 1 June-06 Instruction manual 59150060 Page 23 ENGLISH INDICE DE IDIOMAS 6. RESOLUCIÓN DE PROBLEMAS PROBLEM CAUSE No image is obtained The video camera does not recognizes the system There is no good connection Light does not reach the video camera Video camera is not well orientated Image is no good CASTELLANO Image is too dark Image is too bright Image is out of the horizontal plane Image is blurred SOLUTION Install the software Connect the video camera Check that light is directed to the third tube of the microscope head Place correctly the video camera Increase light intensity Decrease light intensity Turn the video camera until correctly orientate the image Adjust the height of the third tube to focus the image Castellano Inglés 2-12 13-23 INDICE DE CONTENIDOS 1. APLICACIONES DEL INSTRUMENTO 2. DESCRIPCIÓN 3. ESPECIFICACIONES TÉCNICAS 4. INSTALACIÓN / PUESTA EN MARCHA 5. MANTENIMIENTO Y LIMPIEZA 6. RESOLUCIÓN DE PROBLEMAS ANEXO I: CERTIFICADO CE 3 3 4 4 10 11 12 1. APLICACIONES DEL INSTRUMENTO Zuzi le ofrece esta videocámara ocular de alta resolución que le permitirá convertir su microscopio tradicional en un sistema digital de imagen, y que resulta ideal para cualquier aplicación microscópica que requiera imágenes de calidad en el campo de la medicina, biología, geología, investigación o enseñanza. Puede ser utilizada con todo tipo de microscopios que utilicen oculares estándar de 23 mm para obtener imágenes y videos de cualquier tipo de muestras, y su manejo es muy cómodo dado que presenta un único cable para alimentación, transferencia de datos y control de la cámara. La videocámara viene además equipada con un completo software de captura, manipulación y análisis de imagen con el que podrá realizar multitud de operaciones de forma sencilla. INSTRUCTIONS ON ENVIRONMENT PROTECTION Do not dispose of this product in the usual household garbage at the end of it´s life cycle; hand it over at a collection point for the recycling of electrical and electronic appliances. The symbol on the product, the instructions for use or the packing will inform about the methods for disposal. The materials are recyclable as mentioned in it´s marking. By recycling, material recycling or other forms or re-utilization of old appliances, you are making an important contribution to protect our environment. Please inquire at the community adminsitration for the authorized disponsal location. Page 22 Instruction manual 59150060 Version 1 June-06 2. DESCRIPCIÓN Revisión 1 Junio-06 Manual de instrucciones 59150060 Pág. 3 CASTELLANO 3. ESPECIFICACIONES TÉCNICAS Referencia 59140060 59150060 Sensor 1/3", 350 Kpixel 1/2", 1.3 Mpixel Resolución máxima 640x480 píxeles 1280x1024 píxeles Velocidad (fps) 30 FPS (resolución 320x240) 10-15 FPS (resolución 640x480) Diámetro del ocular 23 mm (incluyen adaptador de 30 mm para estereomicroscopios) Campo de visión 18 mm Interfaz USB 2.0; compatible con USB 1.0 Cable 1.5 m Alimentación 5 V (suministrada por el ordenador a través de la interfaz USB) INSPECCIÓN PRELIMINAR Desembale la videocámara, retire el plástico que la envuelve. Antes de operar con ella asegúrese de que no presenta ningún daño debido al transporte. De ser así, comuníquelo inmediatamente a su transportista o suministrador para que pueda hacer las debidas reclamaciones en el plazo establecido. Guarde el embalaje, ya que siempre se deben realizar las devoluciones en su embalaje original con todos los accesorios suministrados. Compruebe los accesorios que usted debe recibir junto al equipo: 2 Adaptadores para estereomicroscopio. CD con software Manual de instrucciones Garantía Nota: Solo aceptamos devoluciones de equipos en los 15 días posteriores al envío y siempre que vengan completos en su embalaje original. INSTALACIÓN Antes de comenzar a utilizar el equipo, es conveniente familiarizarse con sus fundamentos básicos. LEA DETALLADAMENTE ESTE MANUAL DE INSTRUCCIONES ANTES DE OPERAR CON ESTE EQUIPO CON EL FIN DE OBTENER LAS MÁXIMAS PRESTACIONES Y UNA MAYOR DURACIÓN DEL MISMO. Manual de instrucciones 59150060 Together with the Zuzi eyepiece video camera USB 1.3 Mp the programs Minisee (to capture images) and ScopePhoto 2.0 (to capture, process and analyze images) can be also installed. For their use and installation please refer to software manual. Security The video camera must be used by previously qualified staff that knows how the equipment works thanks to the user manual. Made under the European regulations for electrical security, electromagnetic compatibility and security on machines. 5. MAINTENANCE AND CLEANING To get the best results and a higher duration of the video camera it is essential to follow the processes of use. 4. INSTALACIÓN / PUESTA EN MARCHA Pág. 4 ENGLISH 3. SOFTWARE INSTALLATION Revisión 1 Junio-06 Note: All the processes of use mentioned below will not have any value unless you keep a continued and careful maintenance. Please follow the processes of use of this manual. This manual should be available for all users of this equipment. Never try to repair the video camera by yourself, since you will lose the warranty and may provoke damages to its general operating system. In the event of breakdown please contact your distributor to overhaul through Zuzi Technical Assistance Department. Cleaning Never use scourers or substances that can grate for cleaning metallic parts such as stainless steel, aluminium, coatings, etc. as they damage the video camera and produce an early ageing of the equipment. To remove dust from the lens use a blower or a soft brush or wipe it with a previously moistened lens tissue. Under no circumstances dismantle the optical parts for its cleaning; if any problem please contact the Zuzi Technical Assistance department. ATTENTION!! IF EQUIPMENTS ARE NOT PROPERLY CLEAN AND DISINFECTED THEY WOULD NOT BE ALLOWED TO REPAIR BY OUR TECHNICAL SERVICE. Version 1 June-06 Instruction manual 59150060 Page 21 ENGLISH Binocular microscope Remove one of the eyepieces; if the eyepiece presents a security device (screw), unscrew it and then, remove the eyepiece. Put the video camera into the empty tube. Do not connect the video camera to the USB interface until the 5th step of "drivers' installation" section. Monocular miroscope Remove the eyepiece; if the eyepiece presents a security device (screw), unscrew it and then, remove the eyepiece. Put the video camera into the empty tube. Do not connect the video camera to the USB interface until the 5th step of "drivers' installation" section. CASTELLANO Para la instalación de la videocámara ocular ZUZI siga los siguientes pasos: 1.Instalación de drivers. 2.Colocación de la cámara USB. 3.Instalación de software. NOTA: Las videocámaras oculares ZUZI USB deben conectarse en un puerto USB 2.0; de esta manera su rendimiento será máximo. Las videocámaras también son compatibles con el puerto USB 1.0, pero en este caso su rendimiento será menor. ZUZI recomienda el uso de la videocámara en puerto USB 2.0 para obtener las máximas prestaciones 1.INSTALACIÓN DE DRIVERS Coloque el CD-ROM en el compartimiento de CD-ROM de su ordenador. El autorun inicia la instalación automáticamente visualizándose la siguiente pantalla: NOTE: Once the video camera is placed and the image is captured, turn the video camera until it is correctly orientated. 2. Placing the video camera on a stereomicroscope Trinocular stereomicroscope Put the video camera on the third tube of the stereomicroscope head; if necessary, place previously the adapter for the video camera. If the head of the stereomicroscope is provided with a sliding rod, pull it to direct light towards the video camera. Do not connect the video camera to the USB interface until the 5th step of "drivers' installation" section. NOTE: Adjust the height of the third tube so that you can get the desired focus. Binocular stereomicroscope Remove one of the eyepieces; if the eyepiece presents a security device (screw), unscrew it and then, remove the eyepiece. Put the adapter for the stereomicroscope supplied with the video camera (30.4 mm standard diameter) Put the video camera into the empty tube. Do not connect the video camera to the USB interface until the 5th step of "drivers' installation" section. NOTA: Si no se inicia el programa ir a la unidad donde se ha introducido el CD y pulse en el fichero autorun. Pulse sobre la ventana DCM130, DCT130 (USB 2.0). Se inicia el asistente de instalación de Windows. Pulse en el botón "Siguiente", comenzando la instalación. Se visualizará la siguiente pantalla: NOTE: Once the video camera is placed and the image is captured, turn the video camera until it is correctly orientated. Page 20 Instruction manual 59150060 Version 1 June-06 Revisión 1 Junio-06 Manual de instrucciones 59150060 Pág. 5 CASTELLANO ENGLISH NOTE: This window has no importance, it is only an advise according to Microsoft policy. NOTA: En el transcurso de la instalación visualizará en dos ocasiones la pantalla siguiente; pulse siempre CONTINUAR During installation process the following window will be displayed: Cuando haya finalizado la instalación de los driver de la videocámara, visualizará la siguiente pantalla. Pulse "Finalizar". Once the installation finishes the following window will be finally displayed; click on "Finalizar". Antes de seguir la instalación, deberá reiniciar el equipo. Seleccione en la ventana de Windows la opción "Sí, deseo reiniciar el equipo ahora" y pulse "Aceptar". Espere a que se reinicie el equipo 2. PLACING THE VIDEO CAMERA 1.Placing the video camera on a microscope. Trinocular microscope Put the video camera on the third tube of the microscope head; if necessary, place previously the adapter for the video camera. If the head of the microscope is provided with a sliding rod, pull it to direct light towards the video camera. Do not connect the video camera to the USB interface until the 5th step of "drivers' installation" section. NOTE: Adjust the height of the third tube so that you can get the desired focus. Pág. 6 Manual de instrucciones 59150060 Revisión 1 Junio-06 Version 1 June-06 Instruction manual 59150060 Page 19 ENGLISH CASTELLANO Once the computer is reinitialized, connect the video camera to one of the USB interface of your PC; wait until the program recognizes the video camera. The system will warn that a new hardware (Nuevo Hardware) has been found and will activate the new hardware assistant (Asistente para hardware): Una vez reiniciado, conecte la videocámara en uno de los puertos USB que tenga su PC; espere a que el programa la reconozca. El sistema avisará de que un Nuevo hardware ha sido encontrado y activará el Asistente para Hardware: Select the option "No por el momento" and click on SIGUIENTE > Then the following window will appear on screen: SIGUIENTE > Seguidamente visualizará la siguiente pantalla: Select the option "Instalar automáticamente el software (recomendado)" and click on SIGUIENTE > .Seleccione la opción "Instalar automáticamente el software (recomendado)" y pulse SIGUIENTE > NOTE: During installation the following window will appear on screen; click on CONTINUAR Page 18 Seleccione la opción "No por el momento" y pulse NOTA: En el transcurso de la instalación aparecerá la pantalla siguiente; pulse CONTINUAR Instruction manual 59150060 Version 1 June-06 Revisión 1 Junio-06 Manual de instrucciones 59150060 Pág. 7 CASTELLANO NOTA: Esta pantalla de prueba no superada, no tiene importancia, se trata de un aviso según la política de Microsoft. Durante la instalación visualizará la siguiente pantalla: ENGLISH NOTE: During installation the following will be displayed twice on screen; always click on CONTINUAR When video camera drivers' installation finishes, the following will be displayed on screen. Click on "Finalizar" Una vez concluida la instalación visualizará finalmente la pantalla siguiente; pulse en "Finalizar". Before continuing with installation, you must reinitialize the computer. Select the option "Sí, deseo reiniciar el equipo ahora" and click on "Aceptar". Wait until the computer reinitializes. 2. COLOCACIÓN DE LA VIDEOCÁMARA 1. Colocación de la videocámara en un microscopio. Microscopio triocular Coloque la videocámara en el tercer tubo del cabezal; si fuese necesario, coloque previamente el adaptador para la videocámara. Si el cabezal del microcopio dispone de varilla de paso de luz, tire de ella. De esta manera dirigirá la fuente de luz hacia la videocámara. No conecte la videocámara al puerto USB hasta el 5º paso del apartado "Instalación de drivers". NOTA: Ajuste la altura del tercer tubo de modo que consiga el enfoque deseado. Pág. 8 Manual de instrucciones 59150060 Revisión 1 Junio-06 Version 1 June-06 Instruction manual 59150060 Page 17 ENGLISH 2.Placing the video camera. 3.Software installation. CASTELLANO Microscopio binocular Quite uno de los oculares; compruebe si el ocular lleva dispositivo de seguridad (torni- NOTE: Zuzi eyepiece video cameras USB must be connected to a USB 2.0 interface to reach the maximum features. The video cameras are also compatible with USB 1.0 interface, but in this case the resolution will be lower. ZUZI recommends the use of the video camera connected to USB 2.0 interface to reach its maximum features. 1.DRIVERS INSTALLATION NOTE: Without connecting the video camera to the computer USB interface. Insert the CD-ROM into the computer. The autorun automatically initializes installation, displaying the following on screen: llo), si es así desenrósquelo con un destornillador y extraiga el ocular. Coloque la videocámara en el tubo que queda libre. No conecte la videocámara al puerto USB hasta el 5º paso del apartado "Instalación de drivers". Microscopio monocular Quite el ocular; compruebe si el ocular lleva dispositivo de seguridad (tornillo), si es así desenrósquelo con un destornillador y extraiga el ocular. Coloque la videocámara en el tubo. No conecte la videocámara al puerto USB hasta el 5º paso del apartado "Instalación de drivers". NOTA: Una vez colocada la videocámara y cuando visualice la imagen, gire la cámara hasta que la imagen quede correctamente orientada. 2. Colocación de la videocámara en un estereomicroscopio Estereomicroscopio triocular Coloque la videocámara en el tercer tubo del cabezal; si fuese necesario, coloque previamente el adaptador para la videocámara USB. Si el cabezal del microcopio dispone de varilla de paso de luz, tire de ella. De esta manera dirigirá la fuente de luz hacia la videocámara. No conecte la videocámara al puerto USB hasta el 5º paso del apartado "Instalación de drivers". NOTA: Ajuste la altura del tercer tubo de modo que consiga el enfoque deseado. Click on DCM130, DCT130 (USB 2.0) option. The Window installation assistant initializes. Click on "Siguiente" to begin installation, and the following will be displayed on screen: Estereomicroscopio binocular Quite uno de los oculares; compruebe si el ocular lleva dispositivo de seguridad (tornillo), si es así desenrósquelo con un destornillador y extraiga el ocular. Coloque el adaptador de estereomicroscopio suministrado con la videocámara (30.4 mm de diámetro estándar) Coloque la videocámara en el tubo que queda libre. No conecte la videocámara al puerto USB hasta el 5º paso del apartado "Instalación de drivers". NOTA: Una vez colocada la videocámara y cuando visualice la imagen, gire la cámara hasta que la imagen quede correctamente orientada. Page 16 Instruction manual 59150060 Version 1 June-06 Revisión 1 Junio-06 Manual de instrucciones 59150060 Pág. 9 CASTELLANO 3. INSTALACIÓN DE SOFTWARE ENGLISH 3. TECHNICAL SPECIFICATION Con la videocámara ocular ZUZI USB 1.3 Mp pueden instalarse los programas Minisee (para captura de imágenes) y ScopePhoto 2.0 (para captura, procesamiento y análisis de imágenes y captura de vídeos). Para su uso e instalación véase el manual sobre software. Seguridad La videocámara debe ser utilizada por personal cualificado previamente, que conozca el equipo y su manejo mediante el manual de uso. Fabricada según las directivas europeas de seguridad eléctrica, compatibilidad electromagnética y seguridad en máquinas Code 59140060 59150060 Sensor 1/3", 350 Kpixel 1/2", 1.3 Mpixel Max. resolution 640x480 pixels 1280x1024 pixels Speed (frames/second) 30 FPS (resolution 320x240) 10-15 FPS (resolution 640x480) Eyepiece diameter 23 mm (adapter for stereomicroscopes included) Field of view 18 mm Output USB 2.0; compatible with USB 1.0 Cable 1.5 m Power 5 V (supplied by the computer through interface USB) 5. MANTENIMIENTO Y LIMPIEZA Para un adecuado funcionamiento de la videocámara ocular es necesario seguir algunas recomendaciones. 4. INSTALLATION / SETTING UP PRELIMINARY INSPECTION Nota: Todas las normas de utilización citadas anteriormente carecerán de valor si no se realiza una continua labor de mantenimiento. Siga las instrucciones y advertencias relativas a este manual. Tenga este manual siempre a mano para que cualquier persona pueda consultarlo. No intente repararla usted mismo; además de perder la garantía puede causar daños en el funcionamiento general de la videocámara ocular. En caso de avería diríjase a su proveedor para la reparación través del Servicio Técnico de ZUZI. LIMPIEZA Para la limpieza de las partes metálicas, acero inoxidable, aluminio, pinturas, etc nunca utilice estropajos o productos que puedan rayar, ya que deterioran la videocámara, limitando la vida útil del equipo. Para quitar el polvo que se haya posado sobre la lente utilice una pera o un cepillo suave o límpielo con una gasa especial para lentes humedecida. Bajo ningún concepto desmonte la parte óptica para su limpieza; ante cualquier problema póngase en contacto con el Servicio Técnico Zuzi. ¡ATENCIÓN! NO SE ADMITIRÁ NINGÚN APARATO PARA REPARAR QUE NO ESTÉ DEBIDAMENTE LIMPIO Y DESINFECTADO. Pág. 10 Manual de instrucciones 59150060 Revisión 1 Junio-06 Unwrap the video camera and take off the involving plastic. Before operating with the equipment, please make sure that it does not present any damage because of the shipment. In case it presents any damage, tell it immediately to your transport agent or dealer so that they can make the claims in the correct time limit. Please keep the original wrapping; you will always need it for returns enclosed with all the accessories supplied. Please check that all the accessories are enclosed with the equipment: 2 adapters for stereomicroscope. CD with software Instructions manual Warranty We will only accept any equipment return within 15 days after delivery and provided it comes in its original wrapping. INSTALLATION Before using the video camera, it is convenient for you to familiarize with its basic essentials. For the video camera installation please follow the next steps: 1.Drivers' installation. PLEASE READ THOROUGHLY THE INSTRUCTIONS BEFORE CONNECTING AND OPERATING WITH THIS EQUIPMENT WITH THE AIM OF ACHIEVING THE HIGHEST FEATURES AND THE MAXIMUM DURABILITY OF THE INSTRUMENT. Version 1 June-06 Instruction manual 59150060 Page 15 ENGLISH INDEX OF LANGUAGES CASTELLANO 6. RESOLUCIÓN DE PROBLEMAS Castellano Inglés 2-12 13-23 PROBLEMA CAUSA No se obtiene imagen INDEX OF CONTENTS 1. USES OF THE INSTRUMENT 2. DESCRIPTION 3. TECHNICAL SPECIFICATIONS 4. INSTALLATION / SETTING UP 5. MAINTENANCE AND CLEANING 6. TROUBLESHOOTING ANNEX I: CE CERTIFICATE 14 14 15 15 21 22 23 SOLUCIÓN La videocámara no ha reconocido el sistema No hay buena conexión No llega luz a la videocámara Orientación errónea de la videocámara La imagen obtenida no es buena 1. USES OF THE INSTRUMENT Imagen muy oscura Imagen demasiado clara Zuzi offers this high resolution eyepiece video camera that will turn any traditional microscope into an image digital system, and that is ideal for microscopic applications that requires high quality images in the field of medicine, biology, geology, research or education. It can be used with any type of microscopes that use standard eyepieces of 23 mm to obtain images and videos of any kind of sample. It is equipped with a unique wire for power supply, data transfer and camera control. he video camera is also supplied with complete software for image capture, modification and analysis. Imagen fuera del plano horizontal Imagen borrosa INSTRUCCIONES 2. DESCRIPTION SOBRE Instale el software Conecte la videocámara Compruebe que la luz esté dirigida hacia el tercer tubo del cabezal del microscopio Coloque correctamente la videocámara Aumente la intensidad de la luz Disminuya la intensidad de la luz Gire la videocámara hasta orientar correctamente la imagen Ajuste la altura del tercer tubo hasta enfocar la imagen PROTECCIÓN DEL MEDIO AMBIENTE No se deshaga de este equipo tirándolo a la basura ordinaria cuando haya terminado su ciclo de vida; llévelo a un punto de recogida para el reciclaje de aparatos eléctricos y electrónicos. No contiene elementos peligrosos, tóxicos para el humano pero una eliminación no adecuada, perjudicaría al medio ambiente. Los materiales son reciclables tal como se indica en la marcación. Al reciclar materiales o con otras formas de reutilización de aparatos antiguos, esta Ud. haciendo una contribución importante a la protección del medio ambiente. Por favor póngase en contacto con la administración de su comunidad para que le asesoren sobre los puntos de recogida. Page 14 Instruction manual 59150060 Version 1 June-06 Revisión 1 Junio-06 Manual de instrucciones 59150060 Pág. 11 CASTELLANO ANEXO I: CERTIFICADO CE AUXILAB S.L. DECLARACIÓN CE DE CONFORMIDAD VIDEO CAMARA OCULAR de Auxilab,S.L a la Directiva de Máquinas (89/392/CEE modificada) y a las reglamentaciones adoptadas para su transposición NOMBRE DEL FABRICANTE / IMPORTADOR: AUXILAB, S.L. DIRECCIÓN: Polígono Morea Norte, 8 31191 Beriáin (Navarra) DECLARAMOS QUE: VIDEO CAMARA REFERENCIA 59140052, 59140060,59150060 Están diseñados y fabricados de acuerdo a: Directiva 89/392/CEE, incluidas las modificaciones de la misma, y las regla mentaciones nacionales que la trasponen. Directiva 73/23/CEE, modificada sobre seguridad eléctrica. Directiva 89/336/CEE, modificada sobre compatibilidad electromagnética. Y que se han aplicado las siguientes normas armonizadas (o parte de ellas): UNE 292-1, UNE 292-2,UNE 292-2/A1, UNE 614-1, UNE 1050, UNE 294, UNE 894-1 UNE 894-2, UNE 60204, UNE 61010-1. BERIAIN a 05 de JUNIO 2006 Fdo: ALFONSO AINCIBURU SANZ DIRECTOR/GERENTE Polígono Morea Norte, 8 31191 Beriain (Navarra) - Spain. Tel. 948 310 513 Fax 948 312 071 Internet: www.auxilab.es · Email: [email protected] Pág. 12 Manual de instrucciones 59150060 Revisión 1 Junio-06 ENGLISH Thank you for choosing this equipment. We sincerely wish that you enjoy your Zuzi eyepiece video camera USB 1.3 Mp. We highly recommend looking after this equipment according to what is stated in this manual. Zuzi develops its products according to the CE marking regulations as well as emphasizing the ergonomics and security for its user. The correct using of the equipment and its good quality will permit you to enjoy this equipment for years. The improper use of the equipment can cause accidents and electric discharges, circuit breakers, fires, damages, etc. Please read the point of Maintenance, where we expose the security notes. TO GET THE BEST RESULTS AND A HIGHER DURATION OF THE EQUIPMENT IT IS ADVISABLE TO READ THOROUGHLY THIS MANUAL BEFORE OPERATING WITH THE EQUIPMENT. Please bear in mind the following: This manual is inseparable from the Zuzi eyepiece video camera USB 1.3 Mp, so it should be available for all the users of this equipment. You should carefully handle the equipment avoiding sudden movements, knocks, free fall of heavy / sharp objects on it. Avoid spilling liquids inside the equipment. Never dismantle the different pieces of the equipment to repair it yourself, since it could produce a defective use of the whole equipment and a loss of the product warranty. If you have any doubt about setting up, installation or functioning do not hesitate in contacting your wholesaler. You can also tell us any doubts or suggestions you have by contacting Zuzi Technical Assistance Department by email to [email protected] or by telephone: +34 807 117 040 (0.30 Euros/min). This equipment is protected under the Warranties and consumer goods regulation (10/2003). Overhaul is not covered by the equipment warranty. Operations made by non-qualified staff will automatically produce a loss of the warranty. Accessories (including their loss) are not covered by the product's warranty. The warranty neither covers piece's deterioration due to the course of time. Please make sure you keep the invoice, either for having the right to claim or asking for warranty coverage. In case you have to send the equipment to Zuzi Technical Assistance Department you should enclose the original invoice or a copy as guarantee. Please do not forget filling the warranty certificate and send it before 15 days after the date of purchase. Manufacturer reserves the right to modify or improve the manual or equipment. ATTENTION!! IF EQUIPMENTS ARE NOT PROPERLY CLEAN AND DISINFECTED THEY WOULD NOT BE ALLOWED TO REPAIR BY OUR TECHNICAL SERVICE Version 1 June-06 Instruction manual 59150060 Page 13