1
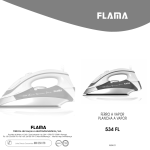
PLANCHA DE VAPOR
Modelo: BHCP-2009
MANUAL DE INSTRUCCIONES
CONSERVE ESTE MANUAL PARA FUTURAS CONSULTAS
Importantes medidas de seguridad
Cuando utilice la plancha, deberá seguir siempre las siguientes precauciones:
Lea todas las instrucciones antes de empezar a utilizar la plancha
1. Utilice la plancha sólo para planchar.
2. Para evitar el riesgo de descarga eléctrica, no sumerja la plancha en agua u otros líquidos.
3. Después de enchufar o desenchufar la plancha, deberá situar siempre el selector en “min”. Para desconectar la
plancha de la instalación eléctrica, sujete el enchufe y no tire nunca del directamente del cable.
4. No permita que el cable entre en contacto con superficies calientes. Antes de guardar la plancha deje que se enfríe
completamente.
5. Desenchufe siempre la plancha de la red eléctrica cuando la llene de agua o la vacíe.
6. No utilice la plancha si el cable está dañado. Tampoco la use si se ha caído o ha sufrido algún daño. Para evitar el
riesgo de descarga eléctrica, no desmonte la plancha. Para revisarla o repararla acuda a un servicio técnico cualificado.
Un montaje incorrecto conlleva riesgo de descarga eléctrica durante el uso.
7. Evite que los niños utilicen o se acerquen a la plancha sin la supervisión de un adulto. Preste atención a la plancha
cuando la enchufe a la instalación eléctrica o la deje encima de la tabla.
8. Tocar las partes metálicas de la plancha, el agua caliente o el vapor puede producir quemaduras. Preste atención si
gira la plancha del revés, ya que podría quedar agua caliente en el depósito.
9. Si la plancha funciona incorrectamente, desenchúfela de la red eléctrica y acuda a un profesional.
10. Esta plancha ha sido diseñada para poder permanecer de pie. Preste atención a la plancha una vez encendida. No
coloque la plancha encendida sobre una superficie desprotegida aunque esté de pie.
Conozca su plancha (funcionamiento con vapor, atomizador o en seco)
Recomendaciones de seguridad y precauciones
Precauciones importantes
Para utilizar la plancha correctamente, lea atentamente el manual de instrucciones y observe las ilustraciones antes de
iniciar el uso.
1. Compruebe si el voltaje especificado en la placa de características coincide con el de la instalación eléctrica de su
hogar.
2. No utilice la plancha si hay signos visibles de daño o fuga de agua. Antes de volver a utilizarla, acuda al vendedor o a
un servicio técnico cualificado.
3. Desenrolle el cable de alimentación completamente.
4. Desenchufe siempre la plancha cuando no vaya a utilizarla aunque sólo sea por un corto periodo de tiempo, y déjela de
pie.
5. Asegúrese de que los niños no toquen la plancha caliente ni puedan tirar del cable.
6. Desenchufe siempre la plancha antes de llenar el depósito de agua o retirar el exceso,
7. No sumerja nunca la plancha en agua.
8. La plancha debe usarse sobre una tabla de planchar estable.
Instrucciones especiales
1. Modelo: BHCP-2009
Voltaje: 220V-240V~50Hz Alimentación nominal: 2200W
2. Para evitar sobrecargas, no enchufe otros aparatos en la misma línea eléctrica.
Recomendaciones antes de utilizar la plancha por primera vez.
1. Algunas partes de la plancha pueden mostrarse ligeramente aceitadas, por lo que la plancha podría producir un ligero
humo al enchufarla por primera vez. Transcurrido escaso tiempo, cesará.
2. Antes de utilizar la plancha por primera vez, retire el protector de plástico de la base (si lo hay) y límpiela con un paño
suave.
3. Mantenga la base deslizable. No deslice la base sobre objetos metálicos como botones, cremalleras, etc.
4. Las prendas de pura lana virgen (100% lana) pueden plancharse con el selector en posición de vapor. Se recomienda
seleccionar la posición de vapor más potente y usar un paño de planchar seco.
Selección de la temperatura
1. Compruebe las instrucciones en la etiqueta de la prenda que desee planchar.
2. Si en la etiqueta de la prenda no hay instrucciones de planchado pero conoce el tipo de tejido, siga la ilustración que se
muestra más adelante.
3. Los tejidos que presentan algún tipo de acabado (telas pintadas, tejido arrugado, contrastes…) pueden plancharse a
baja temperatura.
4. Si el tejido contiene varios tipos de fibra, seleccione siempre la temperatura adecuada. Si la prenda contiene un 60%
de poliéster y un 40% de algodón, deberá seleccionar siempre la temperatura correspondiente al poliéster sin vapor.
5. Clasifique las prendas que desee planchar según la temperatura más elevada adecuada: lana con lana, algodón con
algodón, etc. ya que la plancha se calienta tan pronto como se enfría. Empiece planchando las prendas que necesitan la
temperatura más baja (tejidos sintéticos), y después siga planchando las que necesitan temperaturas más elevadas.
6. Gire el regulador de temperatura hasta situarlo enfrente de la señal adecuada según la siguiente ilustración:
· posición para nilón y acetato
· posición para lana, seda y mezclas
· posición para algodón y lino (vapor)
Cómo llenar el depósito de agua
1. Desenchufe la plancha.
2. Sitúe el selector de vapor en posición de planchado en seco.
3. Rellene el depósito por el orificio de llenado.
4. Si el agua de su hogar es dura, se recomienda utilizar agua destilada o desmineralizada.
-No utilice agua descalcificada químicamente ni agua perfumada.
5. No guarde la plancha con agua en el depósito.
Planchado con vapor
1. Rellene la plancha tal como se ha explicado en el apartado “Cómo llenar el depósito de agua”.
2. Enchufe la plancha.
3. El planchado con vapor sólo es posible cuando se han seleccionado las temperaturas más elevadas del regulador de
temperatura.
De lo contrario, el agua podría derramarse a través de la suela.
4. Espere hasta que el indicador luminoso se apague, ya que entonces se habrá alcanzado la temperatura seleccionada.
5. Gire el selector de vapor hasta la posición deseada.
6. Al interrumpir el planchado o al terminar de planchar, coloque la plancha de pie.
7. Desenchufe la plancha. Vierta el agua sobrante y deje que la plancha se enfríe.
Atomizador
1. El puede utilizarse en cualquier posición, tanto para planchado en seco como con vapor, siempre que el depósito
contenga agua.
2. Para utilizar esta función, pulse el botón del atomizador.
NOTA: Este botón tendrá que presionarse repetidamente al utilizar esta función por primera vez.
Chorro de vapor
El chorro de vapor ofrece una cantidad de vapor extra para eliminar las arrugas persistentes.
1. Sitúe el regulador de temperatura en posición “max” y espere hasta que el indicador luminoso se apague.
2. Espere durante unos segundos para permitir que el vapor penetre en la fibra antes de volver a presionar el botón.
NOTA:
para mayor calidad del vapor, no utilice más de tres chorros sucesivos cada vez. Necesitará presionar varias
veces el botón cuando utilice esta función por primera vez.
Un uso excesivo de esta función hará que la plancha se enfríe. Antes de utilizar el botón del chorro de vapor,
asegúrese de que el indicador luminoso esté apagado.
Limpieza
1. Antes de limpiar la plancha, desenchúfela de la instalación eléctrica.
2. No utilice disolventes ni productos abrasivos. Límpiela con un paño húmedo.
Defectos y reparaciones
No intente cambiar el cable si presenta defectos. Acuda a un centro autorizado.
Fallos, causas y solución
La plancha emite olor o humo
Al encender la plancha por primera vez emite olor. Para que el olor desaparezca permita que los aceites usados en el
proceso de fabricación se quemen unos diez minutos.
La plancha no se calienta
La plancha sólo debe conectarse a una toma eléctrica AC de 230 V. El regulador de temperatura debe ajustarse a la
temperatura deseada.
La plancha no emite vapor.
Es posible que el depósito del agua esté vacío. Desenchufe la plancha, gire la válvula de vapor hasta “0” y añada agua
Deje que la plancha se caliente y, después, sitúe el selector de vapor en la posición adecuada.
El chorro de vapor no funciona
El depósito debe estar lleno al menos 1/4 de su capacidad. La temperatura debe ajustarse en posición de vapor. Para usar
esta función la plancha ha de estar en posición horizontal. Presione el botón brevemente. Haga una pequeña pausa entre
chorros. Asegúrese de presionar completamente el botón del chorro de vapor.
El atomizador no funciona
El depósito debe estar lleno al menos 1/4 de su capacidad. Llene la plancha tal como se describe en el apartado “Cómo
llenar el depósito de agua”.
La plancha vierte agua
El selector de vapor está ajustado en posición de encendido (ON) mientras la plancha se caliente. La temperatura
seleccionada es demasiado baja para producir vapor. Se ha utilizado el chorro de vapor demasiado; deje que la plancha
vuelva a calentarse.
Este aparato no está diseñado para ser utilizado por niños ni personas con capacidad física, sensorial o mental disminuida,
o con falta de experiencia o conocimientos al respecto, a menos que dispongan de supervisión o reciban instrucciones
relativas al uso por parte las personas responsables de su seguridad.
Vigile a los niños para que no jueguen con este aparato.
Para evitar riesgos, si el cable de alimentación está dañado, acuda al vendedor o a un servicio técnico cualificado.
Preste atención a la plancha mientras esté enchufada.
Antes de llenar el depósito con agua, desconecte el enchufe de la toma de la instalación eléctrica.
La plancha debe permanecer y ser utilizada sobre una superficie estable.
No coloque la plancha sobre superficies inestables.
No utilice la plancha si se ha caído, presenta signos visibles de daño o vierte agua.
IMPORTADO
I.R.P., S.L.
AVDA. SANTA CLARA DE CUBA 5
SEVILLA, SPAIN
IMPORTADO
STEAM
IRON
Model: BHCP-2009
INSTRUCTION MANUAL
PLEASE SAVE THESE INSTRUCTIONS
Important safeguards
When using your iron, basic safety precautions should always be followed, including the following:
Read all instructions before using
1. Use the iron only for its intended use.
2. To protect against the risk of electric shock, do not immerse the iron in water or other liquids.
3. The iron should always be turned to “min” before plugging or unplugging from the mains outlet. Never pull the
cord to disconnect from the mains: instead, grasp plug and pull to disconnect.
4. Do not allow the cord to touch hot surfaces. Allow the iron to cool completely before putting away.
5. Always disconnect the iron from the electrical outlet when filling with water or emptying and when not in use
6. Do not operate the iron with a damaged cord or if the iron has been dropped or damaged. To avoid the risk of
electric shock, do not disassemble the iron .take it to a qualified service agent for examination and repair. Incorrect
re-assembly, can cause a risk of electric shock when the iron is used.
7. Close supervision is necessary for any appliance being used by or near children. Do not leave the iron unattended
when connected to the mains or on an ironing board.
8. Burns can occur from torching hot metal parts, hot water or steam, use caution when you turn a steam iron upside
down-there may be hot water in the reservoir.
9. If the iron is not operating normally, disconnect from the power supply. And contact the nearest authorized service
agent.
10. Your iron is designed to rest on the heel. Do not leave the iron unattended when switched on. Do not place the iron
on an unprotected surface even if it is on its heel rest.
Know your steam/spray/dry iron
6
7
8 9 10
5
4
3
2
11
12
13
14
1
15
1. SPRAY NOZZLE
2. UP HANDLE
3. FI LLI NG COVER
4. STEAM RULER
5. BURST BUTTON
6. SPRAY BUTTON
7. SOFT HANDLE
8. SELF- CLEAN BUTTON
9. TEMP. DAI L
10. LAMP COVER
11. CORD GUARD
12. HANDLE
13. WATER TANK
14. SKI RT
15. SOLEPLATE
Safety recommendations and precautions
Important precautions
To make good use of your appliance, please read these instructions carefully and look at the illustrations before using it.
1. Check that the voltage on the product rating plate coincides with your mains voltage.
2. The iron shall not be used if there are visible signs of damage or if the iron in leaking .The iron shall be sent to the
manufacturer or his qualified service agent before further use.
3. Completely unwind the mains cable.
4. Always unplug the iron when not in use, even if only for a short period of time.
Unplug it from the mains and leave it standing on its rear base.
5. Make sure that children can not touch the hot iron and that they can not pull on the mains wire.
6. Always unplug the iron before filling the water or when removing the excess water form it.
7. Never submerge the iron in water.
8. The iron shall be used on a stable ironing board.
Special instructions
1. Model:HJ-8020
Mains Supply:220V-240V~50Hz Rated Power:2200W
2. To avoid overloads, do not plug any other high-power appliance into the same electricity line.
Suggestions before using the iron for the first time
1. Certain parts of the iron have been lightly greased therefore the iron could give off a little smoke when plugged in for
the first time. This will cease after a short while.
2. Before using the iron for the first time, remove the plastic protector from the base (if it has one) clean the base with a
soft cloth.
3. Keep the base very smooth. Do not run it over metal objects (such as against the ironing board, buttons, zips, etc.)
4. Pure wool fibres (100% wool) can be ironed with the appliance in the steam position, by preference, select a high
steam position and use a dry ironing cloth.
Selecting the temperature
1. Check the ironing instructions on the garment to be ironed.
2. If the garment does not have any ironing instructions but you know the kind of fabric in question, use the chart below.
3. Fabrics that have some kind of finish (polishing, wrinkles, contrasts…) can be ironed at the lowest temperatures.
4. If the fabric contains several kinds of fibres, always select the temperature applicable, if an article contains 60%
polyester and 40% cotton, you must always choose the temperature corresponding to polyester and without steam.
5. First classify the articles to be ironed according to the most suitable ironing temperature: wool with wool, cotton with
cotton, etc. as the iron heats up as fast as it cools, start by ironing the articles requiring the lowest temperature such as
those made of synthetic fibres. Progress towards those that require the highest temperatures.
6. Turn the temperature control until it is in front of the appropriate signal according to the following:
· position for nylon and acetate
· position for wool, silk or mixures
· position for cotton or linen (steam).
How to fill the water tank.
1. Unplug the iron.
2. Set the steam ruler to dry ironing.
3. Fill the tank through the filling hole.
4. If you have hard water, it is advisable to use only distilled or demineralized water.
-do not use chemically de-limed water or perfumed
5. Do not store the iron with water in the tank.
Steam ironing
1. Fill the iron as described in the section “how to fill the water tank”.
2. Plug the iron into the mains.
3. Steam ironing is only possible when the highest temperatures shown on the temperature control are selected.
Otherwise, water may escape through the soleplate.
4. Wait until the pilot light goes out, which indicates that the selected temperature has been reached.
5. Turn the steam button to the required position.
6. When the ironing is finished and during breaks in ironing, place the iron in its upright position.
7. Disconnect the iron from the mains supply. Pour of any remaining water and leave the iron to cool off.
Spray
1. The spray can be used in any position, either in dry or steam ironing, as long as the water tank is filled with water.
2. Press the spray button for this function
NOTE: This button has to be pressed repetitively to start this function for the first time.
Shot of steam
Shot of steam give extra steam for removing persistent wrinkles.
1. Place the temperature selector at the “max” position and wait until the pilot light goes out
2. Wait for a few seconds for the steam to penetrate the fibre before pressing again.
NOTE: For the best steam quality, do not use more than three successive bursts each time. Several pumping actions are
needed to start this function.
Excessive use of this feature will cause the iron to cool, ensure that the pilot light is out, before operating the
shot of steam control
Cleaning
1. Disconnect the appliance from the mains, before cleaning.
2. Do not use solvents or abrasive products to clean the iron, clean with a damp cloth.
Defects and repairs
Do not attempt to replace a defective mains lead. The appliance has to be returned to an authorized service centre for
repair.
Faults-reasons and solutions
Iron emits an odor or smoke
Iron gives off an odor when turned on for the first time. Oils used during manufacture need to be burnt off allow ten
minutes for odor to disappear.
Iron does not heat
The iron should be plugged into a 230 Volt, AC electrical outlet only. The temperature dial must be set at the desired
temperature.
Iron does not steam
The water tank many be empty. Turn the steam valve to “0” and add water .Allow the iron to heat, and then set the steam
dial to the steam setting.
Burst of steam feature does not work
The water tank must be at least 1/4 full .Temperature must be set to steam position. Iron should be in the horizontal
position. Prime pump briefly. Allow a short pause between shots. Be sure to fully depress the burst of steam button.
Spry mist feature does not work
The water tank must be at least 1/4 full. Fill the iron as described in the section “how to fill the water tank”.
Iron is leaking
The variable steam dial must be set “on”, until the iron is hot. The temperature setting is too low to produce steam. Shot
of steam used too much, allow iron to re-heat.
This appliance is not intended for use by persons (including children) with reduced physical, sensory or mental
capabilities, or lack of experience and knowledge, unless they have been given supervision or instruction concerning use
of the appliance by a person responsible for their safety
Children should be supervised to ensure that they do not play with the appliance
If the supply cord is damaged, it must be replaced by the manufacturer, its service agent or similarly qualified persons in
order to avoid a hazard
The iron must not be left unattended while it is connected to the supply mains
The plug must be removed from the socket-outlet before the water reservoir is filled with
The iron must be used and rested on a stable surface;
When placing the iron on its stand, ensure that the surface on which the stand is placed is stable.
The iron is not to be used if it has been dropped, if there are visible signs of damage or if it is leaking.
IMPORTADO
I.R.P., S.L.
AVDA. SANTA CLARA DE CUBA 5
SEVILLA, SPAIN
IMPORTADO