1
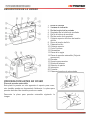
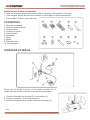
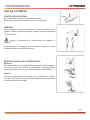
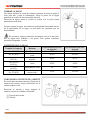
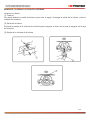
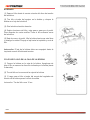
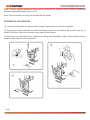
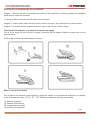
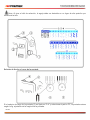
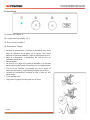
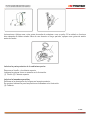
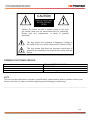
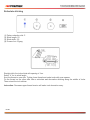
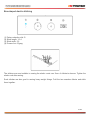
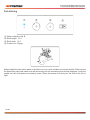
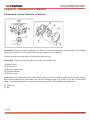
MANUAL DE INSTRUCCIONES
MÁQUINA DE COSER
MCO-5424
ESTIMADO CLIENTE
Con el fin de que obtenga el mayor desempeño de su producto, por favor lea este manual de
instrucciones cuidadosamente antes de comenzar a utilizarlo, y guárdelo para su futura referencia.
Si necesita soporte adicional, no dude en escribir a: [email protected]
PRECAUCIÓN
RIESGO DE CHOQUE
ELÉCTRICO , NO ABRA
Precaución: Para reducir el riesgo de choque eléctrico, no
retire la cubierta, no hay partes manipulables por el usuario al
interior de la unidad.
Refiera todo mantenimiento o
intervención técnica a personal técnico calificado.
Este símbolo indica la existencia de voltaje peligroso al
interior de esta unidad, que constituye un riesgo de choque
eléctrico.
Este símbolo indica que hay importantes instrucciones de
operación y mantenimiento en la literatura que acompaña a
esta unidad.
LÍNEAS DE SERVICIO AL CLIENTE PREMIER
Venezuela:
Panamá:
Sitio Web:
E-mail:
0800 – ELECTRIC (353-2874)
507 300-5185
www.premiermundo.com
[email protected]
NOTA
Nos reservamos el derecho de modificar las especificaciones, características y/u operación de esta
unidad sin previo aviso, con el fin de continuar las mejoras y desarrollo del mismo.
P-1
INSTRUCCIONES DE SEGURIDAD
Antes de usar la unidad por primera vez, lea atentamente las siguientes instrucciones de seguridad:
Con el fin de reducir el riesgo de choque eléctrico:
• Esta unidad no debe ser desatendida mientras se encuentre conectada. Siempre desconecte la
unidad después de ser usada y antes de realizarle limpieza.
• Desconecte la unidad antes de cambiar el bombillo. El bombillo debe ser reemplazado por uno con
las mismas especificaciones (15 Vatios).
Con el fin de reducir quemaduras, incendios, choques eléctricos o accidentes personales:
• Esta unidad no debe ser usada por niños pequeños. Tenga mucha precaución cuando la unidad sea
usada cerca de niños o personas con capacidades físicas, mentales o sensoriales reducidas.
• Use la unidad solo con el fin para el que fue diseñada.
• Utilice solo accesorios recomendados por el fabricante.
• No opere la unidad si tiene el cable de energía o cualquier otra parte dañada o si no esta
funcionando de manera adecuada. Remita la unidad a un agente de servicio calificado con el fin de
realizar su reparación.
• La unidad no debe ser sumergida en agua o en cualquier otro liquido. Si esto sucede, no use la
unidad hasta que no sea revisada por un profesional.
• No use la unidad si las ranuras de entrada de aire se encuentran bloqueadas. Mantenga dichas
ranuras limpias y libres de lanas o polvo.
• No inserte objetos por las ranuras de la unidad.
• Esta unidad no debe ser usada en exteriores
• Esta unidad no debe ser operada en lugares con acceso a aerosoles o donde esta siendo
suministrado oxigeno.
• Antes de desconectar la unidad, apáguela.
• Desconecte la unidad halando del enchufe directamente, no lo haga halando de su cable de energía.
• Mantenga sus dedos alejados de las partes móviles, especialmente de la aguja.
• Use siempre la placa de aguja apropiada. Una placa errada puede causar que la aguja se quiebre
• No use agujas dobladas.
• No hale o empuje las prendas mientras usa la unidad, ya que esto puede ocasionar que la aguja se
quiebre.
• Apague y desconecte la unidad del tomacorriente antes de realizarle cambios a los accesorios en la
unidad.
Guarde este manual de instrucciones para futura referencia
“Esta unidad ha sido creada para uso domestico únicamente”
P-2
DESCRIPCIÓN DE LA UNIDAD
1.
2.
3.
4.
5.
6.
7.
Botón de reversa
Ventana de indicación
Dial de longitud de la puntada
Regulador de la bobina de enrollado
Eje de la bobina de enrollado
Dial de ancho de la puntada
Cubierta superior del disco de tensión
del hilo
8. Disco de tensión del hilo
9. Palanca tira-hilo
10. Cubierta superior
11. Corta Costuras
12. Prénsatelas
13. Placa de la aguja
14. Placa de prendas extensible (Caja de
accesorios)
15. Elevador
16. Soporte para carretes
17. Rueda de balance
18. Selector de patrón
19. Interruptor
20. Potencia
21. Palanca elevadora de prénsatelas
PREPARACIÓN ANTES DE COSER
Placa de prendas extensible
Esta placa le permite no solo agrandar el espacio para coser,
sino también puede ser desmontado fácilmente. La placa para
prendas de brazo libre también puede ser usada.
Desmonte la placa para prendas extensible siguiendo la
imagen.
P-3
Aplicación para la placa de brazo libre
• Evita que la tela se apile mientras cose bolsillos, pliegues y los bordes de la cintura.
• Cose mangas, bordes de la cintura, perneras u otros trajes con forma redondeada.
• Zurce rodillas, Codos y ropa para niños
ACCESORIOS
1. Pie para cremalleras
2. Pie para cosido de botón
3. Pie para ojales
4. Cortador de ojales
5. Destornillador
6. Lanzadera
7. Aguja
8. Aceite
9. Placa de zurcir
10. Porta carrete
FUENTE DE POTENCIA
Revise que el voltaje mostrado en la unidad coincide con el
voltaje del área antes de conectar la unidad al tomacorriente.
1. Conecte el enchufe de la unidad (5) a su interface (4).
2. Conecte el enchufe (1) al tomacorriente (3)
3. Encienda la lámpara de la unidad usando el interruptor (2)
P-4
USO DE LA UNIDAD
CONTROLADOR DE PEDAL
Este controlador cambia la velocidad de cosido.
Entre mas se presiona el pedal, mayor es la velocidad.
LÁMPARA
Esta lámpara se encuentra ubicada en la parte posterior de la
cubierta. Retire la cubierta superior cuando necesite cambiarla
(Tornillo frontal)
Apague y desconecte la unidad antes de cambiar la
lámpara.
Para desmontar la lámpara, gírela hacia la izquierda y para
instalarla gírela en el sentido contrario.
REMOVER E INSTALAR EL PRÉNSATELAS
Remover
Gire hacia delante la rueda de balance mientras sube la aguja a
su posición mas alta. Nivele el prénsatelas. Sostenga hacia
atrás la palanca con el pie guía mientras libera el prénsatelas.
Instalar
Coloque el prénsatelas de manera que el pasador de la placa
este justo en frente de la ranura. Baje la palanca del prénsatelas
y este será fijado en su lugar.
P-5
CAMBIAR LA AGUJA
Gire hacia delante la rueda de balance mientras levanta la aguja al
nivel mas alto y baja el prénsatelas. Afloje el perno de la aguja
girándolo en contra de las manecillas del reloj.
Remueva la aguja usada e inserte la nueva con la parte plana
apuntando hacia atrás.
Cuando inserte la aguja, esta debe ser presionada firmemente dentro
de la abrazadera de la aguja, la cual debe ser apretada con un
destornillador.
Es necesario realizar revisiones constantes con el fin de evitar
que la aguja este doblada o sin punta. Esto podría ocasionar
puntadas desiguales o nudos.
CUADRO DE HILO Y AGUJA
Especificación del hilo
de algodón
70-80
Especificación del hilo
de seda
100-140
50-60
80-100
40-50
60-70
Lana
30-40
50-60
Materiales de Jean
30
45-50
Materiales para
hacer punto
70-80
100-140
Tamaño de la aguja
Material
No. 70 (#10)
Crepe
Popelín de seda
pura
Paño de lana
algodón
No. 80 (#12)
No.80-90
(#12-14)
No. 90-110
(#14-16)
No. 90-110
(#14-18)
Costura elástica
No. 70 (#10)
COMO USAR EL SOPORTE DEL CARRETE
Es usado para sostener carretes. Retirando el
soporte del carrete y luego colocándolo en el
carrete cuando cose.
Remueva el carrete y luego reajuste el
soporte cuando la unidad se ensambla.
(1) Soporte del carrete
(2) Carrete
P-6
REMOVER Y CARGAR LA CAJA DE LA BOBINA
Levantar la cubierta
(1) Cubierta
Gire hacia delante la rueda de balance para subir la aguja. Sostenga la salida de la bobina y hale la
cubierta de la bobina
(2) Salida de la bobina
Presione la manija de la cubierta de la bobina para asegurar el cierre de la junta al cargarlo en la caja
de la bobina.
(3) Manija de la cubierta de la bobina
P-7
BOBINADO
(1) Saque el hilo desde el carrete a través del disco de tensión
de la bobina.
(2) Tire hilo a través del agujero en la bobina y coloque la
bobina en el eje de la bobina.
(3) Gire la bobina hacia la derecha.
(4) Sujete el extremo del hilo y siga paso a paso por el pedal.
Pare después de varias vueltas. Corte el hilo sobrante cerca
de la bobina.
(5) Baje de nuevo el pedal. Hile la bobina hasta que este llena
y detenga la unidad. Empuje el eje hacia la izquierda y corte el
hilo.
Instrucción: El eje de la bobina debe ser empujado hacia la
izquierda cuando el bobinado termine.
COLOCAR EL HILO EN LA CAJA DE LA BOBINA
(1) Cargue la bobina en la caja de la bobina. Asegúrese de
que el hilo se saca en la dirección indicada por la flecha (hacia
la derecha).
(2) Tire del hilo en la ranura de la caja de la bobina.
(3) Y luego pase el hilo a través del resorte del regulador de
tensión de la bobina para el orificio de salida.
Instrucción: Tire del hilo unos 10 cm.
P-8
ENHEBRAR LA UNIDAD
Gire hacia adelante la rueda de balance y mueva la palanca del
tira-hilo a la posición más alta.
Levante el prénsatelas e inserte el soporte del carrete como se
muestra en la ilustración.
Saque el hilo desde el lado posterior del carrete.
(1) Enhebre el retenedor del hilo con ambas manos.
(2) Sujete el hilo y hálelo en el disco de tensión del hilo y luego
más allá de la placa de hilo.
(3) Tire del hilo con fuerza y déjelo pasar a través de la palanca
de tira-hilo desde el lado derecho.
(4) Hale el hilo y déjelo pasar a través del gancho del hilo.
(5) Hale del hilo a través del agujero de la aguja desde la parte
delantera a la parte posterior.
Cambie el par de agujas (Igual al cambio de una aguja) antes de
P-9
coser, e inserte respectivamente un carrete en el soporte de dos carretes, luego complete la acción de
bobinado siguiendo los pasos de (1) a (5).
Nota: Sólo de acuerdo con el tipo de puntada de dos agujas.
EXTENDER EL HILO INFERIOR
(1) Levante el prénsatelas y sostenga el hilo superior ligeramente con la mano izquierda.
(2) Siga girando hacia adelante la rueda de balance hasta que la palanca del tira-hilo este en su
posición más alta. Hale del hilo superior para halar del hilo inferior.
(3) Deje unos 5 cm de ambos hilos y hálelos por debajo del prénsatelas, luego hacia la parte posterior
del prénsatela. Deje 5cm en ambos hilos.
P-10
AJUSTE DE LA TENSIÓN DEL HILO SUPERIOR
Imagen 1. Mientras se hace la costura recta, ambos hilos superiores e inferiores deben ser anudados
entre las dos capas de la prenda.
(1) Ajuste el disco de tensión del hilo dentro de la ventana.
Imagen 2. Cuanto menor sea la tensión el hilo superior es mayor, gire el dial para un numero menor.
Imagen 3. La tensión del hilo superior es menor, gire el dial para un número mayor.
Tensión del hilo superior en el caso de la costura en zigzag.
Con el fin de lograr un buen efecto de zigzag, la tensión del hilo superior debe ser menor que la de la
puntada recta.
El hilo superior debe ser visible desde el reverso.
SELECTOR DE PUNTADAS
Gire el patrón de selección para mostrar el código de patrón en la ventana de indicación de códigos,
como se muestra en la fig. "0.5-4", "S1", "S2", Muestra la ubicación del largo de puntada.
(1) Selector de patrón
(2) Ventana de indicación
(3) Longitud de la puntada
(4) Anchura de la puntada
P-11
Nota: Al girar el dial de selección, la aguja debe ser detenida en un lugar de alta posición por
encima de la tela.
Selector de Ancho y Largo de la puntada
Si el selector de largo de la puntada (3) es fijado en "0-4" y selecciona el patrón "B", la puntada variara
según la fig. ajustando de la longitud de la puntada.
P-12
En términos generales, cuando se cose material delgado, ajuste la longitud de la puntada a un nivel
menor. Y cuando se cose material grueso, ajuste la longitud de la puntada a un nivel mayor. La longitud
de la puntada es un patrón compuesto "S1", "S2".
La marca "
" indica Retorno
Si el ancho de puntada (4) se fija en "0-5" y selecciona el patrón "B", la puntada variara según la fig.
ajustando el ancho de la puntada.
La marca " " indica la selección de aguja de puntada doble
Nota:
1. Debe ajustar el selector de ancho de puntada " " cuando se adopte el modo de cosido con aguja
doble.
2. Sólo de acuerdo con el tipo de puntada de dos agujas.
BOTÓN REVERSA
Si el botón de reversa esta siempre presionado hacia abajo, la unidad reversara la puntada todo el
tiempo.
PLACA DE ZURCIR
Para alguna costura específica, (tal como el bordado a mano libre, el zurcido, botón), se debe instalar la
placa de zurcir. Instale la placa de zurcir en la placa de la aguja como se muestra en la figura.
Instrucciones: Para la costura ordinaria, la placa de zurcir debe ser retirada.
EMPEZAR A COSER
P-13
Costura Recta
(1) selector de Patrón: A
(2) Longitud de la puntada: 1.5-4
(3) Ancho de la puntada: 0
(4) Prénsatelas: Zigzag
• Levante el prénsatelas y coloque la prenda al lado de la
pata de alambre de la placa de la aguja. Gire hacia
delante la rueda de balance y baje la aguja hacia la tela.
• Baje el prénsatelas y asegúrese de que el hilo es
colocado hacia atrás.
• Baje el pedal
• La tela irá a lo largo de la pata de alambre y es llevada
hacia adelante de forma automática por el transportador.
• Con el fin de finalizar la puntada, por favor, pulse el
botón de retroceso y haga varias puntadas en reversa.
• Levante el prénsatelas, extraiga la tela y hale del hilo
hacia atrás.
• Corte ambos hilos
• Deje cierta longitud de hilo para uso a futuro.
P-14
Cambiar dirección de la costura
•
•
•
•
Detenga la máquina y gire la rueda de balance para llevar la aguja hacia abajo en la tela.
Levante el prénsatelas.
Gire la tela para cambiar de dirección si lo desea.
Baje el prénsatelas para reanudar la costura.
Utilizar tiras de la pata de alambre en la placa de la aguja
Las tiras de la pata de alambre en la placa de la aguja son de gran
ayuda para mantener el ancho entre la aguja y el hilo.
Durante la costura haga que el borde de la tela siempre este alineado
con las tiras de la pata de alambre, de modo que puede asegurarse
de que el ancho de la puntada sea igual al ancho del borde de la tela.
(1) Tiras de la pata de alambre
(2) Placa de la aguja
(3) Agujero de la placa de la aguja
Puntada de ángulo recto
Mientras cose en la esquina, pare la unidad y gire la rueda de balance para bajar la aguja. Levante el
prénsatelas, gire la tela alrededor de la aguja, luego baje el prénsatelas y cosa en la nueva dirección.
P-15
Costura en zigzag
(1) Selector de Patrón: B
(2) Longitud de la puntada: 1,5-4
(3) Ancho de puntada: 1,5-5
(4) Prénsatelas: Zigzag
Puntadas en zigzag simples se utilizan a menudo para hacer el dobladillo, hacer ojales y curvas
elásticas.
Zigzag Remallado
(1) selector de Patrón: B
(2) Longitud de la puntada: 1-2
(3) Ancho de la puntada: 1,5-5
(4) Prénsatelas: Zigzag
P-16
Esta puntada es usada para hacer remallado para que el hilo en el borde de la tela no se deshaga.
Zigzag triple
(1) Selector de patrón: C
(2) Longitud de la puntada: 1,5-4
(3) Ancho de la puntada: 3-5
(4) Prénsatelas: Zigzag
La puntada se utiliza para los materiales sintéticos y otros materiales que obtienen pliegues fácilmente.
También se adapta a remallado para evitar que se deshagan los hilos. Es apto para el cosido en curvas
elásticas. Es necesario dejar una tira ribeteada de 1.5cm.
Cortar la tira ribeteada después de coser.
P-17
Triple costura recta elástica
(1) Selector de patrón: A
(2) Largo de puntada: S1
(3) Ancho de puntada: 0
(4) Prénsatelas: Zigzag
Dos puntadas hacia delante y luego hacia atrás harán la costura. Antes de coser piezas de ropa, haga
una muestra mediante el uso de alfileres. Tales puntos son los más adecuados para las costuras en las
entrepiernas.
Botón de costura
(1) selector de patrón: B
P-18
(2) Longitud de la puntada: 0
(3) Ancho de la puntada: 3-5 (Aptas para coser botones)
(4) Prénsatelas: Prénsatelas para coser botones
(5) Placa de zurcir: Instale la placa de zurcir en la placa de la aguja
Pegue el botón sobre la posición marcada. Un alfiler puede ser colocado en el prénsatelas para formar
un tallo para hacer el bobinado del hilo alrededor del botón más fácil.
Alinee los dos orificios del botón con el surco de las ranura mientras coloca el agujero izquierdo del
botón justo debajo de la punta de la aguja.
• Baje el prénsatelas
• Gire el selector de puntadas
• Gire el ancho de la puntada justo hasta la parte superior del agujero derecho del botón
• Haga 5 puntos aproximadamente y suba la aguja.
• Para obtener un espacio mas grueso en el mango del botón, corte el hilo con 20cm sobrantes. Pase
el hilo superior por el orificio del botón y enróllelo alrededor del mango del botón varias veces.
• Saque el hilo por la parte de atrás y haga un nudo.
Instrucción: Levante el alimentador de nuevo después de coser botones.
Los ojales
P-19
(1) Selector de patrón:
(2) Longitud de la puntada:
(3) Ancho de puntada: 3-5
(4) Prénsatelas: Ojal
(0,5-1)
El ancho de la puntada debe ser elegido arbitrariamente con en el rango
variación de la longitud de la puntada.
de acuerdo a la
(1) Para costura gruesa, ajuste el selector en "0". (Puntadas satinadas para trajes de material ligero)
(2) Para costura gruesa, ajuste el selector en "1". (Puntadas flojas para trajes de material ligero)
Instrucciones: Haga una costura de prueba sobre un trozo de tela
pequeño, esto para revisar el efecto adecuado.
Procedimiento de costura:
(1) Haga las marcas de ojal con cuidado sobre el material.
(2) Deslice hacia delante (A), mantenga la marca (C) de acuerdo a la
marca inicial (B). La marca en el prénsatelas debe estar alineada con la
del material. Baje el prénsatela.
Instrucción: Las marcas en la tela deben ser realizadas en cm.
(3) Ajuste el dial de selección de puntada a . Mantenga la costura hacia
adelante hasta llegar a las marcas frente a los botones y luego detenga
la costura con la aguja pausada en la parte inferior derecha.
(4) Ajuste selector de puntada a . Realice de 4-6 puntadas antes de
parar de coser con la aguja pausada en la parte inferior izquierda.
(5) Ajuste el selector de puntada a . Mantenga la costura hacia atrás
hasta llegar a las marcas en la parte posterior de los botones y luego se
detenga la costura con la aguja pausada en la parte superior izquierda.
(6) Ajuste el selector de puntada para . Realice 4-6 puntadas antes de
parar de coser con la aguja pausada en la parte superior derecha.
(7) Después de coser un ojal, retire las telas. Inserte un alfiler en el
orificio posterior del ojal de manera que el extremo del hilo del ojal no se
corte por error. Recorte el ojal cuidadosamente con un cortador de ojal.
P-20
Ojales con costuras decorativas
(1) Selector de patrón:
(2) Longitud de la puntada:
(3) Ancho de la puntada: 3-5
(4) Prénsatelas: Ojal
(0,5-1)
• Levante la placa para coser los ojales a mano, luego coloque los hilos en la leva en la parte posterior
del prénsatelas. (1) Posición de la leva.
• Saque hacia delante el extremo del hilo adicional bajo el prénsatelas y colóquelo bajo el centro del
prénsatela.
• Sostenga firmemente el hilo adicional y enganche el tenedor en la parte delantera del prénsatela.
• Lleve la aguja a las telas antes de iniciar la costura y baje el prénsatela.
• Lentamente baje el pedal de los ojales, con cada cara de los ojales encajando en los hilos
establecidos.
• Retire las telas y recorte el hilo de costura.
• Hale los hilos establecidos desde el lado izquierdo y sosténgalo fuertemente.
• El extremo del hilo debe ser enrollado en la aguja de zurcir. Tire del hilo hacia atrás y recórtelo.
Coser cremalleras
P-21
(1) Selector de patrón: A
(2) Longitud de la puntada: 1,5-4
(3) Ancho de la puntada: 0
(4) Prénsatelas: Pie para cremalleras
Al coser el lado derecho de la cremallera, coloque la lengüeta en la clavija izquierda del pie para
cremalleras al coser el lado izquierdo de la cremallera, coloque la lengüeta en la clavija derecha del pie
para cremalleras, Ver Fig.A.
Doble el borde del material 2cm (3/4 ") y coloque la cremallera debajo de la parte doblada.
Realice la costura desde la parte inferior de la cremallera hasta la parte superior en ambos lados. Ver
fig. B.
Para coser el lado contrario de la cremallera, suelte el pie presionando el botón ubicado en la parte
posterior del prénsatelas, instale el pie para cremalleras al otro lado de la cremallera y siga cosiendo
utilizando la otra muesca.
(1) Pie de la cremallera
(2) Clavija derecha para coser el lado izquierdo de la cremallera.
(3) Clavija izquierda para coser el lado derecho de la cremallera.
Dobladillados Ciegos
P-22
(1) Selector de patrón: D - E
(2) Longitud de la puntada: 1,5-4
(3) Ancho de la puntada: 3-5
(4) Prénsatelas: Zigzag
Esta puntada es ideal para coser bordes, ruedos, manteles, etc,. Ver fig.1
Realice un doblez triple en el borde extendido de 4.5cm del borde de la tela y el borde doblado. Gire la
rueda de balance y haga que la aguja se mueva hasta la posición izquierda.
La punta de la aguja permanece en la parte izquierda del doblez. Es exactamente para traer la aguja al
principio.
Desdoble la tela y tendrá una costura de punto ciego.
Siga la imagen anterior para realizar la puntada correctamente.
Costura de Concha
P-23
(1) Selector de patrón: F
(2) Puntada: 1,5-4
(3) Ancho de la puntada: 3-5
(4) Prénsatelas: Zigzag
La puntada de concha puede ser usada para coser una puntilla (encaje) en una tela ligera.
Ajuste el selector de puntadas en H.
Realice una costura de la tela en diagonal, colocándolo debajo del prénsatela de manera que las
puntadas rectas se cosan en la línea de costura y las puntadas zigzag se cosan ligeramente sobre el
borde doblado.
Esto requiere aumentar un poco la tensión del hilo más de lo normal.
Cosa a una velocidad lenta.
Costura Reticulada
(1) Selector de patrón: C
(2) Longitud de la puntada: S1
P-24
(3) Ancho de la puntada: 3-5
(4) Prénsatelas: Zigzag
Realice una puntada recta en el lado escondido con un espacio de 1cm
Seleccione "4" por su longitud de puntada.
Nude el hilo en un lado. Apriete el hilo inferior y haga pliegues con espacios nivelados.
Fije el hilo en el otro lado. Haga un reticulado y costuras decorativas a lo largo del medio de pliegues.
Luego, extraiga las puntadas.
Instrucción: Disminuir la tensión del hilo superior hará la decoración mas fácil.
Costura elástica en forma de caja
(1) Selector de patrón: G
(2) Longitud de la puntada: 1,5-4
(3) Ancho de la puntada: 3-5
(4) Prénsatelas: Zigzag
Estas puntadas son las más adecuadas para coser las cuerdas elásticas sobre 3 mm de las mangas de
P-25
los niños. Apriete la cuerda elástica después de coser.
Tales puntos son también aptos para coser forros pesados. Doble las dos telas transparentes y únalas.
Costura De Cojines
(1) Selector de patrón: B
(2) Longitud de la puntada: 1,5-4
(3) Ancho de la puntada: 1,5-5
(4) Prénsatelas: Zigzag
Adhiere firmemente las piezas decorativas de las telas. Cosa alrededor de las piezas decorativas y
asegúrese de que la sutura más allá de las piezas decorativas desaparezca. Inserte la aguja en la tela
cuando se encuentre en la esquina. Levante el prénsatelas y gire la tela a la izquierda o a la derecha.
Unión de borde
P-26
(1) Selector de patrón: G
(2) Longitud de la puntada: S1
(3) Ancho de la puntada: 3-5
(4) Prénsatelas: Zigzag
Doble ambos lados con 1,5 cm cada uno y plánchelo. Los lados doblados deben fijarse a los textiles no
tejidos con espacio de 0.3cm. Cosa lentamente y asegúrese que cada puntada llegue a los bordes
plegables.
MANTENIMIENTO DE LA UNIDAD
Bobina pendular y accesorios
P-27
Instrucciones: Apague la lámpara o retire el enchufe. Retire la lanzadera pendular: Levante la aguja a
su posición máxima y levante la tapa de la lanzadera. Retire la caja de la bobina de la unidad.
Destape la palanca de la lanzadera y extraiga el anillo de retención de la lanzadera.
Instrucción: Limpie el transportador con un cepillo y un trapo suave y seco.
(1) Caja de la bobina
(2) Palanca de la lanzadera
(3) Anillo de retención de la lanzadera
(4) Lanzadera Pendular
(5) Portador de la lanzadera
Instalación de la lanzadera pendular: Sostenga el pin del centro de la lanzadera y fíjela cuidadosamente
en el portador de la lanzadera. Reinstale el anillo retenedor de la lanzadera y asegúrese que el pin
central siguiente es fijado en la ranura de la lanzadera. Bloquee el anillo de retención retornando las
palancas a su posición. Repare la caja de la bobina con la bobina.
(6) Pin central
(7) Ranura
Limpieza del transportador
Instrucciones: Apague la lámpara y desenchufe la unidad antes de limpiar el transportador.
Retire la aguja y el prénsatelas. Retire el tornillo en el lado izquierdo de la placa de la aguja con el
destornillador.
Retire la placa de la aguja
Limpie los dientes del transportador con un cepillo y vuelva a colocar la placa de la aguja.
Coloque el prénsatelas y está listo para coser.
Instrucciones: Es necesario una limpieza regular si la unidad va a ser usada frecuentemente.
Funcionamiento del lubricante
P-28
Instrucciones: Aplique una o dos gotas de aceite de máquina o con un paño. Si la unidad no funciona
bien después de haber estado fuera de uso durante un largo período, aplique unas gotas de aceite
antes de usarla.
Lubricar la parte posterior de la cubierta superior
Remueva el tornillo y la cubierta superior
Lubrique las piezas como se muestra en la ilustración.
(1) Tornillo (2) Cubierta superior
Lubricar la lanzadera pendular
Refiérase a la descripción de la figura en la pagina anterior.
Se requiere lubricación para las posiciones marcadas en la ilustración.
(3) Cubierta
P-29
SOLUCIÓN DE PROBLEMAS
Problema
El hilo superior de rompe
El hilo inferior se rompe
La aguja se rompe
Se salta las puntadas
Arrugas en la tela
Bucle en la costura
P-30
Posible Causa y solución
1. El hilo superior no se ha instalado correctamente.
2. La tensión del hilo superior está demasiado tensa.
3. La aguja está doblada o roma.
4. La aguja está fuera de lugar.
5. Las telas no se giran hacia atrás después de coser.
6. El hilo es demasiado grueso o demasiado fino.
1. El hilo inferior no está bien enhebrado en el gancho de la lanzadera.
2. Hay cabello fino en el interior del gancho.
3. La bobina está dañada y la operación fuera de orden.
1. La aguja no está correctamente instalada.
2. La aguja está doblada o roma.
3. El tornillo de la abrazadera de la aguja esta suelto.
4. La tensión del hilo superior está demasiado tensa.
5. Las telas no se giran hacia atrás después de coser.
6. La aguja es demasiado delgada para la tela que se cose.
7. El selector de patrón no es girado correctamente.
1. La aguja no está colocada correctamente.
2. La aguja está doblada o roma.
3. Ni la aguja ni el hilo son aptos para la costura.
4. El enhebrado superior no es correcto.
1. El hilo superior está demasiado tenso.
2. El enhebrado no es correcto
3. La aguja es demasiado gruesa para la tela que se cose.
4. Las puntadas son demasiado grandes para la tela
* Es necesario colocar un forro no tejido debajo de la tela cuando esta es
demasiado delgada.
1. La presión del hilo superior es muy poca
2. La combinación del tamaño de la aguja/ hilo/ tela no es correcta. Puede
La tela no corre
1.
2.
correctamente
3.
1.
La unidad no funciona
2.
3.
La unidad es ruidosa y
1.
2.
funciona muy lentamente
3.
•
ser muy gruesa o muy delgada
El transportador esta atascado con hebras finas
El transportador no se levanta
La puntada es muy pequeña
La unidad esta apagada
Hay hilo enganchado en el gancho
El interruptor de liberación del embrague esta fijo en la bobina
Hay hilo enganchado en el gancho
El transportador esta atascado con hebras finas
Necesita lubricación
Las personas y/o Marcas registradas en este manual de instrucciones no están afiliadas a Premier Electric Japan Corp. y aparecen en
este Manual con propósitos ilustrativos únicamente.
P-31
INSTRUCTION MANUAL
SEWING MACHINE
MCO-5424
DEAR CUSTOMER
In order to achieve the best performance of your product, please read this instruction manual carefully
before using, and keep it for future reference.
If you need extra support, please write to [email protected]
CAUTION
RISK OF ELECTRIC
SHOCK, DO NOT
OPEN
Caution: To reduce the risk of electric shock do not open
this device, there are not serviceable parts for customers.
Please refer any maintenance or repair to qualified
personnel.
This sign means the existence of dangerous voltage at
the inside of the unit, which states a risk of electric shock.
This sign means that there are important instructions of
operation and handling in the manual that comes with this
device.
PREMIER CUSTOMER SERVICE
Venezuela:
Panama:
Website
E-mail:
0800 – ELECTRIC (353-2874)
507 300-5185
www.premiermundo.com
[email protected]
NOTE
This unit may be submitted to changes in specifications, characteristics and/or operation without prior
notice to the user, in order to continue improving and developing its technology.
P-1
IMPORTANT SAFETY INSTRUCTIONS
When using the sewing machine, basic safety precautions should always be followed, including the
following:
“ Read all instruction before using.”
DANGER – To reduce the risk of electric shock:
-
The sewing machine should never be left unattended when plugged in. Always unplug this sewing
machine from the electrical outlet immediately after using and before cleaning.
Always unplug before changing the light bulb. Replace bulb with same type rated 15watts.
WARNING – To reduce the risk of burns, fire, electric shock, or injury to persons:
-
Do not allow this machine to be used as a toy. Close attention is necessary when the sewing
machine is used by or near children.
Use the sewing machine only for its intended use as described in this manual.
Use only accessories recommended by the manufacturer as contained in this manual.
Never operate this sewing machine if it has a damaged cord or plug, if it is not working properly, if it
has been dropped or damaged, or dropped into water. Return the sewing machine to the nearest
authorized dealer or service center for examination, repair, electrical or mechanical adjustment.
Never operate the sewing machine with any of the air openings blocked. Keep the ventilation
openings of the sewing machine and foot controller free from the accumulation of lint, dust and loose
cloth.
Never drop or insert any object into any openings.
Do not use this machine outdoors.
Do not operate this machine where aerosol (spray) products are being used or where oxygen is
being administered.
To disconnect, turn the main switch to the symbol ”O” position which represents off, then remove
plug from outlet.
Do not unplug by pulling on the cord. To unplug, grasp the plug and pull, not the cord.
Keep fingers away from all moving parts. Special care is required around the sewing machine
needle.
Always use the proper needle plate. The wrong plate can cause the needle to break.
Do not use a bent needle.
Don not pull or push the fabric while stitching. It may deflect the needle causing it to break.
Cut off the power position when making and adjustments in the needle area. Such as threading the
needle, changing the needle, threading the bobbin, or changing the presser foot.
Always unplug the sewing machine from the electrical outlet when removing covers, lubrication, or
when making any other user service adjustments mentioned in this instruction manual.
“SAVE THESE INSTRUCTION”
“This sewing machine is intended for household use.”
P-2
A Brief Introduction
Chapter I
Important Functions
Name of parts
…………………………………………………………………………………….5
Chapter II
Preparation before sewing
Extendable
…………………………………………………………………………………….6
Accessory
…………………………………………………………………………………….7
Power supply
…………………………………………………………………………………….8
Foot controller
…………………………………………………………………………………….8
Sewing lamp
…………………………………………………………………………………….9
Remove and attach presser foot ………………………………………………………………….10
Change the needle ………………………………………………………………………………….11
Thread and needle chart ………………………………………………………………………….12
How to use spool holder ………………………………………………………………………….12
Remove and attaché the bobbin case …………………………………………………………….13
Wind the bobbin …………………………………………………………………………………….14
Attach bobbin into bobbin case ………………………………………………………………….15
Machine threading ………………………………………………………………………………….16
Draw up lower threading ………………………………………………………………………….17
Upper threading tension ………………………………………………………………………….18
Pattern selection dial
………………………………………………………………………….19
Stitch width dial & Stitch Length dial …………………………………………………………….20
Reverse sewing button
………………………………………………………………………….21
Darning plate
…………………………………………………………………………………….21
Chapter III
Start sewing
Straight sewing …………………………………………………………………………………….22
Change sewing direction ………………………………………………………………………….23
Use leg wire on the needle plate ………………………………………………………………….23
Right-angle drive …………………………………………………………………………………….24
Zigzag sewing
…………………………………………………………………………………….24
P-3
Chapter IV
Join fabric
Zigzag over-lock
………………………………………………………………………………….25
Triple zigzag stitching …………………………………………………………………………….26
Triple stretch straight stitching …………………………………………………………………….27
Button sewing
………………………………………………………………………………….28
Make a buttonhole ………………………………………………………………………………….30
Buttonhole with decorative stitching ……………………………………………………………….32
Zipper insertion
………………………………………………………………………………….33
Blind hem
………………………………………………………………………………….34
Chapter V
Decorative stitching
Shell stitching
………………………………………………………………………………….35
Net Stitching
………………………………………………………………………………….36
Box-shaped elastic stitching
…………………………………………………………………….37
Pad stitching
………………………………………………………………………………….38
Edge joining
………………………………………………………………………………….39
Chapter VI
Nance of machine
Remove the shuttle and its accessories
……………………………………………………….40
Clean feed dog …………………………………………………………………………………….41
Oil the machine …………………………………………………………………………………….42
Obstacle avoidance ……………………………………………………………………………….43
P-4
Chapter I – Important Functions
Name of parts:
1. Reverse button
2. Indication window
3. Stitch length dial
4. Bobbin winding regulator
5. Bobbin winding shaft
6. Stitch width dial
7. Upper cover thread tension disc
8. Wind thread tension disc
9. Tread take-up lever
10. Top cover
11. Ripper
12. Presser foot
13. Needle plate
14. Extendable cloth plate (accessory case)
15. Lifter
16. Spool holder
17. Balance wheel
18. Pattern selection dial
19. Switch button
20. Power
21. Presser foot elevator lever
P-5
Chapter II – Preparation Before Sewing
Extendable cloth plate
The extendable cloth plate can not nolyenlarge working space while sewing but also can be easily
disassembled. The free-arm cloth plate can also be used.
Disassembe the extendable cloth plate:
Disassembe the cloth plate as shown in the illustration.
Fit over the cloth plate:
Join the extendable cloth plate (namely, platform stitching)
Merits and application of free-arm cloth plate stitching
-
Avoid cloth piled up in front of needle while sewing pockets, tucks and waist edges.
Sew sleeves, waist edges, trouser legs or ther round shaped costumes.
Darn knees, elbows and children clothes.
P-6
Accesories
1 Zipper foot
2 Button sewing foot
3 Buttonhole foot
4 Buttonhole cutter
5 Screw driver
6 Shuttle
7 Needle
8 Oil
9 Darning plate
10 Spool pin felt
P-7
Power supply
It is to be determined that the voltage and frequency indicated on the machine should be identical to the
supply prior to connected to the power.
1. Connect machine plug (5) to machine interface (4).
2. Connect attaching plug (1) to receptacle (3).
3. Switch on sewing lamp with switch button (2).
(1) Attache plug
(3) Receptacle
(5)Machine plug
(2) Switch button
(4) Machine interface
(6) Foot controller
Foot controller
Foot controller may change speed of sewing.
The Tighter the switch is pressed, the faster stitching goes.
P-8
Sewing lamp
Sewing lamp
Sewing lamp bulb stands at the back of top cover. Take off the top cover when changing the bulb (Front
screw).
Note: Switch off the power before replacing a bulb.
Take out a bulb:
- Hold it and screw off to the left.
Fit over a bulb:
- Hold it and screw on to the right.
P-9
Remove and attach presser foot
Removing:
Turn forward the balance wheel while raising the needle to the highest position. Leveling up the presser
foot. Hold back the lever on the foot bearer while re-leasing the presser foot.
Installing:
Fit over the presser foot so that its plate dowel is just opposite to the groove. Lower the presser foot
lever and its presser foot will be fixed to the place.
P-10
Changing the needle
Turn forward the balance wheel while raising the needle to the high level and lower the presser foot.
Loosen the needle clampl bolt by turning it anti-clockwise. Remove the used needle and insert the new
one with its flat side facing the back.
While inserting the needle, the needle should be pressed as firmly as possible up into the needle clamp,
which should be tightened with a screwdriver.
Note: Regular checking should be done to ensure that the needle is never twisted or blunt.
Knitting materials, fine silk or silk fabrics may frequently encounter knots and skipping
stitches, which are often caused by the damaged needles.
P-11
Thead and needle chart
Cotton thread
Silk thread
Specification
Specification
70-80
100-140
50-60
80-100
40-50
60-70
Wool
30-40
50-60
Jeans Materials
30
45-50
Knitting Materials
70-80
100-140
Needle size
Material
No. 70 (#10)
Crepe
No. 80 (#12)
Poplin
Pure Silk
No.80-90
Woolen cloth
(#12-14)
Cotton
No. 90-110
(#14-16)
No. 90-110
(#14-18)
Elastic stitching
No. 70 (#10)
How to use spool holder
Spool holder is used to hold spools. Pulling out the spool holder and then putting on spools when
sewing.
Removing spools and then restting the spool holder when the machine is packed.
(1) Spool holder
(2) Spools
P-12
Remove and load the bobbin case
Life the cover
(1) Cover
Turn forward the balance wheel to raise the needle. Hold on to the bobbin exit and pull out the bobbin
case.
(2) Bobbin exit
Press the bobbin case handle to the innermost to ensure close joiining when loading it into the bobbin
case.
(3) Bobbin case handle
P-13
Winding
(1) Draw thread from the spool through the bobbin winder tension disc.
(2) Pull thread through the hole in the bobbin and insert the bobbin into
the bobbin shaft.
(3) Turn the bobbin to the right.
(4) Hold the end of the thread and keep stepping down the foot controller.
Stop the after several turns. Cut the excess thread close to the bobbin.
(5) Step down again the foot controller. Wind thread until the bobbin is full
and stop the machine. Push the shaft to the left and cut the thread.
Instruction: The bobbin shaft is to be pushed to the left when the winding
finished.
P-14
Put thread into the bobbin case
(1) Load bobbin in bobbin case. Make sure that the thread is ulled out in the direction indicated by the
arrowhead (clockwise).
(2) Pull thread into the slit of bobbin case.
(3) And then pull thread through bobbin tension regulator spring to the outlet hole.
Instruction: Pull thread out about 10cm.
P-15
Machine threading
Turning forward the balance wheel and move thread take-up
lever to the highest position.
Raise presser foot, and insert the spool into spool holder as
shown in the illustration.
Draw thread from the back side of the spool.
(1)
Wind thread past thread retainer by both hands.
(2)
Hold the thread and pull it into the thread tension disc
and then past the thread plate.
(3)
Pull up the thread tightly and let it through the slit of
thread take-up lever from the right side.
(4)
Pull down thread and let it go through the catch the
thread hook.
(5)
Pull thread through needle hole from the front to the
back.
Change the paire of needle (change as the one needle) before
sewing, and insert respectively one spool into the two spool
holder, then complete the action of threading as the move of (1)
- (5).
Note:Only agree with the type of two-needle stitch.
P-16
Draw up lower thread
(1) Lift presser foot and hold the upper thread lightly with your left hand.
(2) Keep turning forward the balance wheel until thread take-up lever is at its highest position. Pull the
upper thread so as to pull up the lower thread.
(3) Leave about 5cm of both threads and pull them under the presser foot then toward the back of the
presser foot. Leave 5cm of both threads.
P-17
Tension adjustment of upper thread
Pic1. While doing straight stitching, both upper and lower threads must be knotted between the two
layers of garment.
(1) Adjust selection dial of thread tension disc within the window.
Pic2. The smaller the tension of upper thread is bigger, turn dial to lower nubmer.
Pic3. The tension of upper thread is smaller, turn dial to higher number.
The tension of upper thread in case of zigzag stitching.
In order to achieve good effect of zigzagging, the tension of upper thread should be less than that of
straight stiching.
The upper thread should be visible from the reverse.
P-18
Pattern selection dial
Turn the pattern selection Dial to show pattern code on the indication window that the pattern of various
code as shown in fig. where “0.5-4“, “S1“, “S2“ said the location that the stitch length dial setted.
(1) Pattern Selection Dial
(2) Indication Window
(3) Stitch Length Dial
(4) Stitch Width Dial
Note: While turning the selection dial, the needle should be stopped at a rather high position
above fabric.
P-19
Stitch Width Dial & Stitch Length Dial
If the Stitch Length Dial (3) set at the “0-4“ and the pattern select “B“, stitch will be vary as the fig. by
adjusting the stitch length.
Generally speaking, when sewing thin material, the adjustment to the smaller stitch length. And when
sewing the thick material, the adjustment to the higher stitch length. The stitch length is composite
pattern “S1“, “S2“.
The “
“ Dial Return-around Mark.
If the Stitch Width Dial (4) set at the “0-5“ and the pattern select “B“, stitch will be vary as the fig. by
adjusting the stitch width.
The“ “ Two-needle Stitch Sewing Selection Mark.
Note: 1. You must set the Stitch Width Dial at the “ “ when adopt the mode of two-needle stitch sewing.
2. Only agree with the type of two-needle stitch.
P-20
Reverse button
If the reverse button is always pressed down, the machine will do reverse stitching all the time.
Darning Plate
For some specific sewing, (sch as the free hand embroidery, mending, button) the darning plater must
be installed. Install the darning plate on the needle plate as shown in Fig.
Instruction: For ordinary sewing, the darning plate should be removed.
P-21
Chapter III - Start Sewing
Straight stitching
(1) Pattern Selection dial: A
(2) Stitch Length: 1.5-4
(3) Stitch Width: 0
(4) Presser Foot: Zigzag
Raise presser foot and put cloth beside leg wire of needle plate.
Turn forward the balance wheel and lower the needle down into
the fabric..
Lower presser foot and make sure that thread is placed
backward.
Step down foot controller
Fabric will go along leg wire and is carried forward
automatically by feed dog.
In order to make end of thread firm, please press the reverse
stitch button and do several reverse stitches.
Raise presser foot, extract fabric and pull the thread backward.
Clip both threads with a cutter
Leaver certain length of thread for future use.
P-22
Change sewing direction
Stop the machine, and turn the balance wheel to bring the needle down into the fabric.
Raise the presser foot.
Turn the fabric to change direction as desired.
Lower the presser foot to resume sewing.
Use strips of leg wire on the needle plate
The strips of leg wire on the needle plate is of great help to
maintaining width between the needle and the thread.
While sewing make the edge of fabric always aligned with the
strips of leg wire, so that can ensure that the stitch width as the
width of edge of fabric.
(1)
(2)
(3)
Strips of leg wire
Needle plate
Hole of needle plate
P-23
Right-angle stitch
While sewing into the corner, stop the machine and turn the balance wheel to lower the needle. Raise
the presser foot, turn the fabric around the needle, then lower the presser foot and sew in the new
direction.
Zigzag stitching
(1) Pattern selection dial: B
(2) Stitch length: 1.5-4
(3) Stitch width : 1.5-5
(4) Presser foot: Zigzag
Simple zigzag stitches are often used for hemming, making button holes and elastic bends.
P-24
Chapter IV- Clothes stitching
Zigzag over-lock
(1) Pattern selection dial: B
(2) Stitch length: 1-2
(3) Stitch width : 1.5-5
(4) Presser foot: Zigzag
The stitch is ussed for making over-lock so that thread at the dege of cloth shall not fall apart.
P-25
Triple zigzag
(1) Pattern selection dial: C
(2) Stitch length: 1.5 - 4
(3) Stitch width : 3-5
(4) Presser foot for needlework: Zigzag
The stitch is used for synthetic materials and other materials that get folds easily.
It also suits over-lock so as to avoid threads falling aparts. It is fit for sweing elastic bends and daming.
Astrip of hemming-stitch with 1.5cm is to be left.
Cut off the strip of hemming-stitching after sewing.
P-26
Triple stretch straight stitching
(1) Pattern selection dial: A
(2) Stitch length: S1
(3) Stitch width : 0
(4) Presser foot: Zigzag
Two stitches forward and then one stitch backward will make the stitching firm. Prior to stitching garment
pieces, make a sample by using pins. Such stitches are most suitable for sewing crotches.
P-27
Button sewing
(1) Pattern selection dial: B
(2) Stitch length: 0
(3) Stitch width: 3-5 (as long as fit for button sewing)
(4) Presser foot: Button sewing foot
(5) Darning plate: Install the darning plate on the needle plate
Tape the button over the marked position. A pin can be placed on the presser foot to form a stem to
make winding thread around the button easier.
Align both holes of the button with groove slots while placing the left button hole directly under the
needle point.
Low presser foot.
P-28
Turn pattern selection dial
Turn the stitch width just up to the top of right button hole
Make 5 stitches approximately and raise the needle.
To get a thicker button handle, cut the thread with 20cm left. Bring the upper thread down through the
button hole and wind it around the button handle for several turns.
Draw the thread to the back and make a knot.
Instruction: Raise the feed dog again after sewing buttons.
P-29
Buttonholes
(1) Pattern selection dial:
(2) Stitch length:
(0.5-1)
(3) Stitch width: 3-5
(4) Presser foot: Bottonhole foot
Stitch width is to be chosen arbitarily with in
range according to variation of stitch length.
(1) For thicker stitching, adjust selection dial to “0“. Satin stitches suit lightweight material.
(2) For Thicker stitching, adjust selection dial to “1“. Loose stitches suit heavyweight material.
Instruction: Make trial stitching on some small cloth so as to find out the optimum effect.
P-30
(1)
Make the marks of buttonhole carefully on the material.
(2)
Pull forward slide (A), keep the mark (C) on it in conformity to
the initial mark (B). The mark on the presser foot should be aligned with
that of the material... Lower the presser foot.
Instruction: Marks on the slide should be carved in cm.
(3)
Adjust stitch selection dial to . Keep stitching forward until
come to the marks in front of the buttons and then stop sewing with
needle pausing at lower right.
(4)
Adjust stitch selection dial to . Make 4-6 stitches before
stopping sewing with needle pausing at lower left.
(5)
Adjust stitch selection dial to . Keep stitching backward until
come to the marks at the back of buttons and then stop sewing with
needle pausing at top left.
(6)
Adjust stitch selection dial to
. Make 4-6 stitches before
stopping sewing with needle pausing at top right.
(7)
After sewing buttonholes, take out fabrics. Insert a pin at the
back hole of buttonhole so that the end of thread of buttonhole will not
be cut off mistakely. Cut out the buttonhole carefully with a buttonhole
cutter.
P-31
Buttonholes with decorative stitching
(1) Pattern selection dial:
(2) Stitch length:
(0.5-1)
(3) Stitch width: 3-5
(4) Presser foot: bottonhole foot
1. Raise the foot plate of buttonholes sewing hand the laid in threads on the cam at the back of presser
foot, (1) Positioning cam.
2. Draw forward the end of additional thread under the presser fot and place it under the center of
presser foot.
3. Hold tightly the additional thread na d hook the fork in front of the presser foot.
4. Bring the needle into the fabrics before starting sewing and lower the presser foot.
5. Slowly step down foot controller buttonholes, with each face of buttonholes encasing the laid-in
treads.
6. Take out fabrics and clip sewing thread.
7. Pull the laid-in threads from left side and hold it tightly.
8. The end of thread should be wound to darning needle. Draw the thread to back and clip.
P-32
Zipper sewing
(1) Pattern selection dial: A
(2) Stitch length: 1.5-4
(3) Stitch width: 0
(4) Presser foot: Zipper foot
When sewing the right side of the zipper, attach the shank to the left pin of the zipper foot when sewing
the left side of the zipper, attach the shank to the right pin of the zipper foot, See fig.A.
Fold the edge of the material 2cm (3/4“) and place the zipper under the folded portion.
Sew From the bottom of the zippertoward the top on both sides. See fig. B.
To sew the opposite side of the zipper, release the foot by pressing the buttonlocated at the back of the
presser foot, install the zipper foot on the other side of the zipper and continue sewing using the other
notch.
(1) Zipper foot
(2) Right pin for sewing the left side of the zipper.
(3) Left pin for sewing the rigth side of the zipper.
P-33
Blind hemming
(1) Pattern selection dial: D oder E
(2) Stitch length: 1.5-4
(3) Stitch width: 3-5
(4) Presser foot: Zigzag
The stitch is suitable for sewing dege of ponts, skirt and table cloth etc which needle fold hem. See fig.1
Fold hem back triple folded edge extend about 4.5cm to the edge of fabric and folded edge. Trun
balance wheel and make needle move till the leftest position.
Needle point stays on the left of folded mark it is exactly to bring needle into then start.
Unfold the fabric and you will have a blind stitch hem.
P-34
Chapter V – Decorative stitching
Shell stitching
(1) Pattern selection dial: F
(2) Stitch: 1.5-4
(3) Stitch width: 3-5
(4) Presser foot: Zigzag
The shell tuck stitch can be used to sew a picot (lace like) edge on a lightweight fabric.
Set the pattern selection Dial to H.
Sew the fabric on the bias, placing it under the presser foot so that the straight stitches are sewn on the
seamline and the Zigzag stitches are sewn slightly over the folded edge.
This Stitch requires a tighter thread tension than normal.
Sew at a slow Speed.
P-35
Reticulate stitching
(1) Pattern selection dial: C
(2) Stitch length: S1
(3) Stitch width: 3-5
(4) Presser foot: Zigzag
Straight stitch the tucked side with spacing of 1cm.
Select “4“ for its stitch lenght.
Knot the thread on one side. Tighten lower thread and make tucks with even spaces.
Fix the thread on the other side. Mke a reticulate and decorative stitching along the middle of tucks.
Then extract the tuck stiches.
Instruction: Decrease upper thread tension will make tuck decoration easy.
P-36
Box-shaped elastic stitching
(1) Pattern selection dial: G
(2) Stitch length: 1.5-4
(3) Stitch width: 3-5
(4) Presser foot: Zigzag
The stitches are most suitable to sewing the elastic cords over 3mm of children’s sleeves. Tighten the
elastic cord after sewing.
Such stitches are also good to sewing heavy weight linings. Fold the two seamless fabrics and stitch
them together.
P-37
Pad stitching
(1) Pattern selection dial: B
(2) Stitch length: 1.5-4
(3) Stitch width: 1.5-5
(4) Presser foot: Zigzag
Adhere tightly the decorative parts to the fabrics or iron it with solvable non-woven textiles. Stitch around
the decorative parts and make sure that suture beyond the decorative parts should disappear. Insert the
needle into the cloth when encountering corner. Raise the presser foot and pivot the cloth to the left or
right.
P-38
Edge joint
(1) Pattern selection dial: G
(2) Stitch length: S1
(3) Stitch width: 3-5
(4) Presser foot: Zigzag
Fold in both sides with 1.5cm each and iron it. The folded sides should be fixed to non-woven textiles
with s[pacing of 0.3cm. Slowly stitch and make sure that ezch stitch should reach the folding edges.
P-39
Chapter VI – Maintainance of Machine
Pendelspule und die Zubehöre entnehmen
Instruction: Switch off lamp or pull plug out. Take out the pendular shuttle: Raise needle to its hightest
position and lift shuttle cover. Remove the bobbin case from the machine.
Uncover shuttle lever and draw out the shuttle retaining ring.
Instruction: Clean the feed dog with a brush and soft and dry rag.
(1) Bobbin case
(2) Shuttle lever
(3) Shuttle retaining ring
(4) Pendular shuttle
(5) Shuttle carrier
Installation of the pendular shuttle: hold shuttle center pin and fit carefully back into the shuttle carrier.
Refit shuttle retaining ring and make sure that the following center pin is fixed in the slot of the shuttle
canier. Lock retaining ring by truning levers back into position. Refit bobbin case with bobbin.
(6) Center pin
(7) Slot
P-40
Cleaning the feed dog
Instruction: Switch off lamp and pull plug out before cleaning the feed dog.
Remove the needle and presser foot. Remove the screw on the left hand side of the needle plate with
the screwdriver.
Remove the needle plate
Clean the feed dog teeth with a brush and refit the needle plate.
Fit the presser foot and it is ready for sewing.
Instruction: To obtain first reate effect of needlework frequent cleaning is required for frequent use.
P-41
Oil the works
Instruction: Apply only one or two drops of machine oil, or cloth wil lbe stained. If the machine should
not run well after being out of use for a long period, apply a few drops of oil before running it and the
result will be the same as the well-thumbed condition.
Oiling the back of top cover
Remove screw and top cover
Oiling the parts as shown in the illustration.
(1) Screw (2) Top cover
Oil the pendular shuttle
Refer to description of figure and Page42.
Oiling is required for the positions marked in the illustration.
(3) Cover
P-42
Obstacle avoidance
Malfunction
Upper thread breaks
Cause
Explanation
7.
Upper thread is not correctly installed.
See Page 16
8.
Upper thread tension is too tight.
See Page 18
9.
Needle is bent or dull.
See Page 11
10. Needle is misplaced.
See Page 11
11. Fabrics are not pivoted backward after sewing.
See Page 22
12. Thread is either too thick or too thin.
See Page 12
4. Lower thread is not threaded properly in the shuttle See Page 15
hook.
Lower thread breaks
5. There is fine hair inside hook.
Clean the bobbin
case
Needle breaks
Skipping stitch
6. Bobbin is damaged and operation out of order.
Replace bobbin
8. Needle is not correctly installed.
See Page 11
9. Needle is bent or dull.
See Page 11
10. Needle clamp screw goes loose.
See Page 11
11. Upper thread tension is too tight.
See Page 18
12. Fabrics are not pivoted backward after sewing.
See Page 22
13. Needle is too thin to the cloth to be stitched.
See Page 12
14. Pattern selection dial is not turned properly.
See Page 19
5. Needle is incorrectly inserted.
See Page 11
6. Needle is bent or dull.
See Page 11
7. Neither needle nor thread is fit for sewing.
See Page 11
8. Upper threading is not correct.
See Page 16
P-43
Malfunction
Fabric puckers
Cause
Explanation
1. Upper thread tension is too tight.
See Page 18
2. Threading is not correct
See Page 16
3. Needle is too thick to the cloth to be stitched.
See Page 12
4. Stitches are too big to the cloth to be sewn.
* Non-woven lining under the cloth is re-quired for very thin
cloth to be stitched.
3. Upper thread pressure it too weak
Loop in seam.
See Page 18
4. The combination of needle size/ thread size/ fabric is See Page 12
incorrect, either too thick or too thin.
Fabric does not feed
properly
Machine does not
work.
Machine is noisy and
works slowly.
P-44
4. Feed dog is stained by fine hair.
See Page 41
5. Feed dog is not hoisted.
See Page 21
6. Stitching is too small.
See Page 20
4. Main power switch is turned off.
See Page 8
5. thread in the hook is tangled.
See Page 40
6. Clutch release switch is set at bobbin mark.
See Page 14
4. Thread in the hook is tangled.
See Page 40
5. Feed dog is stained by fine hair.
See Page 41
6. Insufficient oiling.
See Page 42