1
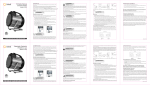
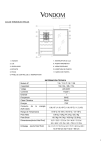
MANUAL DE INSTALACIÓN Y USO DE LOS SECADORES DE CABELLO SIMEX – PPM7/PPM8 (ver 1.2 25/3/09) DATOS TÉCNICOS Potencia (W) 1400 Voltaje (V~) 230 Frecuencia (Hz) 50 Clase II 0 100 cm min. MANUAL DEL INSTALADOR ¡ATENCIÓN! La instalación debe ser ejecutada por un técnico cualificado en conformidad con las normativas en vigor. Antes de cualquier manipulación eléctrica, cortar la corriente. Antes de efectuar la instalación, verificar que la ubicación elegida está conforme con la distancia de seguridad prevista en la normativa CEI (fig-0) El cable de alimentación no puede ser substituido, si está dañado, el aparato debe de ser desechado. Cuando el secador de pelo es usado en un cuarto de baño, desenchufar después de usarlo ya que la proximidad del agua presenta un riesgo aun cuando el secador esté desconectado. El aparato debe de ser fijado de manera que la parte portátil cuando está totalmente extendida, está fuera del alcance de una persona que esté tomando un baño o una ducha. Como protección adicional, es recomendable la instalación de un dispositivo de corriente residual (interruptor diferencial) que tenga una corriente de defecto asignada de funcionamiento que no exceda de 30 mA, en el circuito eléctrico que alimenta el cuanto de baño INSTALACIÓN: Para la instalación del aparato, retire el tornillo según se muestra en la figura 1. Separe la anilla de la base (figura 2). Marque la posición de los taladros utilizando la base del aparato y hágalos mediante una broca de 6 mm. Introduzca los tacos en los agujeros, sitúe la base en su posición y rosque los tornillos suministrados con el aparato (figura 3). Vuelva a ensamblar la anilla sobre la base (figura 4) y rosque nuevamente el tornillo retirado al principio de la instalación (figura 1). A partir de este instante el secador puede ser alojado en la anilla prevista a tal efecto y está dispuesto para ser utilizado. MANUAL DEL USUARIO UTILIZACIÓN: Sitúe el interruptor luminoso de la base (figura 5) en posición ‘ON’ (encendido), un led situado en la parte superior del mismo se iluminará en rojo. Retire el secador de su anilla y elija la temperatura deseada mediante el interruptor situado en la parte anterior de la pistola. Puede elegir entre tres posiciones: ‘C’ caudal mínimo y aire fío, ‘1’ caudal mínimo y aire caliente y ‘2’ caudal y temperatura máximos (fig.- 6). Para poner en funcionamiento el secapelos mantener pulsado el interruptor situado en la parte posterior de la pistola. Si suelta el pulsador el secapelos se parará automáticamente (figura 7). La base del secapelos alberga dos enchufes, uno estilo europeo a 230V y otro de estilo americano a 110V. Ambos enchufes son aptos solo para afeitadores y no se podrán utilizar de forma simultánea. En cualquier caso, para que estén operativos debe de estar en posición ‘ON’ el interruptor indicado en la figura 5 MANTENIMIENTO: El secapelos no requiere de ningún mantenimiento particular. Límpielo mediante un paño ligeramente humedecido y no utilice nunca productos corrosivos o abrasivos. En caso de mal funcionamiento, llame al Servicio de Asistencia Técnica Autorizado más próximo y, en ningún caso, trate de arreglarlo usted mismo. GARANTÍA Este producto goza de una garantía total de 2 años contra cualquier defecto de fabricación o de materiales durante el cual se substituirán o repararan los componentes defectuosos incluyendo, además, la mano de obra necesaria para la citada reparación. El periodo de garantía se inicia en la fecha de compra del aparato, comprobada por el sello del vendedor sobre esté manual y por la factura de compra, y termina después del periodo prescrito aunque el aparato no se haya usado. La garantía se pierde cuando el aparato sea reparado en un centro de asistencia no autorizado o cuando el defecto sea causado por un uso inapropiado o causa de fuerza mayor. Marca / brand name :____________________________________________________________________________ Modelo / Model : ________________________________________________________________________________ nº de serie / serial nº : ____________________________________________________________________________ Firma y sello Distribuidor Dealer’s signature and stamp FECHA/DATE: ___/___/______ INSTALLATION AND USER’S MANUAL FOR HAIR DRYERS SIMEX – PPM7/PPM8 (ver 1.1 23/3/09) TECHNICAL FEATURES Total Power (W) 1400 Voltage (V~) 230 Frequency (Hz) 50 Class II 0 100 cm min. INSTALLATION MANUAL ¡ATENTTION! The installation must be done by qualified technician according with the legal European Standards. Before any electrical manipulation, cut the electrical current. Before the installation check if the selected installation place fulfils the security distances which appears at the CEI standards. (fig-0) If the plug cord is damaged, it must not be substituted, and the hair dryer must be throwing out. When the hair dryer is used in a bathroom, unplug after use because the proximity of water presents a risk, even when the hair dryer is switch off. The device must be installed considering that, when the movable part is fully extended, it is beyond the scope of a person which is taking a bath or a shower. As additional protection, we recommend the installation of a residual current device (differential switch) with a current default of operation not exceeding 30mA in the electrical circuit which supplies the bathroom. INSTALLATION: To install the hair dryer, remove the screw as shown in Figure 1. Separate the ring to the base (Figure 2). Mark the position of the holes using the base of the hair dryer and make it through a 6 mm drill. Insert thee dowels into the holes, place the base in right position and screw the screws supplied (Figure 3). Re-assemble the ring on the base (Figure 4) and screw on again the screw removed at the beginning of the installation (Figure 1). From that moment, the hair dryer can stay in the ring provided for that purpose and is ready for use. USER’S MANUAL USE: Place the light switch at the base (Figure 5) in position 'ON', a LED located on top of this switch becomes red. Remove the hair dryer of its ring and choose the desired temperature using the switch located on the front of the gun. You can choose between three positions: 'C' minimum flow and cold air,'1' minimum flow and hot air and '2' maximum flow rate and temperature (Fig.-6). To switch on the hair dryer, keep pressing the switch located on the rear of the gun. Releasing the button, the hair dryer stops automatically (Figure 7). The hair dryer base has two sockets, a European type 230V and an 110V American type. Both plugs are only suitable for shavers and could not be used simultaneously. In any case, these sockets are operatives when the switch shown in Figure 5 is in position ‘ON'. MAINTENANCE: The hair dryer doesn’t need any special maintenance. Take care and do not use aggressive products which could damage the plastic. In any case, to use a wet rag without any other product is recommended. If the hair dyer is damaged or has a problem, please call to an authorized technical assistance service to avoid danger situations. WARRANTY This device have 2 years of total guarantee against whatever manufacturing problem or damage, both damaged spare parts and labour cost will be included in this guarantee period. The validity of the guarantee starts from the purchasing date, certified by the seller’s stamp, and expires at the end of the indicated period, even when the device has not been used. The guarantee has no validity when damages are caused by a incorrect operation, bad installation or not according with the legal rules, or are caused by people unauthorised by the manufacturer. Brand name : __________________________________________________________________________________ Model : _______________________________________________________________________________________ Serial nº : _____________________________________________________________________________________ Dealer’s signature and stamp FECHA/DATE: ___/___/______