1
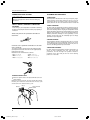
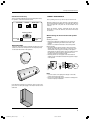
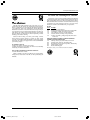
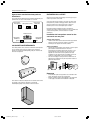
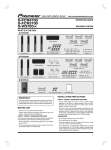
www.pioneerelectronics.com
OPERATING GUIDE
S-FCRW2700
SPEAKER SYSTEM
WHAT'S IN THE BOX
• Speaker cord
• The serial number for this equipment is located on the side of
.
Please write this serial number on the
the packing case.
warranty page and keep it in a secure area for future
reference.
BEFORE USE
Thank you for buying this Pioneer product.
Please read through this operating guide before using your
speaker system to optimize performance.
FRONT / CENTER / SURROUND SPEAKERS
In order to prevent damage to the speaker system resulting from
input overload, please observe the following precautions:
•
SUBWOOFER
• Operating guide
IMPORTANT:
•
• Brackets x 4
• Non-skid pads
• Screws x 4
•
•
• Surround speakers x 2
• Center speaker x 1
• Front speakers x 2
When connecting or disconnecting cables, be sure amplifier
power is OFF.
Do not use excessive amplifier volume if using a tone control
to emphasize high or low frequencies.
INSTALLATION PRECAUTIONS
FRONT / CENTER / SURROUND SPEAKERS
•
Do not install these units near a stove or other heating
appliance, or put them in a place exposed to the sun. Such
locations may cause the cabinet to change color and the
speaker system to break down.
•
The front, center and surround speakers supplied with
this system are magnetically shielded. However,
placing them extremely close to a television may result
in color distortion on the screen. If this happens, move
the speakers a little further away and switch off the
television for 15-30 minutes.
SUBWOOFER
•
•
•
Do not place anything on top of the cabinet.
Do not spill liquid on the cabinet.
Place the subwoofer at least 8 inches from any wall or curtain
in order to avoid heat build-up.
• The subwoofer is not magnetically shielded and so
should not be placed near a TV or monitor. Magnetic
storage media (such as floppy discs and tape or video
cassettes) should also not be kept close to the subwoofer.
CAUTION:
• Do not connect this speaker to any amplifier other
than the one supplied with this system. Connection to
any other amplifier may result in a malfunction or a
fire.
• Do not attach the subwoofer and center speaker to the wall
or ceiling. They may fall off and cause injury.
WARNING:
Handling the cord on this product or cords associated with
accessories sold with the product will expose you to
chemicals listed on proposition 65 known to the State of
California and other governmental entities to cause cancer
and birth defect or other reproductive harm.
Wash hands after handling
1
S-FCRW2700_SRD1317A.p65
1
06.1.25, 4:52 PM
www.pioneerelectronics.com
PLACEMENT AND FINE TUNING
CONNECTING YOUR SYSTEM
SUBWOOFER
IMPORTANT:
Make sure all equipment is turned off before making any
connections.
FRONT / CENTER / SURROUND / SUBWOOFER
SPEAKERS
Correct wiring of your loudspeakers is essential for achieving
the best sound quality. Be careful to ensure proper polarity of
connection.
Twist and pull off the protective shields on
each wire.
Sound spreads in all directions in the very low frequency range.
Human hearing cannot easily detect the source of very low
frequencies. Be sure to provide a space of at least 8 inches
(20cm) between the rear of the subwoofer and the nearest wall.
FRONT SPEAKERS
For best results the loudspeaker should be positioned near ear
level and the loudspeakers separated a distance approximately
equal to the listening distance. Angling the loudspeakers inward
towards the listener will improve the image stability for non-central
listeners. Close proximity to a side or rear wall will enhance the
midbass performance, although too close (particularly a corner
location) and the bass may be unnaturally high and image
performance may be degraded.
CENTER SPEAKER
Connect to the speaker terminals on the rear
of the receiver.
To connect, insert the colored wire into the matching positive
(colored) terminal and the other wire into the negative (black)
terminal as shown below.
Note that the color-coded tabs are as follows:
• Red : Front right (R)
• White : Front left (L)
• Green : Center speaker
• Purple : Subwoofer
• Grey : Surround right (R)
• Blue : Surround left (L)
The loudspeaker should be positioned below the TV. For best
results align the front of the loudspeaker with the front of the
TV. If the loudspeaker is placed under the TV and very close to
the floor, then tilting upwards may be beneficial.
SURROUND SPEAKERS
For best results the loudspeakers should be positioned at or
above ear level. Depending upon your room layout and
preferences, the left and right rear speakers should be
positioned on the side walls just the rear of the listening
position, or on the walls.
CENTER SPEAKER ONLY
Connect the speaker cords to the input terminals at the rear
of center speaker.
Match the colored wire with the color-coded label (above
the tabs), then insert the colored wire into the red (+) tab
and the other wire with the black (–) tab.
red (+)
black (–)
Green Colored
marker
2
S-FCRW2700_SRD1317A.p65
2
06.1.25, 4:52 PM
www.pioneerelectronics.com
Standard surround setup
CABINET MAINTENANCE
This is a standard multichannel surround soundspeaker setup
for optimal 5.1 channel home theater sound.
Use a polishing cloth or dry cloth to wipe off dust and dirt.
Center
Front left
Front right
Subwoofer
When the cabinet is very dirty, clean with a soft cloth dipped in
some neutral cleanser diluted five or six times with water, and
then wipe again with a dry cloth. Do not use furniture wax or
cleaners.
Never use thinners, benzine, insecticide sprays and other
chemicals on or near the cabinets, since these will corrode
the surfaces.
Listening position
Surround
left
Surround
right
NON-SKID PADS
If the front, center and surround speakers are placed on a hard
surface, such as wood or tile place four non-skid pads (small)
on the bottom flat surface of the speakers.
Wall-mounting the front and surround speaker
system
Attaching the brackets
• Make sure to tighten the supplied screw as securely as
possible when attaching the bracket to the back of the
speaker.
• Please do not attach the brackets to the center speaker.
Before mounting
• Remember that the speaker system is heavy and that its
weight could cause the wood screws to work loose, or the
wall material to fail to support it, resulting in the speaker
falling. Make sure that the wall on which you intend to mount
the speakers is strong enough to support them. Do not
mount on plywood or soft surface walls.
• Mounting screws are not supplied. Use screws that are
suitable for the wall material and that will support the weight
of the speaker.
Mounting screw
(not supplied)
5 mm
10 mm
Bracket screw
(supplied)
5 to 7 mm
Note
• If you are unsure of the quality and strength of the walls,
consult a professional for advice.
• Pioneer is not responsible for any accidents or damage that
result from improper installation.
If the subwoofer is placed on a hard floor, such as wood or tile,
place four non-skid pads (large) on the bottom surface of the
subwoofer.
3
S-FCRW2700_SRD1317A.p65
3
06.1.25, 4:52 PM
www.pioneerelectronics.com
TROUBLESHOOTING
SYMPTOM
PROBABLE CAUSE
REMEDY
1. No sound
• Bad speaker wire or connection
• Receiver is off
• Volume control is at zero
• Connect correctly or replace wire
• Turn on receiver
• Slowly turn up volume
2. Sound is distorted
• Extreme signal condition
• Turn down the amplifier’s output level
(volume, bass control, bass boost) to
lower the level.
SPECIFICATIONS
FRONT / SURROUND SPEAKERS
SUBWOOFER
Enclosure ........................................ Closed-box bookshelf type
(magnetically shielded)
System ....................................................... 7.7 cm 1-way system
Speakers ......................................................... 7.7 cm cone type
Nominal impedance ............................................................. 8 Ω
Frequency range ............................................. 85 Hz to 20 kHz
Dimensions ................ 105 mm (W) x 115 mm (H) x 114 mm (D)
4 1/8 in. (W) x 4 1/2 in. (H) x 4 1/2 in. (D)
Weight
FRONT SPEAKER ........................................ 0.6 kg/ 1 lb. 5 oz
SURROUND SPEAKER .............................. 0.66 kg/ 1 lb. 7 oz
Enclosure .................................................. Bass-reflex floor type
System ........................................................ 16 cm 1-way system
Speaker ............................................................. 16 cm cone type
Nominal impedance .............................................................. 8 Ω
Frequency range ................................................ 30 Hz to 2 kHz
Dimensions ................ 190 mm (W) x 360 mm (H) x 317 mm (D)
7 1/2 in. (W) x 14 3/16 in. (H) x 12 1/2 in. (D)
Weight ................................................................. 4.2 kg/ 9 lb. 4 oz
CENTER SPEAKER
Note: Specifications and design subject to possible modification
without notice due to improvements.
Enclosure ......................................... Closed-box bookshelf type
(magnetically shielded)
System ....................................................... 7.7 cm 1-way system
Speakers ......................................................... 7.7 cm cone type
Nominal impedance .............................................................. 8 Ω
Frequency range .............................................. 75 Hz to 20 kHz
Dimensions .................. 270 mm (W) x 90 mm (H) x 100 mm (D)
10 5/8 in. (W) x 3 9/16 in. (H) x 3 15/16 in. (D)
Weight ............................................................. 0.8 kg/ 1 lb. 12 oz
Published by Pioneer Corporation.
Copyright © 2006 Pioneer Corporation.
All rights reserved.
4
S-FCRW2700_SRD1317A.p65
4
06.1.25, 4:52 PM
www.pioneerelectronics.com
We Want You Listening For A Lifetime
Selecting fine audio equipment such as the unit you’ve just
purchased is only the start of your musical enjoyment. Now it’s
time to consider how you can maximize the fun and excitement
your equipment offers. This manufacturer and the Electronic
Industries Association’s Consumer Electronics Group want you
to get the most out of your equipment by playing it at a safe level.
One that lets the sound come through loud and clear without
annoying blaring or distortion-and, most importantly, without
affecting your sensitive hearing.
Sound can be deceiving. Over time your hearing “comfort
level” adapts to higher volumes of sound. So what sounds
“normal” can actually be loud and harmful to your hearing. Guard
against this by setting your equipment at a safe level BEFORE
your hearing adapts.
To establish a safe level:
Start your volume control at a low setting.
Slowly increase the sound until you can hear it comfortably
andclearly, and without distortion.
•
•
Used wisely, your new sound equipment will provide a lifetime
of fun and enjoyment. Since hearing damage from loud noise is
often undetectable until it is too late, this manufacturer and the
Electronic Industries Association’s Consumer Electronics Group
recommend you avoid prolonged exposure to excessive noise.
This list of sound levels is included for your protection.
Decibel
Level
30
40
50
60
70
80
Example
Quiet library, soft whispers
Living room, refrigerator, bedroom away from traffic
Light traffic, normal conversation, quiet office
Air conditioner at 20 feet, sewing machine
Vacuum cleaner, hair dryer, noisy restaurant
Average city traffic, garbage disposals, alarm clock
at two feet.
THE FOLLOWING NOISES CAN BE DANGEROUS
UNDER CONSTANT EXPOSURE
90
Subway, motorcycle, truck traffic, lawn mower
100
Garbage truck, chain saw, pneumatic drill
120
Rock band concert in front of speakers, thunderclap
140
Gunshot blast, jet plane
180
Rocket launching pad
Information courtesy of the Deafness Research Foundation.
Once you have established a comfortable sound level:
Set the dial and leave it there.
•
Taking a minute to do this now will help to prevent hearing
damage or loss in the future. After all, we want you listening for
a lifetime.
5
S-FCRW2700_SRD1317A.p65
5
06.1.25, 4:52 PM
MODE D’EMPLOI
S-FCRW2700
ENCEINTES ACOUSTIQUES
CONTENU DE L’EMBALLAGE
• Haut-parleurs avant x 2
• Cordon de haut-parleur
• Vis x 4
• Haut-parleurs d’ambiance x 2
• Haut-parleur central x 1
• Coussinets antidérapants
• Supports des enceintes x 4
CAISSON DE BASSE
• Mode d’emploi
IMPORTANT :
placés trop près d’un téléviseur, une distorsion des couleurs
peut se produire sur l’écran. Dans ce cas, écartez davantage
les haut-parleurs et mettez le téléviseur hors tension pendant
15 à 30 minutes.
• Le numéro de série de cet appareil est situé sur le côté du
carton d’emballage. Notez ce numéro sur la page de
garantie et conservez cette dernière dans un endroit sûr
pour le cas où vous en auriez besoin ultérieurement.
CAISSON DE BASSE
AVANT LA MISE EN SERVICE
•
•
Merci de votre achat de cet appareil Pioneer.
Veuillez lire attentivement ce mode d’emploi avant d’utiliser
ces enceintes acoustiques, afin d’en obtenir des
performances optimales.
HAUT-PARLEURS AVANT / CENTRAL / AMBIANCE
Pour éviter aux enceintes acoustiques des dégâts causés par une
surcharge à l’entrée, respectez les précautions suivantes :
• Avant de brancher ou de débrancher les câbles, assurezvous que l’amplificateur est hors tension (OFF).
• N’élevez pas excessivement le volume si vous utilisez une
commande des tonalités pour accentuer les hautes ou les
basses fréquences.
PRÉCAUTIONS À L’INSTALLATION
HAUT-PARLEURS AVANT / CENTRAL / AMBIANCE
•
•
N’installez pas ces appareils près d’un feu ou d’un appareil
de chauffage et ne les placez pas en plein soleil. De tels
endroits pourraient décolorer le coffret ou provoquer une
panne des haut-parleurs.
Les haut-parleurs avant, central et d’ambiance fournis avec ce
système sont blindés magnétiquement. Toutefois, s’ils sont
•
•
•
•
Ne posez rien sur le dessus du coffret.
Ne renversez aucun liquide sur le coffret.
Posez le caisson de basse à au-moins 20 cm de tout mur ou
rideau afin d’éviter un échauffement interne.
Comme le caisson de basse n’est pas blindé
magnétiquement, ne le placez pas à proximité d’un
téléviseur ou d’un moniteur. En plus, tout support
magnétique de données (tels que disquettes, bandes ou
cassettes vidéo) doit être placé loin du caisson de basses.
ATTENTION :
• Ne reliez pas cette enceinte à un amplificateur autre que
celui qui est fourni avec le système. Cela pourrait
provoquer un dysfonctionnement ou un incendie.
• Ne fixez ni le caisson de basses ni l’enceinte centrale au
mur ou au plafond. Ils risqueraient, en tombant, de blesser
quelqu’un.
6
S-FCRW2700_SRD1317A.p65
6
06.1.25, 4:52 PM
www.pioneerelectronics.com
BRANCHEMENT DU SYSTÈME
DISPOSITION ET RÉGLAGE PRÉCIS
CAISSON DE BASSE
IMPORTANT :
Assurez-vous que tous les appareils sont hors tension avant
de procéder aux branchements.
HAUT-PARLEURS AVANT / CENTRAL / AMBIANCE /
CAISSON DE BASSE
Un câblage correct des haut-parleurs est indispensable pour
obtenir une bonne qualité sonore. Veillez à respecter les
polarités lors des branchements.
Torsadez et enlevez la gaine protective de chaque cordon.
Branchez les cordons sur les bornes de haut-parleur à
l’arrière de l’ampli-tuner.
Pour installer le système, insérez le fil de couleur dans la borne
positive de couleur correspondante et l’autre fil dans la borne
négative noire de la façon indiquée ci-dessous.
Les couleurs suivantes ont été affectées aux différentes enceintes :
• Rouge : enceinte avant droite (R)
• Blanc : enceinte avant gauche (L)
• Vert : enceinte centrale
• Violet : caisson de basses
• Gris : enceinte surround droite (R)
• Bleu : enceinte surround gauche (L)
Le son de la plage des très basses fréquences se répand dans
toutes les directions. L’oreille humaine détecte difficilement la
source des très basses fréquences. Veillez à laisser un espace
d’au-moins 20 cm entre l’arrière du caisson de basse et le mur
le plus proche.
HAUT-PARLEURS AVANT
Pour optimiser l’écoute, ces haut-parleurs doivent être placés
près du niveau des oreilles et séparés à une distance presque
égale par rapport à la position d’écoute. Une orientation des
haut-parleurs vers l’intérieur et vers l’auditeur améliorera la
stabilité de l’image acoustique pour les auditeurs non placés au
centre. La trop grande proximité d’un mur latéral ou du mur
arrière renforce la performance des basses moyennes, tandis
que si vous êtes trop près d’un coin surtout, les basses
deviennent artificiellement hautes et l’image acoustique est
amoindrie.
HAUT-PARLEUR CENTRAL
Ce haut-parleur doit être positionné sous le téléviseur. Pour
optimiser les résultats, alignez l’avant du haut-parleur et celui
du téléviseur. Si ce haut-parleur est posé sous le téléviseur et
très près du plancher, il est préférable de l’incliner vers le haut.
HAUT-PARLEURS D’AMBIANCE
Pour obtenir d’excellents résultats, ces haut-parleurs doivent
être positionnés au niveau des oreilles ou au-dessus. En
fonction de l’agencement de la pièce et de vos préférences, les
haut-parleurs arrière gauche et droit seront positionnés sur les
murs latéraux juste derrière la position d’écoute ou sur les
parois.
HAUT-PARLEUR CENTRAL SEULEMENT
Raccordez les cordons de haut-parleur sur les bornes d’entrée
à l’arrière du haut-parleur central.
Faites correspondre le cordon coloré avec l’étiquette de même
couleur (au-dessus du taquet), puis insérez le cordon coloré
dans le taquet rouge (+) et l’autre cordon dans le taquet noir (–).
rouge (+)
noir (–)
Repère de couleur
verte
7
S-FCRW2700_SRD1317A.p65
7
06.1.25, 4:52 PM
www.pioneerelectronics.com
Agencement standard des haut-parleurs
d’ambiance
Voici l’agencement habituel des haut-parleurs multicanaux pour
optimiser les sons d’un “home theatre” à 5.1 canaux.
Haut-parleur
avant gauche
Haut-parleur central
Haut-parleur
avant droit
Servez-vous d’un chiffon de nettoyage ou d’un linge sec pour
enlever la poussière et la saleté.
Si le coffret est très sale, frottez-le au moyen d’un linge doux
trempé dans un produit de nettoyage neutre, dilué 5 à 6 fois
dans son volume l’eau, puis essuyez avec un linge sec.
N’utilisez pas de cire ou de décapant pour meubles.
N’employez jamais de diluant, benzène, insecticide en
atomiseur ou d’autres produits chimiques sur ou à proximité des
coffrets de haut-parleur, car leurs surfaces en seraient
détériorées.
Caisson de basse
Position d’écoute
Haut-parleur
d’ambiance
gauche
ENTRETIEN DU COFFRET
Haut-parleur
d’ambiance
droit
Installation du haut-parleur central et des
surrounds sur une paroi
Fixation des supports
•
•
Veillez à serrer la vis fournie aussi fermement que possible
lorsque vous fixez le support à l’arrière de l’enceinte.
Ne fixez pas les supports à l’enceinte centrale.
COUSSINETS ANTIDÉRAPANTS
Avant l’installation
Si les haut-parleurs avant, central ou d’ambiance sont disposés
sur une surface dure comme un parquet ou un pavement,
placez les 4 coussinets antidérapants (petits) sur la surface du
fond des haut-parleurs.
•
•
Sachez que les haut-parleurs sont pesants et que leur poids
peut entrainer le detachement des vis a bois ou
l'arrachement du materiau auxquels ils sont fixes, ce qui
provoquerait leur chute. Assurez-vous que la paroi sur
laquelle vous voulez fixer les haut-parleurs soit assez
resistante pour les supporter. Ne les installez pas sur une
surface en contreplaque ou sur une paroi friable.
Des vis de montage ne sont pas fournies. Utilisez des vis
appropriees au materiau de la paroi et pouvant resister au
poids des haut-parleurs.
Vis de montage
(non fournie)
5 mm
10 mm
Vis du support
(fournie)
5 à 7 mm
Remarque
•
•
Si vous hesitez quant aux proprietes et a la resistance des
parois, demandez conseil a un professionnel.
Pioneer n'assume aucune responsabilite en cas d'accident
ou de degats, decoulant d'une installation inadequate.
Si le caisson de basse est disposé sur une surface dure comme
un parquet ou un pavement, placez les 4 coussinets
antidérapants (petits) sur la surface du fond du caisson.
8
S-FCRW2700_SRD1317A.p65
8
06.1.25, 4:52 PM
www.pioneerelectronics.com
GUIDE DE DÉPANNAGE
SYMPTÔME
CAUSE PROBABLE
CORRECTION
1. Absence de son
• Fil de haut-parleur endommagé ou
connexion erronée.
• L’ampli-tuner est hors tension.
• La commande de volume est réglée sur
zéro.
• Connectez correctement ou remplacez le
fil.
• Mettez l’ampli-tuner sous tension.
• Élevez progressivement le volume
sonore.
2. Le son est distordu.
• L’état des signaux est excessif.
• Réduisez le niveau de sortie de
l’amplificateur (volume, commandes des
basses, renforcement des graves) à un
niveau approprié.
FICHE TECHNIQUE
HAUT-PARLEURS AVANT / D’AMBIANCE
CAISSON DE BASSE
Coffret .................................................. Type fermé, bibliothèque
(blindage magnétique)
Système ................................................................ 1 voie, 7,7 cm
Haut-parleur ............................................ Type à cône de 7,7 cm
Impédance nominale ............................................................. 8 Ω
Plage de fréquences ..................................... De 85 Hz à 20 kHz
Dimensions .................................. 105 x 115 x 114 mm (LxHxP)
Poids
HAUT-PARLEUR AVANT ................................................ 0,6 kg
HAUT-PARLEUR D’AMBIANCE ................................... 0,66 kg
Coffret ......................................... Type bass réflex, sur plancher
Système ................................................................. 1 voie, 16 cm
Haut-parleur ............................................. Type à cône de 16 cm
Impédance nominale ............................................................. 8 Ω
Plage de fréquences ....................................... De 30 Hz à 2 kHz
Dimensions .................................. 190 x 360 x 317 mm (LxHxP)
Poids ................................................................................. 4,2 kg
Remarque : Spécifications et design sous réserve de
changements sans préavis en raison d’améliorations
éventuelles.
HAUT-PARLEUR CENTRAL
Coffret .................................................. Type fermé, bibliothèque
(blindage magnétique)
Système ................................................................ 1 voie, 7,7 cm
Haut-parleur ............................................ Type à cône de 7,7 cm
Impédance nominale ............................................................. 8 Ω
Plage de fréquences ..................................... De 75 Hz à 20 kHz
Dimensions .................................... 270 x 90 x 100 mm (LxHxP)
Poids ................................................................................. 0,8 kg
Publication de Pioneer Corporation.
© 2006 Pioneer Corporation.
Tous droits de reproduction et de traduction reserves.
9
S-FCRW2700_SRD1317A.p65
9
06.1.25, 4:52 PM
www.pioneerelectronics.com
LIMITED WARRANTY
PIONEER ELECTRONICS (USA) INC.
PIONEER ELECTRONICS OF CANADA, INC.
WARRANTY PERIOD
For the period specified below from date of original retail purchase (the warranty period) from an authorized Pioneer dealer, Pioneer
Electronics (USA) Inc. (PUSA), and Pioneer Electronics of Canada, Inc. (POC) warrants that products distributed by PUSA in the
U.S.A., and by POC in Canada that fail to function properly under normal use due to a manufacturing defect when installed and
operated according to the operating instructions enclosed with the unit will be repaired or replaced with a unit of comparable value,
at the option of PUSA or POC, without charge to you for parts or actual repair work. Parts supplied under this warranty may be new
or rebuilt at the option of PUSA or POC.
WARRANTY PERIOD
PRODUCT
PARTS
LABOR
Loudspeakers / Subwoofers (amplifier section not included) ......................................................... 1 YEAR
1 YEAR
1 YEAR
Amplifier Section (if applicable) .......................................................................................................... 1 YEAR
This warranty covers the product during the warranty period whether in the possession of the original owner or any subsequent
owner. In the event service is required, the product must be delivered within the warranty period, transportation prepaid, fro m within
the Country of purchase as explained in this document. You will be responsible for removal and installation of the product.
WHAT'S NOT COVERED
This warranty does not cover any product which is used in any trade or business, or in an industrial or commercial application.
This warranty does not apply to any speaker that has been subjected to power in excess of its published power rating.
This warranty does not cover the cabinet or any appearance item, any damage to the product resulting from alterations or
modifications not authorized in writing by PUSA or POC, accident, misuse or abuse, or damage due to lightning or to power surges.
This warranty does not cover the cost of parts or labor which would be otherwise provided without charge under this warranty
obtained from any source other than a PUSA OR POC Authorized Service Company or other designated location. This warranty
does not cover defects or damage caused by the use of unauthorized parts or labor, or from improper maintenance.
ALTERED, DEFACED OR REMOVED SERIAL NUMBERS VOID THIS WARRANTY.
YOUR RIGHTS
PUSA and POC excludes any obligation on its part for incidental or consequential damages related to the failure of products to
function properly under the conditions set forth above.
IN THE U.S.A. - PUSA LIMITS ITS OBLIGATIONS UNDER ANY IMPLIED WARRANTIES INCLUDING, BUT NOT LIMITED TO, THE
IMPLIED WARRANTIES OF MERCHANTABILITY AND FITNESS FOR A PARTICULAR PURPOSE, TO A PERIOD NOT TO EXCEED
THE WARRANTY PERIOD. NO WARRANTIES SHALL APPLY AFTER THE WARRANTY PERIOD. SOME STATES DO NOT ALLOW
LIMITATIONS ON HOW LONG AN IMPLIED WARRANTY LASTS, AND SOME STATES DO NOT ALLOW THE EXCLUSION OR
LIMITATION OF INCIDENTAL OR CONSEQUENTIAL DAMAGES, SO THE ABOVE LIMITATIONS OR EXCLUSIONS MAY NOT
APPLY TO YOU. THIS WARRANTY GIVES YOU SPECIFIC LEGAL RIGHTS, AND YOU MAY HAVE OTHER RIGHTS WHICH MAY
VARY FROM STATE TO STATE.
IN CANADA - EXCEPT AS EXPRESSLY PROVIDED HEREIN, THERE ARE NO REPRESENTATIONS, WARRANTIES, OBLIGATIONS OR CONDITIONS, IMPLIED, STATUTORY OR OTHERWISE, APPLICABLE TO THIS PRODUCT.
TO OBTAIN SERVICE
PUSA and POC have appointed a number of Authorized Service Companies throughout the U.S.A., and Canada should your
product ever require service. To receive warranty service you will need to present your sales receipt or, if rented, your rental contract
showing place and date of original owner's transaction. Should it become necessary to ship your unit, you will need to package the
product carefully and send it, transportation prepaid by a traceable, pre-insured method, to an Authorized Service Company.
Carefully package the product using adequate padding material to prevent damage in transit. The original container is ideal for this
purpose. Include in the package your name, address, telephone number where you can be reached during business hours, a copy
of your sales receipt and a detailed description of the problem. PUSA or POC, as appropriate, will pay for the cost of returning the
repaired or replacement product to you within the Country of purchase.
For additional information about this limited warranty or to locate the nearest PUSA or POC Authorized Service Company, please
contact:
IN THE U.S.A.
CUSTOMER SERVICE DEPARTMENT
PIONEER ELECTRONICS (USA) INC.
P.O. BOX 1760
LONG BEACH, CA 90801 USA
Phone: 1-800-421-1404
IN CANADA
CUSTOMER SERVICE DEPARTMENT
PIONEER ELECTRONICS OF CANADA, INC.
300 ALLSTATE PARKWAY
MARKHAM, ON L3R OP2
Phone: 905-479-4411, 1-877-283-5901
DO NOT RETURN ANY PRODUCT TO THE ABOVE ADDRESSES. THEY ARE NOT SERVICE LOCATIONS.
RECORD THE PLACE AND DATE OF PURCHASE FOR FUTURE REFERENCE
Model No.: _____________________ Serial No.: _______________________
Purchase Date: ___________ Purchased From:
________________________
KEEP THIS INFORMATION AND YOUR SALES RECEIPT IN A SAFE PLACE
PIONEER CORPORATION
4-1, Meguro 1-Chome, Meguro-ku, Tokyo 153-8654. Japan
PIONEER ELECTRONICS (USA) INC.
P.O. BOX 1540, Long Beach, California 90801-1540
PIONEER ELECTRONICS OF CANADA, INC. 300 Allstate Parkway Markham, Ontario L3R OP2, Canada
PIONEER ELECTRONIC (EUROPE) N.V. Haven 1087 Keetberglaan 1,9120 Melsele, Belgium, TEL: 03/570.05.11
PIONEER ELECTRONICS AUSTRALIA PTY. LTD. 178-184 Boundary Road, Braeside, Victoria 3195, Australia, TEL: [03] 9586-6300
PIONEER ELECTRONICS DE MEXICO S.A. DE C.V. Blvd. Manuel Avila Camacho 138, 10 piso, Col. Lomas De Chapultepec, Mexico D.F. 11000, TEL: 52-55-9178-4270
Printed in China / Imprimé en Chine <SRD1317-A>
Published by Pioneer Corporation.
Copyright © 2006 Pioneer Corporation.
All rights reserved.
S-FCRW2700_SRD1317A.p65
12
06.1.25, 4:52 PM