1
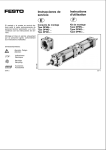
ImmuBlot™
Anti-P0 Antibody
Western Blot
Product Code: 1192
18 Determinations
INTENDED USE
A Western Blot immunoassay for use in the detection and identification of antibodies to P0,
a 30kD antigen associated with autoimmune hearing loss.
SUMMARY AND EXPLANATION
Hearing loss may be caused by a number of conditions. Certain types of hearing loss can be
reversed if diagnosed early and appropriate treatment is instituted. Sensorineural hearing
loss (SNHL), commonly referred to as nerve deafness, may be caused by genetic or
acquired factors such as infections or can be immunologically mediated. Correct diagnosis
of SNHL can be made with the aid of a combination of comprehensive patient history and
laboratory studies. In the majority of cases, no cause of SNHL is apparent: such cases are
referred to as idiopathic SNHL. Subgroups of idiopathic SNHL cases are treatable with
immunosuppressive therapy with gratifying results1, 2. The laboratory work up to identify
these cases may include serum antibody tests to 68 KD (hsp-70) inner ear antigen3-8 and
other auto antigens such as to P0, a 30 KD antigen7-9. Approximately 60% of patients with
progressive SNHL have antibodies to P0. A strong positive correlation between chronic
progressive hearing loss and the presence of anti-P0 antibodies was observed. In addition
patients with positive P0 antibodies had bilateral hearing loss.
PRINCIPLE OF PROCEDURE
This Western Blot immunoassay uses purified P0 antigen from the bovine or primate tissue.
To perform the test, PVDFstrips are incubated with diluted patient serum. Antibodies specifically bind to the P0 protein on the strip. After proper washing and incubation steps with the
Conjugate, strips are washed and incubated with a precipitable substrate. Anti-P0 antibody
positive reactions appear as a blue-violet band at 30kD, sometime this reaction is seen as a
doublet.
REAGENTS
Storage and Preparation
Store all reagents at 2-8°C. Do not freeze. Do not use if liquid reagents are turbid or a
precipitate is present. Prior to starting the assay, reagents must be equilibrated to room
temperature (~22°). Antigen strips can only be used once. Do not interchange components
of different lots. Do not use reagents beyond expiration date indicated on labels.
Precautions
All human derived components used have been tested for HBsAg, HCV, HIV-1 and 2 and
HTLV-I and found negative by US FDA required tests. However, all human blood derivatives
and patient specimens should be considered potentially infectious and good laboratory
1
practices in storing; dispensing and disposing of these materials must be followed10.
WARNING - Sodium azide (NaN ) may react with lead and copper plumbing to form highly
3
explosive metal azides. Upon disposal of liquids, flush with large volumes of water to
prevent azide buildup. NaN is toxic if ingested. Report incidents immediately to laboratory
3
director or poison control center.
Follow good laboratory practices to minimize microbial and cross contamination of reagents.
Materials provided
ImmuBlot™
Anti-P0 Antibody
1192
ImmuBlot™
The
anti-P0 (30kD) antibody Western Blot kit*, contains sufficient reagents to
perform 18 determinations.
1 x 18
1 x 120 µl
1 x 120 µl
1
1 x 240 µl
1 x 60 ml
1 x 25 ml
1 vial
Western Blot Strips, with P0 antigen.
*Positive Control (red vial cap)
*Negative Control (yellow vial cap).
Control Card
*Conjugate (blue vial cap)
*Serum Diluent
*Enzyme Substrate (amber bottle)
Powdered Wash Buffer; reconstitute to one liter with deionized or distilled
water.
3
Assay trays
*Contains <0.1% NaN
Materials Required But Not Provided
•
Clean 1000 ml graduated cylinder
•
Non-serrated forceps (Filter forceps)
•
Rocker or rotating platform shaker
•
Absorbent paper or paper towels
•
Deionized or distilled water
•
Squeeze bottle to hold diluted wash buffer
•
Pipettes capable of delivering 10 to 1000 µl
•
Disposable pipette tips
•
Timer
SPECIMEN COLLECTION AND HANDLING
Only serum specimens should be used in this procedure. Grossly hemolyzed, lipemic or
microbial contaminated specimens may interfere with the performance of the test and
should not be used. Store specimens at 2-8°C for no longer than one week. For longer
storage, serum specimens should be frozen. Avoid repeated freezing and thawing of
samples.
2
PROCEDURE
Procedural Notes
• Read Product Insert carefully before starting with the assay.
• Let serum specimens and test reagents equilibrate to room temperature for ~30 minutes
prior to starting the test procedure. Return all unused specimens and reagents to the
refrigerator promptly after use.
• Proper washing technique is critical to the satisfactory performance of the assay.
• Manipulate test strips with clean forceps only. Do not touch with bare hands.
• Strips are individually numbered at the top of each strip. Assign specimen identification
numbers to the respective strips on the Report Form.
• Complete all other relevant information on the Report Form prior to starting the assay.
Test Method
Step 1 Using blunt forceps, place required number of Strips labeled side up into individual wells of the assay tray.
Step 2 Pipette 1.0 ml of Serum Diluent into each well.
Step 3 Pipette 20 µl of Positive and Negative Control and patient sample into appropriate
wells to obtain a 1:51 dilution. Incubate 90 minutes (±5 min.) at room temperature on a rocker or rotating shaker.
Step 4 Aspirate sample solution into waste container. Thoroughly wash strips with Wash
Buffer by squirting approximately 2ml of solution directly onto strips. Wash strips
with gentle agitation for 5 minutes and aspirate solution into waste container.
Repeat 2x. Caution: Complete washing of the strips between incubations is
crucial to obtain valid results. Improper washing will result in high background
staining.
Step 5 Pipette 1.0 ml of Serum Diluent followed by 10 µl of Conjugate into each well.
Incubate 1 hour (±5 min) at room temperature on rocker or rotating shaker.
Step 6 Repeat Step 4.
Step 7 Pipette 1.0 ml Substrate into each well and incubate with gentle shaking 5 minutes (±5 min) at room temperature and reduced light.
Step 8 Aspirate liquid in wells into waste container. Thoroughly wash strips with deionized water by squirting approximately 2ml of solution directly onto strips. Wash
strips with gentle agitation for 5 minutes aspirate liquid into waste container.
Repeat.
Step 9 Using blunt forceps, remove strips from assay tray and place them gently onto
absorbent paper. Handle strips only at the ends and let them dry 15-20 minutes.
Quality Control
Though the control cards are lot specific, negative and positive controls must be included in
each test run to ensure proper performance of
the assay.
Positive Control Reaction: The positive control
strip will exhibit a dense blue-violet band at 30kD,
sometimes a doublet (Figure 1).
Negative Control Reaction: Typically, the negative control will exhibit no band. Sometimes
some sera may give reactions on the strip but
not at 30kD.
3
MW marker
30 kD (anti-P0)
Figure 1:
Diagram of PO
Positive Reaction
RESULTS
Reading and Interpretation Guidelines
Step 1 Hold test strip between the positive and negative control reactions on the provided,
laminated Control Card and align test strip using the alignment marker as the reference point.
Step 2 Compare reaction of test strip with those of the controls on either side. Use of a
magnifying glass can facilitate proper alignment of test strips along the molecular
weight marker and assist in observation of weak reactions.
Step 3 Check for a band on the test strip that aligns with the 30kD band on the positive
control strip. Such a reaction should be considered positive. Positive reactions can
occur in varying intensities from weak to strong. Weak reactions should be
compared with baseline reaction intensities at the corresponding position on the negative control strip. Reactions that are distinctly darker or denser
than the baseline intensity should be considered positive. Occasionally, minor bands
may be visible with certain sera. However, such reactions are not relevant and
should be considered as negative for antibodies to P0 (30kD) antigen.
Note:
Automated Western blot machines can occasionally show extra bands that may
not be related to the 30kD band. Ensure the washing cycle is thorough. Repeat
process manually for clarity.
Antibodies to P0 (30kD) antigen occur in patients with autoimmune hearing loss.
Anti-P0 (30kD) Antibodies in Patients with SNHL8
Disease Group
No. Tested
No. Positive
% Positive
Sudden
Progressive
Unspecified
Normal
9
20
5
90
1
14
2
1
11
60
40
1
LIMITATIONS OF THE PROCEDURE
The Immublot™ anti-P0 (30kD) antibody Western Blot assay should be used as an aid to the
diagnosis of autoimmune hearing loss. Positive results may be found in other autoimmune
conditions such as in peripheral neuropathy. Hence results should be evaluated and interpreted by a medical authority in light of the patient’s clinical history and other laboratory
findings. Some sera may react to antigens of other molecular sizes. These are not of any
clinical relevance.
4
TROUBLESHOOTING GUIDE
•
•
•
•
Strong band at 30kD on Negative Control strip. Likely cause: contaminated Negative Control vial or cross contamination from well containing a positive serum.
Positive Control appears like Negative Control strip. Likely cause: Negative
Control vial was confused as Positive Control vial.
Strips are completely blank. Likely cause: addition of Conjugate or Substrate was
omitted.
High background and poor contrast between bands and background.
Likely cause: wash step (s) may have been omitted or incorrectly performed, or
incubations were overextended.
REFERENCES
1. McCabe BF, Autoimmune sensorinerual hearing loss. Ann Otol. 1979; 88:5852-589.
2. Arnold W, Pfaltz R, Alternalt HJ. Evidence of serum antibodies against inner ear tissues
in the blood of patients with certain sensorineural hearing disorders. Acta Otolaryngol
(Stockh). 1985; 99:437-444.
3. Harris JP, Sharp PA. Inner ear autoantibodies in patients with rapidly progressive
sensorinerual hearing loss. Laryngoscope. 1990; 100:516-524.
4. Yamanobe S, Harris JP. Inner ear-specific autoantibodies. Laryngoscope. 1993; 103:319325.
5. Shin S, Billings P, Keithley EM, Harris JP. Comparison of anti-heat shock protein 70 (antishp-70) and anti-68-kD inner ear protein in the sera of patients with meniere’s disease.
Laryngoscope. 1997; 107:222-227.
6. Harris JP and Aframian D. Role of autoimmunity in contralateral delayed endolymphatic
hydrops. Am J Otol. 1994; 15:710-716.
7. Yoo TJ, Du X, Kwon SS. Molecular mechanism of autoimmune hearing loss. Acta
Otolaryngol Suppl. 2002;548:3-9. Review.
8. Tomasi JP, Lona A, Deggouj N, Gersdorff M. Autoimmune sensorineural hearing loss
in young patients: an exploratory study. Laryngoscope. 2001;11:2050-3.
9. Boulassel MR, Deggouj N, Tomasi JP, Gersdorff M. Inner ear autoantibodies and their
targets in patients with autoimmune inner ear diseases. Acta Otolaryngol.
2001;121:28-34.
10. Biosafety in Microbiological and Biomedical Laboratories. Centers for Disease Control,
National Institutes of Health, 1993 [HHS Pub. No. (CDC) 93-8395].
5
ImmuBlot™
Anti-P0 Antibody
Western Blot
Code: 1192
18 déterminations
UTILISATION PRÉVUE
Une analyse de Western Blot pour la détection et l’identification des anticorps à l’antigène
de P0, une 30kD antigène s’est associée à la perte d’audition neuro-sensorielle (SNHL).
SOMMAIRE ET EXPLICATION
La perte d’audition peut être provoquée par un certain nombre de conditions. Certains
types de perte d’audition peuvent être renversés si le traitement tôt et approprié diagnostiqué
est institué. La perte d’audition neuro-sensorielle (SNHL), généralement désignée sous le
nom de la surdité de nerf, peut être provoquée par des facteurs génétiques ou acquis tels
que des infections ou peut être immunologiquement négociée. Le diagnostic correct de
SNHL peut être fait à l’aide d’une combinaison des études patientes complètes d’histoire et
de laboratoire. Dans la majorité de cas, aucune cause de SNHL n’est évidente : de tels cas
désigné sous le nom de SNHL idiopathique. Un sous-groupe de cas idiopathiques de SNHL
sont traitable avec la thérapie immunosuppressive avec les résultats agréables 1,2. Le
travail de laboratoire identifient jusqu’à ces caisses peut inclure des essais d’anticorps de
sérum à la 68 kD antigène (hsp-70) 3-8 et à d’autres autoantigènes comme à P0, une 30 kD
antigene 7-9. Approximativement 60% de patients avec SNHL progressif ont des anticorps
à P0. On a observé une corrélation positive forte entre la perte d’audition progressive
chronique et la présence des anticorps anti-P0. En outre les patients avec des anticorps
P0 positifs ont eu la perte d’audition bilatérale.
PRINCIPE DE PROCÉDÉ
Cette analyse de Western Blot emploie l’antigène P0 purifié du tissu de bovin ou de primat.
Pour réaliser l’essai, des bandelettes de PVDF sont incubées avec le sérum patient dilué.
Les anticorps lient spécifiquement à la protéine P0 sur la bandelette. Après des étapes
appropriées de lavage et d’incubation avec le conjugué, des bandelettes sont lavées et
incubées avec un substrat. Les réactions positives apparaissent car une marque bleuviolette à sa réaction de 30kD.
La réaction peut apparaître comme doublet.
RÉACTIFS
Stockage et Preparation
Stockez tous les réactifs à 2-8° C. Ne gelez pas. N’employez pas, si les réactifs liquides
sont troubles ou un précipité est présent. Avant de commencer l’analyse, des réactifs
doivent être équilibrés à la température ambiante (~22°). Des bandes d’antigène peuvent
seulement être employées une fois. N’échangez pas les composants de différents sorts.
N’employez pas les réactifs au delà de la date d’échéance indiquée sur des étiquettes.
Précautions
Tous les composants dérivés humains utilisés ont été examinés pour HBsAg, HCV, Hiv-1
et 2 et Htlv-I et négatif trouvé par les essais exigés par FDA des USA. Cependant, tous les
dérivés humains de sang et spécimens patients devraient être considérés potentiellement
6
infectieux et de bonnes pratiques en matière de laboratoire en stockant, en distribuant et
en ayant ces matériaux doivent être suivies 10.
Attention - l’azoture de sodium (NaN3) peut réagir avec le fil et la tuyauterie de cuivre aux
azotures fortement explosifs en métal de forme. Sur la disposition des liquides, éclat avec
de grands volumes de l’eau pour empêcher l’habillage d’azoture. NaN 3 est toxique s’ingéré.
Rapportez les incidents immédiatement au centre de commande de directeur ou de poison
de laboratoire.
Suivez les bonnes pratiques en matière de laboratoire de réduire au minimum la contamination microbienne et en travers des réactifs.
Matériaux fournis Code : 1192
Le kit contient les réactifs suffisants pour effectuer 18 déterminations.
1 x 18
bandelettes Western Blot
1 x 120 µl
*contrôle positif, prêt à l’emploi
1 x 120 µl
*contrôle négatif, prêt à l’emploi
1
carte de contrôe
1 x 240 µl
*conjugué
1 x 60 ml
*diluant pour échantillons
1 x 25 ml
*substrat enzymatique
1
tampon de lavage pour 1 litre/flacon
3
bains d’analyse
* Contient < 0.1% NaN 3
Matériaux Requis Mais Non fournis
•
Nettoyez le cylindre reçu un diplôme 1000 par ml
•
forceps non-dentelé
•
Culbuteur ou dispositif trembleur tournant de plateforme
•
Papier absorbant ou serviettes de papier
•
Désionisé ou eau distillée
•
Bouteille de compression à l’amortisseur de lavage dilué par prise
•
Pipettes capables de fournir 10 à 1000 µl
•
Jetable introduisez à la pipette les bouts
•
Temporisateur
COLLECTION ET MANIPULATION DE SPÉCIMEN
Seulement des spécimens de sérum devraient être employés dans ce procédé. Hémolysés
excessivement, les spécimens lipémiques ou par microbes souillés peuvent interférer
l’exécution de l’essai et ne devraient pas être employés. Stockez les spécimens à 2-8° C
pour plus qu’une semaine. Pour un entreposage plus prolongé, des spécimens de sérum
devraient être gelés. Évitez la congélation et le dégel répétés des échantillons.
Méthode
Notes Procédurales
•
Lisez les instructions soigneusement avant commençant par l’analyse.
•
Laissez les spécimens de sérum et les réactifs d’essai équilibrer à la température
ambiante pendant les minutes ~30 avant de commencer la méthode d’essai. Renvoyez
tous les spécimens et réactifs inutilisés au après utilisation de réfrigérateur
promptement.
•
La technique de lavage appropriée est critique à l’exécution satisfaisante de l’analyse.
•
Manoeuvrez les bandes d’essai avec les forceps propres seulement. Ne touchez
pas avec les mains nues.
•
Des bandes sont individuellement numérotées au dessus de chaque bande. Assignez
les numéros d’identification de spécimen aux bandes respectives sur le rapport.
•
Remplissez toute autre information appropriée sur le rapport avant de commencer
l’analyse.
7
Examinez La Méthode
1.
En utilisant le forceps émoussé, placez le nombre requis de côté marqué par les
bandelettes Western Blot vers le haut dans différents puits du plateau d’analyse.
2.
Introduisez à la pipette 1.0 ml du diluant pour échantillons dans chacun bien.
3.
Introduisez à la pipette 20 µl du contrôles positif et negatif et échantillon patient
dans les puits appropriés pour obtenir une dilution de 1:51. Incubez 90 minutes (±
5 minutes.) à la température ambiante sur un culbuteur ou un dispositif trembleur
tournant.
4.
Aspirez la solution témoin dans le bac à vidange. Lavez complètement les bandes
avec le tampon de lavage en injectant approximativement 2ml de solution directement
sur des bandes. Lavez les bandes avec l’agitation douce pendant 5 minutes et
aspirez la solution dans le bac à vidange. Répétez 2x. Attention : Le lavage
complet des bandes entre les incubations est crucial d’obtenir des résultats
valides. Le lavage inexact aura comme conséquence le fond élevé souillant.
5.
Introduisez à la pipette 1.0 ml diluant pour échantillons suivi 10 µl de Conjugué
dans chacun bien. Incubez 60 minutes (± 5 minutes) à la température ambiante sur
le culbuteur ou le dispositif trembleur tournant.
6.
Répétez L’Étape 4.
7.
Introduisez à la pipette 1.0 ml substrat dans chacun puits et incubez avec doux en
secouant 5 minutes (± 5 minutes) à la température ambiante et à la lumière réduite.
8.
Aspirez le liquide dans les puits dans le bac à vidange. Lavez complètement les
bandes avec de l’eau désionisé en injectant approximativement 2ml de solution
directement sur des bandes. Les bandes de lavage avec l’agitation douce pendant
5 minutes aspirent le liquide dans le bac à vidange. Répétez.
9.
En utilisant le forceps émoussé, enlevez les bandes du plateau d’analyse et placezles doucement sur le papier absorbant. Manipulez les bandes seulement aux
extrémités et laissez-les sécher 15-20 minutes.
Contrôle de qualité
Bien que les cartes de commande soient détail
de sort, des commandes négatives et positives doivent être incluses dans chaque essai
pour assurer l’exécution appropriée de
l’analyse.
Réaction de contrôle positive: La bande positive montrera une bande bleu-violette dense
à 30kD. Ceci peut être un doublet (le schéma
1).
Réaction de contrôle négative: Typiquement,
la contrôle négative ne montrera aucune
bande. Les sérums peuvent donner des
réactions sur la bande mais pas à 30kD.
Le schéma 1: Diagramme de la
réaction positive de PO
MW Marker – Marqueur de Poids Moléculaire
INTERPRÉTATION DES RÉSULTATS
1.
Tenez la bande d’essai entre les réactions de contrôles positives et négatives sur
la carte de contrôle fourni et et alignez la bande d’essai en utilisant le marqueur
d’alignement comme point de référence.
2.
Comparez la réaction de la bande d’essai à ceux des commandes de chaque côté.
L’utilisation d’une loupe peut faciliter l’alignement approprié des bandes d’essai le
long du marqueur de poids moléculaire et aider à l’observation des réactions
faibles.
3.
Vérifiez une bande croquante sur la bande d’essai qui aligne avec la bande positive de contrôle. Une telle réaction devrait être considérée positive. Les réactions
positives peuvent se produire dans des intensités variables de faible à fort. Des
8
réactions faibles devraient être comparées aux intensités de réaction de ligne de
base à la position correspondante sur la bande négative de contrôle. Des réactions
qui sont distinctement plus foncées ou plus denses que l’intensité de ligne de base
à 30kD devraient être considérées positives. De temps en temps, le poids moléculaire
inférieur mineur bandes peut soit évident avec certains sérums. Cependant, de
telles réactions ne sont pas appropriées et devraient être considérées en tant que
négatif pour des anticorps à l’antigène P0 (30kD).
Note : Les machines automatisées de tache de Western peuvent montrer les bandes
supplémentaires qui ne peuvent être liées à la bande 30kD. Assurez le cycle de
lavage est complet. Répétez le processus manuellement pour la clarté.
Les anticorps à l’antigène P0 (30kD) se produisent dans les patients présentant la
perte d’audition autoimmune.
Anticorps anti-P0 (30kD) dans les patients avec SNHL
Groupe
Soudain
Progressif
Non spécifié
Normale
Numéro Examiné Numéro Positif
9
20
5
90
1
14
2
1
8
% Positif
11
60
40
1
LIMITATIONS DU PROCÉDÉ
Le P0 Western Blot (30kD) kit devrait être employée comme aide au diagnostic. Des
résultats positifs peuvent être trouvés en d’autres conditions autoimmunes ou certaines
maladies infectieuses. Par conséquent des résultats devraient être évalués et interprétés
par une autorité médicale à la lumière de l’histoire clinique du patient et d’autres résultats
de laboratoire. Quelques sérums peuvent réagir au marqueur de MW de temps en temps,
dont la signification n’est pas connue.
GUIDE DE DÉPANNAGE
•
Bande forte à 30kD sur la bande de Contrôle Negative. Cause probable : fiole souillée
de Contrôle Negative, ou contamination en travers à partir du puits contenant un
sérum positif.
•
Contrôle Positif apparaît comme la bande de Contrôle Negative. Cause probable : La
fiole Contrôle Négative a été confondue comme fiole de Contrôle Positif.
•
Les bandes sont complètement blanches. Cause probable : addition de Conjugué ou
Substrat ont été omis.
•
Contraste de fond élevé et de pauvres entre les bandes et le fond. Cause probable :
L’Étape de lavage a pu avoir été omis ou inexactement exécuté, ou des incubations ont
été étendues.
9
REFERENCES • REFERENCIAS • LITERATUR • RIFERIMENTI
1. McCabe BF, Autoimmune sensorinerual hearing loss. Ann Otol. 1979; 88:5852589.
2. Arnold W, Pfaltz R, Alternalt HJ. Evidence of serum antibodies against inner
ear tissues in the blood of patients with certain sensorineural hearing
disorders. Acta Otolaryngol (Stockh). 1985; 99:437-444.
3. Harris JP, Sharp PA. Inner ear autoantibodies in patients with rapidly progressive sensorinerual hearing loss. Laryngoscope. 1990; 100:516-524.
4. Yamanobe S, Harris JP. Inner ear-specific autoantibodies. Laryngoscope.
1993; 103:319-325.
5. Shin S, Billings P, Keithley EM, Harris JP. Comparison of anti-heat shock
protein 70 (anti-shp-70) and anti-68-kD inner ear protein in the sera of patients with meniere’s disease. Laryngoscope. 1997; 107:222-227.
6. Harris JP and Aframian D. Role of autoimmunity in contralateral delayed
endolymphatic hydrops. Am J Otol. 1994; 15:710-716.
7. Yoo TJ, Du X, Kwon SS. Molecular mechanism of autoimmune hearing
loss. Acta Otolaryngol Suppl. 2002;548:3-9. Review.
8. Tomasi JP, Lona A, Deggouj N, Gersdorff M. Autoimmune sensorineural
hearing loss in young patients: an exploratory study. Laryngoscope.
2001;11:2050-3.
9. Boulassel MR, Deggouj N, Tomasi JP, Gersdorff M. Inner ear autoantibodies and their targets in patients with autoimmune inner ear diseases.
Acta Otolaryngol. 2001;121:28-34.
10. Biosafety in Microbiological and Biomedical Laboratories. Centers for Disease Control, National Institutes of Health, 1993 [HHS Pub. No. (CDC) 938395].
10
11
For technical assistance please contact:
IMMCO Diagnostics, Inc.
60 Pineview Drive
Buffalo, NY 14228-2120
Telephone: (716) 691-0091
Fax:
(716) 691-0466
Toll Free USA/Canada: 1-800-537-TEST
E-Mail: [email protected]
or your local product distributor
EU Authorized Representative/Autorisierter Repräsentant/Rappresentante
Autorrizzato/Representante Autorizado/Représentant Autorisé
EMERGO Group, Inc.
Molenstraat 15, 2513 BH, The Hague,
The Netherlands
Tel (+31) 345 8570, Fax (+31) 346 7299
www.emergogroup.com Document No. PI4192 CE EF
REV.NOV2004
12