1
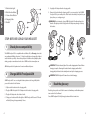
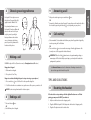
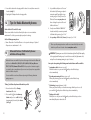
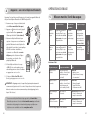
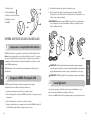
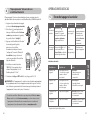
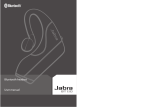
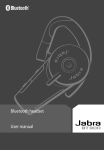
F
BLU
OR
ETOOTH MOBILE PH
ON
JABRA FreeSpeak 250
USER MANUAL
ES
English
1.
Check phone compatibility . . . . . . . . . . . . . . . . . . . . . . . . . . . . . . . . . . . . . . . . . . . 4
2.
Charge JABRA® FreeSpeak™ 250 . . . . . . . . . . . . . . . . . . . . . . . . . . . . . . . . . . . . . . . . 4
3.
Read the glossary . . . . . . . . . . . . . . . . . . . . . . . . . . . . . . . . . . . . . . . . . . . . . . . . . . . . 5
4.
“Pair” to your Bluetooth™ phone . . . . . . . . . . . . . . . . . . . . . . . . . . . . . . . . . . . . . . . 6
5.
Turning headset on/off . . . . . . . . . . . . . . . . . . . . . . . . . . . . . . . . . . . . . . . . . . . . . . . 7
6.
Choosing wearing preference . . . . . . . . . . . . . . . . . . . . . . . . . . . . . . . . . . . . . . . . . 8
7.
Making a call . . . . . . . . . . . . . . . . . . . . . . . . . . . . . . . . . . . . . . . . . . . . . . . . . . . . . . . . 8
8.
Ending a call . . . . . . . . . . . . . . . . . . . . . . . . . . . . . . . . . . . . . . . . . . . . . . . . . . . . . . . . . 8
9.
Answering a call . . . . . . . . . . . . . . . . . . . . . . . . . . . . . . . . . . . . . . . . . . . . . . . . . . . . . 9
English
English . . . . . . . . . . . . . . . . . . . . . . . . . . . . . . . . . . . . . . . . 3
Français . . . . . . . . . . . . . . . . . . . . . . . . . . . . . . . . . . . . . . 17
Español . . . . . . . . . . . . . . . . . . . . . . . . . . . . . . . . . . . . . . . 33
10. Call-waiting . . . . . . . . . . . . . . . . . . . . . . . . . . . . . . . . . . . . . . . . . . . . . . . . . . . . . . . . . . 9
11. Resetting the headset . . . . . . . . . . . . . . . . . . . . . . . . . . . . . . . . . . . . . . . . . . . . . . . . 9
12. Tips for Nokia Bluetooth phones . . . . . . . . . . . . . . . . . . . . . . . . . . . . . . . . . . . . . 10
13. Enhanced features (for Bluetooth phones with hands-free profiles) . . . . . 10
14. Frequently asked questions . . . . . . . . . . . . . . . . . . . . . . . . . . . . . . . . . . . . . . . . . . 12
15. Need more help? . . . . . . . . . . . . . . . . . . . . . . . . . . . . . . . . . . . . . . . . . . . . . . . . . . . 13
16. Storage of headset . . . . . . . . . . . . . . . . . . . . . . . . . . . . . . . . . . . . . . . . . . . . . . . . . . 13
17. Certification and safety approvals . . . . . . . . . . . . . . . . . . . . . . . . . . . . . . . . . . . . 13
18. Warranty and parts replacement . . . . . . . . . . . . . . . . . . . . . . . . . . . . . . . . . . . . . 14
19. Glossary . . . . . . . . . . . . . . . . . . . . . . . . . . . . . . . . . . . . . . . . . . . . . . . . . . . . . . . . . . . . 15
2
3
1
2 Multi-Function Button
English
3 Volume Control Button
2
4
4 Charging Cradle
5 MiniGel™
5. Unplug the AC adapter from the charging cradle.
6. Remove the headset from the charging cradle. You are now ready to “pair” JABRA
FreeSpeak 250 to your mobile phone. If the headset has already been paired to your
phone, then you can begin using it.
English
1 Blue Indicator Light
WARNING: Do not attempt to charge JABRA FreeSpeak 250 with anything other
than the AC adapter provided. Using another AC adapter may damage or destroy
the headset.
5
3
4
1
4
STOP: BEFORE USING YOUR HEADSET
1
3
6
Check phone compatibility
2
The JABRA FreeSpeak 250 is compatible with most Bluetooth1 (see Glossary) phones that
are compliant with Bluetooth version 1.1 or higher specification and support the headset
and/or hands-free profile(s)2. Ensure that your phone has Bluetooth capability by either
visiting your phone manufacturer’s web site or JABRA’s web site at www.jabra.com
JABRA also provides FreeSpeak versions for most non-Bluetooth phones.
2
Charge JABRA FreeSpeak 250
JABRA FreeSpeak 250 uses a rechargeable battery that must be charged fully before
you use the headset for the first time.
5
Fig. 1
IMPORTANT: The blue indicator light will be on while charging and will turn off when
charging is complete. Removing the headset from the charging cradle while it’s
charging will put the headset into standby mode and stop the charging sequence.
IMPORTANT: JABRA FreeSpeak 250 cannot be used while charging.
3
Read the glossary
1. Fully insert the headset into the charging cradle.
2. Plug the JABRA FreeSpeak 250 AC adapter into the headset’s charging cradle.
3. Plug the AC adapter into the electrical outlet.
4. Charge your headset until the blue light on JABRA FreeSpeak 250 turns off. The unit
will be fully charged in approximately 2 hours.
4
Read the glossary at the end of this document to familiarize yourself with important
terms used in this User Manual.
Once JABRA FreeSpeak 250 is fully charged, continue with these instructions.
5
BASIC OPERATIONS
“Pair” to your Bluetooth phone
English
5
Pairing3 will create a unique and encrypted wireless link between two Bluetoothenabled devices such as your Bluetooth phone and JABRA FreeSpeak 250.
Turning headset on/off
1. Ensure the headset is off (see Turning
headset on/off section).
2. Press and hold until you see a solid
blue light (approximately 8 seconds),
then release* (see Fig. 2).
3. Set your Bluetooth phone to “discover”
the headset by following your phone’s
instruction guide. Typically, the steps
involve going to a “setup”,“connect”, or
“Bluetooth” menu on your phone and
then selecting the option to “discover” a
Bluetooth device.
Fig. 2
What you hear
What you see
Press and hold for 3 to 5
seconds until you see a
burst of flashes on the blue
indicator light, then release
Ascending
(low-to-high)
tones
The blue indicator
light will flash while
the power is on (see
Status indicators
table below)
Turning
headset off
Press and hold for 3 to 5
seconds until you see a
burst of flashes on the blue
indicator light, then release
Descending
(high-to-low)
tones
The blue indicator
light will stop
flashing
Status indicators
4. Your phone will find the “JABRA 250”
headset and ask if you want to pair with
it. Confirm this by pressing “yes” or “ok”.
5. Enter passkey or PIN4 = 0000 (4 zeros),
then press “yes” or “ok”.
What you do
Turning
headset on
English
4
What you see
What you hear
Status
Flashes every
second
Quick series of 2 tones –
low to high pitch (when
active mode starts)
Active Mode5
Call in progress
Up to 8 hours of talk-time*
Flashes every
3 seconds
Quick series of 2 tones –
high to low pitch (when
standby mode starts)
Standby Mode6
Waiting for call
Up to 240 hours of
standby time*
3 flashes every
second
3 beeps every 30 seconds
Low Battery (in active mode)
3 – 5 minutes of talk time left
3 flashes every 3
seconds
3 beeps every 5 minutes
Fig. 3
IMPORTANT: If pairing was successful, the blue indicator light will briefly flash rapidly
before going back to flashing every 3 seconds. If unsuccessful, the light remains solid,
and you’ll need to reattempt pairing (see steps 3–5 above).
* If you have a Bluetooth phone that supports the hands-free Bluetooth profile,
see Enhanced features section for alternative pairing instructions. Phonespecific pairing instructions can be found online at www.jabra.com/fscs
•
•
•
•
•
Low Battery (in standby mode)
3 – 5 minutes of talk time left
•
* Depending on phone type and usage.
6
IMPORTANT: Do not hold the button down for more than 3 to 5 seconds when
turning the headset on or else it may go into pairing mode, and the blue indicator light
will turn solid. If that happens, turn off the headset, wait 3 to 5 seconds, and repeat
process for turning the headset on.
7
Choosing wearing preference
English
•
FreeSpeak 250 is ready to wear on
the right ear. If you prefer the left,
gently rotate the MiniGel 180°.
•
For optimal performance, wear
FreeSpeak 250 and your Bluetooth
phone on the same side of your
body. In general, you will get
better performance when there
are no obstructions (including
parts of your body) between the
headset and the phone.
•
Making a call
•
Answering a call
After you hear the ring tone, press and release once.
OR
Answer the call with your phone’s keypad. You may then need to transfer the call to
the headset by pressing and releasing once (depending on your phone).
10
Fig. 4
7
9
English
6
Call-waiting*
(Recommended) Use standard method from your phone’s keypad which typically
involves pressing the “send” button
OR
Press and release once to answer the incoming call and toggle between calls
(some phones do not support this headset feature).
IMPORTANT: Do not hold the button down too long when making, ending, or
answering a call.This should only be a quick tap, so you don’t put the headset into
pairing mode by accident.
If JABRA FreeSpeak 250 is off, turn it on now (see Turning headset on/off section).
Using phone’s keypad
1. Dial number on keypad.
* See Enhanced features section for alternative call-waiting instructions for
phones that support the hands-free profile.
2. Press phone’s “send” key.
Using voice-activated dialing (after you’ve set up voice tags on your phone)
1. Press and release
once. You’ll hear 1 short beep while doing this.
2. You’ll then hear the voice-activation tone; say the name of the person you wish to call.
NOTE: Record voice tag from headset for better reception.
8
Ending a call
TIPS AND SOLUTIONS
11
Resetting the headset
If the headset is not responding or the blue light will not turn on or off after
pairing, you may need to RESET your headset.
1. Fully insert the headset into the charging cradle.
•
•
8
Press and release once.
OR
End call from phone’s keypad.
2. Plug the JABRA FreeSpeak 250 AC adapter into the headset’s charging cradle.
3. Plug the AC adapter into the electrical outlet.
9
5. Unplug the AC adapter from the charging cradle.
English
12
Tips for Nokia Bluetooth phones
4. Your phone will find the “JABRA 250”
headset and ask if you want to pair with
it. Confirm this by pressing “yes” or “ok”.
(Such as Nokia 6310 and 8910 series)
Please ensure that the headset is allowed by the phone to connect without
authorization. To do this, you must adjust your phone’s settings.
Menu > Bluetooth > View Paired Devices > select your headset, press “Options”
> Request conn. authorization? — No
13
Fig. 6
5. Enter passkey or PIN = 0000 (4 zeros), then press “yes” or “ok”.
Set the following menu options:
•
3. Set your Bluetooth phone to “discover”
the headset by following your phone’s
instruction guide. Typically, the steps
involve going to a “setup”,“connect”, or
“Bluetooth” menu on your phone and
then selecting the option to “discover”
a Bluetooth device*.
English
4. Leave the headset in the charging cradle for about 3 seconds, then remove the
headset (see Fig. 1).
* Phone-specific pairing instructions and the most current list of phones with
hands-free profile can be found online at www.jabra.com/fscs
Enhanced features (for Bluetooth phones
with hands-free profiles)
Enhanced features are available for phones that support the hands-free Bluetooth
profile such as Nokia 3600, 3650, 6310, 6310i, 8910, 8910i, Sony Ericsson
T610, T616, T618, Siemens S55 and S56. Check your phone’s instruction guide
or contact the phone manufacturer if you are not sure if your phone supports the
hands-free Bluetooth profile.
You can enable these enhanced features by using the following alternative
pairing sequence.
“Pairing” to a Bluetooth phone with hands-free profile:
IMPORTANT: If pairing was successful, the blue indicator light will briefly flash rapidly
before going back to flashing every 3 seconds. If unsuccessful, the light remains solid,
and you’ll need to reattempt pairing (see steps 3–5 above).
Once you’re done pairing, the following new headset features will be available:
•
Last number redial (when not on a call)
While the headset is on, press and hold until you hear 2 short beeps,
release immediately.
•
Rejecting an incoming call (when not on a call)
When your phone rings, press and hold until you hear 2 short beeps,
release immediately.
•
Call-waiting (swapping between 2 calls)
When your phone notifies you of another incoming call while you’re on a call,
press and hold until you hear 2 short beeps, release immediately.
•
Putting a call on hold
While you’re on a call, press and hold until you hear 2 short beeps, release
immediately. Repeat to retrieve the call.
1. Ensure headset is off (see Turning
headset on/off section).
2. Press and hold plus the volume up
button until you see a solid blue light
(approximately 8 seconds), then release
(see Fig. 5).
Fig. 5
10
11
Frequently asked questions
English
1. How far away from my phone will my JABRA FreeSpeak 250 work?
The operating range is typically up to 30 feet.
2. Will JABRA FreeSpeak 250 work with my cordless phone at home?
FreeSpeak 250 is not designed for use with cordless phones.
3. Will JABRA FreeSpeak 250 work with laptops, PCs, and PDAs?
FreeSpeak 250 will work with devices that are compliant with Bluetooth version 1.1
or higher specifications and support the headset and/or hands-free profile(s).
4. Will anything cause interference with my conversation when I’m using my
JABRA FreeSpeak 250?
Appliances such as cordless phones and wireless networking equipment may
cause interference with your conversation, usually adding a crackling noise. To
reduce any interference, keep the headset away from other devices that use or
produce radio waves.
5. Will my JABRA FreeSpeak 250 interfere with my car’s electronics, radio,
or computer?
FreeSpeak 250 produces significantly less power than a typical mobile phone. It also
only emits signals that are in compliance with the international Bluetooth standard.
Therefore, you should not expect any interference with standard consumer-grade
electronics equipment.
6. Can other Bluetooth phone users hear my conversation?
When you pair your headset to your Bluetooth phone, you are creating a private
link between only these two Bluetooth devices. The wireless Bluetooth technology
used in your headset is not easily monitored by third parties because Bluetooth
wireless signals are significantly lower in radio frequency power than those
produced by a typical mobile phone.
7. What material is the headset made of?
The MiniGel is made of PVC (polyvinyl chloride), a form of plastic. The headset itself
is primarily made of thermoplastic polyurethane, which is a soft plastic. The face of
the headset, where the buttons are located, is made of polycarbonate, a very strong,
hard plastic. Neither the MiniGel nor the headset contains latex.
12
8. How do I take care of JABRA FreeSpeak 250?
• To clean the headset, use a clean, soft cloth that is slightly damp.
• To clean the MiniGel, remove it from the headset by gently lifting and pulling it
off the speaker housing. Then, wash it in warm, soapy water.
15
Need more help?
English
14
1. Web: www.jabra.com/fscs (for the latest support info and online User Manuals)
2. E-mail: Tech Support (North America/Asia-Pacific): [email protected]
Information (North America/Asia-Pacific): [email protected]
Tech Support (Europe/Middle East/Africa): [email protected]
Information (Europe/Middle East/Africa): [email protected]
3. Phone: +1 800-327-2230
+1 858-622-9955
16
Storage of headset
1. Always store the JABRA FreeSpeak 250 with power off and safely protected.
2. Avoid storage at high temperatures (above 60°C / 134°F) – such as in a hot vehicle
or in direct sunlight. (Storage at high temperatures can degrade performance and
reduce battery life).
3. Do not expose the headset or any of its supplied parts to rain or other liquids.
17
Certification and safety approvals
FCC
This device complies with part 15 of the FCC Rules. Operation is subject to the following two
conditions: (1) This device may not cause harmful interference, and (2) this device must
accept any interference received, including interference that may cause undesired operation.
Users are not permitted to make changes or modify the device in any way. Changes or
modifications not expressly approved by JABRA (GN Netcom) will void the user’s
authority to operate the equipment.
This equipment has been tested and found to comply with the limits for a Class B
digital device, pursuant to part 15 of the FCC Rules. These limits are designed to provide
reasonable protection against harmful interference in a residential installation. This
equipment generates, uses and can radiate radio frequency energy and, if not installed
and used in accordance with the instructions, may cause harmful interference to radio
communications. However, there is no guarantee that interference will not occur in a
13
•
•
•
Reorient or relocate the receiving antenna.
•
Consult the dealer or an experienced radio/TV technician for help.
Increase the separation between the equipment and receiver.
Connect the equipment into an outlet on a circuit different from that to which the
receiver is connected.
The user must place the base 8” (20cm) or more from any personnel in order to comply
with FCC RF exposure requirements.
Industry Canada
Operation is subject to the following two conditions: (1) This device may not cause
interference and (2) This device must accept any interference, including interference
that may cause undesired operation of the device.
The term "IC:" before the certification/registration number only signifies that
registration was performed based on a Declaration of Conformity indicating that
Industry Canada technical specifications were met. It does not imply that Industry
Canada approved the equipment.
that it substantially conforms with its published specifications on the date of
Purchaser’s purchase, or, if JABRA, in JABRA’s sole discretion, determines that it is not
possible to repair or replace the Product, JABRA may, at JABRA’s option, refund to
Purchaser the purchase price paid for the Product. THE FOREGOING IS PURCHASER’S
SOLE AND EXCLUSIVE REMEDY FOR BREACH OF WARRANTY BY JABRA WITH RESPECT TO
THE PRODUCT. The warranty set forth above shall not apply to any Product which has
not been properly used or handled in accordance with the instructions supplied by
JABRA, lost or misplaced for any reason, or which has been modified, repaired or altered,
except by JABRA or at a JABRA authorized service facility, or which has been subjected
to faulty installation, misuse, abuse, or which the Product defect is attributable to any
failure or damage which is beyond the reasonable control of JABRA. This warranty is
available only to Purchaser, and does not extend to any distributors, retailers, or other
resellers of the Product. THE FOREGOING WARRANTIES ARE THE SOLE WARRANTIES,
EXPRESS OR IMPLIED, GIVEN BY JABRA IN CONNECTION WITH THE PRODUCT, AND
JABRA DISCLAIMS ALL OTHER WARRANTIES, INCLUDING WARRANTIES OF
MERCHANTABILITY, FITNESS FOR A PARTICULAR PURPOSE AND NONINFRINGEMENT OF
THIRD PARTY RIGHTS. JABRA SHALL NOT BE LIABLE FOR ANY SPECIAL, INCIDENTAL OR
CONSEQUENTIAL DAMAGES IN CONNECTION WITH THE PRODUCT, EVEN IF JABRA HAS
BEEN ADVISED OF THE POSSIBILITY OF SUCH DAMAGES. THE LIABILITY OF JABRA
HEREUNDER FOR ALL CLAIMS SHALL NOT EXCEED THE AMOUNT PAID BY PURCHASER
TO JABRA FOR THE PRODUCT GIVING RISE TO JABRA’S LIABILITY.
Bluetooth
Bluetooth is a trademark owned by the Bluetooth SIG, Inc.
18
Warranty and parts replacement
JABRA limited product warranty. JABRA warrants to Purchaser that for a period of one
(1) year after the date of purchase (the “Warranty Period”) of any JABRA Product
(“Product”) by Purchaser, the Product will substantially conform to JABRA’s published
specifications for the Product on the date of Purchaser’s purchase of the Product,
subject to the terms herein. Purchaser shall notify JABRA of any nonconformance
during the Warranty Period and obtain a written return material authorization (“RMA”)
and an RMA number for the nonconforming Product from JABRA and return the
nonconforming Product to JABRA at: JABRA Corporation, 9171 Towne Centre Drive,
Suite 500, San Diego, California 92122 USA, freight prepaid, with a statement describing
the nonconformity. JABRA’s exclusive obligation with respect to nonconforming
Product shall be, at JABRA’s option and expense, to repair or replace such Product so
14
19
English
English
particular installation. If this equipment does cause harmful interference to radio or
television reception, which can be determined by turning the equipment off and on,
the user is encouraged to try to correct the interference by one or more of the
following measures:
Glossary
1
Bluetooth is a radio technology developed to connect devices, such as mobile
phones and headsets, without wires or cords over a short distance of approximately
30 feet. More information is available at www.bluetooth.com
2
Bluetooth profiles are protocols through which Bluetooth devices communicate
with other devices. Bluetooth phones support different sets of profiles – most
support the headset profile but some support the hands-free profile and others
support both profiles. In order to support a certain profile, a phone manufacturer has
to implement certain mandatory features within the phone’s software.
3
Pairing creates a unique and encrypted communication link between two
Bluetooth-enabled devices and allows them to communicate with each other.
Bluetooth devices will not work if the devices have not been paired with each other.
15
English
5
6
Passkey or PIN is a secret code that needs to be entered on the phone in order to
pair the mobile phone with FreeSpeak. When you have already paired your mobile
phone with FreeSpeak, the phone and headset will recognize each other and the
phone will bypass the discovery and authentication process and automatically
accept the transmission.
Français
Active mode is when the headset has an active call in progress. FreeSpeak will go
from standby mode into active mode when you receive a call or when you make a
call. When FreeSpeak is in active mode, the blue light will flash every second.
Standby mode is when the headset is passively waiting for a call. When you “end”
the call on your mobile phone, FreeSpeak will go into standby mode. When
FreeSpeak is in standby mode, the blue light will flash every three seconds.
1.
Vérifier la compatibilité du téléphone . . . . . . . . . . . . . . . . . . . . . . . . . . . . . . . . . 18
2.
Charger le JABRA® FreeSpeak™ 250 . . . . . . . . . . . . . . . . . . . . . . . . . . . . . . . . . . . . 18
3.
Lire le glossaire . . . . . . . . . . . . . . . . . . . . . . . . . . . . . . . . . . . . . . . . . . . . . . . . . . . . . . 19
4.
« Appairer » avec votre téléphone Bluetooth™ . . . . . . . . . . . . . . . . . . . . . . . . . . 20
5.
Mise en marche/Arrêt du casque . . . . . . . . . . . . . . . . . . . . . . . . . . . . . . . . . . . . . 21
6.
Choisissez votre mode de port du casque . . . . . . . . . . . . . . . . . . . . . . . . . . . . . 22
7.
Effectuer un appel . . . . . . . . . . . . . . . . . . . . . . . . . . . . . . . . . . . . . . . . . . . . . . . . . . . 22
8.
Mettre fin à un appel . . . . . . . . . . . . . . . . . . . . . . . . . . . . . . . . . . . . . . . . . . . . . . . . 23
9.
Répondre à un appel . . . . . . . . . . . . . . . . . . . . . . . . . . . . . . . . . . . . . . . . . . . . . . . . 23
Français
4
10. Mise en attente . . . . . . . . . . . . . . . . . . . . . . . . . . . . . . . . . . . . . . . . . . . . . . . . . . . . . . 23
11. Réinitialisation du casque. . . . . . . . . . . . . . . . . . . . . . . . . . . . . . . . . . . . . . . . . . . . . 24
12. Astuces pour les téléphones Nokia Bluetooth . . . . . . . . . . . . . . . . . . . . . . . . . . 24
13. Fonctionnalités avancées (pour des téléphones
Bluetooth avec profil mains libres) . . . . . . . . . . . . . . . . . . . . . . . . . . . . . . . . . . . . 24
14. Questions fréquemment posées . . . . . . . . . . . . . . . . . . . . . . . . . . . . . . . . . . . . . .26
15. Besoin d’aide ? . . . . . . . . . . . . . . . . . . . . . . . . . . . . . . . . . . . . . . . . . . . . . . . . . . . . . . 27
16. Rangement du casque . . . . . . . . . . . . . . . . . . . . . . . . . . . . . . . . . . . . . . . . . . . . . . .28
17. Certification et exigences de sécurité . . . . . . . . . . . . . . . . . . . . . . . . . . . . . . . . . .28
18. Garantie et Remplacement des pièces . . . . . . . . . . . . . . . . . . . . . . . . . . . . . . . . .29
19. Glossaire . . . . . . . . . . . . . . . . . . . . . . . . . . . . . . . . . . . . . . . . . . . . . . . . . . . . . . . . . . . . 30
16
17
1 Voyant bleu
1
2 Bouton multi-fonctions
3 Bouton de réglage du volume
2
4
4 Support de chargement
5 MiniGel™
5. Débranchez l’adaptateur secteur du support de chargement.
6. Ôtez le casque de son support de chargement. Vous êtes désormais prêt(e) à
« appairer » le JABRA FreeSpeak 250 à votre téléphone mobile. Si le casque a déjà
été appairé à votre téléphone, vous pouvez commencer à l’utiliser.
AVERTISSEMENT : n’essayez pas de charger le JABRA FreeSpeak 250 avec quoi que
ce soit d’autre que l’adaptateur secteur fourni. L’utilisation d’un autre adaptateur
secteur pourrait endommager ou détruire le casque.
5
3
4
1
4
1
6
Français
Français
ATTENTION: AVANT D’UTILISER
VOTRE CASQUE
3
Vérifier la compatibilité du téléphone
2
5
Le JABRA FreeSpeak 250 est compatible avec la plupart des téléphones Bluetooth1 (voir
Glossaire) conformes avec Bluetooth version 1.1 ou toute spécification supérieure, et
supporte les deux profils2 Bluetooth : casque et/ou mains libres. Assurez-vous que votre
appareil est compatible Bluetooth en consultant, soit le site Internet du fabricant de
votre téléphone, soit le site de JABRA à l’adresse ci-après : www.jabra.com
JABRA propose également des versions de FreeSpeak pour la plupart des téléphones
non Bluetooth.
Sch. 1
IMPORTANT: le voyant bleu sera allumé lorsque l’appareil sera en charge et s’éteindra
lorsque le chargement sera achevé. Le fait d’ôter le casque de son support de
chargement au cours de l’opération de chargement aura pour effet de placer le casque
en mode veille et d’interrompre la séquence de chargement.
IMPORTANT: le JABRA FreeSpeak 250 ne peut pas être utilisé en cours de chargement.
2
Charger le JABRA FreeSpeak 250
Le JABRA FreeSpeak 250 utilise une batterie rechargeable qui doit être complètement
chargée avant que vous ne puissiez utiliser le casque pour la première fois.
3
Lire le glossaire
1. Insérez complètement le casque dans le support de chargement.
Lisez le glossaire à la fin de ce document pour vous familiariser avec les termes
importants utilisés dans le principal Manuel de l’Utilisateur.
2. Branchez l’adaptateur secteur du JABRA FreeSpeak 250 sur le support de
chargement du casque.
Une fois le JABRA FreeSpeak 250 complètement chargé, poursuivez ces instructions.
3. Branchez l’adaptateur secteur sur une prise électrique.
4. Chargez votre casque jusqu’à ce que le voyant bleu du JABRA FreeSpeak 250
s’éteigne. Le chargement complet de l’unité nécessite en principe environ 2 heures.
18
19
« Appairer » avec votre téléphone Bluetooth
L’appairage3 crée une liaison sans fil unique et codée entre deux appareils Bluetooth,
tels que votre téléphone Bluetooth et le JABRA FreeSpeak 250.
OPÉRATIONS DE BASE
5
1. Assurez-vous que le casque est éteint (voir la
section Mise en marche/Arrêt du casque).
2. Appuyez sur (environ 8 secondes), jusqu’à
ce qu’une lumière bleue permanente
s’allume puis relâchez-le* (voir schéma 2).
Français
3. Activez votre téléphone Bluetooth pour
« repérer » le casque en vous conformant au
guide de l’utilisateur de votre téléphone. En
règle générale, la procédure à suivre implique
d’accéder à un menu « installation »,
« connexion » ou « Bluetooth » sur votre
téléphone, puis de sélectionner l’option
de « repérage ou recherche » d’un
périphérique Bluetooth.
4. 4. Votre téléphone détectera le casque
« JABRA 250 » et vous demandera si vous
souhaitez l’appairer avec celui-ci. Confirmez
en appuyant sur « oui » ou « ok ».
Mise en marche / Arrêt du casque
Ce que vous faites
Ce que vous
entendez
Ce que vous voyez
Mise en
marche du
casque
Appuyez sur pendant 3 à
5 secondes jusqu’à ce que
vous obteniez une série de
clignotements sur le voyant
bleu puis relâchez
Tonalité
ascendante
(des graves
vers les aigus)
Le voyant bleu
clignote pendant
que l’appareil est
sous tension (voir ciaprès le tableau des
Indicateurs d’état)
Arrêt du
casque
Appuyez sur pendant 3 à
5 secondes jusqu’à ce que
vous obteniez une série de
clignotements sur le voyant
bleu puis relâchez
Tonalité
descendante
(des aigus vers
les graves)
Le voyant bleu
cessera de clignoter
Fig. 2
Indicateurs d’état
Fig. 3
Ce que vous voyez
Ce que vous entendez
Etat
Clignote tous les
secondes
Une série rapide de 2
tonalités — basse à élevée
(lors du démarrage du
mode actif)
Mode actif5
Appel en cours
Jusqu’à 8 heures de temps
de conversation*
Clignote toutes les
3 secondes
Une série rapide de 2
tonalités — basse à élevée
(lors du démarrage du
mode « standby » (veille))
Mode veille6
Attente d’un appel
Jusqu’à 240 heures
d’autonomie en veille*
3 clignotements par
seconde
3 bips toutes les
30 secondes
Batterie faible (en mode actif)
Il reste 3 à 5 minutes de
temps de conversation
3 clignotements
toutes les 3 secondes
3 bips toutes les
5 minutes
Batterie faible (en mode veille)
Il reste 3 à 5 minutes de
temps de conversation
5. 5. Saisissez le Code clé ou PIN = 0000
(4 zéros), puis appuyez sur « oui » ou « ok ».
IMPORTANT: si l’appairage a réussi, le voyant bleu clignote rapidement, avant de
recommencer à clignoter toutes les 3 secondes. Si la procédure a échoué, le voyant reste
allumé en continu et vous devrez recommencer la procédure d’appairage (voir les
étapes 3 à 5 ci-dessus).
* Si vous avez un téléphone Bluetooth qui supporte le profil mains libres
Bluetooth, reportez-vous à la section Fonctionnalités avancées pour d’autres
instructions sur l’appairage. Les instructions d’appairage spécifiques aux
téléphones sont consultables sur le site : www.jabra.com/fscs
20
Français
4
•
•
•
•
•
•
* En fonction du type d’appareil et de l’utilisation.
21
8
•
•
6
Choisissez votre mode de port du casque
FreeSpeak 250 est prêt-à-porter sur l'oreille
droite. Si vous préférez l’oreille gauche,
faites tourner doucement le MiniGel à 180°.
Français
Pour un fonctionnement optimal, portez le
JABRA FreeSpeak 250 et votre téléphone
Bluetooth sur un même côté du corps. En
règle générale, l’absence de toute
obstruction (y compris des parties du
corps) entre le casque et le multiadaptateur permet d’obtenir des
performances optimales.
7
•
Sch. 4
Si le JABRA FreeSpeak 250 est éteint, mettez-le en marche dès maintenant (voir la section
Mise en marche/Arrêt du casque).
Utilisation du clavier du téléphone
1. Composez le numéro sur le clavier.
2. Appuyez sur la touche « envoyer ».
À l’aide de la numérotation par commande vocale (après avoir configuré les fiches
de reconnaissance vocale de votre téléphone)
et relâchez. Vous entendrez pendant ce temps 1 bip prolongé.
•
•
Répondre à un appel
Après la tonalité, appuyez une fois sur et relâchez ;
OU
Répondez à l’appel à partir du clavier de votre téléphone. Vous voudrez ensuite
éventuellement transférer l’appel sur le casque en appuyant sur la touche puis en
la relâchant (selon le modèle de téléphone).
10
Effectuer un appel
1. Appuyez une fois sur
Appuyez une fois sur et relâchez ;
OU
Terminez l’appel en utilisant le clavier de votre appareil.
9
•
Mettre fin à un appel.
Français
IMPORTANT: ne maintenez pas le bouton appuyé plus de 3 à 5 secondes lors de la
mise en marche du casque ; sinon il risque de passer en mode appairage, et le voyant
bleu cessera de clignoter. Dans ce cas, éteignez le casque, attendez 3 à 5 secondes, puis
recommencez la procédure de mise en marche du casque.
Mise en attente*
(Recommandé) Utilisez le mode de mise en attente standard du clavier de votre
téléphone, ce qui suppose, généralement, d'appuyer sur la touche « envoyer » ;
OU
Appuyez et relâchez une fois pour répondre à l’appel entrant et passer d’une ligne
à une autre (certains appareils ne sont pas compatibles avec cette fonctionnalité
du casque).
IMPORTANT: ne maintenez pas le bouton appuyé trop longtemps lorsque vous
effectuez un appel, que vous y mettez fin ou que vous y répondez. Il ne doit s’agir
que d’une brève pression, sinon vous risquez de placer par accident le casque en
mode appairage.
* Pour d’autres instructions concernant les téléphones compatibles avec le profil
mains libres, reportez-vous à la section Fonctionnalités avancées.
2. Vous entendez alors une tonalité : prononcez le nom de la personne que vous
souhaitez appeler.
NOTE: pour une meilleure réception, enregistrez une fiche de reconnaissance vocale à
partir du casque.
22
23
11
Réinitialisation du casque.
« Appairage » à un téléphone Bluetooth avec profil mains libres :
Si le casque ne répond pas ou si le voyant bleu ne s’éteint pas après l’appairage, il
se peut que vous deviez REINITIALISER votre casque.
1. Vérifiez que le casque est éteint (voir la
section Mise en marche/Arrêt du casque).
1. Insérez complètement le casque dans le support de chargement.
2. Appuyez sur (environ 8 secondes) et sur
le bouton de hausse du volume (up)
jusqu’à ce qu’un voyant bleu continu
s’allume, puis relâchez (voir schéma 5).
2. Branchez l’adaptateur secteur du JABRA FreeSpeak 250 sur le support de
chargement du casque.
Français
3. Branchez l’adaptateur secteur sur la prise électrique.
4. Insérez le casque dans le support de chargement pendant environ 3 secondes, puis
retirez-le (voir schéma 1).
5. Débranchez l’adaptateur secteur du support de chargement.
12
Astuces pour les téléphones Nokia Bluetooth
(y compris les séries Nokia 6310 et 8910)
3. Faites en sorte que votre téléphone
Bluetooth « repère » le casque, en vous
conformant au manuel d’utilisation du
téléphone. En règle générale, la procédure
à suivre implique d’accéder, sur votre
téléphone, à un menu d’« installation », de
« connexion » ou « Bluetooth », puis de
sélectionner l'option de « repérage ou
recherche» d'un périphérique Bluetooth*.
Sch. 5
Configurez les options de menu suivantes :
4. Votre téléphone détectera le casque «
JABRA 250 » et vous demandera si vous
souhaitez l'appairer à celui-ci. Confirmez en
appuyant sur « oui » ou « ok ».
•
5. Saisissez votre Code clé ou PIN = 0000 (4 zéros), puis appuyez sur « oui » ou « ok ».
Vérifiez que le casque est reconnu par le téléphone sans demander de validation. Vous
devez pour ce faire ajuster les paramètres de votre téléphone.
Menu > Bluetooth > Affichage périphériques appairés > Sélectionnez votre
casque, appuyez sur « Options » > Demande conn. autorisation ? — Non
13
Fonctionnalités avancées (pour des téléphones
Bluetooth avec profil mains libres)
Des fonctionnalités avancées sont disponibles pour les téléphones qui supportent
le profil Bluetooth mains libres tels que les Nokia 3600, 3650, 6310, 6310i, 8910,
8910i, Sony Ericsson T610, T616, T618, et les Siemens S55 et S56. Reportezvous au guide de l’utilisateur de votre téléphone ou, si vous ne savez pas si votre
téléphone est compatible avec le profil mains libres Bluetooth, contactez le
fabricant du téléphone.
24
Vous pouvez activer ces fonctionnalités avancées en utilisant une autre séquence
d’appairage indiquée ci-dessous.
Français
ASTUCES ET SOLUTIONS
Sch. 6
* Des instructions d’appairage spécifiques, ainsi que la toute dernière
liste des téléphones avec profil mains libre sont consultables sur le site :
www.jabra.com/fscs
IMPORTANT: si l’appairage a réussi,le voyant lumineux clignote rapidement avant de
recommencer à clignoter toutes les 3 secondes.Si la procédure a échoué,la lumière reste
allumée en continu et vous devrez recommencer l’appairage (voir les étapes 3 à 5 ci-dessus).
25
Français
•
Rappel du dernier numéro (lorsque vous n’êtes pas en ligne)
Lorsque le casque est en marche, appuyez sur jusqu’à ce que vous entendiez 2 bips
brefs, puis relâchez immédiatement.
•
Rejet d’un appel entrant (lorsque vous n’êtes pas en ligne)
Lorsque votre téléphone sonne, appuyez sur jusqu’à ce que vous entendiez 2 bips
brefs, puis relâchez immédiatement.
•
Double appel (passer d’un appel à l’autre)
Lorsque votre téléphone vous avertit de l’arrivée d’un autre appel pendant un
appel en cours, appuyez sur jusqu’à ce que vous entendiez 2 bips brefs, puis
relâchez immédiatement.
•
Mise en attente
Pendant l’appel, appuyez sur jusqu’à ce que vous entendiez 2 bips brefs, puis
relâchez immédiatement. Renouvelez la même opération pour rependre cet appel.
14
Questions fréquemment posées
1. Jusqu’à quelle distance de mon téléphone le JABRA FreeSpeak 250 peut-il
fonctionner ?
Le diamètre de fonctionnement est en principe de 10 mètres (30 pieds).
2. Le JABRA FreeSpeak 250 fonctionnera-t-il chez moi avec mon téléphone sans fil ?
Le JABRA FreeSpeak 250 n’est pas conçu pour une utilisation avec des téléphones
sans fil.
3. Le JABRA FreeSpeak 250 fonctionne-t-il avec les ordinateurs portables,PC et PDA ?
Le JABRA FreeSpeak 250 fonctionne avec des appareils compatibles Bluetooth, version
1.1 ou versions supérieures, et supporte les profils : casque et/ou mains libre(s).
4. Ma conversation sera-t-elle gênée par des interférences lorsque j’utilise le
JABRA FreeSpeak 250 ?
Les appareils tels que les téléphones sans fil et autres équipements de réseau sans
fil seront susceptibles d'interférer avec votre conversation, en produisant des
parasites. Pour réduire les interférences, éloignez le casque des appareils qui
utilisent ou produisent des ondes radio.
26
5. Le JABRA FreeSpeak 250 provoquera-t-il des interférences avec la radio,
l’ordinateur ou les appareils électroniques de mon véhicule automobile ?
Le JABRA FreeSpeak 250 produit moins d’électricité qu'un téléphone mobile
traditionnel. D’autre part, il n’émet que des signaux conformes avec la norme
internationale Bluetooth. En conséquence, il ne devrait pas susciter d’interférences
avec les équipements électroniques de consommation courante.
6. D’autres utilisateurs de téléphones Bluetooth pourraient-ils entendre mes
conversations ?
Lorsque vous appairez votre casque à votre téléphone Bluetooth, vous créez un lien
privé uniquement entre ces deux appareils Bluetooth. La technologie Bluetooth
sans fil utilisée sur votre casque ne peut être facilement contrôlée par des tiers car
les signaux sans fil Bluetooth ont une puissance de fréquence radio nettement plus
faible que celle produite par un téléphone mobile type.
Français
Une fois que vous en avez terminé avec l’appairage, les nouvelles fonctions du
casque indiquées ci-dessous seront disponibles :
7. En quelle matière le casque est-il réalisé ?
Le MiniGel est en PVC (polychlorure de vinyle), une sorte de plastique. Le casque luimême est essentiellement en polyuréthane thermoplastique, un plastique souple.
La partie avant du casque, là où les boutons se trouvent, est faite de polycarbonate,
un plastique dur très solide. Ni le MiniGel ni le casque ne contiennent de latex.
8. Comment entretenir le JABRA FreeSpeak 250 ?
• Pour nettoyer le casque, utilisez un chiffon propre et doux légèrement humide.
• Pour nettoyer le MiniGel, ôtez-le délicatement du casque en le soulevant
doucement et en le retirant du logement du haut-parleur. Lavez-le ensuite à
l’eau chaude et savonneuse.
15
Besoin d’aide ?
1. Sur le Web: www.jabra.com/fscs (pour obtenir les dernières infos techniques et
les manuels d'utilisateur en ligne)
2. E-mail: Support technique (Amérique du Nord/Asie-Pacifique): [email protected]
Informations (Amérique du Nord/Asie-Pacifique): [email protected]
Support technique (Europe/Moyen Orient/Afrique): [email protected]
Informations (Europe/Moyen Orient/Afrique): [email protected]
3. Téléphone : +1 800-327-2230
+1 858-622-9955
27
•
•
augmenter la distance entre l’équipement et le récepteur ;
1. Mettez toujours le JABRA FreeSpeak 250 hors tension avant de le ranger et
protégez-le bien.
•
2. Évitez de l’exposer à une forte température (supérieure à 60°C), par exemple
dans un véhicule non ombragé ou directement au soleil. (Une exposition à de
fortes températures peut détériorer la performance et réduire la durée de vie de
la batterie).
consulter le détaillant ou bien un technicien radio/TV expérimenté pour obtenir
de l'aide.
Pour respecter les normes d’exposition RF FCC, l’utilisateur doit positionner la base à 20
cm (8 pouces) ou plus de tout employé.
Rangement du casque
3. Évitez d’exposer le casque et/ou l’un de ses composants à la pluie ou à
d’autres liquides.
Français
17
Certification et exigences de sécurité
FCC
Cet appareil est conforme à la section 15 de la Réglementation FCC. Le fonctionnement
est soumis aux deux conditions suivantes : (1) Cet appareil ne peut pas provoquer
d’interférences nocives ; et (2) cet appareil doit accepter toute interférence à la réception,
y compris une interférence susceptible de provoquer un fonctionnement non-désiré.
Il est interdit aux utilisateurs d’apporter des changements ou de modifier cet appareil
en aucune manière. Les changements ou modifications qui n’auront pas été
expressément approuvés par JABRA (GNNetcom) rendront caduc le droit des
utilisateurs à faire fonctionner cet équipement.
Cet équipement a été testé et considéré comme conforme aux conditions restrictives
relatives à un appareil numérique de classe B, en vertu de la section 15 de la
Réglementation de la FCC. Ces conditions restrictives sont conçues pour fournir une
protection raisonnable contre les interférences nocives dans le cadre d’une installation
résidentielle. Cet équipement produit, utilise et peut émettre une énergie de fréquence
radio électrique. S'il n'est pas installé et utilisé conformément aux instructions, il est
susceptible de produire des interférences nocives pour les communications radio. Il
n’est cependant aucunement garanti que des interférences ne se produiront pas dans
une installation donnée. Si l’équipement provoque effectivement des interférences
indésirables au niveau de la réception radio ou télévision (ce qui pourra être déterminé
en mettant l'appareil en marche et en l'éteignant), l'utilisateur est encouragé à essayer
de corriger ces interférences par l'une ou plusieurs des mesures suivantes :
•
28
réorienter et repositionner l’antenne de réception ;
brancher l’équipement sur une prise d’un circuit différent de celui sur lequel le
récepteur est branché ;
Industry Canada
Le fonctionnement est soumis aux deux conditions suivantes : (1) Cet appareil ne peut
pas provoquer d’interférences nocives ; et (2) Cet appareil doit accepter toute
interférence, y compris une interférence susceptible de provoquer un fonctionnement
non-désiré de l’appareil.
Français
16
La mention « IC : » devant le numéro de certification/immatriculation signifie
simplement que l’immatriculation a été effectuée sur la base d’une déclaration de
conformité indiquant que les spécifications techniques Industry Canada ont bien été
respectées. Le terme n’implique pas un agrément de l'équipement par Industry Canada.
Bluetooth
Bluetooth est une marque appartenant à Bluetooth SIG, Inc.
18
Garantie et Remplacement des pièces
Garantie de produit limitée JABRA. JABRA garantit à l’Acheteur que durant une période
d’une (1) année à compter de la date d’achat (la « Période de garantie ») de tout produit
JABRA (le « Produit ») par l’Acheteur, le Produit sera en substance conforme aux
spécifications publiées par JABRA pour celui-ci à la date d’achat du Produit par
l’Acheteur, sous réserve des dispositions des présentes. L’Acheteur informera JABRA de
tout défaut de conformité au cours de la Période de garantie et obtiendra de JABRA
une autorisation écrite de retour de matériel (« ARM »), ainsi qu’un numéro d’ARM pour
le Produit non-conforme, et retournera le Produit non-conforme à JABRA à l’adresse
suivante : JABRA Corporation, 9171 Towne Centre Drive, Suite 500, San Diego, California
92122 USA, en port payé, accompagné d’une déclaration décrivant le défaut de
conformité. La seule obligation de JABRA concernant le Produit non-conforme sera, au
choix et aux frais de JABRA, de réparer ou de remplacer le Produit de sorte que celui-ci
soit en substance conforme aux spécifications publiées à la date d’acquisition par
l’Acheteur ou bien, si JABRA détermine à sa seule discrétion qu’il n’est pas possible de
réparer ou de remplacer le Produit, JABRA pourra, à son gré, rembourser à l’Acheteur le
29
19
30
4
Le code clé ou PIN est un code secret qui doit être saisi sur le téléphone pour
appairer le téléphone mobile avec FreeSpeak. Lorsque vous avez appairé votre
téléphone mobile avec FreeSpeak, le téléphone et le casque se reconnaîtront
réciproquement et le téléphone omettra la procédure de repérage et
d‘authentification et acceptera automatiquement la transmission.
5
Le casque est en mode actif lorsqu’un appel est en cours. FreeSpeak passe du mode
veille en mode actif lorsque vous recevez ou effectuez un appel. Lorsque FreeSpeak
est en mode actif, le voyant bleu clignote toutes les secondes.
6
Le casque est en mode veille lorsqu’il attend passivement un appel. Lorsque vous
« mettez fin » à un appel sur votre téléphone mobile, FreeSpeak passera en mode
veille. Lorsque FreeSpeak est en mode veille, le voyant bleu clignotera toutes les
trois secondes.
Français
Français
prix d’achat payé pour le Produit. CE QUI PRECEDE EST LE SEUL ET UNIQUE RECOURS
DE L’ACHETEUR EN CAS DE VIOLATION DE LA GARANTIE PAR JABRA CONCERNANT LE
PRODUIT. La garantie stipulée ci-dessus ne s’appliquera à aucun Produit n’ayant pas été
utilisé ou manipulé de manière adéquate, conformément aux instructions fournies par
JABRA, perdu ou égaré pour quelque raison que ce soit, modifié, réparé ou transformé,
sauf par JABRA ou dans les installations de service agréées de JABRA, ayant fait l’objet
d’une installation défectueuse, d’une mauvaise utilisation ou d’un usage abusif, ou
lorsque le défaut du Produit est imputable à un défaut ou à un dommage échappant au
contrôle raisonnable de JABRA. La présente garantie ne s’applique qu'à l'Acheteur et ne
s'étend à aucun autre distributeur, détaillant ou autre revendeur du Produit. LES
GARANTIES CI-DESSUS SONT LES SEULES GARANTIES, EXPRESSES OU IMPLICITES,
ACCORDEES PAR JABRA EN LIAISON AVEC LE PRODUIT, ET JABRA REJETTE TOUTES
AUTRES GARANTIES, Y COMPRIS LES GARANTIES DE QUALITE MARCHANDE,
D’ADEQUATION A UN OBJET PARTICULIER ET DE NON-CONTREFAÇON DE DROIT DES
TIERS. JABRA NE SERA RESPONSABLE D’AUCUNS DOMMAGES SPECIAUX, ACCIDENTELS
OU CONSECUTIFS SURVENUS EN LIAISON AVEC LE PRODUIT, ET CELA MEME SI JABRA A
ETE INFORMEE DE L’EVENTUALITE DE TELS DOMMAGES. LA RESPONSABILITE DE JABRA
EN VERTU DES PRESENTES POUR TOUTE DEMANDE EN INDEMNISATION N’EXCEDERA
PAS LE MONTANT PAYE A JABRA PAR L’ACHETEUR POUR LE PRODUIT A L’ORIGINE DE LA
RESPONSABILITE DE JABRA.
Glossaire
1
Bluetooth est une technologie radio développée pour connecter des périphériques,
tels que des téléphones mobiles et des casques, sans fil ni cordon, sur une courte
distance d’environ 10 mètres (30 pieds). De plus amples informations sont
disponibles sur le site : www.bluetooth.com
2
Les profils Bluetooth sont des protocoles par le biais desquels les appareils
Bluetooth communiquent avec d’autres périphériques. Les téléphones Bluetooth
sont compatibles avec différents ensembles de profils – la plupart supportent le
profil casque, mais certains supportent le profil mains libres et d’autres les deux
profils. Pour être compatible avec un profil donné, il faut que le fabricant d’un
téléphone mette en œuvre un certain nombre de fonctionnalités obligatoires
dans le logiciel du téléphone.
3
L’appairage crée un lien de communication unique et codé entre deux appareils
Bluetooth et leur permet de communiquer l’un avec l’autre. Les appareils Bluetooth
ne fonctionneront pas si les équipements n’ont pas été appairés l’un à l’autre.
31
Español
1.
Compruebe la compatibilidad del teléfono . . . . . . . . . . . . . . . . . . . . . . . . . . . . 34
2.
Cargue el JABRA® FreeSpeak™ 250 . . . . . . . . . . . . . . . . . . . . . . . . . . . . . . . . . . . . . 34
3.
Lea el glosario . . . . . . . . . . . . . . . . . . . . . . . . . . . . . . . . . . . . . . . . . . . . . . . . . . . . . . . 35
4.
“Emparejamiento” del auricular con su teléfono Bluetooth™ . . . . . . . . . . . . 36
Français
5.
Encender/apagar el auricular . . . . . . . . . . . . . . . . . . . . . . . . . . . . . . . . . . . . . . . . . 37
6.
Preferencias de uso . . . . . . . . . . . . . . . . . . . . . . . . . . . . . . . . . . . . . . . . . . . . . . . . . . 38
7.
Cómo hacer una llamada . . . . . . . . . . . . . . . . . . . . . . . . . . . . . . . . . . . . . . . . . . . . . 38
8.
Cómo terminar una llamada . . . . . . . . . . . . . . . . . . . . . . . . . . . . . . . . . . . . . . . . . . 39
9.
Cómo contestar una llamada . . . . . . . . . . . . . . . . . . . . . . . . . . . . . . . . . . . . . . . . . 39
10. Llamada en espera . . . . . . . . . . . . . . . . . . . . . . . . . . . . . . . . . . . . . . . . . . . . . . . . . . 39
11. Cómo reiniciar el auricular . . . . . . . . . . . . . . . . . . . . . . . . . . . . . . . . . . . . . . . . . . . 40
12. Consejos para teléfonos Bluetooth Nokia . . . . . . . . . . . . . . . . . . . . . . . . . . . . . . 40
Español
13. Funciones avanzadas (para teléfonos Bluetooth
con perfil manos libres) . . . . . . . . . . . . . . . . . . . . . . . . . . . . . . . . . . . . . . . . . . . . . . 40
14. Preguntas frecuentes . . . . . . . . . . . . . . . . . . . . . . . . . . . . . . . . . . . . . . . . . . . . . . . . .42
15. ¿Necesita más ayuda? . . . . . . . . . . . . . . . . . . . . . . . . . . . . . . . . . . . . . . . . . . . . . . . . 43
16. Cómo almacenar el auricular . . . . . . . . . . . . . . . . . . . . . . . . . . . . . . . . . . . . . . . . 44
17. Certificaciones y homologaciones de seguridad . . . . . . . . . . . . . . . . . . . . . 44
18. Garantía y sustitución de piezas . . . . . . . . . . . . . . . . . . . . . . . . . . . . . . . . . . . . 45
19. Glosario . . . . . . . . . . . . . . . . . . . . . . . . . . . . . . . . . . . . . . . . . . . . . . . . . . . . . . . . . . . . 46
32
33
1 Indicador azul
1
2 Botón multifunción
3 Botón de control de volumen
2
4
4 Cargador / soporte
5 MiniGel™
5. Desenchufe el adaptador de corriente del cargador/soporte.
6. Retire el auricular del cargador/soporte. Ahora puede “emparejar” el JABRA
FreeSpeak 250 con su teléfono móvil. Si el auricular ya ha sido “emparejado” con su
teléfono, puede empezar a utilizarlo.
ADVERTENCIA: No intente cargar el JABRA FreeSpeak 250 con un adaptador que
no sea el adaptador de corriente suministrado. Si utiliza otro adaptador, puede
dañar o inutilizar el auricular.
5
3
4
1
4
ESPERE: ANTES DE USAR SU AURICULAR
1
3
6
Compruebe la compatibilidad del teléfono
2
JABRA también ofrece versiones manos libres para la mayoría de los teléfonos que no
sean Bluetooth.
5
Fig. 1
IMPORTANTE: El indicador azul estará encendido durante la carga y se apagará
cuando la carga esté completa. Si se retira el auricular del cargador/soporte durante la
carga, el auricular entrará en el modo de espera y se detendrá el proceso de carga.
Español
Español
El JABRA FreeSpeak 250 es compatible con la mayoría de los teléfonos Bluetooth1 (ver
Glosario) que sean compatibles con la especificación Bluetooth versión 1.1 o superior y
que soporten el perfil de auricular y/o manos libres2. Asegúrese de que su teléfono es
compatible con Bluetooth visitando el sitio web del fabricante de su teléfono o el sitio
web de JABRA, www.jabra.com
IMPORTANTE: El JABRA FreeSpeak 250 no puede utilizarse mientras se está cargando.
2
Cargue el JABRA FreeSpeak 250
El JABRA FreeSpeak 250 utiliza una batería recargable que debe cargarse
completamente antes de utilizar el auricular por primera vez.
3
Lea el glosario
1. Introduzca completamente el auricular en el cargador/soporte.
Lea el glosario que aparece al final de este documento para familiarizarse con los
términos importantes utilizados en este Manual del Usuario.
2. Enchufe el adaptador de corriente del JABRA FreeSpeak 250 en el cargador/soporte
del auricular.
Una vez que su JABRA FreeSpeak 250 esté totalmente cargado, siga con estas instrucciones.
3. Enchufe el adaptador de corriente en una toma de corriente.
4. Cargue el auricular hasta que se apague el indicador azul del JABRA FreeSpeak 250.
La unidad debe quedar totalmente cargada en unas dos horas.
34
35
OPERACIONES BÁSICAS
“Emparejamiento” del auricular con
su teléfono Bluetooth
El “emparejamiento”3 creará un enlace inalámbrico exclusivo y encriptado entre dos
dispositivos Bluetooth, como pueden ser su teléfono Bluetooth y el JABRA FreeSpeak 250.
5
Encender/apagar el auricular
1. Asegúrese de que el auricular está apagado
(ver la sección Encender/apagar el auricular).
2. Pulse el botón y manténgalo pulsado
hasta que el indicador azul brille de forma
continua (aproximadamente 8 segundos),
luego suelte el botón* (ver Fig. 2).
3. Haga que su teléfono Bluetooth "descubra"
el auricular siguiendo la guía de
instrucciones de su teléfono.
Normalmente, tendrá que ir al menú
“configuración”,“conexión”, o “Bluetooth”
de su teléfono y luego seleccionar la
opción correspondiente a “descubrir” un
dispositivo Bluetooth.
Español
4. Su teléfono encontrará el auricular
“JABRA 250” y le preguntará si desea
realizar el “emparejamiento” con él.
Confirme pulsando “sí” u “ok”.
Qué debe hacer
Qué debe oír
Qué debe ver
Para
encender el
auricular
Pulse el botón y
manténgalo pulsado
durante 3 - 5 segundos
hasta que el indicador azul
parpadee rápidamente,
luego suelte el botón
Tonos
ascendentes (de
bajo a agudo)
El indicador azul
parpadeará mientras
el auricular está
encendido (ver la
tabla de Indicadores
de estado a
continuación)
Para apagar
el auricular
Press and hold for 3 to 5
seconds until you see a
burst of flashes on the blue
indicator light, then release
Tonos
descendentes
(de agudo a bajo)
El indicador azul
dejará de parpadear
Fig. 2
Indicadores de estado
Fig. 3
Qué debe ver
Qué debe oír
Estado
Parpadea cada
segundo
Serie rápida de 2 tonos
— de tono bajo a agudo
(cuando se inicia el
modo activo)
Modo Activo5
Llamada en progreso
Hasta 8 horas de
conversación*
Parpadea cada 3
segundos
Serie rápida de 2 tonos
— de tono agudo a bajo
(cuando se inicia el
modo de espera)
Modo de espera6
Esperando llamada
Hasta 240 horas en espera*
3 parpadeos cada
segundo
3 bips cada 30 segundos
Batería Baja (en modo activo)
Quedan de 3 a 5 minutos
de conversación
3 parpadeos cada
3 segundos
3 bips cada 5 minutos
Batería Baja (en modo de espera)
Quedan de 3 a 5 minutos
de conversación
5. 5 Introduzca el código o el PIN4 = 0000 (4 ceros), luego pulse “sí” u “ok”.
IMPORTANTE: Si el “emparejamiento” se realizó con éxito, el indicador azul parpadeará
breve y rápidamente antes de volver al parpadeo normal, cada 3 segundos. Si no hubo
éxito, el indicador seguirá encendido de forma continua, y usted tendrá que intentar el
“emparejamiento” de nuevo (ver los pasos 3–5 anteriores).
* Si usted tiene un teléfono Bluetooth con soporte para el perfil Bluetooth manos
libres, consulte la sección Funciones avanzadas, que contiene instrucciones de
“emparejamiento”alternativas. Puede encontrar instrucciones específicas de
“emparejamiento” para determinados teléfonos en www.jabra.com/fscs
Español
4
•
•
•
•
•
•
* Dependiendo del tipo de teléfono y del uso.
36
37
6
Preferencias de uso
•
•
•
•
Para obtener un rendimiento óptimo,
lleve el JABRA FreeSpeak 250 y su
teléfono Bluetooth en el mismo lado de
su cuerpo. En general, usted obtendrá
mejores resultados si no hay obstrucción
alguna (incluyendo partes de su cuerpo)
entre el auricular y el teléfono.
Español
Cómo hacer una llamada
Si el JABRA FreeSpeak 250 está apagado, enciéndalo ahora (ver la sección
Encender/apagar el auricular).
Usando el teclado del teléfono
•
•
Cómo contestar una llamada
Cuando oiga el tono de llamada, pulse una vez y suelte el botón .
O
Conteste a la llamada usando el teclado del teléfono. Puede que necesite entonces
transferir la llamada al auricular pulsando y soltando una vez el botón
(dependiendo de su teléfono).
10
Fig. 4
Cómo terminar una llamada
Pulse una vez y suelte el botón .
O
Termine la llamada usando el teclado del teléfono.
9
El FreeSpeak 250 viene preparado para
llevarse en la oreja derecha. Si usted
prefiere la izquierda, gire el MiniGel
cuidadosamente un ángulo de 180°.
7
8
Llamada en espera*
(Recomendado) Utilice el método estándar desde el teclado de su teléfono,
típicamente pulsando el botón “enviar” del teléfono
O
Pulse y suelte una vez el botón para contestar a la llamada entrante y cambiar
entre llamadas (algunos teléfonos no soportan esta función del auricular).
Español
IMPORTANTE: No mantenga pulsado el botón durante más de 5 segundos al
encender el auricular, porque podría entrar en modo de “emparejamiento”, y el indicador
azul brillaría de forma continua. Si esto ocurre, apague el auricular, espere de 3 a 5
segundos, y repita el proceso para encender el auricular.
IMPORTANTE: No mantenga pulsado el botón durante demasiado tiempo al hacer,
terminar o contestar una llamada. Debe dar un golpe seco y breve, con el fin de no
poner el auricular accidentalmente en modo “emparejamiento”.
1. Marque el número usando el teclado.
2. Pulse la tecla “enviar” del teléfono.
Usando la marcación activada por voz (una vez configuradas las “etiquetas de voz”
en su teléfono)
1. Pulse y suelte una vez el botón
* Consulte la sección Funciones avanzadas, que contiene instrucciones alternativas
de Llamada en espera para teléfonos que soportan el perfil manos libres.
. Oirá un bip corto mientras lo hace.
2. Luego oirá el tono de activación por voz; diga el nombre de la persona a la que
desea llamar.
NOTA: Grabe la “etiqueta de voz” desde el auricular para obtener una mejor recepción.
38
39
11
Cómo reiniciar el auricular
Si el auricular no responde o el indicador azul no se enciende o no se apaga
después del “emparejamiento”, es posible que tenga que REINICIAR el auricular.
1. Introduzca el auricular completamente en el cargador/soporte.
2. Enchufe el adaptador de corriente del JABRA FreeSpeak 250 en el cargador/soporte
del auricular.
3. Enchufe el adaptador de corriente en una toma de corriente.
4. Deje el auricular en el cargador/soporte durante unos 3 segundos, luego retire el
auricular (ver Fig. 1).
5. Desenchufe el adaptador de corriente del cargador/soporte.
12
Consejos para teléfonos Bluetooth Nokia
(tales como las series Nokia 6310 y 8910)
Español
Asegúrese de que el teléfono permite que el auricular se conecte sin autorización. Para
hacer esto, debe ajustar la configuración de su teléfono.
Seleccione las siguientes opciones de menú:
•
Menú > Bluetooth > Ver dispositivos emparejados > seleccione su auricular, pulse
“Opciones“ > ¿Solicitar autorización de conexión? — No
13
Funciones avanzadas (para teléfonos
Bluetooth con perfil manos libres)
Están disponibles funciones avanzadas para teléfonos que soportan el perfil
manos libres de Bluetooth, tales como Nokia 3600, 3650, 6310, 6310i, 8910,
8910i, Sony Ericsson T610, T616, T618, Siemens S55 y S56. Consulte la guía de
instrucciones de su teléfono o póngase en contacto con el fabricante del teléfono
si no está seguro de si su teléfono soporta el perfil manos libres de Bluetooth.
40
Puede activar estas funciones avanzadas usando la siguiente secuencia de
“emparejamiento” alternativa.
“Emparejamiento” con un teléfono Bluetooth con perfil manos libres:
1. Asegúrese de que el auricular está
apagado (ver la sección
Encender/apagar el auricular).
2. Pulse y mantenga pulsado el botón y
también el botón subir volumen hasta
que el indicador azul brille de modo
continuo (aproximadamente 8
segundos), luego suelte los botones
(ver Fig. 5).
Fig. 5
3. Haga que su teléfono Bluetooth
“descubra” el auricular siguiendo la guía
de instrucciones de su teléfono.
Normalmente, tendrá que ir al menú
“configuración” o “conexión” o “Bluetooth”
de su teléfono y luego seleccionar la
opción correspondiente a “descubrir” un
dispositivo Bluetooth*.
Fig. 6
Español
CONSEJOS Y SOLUCIONES
4. Su teléfono encontrará el auricular
“JABRA 250” y le preguntará si desea
realizar el "emparejamiento" con él. Confirme pulsando “sí” u “ok”.
5. Introduzca el código o el PIN = 0000 (4 ceros), luego pulse “sí” u “ok”.
* Puede encontrar en línea instrucciones específicas de “emparejamiento” para
determinados teléfonos y una lista actualizada de teléfonos que tienen el
perfil manos libres en www.jabra.com/fscs
IMPORTANTE: Si el “emparejamiento” se realizó con éxito, el indicador azul parpadeará
breve y rápidamente antes de volver al parpadeo normal, cada 3 segundos. Si no hubo
éxito, el indicador seguirá encendido de forma continua, y usted tendrá que intentar el
“emparejamiento” de nuevo (ver los pasos 3–5 anteriores).
41
•
Remarcado del último número (cuando no hay llamada activa)
Con el auricular encendido, pulse y mantenga pulsado el botón hasta que oiga 2
bips cortos, luego suelte inmediatamente el botón.
•
Rechazar una llamada entrante (cuando no hay llamada activa)
Cuando suene el teléfono, pulse y mantenga pulsado el botón hasta que oiga 2
bips cortos, luego suelte inmediatamente el botón.
•
Llamada en espera (cambiar entre 2 llamadas)
llamada, pulse y mantenga pulsado el botón hasta que oiga 2 bips cortos, luego
suelte inmediatamente el botón.
•
Poner una llamada en espera
Durante una llamada, pulse y mantenga pulsado el botón hasta que oiga 2 bips
cortos, luego suelte inmediatamente el botón. Repita para recuperar la llamada.
14
Preguntas frecuentes
1. ¿A qué distancia de mi teléfono funcionará mi JABRA FreeSpeak 250?
El alcance operativo es típicamente de hasta 10 metros.
Español
2. ¿Funcionará el JABRA FreeSpeak 250 con el teléfono inalámbrico que tengo
en casa?
El JABRA FreeSpeak 250 no está diseñado para funcionar con teléfonos inalámbricos.
3. ¿Funcionará el JABRA FreeSpeak 250 con ordenadores portátiles, PCs y PDAs?
El JABRA FreeSpeak 250 funcionará con cualquier dispositivo que sea compatible
con la especificación Bluetooth versión 1.1 o superior y que soporte el perfil de
auricular y/o manos libres.
4. ¿Hay algo que puede causar interferencias en mi conversación mientras utilizo
mi JABRA FreeSpeak 250?
Aparatos tales como teléfonos inalámbricos y equipos de red inalámbricos pueden
causar interferencias en su conversación, normalmente en forma de crujidos. Para
reducir cualquier interferencia, mantenga el auricular alejado de otros dispositivos
que utilizan o producen ondas de radio.
42
5. ¿Puede interferir mi JABRA FreeSpeak 250 con la radio, el ordenador o el
sistema electrónico de mi automóvil?
El JABRA FreeSpeak 250 produce bastante menos potencia que un teléfono móvil
típico. Asimismo, únicamente emite señales que cumplen el estándar internacional
Bluetooth. Por tanto, usted no debe experimentar interferencia alguna con equipos
electrónicos normales de consumo.
6. ¿Pueden oír mi conversación otros usuarios de teléfonos Bluetooth?
Cuando usted empareja su auricular a su teléfono Bluetooth, crea un enlace privado
únicamente entre estos dos dispositivos Bluetooth. La tecnología inalámbrica
Bluetooth utilizada en su auricular no puede ser monitorizada fácilmente por
terceros, porque las señales inalámbricas Bluetooth tienen una potencia de
radiofrecuencia significativamente menor que la de un teléfono móvil normal.
7. ¿De qué material está hecho el auricular?
El MiniGel está hecho de PVC (cloruro de polivinilo), un tipo de plástico. El auricular
en sí está hecho principalmente de poliuretano termoplástico, un plástico blando.
La cara del auricular en la que están ubicados los botones está fabricada en
policarbonato, un plástico muy duro y resistente. Ni el MiniGel ni el auricular
contienen látex.
8. ¿Qué cuidados necesita mi JABRA FreeSpeak 250?
• Para limpiar el auricular, utilice un paño limpio y suave, ligeramente humedecido.
• Para limpiar el MiniGel, levántelo y tire suavemente para separarlo del auricular.
Luego, lávelo en agua templada jabonosa.
15
Español
Cuando termine el proceso de emparejado, estarán disponibles las siguientes
funciones nuevas del auricular:
¿Necesita más ayuda?
1. Web: www.jabra.com/fscs (para acceder a la información más actualizada,
y Manuales de Usuario)
2. E-mail: Soporte técnico (Norteamérica/Asia-Pacífico): [email protected]
Información (Norteamérica/Asia-Pacífico): [email protected]
Soporte técnico (Europa/Oriente Medio/África): [email protected]
Información (Europa/Oriente Medio/África): [email protected]
3. Teléfono: +1 800-327-2230
+1 858-622-9955
43
Cómo almacenar el auricular
1. Guarde siempre el JABRA FreeSpeak 250 apagado y en un lugar seguro.
2. Evite guardarlo en lugares en los que se alcanzan temperaturas elevadas (por encima de
los 60°C / 134°F) – tales como un vehículo caldeado o a la luz del sol.(El almacenamiento
a altas temperaturas puede reducir el rendimiento y la vida de la batería).
3. No exponga el auricular o cualquiera de los componentes suministrados a la lluvia
o a otros líquidos.
17
Certificaciones y homologaciones de seguridad
FCC
Este dispositivo cumple la Parte 15 de la Normativa FCC. Su operación está sujeta a las
siguientes dos condiciones: (1) Este dispositivo no debe causar interferencias dañinas, y
(2) este dispositivo debe aceptar cualquier interferencia recibida, incluyendo
interferencias que causen una operación no deseada.
Español
No se permite a los usuarios efectuar cambios o modificar el dispositivo de modo
alguno. Cualquier cambio o modificación no expresamente autorizado por JABRA (GN
Netcom) invalidará la autorización del usuario para utilizar el equipo.
Este equipo ha sido probado y se ha verificado que cumple los límites de un dispositivo
digital de la Clase B, conforme con la parte 15 de la Normativa FCC. Estos límites están
diseñados para proporcionar protección razonable contra interferencias dañinas en una
instalación residencial. Este equipo genera, utiliza y puede radiar energía de
radiofrecuencia y, en caso de no instalarse y utilizarse de acuerdo con las instrucciones,
puede causar interferencia dañina en las comunicaciones por radio. No obstante, no hay
garantía de que no se produzcan interferencias en una instalación determinada. Si este
equipo causa interferencias dañinas a la recepción de radio o televisión, lo cual puede
determinarse encendiendo y apagando el equipo, se recomienda al usuario intentar
corregir la interferencia con una o más de las siguientes medidas:
•
•
•
44
Reorientar o reubicar la antena de recepción.
Aumentar la separación entre el equipo y el receptor.
Conectar el equipo a un enchufe que esté en un circuito diferente al circuito al que
está conectado el receptor.
•
Consultar con el distribuidor o con un técnico experimentado en radio/televisión.
El usuario debe colocar la base a 20cm (8") o más de cualquier persona con el fin de
cumplir los requisitos de exposición RF de la FCC.
Industry Canada (Ministerio de Industria del Canadá)
Su operación está sujeta a las siguientes dos condiciones: (1) Este dispositivo no debe
causar interferencias, y (2) Este dispositivo debe aceptar cualquier interferencia,
incluyendo interferencias que causen una operación no deseada del dispositivo.
El término "IC:" que antecede al número de certificación/registro significa únicamente
que el registro realizado se basó en una Declaración de Conformidad que indicaba el
cumplimiento de las especificaciones técnicas de Industry Canada. No implica que
Industry Canada haya aprobado el equipo.
Bluetooth
Bluetooth es una marca propiedad del Bluetooth SIG, Inc.
18
Garantía y sustitución de piezas
Garantía limitada de productos JABRA. JABRA garantiza al Comprador que durante un periodo de un
(1) año a partir de la fecha de la compra (el "Periodo de Garantía") de cualquier producto JABRA
("Producto") por el Comprador, el Producto cumplirá de forma sustancial las especificaciones
publicadas de JABRA correspondientes al Producto en la fecha de la compra del Producto por parte
del Comprador, con arreglo a los términos aquí contenidos. El Comprador notificará a JABRA de
cualquier incumplimiento durante el Periodo de Garantía y obtendrá de JABRA una autorización
escrita de devolución de material ("RMA") y un número RMA para el producto no conforme, y
devolverá el Producto no conforme a JABRA a la dirección siguiente: JABRA Corporation, 9171 Towne
Centre Drive, Suite 500, San Diego, California 92122 EE.UU., con portes pagados, con una declaración
que describa el incumplimiento. La obligación exclusiva de JABRA respecto a Productos no
conformes será, a opción de JABRA y a su costa, la de reparar o sustituir dicho Producto para que
cumpla de forma sustancial sus especificaciones publicadas en la fecha de la compra del Producto
por parte del Comprador, o, si JABRA, a su sola discreción, determina que no es posible reparar o
sustituir el Producto, JABRA puede, a opción de JABRA, reembolsar al Comprador el precio de compra
pagado por el Producto. LO ANTERIOR ES EL ÚNICO Y EXCLUSIVO REMEDIO DEL COMPRADOR O
RESPECTO A CUALQUIER INCUMPLIMIENTO DE LA GARANTÍA POR JABRA RESPECTO AL PRODUCTO.
La garantía arriba descrita no será aplicable a producto alguno que no haya sido usado o
manipulado correctamente de acuerdo con las instrucciones suministradas por JABRA, que haya sido
perdido o extraviado por cualquier razón, o que haya sido modificado o reparado, salvo por JABRA o
Español
16
45
en una instalación de servicio técnico autorizado de JABRA, o que haya sido sometido a instalación
errónea, mal uso, abuso, o cuyo defecto sea atribuible a cualquier fallo o daño que esté fuera del
control razonable de JABRA. Esta garantía está disponible únicamente para el Comprador, y no es
extensible a distribuidores, detallistas u otros vendedores del Producto. LAS GARANTÍAS ANTERIORES
SON LAS ÚNICAS GARANTÍAS, EXPRESAS O IMPLÍCITAS, DADAS POR JABRA RESPECTO AL
PRODUCTO,Y JABRA RECHAZA TODA OTRA GARANTÍA, INCLUYENDO GARANTÍAS DE
MERCANTIBILIDAD, ADECUACIÓN PARA UN PROPÓSITO DETERMINADO Y NO INFRACCIÓN DE
DERECHOS DE TERCEROS. JABRA NO SERÁ RESPONSABLE DE NINGÚN DAÑO ESPECIAL, INCIDENTAL
O CONSECUENTE RESPECTO AL PRODUCTO, INCLUSO SI JABRA HA SIDO ADVERTIDO DE LA
POSIBILIDAD DE DICHOS DAÑOS. LA RESPONSABILIDAD DE JABRA BAJO ESTA GARANTÍA RESPECTO
A TODA RECLAMACIÓN NO SUPERARÁ EL IMPORTE PAGADO POR EL COMPRADOR A JABRA POR EL
PRODUCTO QUE DÉ LUGAR A LA RESPONSABILIDAD DE JABRA.
6
El Modo de espera es cuando el auricular está esperando pasivamente una llamada.
Cuando usted “termine” la llamada en su teléfono móvil, FreeSpeak pasará al modo
de espera. Cuando FreeSpeak está en modo de espera, el indicador azul parpadeará
cada tres segundos.
Glosario
1
Bluetooth es una tecnología de radio desarrollada para conectar dispositivos tales
como teléfonos móviles y auriculares, sin cables, a distancias muy cortas de
aproximadamente 10 metros. Para más información, visite www.bluetooth.com
2
Los perfiles Bluetooth son protocolos mediante los cuales los dispositivos Bluetooth
se comunican con otros dispositivos. Los teléfonos Bluetooth ofrecen soporte para
diferentes conjuntos de perfiles – la mayoría tienen soporte para auriculares, pero
algunos tienen soporte para el perfil manos libres, y otros tienen soporte para
ambos. A fin de ofrecer soporte para un perfil determinado, un fabricante de
teléfonos tiene que implementar determinadas características obligatorias en el
software del teléfono.
3
El emparejamiento crea un enlace de comunicación exclusivo y encriptado entre
dos dispositivos Bluetooth y permite que se comuniquen entre sí. Los dispositivos
Bluetooth no funcionarán hasta que hayan sido emparejados.
4
Código o PIN es un código secreto que usted debe introducir en el teléfono para
emparejar el móvil con FreeSpeak. Una vez que haya emparejado su teléfono
móvil con FreeSpeak, el teléfono y el auricular se reconocerán, y el teléfono pasará
por alto el proceso de descubrimiento y autentificación, aceptando automáticamente
la transmisión.
Español
46
El Modo activo es cuando el auricular tiene una llamada activa en progreso.
FreeSpeak pasará del modo de espera al modo activo cuando usted reciba o haga
una llamada. Cuando FreeSpeak está en modo activo, el indicador azul parpadeará
cada segundo.
Español
19
5
47
© 2004 JABRA Corporation, a GN Netcom company. All rights reserved. Patents pending.
JABRA and the JABRA logo are registered trademarks of JABRA Corporation in the USA
and may be registered in other countries. FreeSpeak and MiniGel are trademarks of
JABRA. Bluetooth is a trademark owned by Bluetooth SIG, Inc. and is used by JABRA
under license. Design and specifications subject to change without notice. The JABRA
FreeSpeak headset may not be authorized for use in some countries.
www.jabra.com
1
YEAR
WARRANTY