1
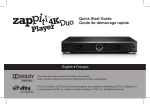
Auto Guide
Figure 1: Product Description
Back
Front
h USB Output (5V/1A)
g Embedded WiFi
a WPS
TA2
j
i
b 5V/1A
5V/ 512 mA
e Hotspot LED
c
j
Antenna Connectors
Frequency Switch
TA3
(3 tuners)
i
j
d WLAN LED
Reset
12V-24V/ 2A Power
k Diversity & Automatic
f USB Host
USB Input
i
(2 tuners)
k
TA4
(4 tuners)
i
Figure 2 : Antenna
TAx- R
k
j
TAx- B
TAx- L
1
1 Cable down
1
1
2 Cable up
2
3
2
1
2
2
2
3
Figure 3 : TV and Multimedia Access Point
Download
Figure 4 : Application
Tablet
Application
TVman
Connected to TVman
Smartphone
2
1
1
Available on
Available on
Apple ios
Android
www.noovo.co
PC / Mac
www.noovo.co/ [email protected]/ [email protected]
I. Installation
Freeview, DVB-T
TNT, DVB-T
1. To watch TV: Install « TVman DVB » application from AppStore, GooglePlay or from our website for Window PC and MAC (Fig. 4)
2. To Play Multimedia from USB Disk: Install any players compatible with Samba server (check our web site for references).
3. Plug the power supply cable from TVman i to your cigar lighter (trunk or dashboard).
4. Hide TVman Auto below the passenger seat, on the trunk spare wheel compartment…
5. Install the antenna (refer to II) and screw to TVman j
6. Supply your GPS and charge your phone, tablet from the two USB outputs f h
7. Stream wirelessly your Movies, cartoons, music from your USB Disk f to 8 smart devices (format the disk in NTFS).
1. Regardez la TNT: Installer l'application «TVman DVB» sur l'AppStore, GooglePlay ou notre site Web pour Windows PC et MAC (Fig 4).
2. Visualisez vos multimédias du disque USB: Installez une application compatibles avec le serveur Samba (Références sur notre site).
3. Branchez le câble d'alimentation du TVman i à votre allume-cigare (coffre ou tableau de bord).
4. Placez le TVman Auto dessous le siège du passager, dans le coffre, compartiment de la roue de secours ...
5. Installez l'antenne (voir II) et vissez la au TVman Auto j
6. Alimentez votre GPS ou rechargez votre téléphone, tablette aux sorties USB f h
7. Diffusez vos films, dessins animés, musiques de votre disque USB f vers huit appareils intelligents (formater le disque en NTFS).
II. Antenna Installation (Refer to Fig. 2) *
II. Installation des antennes (voir la figure 2). *
1. TAx-R (Roof Rod antenna): Place the antenna as described on Fig 2 TAx-R option 1, 2 or 3. Avoid metallic objects around antennas.
Hide the cables on the door rubbers down to the floor, bellow carpets and connect to TVman below the passenger seat.
1. TAx-R (antenne Tige de toit): Placez les antennes (voir Fig 2 TAx-R option 1, 2 or 3). Évitez les objets métalliques autour des antennes.
Cachez les câbles dans les caoutchoucs des portes vers le sol, sous les tapis et connectez les au TVman sous le siège du passager.
2. TAx-L (Window Linear antenna): Choose where to hide the cables: up in the roof or down to the carpet: Fig 2 TAx-L option 1 or 2
- Option 1: Cables (down) can follow the windscreen and be hidden in the door rubbers down to the floor, bellow carpets and be
connected to TVman below the passenger seat. The L antenna should be placed on the Left side and R antenna on the Right side.
- Option 2: Cables (up) can be hidden in the roof isolation and down beside the plastic decoration and connect to TVman below
the seat. The L antenna should be placed on the right side and R antenna on the left (Antenna upside down).
Stick Two antennas on the top (preferred) corners of your front windscreen (preferred) then others to the back windscreen (one for TA3
and two for TA4). For better reception, avoid placing the antenna over the window UV filtering film. Clean your window, remove
the sticker no.1, stick the antenna then remove the sticker no.2. Remove the sticker from the cable connector, place its contacts
to match with the antenna contacts and stick over as described in the fig 2. Align the cable with the antenna. *
2. TAx-L (antenne linéaire fenêtre): Choisissez où cacher les câbles: dans le faux plafond ou sous les tapis: Fig 2 TAx-L option 1 or 2
- Option 1: Les Câbles (vers le bas) peuvent suivre le pare-brise, être caché dans les caoutchoucs des portes, sous les tapis de sol afin
de les connecter au TVman sous le siège du passager. L'antenne L doit être placé sur le côté gauche et R sur le côté droit.
- Option 2: Les Câbles (vers le haut) peuvent être caché dans le faux plafond et descendre derrière la décoration plastique vers le sol afin
de les connecter au TVman sous le siège du passager. L'antenne L doit être placé sur le côté droit et R sur le côté gauche (à l'envers).
Collez Deux antennes de préférence dans les coins supérieurs du pare-brise avant puis les autres sur le pare-brise arrière.
Pour une meilleure réception, évitez de placer l'antenne sur les filtres UV de vos fenêtres. Nettoyez votre fenêtre, enlever l'autocollant n°1,
collez l'antenne puis retirer l'autocollant n°2. Retirez l'autocollant du connecteur au bout du câble, placez ses contacts en correspondance
avec ceux de l'antenne et collez comme décrit dans la figure 2. Alignez le câble avec l'antenne.
3. TAx-B (Bumper antenna): Stick Two antennas on the front bumper (preferred) then others to the back bumper by avoiding the
Metallic License plate: Fig 2 TAx-B option 1 and 2 . Attach the cables below the car using the Nylon Cable Tie (Avoid moving and hot
area). Check the car architecture to find pass-through from outside to inside and screw the antenna to TVman below the passenger seat.
3. TAx-B (antenne pare-chocs): coller les deux antennes de préférence sur le pare-chocs avant puis les autres sur le pare-chocs arrière en
évitant la Plaque d'immatriculation métallique: Fig 2 TAx-B option 1 and 2. Fixez les câbles en dessous de la voiture (Évitez les parties
chaude ou en mouvement). Vérifiez l'architecture de la voiture pour trouver un passage de l'extérieur vers l'intérieur et vissez l'antenne au
TVman dessous le siège du passager.
français
English
I. Installation
Warning: Use only TVman Auto antenna (5V amplification) to not damage your product.
Attention: Utilisez uniquement l'antenne TVman Auto (5V amplification) pour ne pas endommager le produit.
III. Comment utiliser votre TVman Auto?
III. How to use TVman Auto?
1. Start your car (or ACC position) and wait for the blue LED to be solid to connect your smart devices to TVman WiFi (TVmanxxx).
2. Watch TV: Open “TVman DVB” application, scan the TV frequencies (first time only) and select a TV channel.
3. Play Multimedia: Open your “multimedia application”, scan the network to find TVman “Samba” and play your USB disk files *
4. While traveling between two TV networks a new frequency scan could be required. Scan manually on TA2 or turn on the “automatic
scan” of TA3 and TA4. When driving in the same TV frequency network, turn off the “Automatic scan” for a better reception.
5. To use TVman Auto at home and connect to your Wireless network please refer to our full user manual. *
IV. Hardware Description
1. Démarrez votre voiture et attendre que le voyant bleu soit fixe pour connecter vos appareils intelligents au WiFi du TVman (TVmanxxx).
2. Regardez la télévision: Ouvrez l'application "TVman DVB", Lancez une recherche des fréquences TNT et sélectionnez une chaîne.
3. Visualisez vos Multimédias: Ouvrez l’application Samba, balayez le réseau pour trouver le serveur "Samba" et lisez le fichier du disque USB
4. Si vous voyagez entre deux réseaux TNT, un nouveau balayage des fréquences sera nécessaire. Scannez manuellement avec le modèle
TA2 ou autorisez la fonction «automatique scan » sur le TA3 et TA4. Si vous voyagez dans le même réseau TNT, éteignez le "scan
automatique" pour une meilleure réception.
5. Pour utiliser le TVman Auto à la maison et le connecter à votre réseau sans fil, référez-vous à notre manuel d'utilisation complet. *
IV. description du matériel
a WPS: easy pairing with router at home
b USB power input for home
g Embedded WiFi (IEEE 802.11)
a WPS: appairage facile avec le routeur à la maison
g WiFi intégré (IEEE 802.11)
h 5V/1A USB power output for GPS, phone and tablet charging.
b Entrée d'alimentation USB pour la maison
h 5V /1A ortie USB pour alimenter le GPS ou charger votre
c Reset to factory settings (long press)
d WLAN LED (Home wireless network)
Available only if TVman is supplied with 12V - 24V DC
i Input voltage from cigar lighter or car electrical system (12V - 24V/ 2A)
j Antenna connectors with 5 V DC for TV signal amplification
k The tuner support diversity and automatic frequency switch
c Rétablir les réglages d'usine (appui long)
e Hotspot LED (Access point)
f 5V/512mA USB Host to record and share files
i Alimentation 12V-24V de l'allume-cigare ou du système électrique de la voiture
e Hotspot LED (point d’accés)
j Connecteurs d'antenne avec alimentation 5V DC pour l’amplification
f 5V/512mA USB Host pour enregistrer la TNT, partager k Le tuner support la diversity et la recherche automatique des fréquences TV
les fichiers du disque USB (NTFS) ou charger votre téléphone
from USB disk (NTFS) or charge phone
LED
e
Hotspot
d
WLAN
téléphone, tablette... Disponible uniquement sous-alimentation 12V-24V DC
d LED WLAN (réseau domestique sans fil)
STATUS
Fixed Blue
Blinking Blue
Fixed Orange
Blinking Orange
Blue and orange both blinkng
Blue and orange blinkng alternately
LED
FUNCTION
TVman available for the connection
TVman is busy
TVman available for the connection
TVman is busy
FW upgrading in progress
The device is booting up
d
CAUTION: Your TVman product has been designed and manufactured with materials and components of high quality that can be
recycled and reused. This symbol means that electrical and electronic equipment, when end-of-life, should be disposed
of separately from household waste. Please report this to your local collection point or recycling center. This will help to
preserve the environment.
* Visit our web site for Full user manual, installation guide, support document, video..
2
Statut
Bleu fixe
Bleu clignotent
Orange fixe
d WLAN
Orange clignotent
Bleu et Orange clignotent ensemble
Bleu et Orange clignotent en alternance
e
Hotspot
Fonction
Le TVman est disponible
Le TVman est occupé
Le TVman est disponible
Le TVman est occupé
Mise à jour en cours
initialisation
Avertissement : Votre produit TVMan a été conçu et fabriqué avec des matériaux et composants de haute qualité, susceptibles d’être
recyclés et réutilisés. Ce symbole signifie que les appareils électriques et électroniques, lorsqu’ils sont arrivés en fin de vie,
doivent êtreéliminés séparément des ordures ménagères. Veuillez rapporter ce produit à la déchetterie communale ou à
un centre de recyclage. Vous contribuez ainsi à la préservation de l’environnement
* Visitez notre site web pour le mode d'emploi complet, le guide d'installation, documents de support, vidéo ..
2