1
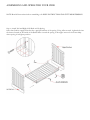
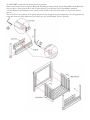
Li’l Angels Furniture
2673 Steeles Avenue West
Toronto, ON M3J 2Z8
[email protected]
Christina
Always ensure a safe environment for the child. Check that every component is properly secured and in place, before placing the
child in the crib.
The crib has an adjustable spring, which serves as mattress support. For the convenience of the mother when the baby is very small,
the spring may be used in the highest position.
IMPORTANT: With the spring and mattress in this highest position, be absolutely sure the top of the footboard is at least 3
inches (7.6 cm), higher than the top surface of the mattress. If it is not, lower the spring and mattress to the next highest position and
check again.
When your child is beginning to push up on hands and knees or it is 5 months of age, whichever occurs earliest, remove all toys
which are strung across crib area. These toys cause STRANGULATION !
When child is able to pull to standing position, set mattress to lowest position and remove bumper pads large toys and other objects
that could serve as steps for climbing out.
When the child is able to climb out or reaches the height of 35 inches (90 centimeters), the crib should no longer be used. The child
should then be placed in a youth or regular bed.
Strings can cause strangulation ! Do not place items with a string around childs neck, such as hood strings pacifier cords. Do not
suspend strings over crib or attach strings to toys.
Any mattress used in this crib must be at least 27-1/4 inches (69 centimetres), by 51-5/8 inches /131 centimetres), with a thickness
not exceeding 6 inches (15 centimetres). The dimension of the mattress shall be taken from seam to seam or edge to edge where
appropriate.
Never use plastic shipping bags or plastic film as mattress covers because they can cause suffocation.
Do not place crib near window where cords from blinds or drapers may strangle a child.
MISE EN GARDE
NE PAS UTILISER LE LIT D'ENFANT A MOINS D'ETRE EN MESURE DE RESPECTER
RIGOUREUSEMENT LE MODE D'EMPLOI CI-JOINT OU APPOSE SUR LE PRODUIT.
NE PAS UTILISER LELIT D'ENFANT SI L'ENFANT EST CAPABLE D'EN SORTIR
SANS AIDE OU SI L'ENFANT MESURE PLUS DE 90 CM. NE PAS METTRE DANS LE
LIT OU A PROXIMITE DU LIT DES CORDES, COURROIES OU OBJETS
SEMBLABLES QUI POURRAIENT S'ENROULER AUTOUR DU COU DE L'ENFANT.
S'ASSURER QUE LES COTES SONT BIEN ENCLENCHES OU VERROUILLES EN
POSITION POUR Y LAISSER UN ENFANT SANS SURVEILLANCE LORSQUE
L'ENFANT EST PLACE DANS DE LIT. L'EPAISSEUR DU MATELAS UTILISE DANS
LELIT NE DOIT PAS ETRE SUPERIEURE A 15 CM, ET SA LONGUEUR ET LARGEUR
DOIVENT ETRE TELLES QUE L'ESPACE ENTRE LE MATELAS ET LES COTES DU
LIT NE SOIT PAS SUPERIEURE A 3 CM LORSQUE LE MATELAS EST POUSSE
DANS UN DES COINS.
UNE MISE EN GARDE PRECISANT QUE LES PARENTS DOIVENT ASSURER LA
SECURITE DE L'ENFANT EN VERIFIANT DE TEMPS A AUTRE, AVANT DE METTRE
L'ENFANT DANS LE PRODUIT, SI TOUTES LES PIECES SONT SOLIDEMENT A
LEUR PLACE
WARNING
DO NOT USE THIS CRIB IF THE ENCLOSED OR ATTACHED INSTRUCTIONS
CANNOT BE STRICTLY ADHERED TO. DO NOT USE THIS CRIB IF THE CHILD IS
ABLE TO CLIMB OUT UNAIDED OR IS TALLER THAN 90 CM. DO NOT PLACE
CORDS, STRAPS OR SIMILAR ITEMS WHICH COULD BECOME WOUND AROUND
THE CHILD'S NECK IN OR NEAR CRIB. ENSURE THAT THE SIDES ARE PROPERLY
LATCHED OR LOCKED IN PLACE WHEN THE CRIB IS OCCUPIED. THE MATTRESS
USED WITH THIS CRIB SHOULD NOT BE MORE THAN 15 CM THICK AND SHOULD
BE OF SUCH LENGHT AND WIDTH THAT THE GAP BETWEEN THE MATTRESS
AND THE SIDES OF THE CRIB IS NOT MORE THAN 3 CM WHEN THE MATTRESS IS
PUSHED INTO ONE CORNER OF THE CRIB.
A WARNING STATING THAT PARENTS SHOULD ENSURE A SAFE ENVIRONMENT
FOR THE CHILD IN THE PRODUCT, THAT EVERY COMPONENT IS PROPERLY
AND SECURELY IN PLACE.
FAILURE TO FOLLOW THESE WARNING AND ASSEMBLY INSTRUCTIONS COULD
RESULT IN SERIOUS INJURY AND DEATH.
PARTS LIST
ASSEMBLING AND OPERATING YOUR CRIB
NOTE: Read all instructions before assembling crib. KEEP INSTRUCTIONS FOR FUTURE REFERENCE.
Step 1: Attach Left and Right Crib Ends to Crib Spring:
Select four D bolts .Apply bolts thru the 4 upright brackets of the spring. Using Allen wrench, tighten bolts into
the inserts located on the inside of the End Frames. Attach the spring to the upper inserts for new born baby
where spring is in highest position.
Step 2: Assemble Footboard then Assemble Crib.
Use four “A” bolts and four E dowels to attach footboard frame and base moulding to left and right posts.
Tighten snugly with Allen wrench. To attach the spring assembly to the footboard, use four B bolts thru the
holes in the end uprights and tighten snugly into the inserts. To attach the spring assembly to the headboard,
use four A bolts.
To CONVERT to Day bed with spring in lowest position:
Remove front frame from front posts. Keep base moulding in same position. Attach Guard Rail Youth Rail with
four(4) C bolts. Select guard rail for left or right position (your decision). Once Guard Rail is attached
to Youth Rail bolt this assembly to the inserts on the bottom of the front posts with two (2) A bolts and 4 E
dowels .
Notes: The front two brackets of the spring may need to be dropped down in a temporary out of way position by
removing the spring bolts. Reconnect the spring once the Youth/Guard Tail is in position.