1
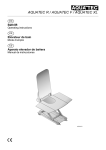
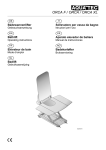
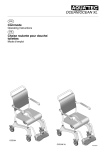
Aquatec Series
EN
Bathlift
Operating instructions
FR
Elévateur de bain
Mode d’emploi
FR
EN
IMPORTANT!
Before you use the product, please read these operating instructions carefully. Pay attention to all instructions, especially those regarding safety, and follow them
at all times.
IMPORTANT !
Veuillez lire attentivement ce mode d’emploi avant d’utiliser le produit. Veuillez respecter toutes les consignes,
notamment les consignes de sécurité, et agir en conséquence.
1
2
3
4
5
6
7
8
9
10
3
Contents
1
General instructions
1
1.1
1.2
1.3
1.4
1.5
1.6
General instructions . . . . . . . . . . . . . . . . 4
Introduction . . . . . . . . . . . . . . . . . . . . . . . . 4
Proper use . . . . . . . . . . . . . . . . . . . . . . . . 4
Warranty . . . . . . . . . . . . . . . . . . . . . . . . . . 4
Re-use/Reconditioning . . . . . . . . . . . . . . . 4
Disposal . . . . . . . . . . . . . . . . . . . . . . . . . . 5
CE marking . . . . . . . . . . . . . . . . . . . . . . . . 5
1.1
2
2.1
2.2
2.3
Safety instructions . . . . . . . . . . . . . . . . . 5
Warnings and symbols . . . . . . . . . . . . . . . 5
General instructions . . . . . . . . . . . . . . . . . 5
Instructions on the battery and charger . . 5
Keep all documents supplied in a safe place.
3
3.1
3.2
Description . . . . . . . . . . . . . . . . . . . . . . . 6
Scope of delivery . . . . . . . . . . . . . . . . . . . 6
Technical data. . . . . . . . . . . . . . . . . . . . . . 6
4
Transport . . . . . . . . . . . . . . . . . . . . . . . . . 6
5
5.1
5.2
5.3
Setting up . . . . . . . . . . . . . . . . . . . . . . . . 6
Recharging the battery . . . . . . . . . . . . . . . 6
Setting up the bathlift in the bathtub . . . . . 7
Removing the bathlift from the bathtub . . . 7
6
6.1
6.1.1
6.1.2
6.1.3
6.2
6.3
Operation . . . . . . . . . . . . . . . . . . . . . . . . . 8
Control . . . . . . . . . . . . . . . . . . . . . . . . . . . 8
Lifting . . . . . . . . . . . . . . . . . . . . . . . . . . . . 8
Lowering . . . . . . . . . . . . . . . . . . . . . . . . . . 8
Emergency stop . . . . . . . . . . . . . . . . . . . . 8
Using the bathlift . . . . . . . . . . . . . . . . . . . . 8
Troubleshooting . . . . . . . . . . . . . . . . . . . . 9
7
7.1
7.2
7.3
Care and maintenance . . . . . . . . . . . . . . 9
Seat and backrest . . . . . . . . . . . . . . . . . . . 9
Charger and hand control . . . . . . . . . . . . . 9
Maintenance/safety check . . . . . . . . . . . . 10
EN
Introduction
These operating instructions contain information and
instructions regarding the safe and proper use of your
bathlift.
In the text of these operating instructions, we refer to
figures and individual items within the figures. These
references are shown in brackets.
Example: (3, fig. 1) refers to figure 1, item 3.
1.2
Proper use
The bathlift is designed exclusively for lowering and
lifting a person in a bathtub.
Any other use is prohibited.
Never use the bathlift as an aid to get in or out of anything, nor as a support, lifting platform or for other similar purposes.
1.3
Warranty
The warranty depends on the legal specifications in
the country of destination or on the specifications
made by our sales partners.
In the event of damage, please notify your specialist
dealer or contact one of the addresses printed in these
operating instructions.
The covers, suction cups and the battery that is built in
to the hand control are not covered by the warranty.
The warranty period begins at the delivery date as
shown on the delivery note.
1.4
Re-use/Reconditioning
The product is designed for repeated use. The maximum number of times you can re-use the device depends on its general state and condition.
On reconditioning, always follow the AQUATEC reconditioning and hygiene instructions. These are available
on request from AQUATEC.
4
1.5
Disposal
Observe the information on the label. Do not
overload the bathlift.
This product has been supplied from an environmentally aware manufacturer that complies with the Waste Electrical and Electronic
Equipment (WEEE) Directive 2002/96/CE.
If you are using bath oils or bath salts, do not
exceed the recommended dosage. These
additives may impair the operation of the lifting scissors.
This product may contain substances that
could be harmful to the environment if disposed of in places (landfills) that are not appropriate according to legislation.
Transport or store the product in a dry room
at a temperature between 0 °C and 40 °C
and a humidity of 30 to 75 %.
The "crossed out wheelie bin" symbol is
placed on this product to encourage you to
recycle wherever possible.
Never store the product directly next to heat
sources.
Please be environmentally responsible and
recycle this product through your recycling
facility at its end of life.
Never expose the product to direct sunlight.
1.6
CE marking
The product complies with EU directive 93/42/EEC for
medical equipment.
If you detect any malfunction, please contact
your authorised dealer immediately.
The product meets the requirements specified in the
DIN EN 60601-1-2 standard (electromagnetic compatibility).
Do not modify or reconstruct the device.
2
Safety instructions
2.3
2.1
Warnings and symbols
The following warnings and symbols are used in these
operating instructions:
*
CAUTION!
This notice indicates a potential hazard.
Not following these instructions can result in injury or damage.
Important!
This symbol indicates additional instructions,
information or tips.
2.2
*
Instructions on the battery and charger
Never throw the hand control into a fire. Do
not store it near naked flames.
Do not open the hand control. The warranty
expires if it is opened!
Only use the charger provided (art.no.
16429) to recharge the battery in the hand
control.
Recharge the battery in the hand control as
soon as possible after use.
General instructions
The bathlift may only be used for lowering
and lifting a person within a bathtub.
To increase the life of the battery, recharge it
once a month if you do not use the device for
extended periods.
If you are unable to take a bath on your own,
use the device only under supervision.
Example: You might not always be able to
reach the emergency stop button on the
hand control while you are operating the device.
Only plug the charger into the mains if the
hand control is connected to the charger.
In the text, a picture illustrating the type of risk replaces the asterisk.
5
EN
3
3.1
Description
Scope of delivery
The AQUATEC Series is supplied with the following
parts (fig. 1 to fig. 3):
Seat (fig. 1) consisting of:
1
2
3
4
5
6
7
8
9
10
Sideflap
Seat plate
Hinge for backrest
Lifting scissors
Spindle foot retainer
Rear suction cup (double strap with thread)
Base plate
Guide for gliding shoe
Gliding shoe
Front suction cup (single strap with head)
5
6
7
8
9
10
11
12
13
Period of production
Serial number
Day of production (1 to 365)
Last digit of year of production
Device type
Instruction (observe accompanying documents)
Degree of protection
Rated voltage/consumption
Load capacity
The label is on the rear side of the backrest.
4
Transport
Important!
● The backrest is not locked on the seat
when it is folded together.
●
Do not remove the suction cups when
transporting the bathlift.
●
The hand control must be removed from
the backrest for transport.
Backrest (fig. 2) consisting of:
1
2
3
4
5
Jack plug
Drive
Spindle foot
Lock pin
Backrest plate
Hand control and charger (fig. 3)
1
3
Hand control and curled cable
Charger
Remove the hand control and always disassemble the
bathlift into two sections for transport (the seat and the
backrest).
For detailed instructions on how to dismantle the device, please refer to section 5.3.
The battery is built into the hand control.
Operating instructions (not illustrated)
3.2
5
Important!
● Before setting up, inspect all parts for damage caused by transport.
Technical data
Bathlift
Seat length:
590 mm
Seat width with sideflaps folded out:
715 mm
Seat width with sideflaps folded in:
390 mm
Seat height at lowest position:
60 mm
Seat height at highest position:
420 mm
Maximum load:
135 kg
Total weight without hand control:
12.1 kg
Seat weight:
7.5 kg
Backrest weight:
4.6 kg
Hand control weight:
0.43 kg
Charger weight:
0.25 kg
Operating voltage:
14 V
Rated current:
4A
Battery type:
LiIon
Charger input:
230-240 V AC, 50 Hz
Charger output:
24 V DC, 200 mA, 12 W
Charge time as from low-voltage warning: approx. 5 h
●
5.1
Instruction (disposal)
Conformance code
Duty cycle
Type B application unit
EN
During assembly, make sure the parts are
positioned correctly in relation to each
other.
Recharging the battery
CAUTION!
There is a risk of injury from electric shock.
Only recharge the battery in dry rooms (not
in the bathroom).
Important!
● Recharge the battery completely each time
before you use the bathlift.
●
The label (fig. 10) provides important information:
1
2
3
4
Setting up
1.
Make sure that the voltage specifications
shown on the charger correspond to those
of the power mains.
Insert the jack plug (7, fig. 3) of the charger (3,
fig. 3) into the jack socket (6, fig. 3) on the curled
cable (4, fig. 3) of the hand control (1, fig. 3), until
the jack plug engages.
6
2.
Insert the power plug (2, fig. 3) of the charger into
the power socket.
5.
The red indicator lamp (5, fig. 9) on the hand control
stays on until the battery is fully recharged.
3.
Pull the charger out of the power socket.
4.
Push the unlocking sleeve (5, fig. 3) upwards and
disconnect the jack plug of the charger from the
jack socket on the hand control.
5.2
The bathlift is now ready for use.
5.3
Let the water out of the bathtub.
2.
Lower (1, fig. 8) the bathlift with the DOWN button
(4, fig. 9), until the backrest is at the stop in lowered limit position.
3.
Unlock the jack socket on the curled cable of the
hand control by pushing up the unlocking sleeve
(3, fig. 7) and pull it off the jack plug (4, fig. 7).
The seat may slip if the suction cups do not
adhere properly.
●
Before you set up the bathlift, clean the
bathtub and the suction cups.
●
Do not move the bathlift once you have
installed it in the bathtub.
Important!
● When folding the backrest down, ensure
that the curled cable (2, fig. 7) of the hand
control does not get caught.
●
Important!
● The suction cups have to be attached.
1.
●
The battery in the hand control must be fully
charged.
●
The spindle foot must be fully retracted.
●
When lifting, please remember: The seat
weighs 7.5 kg and the backrest weighs
4.6 kg (without the hand control).
●
If your bathtub has a handrail, use the sideflap diverter (optional).
Place the seat (2, fig. 4) onto the base of the empty bathtub. The spindle foot retainer (3, fig. 4)
must point towards the end of the bathtub opposite the drain (1, fig. 4).
2.
Fold the sideflaps of the seat outwards (fig. 5).
3.
Place the backrest (without the hand control) (1,
fig. 6) onto the seat so that the hooks (2, fig. 6) in
the backrest fit in the hinges (3, fig. 6) of the seat
plate (4, fig. 6).
CAUTION!
4.
4.
Before you fold up the backrest, check
whether the spindle is fully retracted.
●
After you have folded the backrest up,
check whether the spindle foot is in the
spindle foot retainer.
Do not fold the backrest down if there is water in the bathtub.
Take hold of the backrest at the head-end with
one hand and fold it forwards up to the limit position (2, fig. 8).
Important!
When lifting, please remember: The seat
weighs 7.5 kg, and the backrest weighs 4.3 kg
(without the hand control).
5.
Pull the backrest up off the seat (3, fig. 8) and out
of the bathtub.
6.
Fold the sideflaps on the seat inwards (4, fig. 8).
Important!
Release the suction cups at the rear simultaneously.
7.
To release the rear suction cups, pull the straps (6,
fig. 1).
8.
Lift the rear end of the seat further (5, fig. 8).
This releases the front suction cups.
There is a risk of damage if the spindle foot
slips out.
●
Removing the bathlift from the bathtub
1.
Setting up the bathlift in the bathtub
CAUTION!
Plug the jack plug with the unlocking sleeve (3,
fig. 7) on the curled cable (2, fig. 7) of the hand
control (1, fig. 7) onto the jack plug (4, fig. 7) until
the locking mechanism engages noticeably.
Important!
If you have installed the height adapters (optional), you also have to pull the straps on the
front suction cups to release them.
9.
Take the seat out of the bathtub.
10. Carefully put away all components of the bathlift.
Carefully lift the backrest by pulling it up to the
limit position at the head end (fig. 6).
7
EN
6
Operation
6.2
Using the bathlift
CAUTION!
6.1
Control
The seat may slip if the suction cups do not
adhere properly.
Important!
● If the battery in the hand control is not sufficiently charged, the battery pilot light goes
on (5, fig. 9). In this case, the lowering function of the bathilft is disabled. However, you
can still raise the lift. Recharge the battery
immediately after you have raised it.
●
●
Important!
● Before you take a bath, do a test run* to
make sure that the bathlift functions properly.
The hand control may only be used when
the backrest is properly mounted and in upright position.
If you let go of the button, the lift stops instantly in its position.
Controlling is done using the hand control (fig. 9).
6.1.1
Before you use the bathlift, make sure that it
is securely positioned and cannot tip over.
Lifting
Important!
If the backrest is folded down, it first moves to
the upright position.
●
Before using the bathlift, check the temperature of the bath water.
Section 5.2 describes how to set up the bathlift in the
bathtub.
1.
Raise the seat until it is level with the edge of the
bathtub by pressing the UP button (2, fig. 9).
The sideflaps should be level and rest on the edge of
the bathtub.
2.
Press the UP button (2, fig. 9) on the hand control (3,
fig. 9).
Fill the bath with water and check the temperature.
3.
The backrest moves to the upright position, or the seat
moves up.
Sit down on the sideflap nearest to you as you
would sit down on a chair.
4.
Slide backwards until you are sitting in the middle
of the seat.
6.1.2
5.
Turn yourself so that you can be comfortably lowered into the water. Lift one leg after the other over
the edge of the bathtub.
6.
Once you are sitting correctly, press the DOWN
button (4, fig. 9) to lower the seat into the water.
Lowering
Important!
If the seat is already lowered, the backrest
leans backwards.
Press the DOWN button (4, fig. 9) on the hand control
(3, fig. 9).
The seat moves down, or the backrest moves back.
6.1.3
Emergency stop
Important!
Only press the red emergency stop button (1,
fig. 9) if the device does not stop immediately
after letting go of the UP or DOWN button (e.g.
if a button jams). The bathlift stops moving immediately. The red LED that is built into the
hand control goes on.
Once the seat has reached its lowest position, you can
tilt the backrest back, so that you can lean back deeper in the water.
7.
Keep pressing the DOWN button until the backrest is at the right position.
To get out of the bath, follow the above steps in reverse order.
To lift the seat, press the UP button (2, fig. 9).
8.
If the red LED goes out after letting go of the emergency stop button, the fault has been rectified (e.g. if the
button is released). The device is ready for use again.
Remove the jack socket on the curled cable of the
hand control from the jack plug on the backrest by
moving up the unlocking sleeve and charge as described in section 5.1 or remove the bathlift from
the bathtub as described in section 5.3.
If the red LED stays on after letting go of the emergency stop button, the fault has not yet been rectified. The
device is not ready for use and must be repaired (e.g.
in the event of damage to the electronics).
*
EN
Run the lift unloaded once to the top and then back
to the bottom.
8
6.3
Troubleshooting
Important!
The following table provides information on
faults and their probable cause. If you cannot
rectify a fault using the table, please contact
your authorised dealer directly.
Problem
Possible
causes
Remedy
No motor noise/lift Jack socket of the Lock the jack
does not move
hand control is not socket (see seclocked correctly
tion 5.2)
The battery is flat
Recharge the battery (see
section 5.1)
The contacts are
dirty
Clean the contacts
Important!
● Regularly clean the seat and backrest and
keep them clean.
●
1.
Wash the product with commercial detergents and
disinfectants using a cloth or brush.
2.
Rinse the product with warm water.
3.
Dry the product with a cloth.
4.
Lightly grease the guide for the sliding shoe (8,
fig. 1) using Vaseline.
5.
Unbutton the covers (optional) from the seat and
backrest.
CAUTION!
There is a risk of damage.
The cable is dam- Replace the hand
aged
control
The lift can be
Low-voltage proRecharge the batraised but not low- tection is activated tery
ered
The lift stops while The load is exces- Observe the maxibeing raised
sive
mum load
The battery cannot be recharged
The bathlift slips
7
7.1
Do not use abrasive cleaning agents.
Do not tumble-dry the covers.
6.
7.2
Wash the covers (optional) in the washing machine at maximum 60 °C using a mild detergent.
Charger and hand control
The electronics
are faulty
Have your authorised dealer check
the hand control
CAUTION!
The battery is
faulty
Replace the hand
control
●
Before cleaning the charger, always pull
the plug out of the power socket.
The charger is
faulty
Have the charger
checked
●
The suction cups
are old or damaged
Replace the suction cups
Never plug objects made of conducting
material (e.g. knitting needles, metal
pins) into the jack socket of the hand
control.
●
Only use a dry cloth to clean the
charger.
Care and maintenance
Seat and backrest
There is a risk of injury from electric shock.
1.
Wipe down the charger with a dry cloth.
2.
Wipe down the hand control with a damp cloth
and dry it with a dry cloth.
CAUTION!
There is a risk of injury when the lifting scissors move.
Be especially careful when cleaning the
seat.
There is a risk of damage.
Never clean the backrest with a high pressure cleaner.
9
EN
7.3
Maintenance/safety check
Important!
The hand control may only be opened by the
manufacturer of the lifter.
Routine inspection:
The lifter must be checked at least every 24 months
with regard to the following aspects:
●
Mechanical damage to the device and the accessories that impairs the functionality
●
Legibility of safety-relevant inscriptions
●
Functionality according to the operating instructions
The checks must be carried out by specialists able to
carry out such safety checks correctly, due to their
training, knowledge and practical experience. These
persons must not be subject to instructions with regard
to their checking activities.
Contact your medical supplies dealer to carry out the
routine inspection.
A spare parts list/documentation is also available at
your sanitary specialist.
Please have necessary repairs only carried out by an
authorised sanitary specialist.
EN
10
Sommaire
1
1.1
1.2
1.3
1.4
1.5
1.6
Remarques de base . . . . . . . . . . . . . . . . 11
Introduction . . . . . . . . . . . . . . . . . . . . . . . . 11
Utilisation . . . . . . . . . . . . . . . . . . . . . . . . . 11
Garantie . . . . . . . . . . . . . . . . . . . . . . . . . . 11
Réutilisation/Préparation. . . . . . . . . . . . . . 11
Elimination . . . . . . . . . . . . . . . . . . . . . . . . 12
Sigle CE . . . . . . . . . . . . . . . . . . . . . . . . . . 12
2
2.1
2.2
2.3
Consignes de sécurité . . . . . . . . . . . . . . 12
Avertissements et symboles . . . . . . . . . . . 12
Remarques générales. . . . . . . . . . . . . . . . 12
Remarques concernant l’accumulateur
et le chargeur . . . . . . . . . . . . . . . . . . . . . . 12
3
3.1
3.2
Description . . . . . . . . . . . . . . . . . . . . . . . 13
Volume de livraison. . . . . . . . . . . . . . . . . . 13
Caractéristiques techniques . . . . . . . . . . . 13
4
Transport . . . . . . . . . . . . . . . . . . . . . . . . . 13
5
5.1
5.2
5.3
Mise en service . . . . . . . . . . . . . . . . . . . . 13
Chargement de l’accumulateur . . . . . . . . . 14
Montage dans la baignoire . . . . . . . . . . . . 14
Démontage dans la baignoire . . . . . . . . . . 14
6
6.1
6.1.1
6.1.2
6.1.3
6.2
6.3
Utilisation. . . . . . . . . . . . . . . . . . . . . . . . . 15
Commande . . . . . . . . . . . . . . . . . . . . . . . . 15
Elévation . . . . . . . . . . . . . . . . . . . . . . . . . . 15
Abaissement . . . . . . . . . . . . . . . . . . . . . . . 15
ARRET DE SECOURS . . . . . . . . . . . . . . . 15
Bains . . . . . . . . . . . . . . . . . . . . . . . . . . . . . 15
Réparation des pannes. . . . . . . . . . . . . . . 16
7
7.1
7.2
7.3
Maintenance et entretien . . . . . . . . . . . . 16
Siège et dossier . . . . . . . . . . . . . . . . . . . . 16
Chargeur et commande manuelle. . . . . . . 17
Maintenace/Contrôle de sécurité . . . . . . . 17
1
1.1
Remarques de base
Introduction
Vous trouverez dans ce mode d’emploi des informations et des consignes pour une utilisation conforme et
en toute sécurité de l’élévateur de bain.
Vous trouverez également dans le texte de ce mode
d’emploi des renvois à des numéros d’illustrations et à
des numéros de positions sur les illustrations. Ces numéros sont indiqués entre parenthèses.
Exemple : (3, image 1) signifie image 1, position 3.
Conservez soigneusement tous les documents.
1.2
Utilisation
L’élévateur de bain est conçu uniquement pour le bain
de personnes dans une baignoire.
Toute autre utilisation est interdite.
Il est interdit d’utiliser l’élévateur de bain comme aide à
la montée ou à la descente, comme support, comme
monte-charge ou tout autre emploi similaire.
1.3
Garantie
La garantie s’aligne sur les réglementations en vigueur
dans les pays d’exploitation ou sur les dispositions de
nos partenaires de distribution.
En cas de dommage, veuillez vous adresser à votre
distributeur spécialisé ou à l’une des adresses indiquées dans le présent manuel d’utilisation.
Sont exlus de cette garantie les housses, les ventouses et l’accumulateur qui est intégré dans la commande manuelle.
La date de livraison figurant sur le bon de livraison correspond également à la date d’entrée en vigueur de la
garantie.
1.4
Réutilisation/Préparation
Le produit est destiné à être réutilisé. Le nombre maximal de réutilisations dépend de l’état de l’appareil
après chaque utilisation.
Lors de la préparation, respecter les directives de préparation et d’hygiènes d’AQUATEC. Vous pouvez
vous procurer ces directives sur demande en vous
adressant à AQUATEC.
11
FR
1.5
Elimination
Prenez vos bains sous la surveillance d’une
autre personne si votre état de santé ne vous
permet pas de vous baigner seul.
Exemple : au cours du bain, vous n’atteignez
pas toujours le bouton ARRET DE SECOURS sur la commande manuelle.
Ce produit vous a été fourni par Invacare®,
un fabricant qui respecte l’environnement.
Il est conforme à la directive 2002/96/CE sur
la gestion des déchets d’équipements électriques et électroniques (DEEE).
Veuillez respecter les indications figurant sur
la plaque d’identification. Ne soumettez pas
l’élévateur de bain à des contraintes de
poids excessives.
Ce produit peut contenir des substances qui
pourraient être nocives à l’environnement si
elles sont déposées dans des endroits inappropriés (remblais par exemple) et non conformes à la législation en vigueur.
Si vous utilisez des huiles ou des sels de
bain, respectez le dosage recommandé. Les
adjuvants pourraient affecter le bon glissement du ciseau de levage.
Le symbole "poubelle barrée" est apposé sur
ce produit pour vous encourager à le recycler dans les structures de collecte sélective
(veuillez contacter votre Mairie).
Transportez ou stockez le produit dans des
locaux secs, à une température de 0 °C à
40 °C et une humidité de l’air de 30 à 75 %.
Soyez écologiquement responsable et recyclez ce produit à la fin de sa durée de vie.
1.6
Sigle CE
Ne conservez pas le produit à proximité immédiate de sources de chaleur.
Ce produit est conforme aux réglementations de la
directive sur les produits médicaux 93/42/CEE.
Ce produit satisfait aux prescriptions de la norme
DIN EN 60601-1-2 (compatibilité électromagnétique).
2
N’exposez pas le produit directement à la lumière du soleil.
Consignes de sécurité
2.1
En cas de panne, veuillez immédiatement
contacter votre revendeur spécialisé.
Avertissements et symboles
Dans ce mode d’emploi, vous trouverez les avertissements et symboles suivants :
ATTENTION !
*
Ce terme d’avertissement indique un risque possible.
Le non-respect de cette consigne de sécurité peut s’avérer dangereux pour les
personnes et occasionner des dégâts
matériels.
Important !
Ce terme caractérise des remarques, informations ou conseils supplémentaires.
2.2
N’effectuez jamais vous-même des modifications ou des transformations.
Remarques générales
L’élévateur de bain est conçu uniquement
pour le bain de personnes dans une
baignoire.
2.3
Remarques concernant l’accumulateur
et le chargeur
Ne jetez jamais la commande manuelle dans
un feu et ne la conservez pas à proximité
d’un feu.
N’ouvrez pas la commande manuelle. Vous
perdez votre droit à la garantie si vous
l’ouvrez!
Utilisez exclusivement le chargeur fourni
(n° art. 16429) pour recharge l’accu de la
commande manuelle.
Rechargez l’accumulateur de la commande
manuelle dès que possible après utilisation.
Pour augmenter la durée de vie de l’accumulateur, chargez-le une fois par mois quand
vous ne l’utilisez pas sur une période prolongée.
*
Vous trouverez ici une représentation du type de
danger encouru.
FR
12
Connectez le chargeur au réseau électrique
seulement après avoir branché la commande manuelle sur le chargeur.
3
Vous trouverez des informations importantes sur la
plaque d’identification (image 10) :
Description
3.1
Volume de livraison
Le volume de livraison de l’AQUATEC comprend
les pièces suivantes (image 1 à 3) :
Siège (image 1) composé de :
1
2
3
4
5
6
Rabat latéral
Plaque du siège
Charnière pour le dossier
Ciseau de levage
Logement du pied de l’arbre
Ventouse arrière (à deux languettes avec filet
de vis)
7 Plaque de base
8 Guidage pour patin
9 Patin
10 Ventouse avant (à une languette avec tête)
1
2
3
4
5
6
7
8
9
10
11
12
13
Remarque (élimination)
Certification de conformité
Durée de fonctionnement
Pièce d’application de type B
Période de fabrication
Numéro courant de l’appareil
Jour de fabrication (1 à 365 jours)
Dernier chiffre de l’année de fabrication
Type d’appareil
Remarque (observer la documentation annexe)
Type de protection
Tension nominale/Puissance absorbée nominale
Charge
La plaque d’identification est apposée au dos du dossier.
4
Dossier (image 2) composé de :
1
2
3
4
5
Entrée chargeur :
230-240 V CA, 50 Hz
Sortie chargeur :
24 V CC, 200 mA, 12 W
Temps de chargement à partir de
l’avertissement de tension insuffisante :
env. 5 h
Fiche à jack
Entraînement
Pied de l’arbre
Goujons de verrouillage
Plaque dossier
Transport
Important !
● Lorsque le dossier est replié, il n’est pas
bloqué au niveau du siège.
●
Les ventouses restent montées durant le
transport.
●
La commande manuelle doit être retirée du
dossier pour le transport.
Commande manuelle et chargeur (image 3)
1
3
Commande manuelle et câble en spirale
Chargeur
L’accumulateur n’est pas intégré à la commande manuelle.
Mode d’emploi (sans image)
Retirez la commande manuelle et détachez toujours
les deux parties de l’élévateur de bain (siège et dossier) avant de le transporter.
Le démontage est décrit à la section 5.3.
3.2
Caractéristiques techniques
Elévateur de bain
Longueur du siège :
Largeur du siège avec rabats
latéraux déployés :
Largeur du siège avec rabats
latéraux repliés :
Hauteur du siège en position la plus basse :
Hauteur du siège en position la plus haute :
Charge max. :
Poids total sans commande manuelle:
Poids du siège :
Poids du dossier:
Poids de la commande manuelle:
Poids du chargeur :
Tension d’alimentation :
Courant nominal:
Type d’accu:
13
590 mm
715 mm
390 mm
60 mm
420 mm
135 kg
12,1 kg
7,5 kg
4,6 kg
0,43 kg
0,25 kg
14 V
4A
LiIon
5
Mise en service
Important !
● Avant la mise en service, vérifiez si des éléments ont subis des dégâts pendant le
transport.
●
Lors du montage, respectez l’emplacement
des éléments les uns par rapport aux
autres.
FR
5.1
Chargement de l’accumulateur
1.
Posez le siège (2, image 4) au fond de la
baignoire vide. Ce faisant, orientez le logement de
l’arbre (3, image 4) vers l’extrémité de la baignoire
opposée à la bouche d’écoulement (1, image 4).
2.
Déployez les rabats latéraux du siège (image 5).
3.
Placez le dossier (sans commande manuelle)
(1, image 6) sur le siège de manière à ce que les
crochets (2, image 6) du dossier s’engagent dans
les charnières (3, image 6) de la plaque du siège
(4, image 6).
ATTENTION !
Danger dû au courant électrique
Rechargez l’accumulateur dans des locaux
secs uniquement (pas dans la salle de
bain).
Important !
● Chargez l’accumulateur complètement
avant chaque utilisation.
●
1.
2.
Détérioration si glissement du pied de l’arbre hors de son logement
Enfoncez la fiche à jack (7, image 3) du chargeur
(3, image 3) dans la douille de jack (6, image 3)
du câble en spirale (4, image 3) de la commande
manuelle (1, image 3) jusqu’à ce qu’elle s’encliquète.
Branchez la fiche (2, image 3) du chargeur dans
une prise.
Le voyant de contrôle rouge (5, image 9) de la commande manuelle reste allumé jusqu’à ce que l’accumulateur soit chargé.
3.
Débranchez la fiche de la prise.
4.
Poussez le manchon de déverrouillage (5,
image 3) vers le haut et sortez la fiche à jack du
chargeur hors de la douille de la commande manuelle.
5.2
ATTENTION !
L’indication de tension sur le chargeur doit
correspondre à la tension de votre réseau
électrique.
Montage dans la baignoire
●
Ne modifiez plus la position de l’élévateur de bain une fois que vous l’avez installé dans la baignoire.
●
Après avoir redressé le dossier, vérifiez
que le pied de l’arbre se trouve dans son
logement.
Soulevez lentement le dossier jusqu’à la position
finale, en l’empoignant côté tête par le milieu
(image 6).
5.
Enfoncez la douille de jack avec manchon de déverrouillage (3, image 7) située sur le câble en
spirale (2, image 7) de la commande manuelle (1,
image 7) sur la fiche à jack (4, image 7), jusqu’à
ce que le verrouillage se fasse sentir.
L’élévateur de bain est alors opérationnel.
5.3
Démontage dans la baignoire
1.
Videz l’eau de la baignoire.
2.
Abaissez (1, image 8) l’élévateur de bain en appuyant sur la touche DESCENDRE (4, image 9)
jusqu’à ce que le dossier s’arrête en position
abaissée.
3.
Déverrouillez la douille située sur le câble en spirale de la commande manuelle en poussant vers
le haut le manchon de déverrouillage (3, image 7)
et ôtez-la de la fiche à jack (4, image 7).
Glissement du siège si des ventouses adhèrent mal
Nettoyez la baignoire et les ventouses
avant d’installer l’appareil.
Avant de replier le dossier, vérifiez que
l’arbre est complètement rentré.
4.
ATTENTION !
●
●
Important !
● Les ventouses doivent être montées.
Important !
● En rabattant le dossier, faites attention à ne
pas coincer le câble en spirale (2, image 7)
de la commande manuelle.
●
L’accumulateur de la commande manuelle
doit être chargé.
●
●
Le pied de l’arbre doit être complètement
rentré.
●
Respectez l’indication de poids lors de l’élévation : le siège pèse 7,5 kg, le dossier
4,6 kg (sans commande manuelle).
●
Si la baignoire est équipée d’une poignée,
utilisez l’écarteur de rabat latéral (en option).
FR
4.
Rabattez le dossier seulement après avoir
vidé la baignoire.
Saisissez le dossier d’une main par le côté tête et
rabattez-le à fond vers l’avant (2, image 8).
Important !
Respectez l’indication de poids lors de l’élévation : le siège pèse 7,5 kg, le dossier 4,6 kg
(sans commande manuelle).
14
5.
Retirez le dossier du siège en le tirant vers le haut
(3, image 8) et enlevez-le de la baignoire.
Appuyez sur la touche MONTER (2, image 9) de la
commande manuelle (3, image 9).
6.
Rabattez les rabats latéraux du siège (4,
image 8).
Le dossier se remet en position verticale et le siège
monte.
Important !
Décollez les deux ventouses arrière en même
temps !
7.
Décollez les ventouses arrière (6, image 1) en tirant vers le haut sur la languette de la ventouse.
8.
Relevez encore un peu l’arrière du siège (5,
image 8).
Les ventouses avant se décollent d’elles-mêmes.
6.1.2
Appuyez sur la touche DESCENDRE (4, image 9) de
la commande manuelle (3, image 9).
Le siège descend et le dossier se déplie vers l’arrière.
6.1.3
Important !
Si les adaptateurs de hauteur (en option) sont
montés, vous devez également décoller les
ventouses avant en tirant sur les languettes.
9.
Soulevez le siège et sortez-le de la baignoire.
10. Rangez soigneusement toutes les pièces de l’élévateur de bain.
6
Utilisation
6.1
Commande
Important !
● Si l’accumulateur de la commande manuelle n’est pas assez chargé, le voyant de contrôle de l’accumulateur (5, image 9)
s’allume en rouge. La fonction d’abaissement de l’élévateur de bain est bloquée.
Cependant, la fonction de levage peut encore être utilisée. Dans ce cas, rechargez
l’accumulateur immédiatement après le levage.
●
Actionnez la commande manuelle uniquement lorsque le dossier est monté et installé.
●
Le relâchement de la touche entraîne l’immobilisation instantanée de l’élévateur
dans la position du moment.
Abaissement
Important !
Si le siège est déjà abaissé, le dossier se déplie vers l’arrière.
ARRET DE SECOURS
Important !
N’appuyez sur le bouton rouge d’arrêt d’urgence (1, image 9) que si l’appareil ne s’immobilise pas immédiatement après relâchement
des touches MONTER ou DESCENDRE
(p. ex. si une touche s’est coincée). Le mouvement de l’élévateur de bain s’arrête immédiatement. Le diode rouge intégrée dans la commande manuelle s’allume.
Si la diode rouge s’éteint après relâchement de la touche d’arrêt d’urgence, l’erreur a été éliminée (p. ex.
touche décoincée). L’appareil est à nouveau prêt au
service.
Si la diode rouge reste allumée après relâchement de
la touche d’arrêt d’urgence, l’erreur n’a pas encore été
éliminée. L’appareil n’est pas prêt au service et doit
être réparé (p. ex. en cas de défaut électronique).
6.2
Bains
ATTENTION !
Glissement du siège si des ventouses adhèrent mal
Avant l’utilisation, assurez-vous que l’élévateur de bain est en position bien sécurisée
contre le glissement ou basculement dans
la baignoire.
La commande s’effectue par la commande manuelle
(image 9).
Important !
● Avant de prendre un bain, vérifiez le bon
fonctionnement en procédant à un remplissage d’essai*.
6.1.1
●
Elévation
Important !
Si le dossier est abaissé, il se remettra le premier en position verticale.
L’élévateur de bain doit être monté dans la baignoire
en suivant les instructions de la section 5.2.
*
15
Vérifiez la température de l’eau du bain
avant l’emploi.
Faites monter et descendre une fois l’élévateur non
chargé.
FR
1.
Montez le siège à hauteur du bord de la baignoire
en utilisant la touche MONTER (2, image 9).
Les rabats latéraux reposent à plat sur le bord de la
baignoire.
2.
Faites couler l’eau pour le bain et vérifiez sa température.
3.
Asseyez-vous sur le rabat latéral dirigé vers vous
comme sur une chaise.
4.
Glissez jusqu’au milieu du siège.
5.
Tournez-vous dans la position pour prendre un
bain. Pour cela, faites passer une jambe après
l’autre au-dessus du bord de la baignoire.
6.
Quand vous êtes correctement assis, appuyez sur
la touche DESCENDRE (4, image 9) pour faire
descendre le siège dans la baignoire.
Si le siège a atteint la position la plus basse, vous pouvez incliner le dossier vers l’arrière pour obtenir une
position pour le bain plus confortable et être mieux immergé(e) dans l’eau du bain.
7.
Continuez à appuyez sur la touche DESCENDRE
jusqu’à ce que le dossier ait atteint la position souhaitée.
Panne
Cause possible Remède
Aucun bruit de
moteur perceptible/l’élévateur ne
bouge pas
La douille à jack
Verrouillez la
de la commande
douille à jack (voir
manuelle n’est pas section 5.2)
bien verrouillée
6.3
Réparation des pannes
Important !
Le tableau suivant vous donne des indications
concernant les pannes et leurs causes possibles. Si vous ne parvenez pas à réparer la
panne à l’aide des indications fournies, adressez-vous directement à votre revendeur spécialisé.
Les broches de
contact sont encrassées
Nettoyez les broches de contact
L’élévateur peut
Le dispositif de
Chargez l’accuseulement monter contrôle de tenmulateur
sion insuffisante a
réagi
L’élévateur s’immobilise pendant
la montée
La charge de leva- Respectez la
ge est trop élevée charge max.
L’accumulateur ne Electronique dése charge pas
fectueuse
Pour monter, appuyez sur la touche MONTER (2,
image 9).
Ôtez la douille située sur le câble en spirale de la
commande manuelle hors de la fiche à jack en
poussant le manchon de déverrouillage vers le
haut et chargez, comme décrit au paragraphe 5.1
ou démonter l’élévateur de bain dans la baignoire,
comme décrit au paragraphe 5.3.
Chargez l’accumulateur (voir section 5.1)
Le câble est pincé Remplacez la
commande manuelle
Pour sortir de la baignoire, il faut procéder dans l’ordre
inverse.
8.
L’accumulateur
est déchargé
Aucune stabilité
7
7.1
Faites contrôler la
commande manuelle par votre
revendeur spécialisé
Accumulateur défectueux
Remplacez la
commande manuelle
Chargeur défectueux
Faites contrôler le
chargeur
Les ventouses
Remplacez les
sont usées ou abî- ventouses
mées
Maintenance et entretien
Siège et dossier
ATTENTION !
Risque de pincement dû aux éléments mobiles du ciseau de levage
Procédez avec précaution pour nettoyer le
siège.
Risque d’endommagement
Ne nettoyez jamais le dossier avec un jet
d’eau à haute pression.
Important !
● Maintenez le siège et le dossier propres et
nettoyez-les régulièrement.
●
FR
N’utilisez pas de produits à récurrer.
16
1
Lavez ce produit avec des agents nettoyants et
désinfectants en vente dans le commerce, en utilisant un chiffon ou une brosse.
2.
Douchez le produit avec de l’eau chaude.
3.
Séchez le produit avec un chiffon.
4.
Enduisez la glissière du patin (8, image 1) d’un
peu de vaseline.
5.
Déboutonnez les housses (option) du siège et du
dossier.
ATTENTION !
Risque d’endommagement
Ne séchez pas les housses dans un sèchelinge.
6.
Les contrôles doivent être effectués par des personnes possédant la formation, les connaissances ou l’expérience acquise par la pratique, nécessaires pour
être capables de mener correctement des contrôles de
sécurité. Ces personnes ne doivent pas être soumises
à des consignes concernant leur activité de contrôle.
Veuillez vous adresser à votre revendeur spécialisé en
matériel sanitaire pour faire effectuer cette inspection
périodique.
Votre revendeur spécialisé en matériel sanitaire possède aussi une liste de pièces détachées/documentation en réserve.
Veuillez ne faire effectuer les réparations nécessaires
que par une société sanitaire autorisée.
Lavez les housses (en option) dans la machine à
laver à une température max. de 60 °C en utilisant
une lessive pour linge délicat.
7.2
Chargeur et commande manuelle
ATTENTION !
Danger dû au courant électrique
●
Débranchez toujours la fiche de la prise
de courant avant de nettoyer le chargeur.
●
N’enfoncez pas d’objet conducteur
(p. ex. aiguille à tricoter, pointe métallique) dans la douille à jack de la commande manuelle.
●
Nettoyez le chargeur en utilisant uniquement un chiffon sec.
1.
Essuyez le chargeur avec un chiffon sec.
2.
Essuyez la commande manuelle avec un tissu humide et séchez-la avec un chiffon.
7.3
Maintenace/Contrôle de sécurité
Important !
La commande manuelle ne doit être ouverte
que par le fabricant de l’élévateur.
Inspection périodique :
Les points suivants doivent être contrôlés au minimum
tous les 24 mois sur l’élévateur:
●
Dommages mécaniques gênant le fonctionnement
sur l’appareil ou les accessoires
●
Lisibilité des inscriptions concernant la sécurité
●
Fonctionnement conformément au mode d’emploi
17
FR
08-699C