1
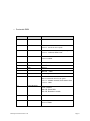
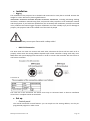
EVO Spot 60 60 W Spot Moving Head User manual / Mode d’emploi EVO Spot 60 Manual Ver. 1.00 Page 1 ATTENTION ! Avant d’utiliser votre matériel, nous vous recommandons de lire l’ensemble des instructions de ce manuel. ATTENTION ! Cet appareil produit une lumière intense et puissante. Risque pour les yeux. Ne regardez pas directement dans le faisceau. DANGER ! Risque de chocs électriques. Il est important d’utiliser le câble d’alimentation secteur fourni (câble avec terre). Toujours débrancher l’appareil avant une intervention technique ou avant son entretien. Ne pas brancher cet appareil sur un bloc de puissance variable type “ Dimmer pack”. Afin de réduire et d’éviter tout risque d’électrocution ou d’incendie, ne pas utiliser cet appareil dans un milieu humide ou sous la pluie. ATTENTION ! Risque de brûlure. Il est important d’éviter tout contact avec l’appareil en fonctionnement et au moins 10 minutes après son utilisation. L’extérieur de l’appareil peut devenir très chaud. Ne pas utilisez le projecteur avec une température ambiante supérieure de 40°C. ATTENTION ! Risque d’incendie. Il est important de garder éloigner tous matériaux combustibles et inflammables de l’appareil en fonctionnement. EVO Spot 60 Manual Ver. 1.00 Page 2 DANGER ! Cet appareil présente des risques importants de blessures. Il est important de manipuler et d’utiliser cet appareil de façon professionnelle. Cet appareil evolite doit être installé avec des crochets solides et de dimension adéquate au poids supporté. L’appareil doit être vissé aux crochets et serré convenablement afin d’éviter toute chute due aux vibrations produites par la machine en fonctionnement. L’accroche de l’appareil doit être sécurisée par une élingue de sécurité. Assurez-vous également que la structure (ou point d’accroche) peut supporter au moins 10X le poids de l’appareil accroché. L’appareil doit être installé par une personne qualifiée et doit être placée hors de portée du public. En cas de problème de fonctionnement, arrêtez immédiatement l’appareil. Ne pas essayer de le réparer soi- même. Contactez votre revendeur ou faites appel à un réparateur spécialisé et agréé. Il n’y a aucune pièce remplaçable par l’utilisateur. EVO Spot 60 Manual Ver. 1.00 Page 3 Table des matières Français………………………………………………………………………………………….…. 5 Introduction………………………………………………………….......... 5 Description du produit…………………………………………………...5 Installation…………………………………………………………………… 5 o Accroche………………………………………………………………………….. 5 o Connexion DMX……………………………………………………….………. 6 Configuration…………………………………………………………………. 7 o Panneau de contrôle / Navigation dans les menus……………. 7 o Mode DMX………………………………………………………………………. 7 o Protocole DMX……………………………………………………………………8 o Mode Automatique…………………………………………………………. 9 o Mode Maître / Esclave……………………………………………………… 9 Entretien et maintenance……………………………………………… 9 o Nettoyage………………………………………………………………………….9 o Maintenance……………………………………………………………………. 10 Caractéristiques techniques…………………………………………. 10 English…………………………………………………………………………………. 11 Introduction………………………………………………………….......... 12 Device description …………………………………………………...... 12 Installation…………………………………………………………………… 12 o Rigging…………………………………………………………………………….. 12 o DMX connection……………………………………………………….………. 13 SET UP……….…………………………………………………………………. 13 o Control panel………………………………………………………..…………. 13 o Auto Mode ………….………………………………………………………….. 13 o DMX Mode………………………………………………………………………. 14 o DMX Protocol…………………………………………………………………… 15 o Master/Slave Mode…..……………………………………………………… 15 Maintenance & Service..……………………………………………… 16 o Cleaning …………………………………………………………………………. 16 o Troubleshooting.……………………………………………………………. 16 Technical Specifications………………………………………………. 17 EVO Spot 60 Manual Ver. 1.00 Page 4 Introduction Toutes nos félicitations pour l’achat de ce projecteur evolite. Ce projecteur professionnel est doté des dernières avancées technologiques, et a été conçu pour un usage professio nnel. Sa qualité et sa fiabilité so nt le résultat d’une fabrication soignée et suivant un cahier des charges précis. Ce projecteur intelligent respecte les normes européenne s en vigueur : EN605981:2008+A11:2009 EN60598-2-17:1989+A2:1991 et RoHs. Description du produit > Contrôlable DMX512 – 13 canaux. > Pan :540°/tilt:240°. > Effet Stroboscopique à vitesse variable > Dimmer (0-100%). > Panneau de contrôle avec afficheur. > Option de remise à zéro avec les presets usine. > Option inversion Pan/tilt. > Roue de 7 Gobos rotatifs > Roue de 8 couleurs > Source lumineuse : 1 LED blanche de 60W > Consommation : 80W Installation o Accroche Ce projecteur asservi evolite doit être installé avec des crochets solides et de dimension adéquate au poids supporté. L’appareil doit être vissé aux crochets et serré convenablement afin d’éviter toute chute due aux vibrations produites par la machine en fonctionnement. L’accroche de l’appareil doit être sécurisée par une élingue de sécurité. Assurez-vous également que la structure (ou point d’accroche) peut supporter au moins 10X le poids de l’appareil accroché. L’appareil doit être installé par une personne qualifiée et doit être placée hors de portée du public. EVO Spot 60 Manual Ver. 1.00 Page 5 Sécurisez la fixation du projecteur avec une élingue de sécurité homologuée pour le poids du projecteur. o Connexion DMX Il est fortement conseillé d’utiliser des câbles DMX de bonne qualité. Utiliser du câble torsadé blindé. o Connexion du câble d’alimentation secteur La terre ou « Earth » doit toujours être connectée .Les câble d’alimentation doivent être homologués et conformes au Standard IEC. EVO Spot 60 Manual Ver. 1.00 Page 6 Configuration o Panneau de contrôle / Navigation dans les menus Panneau de contrôle avec afficheur. Accédez directement au menu en appuyant sur la touche Menu puis déplacez-vous dans les menus grâce aux touches UP & DOWN. Appuyez sur la touche ENTER pour valider vos choix et valeurs Options Run Mode DMX AUTO Random Sound DMX Address Channel Mode 1~512 Standard 12CH Inversion Pan off on off on off on on off hold clear on off Inversion Tilt Pan-Tilt Swap Pan-Tilt Encoder No DMX Signal Display Load Default EVO Spot 60 Manual Ver. 1.00 Description Mode DMX Modes automatiques Adresse DMX Nombre de canaux DMX Echanger les canaux PAN et TILT Calibration du TILT Calibration du PAN Garde le même état que précédemment Eteint l’écran après 30 secondes d’inactivité Ecran toujours allumé Rappel des réglages d’usine Page 7 o Protocole DMX CANAL Fonction DESCRIPTION 1 Dimmer 000-255:dimmer 0%~100% 2 Strobe 000-009:Pas de Strobe 010-255:Strobe de lent à rapide 3 Couleur 000-125:Demi-couleurs et couleurs pleines 126-255:couleurs effets “eau” 4 Prisme 000-127 Pas d’effet 128-255 Prisme 5 Pan 000-255 6 Pan fin 000-255(16bit) 7 Tilt 000-255 8 Tilt fin 000-255(16bit) 9 Vitesse Pan-Tilt 000-255 adjuste la vitesse 10 Gobos 000-079:Gobo de 1 à 8; 080-127: Rotation de la roue de gobos 128-175:Pattern reversal, from slow to fast; 176-255:Jitter 11 Gobo Rotation 0-7: Pas d’effet 8-127: Vitesse 128-135: Pas d’effet 136-155: Rotation inversée 12 Macro Macro 13 Reset 000-244 Pas d’effet 245-255 Reset EVO Spot 60 Manual Ver. 1.00 Page 8 o Mode Automatique Sélection du Mode AUTO . Appuyez sur la touche Menu jusqu’à l’affichage de Auto, puis appuyez sur ENTER pour valider ce choix. Sélection du Mode AUTO à détection sonore. . Appuyez sur la touche Menu jusqu’à l’affichage de SOUND. o Mode DMX Chaque appareil peut-être contrôlé individuellement grâce à un contrôleur DMX-512 standard. Il faut « adresser » chaque appareil grâce au menu « A001 ». L’adresse renseignée est alors l’adresse de base, adresse à partir de laquelle l’appareil va répondre. Si deux MOVING WASH 315C sont adressées à la même adresse DMX ; elles se comporteront alors de manière identique, répondants aux mêmes canaux DMX. o Mode Maître / Esclave L’appareil est automatiquement désigné en “Maitre” si il est en mode Master Auto / Alone -Auto. Dans le menu principal, sélectionnez «AUTO PROGRAM». L’appareil « Esclave » doit être configuré en Mode D MX à l’adresse A001. Entretien et maintenance o Nettoyage Un nettoyage extérieur de l’appareil doit être fait régulièrement. Les lentilles doivent être nettoyées pour une luminosité optimum. Si l’appareil est installé dans un environnement poussiéreux ou avec de la fumée cet entretien régulier est très important. Débranchez l’appareil avant toute intervention ! Utilisez un chiffon propre et sec. EVO Spot 60 Manual Ver. 1.00 Page 9 o Maintenance DANGER ! Risque de chocs électriques. Toujours débrancher l’appareil avant une intervention technique ou avant son entretien. Voici quelques suggestions si vous rencontrez des problèmes avec votre appareil. L’appareil ne fonctionne pas du tout. o Vérifiez le cordon d’alimentation et le fusible. o Assurez-vous que votre prise soit bien alimentée. L’appareil ne répond pas ou pas correctement aux commandes DMX. o Vérifiez vos câbles DMX o Vérifiez votre adressage DMX o Essayez un autre contrôleur DMX o Vérifiez que vos câbles DMX ne passent pas à proximité de câbles haute tension, ce qui pourrait créer des interférences. Ne réagit pas au son o Vérifiez le mode de fonctionnement choisi o Vérifiez qu’il n’y a pas de câble DMX branché sur DMX IN o Tapotez directement sur le microphone pour tester sa réactivité. Caractéristiques techniques Modèle Voltage EVO Spot 60 110V- 250V / 50-60Hz Consommation: LEDs Poids brut Dimensions du carton 80W 1 LED 60W blanche 8.5 Kg EVO Spot 60 Manual Ver. 1.00 330(H) x 220(l) x 435(L) mm Page 10 WARNING ! Before use, and before installing this fixture, read carefully user manual, and follow the safety precautions listed on this page. WARNING ! Very high level light output. DO NOT LOOK INTO THE BEAM. DANGER ! Hazardous voltage. Risk of electric shock! ALWAYS disconnect the fixture from power for servicing, for cleaning or installing. Do not connect this unit on a dimmer power pack. Protect the unit from rain or moisture. WARNING ! Burn Hazard. Do not touch. Very hot surface The fixture becomes hot during use and remains hot 10 min after use . Do not touch the unit. EVO Spot 60 Manual Ver. 1.00 Page 11 WARNING ! Fire Hazard! Keep flammable materials away from the fixture. Do not operate the fixture with ambient temperature over 40°C. . DANGER ! Safety Hazard. Risk of injury. This evolite unit must be installed by professional people. If suspended, make sure the structure and the hardware used for this suspension is secured. This Hardware must support at least 10 times the weight of the device suspended. Ensure public is not looking at the beam. Do not try to repair the fixture by yourself. Contact a professional repair service. Introduction Thank you for selecting this professio nal fixture from evolite This new intelligent Moving Wash will provide you reliability, latest features, and professional lighting effects for a long period of time. This evolite fixture is complying with European standards: EN605981:2008+A11:2009 EN60598-2-17:1989+A2:1991 et RoHs. Device Description > 13 channel DMX-512 . > Pan: 540°/tilt: 270°. > Variable electronic strobe. > Variable electronic dimmer(0-100%). > LED display menu. > Reset to factory settings option. > Pan/tilt invert option. > Fan cooled. EVO Spot 60 Manual Ver. 1.00 Page 12 Installation o Rigging The installation of the projector has to be built and constructed in a way that it can hold 10 times the weight for 1 hour without any harming deformation. IMPORTANT! OVERHEAD RIGGING REQUIRES EXTENSIVE EXPERIENCE, including calculating working load limits, installation material being used, and periodic safety inspection of all installation material and the projector. If you lack these qualifications, do not attempt the installation yourself, but instead use a professional structural rigger. Improper installation can result in bodily injury and or damage to property. The projector had to be installed out of the reach of people Always secure your fixture with a safety cable ! o DMX 512 Connection The wires must not come into contact with each other, otherwise the fixture will not work at all or properly. Please note the starting address depends upon which controller is being used. Only use a DMX cable and 3-pin XLR-plugs and connectors in order to connect the controller with the fixture or one fixture to another Connection with the mains. The earth has to be connected. The device must only be connected with an electric installation carried out in compliance with IEC standards. Set up o Control panel The control board offer several features: you can simple set the starting address, run the preprogrammed program or make a reset EVO Spot 60 Manual Ver. 1.00 Page 13 The main menu is accessed by pressing the Menu button, Browse through the submenu by pressing Up or Down .Press the Enter-button in order to select the desired menu. You can change the selection by pressing Up or Down, Confirm every selection by pressing the Enter-button. The functions provided are described in the following setting. Options Run Mode DMX AUTO Random Sound DMX Address 1~512 Channel Mode Standard 12CH Inversion Pan off on off on off on Inversion Tilt Pan-Tilt Swap Pan-Tilt Encoder on off No DMX Signal Display hold clear on off Load Default EVO Spot 60 Manual Ver. 1.00 Description Status of Slave: receive the DMX signal from the main console or master Status of Master:Auto Mode and send DMX signal to slave Press “OK” button into Edit Mode. Now the hundred-bit is selected, press “UP”,”DOWN” to change the address code. Press “OK” again to choose the decade-bit to edit. Press “OK” once again to choose the unit-bit, again to quit the Edit Mode. Standard 12 channel mode Switch channels of Pan and Tilt axis(including fine-tuning) Use encoder (optocoupler) to estimate the wrong step and right the wrong position Don’t use encoder (optocoupler) to right the position Keep going as this status Motor return, stop running. Turn off back light after being idle for 30 seconds Back light always on The Confirmation dialog will show after pressing “OK” button, press “OK” again to restore the default setting. Page 14 o Auto Mode/Sound Mode .Press the MENU until it shows Auto program .Use the UP/DOWN buttons to set to Master-Auto / Alone-Auto Master-Music / Alone-Music, Press ENTER to confirm. o DMX Mode DMX mode is selected in the main menu. You can control the projectors individually via your DMX-controller Just select the fixture address, knowing that this address will be the start address. (1 st DMX channel). Note. If 2 fixtures are addressed with same DMX value, they will move exactly the same way. o DMX-protocol CHANNEL Function DESRIPTION 1 Dimmer 000-255:dimmer 0%~100% 2 Strobe 000-009:no effect 010-255:From slow to fast 3 Color 000-125:half color and full color 126-255:color water effect 4 Prism 000-127 no effect 128-255 Prism pitching-in 5 Pan 000-255 6 Pan fine-tuning 000-255(16bit) 7 Y 000-255 8 Tilt fine-tuning 000-255(16bit) 9 Pan-Tilt SPEED 000-255 adjust speed(from fast to slow) 10 Gobo 000-079:Gobo switching 1-8; 080-127:The Gobo is transferred, from fast to slow; 128-175:pattern reversal, from slow to fast; 176-255:Jitter EVO Spot 60 Manual Ver. 1.00 Page 15 11 Gobo Rotation 0-7: no effect 8-127:from fast to slow; 128-135: no effect 136-155: reverse, from slow to fast; 12 Macro Macro 13 Reset 000-244 no effect 245-255 Reset LCD display board contains the information of the driver board, after changing the display board and motor driver board, “Restore default setting” is needed. In the process of reset, long press the touch screen or “OK” button for 5 seconds to interrupt the reset. Press “OK” button or touch screen to interrupt reset process into Test Mode(The functions in Test Mode in tuning process will make the problems more visible.) DMX address is 512, return to the Main Interface, long press the “512” on the screen or “OK” for about 5 seconds to show/hide logo. Gobo wheel and color wheel have zero calibration function. Be caution when installing the Hall, channel 0 means using rest calibration to fine tuning , better with magnet matched, zero calibration will not work if the adjustment range of the gobo wheel and color wheel is out of +20. If magnet is matched, user turn channel into 0 when finding the gobo wheel or color wheel of some lamp is out of step to correct the wrong. Turn off the zero calibration functions in Advanced setting item named “Zero calibrations of pattern color” Signal lights: The blink of ERR red light means error, check the detail in “Information”->”System error information” The on status of DMX blue light mean received the DMX signal, off means no. The light in motor driver board: 1. Blinking as 1-s intervals means receiving the uart signal sent from display board; 2. Blinking as 2-s intervals means no uart signal; 3. Always on or always off means something is wrong about the motor driver board. o Master/ Slave Mode Use standard DMX cables to daisy chain your units together via the DMX connector on the rear of the units. Proper performance it may be necessary to use a terminator at the last fixture. For more information about terminators. Maintenance & service o Cleaning The cleaning of internal must be carried out periodically to optimize light output. Cleaning frequency depends on the environment in which the fixture operates: damp, smoky or particularly dirty surrounding can cause greater accumulation of dirt on the fixture’s optics. Clean with soft cloth using normal glass cleaning fluid. Always dry the parts carefully. Clean the external optics at least every 20 days. EVO Spot 60 Manual Ver. 1.00 Page 16 o Troubleshooting Following are a few common problems that may occur during operation. Here are some suggestions for easy troubleshooting: The fixture does not work, no light o Check the connection of power and main fuse. o Measure the mains voltage on the main connector. Not responding to DMX controller o DMX LED should be on. If not, check DMX connectors, cables to see if link properly. o If the DMX LED is on and no response to the channel, check the address settings and DMX polarity. o If you have intermittent DMX signal problems, check the pins on connectors or on PCB of the fixture or the previous one. o Try to use another DMX controller. o Check if the DMX cables run near or run alongside to high voltage cables that may cause damage or interference to DMX interface circuit. Some fixtures don’t respond to the easy controller o You may have a break in the DMX cabling. o Check the LED for the response of the master/ slave mode signal. No response to the sound o Make sure the fixture does not receive DMX signal. o Check microphone to see if it is good by tapping the microphone. Technical Specifications TECHNICIAL SPECIFICATIONS Model Voltage Power consumption: LED Gross Weight Dimensions EVO Spot 60 Manual Ver. 1.00 EVO Spot 60 110V- 250V / 50-60Hz 80W 1 LED 60W White 8.5 Kg 330(H) x 220(W) x 435(L) mm Page 17 www.evolite-pro.com EVO Spot 60 Manual Ver. 1.00 Page 18