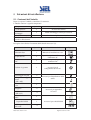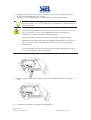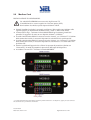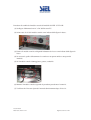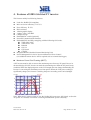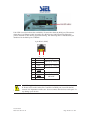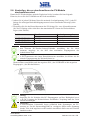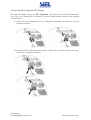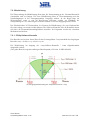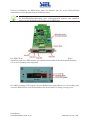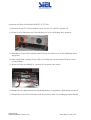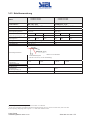
1
Inverter Soleil per collegamento in rete SOLEIL 3F-TL10K DE / IT / ES / UK SOLEIL 3F-TL15K DE / IT / ES / UK SOLEIL 3F-TL20K DE / IT / ES / UK Manuale di istruzione IV351 Rev03 Date Issue: 2012-11-22 Pagina 1 di 278 + FR MANUALE DI ISTRUZIONE ............................................................................................. 1! 1.! ISTRUZIONI DI SICUREZZA .................................................................................... 5! 2.! GARANZIA LIMITATA ............................................................................................... 6! 3.! PANORAMICA DEL PRODOTTO ............................................................................. 7! 3.1.! 3.2.! 3.3.! 3.4.! 3.5.! SCHEMA DELL'IMPIANTOFV .................................................................................................................. 7! PRESENTAZIONE DELL'INVERTER DI RETE FV SIEL............................................................................... 8! IDENTIFICAZIONE .................................................................................................................................. 9! ESTERNO E DENOMINAZIONE COMPONENTI ......................................................................................... 10! INTRODUZIONE AL REGISTRATORE GRAFICO DATI................................................................................ 12! 4.! CARATTERISTICHE DELL'INVERTER DI RETE FV SIEL .................................... 14! 5.! ISTRUZIONI DI INSTALLAZIONE .......................................................................... 15! 5.1.! 5.2.! 5.3.! 5.4.! 5.5.! 5.6.! 5.7.! 5.8.! 6.! FUNZIONAMENTO DELL'INVERTER FV .............................................................. 31! 6.1.! 6.2.! 6.3.! 6.4.! 7.! CONTENUTI DELL’IMBALLO ................................................................................................................ 15! PRIMA DELL'INSTALLAZIONE............................................................................................................... 16! MONTAGGIO DELL'INVERTER FV ........................................................................................................ 17! COLLEGAMENTO DEL CAVO DI USCITA AC .......................................................................................... 21! CONNESSIONE ALL'UNITÀ DI GIUNZIONE AC (RETE PUBBLICA AC) .................................................... 24! CONTROLLI DA ESEGUIRE PRIMA DELLA CONNESSIONE DEI MODULI FV ............................................. 25! COLLEGAMENTO DEI MODULI FV ALL'INVERTER ................................................................................ 26! ELENCO DI CONTROLLO POST INSTALLAZIONE .................................................................................... 29! USO DEL SEZIONATORE DC ................................................................................................................. 31! INIZIALIZZAZIONE PER L'IMPOSTAZIONE DEL TIPO DI NORMATIVA ....................................................... 31! MODALITÀ OPERATIVE ........................................................................................................................ 32! USO DEL DISPLAY LCD E DEL REGISTRATORE DATI ............................................................................. 35! SERVIZI DI RETE ................................................................................................... 40! 7.1. POTENZA ATTIVA ........................................................................................................................................ 40! 7.1.1. RIDUZIONE DELLA POTENZA ATTIVA ........................................................................................................ 40! 7.2. POTENZA REATTIVA .................................................................................................................................... 41! 8.! STATO DI FUNZIONAMENTO DELL'INVERTER .................................................. 45! 9.! COMUNICAZIONI ................................................................................................... 53! 9.1! 9.2! 9.3! 9.4! 9.5! 9.6! 9.7! USB (SU INVERTER)................................................................................................................................. 53! SLOT COMUNICAZIONI RS-485 .............................................................................................................. 53! CONFIGURAZIONE SCHEDA RS485........................................................................................................... 56! SPECIFICHE SCHEDA RS485 ..................................................................................................................... 59! RISOLUZIONE PROBLEMI SCHEDA RS485 ................................................................................................. 59! MODBUS CARD ........................................................................................................................................ 60! INTERFACCIA USB (REGISTRATORE DATI) ............................................................................................... 63! 10.! IMPOSTAZIONI AVANZATE ................................................................................... 64! 11.! SCARICO DEI DATI CONTENUTI NEL REGISTRATORE DATI ........................... 65! 11.1! ACCESSO E GESTIONE DEI DATI REGISTRATI ........................................................................................ 65! 12.! RISOLUZIONE DEI PROBLEMI ............................................................................. 69! 13.! MANUTENZIONE PREVENTIVA ............................................................................ 73! 13.1! 13.2! 13.3! ISPEZIONE VISIVA ................................................................................................................................ 73! CONTROLLO E MANUTENZIONE ........................................................................................................... 73! PULIZIA E SCAMBIO DEL MODULO DELLA VENTOLA DI RAFFREDDAMENTO ....................................... 74! 14.! SPECIFICHE ........................................................................................................... 77! 14.1! 14.2! 14.3! NORMATIVE NAZIONALI DI RIFERIMENTO............................................................................................ 77! SPECIFICHE ELETTRICHE ..................................................................................................................... 77! MONITORAGGIO RETE ......................................................................................................................... 80! IV351 Rev03 Date Issue: 2012-11-22 Pagina 2 di 278 + FR 15.! SMALTIMENTO ...................................................................................................... 86! 16.! INFORMAZIONI DI CONTATTO ............................................................................. 87! 17.! DIAGRAMMI EFFICIENZA ..................................................................................... 88! 17.1! 17.2! GRAFICI DI CARICO ............................................................................................................................. 88! DIAGRAMMA EFFICIENZA .................................................................................................................... 89! ! IV351 Rev03 Date Issue: 2012-11-22 Pagina 3 di 278 + FR Prima di iniziare… Il presente manuale contiene informazioni importanti relative all'installazione e al funzionamento sicuro dell'unità . Prima dell'uso si raccomanda di leggere a fondo il manuale. Vi ringraziamo per aver scelto il presente inverter di rete fotovoltaico (di seguito denominato "inverter FV" oppure "inverter"). Il presente inverter FV è un prodotto altamente affidabile grazie al design innovativo e al perfetto controllo qualitativo. L'inverter viene utilizzato negli impianti fotovoltaici a elevato carico collegati alla rete. In caso di problemi durante l'installazione o durante il funzionamento dell'unità, consultare il manuale prima di contattare il rivenditore o fornitore locale. Le istruzioni contenute nel presente manuale consentono di risolvere la maggior parte dei problemi che possano verificarsi durante l'installazione e l'uso. Tenere sempre a disposizione il manuale per poterlo consultare in caso di necessità. IV351 Rev03 Date Issue: 2012-11-22 Pagina 4 di 278 + FR 1. Istruzioni di sicurezza Rischio di scosse elettriche: All'interno del dispositivo, le fonti di corrente alternata (AC) e corrente continua (DC) sono collegate. Allo scopo di prevenire il rischio di scosse elettriche durante la manutenzione o l'installazione verificare che tutti i morsetti AC o DC siano scollegati. Verificare che la linea di terra sia collegata saldamente alla terra della rete, e verificare di non aver confuso il conduttore e il neutro con la terra. Rischio di scosse elettriche: Dopo aver esposto il pannello FV alla luce, questo inizierà ad erogare corrente continua ad alta tensione. Verificare di aver aperto il sezinatore DC prima di eseguire l'assistenza o verificare di non entrare in contatto con i componenti in tensione. Rischio di scosse elettriche: Avvertenza - La presenza di elevate correnti di dispersione rende essenziale il collegamento a terra prima di eseguire il collegamento alla rete. Rischio di scosse elettriche: Presenza di più fonti di alimentazione. Prima di eseguire l'assistenza scollegare tutte le fonti. AVVERTENZA : Dopo aver scollegato l'inverter FV dall'alimentazione e dai moduli FV, i condensatori del circuito DC potrebbero ancora contenere carica elettrica residua. Dopo aver scollegato l'alimentazione e prima di lavorare sul dispositivo attendere almeno 1 minuto . Solo per rete elettrica pubblica: L'inverter FV è progettato per fornire alimentazione AC direttamente alla rete dell'azienda di servizio pubblico. Non collegare l'uscita AC del dispositivo ad apparecchiature AC private. Superfici calde: Anche se progettato per soddisfare le normative di sicurezza internazionali, l'inverter FV potrebbe scaldarsi durante il funzionamento. Non toccare il dissipatore di calore o le superfici esterne durante o appena dopo il funzionamento. Manutenzione e assistenza dell'inverter FV: L'apertura dell'inverter a scopo di assistenza è consentita solamente al personale autorizzato. AVVERTENZA : Rischio di scosse elettriche causate dall'energia residua del condensatore. Non rimuovere il coperchio prima di aver atteso 2 minuti dalla disconnessione di tutte le fonti di alimentazione. Apertura dell'imballaggio e installazione: Alcuni modelli dell'inverter FV SIEL possono pesare fino a 57kg. Per evitare lesioni e a scopo di sicurezza, utilizzare le corrette tecniche di sollevamento e farsi aiutare da altri durante la rimozione dell'imballaggio e l'installazione dell'unità. AVVERTENZA: L'uso dell'apparecchio in modalità non previste dal fabbricante potrebbe pregiudicare la protezione fornita dall'apparecchio stesso. IV351 Rev03 Date Issue: 2012-11-22 Pagina 5 di 278 + FR 2. Garanzia limitata La garanzia include eventuali difetti di progettazione, componentistica e fabbricazione. La garanzia di fabbrica non copre i danni dovuti a: ! ! ! ! ! ! Rottura del sigillo sul prodotto danni causati durante la fase di trasporto o scarico cadute o spostamenti dovuti ad installazione non corretta guasti che risultino causati da imperizia o negligenza del committente manomissioni, modifiche non autorizzate da SIEL SpA o tentativi di riparazione utilizzo errato e/o funzionamento inappropriato La garanzia decade nei seguenti casi: ! ! ! ! ! ! ! ! ! ! ! ! ! ! si manifestino difetti di installazione uso dei prodotti al di fuori delle specifiche tecniche non osservanza delle istruzioni per l’uso, delle disposizioni e degli intervalli di manutenzione aerazione insufficiente dell'apparecchio siano stati modificati o riparati da personale non autorizzato presenza eccessiva di fumo o altre sostanze corrosive presenza di corrosione da sale marino, se il prodotto non è installato in conformità a quanto riportato nel manuale di installazione e uso mancato rispetto delle norme di sicurezza pertinenti Collegamento dell’inverter ad altre apparecchiature incompatibili utilizzo di materiali non appropriati per la pulizia del prodotto, come benzina, alcool, ecc. installazione ed utilizzo di cavi elettrici non appropriati forza maggiore (per es. sovratensioni, fulmini, calamità naturali, incendi, inondazioni, terremoti, atti di guerra, sommosse, atti di vandalismo, etc) qualora i materiali vengano installati in condizioni diverse da quelle prescritte Applicazioni che non rientrano nell’ambito delle normative vigenti in materia di sicurezza e dei codici sulle reti (VDE, UL e così via) Garanzia di Fabbrica non copre: ! ! i difetti estetici e quant’altro non influenzi il buon funzionamento dell’apparato richieste di risarcimento danni indiretti o diretti dovuti a difetti dell’apparecchio, di costi derivanti da lavori di montaggio e smontaggio o di utili mancati, non sono coperti dalla garanzia di fabbrica; nulla sarà dovuto al committente per il tempo durante il quale l’impianto sarà rimasto inoperoso, né egli potrà pretendere risarcimenti o indennizzi per spese, sinistri o danni diretti e indiretti conseguiti Il diritto di procedere alla riparazione e/o sostituzione del prodotto difettoso è a esclusiva discrezione del fornitore. Eventuali richieste di intervento in garanzia devono essere presentate per iscritto al fornitore entro 5 giorni lavorativi dal malfunzionamento del prodotto. Il fornitore declina ogni responsabilità per danni che esulano dall'ambito della presente garanzia. IV351 Rev03 Date Issue: 2012-11-22 Pagina 6 di 278 + FR 3. Panoramica del prodotto 3.1. Schema dell'impiantoFV Un impianto FV collegato alla rete è composto principalmente da 5 elementi: Pannello fotovoltaico o batteria di pannelli FV, unità di giunzione DC, inverter FV, unità di giunzione AC (interfaccia di connessione) e un collegamento alla Rete pubblica. Il normale schema di collegamento dell'impianto FV viene illustrato nella figura seguente. Pannello FV Congiuntore DC Rete elettrica pubblica Inverter FV Congiuntore AC Contatore . Unità Descrizione Array FV (pannello Dispositivo che converte l’energia della luce solare in elettricità e fornisce fotovoltaico) alimentazione DC all’inverter. Interfaccia tra l’array FV e l’inverter FV, costituita da un interruttore DC e Unità di scollegamento DC dai terminali di connessione. (o congiuntore DC) Inverter FV Dispositivo che converte la corrente continua (DC) proveniente dai pannelli FV in corrente alternata (AC). Interfaccia tra la rete elettrica pubblica e l’inverter FV per l’installazione Unità di scollegamento AC dei dispositivi di protezione richiesti dalle normative sulla sicurezza, ad (o congiuntore AC) esempio commutatori AC, interruttori AC, fusibili e terminali di connessione. Per garantire la conformità ai codici e alle normative locali in materia di sicurezza, la configurazione dell’impianto di produzione dell’energia deve essere progettata e implementata da un tecnico qualificato. Infrastruttura con cui la società fornitrice dell’energia elettrica Rete elettrica pubblica distribuisce l’energia AC (nel presente manuale definita anche “griglia”) agli utenti finali. Tenere presente che l’inverter FV può essere collegato solo a sistemi a bassa tensione (BT). Nota : Ai sensi di DIN VDE 0100-712:2006-06, in Germania è necessario installare un dispositivo di disconnessione dell'inverter dalla potenza DC tra il modulo FV e l'inverter. Solo per moduli FV Collegare all'inverter di rete FV SIEL solamente moduli FV e non altre fonti di alimentazione. IV351 Rev03 Date Issue: 2012-11-22 Pagina 7 di 278 + FR 3.2. Presentazione dell'inverter di rete FV SIEL L'inverter di rete FV SIEL Soleil, converte la corrente continua (DC) generata dai moduli FV in corrente alternata (AC), compatibile con la rete locale di distribuzione dell'elettricità, denominata anche Rete pubblica. Modello Aspetto Dimensioni (mm) SOLEIL 3F-TL10K 548*565*275 SOLEIL 3F-TL15K 548*565*275 SOLEIL 3F-TL20K 548*565*275 IV351 Rev03 Date Issue: 2012-11-22 Pagina 8 di 278 + FR 3.3. Identificazione L'installatore o l'utente deve conservare una registrazione delle informazioni relative all'inverter (modello, numero di serie e numero dei pannelli associati) installato a scopo di gestione e manutenzione o per rivolgersi all'assistenza. Numero di modello e numero di serie Sul lato sinistro dell'inverter è presente la targa dati dello stesso. La targa riporta Tipo, Marca, Denominazione modello, Specifiche tecniche e Numero di serie dell'inverter. In caso di difficoltà durante l'installazione o il funzionamento, annotare il numero di serie prima di rivolgersi al rivenditore locale o al rappresentante. IV351 Rev03 Date Issue: 2012-11-22 Pagina 9 di 278 + FR 3.4. Esterno e denominazione componenti La descrizione dei componenti principali dell'inverter è indicata di seguito: Denominazione Descrizione componente Ciascuna coppia di ingresso è composta da un morsetto positivo (1) Morsetti ingresso DC e un morsetto negativo (2) Ventola di Ventola esterna di raffreddamento dell'inverter raffreddamento Sezionatore DC per la disconnessione dell'inverter dal modulo (3) Sezionatore DC FV (4) Slot opzionale Slot per l'installazione di una scheda di comunicazione RS485 (standard). Gli utenti potranno collegarsi all'inverter e comunicazioni con coperchio monitorarne lo stato e il funzionamento in tempo reale da remoto. Dispositivo utilizzato per dissipare il calore nell'ambiente (5) Dissipatore di calore circostante Collega questa porta direttamente al PC tramite un cavo USB (6) Interfaccia USB per consentire all'utente di comunicare con l'inverter tramite uno specifico software. (7) Morsetto uscita AC Per collegare l'uscita AC alla rete. Involucro impermeabile (8) Morsetto di terra (9) Registratore grafico dati IV351 Rev03 Date Issue: 2012-11-22 Per collegare l’apparecchiatura a terra Per la visualizzazione dello stato del funzionamento e le impostazioni caratteristiche dell'impianto SOLEIL 3F-TL10K DE/IT/ES/UK SOLEIL 3F-TL15K DE/IT/ES/UK SOLEIL 3F-TL20K DE/IT/ES/UK Pagina 10 di 278 + FR SOLEIL 3F-TL10K DE/IT/ES/UK SOLEIL 3F-TL15K DE/IT/ES/UK SOLEIL 3F-TL20K DE/IT/ES/UK IV351 Rev03 Date Issue: 2012-11-22 Pagina 11 di 278 + FR 3.5. Introduzione al registratore grafico dati Per mostrare le informazioni relative all'inverter, l'unità dispone di un Registratore grafico di Dati. Tale dispositivo può visualizzare diverse informazioni relative all'inverter, ad esempio lo stato di funzionamento e i messaggi di avviso. La visualizzazione delle informazioni o l'impostazione delle caratteristiche avviene utilizzando i relativi pulsanti Configurazione del registratore grafico dati La seguente tabella riporta le specifiche principali del Registratore Dati: LCD Informazioni visualizzate Periodo di conservazione dati Supporto di memorizzazione Scarico Dati Monocromatico Potenza in ingresso, potenza in uscita, modalità di funzionamento e messaggi di avviso 5 anni Scheda SD 2 GB (fino a 32 GB) Tramite USB tipo B Caratteristiche del registratore grafico dati Retroilluminazionein diversi colori La retroilluminazione dell'LCD viene modificata in funzione al relativo stato. I tre colori della retroilluminazione indicano: ! Verde: Avvio. Stato normale. ! Rosso: Malfunzionamento. Questo stato indica che l'inverter si è scollegato dalla rete a causa di un guasto dell'impianto o dell'inverter. I guasti vengono definiti nella tabella dei messaggi di errore riportata in seguito. ! Giallo: Attenzione. L'inverter si è scollegato dalla rete a causa di un guasto dell'impianto occorso nelle 48 ore precedenti, ma si è ricollegato. Scaricamento dati L'utente può scaricare e accedere ai dati del registratore per mezzo di un PC, tramite un cavo USB tipo B e gestire i dati interni. Consultare il Capitolo 11 relativo allo scaricamento dei dati dal registratore. IV351 Rev03 Date Issue: 2012-11-22 Pagina 12 di 278 + FR Precisione delle letture L'inverter non è progettato per fornire una lettura precisa della tensione, della corrente e della potenza. Le letture riportate sull'LCD servono solamente a scopo di consultazione da parte dell'utente e non dovrebbero essere considerate indice per la valutazione ufficiale delle prestazioni o per il calcolo della tariffa dell'energia immessa in rete. Si consiglia di non utilizzare i dati per il controllo o il collaudo dell'impianto. Di solito, la precisione è circa il ±2%. In tutti gli intervalli di funzionamento, la deviazione della precisione è di circa il ±5%. La tolleranza di lettura può variare dal 2% al 5% in funzione delle condizioni di funzionamento. Nel caso fosse necessario una misurazione precisa dello stato del sistema, installare le apparecchiature necessarie, come ad esempio un contatore. Aspetto del display LCD ! LCD: 128 x 64 grafico, monocromatico ! Tastierina di navigazione: “Ⴄ”, “Ⴎ”, “!” , “"” e il tasto “OK” al centro. ! Retroilluminazione: 3 colori IV351 Rev03 Date Issue: 2012-11-22 Pagina 13 di 278 + FR 4. Caratteristiche dell'inverter di rete FV SIEL L'inverter presenta le seguenti caratteristiche: ! ! Senza utilizzo di piombo, conforme RoHS GP2 Max efficienza di conversione ฺ 97,5% ! ! ! ! ! ! ! ! Euro efficienza ฺ 97% Involucro IP65 Display grafico 128x64 trifase 4 fili, 230/400V Design compatto Sezionatore DC integrato Potente interfaccia di comunicazione ENS integrato e conformità totale con le seguenti specifiche di rete: " VDE-AR-N 4105 " VDE-0126-1-1/A1 " RD1699 " G83/1-1 " G59 Issue2 " CEI-021 RCMU integrata (Residual Current Monitoring Unit - Unità monitoraggio corrente residua) Gestione Potenza per controllare la potenza efficiente e la potenza reattiva (Sarà necessario un dispositivo remoto supplementare, come un registratore dati esterno) ! ! Maximum Power Point Tracking (MPPT) Un inverter FV deve riuscire a convertire il massimo di potenza da ciascun pannello FV, Grazie alla sua progettazione all' avanguardia, questo inverter FV può estrarre la massima potenza dal pannello FV in qualsiasi condizione. Quando la potenza visualizzata sull'LCD non cambia in maniera significativa, l'inverter sta convertendo la potenza massima dai pannelli. Quando la lettura della potenza sull'LCD cambia in maniera significativa, l'inverter sta variando la potenza in funzione della variazione della luce solare. IPV (A) 5 4 1000W/m 2 800W/m 2 600W/m 2 P PV (W) Maximum power point 2 @ 1000W/m ~ 120W 125 100 3 75 2 50 1 25 0 10 20 30 40 50 U PV (V) Nota: Quando l'uscita del pannello FV è bassa, la potenza in entrata DC potrebbe variare gradualmente allo stesso modo della potenza AC. Questo accade perché l'inverter FV controlla la potenza massima DC in maniera costante. IV351 Rev03 Date Issue: 2012-11-22 Pagina 14 di 278 + FR 5. Istruzioni di installazione 5.1. Contenuti dell’imballo Dopo aver aperto l’imballo, controllarne il contenuto. L’imballo contiene i seguenti componenti: Componente (1) Inverter FV Quantità 1 Nota Inverter fotovoltaico (2) Staffa di 1 Staffa di montaggio a muro per l'inverter montaggio (3) Scatola accessori 1 Contiene tutti gli accessori richiesti Nota: Conservare l’imballo in buone condizioni in caso sia necessario la spedizione del dispositivo all'assistenza. Di seguito viene fornito il contenuto della Scatola Accessori (3): Articolo Quantità Manuale d'uso 1 Coperchio AC 1 Estrattore connettore DC 1 Isolante in gomma 1 Ancoraggio in nylon 6 Viti per il montaggio a muro (M5 x 40L) Blocco di sicurezza a vite 6 2 Viti (M5 x12L) 4 Coperchio RS485 Viti coperchio RS485 M3 x15L IV351 Rev03 Date Issue: 2012-11-22 Figura Manuale di installazione e uso Coperchio superiore utilizzato per il Morsetto AC Strumento per scollegare il connettore DC Accessori per il collegamento dei fili AC. Accessori per l'installazione della staffa. 1 Supporto Boccola a scatto RS485 Descrizione articolo Accessori per appendere l'inverter 1 1 Accessori per scheda RS485 4 Pagina 15 di 278 + FR 5.2. Prima dell'installazione Per ottenere prestazioni ottimali, prendere in considerazione le seguenti linee guida prima di procedere all'installazione: # verificare che la temperatura ambiente di installazione sia compresa tra l'intervallo specificato, -20 ~ +60!C. # La tensione e la frequenza di rete sul sito di installazione devono rientrare nell'intervallo specifico definito dalle normative vigenti. # La connessione alla rete deve essere approvata dal gestore della rete elettrica. # L'installazione e la manutenzione devono essere eseguite solamente da personale qualificato. # L'inverter deve disporre di uno spazio adeguato per la circolazione dell'aria. # Nei pressi dell'inverter non devono essere presenti vapori o polveri esplosivi. # Nei pressi dell'inverter non devono essere presenti oggetti infiammabili. # È vietato il montaggio su superfici infiammabili di legno. Scelta del luogo di installazione: È possibile installare e mettere in funzionamento l'inverter di rete FV SIEL in ambienti con temperatura fino a 60!C. Tuttavia, per un funzionamento ottimale, si consiglia di installare l'inverter ove la temperatura ambiente è tra 0 e 45!C. Avvertenza: Non esporre l'inverter FV alla luce solare diretta. La luce solare diretta aumenta la temperatura interna riducendo l'efficienza di conversione. Nota : Anche se l'inverter è stato progettato per uso esterno (IP65), si consiglia comunque di non esporre l'inverter ad ambienti molto umidi o bagnati. Prima di eseguire il montaggio si consiglia: l'inverter di rete FVSIEL pesa circa 57kg. Per evitare lesioni e a scopo di sicurezza, utilizzare le corrette tecniche di sollevamento e farsi aiutare da altri durante la rimozione dell'imballaggio e l'installazione dell'unità. Solo per rete elettrica pubblica: L'inverter SIEL è dotato di un dispositivo RCMU (Residual Current Monitoring Unit) utilizzato per proteggere dal contatto diretto o indiretto con il prodotto in qualsiasi condizione. IV351 Rev03 Date Issue: 2012-11-22 Pagina 16 di 278 + FR 5.3. Montaggio dell'inverter FV Verificare che siano seguite le norme di installazione riportate di seguito. 1. 2. 3. Scegliere una parete o una superficie verticale solida che possa sostenere l'inverter FV nel lungo periodo. L'inverter necessita di un adeguato spazio di raffreddamento. È necessario disporre di almeno di 30 cm al di sopra e 90 cm al di sotto l'inverter. Per facilitare la manutenzione, montare gli inverter ad almeno 30 cm di distanza l'uno dall'altro. Nota: Non impilare gli inverter o montarli sopra altre fonti di calore salvo non sia disponibile altra alternativa. In tal caso, lasciare uno spazio minimo di almeno 100 cm tra le varie unità per consentire un'adeguata ventilazione. 4. Fissare la staffa utilizzando i sei fori di montaggio e le viti M5*40 mm. Serrare con una coppia di 30kgf-cm (o 2,94 N-m), come illustrato di seguito: IV351 Rev03 Date Issue: 2012-11-22 Pagina 17 di 278 + FR Staffa di montaggio Note: Il diametro della vite di sicurezza è 10 mm2. IV351 Rev03 Date Issue: 2012-11-22 Pagina 18 di 278 + FR 5. Sarà possibile sollevare l'inverter nella posizione di installazione utilizzando un adeguato strumento di sollevamento dopo aver montato sull'inverter stesso i supporti come illustrato: Sollevamento dell'inverter nella posizione di installazione (opzionale) *Note: Utilizzare un corretto strumento di sollevamento. IV351 Rev03 Date Issue: 2012-11-22 Pagina 19 di 278 + FR 6. Montare l'inverter sulla staffa come da illustrazione: Montaggio dell'inverter FV a parete 7. Verificare che il dispositivo sia correttamente fissato alla staffa con la corretta inclinazione. IV351 Rev03 Date Issue: 2012-11-22 Pagina 20 di 278 + FR 5.4. Collegamento del cavo di uscita AC Collegare l'inverter FV all' Unità di giunzione AC con i cavi di uscita e i cavi di terra come illustrato di seguito: 1. 2. 3. Misurare la tensione di rete e la frequenza di rete. La lettura dovrebbe essere circa 230VCA (L-N) / 50Hz, e la tensione misurata tra N e PE circa 0 volt (Il neutro deve essere collegato a terra in cabina elettrica). Aprire l'interruttore o il fusibile dell'Unità di giunzione AC (tra l'inverter FV e la rete elettrica). Trovare i cavi di uscita AC del diametro consigliato, come indicato dalla tabella in basso: L1ᇬL2ᇬL3ᇬNᇬPE1 devono utilizzare cavi del diametro minimo indicato nella tabella seguente. Modello SOLEIL 3F-TL10K SOLEIL 3F-TL15K SOLEIL 3F-TL20K Potenza (W) 10000 15000 20000 Max corrente AC 16 A 24 A 30A Diametro max cavo 10 AWG 8 AWG AC Nota: non utilizzare cavi con perdita superiore all'1%. 8 AWG La sezione del cavo PE2 deve essere dello stesso diametro del cavo PE1 (o 10 mm2). ! 4. 5. Rimuovere il tappo di gomma dalla presa del connettore AC Inserire tutti i cavi AC attraverso il coperchio AC nel seguente ordine prima di serrarli con un coprimorsetto isolato: $ pressacavo $ isolante di gomma $ coperchio AC $ coprimorsetto IV351 Rev03 Date Issue: 2012-11-22 Pagina 21 di 278 + FR 6. 7. Aggiungere un coprimorsetto isolato a ciascun cavo AC prima di collegare. Spelare il cavo AC per una lunghezza di 10 - 12 mm. Collegare i cavi CA al morsetto CA corrispondente e serrarlo correttamente. Dopo la connessione si consiglia: Dopo aver serrato i cavi AC al morsetto AC, controllarne la fermezza tirando i cavi uno alla volta. Promemoria importante: Durante il normale funzionamento, tutti i cavi AC (Fase L1ᇬFase L2ᇬFase L3ᇬ Fase N e Terra ( PE ) devono essere saldamente connessi al morsetto AC dell'inverter FV prima di accendere l'alimentazione AC. Quando è necessario scollegare il servizio AC dall'inverter, spegnere prima l'alimentazione DC dell'inverter. Quindi scollegare l'alimentazione AC ( Fase L1ᇬ Fase L2ᇬFase L3 e Fase N) dell'inverter FV allo stesso tempo per proteggere l'inverter stesso. In caso di mancata osservanza di quanto sopra, potrebbero danneggiarsi l'inverter FV e le eventuali apparecchiature collegate. 8. Rimontare il coperchio dell'uscita CA utilizzando un cacciavite. 9. Ruotare il pressatreccia del connettore per bloccare saldamente insieme la l'isolante e il cavo. 10. Controllare nuovamente le condizioni di installazione. IV351 Rev03 Date Issue: 2012-11-22 Pagina 22 di 278 + FR % Non installare l'inverter FV su superfici inclinate % Verificare che l'inverter sia agganciato saldamente alla staffa sia in alto sia in basso. Dopo il montaggio verificare: che l'inverter sia montato correttamente provando a sollevarlo leggermente dalla parte inferiore e ruotandolo. L'inverter dovrebbe restare attaccato saldamente. Dopo il montaggio verificare: la selezione di una posizione di installazione che consenta la chiara visualizzazione del display di stato, che la parete di montaggio selezionata sia robusta, in modo da impedire vibrazioni durante il funzionamento dell'inverter FV. IV351 Rev03 Date Issue: 2012-11-22 Pagina 23 di 278 + FR 5.5. Connessione all'Unità di giunzione AC (rete pubblica AC) L'Unità di giunzione AC è l'interfaccia tra l'inverter FV e la Rete pubblica. È composta da interruttore elettrico, fusibile, dispositivo di protezione dalle sovratensioni e morsetti per il collegamento dell'inverter alla Rete pubblica. L'unità di giunzione AC deve essere progettata da un tecnico qualificato ed essere conforme alle normative locali di sicurezza. Modello Max corrente AC Protezione nominale esterna dalle sovracorrenti SOLEIL 3F-TL10K 16A SOLEIL 3F-TL15K 24A SOLEIL 3F-TL20K 30A 20A 25A 35A Attenzione: Selezionare un dispositivo di protezione dalle sovracorrenti idoneo in funzione della massima corrente AC di ciascun modello, come da Sezione 14.2. IV351 Rev03 Date Issue: 2012-11-22 Pagina 24 di 278 + FR 5.6. Controlli da eseguire prima della connessione dei moduli FV Per ottenere un funzionamento ottimale dell'inverter FV, prendere in considerazione le seguenti linee guida prima di collegare i moduli FV al dispositivo: % Per prima cosa verificare che la tensione massima a circuito aperto (Voc) di ciascuna stringa FV non superi, in qualsiasi condizione, le relative specifiche elencate nella tabella seguente . % Verificare la corrente di corto circuito della stringa FV. La corrente di corto circuito totale (Isc) della stringa FV non deve eccedere la corrente DC massima dell'inverter. Modello Max!Tensione!!Voc) VDC SOLEIL 3F-TL10K ู1000V Max corrente (Isc) ADC 24A * 2 SOLEIL 3F-TL15K ู1000V 30A * 2 SOLEIL 3F-TL20K ู1000V 34,5A * 2 Attenzione: selezionare una spina/cavo/connettore DC esterno che sopporti una corrente nominale maggiore della corrente DC massima dell'inverter. Attenzione: selezionare pannelli FV con corrente di corto circuito minore della corrente DC massima dell'inverter. % Collegare sempre il polo positivo (+) dei moduli FV al polo DC positivo (+) dell'inverter e il polo negativo (-) dei moduli FV al polo DC negativo (-)dell'inverter. Attenzione: Prima di collegare la potenza DC all'inverter, verificare che la polarità di ogni coppia di ingresso DC sia corretta. L'errato collegamento dei poli potrebbe danneggiare l'unità in maniera permanente. Avvertenza: Quando il pannello FV viene esposto alla luce è presente alta tensione. Per ridurre il rischio di scosse elettriche, non toccare i componenti sotto tensione e manipolare con attenzione i morsetti di connessione. IV351 Rev03 Date Issue: 2012-11-22 Pagina 25 di 278 + FR 5.7. Collegamento dei Moduli FV all'inverter Tipo modello modulo FV utilizzabile Le stringhe collegate devono essere composte da moduli dello stesso tipo; la tabella seguente elenca l'applicabilità dei diversi tipi di moduli FV. Tipo modulo FV Applicabilità Monocristallino Sì Multicristallino Sì Film sottile Sì (Senza messa a terra + o –) Tipo specifico con polo positivo collegato a No terra Tipo specifico con polo negativo collegato a No terra Nota: farsi consigliare il tipo di modulo FV dal proprio rivenditore. Requisiti del modulo FV Per collegarsi all'ingresso DC di un unico inverter, le stringhe connesse devono essere composte da moduli dello stesso tipo. Non condividere la connessione DC in ingresso con altri inverter. Il numero, l'orientamento, e l'inclinazione dei pannelli può variare in funzione delle diverse applicazioni. Tipo di modello connettore DC I morsetti di ingresso dell'inverter sono connettori DC Amphenol Helios H4 oppure Multicontact MC4. Per la connessione dell'ingresso DC utilizzare i giunti idonei dello stesso produttore. IV351 Rev03 Date Issue: 2012-11-22 Pagina 26 di 278 + FR La tabella seguente elenca tali coppie di connettori: MultiContact PV-KST4/6I Maschio PV-KBT4/6I Femmina IV351 Rev03 Date Issue: 2012-11-22 Amphenol Helios H4 Maschio Helios H4 Femmina Pagina 27 di 278 + FR Modalità di disconnessione del connettore DC MC4 / Amphenol Le seguenti immagini illustrano le modalità di disconnessione del connettore DC MC / Amphenol utilizzando l'estrattore presente nella scatola degli accessori fornita con l'inverter. (1) Inserire lo strumento nel connettore per serrare le clip, come da figura seguente: (2) Dopo aver serrato le clip, tirare il connettore leggermente verso il basso per smontare il cavo DC. IV351 Rev03 Date Issue: 2012-11-22 Pagina 28 di 278 + FR Attenzione: Non scollegare l'alimentazione o i cavi DC mentre l'inverter sta ancora fornendo potenza AC alla rete , verificare di aver prima scollegato la potenza AC , quindi aprire il Sezionatore DC (se presente) e per ultimo scollegare i cavi DC. Solo per rete elettrica pubblica: Non ruotare il connettore in senso antiorario; il connettore DC attaccato al telaio dell'inverter potrebbe allentarsi. Attenzione: Prima di collegare la potenza DC all'inverter, utilizzare un multimetro per verificare che la polarità di ogni coppia di ingresso DC sia corretta. L'errato collegamento dei poli potrebbe danneggiare l'unità in maniera permanente. 5.8. Elenco di controllo post installazione % Se il pannello viene esposto a un'irradiazione sufficiente sarà presente alta tensione. I morsetti esposti del pannello FV sono sotto tensione, e possono causare scosse elettriche. Evitare il contatto con tali componenti del dispositivo. % Dopo aver collegato il pannello FV all'inverter, la tensione di uscita è maggiore di 260VDC. Se la rete AC non è collegata all'inverter, l'LCD del registratore dati visualizzerà quanto segue: Pac:0W Temperature:26.8°C Iac:0.0/0.0/0.0A Vac:0.0/0.0/0.0V Status:Fault No Utility 21.04.12 15 :01 % Verificare la connessione tra l'inverter FV e l'impianto di connessione AC e quindi verificare il collegamento tra la Rete pubblica e l'Unità di giunzione AC. Chiudere l'interruttore AC o il fusibile dell'unità. Durante il normale funzionamento, l'LCD del registratore dati mostrerà, ad esempio, quanto segue: IV351 Rev03 Date Issue: 2012-11-22 Pagina 29 di 278 + FR Pac:7494W Temperature:26.8°C Iac:10.5/11.2/10.7A Vac:219.4/219.3/219.3V Status:Normal 21.04.12 15 :01 % Se il display è verde, l'inverter sta erogando energia alla rete. In questo caso, l'inverter è stato installato correttamente. Avvertenza: Non scollegare la potenza o i cavi DC mentre l'inverter sta ancora fornendo potenza AC alla rete , verificare di aver prima scollegato l'alimentazione AC , quindi aprire il sezionatore DC (se presente) e per ultimo scollegare i cavi DC. Avvertenza: Verificare che la tensione AC non sia mai superiore alle specifiche del prodotto. Attenzione: Prima di collegare la potenza DC all'inverter, utilizzare un multimetro per verificare che la polarità di ogni coppia di ingresso DC sia corretta. L'errato collegamento dei poli potrebbe danneggiare l'unità in maniera permanente. Attenzione: la tensione DC di ingresso deve essere uguale o maggiore della tensione iniziale di alimentazione (350 volt) in modo che il dispositivo possa fornire energia alla rete. IV351 Rev03 Date Issue: 2012-11-22 Pagina 30 di 278 + FR 6. Funzionamento dell'inverter FV 6.1. Uso del sezionatore DC L'inverter FV sia avvia automaticamente una volta che la potenza DC proveniente dal pannello FV è sufficiente e il fusibile che protegge le stringhe chiuso. Naturalmente si dovrà provvedere alla chiusura del sezionatore DC posto sul lato inferiore del dispositivo. Attenzione: Lo schermo LCD dell'inverter si illuminerà al raggiungimento di 260VDC. Allo scopo di fornire energia costante alla rete, la tensione dell'ingresso DC deve essere maggiore della tensione iniziale di alimentazione dell'impianto di 350VDC , come spiegato nella Sezione 12.2. 6.2. Inizializzazione per l'impostazione del tipo di normativa % L'inverter, al momento del primo avvio, attiva la funzione “Select Safety” . È un processo che consente all'utente di selezionare la lingua del display e il tipo di normativa prima di iniziare il normale funzionamento. % Prima di aver completato l'impostazione della normativa l'inverter non potrà funzionare in maniera normale anche se collegato correttamente all'ingresso DC e all'uscita AC. % Il seguente diagramma illustra il processo “Select Safety”. Ad esempio, se un utente tedesco vuole impostare il tipo di normativa VDE0126-1-1/A1, sarà necessario avviare l'inverter e quindi il processo “Select Safety”. Per prima cosa, scorrere il menu fino a raggiungere la pagina normativa desiderata utilizzando gli appositi pulsanti, quindi premere il pulsante “OK” per altri 5 secondi fino alla visualizzazione del messaggio “Regulation Setting OK” . Please Select Safety Please Select Safety Unknown VDE0126-1-1/A1 !": Select Safety OK: Press Over 5 sec. IV351 Rev03 Date Issue: 2012-11-22 $ !": Select Safety OK: Press Over 5 sec. $ Pagina 31 di 278 + FR Regulation Setting OK Press any button Nota: Una scorretta impostazione della normativa potrebbe dare luogo a un comportamento improprio. Consultare il proprio fornitore in caso di scarsa conoscenza delle normative e delle relative impostazioni. 6.3. Modalità operative Sono presenti quattro modalità operative. Lo stato di ciascuna modalità viene indicato da un colore e da un testo. (1) Normale In questa modalità, l'inverter converte in maniera continua energia dal generatore solare alla rete pubblica. In questo caso, l'LCD sarà verde. Pac:7494W Vdc:403/420V Vac:230.5/232.3/231.1V Iac:10.5/11.2/10.7A Status:Normal 21.04.12 15 :01 (2) Ripristino da guasto In determinate situazioni come ad esempio tensione e frequenza anomale, l'inverter deve scollegarsi dalla rete. Dopo aver risolto il problema, l'inverter torna alla condizione di normalità. Per le successive 48 ore, l'LCD sarà retroilluminato in giallo, come mostrato nell'immagine seguente. In mancanza di ulteriori eventi anomali dopo 48 ore di funzionamento, il colore dell'LCD tornerà verde. Pac:7494W Vdc:403/420V Vac:230.5/232.3/231.1V Iac:10.5/11.2/10.7A Status:Normal 21.04.12 15 :01 IV351 Rev03 Date Issue: 2012-11-22 Pagina 32 di 278 + FR (3) Durante un guasto Durante un guasto alla rete o un malfunzionamento dell'impianto (consultare la “tabella dei messaggi di errore” per ulteriori informazioni) l'inverter si scollega dalla rete, la retroilluminazione diventa rossa, e l'allarme si attiva per avvisare l'utente. L'utente può premere il pulsante “OK” sulla tastierina di navigazione per azzerare la notifica di guasto. In questo caso, controllare il messaggio. Se non è possibile cancellare l'avviso di guasto, contattare l'assistenza locale. (4) Spegnimento Di notte o in caso di forte nuvolosità durante il giorno, l'inverter si spegne automaticamente. In queste condizioni, il registratore dati e la tastierina di navigazione sono inattivi. IV351 Rev03 Date Issue: 2012-11-22 Pagina 33 di 278 + FR (5) Stati di funzionamento: ! Standby: Durante il normale funzionamento, l'inverter FV è in “Standby” quando la tensione del circuito aperto è tra 200V e 250V. Pac:0W Vdc:220/210V Vac:219.4/219.3/219.3V Temperature:26.8°C Status:Standby 21.04.12 15 :01 ! In attesa: Tra 251V e 349V dal lato DC, l'inverter è “In attesa”. Allo stesso tempo, l'inverter controlla le condizioni DC e AC e attende la connessione. ! Normale: Lo stato “Normale” richiede che la tensione dal lato DC sia almeno 350V. Per controllare il collegamento dei cavi DC, l'inverter tenta di regolare la potenza in entrata a ogni accensione. Nel corso del processo, l'utente potrà osservare una variazione nella lettura della potenza DC. Pac:2300W Vdc:450/420V Vac:219.4/219.3/219.3V Temperature:26.8°C Status:Normal 21.04.12 15 :01 IV351 Rev03 Date Issue: 2012-11-22 Pagina 34 di 278 + FR 6.4. Uso del display LCD e del registratore dati Funzionamento (1) Tasti del registratore dati: Il registratore dati è dotato di 5 tasti per eseguire le modifiche e il funzionamento. Normalmente, le funzioni dei tasti sono definite come segue. ! “ ! ” : Visualizza il livello inferiore (dal primo al secondo) o sposta il cursore a destra ! “ "” : Visualizza il livello superiore (dal secondo al primo) o sposta il cursore a sinistra ! “ Ⴄ ” : Visualizza la schermata precedente o sposta il cursore in alto ! “ Ⴎ ” : Visualizza la schermata successiva o sposta il cursore in basso ! “ OK ” : Imposta o conferma (2) Retroilluminazione dell'LCD Come descritto nella sezione precedente, il colore della retroilluminazione si modifica secondo lo stato di funzionamento. Per risparmiare energia, lo schermo resta illuminato solo per i 3 minuti seguenti l'ultima operazione. Tuttavia, in caso di guasto o errore, oltre a diventare rosso, lo schermo lampeggerà con frequenza di un secondo fino a quando l'utente preme il tasto indicato dalle istruzioni a schermo. (3) Allarme acustico Nei seguenti casi, il registratore dati emetterà un avviso acustico: ! Guasto dell'inverter ! La memoria del registratore dati è scesa al di sotto del 5% di capacità ! Blocco rotazione della ventola di convezione (4) In caso di riempimento totale della capacità di memoria Quando la capacità residua della memoria scende al di sotto del 5% del totale, il registratore audio emetterà un avviso acustico. L'utente dovrà quindi selezionare i dati da cancellare dalla memoria stessa utilizzando un PC. Nel caso l'avviso sia ignorato e la memoria non venga liberata, al raggiungimento della piena capacità, i dati più recenti sovrascriveranno i dati precedenti. IV351 Rev03 Date Issue: 2012-11-22 Pagina 35 di 278 + FR Visualizzazione su LCD (1) Avvio All'avvio dell'inverter, l'LCD visualizza il logo e la versione del firmware. La schermata viene visualizzata per 3 secondi quindi vengono mostrate le informazioni seguenti. (2) Testo visualizzato Il display mostra quattro letture e uno stato. La parte in basso a destra del display mostra data e ora. In caso di messaggio di “avviso” o “errore” la riga in basso che riporta lo “stato” viene automaticamente sostituita dal messaggio di errore. L'utente può modificare i quattro parametri di monitoraggio. ! Premere “!” per evidenziare il parametro di monitoraggio nella prima riga. Utilizzando i tasti “Ⴄ” e “Ⴎ”, l'utente potrà passare alla riga successiva. ! Premere “OK” per iniziare a impostare i parametri di monitoraggio. ! Premere “Ⴄ” o “Ⴎ” per selezionare il parametro di monitoraggio della riga. ! Premere “OK” per confermare. IV351 Rev03 Date Issue: 2012-11-22 Pagina 36 di 278 + FR (3) Grafico quotidiano Premendo il tasto “Ⴎ” nella visualizzazione testuale, la schermata sull'LCD mostrerà il grafico quotidiano, come illustrato di seguito. Il grafico indica l'andamento della potenza CA in una data specifica. Ulteriori informazioni sono riportate di seguito: ! ! Asse dei tempi (asse x): Il periodo più lungo preso in considerazione nella schermata è di 12 ore. Il numero rappresenta l'ora. Il primo dato registrato nella giornata viene riportato nel primo punto a sinistra. Nel caso i dati registrati della giornata superassero le 12 ore, premere “OK” e quindi ! e " per spostare il grafico all'ora interessata. Premere nuovamente “OK” per terminare lo spostamento. Asse potenza (asse y): Da 0 a 24kW. Ogni punto rappresenta la potenza media in un intervallo di 6minuti , ogni punto rappresenta 500W, il massimo numero di punti è 48. Data: Il lato superiore destro riporta la data corrente. Per visualizzare il grafico relativo a un dato giorno premere ! e " per eseguire la selezione \ 20.04 \ ! KW 20 10 6 7 8 9 10 11 12 1 2 3 4 5 (4) Grafico settimanale Premendo il tasto “Ⴎ” durante la visualizzazione del grafico giornaliero, l'LCD passerà alla “Visualizzazione settimanale” come illustrato di seguito. Ulteriori informazioni, sono riportate in basso: ! ! Asse dei tempi (asse x): settimanale a partire da domenica. Il dato presente al primo punto a sinistra è relativo alla domenica. kWh generati (asse y): La potenza totale generata nella giornata in kWh. Da 0 a 240kWh. Ogni punto rappresenta 5 kWh, il numero massimo di punti è 48. Cambiamento di settimana: Premere ! e " per passare alla settimana desiderata. È anche possibile modificare le date corrispondenti nel lato in alto a destra. \ \ ! 15.04-21.04 KWH 200 100 15 IV351 Rev03 Date Issue: 2012-11-22 16 17 18 19 20 21 Pagina 37 di 278 + FR (5) Storico errori Premendo nuovamente “Ⴎ” sulla “Visualizzazione settimanale”, l'LCD passerà allo “Storico errori”. L'LCD visualizza i due eventi di errore più recenti registrati. Per visualizzare ulteriori errori, premere “OK” per azionare il display e quindi “!” e “"”. (6) Informazioni di sistema Premendo nuovamente “Ⴎ” su “Storico errori”, l'LCD passa a “Informazioni di sistema” dell'inverter che includono il numero di serie dell'inverter, la versione del firmware , ecc… come illustrato di seguito. I parametri di monitoraggio visualizzati in “Informazioni di sistema”sono: ! ! ! ! ! ! ! SN: numero di serie dell'inverter Versione: versione del firmware dell'inverter Memoria: stato della memoria del registratore dati Data: Impostazione della data dell'inverter Ora: Impostazione dell'ora dell'inverter Allarme acustico: Per “Attivare (On)” o “Disattivare (Off)” l'allarme acustico Lingua: Impostazione della lingua visualizzata Per modificare le impostazioni Data, Ora, Audio e Lingua: ᧤a᧥Premere “!” e quindi “Ⴄ” o “Ⴎ” per modificare il parametro alle impostazioni desiderate. ᧤b᧥Premere “OK” per confermare. Utilizzare “Ⴄ” e “Ⴎ” per modificare il valore ᧤c᧥Premere “OK” per confermare. ᧤d᧥Premere “"” per annullare una selezione e completare le impostazioni. IV351 Rev03 Date Issue: 2012-11-22 Pagina 38 di 278 + FR Illustrazione della sequenza visualizzata del registratore dati IV351 Rev03 Date Issue: 2012-11-22 Pagina 39 di 278 + FR 7. SERVIZI DI RETE I servizi di rete possono essere gestiti anche da remoto. I dispositivi esterni possono comunicare con l'inverter tramite un protocollo standard denominato “MODBUS RTU (Vedi SP104 Siel). L'operatore di rete può gestire la distribuzione della potenza nelle seguenti modalità: 7.1. Potenza attiva Allo scopo di garantire la stabilità dell'impianto o gestire la fornitura di energia in eccesso, l'operatore di rete ha il diritto di richiedere una temporanea limitazione dell'immissione di potenza in rete. 7.1.1. Riduzione della potenza attiva L'inverter ha la possibilità di ridurre la potenza attiva in intervalli minimi di 1%Pn, l'intervallo regolabile viene definito da 0% ~ 100%Pn. Di solito, vengono utilizzate le impostazioni 100% / 60% / 30% / 0%. 7.1.2. Riduzione della potenza attiva in funzione della frequenza Il principio di tale requisito consiste nell'identificare l'eccessiva fornitura di potenza come innalzamento della frequenza di rete. La limitazione di potenza in funzione della frequenza dà luogo a una rapida reazione secondo gli improvvisi cambiamenti di frequenza della rete. Se la frequenza aumenta al di sopra di una soglia specifica, la potenza attiva sarà ridotta in funzione della frequenza di rete. In relazione alla riduzione del setpoint di frequenza e del gradiente di potenza, sono disponibili diverse implementazioni dovute a differenti normative di sicurezza. Il grafico seguente descrive il concetto di limitazione della potenza attiva in funzione della frequenza. (a) Caratteristiche della riduzione della potenza attiva in funzione della frequenza IV351 Rev03 Date Issue: 2012-11-22 Pagina 40 di 278 + FR 7.2. Potenza reattiva Il controllo della potenza reattiva viene utilizzato per regolare e stabilizzare la tensione di rete nel punto di collegamento alla rete stessa. La potenza reattiva di stabilizzazione deve essere determinata in conformità alle condizione della rete nell'impianto di generazione. Di solito, un inverter, se sovraeccitato, contribuisce all'innalzamento della tensione di rete e, se sottoeccitato, si comporta in maniera contraria. L'inverter Soleil 3F TL supporta quattro modalità di potenza reattiva, che l'operatore di rete potrà utilizzare per il proprio impianto. Il controllo del setpoint o la curva caratteristica sono regolabili tramite comunicazioni. Di seguito è presente la descrizione di ciascun metodo: 7.2.1. Controllo setpoint COS$ L'operatore assegna un valore fisso del fattore di potenza Cos] all'interno dell'intervallo consentito di impostazione cos] = da 0,8sottoeccitato a 0,8sovraeccitato. La capacità di potenza in uscita del “controllo setpoint cos]” può essere così illustrata: (L'area verde indica il punto di funzionamento consentito, ad esempio per il modello 10 kW) (b) Capacità di uscita reattiva del controllo setpoint IV351 Rev03 Date Issue: 2012-11-22 cos] Pagina 41 di 278 + FR 7.2.2. Controllo setpoint Q L'operatore di rete assegna un valore di potenza reattiva Q con intervallo di impostazione ammesso Q = +6kVar a -6kVar (per il modello 10kW). La capacità di potenza in uscita del “controllo setpoint Q” può essere così illustrata: (L'area verde indica il punto di funzionamento consentito, ad esempio per il modello 10 kW) (b) Capacità di uscita reattiva del controllo setpoint IV351 Rev03 Date Issue: 2012-11-22 Q Pagina 42 di 278 + FR 7.2.3 Curva caratteristica COS$(P) Il valore del fattore di potenza cos] viene controllato come funzione della potenza attiva con una curva caratteristica di preimpostazione. Tuttavia, gli operatori di rete possono fornire una curva diversa per i propri impianti di generazione in funzione delle condizioni di rete. La curva caratteristica prescritta COS](P) dispone di quattro punti di regolazione e un limite cos] con impostazioni predefinite: (L'intervallo consentito del limite cos] è 0,8~1,0 e per i punti di impostazione è 0%~100%.) (d) Curva caratteristica COS](P) con impostazioni predefinite La capacità di potenza in uscita della “curva caratteristica COS](P) ” può essere così illustrata: (L'area verde indica il punto di funzionamento consentito, ad esempio per il modello 10 kW) (e) Capacità di uscita reattiva della curva caratteristica COS](P) IV351 Rev03 Date Issue: 2012-11-22 Pagina 43 di 278 + FR 7.2.4 Curva caratteristica Q (U) Il valore della potenza reattiva Q viene controllato come funzione della tensione di rete con una curva caratteristica di preimpostazione. Tuttavia, gli operatori di rete possono fornire una curva diversa per i propri impianti di generazione in funzione delle condizioni di rete. La curva caratteristica prescritta Q(U) dispone di quattro punti di regolazione e un limite Q con impostazioni predefinite: (L'intervallo consentito del limite Q/S è 0%~60% e per i punti di impostazione è 0%~100%.) (f) La curva caratteristica Q (U) con impostazioni predefinite La capacità di potenza in uscita della “curva caratteristica Q(U) ” può essere così illustrata: (L'area verde indica il punto di funzionamento consentito, ad esempio per il modello 10 kW) (g) Capacità di uscita reattiva della curva caratteristica Q (U) IV351 Rev03 Date Issue: 2012-11-22 Pagina 44 di 278 + FR 8. Stato di funzionamento dell'inverter L'inverter è stato progettato per essere di facile uso; è possibile capirne facilmente lo stato leggendo le informazioni visualizzate sul display anteriore o tramite monitoraggio remoto. La tabella seguente indica i messaggi visualizzati. Matrice delle lingue dei messaggi visualizzati (continua nella pagina seguente) IV351 Rev03 Date Issue: 2012-11-22 Pagina 45 di 278 + FR DEUTSCH (Germania) System Display ITALIANO Sprache Englisch Deutsch Language English German Visualizza selezione lingua Visualizza in inglese Visualizza in tedesco Französisch France Dutch Visualizza in francese Visualizza in olandese IV351 Rev03 Date Issue: 2012-11-22 Italienisch Italy Holländisch Spanisch Spanish DEUTSCH (Germania) Paro Aus ENGLISH Marcha Ein Off On Allarme sonoro S/N:xxxxxxxxxxxxxxxx Vers.FW:xx.xx-xx.xx Memoria:xx.x% Data:dd.mm.yyyy Dom. Data:dd.mm.yyyy Lun. Data:dd.mm.yyyy Mar. Data:dd.mm.yyyy Mer. Data:dd.mm.yyyy Gio. Data:dd.mm.yyyy Ven. Data:dd.mm.yyyy Sab. Ora Info. sistema Olandese Francese Italiano Spagnolo Tedesco Inglese Lingua ITALIANO Pagina 46 di 278 + FR Holandés Frances Italiano Español Aleman Ingles Idioma ESPAÑOL (Spagna) Messaggi generali di sistema Alarma sonora S/N:xxxxxxxxxxxxxxxx Versión:xx.xx-xx.xx Memoria:xx.x% Fecha:dd.mm.yyyy Dom. Fecha:dd.mm.yyyy Lun. Fecha:dd.mm.yyyy Mar. Fecha:dd.mm.yyyy Mie. Fecha:dd.mm.yyyy Jue. Fecha:dd.mm.yyyy Vie. Fecha:dd.mm.yyyy Sab. Hora Pantalla inform. Alarm S/N:xxxxxxxxxxxxxxxx Version:xx.xx-xx.xx Speicher:xx.x% Datum:dd.mm.yyyy So Datum:dd.mm.yyyy Mo Datum:dd.mm.yyyy Di Datum:dd.mm.yyyy Mi Datum:dd.mm.yyyy Do Datum:dd.mm.yyyy Fr Datum:dd.mm.yyyy Sa Zeit Systemanzeige Funzionamento Stato Visualizza in spagnolo Visualizza in italiano ESPAÑOL (Spagna) Messaggi generali di sistema day.month.year ( day.month.year ( dia.mes.año ( 10.04.2011 giorno.mese.anno 10.04.2011 ) 10.04.2011 ) ) 10.04.2011 ) hours:minutes ( 17:23 ) hours:minutes ( 17:23 ) horas:minutos ( 17:23 ) ore:minuti ( 17:23 ) ENGLISH S/N:xxxxxxxxxxxxxxxx Version:xx.xx-xx.xx Memory:xx.x% Date:dd.mm.yyyy Sun Date:dd.mm.yyyy Mon Date:dd.mm.yyyy Tue Informazioni Date:dd.mm.yyyy Wed data Date:dd.mm.yyyy Thu Date:dd.mm.yyyy Fri Date:dd.mm.yyyy Sat Informazioni sull'ora Time Allarme registratore Audible Alarm dati Attivazione allarme On sonoro Spegnimento allarme Off sonoro Formato ora Menu Display di sistema Numero di serie Versione firmware Scheda memoria SD Formato data Funzionamento Stato Messaggi generali di sistema Nederlands (Olanda) Hollandaise Français Italien Espagnol Allemand Anglais Langue Français (Francia) OFF ON Alarme sonore S/N:xxxxxxxxxxxxxxxx Version:xx.xx-xx.xx Carte SD:xx.x% Date:dd.mm.yyyy dim Date:dd.mm.yyyy lun Date:dd.mm.yyyy mar Date:dd.mm.yyyy mer Date:dd.mm.yyyy jeu Date:dd.mm.yyyy ven Date:dd.mm.yyyy sam Heure Affichage Nederlands Frans Italiaans Spaans Duits Engels Taal Nederlands (Olanda) Uit Aan Alarm S/N:xxxxxxxxxxxxxxxx Versie:xx.xx-xx.xx Geheugen:xx.x% Datum:dd.mm.yyyy Zo Datum:dd.mm.yyyy Ma Datum:dd.mm.yyyy Di Datum:dd.mm.yyyy Wo Datum:dd.mm.yyyy Do Datum:dd.mm.yyyy Vr Datum:dd.mm.yyyy Za Tijd Systeem informatie ( day.month.year ( dag.maand.jaar (10.04.2011) 10.04.2011 ) hours:minutes ( 17:23 ) uren:minuten ( 17:23 ) Français (Francia) E-heute:xxx.xkWh h-Gesamt:xxxxxxhr Temperatur:xx.xºC Uac:xxx.x/xxx.x/xxx.xV Frequenz:xx.xHz ENGLISH Vdc:xxx/xxxV Idc:xx.x/xx.xA Etot:xxxxxxxxx.xkWh Etoday:xxx.xkWh H-total:xxxxxxhr Temperature:xx.xºC Vac:xxx.x/xxx.x/xxx.xV Frequency:xx.xHz Stato funzionament o Tensione batteria dei pannelli FV Corrente batteria dei pannelli FV Informazioni energia accumulata Energia per giorno Ore di funzionamento Temperatura interna Tensione di rete Frequenza di rete IV351 Rev03 Date Issue: 2012-11-22 Etot:xxxxxxxxx.xkWh Pdc:xxxx/xxxxW Potenza in ingresso istantanea Pdc:xxxx/xxxxW Pac:xxxxxW ESPAÑOL (Spagna) Pdc:xxxx/xxxxW Pac:xxxxxW ITALIANO Idc:xx.x/xx.xA Udc:xxx/xxxV DEUTSCH (Germania) Frequenza:xx.xHz Vac:xxx.x/xxx.x/xxx.xV Temperatura:xx.xºC H.tot.funz.:xxxxxxhr Eoggi:xxx.xkWh Etot:xxxxxxxxx.xkWh Idc:xx.x/xx.xA Vdc:xxx/xxxV ITALIANO Pagina 47 di 278 + FR Frecuencia:xx.xHz Vac:xxx.x/xxx.x/xxx.xV Temperatura:xx.xºC H.TotalFunc.:xxxxxxhr Ehoy:xxx.xkWh Etot:xxxxxxxxx.xkWh Idc:xx.x/xx.xA Vdc:xxx/xxxV ESPAÑOL (Spagna) Messaggi di informazione misuratore Pdc:xxxx/xxxxW Pac:xxxxxW Pac:xxxxxW Potenza in uscita in tempo reale DEUTSCH (Germania) ENGLISH Messaggi di informazione contatore Stato funzionament o Messaggi di informazione contatore Fréquence:xx.xHz VAC:xxx.x/xxx.x/xxx.xV Température:xx.xºC H.fonction:xxxxxxhr Ejour:xxx.xkWh Etot:xxxxxxxxx.xkWh IDC:xx.x/xx.xA VDC:xxx/xxxV Français (Francia) Pdc:xxxx/xxxxW Pac:xxxxxW Français (Francia) Frequentie:xx.xHz Uac:xxx.x/xxx.x/xxx.xV Temperatuur:xx.xºC h-Totaal:xxxxxxhr E-today:xxx.xkWh Etot:xxxxxxxxx.xkWh Idc:xx.x/xx.xA Udc:xxx/xxxV Nederlands (Olanda) Pdc:xxxx/xxxxW Pac:xxxxxW Nederlands (Olanda) Safety:G83/1-1 Safety:G59 Issue 2 Safety:G83/1-1 Safety:G59 Issue 2 Status:Fehler Status:Flash Status:2.Flash Status:Waiting Status:Checking xxxs Status:Normal Status:Fault Status:FLASH Status:SLAVE FLASH Inizializzazione e attesa in intervallo ingresso 260V~349V Controllo rtete con tensioneDC >= 350V Inverter alimenta la griglia Guasto impianto o guasto inverter Aggiornamento DSP Aggiornamento Slave Status:Normal Status:Netz-Prüf xxxs Status:Warten Status:Standby Status:Standby Standby in intervallo ingresso 200V~259V DEUTSCH (Germania) ENGLISH Condizioni di funzionamento IV351 Rev03 Date Issue: 2012-11-22 Safety:G59 Issue 2 Safety:G83/1-1 Safety:RD1699 Safety:G59 Issue 2 Safety:G83/1-1 Safety:RD1699 Safety:VDE-AR-N 4105 Safety:VDE0126-1-1/A1 Pagina 48 di 278 + FR Estado:Flash Sec Estado:Actualizando Estado:Defecto Estado:Normal Estado:Chequeo xxxs Estado:En proceso Estado:En espera ESPAÑOL (Spagna) Stato:Aggiorn. Slave Stato:Aggiornamento Stato:Errore Stato:Normale Stato:Test xxxs Stato:In attesa Stato:Standby ITALIANO Messaggi informazione stato generale Safety:RD1699 Safety:RD1699 Messaggi informazione stato generale Selezione normativa Safety:VDE-AR-N 4105 Safety:VDE-AR-N 4105 Safety:VDE-AR-N 4105 Safety:VDE0126-1-1/A1 Safety:VDE0126-1-1/A1 Safety:VDE0126-1-1/A1 Etat:FLASH "esclave" Etat:Mem. FLASH Etat:En défaut Etat:Connecté réseau Etat:Vérif. xxxs Etat:Prêt Etat:En attente Français (Francia) Safety:G59 Issue 2 Safety:G83/1-1 Safety:RD1699 Safety:VDE-AR-N 4105 Safety:VDE0126-1-1/A1 Status:Slave Flash Status:Flash Status:Fout Status:Normaal Status:Controle xxxs Status:Wachten Status:Standby Nederlands (Olanda) Safety:G59 Issue 2 Safety:G83/1-1 Safety:RD1699 Safety:VDE-AR-N 4105 Safety:VDE0126-1-1/A1 Memory Full SD Card access error RCMU Fault Memoria scheda SD insufficiente per memorizzazione dati Impossibile leggere da scheda SD Corrente di dispersione su conduttore terra troppo elevata IV351 Rev03 Date Issue: 2012-11-22 DC-Überspannung PV over voltage Sovra tensione di rete Fehlerstrom SD Zugriff-Fehler Speicher voll Kein Netz No Utility Rete C.a. non disponibile Isolationsfehler Isolation Fault Pagina 49 di 278 + FR Defecto a tierra Error lectura SD Memoria llena Sobretensión DC Red ausente Def. aislamiento I dispers.Alta Err. accesso SD Memoria piena Sovratensione DC Rete assente Err.Isolamento Err. Freq. rete Def. frec. red Fehler Netzfrq. Grid Freq. Fault Err. Tens. rete Def. tension red Fehler Netzspg. Grid Volt. Fault ITALIANO Errore di rete ESPAÑOL (Spagna) Defecto de red Netzfehler DEUTSCH (Germania) Grid Fault ENGLISH Messaggi generali di avviso e di guasto Guasto isolamento del pannello FV Frequenza di rete fuori range Tensione di rete fuori range Valori di misura rete fuori intervallo specifica Condizioni di funzionamento Messaggi generali di avviso e di guasto Défaut terre Err. Accès SD Mémoire pleine Surtention DC Réseau absent Défaut isolation Déf. Freq réseau Déf. U(v) réseau Défaut réseau Aardfout SD kaart toegangsfout Geheugen vol DC-overspanning Net niet aanw. Isolatiefout Netfreq. fout Netspanningsfout Netfout Français(France) Nederlands (Dutch) DC Sensor Fault CPLD Ver. Fault Low DC Bus High DC Bus Consistent Fault M-S Ver. Fault Relay Failure USB CONNECT Sensore uscita DC anomalo Versione CPLD non corretta Basso livello tensione del BUS DC Alto livello tensione del BUS DC Lettura tra CPU Master e Slave non coerente Versione firmware DSP e CPU slave non corrisponde Relé uscita non avviato Errore comunicazione tra Dati e CPU Slave IV351 Rev03 Date Issue: 2012-11-22 ENGLISH Condizioni di funzionamento Messaggi generali di guasto inverter USB angeschlossen Relaisfehler M-S Ver. Fehler Konsistenzfehler DC Bus zu hoch DC Bus zu tief CPLD Ver. Fehler DC Sensor Fehler DEUTSCH (Germania) Pagina 50 di 278 + FR Conexión USB Fallo relé Ver. M-E incomp. Defec.Coherencia Bus DC alto Bus DC bajo Fallo CPLD Ver. Defecto sensorDC ESPAÑOL (Spagna) Connessione USB Errore Relè FW incompatibile Err. processore DC Bus alto DC Bus basso Errore CPLD Ver. Err. Sensore DC ITALIANO Messaggi generali di guasto inverter Connection USB Défaut relais AC Err applicatif Err. processeur Entrée 1 élevée Entrée 1 faible Err CPLD Ver. Err capteur DC Français(France) USB verbonden Relaisfout M-S Ver. Fout CPU fout DC bus hoog DC bus laag CPLD Ver. Fout DC sensor fout Nederlands (Dutch) Bus Soft Timeout Protezione BUS CC IV351 Rev03 Date Issue: 2012-11-22 Unbekant. Fehler Unknown Anomalia EEPROM Bus Soft Timeout EEPROM Fehler EEPROM Failure Lüfter blockiert External Fan Lock Impossibile leggere o scrivere su EEPROM Lüfter blockiert Internal Fan Lock Inv Start Fault Inv Start Fault Errore avvio IGBT Ventola interna di raffreddamento non funzionante Ventola esterna di raffreddamento non funzionante PV Verbdg.fehler PV Connect Fault Impossibile identificare pannello FV Eingang Überlast Over Boost Curr. Over Boost Curr. Over Inv Curr. CPU Fehlfunktion DEUTSCH (Germania) Sci Failure ENGLISH Corrente di ingresso di IGBT troppo elevata Errore comunicazione tra CPU Master e Slave Corrente di ingresso del modulo di boost troppo elevata Condizioni di funzionamento Pagina 51 di 278 + FR LimiteTiempo Bus Desconocido Fallo EEPROM Bloq.vent.extern Bloq.vent.Intern Def.arranque Inv Defecto conex.PV Int. limite Inv Sobreint.Exc.Reg Fallo en 1 CPU ESPAÑOL (Spagna) Bus Soft Timeout Sconosciuto Errore EEPROM Ventil.est.blocc Ventil.int.blocc Err.attivazione Err conness. PV I Inverter alta Sovracorrente Err.com.interna ITALIANO Messaggi generali di guasto inverter Déf. Com. Bus Err. Inconnue ERR EEPROM Verr. Ventil Ext Verr. Ventil Int Déf. Démarrage Err. Connect. PV Courant>Onduleur Cour. Boost haut Err. Com proces. Français(France) Bus Soft Timeout Onbekend EEPROM fout Ext.vent.geblokk Int.vent.geblokk Inv Start Fault PV verbind. fout Max inv. Stroom Over Boost Curr. CPU fout Nederlands (Dutch) RCMU Failure Rilevamento modulo GFCI anomalo FalloDiferencial Sobretemperatura LimiteTiempo Inv ESPAÑOL (Spagna) Err. Sens.Terra Sovratemperatura Inv Soft Timeout ITALIANO Fehlerspeicher leer Bitte warten Fehlergeschichte Wert= N/A "OK" um zu Starten No Error History Please Wait Error History Value= N/A PRESS OK TO START Pagina 52 di 278 + FR Arrancar:PulseOK No disponible Valor= HistoricoErrores Espere por favor NoHistor.Errores Sem.: NoRegistro Dia: No registro Keine Tagesaufzeichng Keine Wochenaufzeichn "OK" um zu Löschen Press OK to Clear No Daily Records Borrar:Pulse OK DEUTSCH (Germania) ENGLISH ESPAÑOL (Spagna) OK per start N/D Valore= Storico errori Attendere prego NO storico err. NO Dati settim. NO Dati giorno Premi OK x reset ITALIANO Messaggi registrazione inverter No Weekly Records IV351 Rev03 Date Issue: 2012-11-22 Messaggi registrazione generali di sistema Condizioni di funzionamento Messaggi registrazione inverter Übertemperatur Over temperature Temperatura interna alta FI-Fehler Inv Soft Timeout Inv Soft Timeout Protezione IGBT Inverter DEUTSCH (Germania) ENGLISH Condizioni di funzionamento Messaggi generali di guasto inverter RCMU fout Temp. te hoog Inv Soft Timeout Nederlands (Dutch) OK = démarrer N/A VALEUR= Err. Historique Attendre SVP Historique OK Pas aff. semaine Pas aff. jour OK = suppression Druk OK om te starten N/A Waarde= Foutenhistorie A.U.B. wachten Geen foutenhistorie Geen weekrecords Geen dagrecords Druk OK om te wissen Français(France) Nederlands (Dutch) Défaut RCMU Temp. élevée Déf. Logicel Français(France) 9. Comunicazioni L'inverter è dotato di una potente interfaccia di comunicazione con relative opzioni. Personale qualificato potrà aggiornare il firmware utilizzando la porta USB, se necessario. 9.1 USB (su inverter) L'inverter FV è dotato di una versatile interfaccia di comunicazione, la porta USB collocata sul lato inferiore del dispositivo, che consente all'utente l'uso di “Pro Control” per monitorare in tempo reale lo stato di diversi inverter. Anche l'aggiornamento del firmware viene eseguito tramite questa interfaccia. Collegamento del PC portatile all'inverter tramite cavo adattatore da USB tipo A a USB tipo B. 9.2 Slot comunicazioni RS-485 L'inverter FV è dotato di un ulteriore slot da utilizzare per un'interfaccia di comunicazione Tramite una scheda RS-485 (Montata di serie) o compatibile è possibile ampliare la funzione di comunicazione dell'inverter. Per utilizzare lo slot, aprire il coperchio con un cacciavite, inserire la scheda e collegare i cavi attraverso l'isolante di gomma. Per ulteriori informazioni, contattare il proprio rivenditore. A titolo di esempio, il disegno del SOLEIL 3F-TL10K: IV351 Rev03 Date Issue: 2012-11-22 Pagina 53 di 278 + FR Dopo l'installazione della scheda RS485, l'utente potrà collegare il PC con gli inverter e monitorarne da remoto lo stato di funzionamento. Nota: Montare il coperchio dello slot in maniera corretta per garantirne l'impermeabilità. Scheda RS485 dotata di due porte RJ45 con indicatori a LED, una morsettiera per il cablaggio e un dip switch terminale a resistenza per il bus comunicazioni come illustrato nella figura precedente. Il led PWR (Alimentazione) viene utilizzato per indicare la connessione della scheda RS-485 ; sarà illuminato in verde se l'inverter è attivo e fino a quando la scheda RS485 viene alimentata dall'inverter stesso. IV351 Rev03 Date Issue: 2012-11-22 Pagina 54 di 278 + FR Il led Link viene utilizzato per indicare la disponibilità alla connessione della porta RJ45. Ciò significa che in caso nelle porte RJ45 sia inserito un cavo Ethernet, tale led sarà illuminato in giallo e lampeggerà con frequenza 2Hz durante il trasferimento del segnale. La seguente tabella indica la piedinatura delle porte RJ45 della scheda RS485. RJ-45 8 pin (8P8C) 8 1 PIN DENOMINAZIONE Tensione 1 Tx+ s400mVp-p~s15Vp-p 2 Tx400mVp-p~15Vp-p 3 Rx+ 4 5 GND GND 6 Rx- 400mVp-p~15Vp-p 7 8 VDC VDC 11V~12V Avviso cablaggio RS485 La presa è dotata di alimentazione DC. Il piedino 7 e il piedino 8 della porta RJ45 vengono utilizzati per l'alimentazione DC. Assicurarsi di “non collegare altri dispositivi a questa porta”, per evitare danni. IV351 Rev03 Date Issue: 2012-11-22 Pagina 55 di 278 + FR 9.3 " Configurazione scheda RS485 Connessione scheda RS485 È possibile collegare un cavo Ethernet tra qualsiasi porta RJ45 di ciascuna scheda RS485. Il cavo deve essere del tipo “Diretto”. Connessione con cavo Ethernet tipo A per scheda RS485 Connessione con cavo Ethernet tipo B per scheda RS485 IV351 Rev03 Date Issue: 2012-11-22 Pagina 56 di 278 + FR Definizione del cavo Diretto utilizzato sulla porta RJ-45 della scheda RS485: Oltre che per le connessioni cablate Ethernet, il cablaggio potrà essere utilizzato per le connessioni standard della scheda RS485 come indicato dalla figura in basso. Come terminatori della scheda RS485 sono stati utilizzati cavi "twisted pair". Connessioni cavo "twisted pair" per scheda RS485 Come connessione standard per la scheda RS485 è anche possibile utilizzare una combinazione di cavo "twisted pair" e cavo Ethernet come da figura in basso. Combinazione connessioni per scheda RS485 IV351 Rev03 Date Issue: 2012-11-22 Pagina 57 di 278 + FR Nel cablaggio da inverter a scheda RS485 a RS232 Converter, si collegano i morsetti opposti della RS485 ovvero morsetto di ricezione a morsetto di trasmissione e morsetto di trasmissione a morsetto di ricezione. Vedere il riquadro in basso. " Dip switch resistenze terminali Il dip switch può essere utilizzato per configurare la scheda RS485 dell'ultimo inverter sulla stessa linea come terminale della comunicazione. Dip switch attivati Pin Pin Pin Pin 2 1 1 2 Stato di attivazione/disattivazione del dip switch Portando il piedino 1 e il piedino 2 del DIP Switch in posizione “ON” nella scheda RS485 dell'ultimo inverter questo funzionerà come terminale. Tale configurazione è necessaria solamente sull'ultimo inverter. Negli altri inverter, impostare su “off”. IV351 Rev03 Date Issue: 2012-11-22 Pagina 58 di 278 + FR 9.4 Specifiche scheda RS485 9.5 Risoluzione problemi scheda RS485 Normalmente, la scheda RS485 richiede poca manutenzione. Tuttavia, nel caso la scheda RS485 non funzioni perfettamente, consultare le istruzioni seguenti prima di contattare il rivenditore. Il led PWR (Alimentazione) è spento Il led giallo è spento IV351 Rev03 Date Issue: 2012-11-22 Azioni possibili La scheda non è inserita a fondo. Inserirla nuovamente Verificare che l'inverter sia attivo Verificare se l'inverter è spento Verificare eventuali danni alla scheda RS485 Verificare il normale funzionamento dell'inverter Verificare la correttezza del cablaggio, consultando il capitolo 3.1 per la definizione della piedinatura RJ-45 Verificare che la lunghezza dei cavi non ostacoli la corretta trasmissione. La distanza totale deve essere inferiore a 800 m Verificare che la temperatura ambiente sia nell'intervallo -10 ? ~ 70 ?. Pagina 59 di 278 + FR 9.6 Modbus Card INSTALLAZIONE E CONNESSIONE: LA scheda PCB SERMB è una accessorio degli inverter FV. L’installazione deve essere eseguita con l’inverter spento (OFF). Non instalarre la scheda se questa riporta dei danni visibili. " Prima di installare la scheda, è necessario configurare i Dip-switch come indicato nella seguente pagina ( le impostazioni di fabbrica sono_ mode 1 , Baud –Rate 9600) " Come mostra la Fig 1, connettere la linea RS485/RS422 sul connettore frontale del pannello. Si suggerisce di usare un cavo bipolare 0.22mm2, (AWG24) *1. " Se nella comunicazione RS485 è connesso un unico inverter, o se l’inverter FV è l’ultimo della connessione seriale, è necessario impostare lo switch SW3-4 in posizione ON. " Se nella comunicazione RS422 è connesso un unico inverter, o se l’inverter FV è l’ultimo della connessione seriale, è necessario impostare lo switch SW3-3 e lo switch SW3-4 in posizione ON. " Inserire la scheda nell’apposito slot e fiisare la copertura di protezione (fornita con l’inverterFV), in modo da garatntire la protezione dall’acqua del dispositivo. " Accendere l’inverter FV e verificare la scheda MODBUS ig.1: RS 485/RS422 connections 1 . La connessione della massa GND aiutare a eliminare problem di offset tra i vari dispositive, oppure può essere connesso allo schermo del cavo per limitare le interferenze. IV351 Rev03 Date Issue: 2012-11-22 Pagina 60 di 278 + FR CONFIGURAZIONI: Sulla scheda sono presenti due blocchi di dip-switch per la configurazione: ID Function Dip Description 1 Indirizzo Slave DIP1-5 ON DIP 1 2 3 4 5 6 7 8 2 Impostazione Baud Rate DIP6-7 ON DIP 1 2 3 4 5 6 7 8 3 Riservato DIP8 ON Modbus Slave number: 1-31 DIP DIP DIP DIP 5 4 3 2 OFF OFF OFF OFF OFF OFF OFF ON OFF OFF OFF ON .. .. .. .. ON ON ON ON N.B. Address 0 is reserved. DIP DIP6 BAUD 7 OFF OFF 1200 OFF ON 2400 ON OFF 4800 ON ON 9600 DIP 1 ON OFF ON .. ON IND 1 2 3 .. 31 DIP 1 2 3 4 5 6 7 8 ID Function Dip 4 Selezione Protocollo DIP1-2 Description DIP 1 2 3 4 5 Carico RS485A DIP3 6 Carico RS485B DIP4 ON DIP DIP DIP1 PROTOCOL 2 OFF OFF Modbus Function OFF ON -ON OFF -ON ON -DIP 3 OFF = No DIP 3 ON = 120Ohm 1 2 3 4 ON DIP DIP 4 OFF = No DIP 4 ON = 120Ohm 1 2 3 4 LED: Spento (OFF ) Acceso (ON) BLINKING (500ms ON- 500ms OFF) YELLOW LED (Modbus communication) Nessuna comunicazione con AP -Modbus ok 2 GREEN LED (Internal state) Scheda rotta Alimentazione ok, La scheda sta comunicando con l’inverter La comunicazione con l’inverter è OK 2 Il led lampeggia ogni volt ache riceve un commando MODBUS e termina dopo un second che non riceve nessun altro commando. IV351 Rev03 Date Issue: 2012-11-22 Pagina 61 di 278 + FR Problemi e soluzioni: Problema Possible cause Solution La scheda non si accende La scheda non è ben fissata. L’inverter è spento. La scheda è rotta La scheda non comunica con l’inverter (led verde ACCESO) Attesa di una comunicazione La scheda non comunica con il SW Modbus Errata connessione della linea Modbus Errata impotazione dei parametri Controllare che la scheda è ben fissata allao SLOT. Verificare che l’inverter non è spento Se il problema persiste contattare il servizio assistenza. ll sistema è in attesa di un commando di ripristino Ripristino della scheda attraverso uno spegnimento ed una accensione dell’inverter. Verificare la connessione Verificare la impostazioni relative alle resistenze di terminazione Verificare le impostazioni dei DIP-SWITCH CARATTERISTICHE TECNICHE Nella tabella di seguito le caratteristiche tecniche della scheda di interfacciamento Modbus. Feature Specification Alimentazione Descrizione Comandi ModBus supportati 12VDC Scheda di conversion protocollo Modbus per inverter solari 3F 0x03 Singola o multipla lettura baud rate Configurabile Indirizzo Slave Connessione seriale 1200 / 2400 / 4800 / 9600 bps Node 1-31 (0 reserved), via dip switches 4 fili RS422 o 2 fili RS485 Fino ad un Massimo di 31 slave sulla stessa linea Compatibilità Temperatura di esercizio Umidità Grado IP Consumi Leds Standard Dimensioni LxWxH [mm] Inverter solari FV -10°/50°C 0-95% senza condensa IP65 < 1W Comunicazione Modbus CE 132 x 76 x 34 IV351 Rev03 Date Issue: 2012-11-22 Pagina 62 di 278 + FR 9.7 Interfaccia USB (Registratore dati) Il registratore dati è dotato di un connettore USB tipo B da collegare all'interfaccia USB del PC. Prima dell'uso aprire il coperchio della presa USB. IV351 Rev03 Date Issue: 2012-11-22 Pagina 63 di 278 + FR 10. Impostazioni avanzate Di seguito la descrizione del menu di configurazione dei parametri inverter per i Servizi di rete previsti dalla normativa CEI-021 e VDE-AR-N 4105. Five conditions on this screen Reactive Power Func. Mode:Off Value:N/A Reactive Power Func. Mode:Off Value:N/A Press OK over 5s to change the setting Press OK over 5s to change the setting Reactive Power Func. Mode:Const. PF Value:+0.90pf Password Incorrect password \ Press OK over 5s to change the setting Press OK button over 5 seconds 1 \ Reactive Power Func. Mode:Const. Q Value:+1000VAR Press OK over 5s to change the setting Reactive Power Func. Mode:Curve PF(P) Value:1. 20% +1.00pf 2. 40% +1.00pf 3. 50% +1.00pf 4. 100% -0.90pf V lock-in: 241.5 V V lock-out: 230.0 V Press any button \ \ : Select char : Delete : Next Press OK button If password is correct (Password: 14914) Reactive Power Mode Const. PF Const. Q Curve PF(P) Curve Q(U) OK Reactive Power Mode Off <Off> Off/Const. PF/Const. Q/Curve PF(P)/Curve Q(U) Reactive Power Mode Const. PF Const. Q Curve PF(P) Curve Q(U) OK Const. PF +1.00pf > <+1.00pf Reactive Power Func. Mode:Curve Q(U) Type: A Value: 1. 90% +43.6% Q/S 2. 92% +0% Q/S 3. 108% +0% Q/S 4. 110% -43.6% Q/S P lock-in: 20% Pn P lock-out: 5% Pn -0.90~+0.90pf Reactive Power Mode Const. PF Const. Q Curve PF(P) Curve Q(U) OK Const. Q +1000VAR <+1000VAR> 10k model: -4358~+4358VAR 15k model: -6537~+6537VAR 20k model: -8717~+8717VAR Curve PF(P) Reactive Power Mode Const. PF Const. Q Curve PF(P) Curve Q(U) OK V lock-in: 241.5 241.5 V V lock-out: 230.0 V Node 1: 20% +1.00pf Node 2: 40% +1.00pf Node 3: 50% +1.00pf Node 4: 90% -0.90pf V lock-in: 230.0~253.0V V lock-out: 207.0~230.0V Node (X-axis): 0~100% Node (Y-axis): -0.90~+0.90pf Reactive Power Mode Const. PF Const. Q Curve PF(P) Curve Q(U) OK Curve Q(U) Type: A P lock-in: 20% Pn P lock-out: 5% Pn Node 1: 90% +43.6% Q/S Node 2: 92% +0% Q/S Node 3: 108% +0% Q/S Node 4: 110% -43.6% Q/S La normativa di riferimento VDE-AR-N 4105, non prevede l’impostazione dei parametri V lock-in/out e P lock-in/out. Questi due parametri riguardano la sola norma CEI-021. Type: A/B P lock-in: 10~100% P lock-out: 5% Node (X-axis): 80~120% Node (Y-axis): -43.6~+43.6% IV351 Rev03 Date Issue: 2012-11-22 Pagina 64 di 278 + FR 11. Scarico dei dati contenuti nel registratore dati È possibile scaricare i dati contenuti nel registratore dati nel PC a scopo di analisi utilizzando un adattatore da cavo USB tipo A a cavo USB tipo B. Il registratore Dati è alimentato direttamente dalla porta USB del PC. 11.1 Accesso e gestione dei dati registrati (1) Svitare e rimuovere il coperchio della porta USB tipo B. I PC con Windows ME, 2000, e XP, Vista, Windows 7, non necessitano di driver per l'accesso al registratore dati. I PC con Windows 98 devono utilizzare il driver per accedere ai dati del registratore. (2) Collegare il cavo adattatore USB al PC. Se il Registratore dati è correttamente collegato al PC il led visualizzerà “CONNESSIONE USB”. (3) Fare clic su “ Computer” – “Disco rimovibile” sul PC. (4) Copiare la cartella “DAILY” del “Disco rimovibile” e incollarla sul “Desktop.” (5) Eseguire il programma “Pro Control”. Quindi, fare clic su “File”, e selezionare “Export/Import”. Nota: Contattare il rivenditore o il rappresentante per l'installazione del programma. IV351 Rev03 Date Issue: 2012-11-22 Pagina 65 di 278 + FR (6) Selezionare il periodo desiderato con inizio da “Date from” e termine a “Date to”. Fare clic sul pulsante “Import”. (7) Selezionare il file “DAILY.dat” nella cartella DAILY precedentemente salvata. Fare clic sul pulsante “Open”. IV351 Rev03 Date Issue: 2012-11-22 Pagina 66 di 278 + FR (8) Fare clic sul pulsante “View”. Il software elaborerà i dati registrati. (9) Fare clic sul pulsante “Export” IV351 Rev03 Date Issue: 2012-11-22 Pagina 67 di 278 + FR (10) Fare clic sul pulsante “Save” I dati saranno memorizzati nella directory selezionata sul PC in formato .CSV (11) Fare clic sul pulsante “OK” (12) Fare doppio clic sul file “DAILY.CSV” nella directory selezionata del PC. Sarà possibile gestire tali dati utilizzando Microsoft Excel. IV351 Rev03 Date Issue: 2012-11-22 Pagina 68 di 278 + FR 12. Risoluzione dei problemi L'inverter FV non richiede molta manutenzione. Nel caso si presentino situazioni impreviste, consultare la tabella seguente prima di contattare l'assistenza locale. La tabella riporta i messaggi di errore più comune e gli eventuali rimedi. Analisi guasti comuni e azioni di risoluzione dei problemi Messaggio di errore Guasto sistema Guasto RCMU Definizione guasto Possibili cause 1. Sono presenti La corrente di terra rilevata dall'inverter ostruzioni, umidità o supera la soglia dopo acqua tra la LINEA aver collegato AC e/o il NEUTRO l'inverter alla rete AC e la terra 2. Sono presenti ostruzioni, umidità o acqua tra la LINEA AC e/o il NEUTRO e la terra nella scatola di giunzione 3. L'isolamento dei cavi AC potrebbe essere stati danneggiato da ratti o altri animali 4. Anomalia inverter 1. Sono presenti La corrente di terra ostruzioni, umidità o rilevata dall'inverter acqua tra la il lato supera la soglia prima DC (pannello FV) e di aver collegato la terra l'inverter alla rete AC 2. Sono presenti ostruzioni, umidità o Guasto acqua tra il lato DC dell'isolament (pannello FV) e la o terra nella scatola di giunzione 3. L'isolamento dei cavi DC potrebbe essere stati danneggiato da ratti o altri animali 4. Anomalia inverter IV351 Rev03 Date Issue: 2012-11-22 Azioni proposte all'utente finale Azioni proposte ai tecnici professionisti 1. Staccare la connessione DC/AC dell'inverter aprendo l'interruttore. 2. Controllare i cavi DC/AC dell'impianto. Rimuovere eventuali ostruzioni OPERANDO SOLAMENTE IN SICUREZZA 3. Ripristinare il collegamento DC/AC e verificare lo stato dell'inverter 4. Se il problema persiste, rivolgersi all'assistenza 1. Staccare il lato AC dell'inverter spegnendo l'interruttore AC 2. Scollegare il lato DC dell'inverter 3. Controllare cablaggio e isolamento DC e AC 4. Ripristinare il collegamento AC/DC e verificare lo stato dell'inverter 5. Se il problema persiste, & aggiornare il firmware secondo le istruzioni, o & sostituire l'inverter *Note: Durante le procedure indossare guanti isolati *Note: Durante le procedure indossare guanti isolati 1. Staccare la connessione DC/AC dell'inverter aprendo l'interruttore. 1. Scollegare il lato AC dell'inverter aprendo l'interruttore AC 2. Controllare i cavi DC/AC 2. Scollegare il lato DC dell'inverter dell'impianto fotovoltaico. 3. Controllare cablaggio e Rimuovere eventuali ostruzioni isolamento DC e CA OPERANDO SOLAMENTE 4. Ripristinare il collegamento IN SICUREZZA AC/DC e verificare lo stato 3. Ripristinare il collegamento dell'inverter DC/ACdell'inverter e verificare 5. Se il problema persiste, lo stato dell'inverter stesso & aggiornare il firmware secondo 4. Se il problema persiste, le istruzioni, o rivolgersi all'assistenza & sostituire l'inverter Note: Durante le procedure indossare guanti isolati Note: Durante le procedure indossare guanti isolati Pagina 69 di 278 + FR Messaggio di errore Definizione guasto La misurazione dei dati di griglia è fuori dalle specifiche di tensione e frequenza Possibili cause 1. a tensione AC rilevata è superiore/inferiore alle impostazioni dell'inverter 2. a frequenza AC rilevata è superiore/inferiore alle impostazioni dell'inverter 3. l collegamento AC non è corretto Guasto griglia 4. 1. 2. 3. 4. 5. 6. a rete è debole o instabile (Tensione griglia) (Frequenza griglia) 5. ltri dispositivi ad alto 7. assorbimento incidono sulla rete 8. 6. e impostazioni dell'inverter variano rispetto ai valori predefiniti 7. 9. nomalia inverter 10. Rete non rilevata Scollegare e ricollegare la rete AC per provare se l'inverter funziona normalmente Se il problema persiste, controllare la lettura della rete ACsul display LCD dell'inverter. Se il problema si presenta raramente (una volta al giorno), non è necessario intervenire. Se il problema si presenta frequentemente, agire come di seguito. Trovare il dispositivo ad alto assorbimento nei pressi dell'impianto AC Utilizzare il software dell'inverter per controllare le impostazioni dello stesso. Le impostazioni devono essere nell'intervallo riportato nelle specifiche Se le impostazioni non sono corrette, consultare l'assistenza per modificarle Utilizzare il software dell'inverter o un dispositivo di monitoraggio per raccogliere dati. Inviare i dati a tecnici professionisti per un'ulteriore analisi Consultare il gestore della rete pubblica per avere informazioni sullo stato della rete Richiedere aiuto all'installatore L'inverter non rileva 1. Griglia non 1. Verificare che l'interruttore del lato AC sia chiuso tensione AC disponibile 2. Il collegamento AC 2. Controllare il cablaggio AC 3. Se il problema persiste, non è corretto rivolgersi all'assistenza 3. L'interruttore AC tra l'inverter e la rete pubblica non è attivato 4. L'interruttore e/o il fusibile AC è aperto 5. Anomalia inverter 1. La tensione della La tensione FV batteria di pannelli rilevata è maggiore FV è troppo delle specifiche elevata Sovratensione 2. Anomalia lato FV ingresso DC dell'inverter IV351 Rev03 Date Issue: 2012-11-22 Azioni proposte ai tecnici professionisti Azioni proposte all'utente finale 1. 2. 3. 4. 5. 6. 7. 8. 9. 10. Scollegare e ricollegare la rete AC per provare se l'inverter funziona normalmente Se il problema persiste, controllare la lettura della rete AC sul display LCD dell'inverter. Se la lettura è all'interno delle specifiche, verificare la connessione dell'impianto incluso per primi polarità e sicurezza Trovare i dispositivi ad alto assorbimento nei pressi dell'impianto AC Consultare il gestore della rete pubblica per avere informazioni sullo stato della rete e le relative specifiche: Utilizzare il software dell'inverter per monitorare la frequenza e la tensione Se i dati misurati sono inferiori alle impostazioni, chiedere al gestore l'autorizzazione di utilizzare il software per modificare i parametri Se la situazione non migliora dopo la modifica dei parametri, aggiornare il firmware secondo le istruzioni, o sostituire l'inverter 1. Verificare che l'interruttore del lato AC sia chiuso 2. Controllare il cablaggio AC 3. Se il problema persiste, sostituire l'inverter 1. Aprire il collegamento DC 1. Verificare la tensione a vuoto dell'inverter e ricollegare FV, e constatare se è maggiore 2. Se il guasto persiste, rivolgersi o troppo vicino alle specifiche all'assistenza 2. Se la tensione FV è molto minore delle specifiche e il problema persiste, sostituire l'inverter Pagina 70 di 278 + FR Messaggio di errore Definizione guasto Possibili cause 1. Problema software 2. Anomalia circuiti interni dell'inverter 3. Anomalia inverter 1. Aprire tutte le connessioni DC dell'inverter 2. Attendere 3 minuti 3. Ricollegare le connessioni DC e controllare 4. Se il guasto persiste, rivolgersi all'assistenza 1. Aprire tutte le connessioni DC dell'inverter 2. Attendere 3 minuti 3. Ricollegare le connessioni DC e controllare 4. Se il guasto persiste & aggiornare il firmware secondo le istruzioni, o & sostituire l'inverter La temperatura rilevata è alta 1. La temperatura ambiente è troppo alta 2. Possibile problema di dissipazione del calore 3. Anomalia inverter 1. Verificare che la temperatura ambiente di installazione sia 1. Verificare che la temperatura ambiente di installazione sia inferiore a 55!C 2. Liberare lo spazio intorno al dissipatore 3. Rimuovere eventuali ostacoli alla dispersione del calore accanto al dissipatore 4. Se il problema persiste chiamare l'assistenza inferiore a 55!C 2. Verificare che la posizione di installazione non sia collocata Surriscaldam ento Anomalia nel Anomalia inverter controllo del relé AC Guasto relé Guasto dell'inverter Azioni proposte ai tecnici professionisti Le letture dei 2 microprocessori non corrispondono Guasto corrispondenz a La corrente rilevata dal componente del sensore di Hall del INIEZIONE lato uscita AC è CC Alta maggiore del consentito Guasto EEPROM Azioni proposte all'utente finale 1. Scollegare tutti gli (+) e (-) dell'FV 2. Attendere 1 minuto 3. Dopo che nulla viene visualizzato sull'LCD, ricollegare di nuovo la DC e controllare 4. Se il messaggio di errore si ripresenta dopo il riavvio, chiamare l'assistenza alla luce solare diretta 3. Verificare di aver lasciato lo spazio richiesto intorno al dissipatore e che l'area di circolazione dell'aria intorno al dissipatore sia libera 4. Rimuovere eventuali ostacoli alla dispersione del calore accanto al dissipatore 5. Se il problema persiste, sostituirlo 1. Verificare che l'installazione sia configurata secondo le specifiche 2. Ripetere le azioni menzionate nella colonna a sinistra 3. Se il problema persiste, & aggiornare il firmware alla versione più recente secondo le istruzioni, o & sostituire l'unità 1. Anomalia sensore di 1. Osservare la condizione di 1. Ricollegare le connessioni DC errore per 1 minuto. Hall all'uscita e controllare 2. La corrente DC della 2. Se non ritorna alle condizioni rete AC è maggiore normali, chiamare l'assistenza. 2. Se il guasto persiste & aggiornare il firmware del valore consentito. secondo le istruzioni, o 3. Anomalia inverter & sostituire l'inverter Anomalia in lettura o 1. Anomalia firmware 1. Scollegare FV (+) e FV (-) 1. Ripetere le azioni menzionate dall'ingresso e riavviare l'unità. scrittura sulla operativo nella colonna a sinistra EEPROM della 2. Anomalia dei circuiti 2. Se non funziona, chiamare 2. Se il guasto persiste l'assistenza. della scheda di scheda di controllo & aggiornare il firmware controllo all'interno all'interno secondo le istruzioni, o dell'inverter dell'inverter & sostituire l'inverter 3. Anomalia inverter Anomalia comunicazione tra le 2 CPU Guasto SCI IV351 Rev03 Date Issue: 2012-11-22 . 1. Anomalia firmware 1. Scollegare FV (+) e FV (-) dall'ingresso e riavviare l'unità. 1. Ripetere le azioni menzionate operativo nella colonna a sinistra 2. Anomalia dei circuiti 2. Se non funziona, chiamare 2. Se il guasto persiste l'assistenza. della scheda di & aggiornare il firmware controllo all'interno secondo le istruzioni, o dell'inverter & sostituire l'inverter 3. Anomalia inverter Pagina 71 di 278 + FR Messaggio di errore Definizione guasto La tensione Bus del BUS DC all'interno DC alto dell'inverter è più elevata del previsto BUS DC basso Guasto sensore DC La tensione del BUS DC all'interno dell'inverter è più bassa del previsto Possibili cause Azioni proposte all'utente finale La tensione ingresso DC che alimenta il BUS DC è troppo elevata La tensione ingresso DC che alimenta il BUS DC è troppo bassa Azioni proposte ai tecnici professionisti 13. Ripetere le azioni menzionate nella colonna a sinistra 1. Scollegare FV (+) e FV (-) dall'ingresso e riavviare l'unità. 2. In questo caso, chiamare l'assistenza. 14. Confermare la configurazione del pannello FV per verificare che sia utilizzato entro le specifiche 15. Se il guasto persiste & aggiornare il firmware secondo le istruzioni, o & sostituire l'inverter 1. Ripetere le azioni menzionate Anomalia sensore DC 1. Anomalia firmware 1. Scollegare FV (+) e FV (-) dall'ingresso e riavviare l'unità. nella colonna a sinistra operativo all'uscita 2. Se non funziona, chiamare 2. Se il guasto persiste 2. Anomalia l'assistenza. & aggiornare il firmware rilevamento corrente secondo le istruzioni, o sensore di Hall & sostituire l'inverter Nota: per “griglia” si intende rete elettrica Nota: Durante i periodi di buio o scarsa illuminazione solare, l'inverter FV potrebbe accendersi e spegnersi a ripetizione. Ciò è dovuto all'alimentazione generata, insufficiente per il funzionamento dei circuiti di controllo. Attenzione: È presente alta tensione pericolosa sulle connessioni e dei cavi AC e DC. Gli utenti finali NON devono toccare i componenti parti sotto tensione. IV351 Rev03 Date Issue: 2012-11-22 Pagina 72 di 278 + FR 13. Manutenzione preventiva L'inverter FV non richiede molta manutenzione. Nel caso si presentino situazioni impreviste, consultare la tabella di pagina 12 prima di contattare l'assistenza locale. La tabella riporta i messaggi di errore più comune e gli eventuali rimedi. In ogni caso, eseguire le seguenti ispezioni regolarmente per garantire un funzionamento ottimale dell'inverter FV. 13.1 Ispezione visiva Controllare eventuali segni di danni esterni ai cavi e all'inverter. In caso di difetti contattare immediatamente l'installatore. Non eseguire alcuna riparazione in proprio. 13.2 Controllo e manutenzione Richiedere all'installatore il controllo periodico del funzionamento dell'inverter come misura consigliata di manutenzione preventiva. Controllare in modo particolare quanto segue: % % % % % % controllare la presenza di detriti o polvere sulla protezione della ventola e, nel caso, pulire. Controllare che la circolazione dell'aria intorno al dissipatore di calore non sia bloccata. Controllare la presenza di corrosione, specialmente sui punti di connessione. Controllare periodicamente la fermezza delle connessioni. Pulire regolarmente l'esterno dell'unità con un panno umido per impedire l'accumulo di polvere e sporco sull'inverter . Mantenere l'etichetta di garanzia in perfette condizioni. Per ottenere prestazioni ottimali, è essenziale pulire i moduli FV periodicamente a causa della tendenza all'accumulo di polvere e sporco. Attenzione: Prima della pulizia dei moduli FV o dell'inverter, assicurarsi di staccare l'alimentazione AC e controllare che l'LCD dell'inverter segnali “No Utility”. La pulizia deve essere limitata alle superfici esterne. Avvertenza: per evitare il rischio di scosse elettriche, staccare l'alimentazione AC e DC nel caso il personale abbia necessità di entrare in contatto con i moduli FV per qualsiasi ragione. Superfici calde: anche se progettato per soddisfare le normative internazionali, l'inverter FV potrebbe scaldarsi durante il funzionamento. Non toccare il dissipatore di calore o le superfici esterne durante o appena dopo il funzionamento. IV351 Rev03 Date Issue: 2012-11-22 Pagina 73 di 278 + FR 13.3 Pulizia e scambio del modulo della ventola di raffreddamento In caso di accumulo di sporco o polvere sulle ventole, chiedere all'installatore di eseguirne la pulizia. (Nota: questa sezione è valida solamente per i modelli con ventola esterna) Procedura di scambio del modulo ventola del modello SOLEIL 3F-TL10K: (1) Scollegare l'alimentazione AC e DC dell'inverter FV. (2) Svitare tutte le viti del modulo ventola come indicato dalla figura in basso: (3) Estrarre il modulo ventola scollegando l'adattatore del cavo come indicato dalla figura in basso: (4) Se necessario, pulire delicatamente la ventola con un panno umido o una spazzola morbida. (5) Se il modulo ventola è danneggiato o guasto, sostituirlo. (6) Montare il modulo ventola eseguendo la procedura precedente al contrario. (7) Verificare che l'inverter riprenda il normale funzionamento dopo il riavvio. IV351 Rev03 Date Issue: 2012-11-22 Pagina 74 di 278 + FR Procedura di scambio del modulo ventola del modello SOLEIL 3F-TL15K: (1) Scollegare l'alimentazione AC e DC dell'inverter FV. (2) Svitare tutte le viti del modulo ventola come indicato dalla figura in basso: (3) Estrarre il modulo ventola scollegando l'adattatore del cavo come indicato dalla figura in basso: (4) Se necessario, pulire delicatamente la ventola con un panno umido o una spazzola morbida. (5) Se il modulo ventola è danneggiato o guasto, sostituirlo. (6) Montare il modulo ventola eseguendo la procedura precedente al contrario. (7) Verificare che l'inverter riprenda il normale funzionamento dopo il riavvio. IV351 Rev03 Date Issue: 2012-11-22 Pagina 75 di 278 + FR Procedura di scambio del modulo ventola del modello SOLEIL 3F-TL20K: (1) Scollegare l'alimentazione AC e DC dell'inverter FV. (2) Svitare tutte le viti del modulo ventola come indicato dalla figura in basso: (3) Estrarre il modulo ventola scollegando l'adattatore del cavo come indicato dalla figura in basso: (4) Se necessario, pulire delicatamente la ventola con un panno umido o una spazzola morbida. (5) Se il modulo ventola è danneggiato o guasto, sostituirlo. (6) Montare il modulo ventola eseguendo la procedura precedente al contrario. (7) Verificare che l'inverter riprenda il normale funzionamento dopo il riavvio. IV351 Rev03 Date Issue: 2012-11-22 Pagina 76 di 278 + FR 14. Specifiche 14.1 Normative nazionali di riferimento SOLEIL 3F-TL10K SOLEIL 3F-TL15K SOLEIL 3F-TL20K SOLEIL 3F-TL10K SOLEIL 3F-TL15K SOLEIL 3F-TL20K Mercato di riferimento (Nazione) Germania (DE) Spagna (ES) Normative Interfaccia rete VDE-AR-N 4105 VDE0126-1-1/A1 VDE0126-1-1 RD1699 Regno Unito (UK) Italia (IT) G83/1-1 / G59 Issue 2 CEI0-21 Modello 14.2 Specifiche elettriche Modello SOLEIL 3F-TL10K SOLEIL 3F-TL15K SOLEIL 3F-TL20K Ingresso (DC) Tensione nominale DC 720 V Max tensione a circuito aperto 1000V Tensione di accensione 260V Tensione di avviamento 350 V Tensione di spegnimento 200V (Tipico) Intervallo tensione di esercizio 250 ~ 1000V Intervallo nominale tensione MPPT (piena potenza) 350 ~ 850 V Efficienza MPPT 400 ~ 850 V 450 ~ 850 V > 99% Numero MPPT 2 Max potenza DC 10500W 15750W 21000W Max corrente DC 16A 2 20A 2 23A 2 Max numero stringhe in parallelo 2 2 2 2 3 2 Sezionatore esterno DC 20A x 2 25A x 2 30A x 2 Max corrente reiettata dall’ inverter verso i pannelli FV 300mA 650mA 850mA Resistenza isolamento DC Isolamento DC > 1. 2 M# Transformerless, non è possibile collegare l'ingresso alla terra. (Impianto fotovoltaico non collegato a terra) Uscita (AC) Potenza nominale AC 10kW/ 10kVA 15kW/ 15kVA 20kW/ 20kVA Max potenza AC 10kW/ 10kVA 15kW/ 15kVA 20kW/ 20kVA 14,5A 21,7 A 29 A 16A 24A 30A Corrente nominale AC Max corrente AC IV351 Rev03 Date Issue: 2012-11-22 Pagina 77 di 278 + FR Modello SOLEIL 3F-TL10K SOLEIL 3F-TL15K SOLEIL 3F-TL20K Corrente di spunto 65A 85A 90A Max corrente di guasto uscita 30A 45A 60A Max corrente AC di cto-cto 60A 106A 210A 20mA 50mA 70mA Max corrente di iniezione DC RangeTensione di rete AC 230 / 400Vca ˵4W+PE / ±20%, secondo la configurazione del paese (consultare 12.3) Range frequenza di rete AC 50Hz / 60Hz / secondo configurazione del paese (consultare 12.3) Distorsione corrente uscita (THD i)4 > 3% Sfasamento (cos˳) a potenza nominale di uscita (regolabile) >0,99 (±0,8 su richiesta) Efficienza Efficienza massima ฺ97,8% ฺ97,7% ฺ97,7% Euro efficienza ฺ97,2% ฺ97,0% ฺ97,2% Dati generali TIpologia Assorbimento potenza: standby / notte Transformerless ู 20W / ู 1W Grado protezione Dissipazione calore ู 20W / ู 1W Telaio: IP65 / Ventola: IP55 Raffreddamento forzato, ventola velocità variabile in funzione temperatura dissipatore ู 55dB(A) Livello rumorosità Intervallo temperatura di esercizio - 20 ~ + 60ഒ Range di temperatura con piena potenza in uscita - 20 ~ + 45ഒ Max potenza in uscita (600C, tensione nominale, declassamento lineare) 10000W 11000W Max Temperatura di esercizio senza declassamento a tensione nominale Umidità Altitudine Limitazioni sostanze pericolose Protezione guasto terra Disconnessione DC Comunicazione IV351 Rev03 Date Issue: 2012-11-22 ู 20W / ู 1W 12000W 450C 100%, condensa Fino a 2000m senza declassamento potenza Senza piombo,conforme alla direttiva RoHS GP2 RCMU interna e funzione rilevamento isolamento ai sensi della norma VDE0126-1-1 Sezionatore DC approvato dalla standard EN/IEC Standard: USB tipo B, RS485 Modbus. Pagina 78 di 278 + FR Modello SOLEIL 3F-TL10K SOLEIL 3F-TL15K SOLEIL 3F-TL20K Protocollo RS485 Registratore dati Cornice anteriore - Display: 128 64 pixel - Tasti funzione × 5 - Standard: integrato - Opzionale: rimovibile Riferimenti normativi Normativa di interfaccia verso rete Sicurezza VDE-AR-N 4105 VDE0126-1-1/A1 VDE0126-1-1 RD1699 G83/1-1 G59 Issue 2 IEC 62109-1: 2010, EN 62109-1: 2010 IEC 62109-2: 2011, EN 62109-2: 2011 Compatibilità elettromagnetica EN 61000-6-2: 2005 EN 61000-6-3: 2007/A1: 2011 Sezionatore DC EN 60947-1 EN 60947-3 CE IV351 Rev03 Date Issue: 2012-11-22 CEI0-21 Direttiva bassa tensione 2006/95/EC EMC: 2004/108/EC Pagina 79 di 278 + FR 14.3 Monitoraggio rete SOLEIL 3F-TL10K SOLEIL 3F-TL15K SOLEIL 3F-TL20K Model SOLEIL 3F-TL10K SOLEIL 3F-TL15K SOLEIL 3F-TL20K Normativa di riferimento servizi di rete VDE-AR-N 4105 Nome del modello SOLEIL3F-TL10K Limite per singola fase N/A 230V / 400V, -20%+15% +15% Intervallo tensione di esercizio Tempo disconnessione in caso di superamento intervallo tensione di esercizio 1 Impostazione di fabbrica: Valore di tensione 2 Fattore di potenza Tolleranza tensione Tooleranza frequenza -20% SOLEIL3F-TL15 / 20K +10% < 0.1s 184V VDE0126-1-1/A1 -20% ู0.2s < 0.1s 264.5V 253V N/A 230V / 400V, -20%+15% +15% 187V 0.9 lagging/leading better than 1% better than 0.1% +10% ู0.2s 262V 250V 0.99 N/A N/A Intervallo frequenza di esercizio 1. 2. Impostazione di fabbrica: Valore di frequenza Tempo di riconnessione Impostazione FW Tempo disconnessione per eccesso corrente DC“Current injection” (sec.) Current DC-Injection 47.5~51.5Hz , Disconnection within 0.2seconds Back frequency point: The same as the red curve (Before disconnection) 47.5 Hz 51.5Hz 47.55 Hz 51.45Hz 1. 60s @ 85% ~ 110% voltage & 47.5Hz ~ 50.05Hz with 10% Power/min increment < 0.1s < 0.2s 1A 1A 1 Calcolo del valore medio con media mobile di 10 minuti Se viene utilizzata la protezione di interfaccia integrate il livello di protezione di tensione S1 max deve essere 1,1 Vn e non deve assumere altri valori 2 IV351 Rev03 Date Issue: 2012-11-22 Pagina 80 di 278 + FR SOLEIL 3F-TL10K SOLEIL 3F-TL15K SOLEIL 3F-TL20K Modello Normativa di riferimento servizi di rete Denominazione modello limite singola fase Intervallo tensione di esercizio Tempo disconnessione in caso di superamento intervallo tensione di esercizio Impostazione valore tensione nel firmware Intervallo frequenza di esercizio RD1699 SOLEIL3F-TL10 /15/20K N/A 230V / 400V, -15%+10% -15% +10% +15% < 1,5 secondi < 1,5 secondi < 0,2 secondi 198V 250V 262V 48Hz 50,5Hz < 3 secondi < 0,5 secondi Riconnessione @ 50Hz se sovrafrequenza Impostazione valore frequenza nel firmware Tempo riconnessione Tempo riconnessione (Impostazione FW) Tempo disconnessione per eccesso corrente di iniezione DC (sec) Iniezione DC IV351 Rev03 Date Issue: 2012-11-22 48,05 Hz 50,45 Hz NA 180 secondi < 0,2 secondi 0,5% della corrente nominale AC Pagina 81 di 278 + FR Modello SOLEIL 3F-TL15K SOLEIL 3F-TL20K SOLEIL 3F-TL10K Normativa di riferimento servizi di rete Nome del modello G83/1-1 G59 Issue 2 SOLEIL3F-TL10K SOLEIL3F-TL15/20K Limite per singola fase < 16A/phase > 16A/phase Intervallo tensione di esercizio 230V / 400V, -10%+14.7% 230V / 400V, -20%+15% Tempo disconnessione in caso di superamento intervallo tensione di esercizio 3 Impostazione di fabbrica: Valore di tensione 4 -10% +14.7% < 1.5 s -20% -13% +10% +15% < 0.5s < 2.5s < 1s < 0.5s 210V 261V 184V 200.1V 253V 264.5V 47Hz 50.5Hz 47Hz 47.5Hz 51.5Hz 52Hz 90s ~ 91s < 0.5s 51.5Hz 52Hz Tooleranza frequenza < 0.5s Tooleranza frequenza 47.05 Hz Tempo di riconnessione Impostazione FW Tempo disconnessione per eccesso corrente DC“Current injection” (sec.) Current DC-Injection < 0.5s 20s ~ 21s 50.45Hz 180s NA NA < 20mA < 0.25% of Nominal AC current SOLEIL 3F-TL10K SOLEIL 3F-TL15K SOLEIL 3F-TL20K Normativa di riferimento servizi di rete Limite per singola fase VDE 0126-1-1 NA 230V / 400V, -20%+15% Intervallo tensione di esercizio Tooleranza frequenza Impostazione di fabbrica: Valore di frequenza Perdita rete Perdita rete (impostazione FW) Tempo riconnessione Tempo riconnessione (impostazione FW) Tempo disconnessione per eccesso corrente DCCurrent DC-Injection 47.5Hz 180s Modello Tempo disconnessione in caso di superamento intervallo tensione di esercizio 5 Impostazione di fabbrica: Valore di tensione 6 47Hz 0.2 secondi 187V 10 minuti 262V 250V 47.5~50.2Hz Disconnessione entro 0.2 secondi quando la frequenza è fuori range 47.55 Hz 50.15 Hz 0.2 s 30 s <0.2 s 1A 3 Calcolo del valore medio con media mobile di 10 minuti Se viene utilizzata la protezione di interfaccia integrate il livello di protezione di tensione S1 max deve essere 1,1 Vn e non deve assumere altri valori 4 5 Calcolo del valore medio con media mobile di 10 minuti Se viene utilizzata la protezione di interfaccia integrate il livello di protezione di tensione S1 max deve essere 1,1 Vn e non deve assumere altri valori 6 IV351 Rev03 Date Issue: 2012-11-22 Pagina 82 di 278 + FR Modello Normativa di riferimento servizi di rete SOLEIL 3F-TL10K/15K/20K Nome del modello SOLEIL3F-TL10/15/20K limite singola fase N/A CEI 0-21 Range tensione di esercizio 230V / 400V, Fattore di potenza S1 Tensione 0.9 over or under excited *(2) Valore di fabbrica tensione S1 Tempo disconnessione S1 V Valore di fabbrica Tempo disconnessione S1V Frequenza S1 Valore di fabbrica frequenza S1F Tempo disconnessione S1 F 46 ~230V 230 ~276.0V 184V (80%) 264.5V (115%) 0.05~5.00S 0.20~10.00S 0.5s 0.2s 47.0 ~50.0Hz 50.0 ~52.0Hz 47Hz 51Hz 0.05~5.00S 0.05~5.00S 4s 1s Valore di fabbrica Tempo disconnessione S1F S2 Tensione *(1) *(2) 0 ~230V 230 ~299.0V 0V 264.5V (115%) 0.05~5.00S 0.05~1.00S 0.2s 0.2s 47.0 ~50.0Hz 50.0 ~52.0Hz 47Hz 51Hz 0.10~5.00S 0.10~5.00S 4s 1s Valore di fabbrica tensione S2 Tempo disconnessione S2 V Valore di fabbrica Tempo disconnessione S2V Frequenza S2 Valore di fabbrica frequenza S2 Tempo disconnessione S2 F Valore di fabbrica Tempo disconnessione S2F ! Urva di limitazione Potenza P in funzione della sovreafrequenza di rete (Statismo = 2~5%Impostabile , 2.4% Valore di default, può essere disabilitato/abilitato) ! Tempo di attesa prima della riconnessione Slow-Start dopo condizione di declassamento P(f) Valore di frequenza per ripristinare la condizione di riduzione potenza attende 300 sec con frequenza all'interno del corretto range "valore frequenza per ripristino condizione di declassamento" 20% per min del valore di preguasto 49.90 - 50.10 Hz Tensione di riconnessione 195,5 V - 253 V Frequenza di riconnessione 49,90 - 50,10 Hz predefinito (impostabile da 49Hz a 51Hz in incrementi di 0,05Hz) Tempo riconnessione 300s predefinito (impostabile da 0s a 900s in incrementi di 5s) Slow-Start dopo disconnessione 20% per min a potenza nominale (10kW) IV351 Rev03 Date Issue: 2012-11-22 Pagina 83 di 278 + FR Iniezione CC > 1 sec @0,5% (72,5mA) & > 0,2sec @ 1A Controllo potenza reattiva 1.Const. Q Cosfi!=!0.9!3>! ! ! ! ! ! ! ! ! ! ! ! ! ! ! ! ! ! ! ! ! ! ! ! ! ! P!=!9KW! ! ! ! ! ! ! ! ! ! ! ! ! ! ! ! ! ! ! ! ! ! ! ! ! ! ! ! ! Q=!(3)4358!Var!~!(+)4358!Var! ! (48.43%!P)! Cosfi!=!1! ! ! ! ! ! ! ! ! ! ! ! ! ! ! ! ! ! ! ! ! ! ! ! ! ! ! ! P=10KW! ! ! ! ! ! ! ! ! ! ! ! ! ! ! ! ! ! ! ! ! ! ! ! ! ! ! ! Q!=!0!VAR! Cosfi!=!1! ! ! ! ! ! ! ! ! ! ! ! ! ! ! ! ! ! ! ! ! ! ! ! ! ! ! ! P=15KW! ! ! ! ! ! ! ! ! ! ! ! ! ! ! ! ! ! ! ! ! ! ! ! ! ! ! ! Q!=!0!VAR! 10kVA 15kVA Cosfi!=!0.9!3>! ! ! ! ! ! ! ! ! ! ! ! ! ! ! ! ! ! ! ! ! ! ! ! ! ! P!=!13,5KW! ! ! ! ! ! ! ! ! ! ! ! ! ! ! ! ! ! ! ! ! ! ! ! ! ! ! Q=(3)6537!Var!~!(+)!6537!Var!(48.43%!P)! Cosfi!=!1! ! ! ! ! ! ! ! ! ! ! ! ! ! ! ! ! ! ! ! ! ! ! ! ! ! ! ! Cosfi!=!0.9!3>! ! ! ! ! ! ! ! ! ! ! ! ! ! ! ! ! ! ! ! ! ! ! ! ! P=20KW! ! ! ! ! ! ! ! ! ! ! ! ! ! ! ! ! ! ! ! ! ! ! ! ! ! ! ! P!=!18KW! ! ! ! ! ! ! ! ! ! ! ! ! ! ! ! ! ! ! ! ! ! ! ! ! ! ! ! Q!=!0!VAR Q=(3)8717!Var!~!(+)!8717!Var!(48.43%!P)! 20kVA (3)0.90!~(+)0.90!pf! 2. Const PF 3. Curve Q(U)with type A&B ! ! ! P Lock-in: 20% Pn P Lock-out: 5% Pn Node1: 90% (+)43.6% Q/S Node2: 92% (+) 0% Q/S Node3: 108% (+) 0% Q/S Node4: 110% (-)43.6% Q/S 4.Curve PF(P) Type A V Lock-in: 241.5 V V Lock-out:230.0 V Node1: 20% (+) 1.00pf Node2: 40% (+) 1.00pf Node3: 50% (+) 1.00pf Node4: 90% (-) 0.90pf Node1: 0% (+) 1.00pf Node2: 5% (+) 1.00pf Node3: 5% (-)0.90pf Node4: 90% (-) 0.90pf Curve Curve PF(P) Type B IV351 Rev03 Date Issue: 2012-11-22 Pagina 84 di 278 + FR (1) CEI 0-21 LV (S1=S2) LV & MV hanno gli stessi valori di default : V$ = 276V 0,5s, V* = 184V 1s, F* = 47Hz 4s, F$ = 52Hz 1s, Slope:2.4% (2) In CEI 0-21, I range di tensione e frequenza e I tempi di disconnessione sono tarabili. S1 Valore medio di tensione in una finestra temporal di 10 minuti (3) L’inverter parte comunque quando I valori di frequenza e tensione sono compresi tra 49.9~50.1hz & 195.5 ~253V, (incluso il primo avviamento) IV351 Rev03 Date Issue: 2012-11-22 Pagina 85 di 278 + FR 15. Smaltimento Il rivenditore o installatore deve rimuovere l'inverter FV dall'impianto e contattare il produttore per le istruzioni di smaltimento Non smaltire l'inverter come rifiuto comune. Eseguire lo smaltimento dell'inverter al termine del suo ciclo di vita ai sensi delle disposizioni locali relative allo smaltimento delle apparecchiature elettriche ed elettroniche. Nota: Contattare il fabbricante o il rivenditore per le istruzioni relative allo smaltimento IV351 Rev03 Date Issue: 2012-11-22 Pagina 86 di 278 + FR 16. Informazioni di contatto In caso di problemi tecnici relativi al prodotto, contattare la linea di assistenza Siel. Per ricevere assistenza sarà necessario comunicare le seguenti informazioni: • Tipo inverter • Numero di serie dell'inverter FV • Tipo e numero dei pannelli FV collegati • Messaggio di errore • Metodo di comunicazione IV351 Rev03 Date Issue: 2012-11-22 Pagina 87 di 278 + FR 17. Diagrammi efficienza 17.1 Grafici di carico I grafici di carico sono normali diagrammi di efficienza relativi a VCC e PCA e la potenza di uscita nell'intervallo di esercizio può essere determinata dai diversi livelli di tensione di ingresso come curva di potenza illustrata di seguito: Modello Curva di potenza SOLEIL 3F-TL10K SOLEIL 3F-TL15K SOLEIL 3F-TL20K ! IV351 Rev03 Date Issue: 2012-11-22 Pagina 88 di 278 + FR 17.2 Diagramma efficienza IV351 Rev03 Date Issue: 2012-11-22 Pagina 89 di 278 + FR IV351 Rev03 Date Issue: 2012-11-22 Pagina 90 di 278 + FR SIEL Grid-Tied PV inverter SOLEIL 3F-TL10K DE / IT / ES / UK SOLEIL 3F-TL15K DE / IT / ES / UK SOLEIL 3F-TL20K DE / IT / ES / UK Installation and Operation Manual IV351 Rev03 Date Issue: 2012-11-22 Pagina 91 di 278 + FR Content 1.! SAFETY INSTRUCTIONS ...................................................................................... 95! 2.! LIMITED WARRANTY ............................................................................................ 96! 3.! PRODUCT OVERVIEW .......................................................................................... 97! 3.1 PV SYSTEM DIAGRAM................................................................................................................................. 97! 3.2! INTRODUCTION OF SIEL GRID-TIED PV INVERTER .................................................................................. 98! 3.3! IDENTIFICATION ....................................................................................................................................... 99! 3.4! EXTERIOR AND PARTS NAME ................................................................................................................. 100! 3.5! INTRODUCTION OF GRAPHIC DATA LOGGER .......................................................................................... 102! 4.! FEATURES OF SIEL GRID-TIED PV INVERTER ................................................ 104! 5.! INSTALLATION INSTRUCTIONS ......................................................................... 105! 5.1! 5.2! 5.3! 5.4! 5.5! 5.6! 5.7! 5.8! 6.! OPERATION OF PV INVERTER .......................................................................... 121! 6.1! 6.2! 6.3! 6.4! 7.! INSIDE THE PACKAGE ............................................................................................................................. 105! BEFORE INSTALLATION .......................................................................................................................... 106! MOUNTING PV INVERTER ...................................................................................................................... 107! CONNECTING AC OUTPUT CABLE .......................................................................................................... 111! CONNECTING TO THE AC JUNCTION UNIT (AC UTILITY) ........................................................................ 114! CHECK BEFORE CONNECTING THE PV MODULES ................................................................................... 115! WIRING PV MODULES TO THE INVERTER................................................................................................ 116! POST INSTALLATION CHECKLIST............................................................................................................ 120! DC SWITCH USAGE ............................................................................................................................... 121! INITIALIZATION FOR REGULATION TYPE SETTING .................................................................................. 121! OPERATING MODES ............................................................................................................................... 122! USING THE LCD DISPLAY AND DATA LOGGER ....................................................................................... 125! POWER MANAGEMENT ...................................................................................... 130! 7.1. ACTIVE POWER ......................................................................................................................................... 130! 7.1.1. ACTIVE POWER REDUCTION ................................................................................................................... 130! 7.2. REACTIVE POWER ..................................................................................................................................... 131! 8.! INVERTER OPERATING STATUS ....................................................................... 135! 9.! COMMUNICATIONS ............................................................................................. 144! 9.1! 9.2.! 9.3! 9.4! 9.5! 9.6! 9.7! USB (ON INVERTER) .............................................................................................................................. 144! COMMUNICATIONS SLOT FOR RS-485 ............................................................................................... 144! RS485 CARD CONFIGURATION .............................................................................................................. 147! RS485 CARD SPECIFICATION ................................................................................................................. 150! RS485 CARD TROUBLE SHOOTING ........................................................................................................ 150! MODBUS CARD ...................................................................................................................................... 151! SB INTERFACE (DATA LOGGER) ............................................................................................................. 153! 10.! ADVANCED SETTING .......................................................................................... 154! 11.! DOWNLOADING DATA INSIDE DATA LOGGER ................................................ 155! 11.1! HOW TO ACCESS AND MANAGE LOG DATA ....................................................................................... 155! 12.! TROUBLE SHOOTING ......................................................................................... 160! 13.! PREVENTATIVE MAINTENANCE ........................................................................ 165! 13.1! 13.2! 13.3! VISUAL INSPECTION .......................................................................................................................... 165! CHECKING AND MAINTENANCE ........................................................................................................ 165! CLEANING AND SWAPPING COOLING FAN MODULE .......................................................................... 166! 14.! SPECIFICATION ................................................................................................... 169! 14.1.! 14.2! 14.3! MARKETING VS. REGULATORY.......................................................................................................... 169! ELECTRICAL SPECIFICATION ............................................................................................................. 169! GRID MONITORING ........................................................................................................................... 172! IV351 Rev03 Date Issue 2012-11-22 Page 92 di 278 + FR 15.! DISPOSAL ............................................................................................................ 178! 16.! CONTACT INFORMATION ................................................................................... 179! 17.! EFFICIENCY CHART ............................................................................................ 180! 17.1! 17.2! LOAD GRAPHS .................................................................................................................................. 180! EFFICIENCY CHART ........................................................................................................................... 181! IV351 Rev03 Date Issue 2012-11-22 Page 93 di 278 + FR Before you start… This manual contains important information regarding installation and safe operation of this unit. Be sure to read this manual carefully before using. Thanks for choosing this Grid-tied PV inverter (referred to in this manual as “PV inverter”, or simply “Inverter”). This Grid PV inverter is a highly reliable product due to its innovative design and perfect quality control. Such an Inverter is used in high demand, grid-tied PV systems. If you encounter any problems during installation or operation of this unit, first check this manual before contacting your local dealer or supplier. Instructions inside this manual will help you solve most installation and operation difficulties. Please keep this manual on hand for quick reference. IV351 Rev03 Date Issue 2012-11-22 Page 94 di 278 + FR 1. Safety Instructions Risk of Electric Shock: Alternating Current (AC) and Direct Current (DC) sources are terminated in this device. To prevent risk of electric shock during maintenance or installation please ensure that all AC and DC terminals are disconnected. Be sure to secure the Ground line to the Grid’s Ground, and double check the Line and Neutral are not confused with Ground. Risk of Electric Shock: When PV module or panel is exposed to light, it starts to supply high DC voltage, be sure to turn off DC switch before servicing, or make sure no live part will be touched. Risk of Electric Shock: Warning - High leakage current, earth connection is essential before connecting to the utility. Risk of Electric Shock: More than one source of supply. Disconnect all sources before servicing. CAUTION : After disconnecting the PV inverter from the power supply and PV modules, electrical charge can still reside in the DC link capacitors. Before handling the device, please allow at least 1 minute after the power is disconnected. Public Utility only: The PV inverter is designed to feed AC power directly to the public utility power grid. Do not connect the AC-output of this device to any private AC equipment. Hot Surfaces: Although designed to meet international safety standards, the PV inverter can become hot during operation. Do not touch the heat sink or peripheral surfaces during or shortly after operation. Maintaining and Servicing PV inverter: Only authorized personnel are allowed to open the Inverter for service purpose. CAUTION : Risk of electric shock from energy stored in capacitor, do not remove cover until 2 minutes after disconnecting all sources of power supply. Unpacking and Installation: Some certain models of the SIEL grid-tied PV inverter may weighs up to 57kg (125.7lbs). To avoid injury and for safety purpose, be sure to use proper lifting techniques and secure the help of someone to assist in the unpacking and installation of the Inverter. CAUTION: If the equipment is used in a manner not specified by the manufacturer, the protection provided by the equipment may be impaired. IV351 Rev03 Date Issue 2012-11-22 Page 95 di 278 + FR 2. Limited Warranty The warranty includes all defects of design, components and manufacturing. The Warranty is void and does not cover any defects or damages caused by in any of the following circumstances: ! ! ! ! ! ! ! ! ! ! ! ! Seal on the product is broken The Inverter has been misused, neglected, or abused Improper transportation and delivery The Inverter has been used or stored in conditions outside its electrical or environmental specifications The Inverter has been used for purposes other than for which it was designed The Inverter has been used outside its stated specifications, operating parameters and application Acts of third parties, atmospheric discharges, excess voltage, chemical influences, natural wear and tear and for loss and damage in transit Improper testing, operation, maintenance, adjustment, repair, or any modification of any kind not authorized in writing by the Inverter supplier The Inverter has been connected to other equipment with which it is not compatible Use and application beyond the definition in this manual Application beyond the scope of applicable safety standards or grid codes (VDE etc.) Acts of nature such as lighting, fire, storm, flood, vandalism and etc. The right to repair and/or replace the defective product is at the supplier’s sole discretion. Any warranty claim shall be asserted in writing to the supplier within 5 working days after notice of product failure. The supplier is not responsible for damages beyond the scope of this warranty. IV351 Rev03 Date Issue 2012-11-22 Page 96 di 278 + FR 3. Product Overview 3.1 PV System Diagram A Grid-tied PV System is mainly composed of 5 parts: PV panel or PV array, DC Junction Unit, the PV inverter, AC Junction Unit (connection Interface) and a connection to the Public Utility. The typical connection diagram of the PV system is shown in the following figure. . Unit PV Array (or PV Modules) DC Junction Unit Description Provide DC power to the Inverter This “interface” between PV array and PV inverter must consist of DC breaker, and connecting terminals. PV Inverter Converts DC (Direct Current) power from PV panel(s) to AC (Alternating Current) power. Because the PV inverter is grid-connected it controls the current amplitude according to the PV Panel power supply. The Inverter always tries to convert the maximum power from your PV panel(s). AC Junction Unit This “interface” between Utility and PV inverter must consist of AC breaker, and connecting terminals. To comply with local safety standards and codes, the connection system should be designed and implemented by a qualified technician. The Utility or the Referred to as “grid” in this manual, is the way your electric power Grid company provides power to your place. Please note that the PV inverter can only connect to low-voltage systems (namely, 230VAC/50Hz). Note : According to DIN VDE 0100-712:2006-06, a device for disconnecting Inverter fr DC power must be installed between PV-module and the Inverter in German. PV Modules Only Do not connect any sources of energy other than PV modules to SIEL Grid-Tied PV inverter, please beware. IV351 Rev03 Date Issue 2012-11-22 Page 97 di 278 + FR 3.2 Introduction of SIEL Grid-tied PV Inverter SIEL grid-tied PV Inverters converts direct current (DC) power generated by PV modules into alternating current (AC), which is compatible with the local electricity distribution network; also called the public utility, or grid system. Model Appearance Dimension (mm) SOLEIL 3F-TL10K 548*565*275 SOLEIL 3F-TL15K 548*565*275 SOLEIL 3F-TL20K 548*565*275 IV351 Rev03 Date Issue 2012-11-22 Page 98 di 278 + FR 3.3 Identification It is essential for installer or user to keep a record of Inverter information (such as model, serial number and associated pole number) installed in terms of management or maintenance, or even for calling service in the future. " Model Number and Serial Number On the left side of SIEL Grid-tied PV inverter shows the rating label of the Inverter. The rating label states the Type, Brand Name, Model Name, Specifications, and the Serial Number of the Inverter. When encounter any difficulties during installation or operation, please record the Serial Number (SN) before contacting your local dealer or representative. IV351 Rev03 Date Issue 2012-11-22 Page 99 di 278 + FR 3.4 Exterior and Parts Name The descriptions of the major parts of Part Name Grid-tied PV Inverter are indicated below: Description (1) DC-Input Terminals Each input pair consists of positive and negative terminal (2) Cooling Fan External cooling fan for the inverter (3) DC Switch DC switch for disconnecting Inverter from PV module Communication slot for RS485 card installation, users can link with the Inverter and monitor its real-time operation and status remotely. A hardware device that used to dissipating heat into the surrounding air Connect this port directly to your PC via an USB cable; users can communicate with the Inverter through specific program tool. For wiring AC output cable to the grid with a waterproof enclosure (4) Communication Slot and Cover (5) Heat Sink (6) USB Interface (7) AC Output Terminal (8) Ground terminal Connect this at Ground conductor (9) Graphic Data Logger Operation status display and system characteristic setting SOLEIL 3F-TL10K DE/IT/ES/UK SOLEIL 3F-TL15K DE/IT/ES/UK SOLEIL 3F-TL20K DE/IT/ES/UK IV351 Rev03 Date Issue 2012-11-22 Page 100 di 278 + FR SOLEIL 3F-TL10K DE/IT/ES/UK SOLEIL 3F-TL15K DE/IT/ES/UK SOLEIL 3F-TL20K DE/IT/ES/UK IV351 Rev03 Date Issue 2012-11-22 Page 101 di 278 + FR 3.5 Introduction of Graphic Data Logger To show the information of Inverter, there is a graphic Data Logger in the unit. This Data Logger can show various information of the Inverter such as operational status and warning message, its button allow user to operate for display control or system characteristic setting " Graphic Data Logger Configuration The following table indicates the main specification of the Data Logger: LCD Monochrome Displayed Each I/P power, O/P power, Operation mode and warning Information message Storage Period 5 years Storage Media 2GB SD card (support up to 32GB) Data Download Via B type USB " Features of Graphic Data Logger Multicolored back light The backlight of the LCD will be changed according to its status. There are 3 colors of backlight and their indications are: ! Green: Start-up and normal status ! Red: Fault Status. In this status, Inverter disconnected from grid due to system fault or Inverter failure. These faults and failures are defined in “error message table” later on. ! Yellow: Warning Status. Inverter disconnected from grid due to system fault within the past 48 hours, but Inverter reconnected. Data download User can download and access logger data with a PC via B type USB cable and manage internal data. Please refer to the chapter 11, download the data from the graphic logger. IV351 Rev03 Date Issue 2012-11-22 Page 102 di 278 + FR " Accuracy of the reading The Inverter is not designed for precise measurement of voltage, current and power, The readings on the LCD is just solely for user’s reference and should not be taken as the index for official performance evaluation or feed-in tariff calculation. We do not recommend using the data for checking or testing of the system. Normally, its accuracy is around ±2%. In all ranges of operation, the deviation of accuracy is up to ±5%. The reading tolerance may vary from 2% to 5% depending on the operating condition. If precise measurement of the system status is needed, adequate equipment such as power meter shall be installed. " Appearance of LCD Display ! LCD: 128 x 64 graphic, monochrome ! Navigation Pad: “Ⴄ”, “Ⴎ”, “!” , “"” and “OK” in the center. ! Back light: 3 colors Pac:7494W Vdc:403/420V Vac:230.5/232.3/231.1V Iac:10.5/11.2/10.7A Status:Normal 21.04.12 15 :01 IV351 Rev03 Date Issue 2012-11-22 Pac:0W Vdc:403/420V Vac:230.5/232.3/231.1V Iac:0.0/0.0/0.0A Status:Fault Isolation Fault 21. 04.12 15 :01 Pac:7494W Vdc:403/420V Vac:230.5/232.3/231.1V Iac:10.5/11.2/10.7A Status:Normal 21.04. 12 15 :01 Page 103 di 278 + FR 4. Features of SIEL Grid-tied PV inverter This Inverter mainly has following features: ! ! Lead-free, RoHS GP2 compliant Max conversion efficiency ฺ 97.5% ! ! ! ! ! ! ! ! Euro efficiency ฺ 97% IP65 enclosure 128x64 graphic display 3-phase 4 wire, 230/400V Compact design Embedded DC switch (Optional) Powerful Communications Interface Embedded ENS and fully complying with the following Grid codes: " VDE-AR-N 4105 " VDE-0126-1-1/A1 " RD1699 " G83/1-1 " G59 Issue2 " CEI-021 Integrated RCMU (Residual Current Monitoring Unit) Power Management for Active Power and Reactive Power Control (An additional remote device will be required such as external data logger) ! ! " Maximum Power Point Tracking (MPPT) A PV inverter must be able to convert the maximum power from any PV panel. Due to its advanced design, this PV inverter can track the maximum power from the PV panel in any condition. When the displayed power on the LCD output does not change dramatically, the Inverter is converting the maximum power from panels. When the LCD power reading is significantly changes, the Inverter is tracking the power according to the varied sunlight. IPV (A) 5 4 1000W/m 2 800W/m 2 600W/m 2 P PV (W) Maximum power point 2 @ 1000W/m ~ 120W 125 100 3 75 2 50 1 25 0 10 20 30 40 50 U PV (V) Note: When the PV panel’s output is low, the feeding DC-power may drift slowly as does the AC power. It is because PV inverter is tracking maximum DC-power constantly. IV351 Rev03 Date Issue 2012-11-22 Page 104 di 278 + FR 5. Installation instructions 5.1 Inside the Package After opening the package, please check the contents of the box. It contains the following items: Item Quantity Note (1) PV inverter 1 Photovoltaic Inverter (2) Mounting Bracket 1 Wall bracket for the PV inverter (3) Accessory Box 1 Contains all necessary accessories Note: Please keep the package box nicely in case of repair service needed. The (3) Accessory Box contains items that listed in the table below: Items Quantity User’s Manual 1 AC Cover 1 DC Connector Extractor 1 Rubber Bushing 1 Nylon Drive Anchor 6 Wall Mounting Screws (M5 x 40L) 6 Safety lock screw 1 Hanging Iron 2 Hanging Screws (M5 x12L) 4 RS485 Snap Bushing 1 RS485 Cover 1 RS485 Cover Screws M3 x15L IV351 Rev03 Date Issue 2012-11-22 Item Descriptions Figure Installation and Operation Manual Top enclosure used for the AC Terminal Disconnecting tools for the DC connector Accessories for the AC wires connection. Accessories for the bracket installation. Accessories for Inverter hanging(Optional) Accessories for the RS485 card 4 Page 105 di 278 + FR 5.2 Before Installation To obtain optimal performance, please consider following guidelines before installation: # Check the ambient temperature of installation is within specified range -20 ~ +60!C. # The grid voltage and frequency at installed site must be within the specific range defined by applicable regulation type. # Electric utility company has approved the grid connection. # Only qualified personnel are performing the installation and maintenance. # Adequate convection space surrounds the Inverter. # Inverter is being installed away from explosive vapor or dust. # No flammable object is near the Inverter. # No mounting on wooden flammable surface. Installation Location : SIEL grid-tied PV inverter can be installed and operated at locations where the ambient temperature is up to 60!C. However, for optimal operation, it is recommended that Inverter is installed where the ambient temperature is between 0 to 45!C. Warning: Do not expose the PV inverter to direct sunlight. Direct sunlight increases the internal temperature that may reduce conversion efficiency. Note : Although the Inverter is designed for outdoor application (IP65), still, we recommend not exposing the Inverter to severe moist or wet environment. Suggestion before mounting: SIEL grid-tied PV inverter may weigh up to around 57kg ( 125.7 lbs). To avoid injury and for safety purpose, be sure to use proper lifting techniques and secure for the help of someone to assist in the unpacking and installation of the Inverter. Public Utility only: SIEL grid-tied PV inverter is equipped with a RCMU (Residual Current Monitoring Unit) device which is used for protection of direct or indirect contact with this product under any condition. IV351 Rev03 Date Issue 2012-11-22 Page 106 di 278 + FR 5.3 Mounting PV inverter Please be sure the installation rules listed below are followed. 1. 2. 3. Select a wall or solid vertical surface that can support the PV inverter in the long run. PV inverter requires adequate cooling space. Allow at least 30cm space above and 90cm space below the Inverter. For maintenance purpose, please keep Inverter 30cm distance at least from each other. Note: Don’t mount PV inverter on top of another one or other heat radiating sources unless it is inevitable, in that case, 100cm spacing at minimum from each other is required to provide proper ventilation effect. 4. Fix the Bracket by using all of six mounting holes, the bracket should be fixed with M5*40mm screws by 30kgf-cm (or 2.94 N-m ) torque force, as illustrated below: IV351 Rev03 Date Issue 2012-11-22 Page 107 di 278 + FR Mounting Bracket Notes: Diameter for the safety screw is at 10mm2. IV351 Rev03 Date Issue 2012-11-22 Page 108 di 278 + FR 5. PV inverter will be able to lift up with the proper lifting tool in order to move PV inverter to the installed location when the hanging irons installed on the PV inverter as illustrated: Hanging PV inverter to the install location (Optional) *Notes: Proper lifting tool must be used for the lifting, please beware. IV351 Rev03 Date Issue 2012-11-22 Page 109 di 278 + FR 6. Mount the Inverter onto the bracket as illustrated: Mount the PV inverter on the Wall 7. Check and ensure the device is properly fixed to the bracket in the proper direction. IV351 Rev03 Date Issue 2012-11-22 Page 110 di 278 + FR 5.4 Connecting AC Output Cable Connect PV inverter to the AC Junction Unit with AC output wires and ground wire as shown in the following steps: 1. 2. 3. Measure grid (utility) voltage and frequency. It should be around 230VAC (L-N) / 50Hz, and the measuring voltage of N to PE must be close to 0 volt (ground-neutral connection). Open the breaker or fuse of AC Junction unit (between PV inverter and the utility). Find the AC output wires with recommended size, as indicated in the table below: L1ᇬL2ᇬL3ᇬNᇬPE1 must use wire with minimum gauge indicated in following table. Model SOLEIL 3F-TL10K SOLEIL 3F-TL15K SOLEIL 3F-TL20K Power (W) 10000 15000 20000 Max. AC current 16 A 24 A 30A 10 AWG 8 AWG 8 AWG Max. AC Cable Size Note: Do not use cables where losses will exceed 1% PE2 wire area must be of same gauge as PE1 does (or 10 mm2). ! ! 4. 5. Remove the rubber plug from inside of the AC connector socket Insert all AC wires through AC cover kit in following order before cramped with insulated cord end terminal: $ cable gland $ rubber bushing $ AC cover $ cord end terminal IV351 Rev03 Date Issue 2012-11-22 Page 111 di 278 + FR 6. 7. Add an insulated cord end terminal to each AC wire before connecting. The stripped length of AC wire is about 10 mm to 12 mm. Connect the AC wires to the AC terminal block correspondingly and tighten it properly. Suggestion After Connecting: After tightening AC wires to the AC terminal block, be sure to check its tightness by pulling the wire one by one. IV351 Rev03 Date Issue 2012-11-22 Page 112 di 278 + FR Important Reminder: In Normal operation, all the AC cables (L1-PhaseᇬL2-PhaseᇬL3-Phaseᇬ N-Phase and G-Phase) need to be connected firmly in the AC terminal of PV inverter before AC power turn on, please beware. When the AC utility is required to be disconnected from the PV inverter, DC power of PV inverter has to be turned off firstly. And then disconnected the AC power ( L1-PhaseᇬL2-PhaseᇬL3-Phase and N-Phase) of PV inverter at the same time in order to protect the PV inverter itself. If user fails to comply with the above Important Reminder, PV inverter and the connected equipment will be damaged. 8. Fix the AC output cover back with a screwdriver. 9. Twist the connector cable gland to lock the bushing and cable together firmly. 10. Check the installation condition again. % Do not install the PV inverter on a slanted surface % Check Inverter are securely hooked on bracket at both of upper and lower sides. IV351 Rev03 Date Issue 2012-11-22 Page 113 di 278 + FR Check After Mounting: Ensure the Inverter is properly mounted by trying to lifting it slightly from the bottom and turning around. The PV inverter should remain firmly attached. Check After Mounting: Select the installation location so that the status display can be easily viewed. Choose a strong mounting wall to prevent vibration while PV inverter is in operation. 5.5 Connecting to the AC Junction Unit (AC utility) The AC Junction unit is an interface between PV inverter and the Public Utility. It may consist of an electrical breaker, fuse, surge protector and terminals for connection of the PV inverter to the Public Utility. This AC Junction Unit must be designed by a qualified technician to comply with local safety standards requirement. Model Max. AC current External rating of Max. over current protection SOLEIL 3F-TL10K 16A SOLEIL 3F-TL15K 24A SOLEIL 3F-TL20K 30A 20A 25A 35A Attention: Please select a suitable over current protection device according maximum AC current of each model, see Section 15.2 IV351 Rev03 Date Issue 2012-11-22 Page 114 di 278 + FR 5.6 Check Before Connecting the PV Modules To obtain optimal result from PV inverter, please consider the following guidelines before connecting the PV modules to the device: % Firstly make sure the maximum open circuit voltage (Voc) of each PV string does not exceed the related specification as below table listed in all condition. % Check short-circuited current of the PV string. The total short-circuits current (Isc) of the PV string should not exceed the Inverter’s maximum DC current. Model Voc VDC SOLEIL 3F-TL10K ู1000V Max. Current (Isc) ADC 24A * 2 SOLEIL 3F-TL15K ู1000V 30A * 2 SOLEIL 3F-TL20K ู1000V 34.5A * 2 Attention: Please select suitable external DC power plug/cable/connector with rating current higher than Max. DC current of the Inverter. Attention: Please select suitable PV panel which has short circuit current less than Max DC current of PV Inverter. % Always connect PV modules positive (+) terminal to PV inverter DC positive (+) terminal; negative (-) terminal to PV inverter DC negative (-) terminal. Attention: Before connecting DC power to the Inverter, be sure to check the polarity of each DC input pair is correct. Incorrect polarity connection would permanently damage the unit. Caution : High voltages exist when the PV panel is exposed to the sun. To reduce risk of electric shock, avoid touching live components and treat connection terminals carefully. IV351 Rev03 Date Issue 2012-11-22 Page 115 di 278 + FR 5.7 " Wiring PV Modules to the Inverter Applicable PV Module Model Type Connected strings must consist of modules of the same type; the table below lists the applicability of different type of PV modules. PV Module Type Applicability Mono-crystalline Yes Multi-crystalline Yes Thin-Film Yes (Without + or – Grounding) Specific type with earthed positive pole No Specific type with earthed negative pole No Note: Please consult with your dealer for PV module type suggestion. " Requirement of PV Module For connecting DC input of one single Inverter, connected strings must consist of modules of the same type. Do not share the DC input connection with other Inverter. The number, orientation, and tilt of panels may differ for different application. " DC Connector Model Type The input terminals on the Inverter are either Amphenol Helios H4 or Multicontact MC4 DC connectors. Appropriate cable couplers from the same manufacturer should be used for DC input connection. IV351 Rev03 Date Issue 2012-11-22 Page 116 di 278 + FR The following table lists those connector pairs: MultiContact PV-KST4/6I Male Connector PV-KBT4/6I Female Connector IV351 Rev03 Date Issue 2012-11-22 Amphenol Helios H4 Male Connector Helios H4 Female Connector Page 117 di 278 + FR " How to Disconnect MC4 / Amphenol DC Connector The following pictures illustrates how to disconnect MC / Amphenol DC connector by using a connector extractor as below figure shown, the connector extractor shall be found in accessories box shipped along with package of Inverter. (3) Insert the tool through the connector in either way to cramp its clips. As below figure shown: (4) After cramping the clips, pull the connector slightly downward to disassemble the DC cable. IV351 Rev03 Date Issue 2012-11-22 Page 118 di 278 + FR Warning: Don’t disconnect DC power or cables while the Inverter is still feeding AC power to the grid, be sure to switch off AC power at first, then turn off DC switch (if present), and disconnect DC cables at last. Public Utility only: Don’t turn the connector around in anti-clockwise direction; otherwise, DC connector assembled to the chassis of the Inverter may become loose. Attention: Before connecting DC power to the Inverter, be sure to check polarity of each DC input pair is correct by multi-meter. Incorrect polarity connection would permanently damage the unit. IV351 Rev03 Date Issue 2012-11-22 Page 119 di 278 + FR 5.8 Post Installation Checklist % High voltages exist when PV-Panel is exposed to sufficient irradiation. Exposed terminals of PV-Panel are under tension, and can cause electric shock. Avoid making physical contact with those parts of the device. % After PV-Panel is connected to the PV inverter, the output voltage is greater than 260VDC and when the AC grid is not connected to the Inverter, the Data Logger LCD displays the following: Pac:0W Temperature:26.8°C Iac:0.0/0.0/0.0A Vac:0.0/0.0/0.0V Status:Fault No Utility 21.04.12 15 :01 % Check the connection between PV inverter and the AC Connection System, and then check the connection between the Public Utility and the AC Junction Unit. Close the AC breaker or fuse in the unit. Under normal operation, the Data Logger LCD shows the following as an example: Pac:7494W Temperature:26.8°C Iac:10.5/11.2/10.7A Vac:219.4/219.3/219.3V Status:Normal 21.04.12 15 :01 % When the display is green, the Inverter is feeding power to the grid. Under such condition, you have installed the Inverter successfully. Warning: Don’t disconnect DC power or cables while the Inverter is still feeding AC power to the grid, be sure to switch off AC power at first, then turn off DC switch (if present), and disconnect DC cables at last. Warning: Please ensure that AC voltage does not exceed product spec under any circumstances. Attention: Before connecting DC power to the Inverter, be sure to check polarity of each DC input pair is correct by multi-meter. Incorrect polarity connection would permanently damage the unit. Attention: DC input voltage must be greater than or equal to initial feeding voltage 350 volt so the device could feed power to the grid. IV351 Rev03 Date Issue 2012-11-22 Page 120 di 278 + FR 6. Operation of PV inverter 6.1 DC Switch Usage The PV inverter starts up automatically once the DC-power from PV Panel is sufficient and fuse is closed. However, if a DC switch is integrated at underside of the device, user has also to switch it on in order to feed power to the device. Attention: The Inverter LCD screen will illuminate up at 260VDC, in order to feed power to the grid constantly, DC input voltage must be greater than system initial feed-in voltage 350VDC , see Section 12.2. 6.2 Initialization for Regulation Type Setting % The Inverter provides a “Select Safety” function at the first time start-up as a process in which user is able to select the intended language displayed and regulation type before starting normal operation. % The Inverter will not able to operate normally before regulation setting is completed even though it is connected correctly at both DC input and AC output. % The following flowchart illustrates the process of “Select Safety”. For example, if users in German need to set regulatory type to VDE0126-1-1/A1, user has to power on the Inverter start “Select Safety” process. Firstly user has to scroll the menu to the intended regulatory page by button control, then hold on to the “OK” button for 5 more seconds until “Regulation Setting OK” message appeared, the regulatory setting is completed. Please Select Safety Please Select Safety Unknown VDE0126-1-1/A1 !": Select Safety OK: Press Over 5 sec. IV351 Rev03 Date Issue 2012-11-22 $ !": Select Safety OK: Press Over 5 sec. $ Page 121 di 278 + FR Regulation Setting OK Press any button Note: Incorrect regulation type setting would result in improper behaviors, please consult with the supplier in case of unfamiliarity with regulatory selection and setting. 6.3 Operating Modes There are 4 modes of operation. For each mode, there is a corresponding color and text to indicate the status. (6) Normal In this mode, Inverter continuously converts energy from solar generator to grid (utility). The corresponding color of LCD is green in this case. Pac:7494W Vdc:403/420V Vac:230.5/232.3/231.1V Iac:10.5/11.2/10.7A Status:Normal 21.04.12 15 :01 (7) Recovery from Fault In some situations such as abnormal voltage and frequency, the Inverter has to disconnect from grid. After the situations are cleared, Inverter recovers to normal condition. For the coming 48 hours, the LCD backlight will be yellow as following picture. If there is no further abnormal event after 48 hours of operation, the color switches back to green again. Pac:7494W Vdc:403/420V Vac:230.5/232.3/231.1V Iac:10.5/11.2/10.7A Status:Normal 21.04.12 15 :01 (8) During Fault During grid fault or system failure (refer to “error message table” for further information) the Inverter disconnects from the grid, the backlight turns red, and alarm is ON to notify user. User can press “OK” button on navigation pad to clear fault notification. In this condition, please check the message. If the fault notification cannot IV351 Rev03 Date Issue 2012-11-22 Page 122 di 278 + FR be cleared, please contact with your local service. ! No Utility Press OK to Clear (9) Shutdown During night or heavily cloudy day, the Inverter automatically shuts down. In this condition, Data Logger and the navigation pad are inactive. IV351 Rev03 Date Issue 2012-11-22 Page 123 di 278 + FR (10) Operating States: ! Standby: During normal operation, the PV inverter is in “Standby” state when the open circuit voltage is between 200V to 250V. Pac:0W Vdc:220/210V Vac:219.4/219.3/219.3V Temperature:26.8°C Status:Standby 21.04.12 15 :01 ! Waiting : Between 251V and 349V at DC side, the Inverter is in “Waiting” state. In the meantime, the Inverter keeps checking both DC and AC conditions and waiting for connection. ! Normal: To be in “Normal” state, voltage on DC side must be 350V or above. To check the DC wire connection, this Inverter tries to change its input power for every starting-up. During the process, user can see the DC power reading drift. Pac:2300W Vdc:450/420V Vac:219.4/219.3/219.3V Temperature:26.8°C Status:Normal 21.04.12 15 :01 IV351 Rev03 Date Issue 2012-11-22 Page 124 di 278 + FR 6.4 Using the LCD Display and Data Logger " Operation (5) Keys on the data logger: On the data logger, there are 5 keys used to change and operate. Generally, the functions of keys are defined as followings. ! “ ! ” : View the lower layer (1st to 2nd) or move the cursor right ! “ "” : View upper layer (2nd to 1st) or move the cursor left ! “ Ⴄ ” : View the previous screen or move the cursor up ! “ Ⴎ ” : View the next screen or move the cursor down ! “ OK ” : Set or confirm (6) Back light of LCD As described in previous section, the color of backlight changes according to operation status. To save power, the light remains illuminated only for 3 minutes after last operation. However, in case a failure or error occurs, other than the backlight goes red, the backlight flashes every second until user presses the key according to instruction on the LCD. (7) Audio Alarm To inform the user, data logger will emit audio alarm in cases of following: ! Inverter failure ! Memory capacity of data logger is less than 5% remained ! Convection fan is not able to rotate for any reason (8) Behavior in case memory is reach to full condition Once the capacity of memory is less than 5%, data logger will emit audible alarm. At that moment, user should manage the data inside and try to clear the memory by using a PC. In case user ignores the warning and does not clear the memory, after memory is 100% full, the latest data will overwrite the earlier ones. IV351 Rev03 Date Issue 2012-11-22 Page 125 di 278 + FR " Display on LCD (7) Startup After the Inverter starts up, the LCD shows logo and firmware version. The frame lasts for 3 seconds and changes to text information below. (8) Text display The display shows four measurements and one status. The bottom-right part of the display shows the time and date. On occurrence of a “warning” or “error” message, the bottom line “Status” is automatically replaced by the error message. The user can change the four monitoring parameters. ! Press “!” to highlight the monitoring parameter at the first line. By using “Ⴄ” and “Ⴎ”, the user can shift to the next line. ! Press “OK” to begin setting the monitoring parameter. ! Press “Ⴄ” or “Ⴎ” to select the monitoring parameter of the line. ! Press “OK” to confirm. Pac:7494W Vdc:403/420V Vac:230.5/232.3/231.1V Iac:10.5/11.2/10.7A Status:Normal 21.04.12 15 :01 IV351 Rev03 Date Issue 2012-11-22 Page 126 di 278 + FR (9) Daily graph By pressing the “Ⴎ” key in the text display, screen on LCD is transformed to daily graph as below. The graph indicates the AC power trend of a specified date. Further explanations are stated below: ! Time-axis (x-axis): On the frame, the longest period is 12 hours. The number represents the hour. The first recorded data of a day is plotted on the first point of left side. In case the recorded data of a day is longer than 12 hours, press “OK” first and then press ! ! ! and " to move the graph to time interested. Press “OK” again to terminate the moving. Power-axis (y-axis): From 0 to 24KW. Each point is the averaged power during 6-minute interval, each dot means 500W, the maximal dot number is 48. Date: On the upper right corner, the date of present display is shown. To see daily graph \ 20.04 \ of expected day, press ! and " to select KW 20 10 6 7 8 9 10 11 12 1 2 3 4 5 (10) Weekly graph Press the “Ⴎ” of daily display, LCD changes to the “Weekly Display” as below. For further explanations, see below: ! ! ! Time-axis (x-axis): 7 days from Sunday of a week. The data at first point of left side is the data for Sunday. Generated KWh (Y-axis): The total generated energy in kWh of the day. From 0 to 240kWh. Each dot means 5kWh, the maximal dot number is 48. Week change: Press ! and " to switch to the week interested. The corresponding dates on the upper-right corner can also be changed. IV351 Rev03 Date Issue 2012-11-22 Page 127 di 278 + FR (11) Error history By pressing “Ⴎ” again on the “Weekly Display”, the LCD changes to “Error History” as shown below. The LCD displays the last two recorded error events. To see more error events, press “OK” first to toggle the display and then press “!” and “"”. Error History E001:No Utility @ 19.04.12 15:49 Vaule=N/A E002:Grid Volt. Fault @ 21.04.12 12:34 Vaule=230,260,240 (12) System Information By pressing “Ⴎ” again on “Error History”, the LCD changes to the “System information” of the Inverter including serial number of the Inverter, firmware version, etc… as shown below. System Display S/N:0123456789ABCDEF Version:MB.20-00.27 Memory:0.3% Date:21.04.2011 Sat Time:15:01:19 GMT +08 Audible Alarm:On Language:English The following are the monitoring parameters shown in “System Display”: ! ! ! ! ! ! ! SN: Serial number of the Inverter Version: Firmware version of the Inverter Memory: Memory status of the Data Logger Date: Date setting of the Inverter Time: Time setting of the Inverter Audio Alarm: Turn “On” or “Off” audio alarm Language: Language setting of display To change the Date, Time, Audio and Language settings: ᧤e᧥Press “!” and then press “Ⴄ” or “Ⴎ” to change the parameter to the desired setting. ᧤f᧥Press “OK” to confirm. Use “Ⴄ” and “Ⴎ” to alter the value ᧤g᧥Press “OK” to confirm. ᧤h᧥Press “"” to cancel a selection and complete the setting. IV351 Rev03 Date Issue 2012-11-22 Page 128 di 278 + FR " Illustration of Data Logger Display Sequence: IV351 Rev03 Date Issue 2012-11-22 Page 129 di 278 + FR 7. Power Management The remote control has been carried out to fulfill the requirement of power management. External device can communicate with inverter via a standard protocol, “MODBUS RTU (See SP104 Siel”. The network operator is entitled to manage the power distribution in the following limited way. 7.1. Active power In order to secure the network system stability or handle the excessive energy supply, the network operator has the right to require a temporary limitation of the active power feed-in. 7.1.1. Active power reduction Inverter has the capability of reducing active power with the minimum step of 1%Pn, the adjustable range is defined as 0% ~ 100%Pn. In general, the settings of 100% / 60% / 30% / 0% are commonly used in several power management provisions. 7.1.2. Frequency-dependent active power reduction The principle for this requirement is that the energy oversupply can be recognized as gird frequency rise. The frequency-dependent active power limitation will get a quick reaction while suddenly frequency changes in the grid. If the frequency increases over a specific threshold, the active power has to be reduced as a function of the grid frequency. Regarding the frequency set-point and the gradient of power reducing, several implementations are carried out due to different safety regulations. The following graph only describes the concept of frequency-dependent active power limitation. Output Power (%) Power limitation 100 Disconnect region 50 0 fback fstart fend Freq. (Hz) (a) Characteristic of frequency-dependent active power reduction IV351 Rev03 Date Issue 2012-11-22 Page 130 di 278 + FR 7.2. Reactive power The requirement of reactive power control is used to regulate and stabilize the grid voltage at the network connection point. The steady-state reactive power should be determined in accordance with the grid condition in the generating plant. In general, the inverter with over-excited operation contributes to increase the grid voltage at the network connection point and under-excited one result in the opposite. There are four reactive power mode supported by Soleil PV inverter, each one of them can be specified by the network operator for their plant use. Either set-point control or characteristic curve is adjustable by the communication. The capability of each method is described as follows: 7.2.1. COS$ Set-Point Control A fixed value of the power factor Cos] is assigned by the network operator with the permissible setting range cos] = 0.8under-excited to 0.8over-excited. The output power capability of “cos] set-point control” can be shown as: (Green region means the permissible operating point, take 10kW model for example) (b) Reactive Output capability of cos] set-point control IV351 Rev03 Date Issue 2012-11-22 Page 131 di 278 + FR 7.2.2. Q set-point control A fixed value of the reactive power Q is assigned by the network operator with the permissible setting range Q = +6kVar to -6kVar (with 10kW model). The output power capability of “Q set-point control” can be shown as: (Green region means the permissible operating point, take 10kW model for example) (c) Reactive output capability of Q set-point control IV351 Rev03 Date Issue 2012-11-22 Page 132 di 278 + FR 7.2.3 COS$(P) Characteristic Curve The value of the power factor cos] is controlled as a function of the active power with a presetting characteristic curve. However, the network operator may provide different one for their power generation plant depending on the network conditions. The prescribed COS](P) characteristic curve has four adjustable nodes and one cos] limit with default setting: (The permissible range of cos] limit is 0.8~1.0 and for node setting is 0%~100%.) (d) The COS](P) characteristic curve with default setting The output power capability of “COS](P) characteristic curve” can be shown as: (Green region means the permissible operating point, take 10kW model for example) (e) Reactive output capability of COS](P) Characteristic Curve IV351 Rev03 Date Issue 2012-11-22 Page 133 di 278 + FR 7.2.4 Q (U) characteristic curve The value of the reactive power Q is controlled as a function of the grid voltage with a presetting characteristic curve. However, the network operator may provide different one for their power generation plant depending on the network conditions. The prescribed Q(U) characteristic curve has four adjustable nodes and one Q limit with default setting: (The permissible range of Q/S limit is 0%~60% and for node setting is 0%~100%.) (f) The Q (U) characteristic curve with default setting The output power capability of “Q (U) characteristic curve” can be shown as: (Green region means the permissible operating point, take 10kW model for example) (g) Reactive output capability of Q (U) characteristic curve IV351 Rev03 Date Issue 2012-11-22 Page 134 di 278 + FR 8. Inverter Operating Status This Inverter is designed to be user-friendly; the status of the Inverter can be easily understood by reading the information shown on the front panel display or through remote monitoring. All possible messages are listed in the following table. The Language Matrix of Display Messages (Continue in next page) IV351 Rev03 Date Issue 2012-11-22 Page 135 di 278 + FR ( day.month.year 10.04.2011 ) On Off Turn on the audible alarm Turn on the audible alarm IV351 Rev03 Date Issue 2012-11-22 Audible Alarm Datum:dd.mm.yyyy Sa Date:dd.mm.yyyy Sat Data Logger Alarm Datum:dd.mm.yyyy Fr Date:dd.mm.yyyy Fri Aus Ein Alarm Zeit Datum:dd.mm.yyyy Do Date:dd.mm.yyyy Thu Time Datum:dd.mm.yyyy Mi Datum:dd.mm.yyyy Di Date:dd.mm.yyyy Tue Date:dd.mm.yyyy Wed Datum:dd.mm.yyyy Mo Date:dd.mm.yyyy Mon Time Information Date Information Datum:dd.mm.yyyy So Speicher:xx.x% Date:dd.mm.yyyy Sun Version:xx.xx-xx.xx SD Card Memory Memory:xx.x% S/N:xxxxxxxxxxxxxxxx S/N:xxxxxxxxxxxxxxxx Serial Number Firmware Version Version:xx.xx-xx.xx Systemanzeige System Display hours:minutes ( 17:23 ) hours:minutes ( 17:23 ) day.month.year 10.04.2011 ) DEUTSCH (German) System Display Menu Time format Date Format ENGLISH General System Messages Operation Status " ( 10.04.2011 ) Paro Marcha Alarma sonora Hora Fecha:dd.mm.yyyy Sab. Fecha:dd.mm.yyyy Vie. Fecha:dd.mm.yyyy Jue. Fecha:dd.mm.yyyy Mie. Fecha:dd.mm.yyyy Mar. Fecha:dd.mm.yyyy Lun. Fecha:dd.mm.yyyy Dom. Memoria:xx.x% Versión:xx.xx-xx.xx S/N:xxxxxxxxxxxxxxxx Pantalla inform. horas:minutos ( 17:23 ) dia.mes.año ( day.month.year 10.04.2011 ) Français (France) Page 136 di 278 + FR Off On Allarme sonoro Ora Data:dd.mm.yyyy Sab. Data:dd.mm.yyyy Ven. Data:dd.mm.yyyy Gio. Data:dd.mm.yyyy Mer. Data:dd.mm.yyyy Mar. Data:dd.mm.yyyy Lun. Data:dd.mm.yyyy Dom. Memoria:xx.x% Vers.FW:xx.xx-xx.xx S/N:xxxxxxxxxxxxxxxx Info. sistema OFF ON Alarme sonore Heure Date:dd.mm.yyyy sam Date:dd.mm.yyyy ven Date:dd.mm.yyyy jeu Date:dd.mm.yyyy mer Date:dd.mm.yyyy mar Date:dd.mm.yyyy lun Date:dd.mm.yyyy dim Carte SD:xx.x% Version:xx.xx-xx.xx S/N:xxxxxxxxxxxxxxxx Affichage hours:minutes ( 17:23 ) hours:minutes ( 17:23 ) day.month.year 10.04.2011 ) ITALY General System Messages ( ESPAÑOL (Spanish) General System Messages Uit Aan Alarm Tijd Datum:dd.mm.yyyy Za Datum:dd.mm.yyyy Vr Datum:dd.mm.yyyy Do Datum:dd.mm.yyyy Wo Datum:dd.mm.yyyy Di Datum:dd.mm.yyyy Ma Datum:dd.mm.yyyy Zo Geheugen:xx.x% Versie:xx.xx-xx.xx S/N:xxxxxxxxxxxxxxxx Systeem informatie uren:minuten ( 17:23 ) ( dag.maand.jaar (10.04.2011) Nederlands (Dutch) Spanisch Italienisch Französisch Spanish Italy France Dutch Display in Spanish Display in Italian Display in French Display in Dutch Pac:xxxxxW Pdc:xxxx/xxxxW ENGLISH The Real time output power Instantaneous Input Power Operation Status IV351 Rev03 Date Issue 2012-11-22 ENGLISH Operation Status Meter Information Messages Deutsch German Display in German " Englisch English Display in English DEUTSCH (German) Pdc:xxxx/xxxxW Pac:xxxxxW DEUTSCH (German) Holländisch Sprache Language Display Language selection DEUTSCH (German) ENGLISH Operation Status Olandese Francese Italiano Spagnolo Tedesco Inglese Lingua ITALY Pdc:xxxx/xxxxW Pac:xxxxxW ITALY ESPAÑOL (Spanish) Page 137 di 278 + FR ITALY Meter Information Messages Pdc:xxxx/xxxxW Pac:xxxxxW ESPAÑOL (Spanish) Meter Information Messages Holandés Frances Italiano Español Aleman Ingles Idioma ESPAÑOL (Spanish) Français (France) Pdc:xxxx/xxxxW Pac:xxxxxW Français (France) Hollandaise Français Italien Espagnol Allemand Anglais Langue Français (France) Nederlands (Dutch) Pdc:xxxx/xxxxW Pac:xxxxxW Nederlands (Dutch) Nederlands Frans Italiaans Spaans Duits Engels Taal Nederlands (Dutch) Temperatur:xx.xºC Uac:xxx.x/xxx.x/xxx.xV Frequenz:xx.xHz Temperature:xx.xºC Vac:xxx.x/xxx.x/xxx.xV Frequency:xx.xHz Internal Temperature Grid Voltage Grid Frequency IV351 Rev03 Date Issue 2012-11-22 Safety Selection h-Gesamt:xxxxxxhr H-total:xxxxxxhr Working Hours Frecuencia:xx.xHz Vac:xxx.x/xxx.x/xxx.xV Temperatura:xx.xºC H.TotalFunc.:xxxxxxhr Ehoy:xxx.xkWh Safety:RD1699 Safety:G83/1-1 Safety:G59 Issue 2 Safety:RD1699 Safety:G83/1-1 Safety:G59 Issue 2 Safety:VDE-AR-N 4105 Safety:G59 Issue 2 Safety:G83/1-1 Safety:RD1699 Safety:VDE-AR-N 4105 Safety:VDE0126-1-1/A1 Frequenza:xx.xHz Vac:xxx.x/xxx.x/xxx.xV Temperatura:xx.xºC H.tot.funz.:xxxxxxhr Eoggi:xxx.xkWh Etot:xxxxxxxxx.xkWh Idc:xx.x/xx.xA Vdc:xxx/xxxV Page 138 di 278 + FR Safety:G59 Issue 2 Safety:G83/1-1 Safety:RD1699 Safety:VDE-AR-N 4105 E-heute:xxx.xkWh Etoday:xxx.xkWh Daily Energy Etot:xxxxxxxxx.xkWh Safety:VDE-AR-N 4105 Etot:xxxxxxxxx.xkWh Etot:xxxxxxxxx.xkWh Accumulated Energy Information Idc:xx.x/xx.xA Safety:VDE0126-1-1/A1 Idc:xx.x/xx.xA Idc:xx.x/xx.xA PV Array Current Vdc:xxx/xxxV Safety:VDE0126-1-1/A1 Safety:VDE0126-1-1/A1 Udc:xxx/xxxV Vdc:xxx/xxxV PV Array Voltage Safety:G59 Issue 2 Safety:G83/1-1 Safety:RD1699 Safety:VDE-AR-N 4105 Safety:VDE0126-1-1/A1 Fréquence:xx.xHz VAC:xxx.x/xxx.x/xxx.xV Température:xx.xºC H.fonction:xxxxxxhr Ejour:xxx.xkWh Etot:xxxxxxxxx.xkWh IDC:xx.x/xx.xA VDC:xxx/xxxV Safety:G59 Issue 2 Safety:G83/1-1 Safety:RD1699 Safety:VDE-AR-N 4105 Safety:VDE0126-1-1/A1 Frequentie:xx.xHz Uac:xxx.x/xxx.x/xxx.xV Temperatuur:xx.xºC h-Totaal:xxxxxxhr E-today:xxx.xkWh Etot:xxxxxxxxx.xkWh Idc:xx.x/xx.xA Udc:xxx/xxxV Status:Flash Status:2.Flash Status:Checking xxxs Status:Normal Status:Fault Status:FLASH Status:SLAVE FLASH Check Grid in input range 350V and above Inverter is feeding with the Grid A system fault or Inverter fault happened DSP Flash Slave Flash IV351 Rev03 Date Issue 2012-11-22 Status:Fehler Status:Waiting Initialization & Waiting in input range 260V ~349V Status:Normal Status:Netz-Prüf xxxs Status:Warten Status:Standby Status:Standby Standby in input range 200V~259V DEUTSCH (German) Stato:Aggiorn. Slave Stato:Aggiornamento Stato:Errore Stato:Normale Stato:Test xxxs Stato:In attesa Stato:Standby ITALY Page 139 di 278 + FR Estado:Flash Sec Estado:Actualizando Estado:Defecto Estado:Normal Estado:Chequeo xxxs Estado:En proceso Estado:En espera ESPAÑOL (Spanish) General Status Information Messages ENGLISH General Status Information Message Operating Conditions " Etat:FLASH "esclave" Etat:Mem. FLASH Etat:En défaut Etat:Connecté réseau Etat:Vérif. xxxs Etat:Prêt Etat:En attente Français (France) Status:Slave Flash Status:Flash Status:Fout Status:Normaal Status:Controle xxxs Status:Wachten Status:Standby Nederlands (Dutch) Isolation Fault No Utility PV over voltage Memory Full SD Card access error RCMU Fault Earth Fault of the PV Panel AC Grid is not available Input voltage is higher than specification There is not enough space to store data into SD card Reading of SD card failed Leakage current on ground conductor is too high IV351 Rev03 Date Issue 2012-11-22 Grid Freq. Fault Measuring of Grid Frequency is not in the operation range Grid Fault ENGLISH Grid Volt. Fault Grid measuring value is beyond the specification Operating Conditions Fehlerstrom SD Zugriff-Fehler Speicher voll DC-Überspannung Kein Netz Isolationsfehler Fehler Netzfrq. Fehler Netzspg. Netzfehler DEUTSCH (German) I dispers.Alta Err. accesso SD Memoria piena Sovratensione DC Rete assente Err.Isolamento Err. Freq. rete Err. Tens. rete Errore di rete ITALY Page 140 di 278 + FR Defecto a tierra Error lectura SD Memoria llena Sobretensión DC Red ausente Def. aislamiento Def. frec. red Def. tension red Defecto de red ESPAÑOL (Spanish) General Warning and System Fault Messages General Warning and System Fault Messages Measuring of Grid voltage is not in the operation range " Défaut terre Err. Accès SD Mémoire pleine Surtention DC Réseau absent Défaut isolation Déf. Freq réseau Déf. U(v) réseau Défaut réseau Aardfout SD kaart toegangsfout Geheugen vol DC-overspanning Net niet aanw. Isolatiefout Netfreq. fout Netspanningsfout Netfout Français(France) Nederlands (Dutch) Operating Conditions IV351 Rev03 Date Issue 2012-11-22 Communication failed between Master and Slave CPU Input current of boost module is too high Input current of IGBTs is too high PV Panel is not able to identify Operating Conditions DC Bus zu tief DC Bus zu hoch Konsistenzfehler M-S Ver. Fehler Relaisfehler USB angeschlossen Low DC Bus High DC Bus Consistent Fault M-S Ver. Fault Relay Failure USB CONNECT CPU Fehlfunktion Over Boost Curr. Eingang Überlast PV Verbdg.fehler Over Boost Curr. Over Inv Curr. PV Connect Fault DEUTSCH (German) Sci Failure ENGLISH CPLD Ver. Fehler CPLD Ver. Fault Conexión USB Fallo relé Ver. M-E incomp. Defec.Coherencia Bus DC alto Bus DC bajo Fallo CPLD Ver. Defecto sensorDC Connessione USB Errore Relè FW incompatibile Err. processore DC Bus alto DC Bus basso Errore CPLD Ver. Err. Sensore DC ITALY Err conness. PV I Inverter alta Sovracorrente Err.com.interna ITALY Page 141 di 278 + FR Defecto conex.PV Int. limite Inv Sobreint.Exc.Reg Fallo en 1 CPU ESPAÑOL (Spanish) General Inverter Fault Messages DC Sensor Fehler ESPAÑOL (Spanish) General Inverter Fault Messages DEUTSCH (German) DC Sensor Fault ENGLISH General Inverter Fault Messages Output DC Sensor is abnormal CPLD Version Incorrect Voltage level of DC BUS is lower than expected Voltage level of DC BUS is higher than expected The reading between Master and Slave CPU is not consistent Firmware version of DSP and Slave CPU is mismatch Output Relay is failed to start Communication between Data and Slave CPU failed " Err. Connect. PV Courant>Onduleur Cour. Boost haut Err. Com proces. Français(France) Connection USB Défaut relais AC Err applicatif Err. processeur Entrée 1 élevée Entrée 1 faible Err CPLD Ver. Err capteur DC Français(France) PV verbind. fout Max. inv. Stroom Over Boost Curr. CPU fout Nederlands (Dutch) USB verbonden Relaisfout M-S Ver. Fout CPU fout DC bus hoog DC bus laag CPLD Ver. Fout DC sensor fout Nederlands (Dutch) IV351 Rev03 Date Issue 2012-11-22 Protection for the IGBT of inverter Internal Temp. is higher than normal Detection of GFCI module is abnormal Operating Conditions IGBTs start Failed Internal Cooling Fan is not working External Cooling Fan is not working Reading or writing of EEPROM failed EEPROM abnormal Protection for the DC BUS Lüfter blockiert EEPROM Fehler Unbekant. Fehler Bus Soft Timeout External Fan Lock EEPROM Failure Unknown Bus Soft Timeout Inv Soft Timeout Übertemperatur FI-Fehler Over temperature RCMU Failure DEUTSCH (German) Inv Soft Timeout ENGLISH Lüfter blockiert Internal Fan Lock LimiteTiempo Bus Desconocido Fallo EEPROM Bloq.vent.extern Bloq.vent.Intern Def.arranque Inv Bus Soft Timeout Sconosciuto Errore EEPROM Ventil.est.blocc Ventil.int.blocc Err.attivazione Err. Sens.Terra Sovratemperatura Inv Soft Timeout ITALY Page 142 di 278 + FR FalloDiferencial Sobretemperatura LimiteTiempo Inv ESPAÑOL (Spanish) General Inverter Fault Messages Inv Start Fault Inv Start Fault Défaut RCMU Temp. élevée Déf. Logicel Français(France) Déf. Com. Bus Err. Inconnue ERR EEPROM Verr. Ventil Ext Verr. Ventil Int Déf. Démarrage RCMU fout Temp. te hoog Inv Soft Timeout Nederlands (Dutch) Bus Soft Timeout Onbekend EEPROM fout Ext.vent.geblokk Int.vent.geblokk Inv Start Fault Operating Conditions No disponible N/A "OK" um zu Starten N/A PRESS OK TO START IV351 Rev03 Date Issue 2012-11-22 Valor= OK per start N/D Valore= Storico errori Attendere prego NO storico err. NO Dati settim. NO Dati giorno Premi OK x reset ITALY Page 143 di 278 + FR Arrancar:PulseOK HistoricoErrores Wert= Espere por favor NoHistor.Errores Sem.: NoRegistro Value= Fehlerspeicher leer No Error History Fehlergeschichte Keine Wochenaufzeichn No Weekly Records Dia: No registro Error History Keine Tagesaufzeichng No Daily Records Borrar:Pulse OK Bitte warten "OK" um zu Löschen Press OK to Clear ESPAÑOL (Spanish) Please Wait DEUTSCH (German) Inverter Record Messages ENGLISH Inverter Record Messages General System Record Messages " OK = démarrer N/A VALEUR= Err. Historique Attendre SVP Historique OK Pas aff. semaine Pas aff. jour OK = suppression Druk OK om te starten N/A Waarde= Foutenhistorie A.U.B. wachten Geen foutenhistorie Geen weekrecords Geen dagrecords Druk OK om te wissen Français(France) Nederlands (Dutch) 9. Communications This Inverter is equipped with a powerful communications interface and options. User can monitor the real-time operation status of 10 or more Inverters simultaneously through using web-linked program “Pro Control”. Also, qualified personnel can upgrade the firmware by using the USB port if required. 9.1 USB (on Inverter) The PV inverter is equipped with a versatile communications interface, a USB port at underside of the device, which allows user to use “Pro Control” to monitor the real-time status of multiple Inverters. Firmware upgrade is also conducted via this interface. Connecting laptop PC to Inverter via USB type-A to type-B adapter cable. 9.2. Communications slot for RS-485 PV inverter has an extended slot for an optional communication interface. Through installing a RS-485 card or compliant card to extend the communication function of the Inverter. To use this slot, please use a screwdriver to open the cover, insert the card into the slot and wire through the rubber bushing. For further information, please contact with your dealer. Take the SOLEIL 3F-TL10K drawing as example: IV351 Rev03 Date Issue 2012-11-22 Page 144 di 278 + FR After installation of RS485 card, user can link PC with Inverters and monitor their real-time operation status remotely. Note: The communication slot cover must be properly assembled and installed in order to maintain waterproof grade of the unit. RS485 Card equipped 2 RJ45 ports with LED indicators, a terminal block for the wiring selection and a terminal resistor dip switch for the communication bus as above figure shown. PWR (Power) LED is used to indicate the connectivity of RS-485 card; it will light up in green when the inverter is active and as long as RS485 card had power from the inverter. IV351 Rev03 Date Issue 2012-11-22 Page 145 di 278 + FR Link LED is used to indicate the availability of connection from the RJ45 port. That means when there is an Ethernet cable inserted in any RJ-45 ports, link LED will be lighted in yellow and blink in 2Hz during signal transferring. The following table is indicated the pin dentitions for the RS45 ports of RS485. 8 pin RJ-45 (8P8C) 8 1 PIN 1 2 NAME Tx+ Tx- Voltage 3 Rx+ 4 5 GND GND 6 Rx- 400mVp-p~15Vp-p 7 8 VCC VCC 11V~12V s400mVp-p~s15Vp-p 400mVp-p~15Vp-p RS485 Wiring Notification DC Power exists on the socket. Pin 7 and Pin 8 of RJ45 port is used for the DC powered. It is important to make sure “do not connect other devices to this port”. It may damage your devices. IV351 Rev03 Date Issue 2012-11-22 Page 146 di 278 + FR 9.3 " RS485 Card Configuration RS485 Card Connection Ethernet cable can be connected either RJ45 port between each RS485 Card. And the cable must be a “Straight through Cable”. Type A Ethernet Cable Connection for RS485 Card Type B Ethernet Cable Connection for RS485 Card The wiring definition for the Straight through Cable that used to RJ45 port of RS485 card: IV351 Rev03 Date Issue 2012-11-22 Page 147 di 278 + FR Other than Ethernet cable connections, the wires connection is also can be applied as one of standard connections for the RS485 Card as figure indicated below. Twisted wire pairs were used to terminal blocks of RS485 card. Twisted Wire Pairs Connection for RS485 Card A combination of the Twisted Wire Pair and Ethernet cable also can be applied as one of standard connections for the RS485 card as figure indicated below. Combination Connection for RS485 Card When wiring RS485 card from Inverter to RS485 to RS232 Converter, we connect opposite pins of RS485 which means Receive Pin to Transmit Pin, and Transmit Pin to Receive Pin. See framed area below. IV351 Rev03 Date Issue 2012-11-22 Page 148 di 278 + FR " Terminal Resistors DIP Switch Terminal resistors dip switch is the dip switch that can be used to configure the RS485 card of last PV inverter in a same line connection as a final terminal point for the communication transmitting by turned on terminal dip switch. Turned On Terminal Resistors Dip Switch Pin 1 Pin 2 Pin 1 Pin 2 Off and On Status of Terminal Resistor Dip Switch By pressing the pin 1 and pin 2 of DIP Switch in “ON” position from the RS485 card of last PV inverter as the terminal inverter. Only the last inverter required to have this configuration. For the , please set it to “off”. IV351 Rev03 Date Issue 2012-11-22 Page 149 di 278 + FR 9.4 RS485 Card Specification 9.5 RS485 Card Trouble Shooting In most situations, the RS485 card requires very little care. However, if RS485 card is not able to work perfectly, please refer the following instruction before calling your local dealer. PWR(Power) LED is off Yellow LED is off IV351 Rev03 Date Issue 2012-11-22 Possible actions RS485 card is not inserted well, please insert it again Check whether inverter is active Check whether Inverter is shut down Check whether RS485 card is damaged Check whether Inverter runs normally. Check whether the cables and wiring are set up properly, please refer to chapter 3.1 RJ-45 pin definition Check whether the cables are too long for proper transmission, total distance should be less than 800M Check whether the ambient temperature is within -10 ഒ ~ 70 ഒ. Page 150 di 278 + FR 9.6 Modbus Card INSTALLATION AND CONNECTION: The PCB SERMB is an accessory for the PV Inverter series. The installation has to be done with the unit OFF. Don’t install the PCB if you see damaged on it. " Before installing the PCB, it is necessary to configure the dip-switch as indicate on following page. ( the factory setting are: mode 1, Baud-Rate 9600 ) " Connect the RS485/RS422 line to the connector on front panel, as show on Fig 1. It is suggested to use twisted cable section 0.22mm2, (AWG24) *1. " If in the RS485 is connected one PV Inverter only, or if the PV Inverter is the last in the serial connection, it is necessary to set the SW3-4 to ON position. " If in the RS422 is connected one PV Inverter only, or if the PV Inverter is the last in the serial connection, it is necessary to set both SW3-3 and SW3-4 to ON position. " Fit the PCB in the SLOT and fix the protection cover ( supply with the PV Inverter ), then it can guarantee the additional water protection to the device. " Start the PV Inverter and verify the PCB. ig.1: RS 485/RS422 connections 1 .The GND connection can help to cancel offset problem between the devices, or it can be connected to cable shield where present to limit the interference. IV351 Rev03 Date Issue 2012-11-22 Page 151 di 278 + FR CONFIGURATION: On the PCB are presented 2 dip switch blocks for the configuration: ID Function Dip Description 1 Slave Address DIP1-5 ON DIP 1 2 3 4 5 6 7 8 2 Baud Rate setting DIP6-7 ON DIP 1 2 3 4 5 6 7 8 3 Reserved DIP8 ON Modbus Slave number: 1-31 DIP DIP DIP DIP 5 4 3 2 OFF OFF OFF OFF OFF OFF OFF ON OFF OFF OFF ON .. .. .. .. ON ON ON ON N.B. Address 0 is reserved. DIP DIP6 BAUD 7 OFF OFF 1200 OFF ON 2400 ON OFF 4800 ON ON 9600 DIP 1 ON OFF ON .. ON IND DIP 1 2 3 4 5 6 7 8 ID Function Dip 4 Protocol Selection DIP1-2 Description DIP 1 2 3 4 5 RS485A load DIP3 ON DIP DIP DIP1 PROTOCOL 2 OFF OFF Modbus Function OFF ON -ON OFF -ON ON -DIP 3 OFF = no load on line DIP 3 ON = 120Ohm load on the line 1 2 3 4 6 RS485B load DIP4 ON DIP DIP 4 OFF = no load on line DIP 4 ON = 120Ohm load on the line 1 2 3 4 LED: OFF ON BLINKING (500ms ON- 500ms OFF) YELLOW LED (Modbus communication) No communication with AP -Modbus ok 2 GREEN LED (Internal state) Faulty board Power supply ok, the board is not communicating with the inverter Communication with inverter is ok 2.This flag is set each time the board receives a valid modbus command and reset, after one second if not receiving any other command. IV351 Rev03 Date Issue 2012-11-22 Page 152 di 278 + FR 1 2 3 .. 31 Problems and solution: Problem Possible cause Solution The PCB don’t start PCB not well fix on SLOT Inverter is OFF PCB broken The PCB don’t communicate with the inverter (green led ON) The PCB don’t communicates with the Modbus SW Initialization error, waiting for communication condition Control the PCB fixing on SLOT ; verify if the Inverter is OFF If the problem still present contact service. The system is waiting for command reset. Reset the PCB by stop and restart the Inverter. Verify the cable connection. Verify the RS485 terminal resistor setting Verify the dip-switch setting Wrong connection RS485 line Wrong setting TECHNICAL FEATURES See the table below for the technical features of the board. Feature Specification Insulated power supply SELV Description ModBus commands suppurated 12VDC Modbus Protocol conversion board for Solar inverters 0x03 single or multiple reading Configurable baud rate Slave address Serial connections 1200 / 2400 / 4800 / 9600 bps Node 1-31 (0 reserved), via dip switches 4 wires RS422 or 2 wires RS485 up to a maximum of 31 slaves on the same line Compatibility Operating temperatures Humidity Water proof degree IP Consumption Leds PV Inverter Series -10°/50°C 0-95% without condensing IP65 < 1W Green Led: power supply ok and communication with the inverter Yellow Led : ModBus Communication CE 132 x 76 x 34 Standard Dimension LxWxH [mm] 9.7 SB Interface (Data Logger) The Data Logger is fit with a B type USB connector for your PC USB host interface. Open the USB socket cover before use. IV351 Rev03 Date Issue 2012-11-22 Page 153 di 278 + FR 10. Advanced Setting Here below the description of the configuration menu for the inverter parameters for network services according to the CEI-021 and VDE-AR-N 4105. Five conditions on this screen Reactive Power Func. Mode:Off Value:N/A Reactive Power Func. Mode:Off Value:N/A Press OK over 5s to change the setting Press OK over 5s to change the setting Reactive Power Func. Mode:Const. PF Value:+0.90pf Password Incorrect password \ Press OK over 5s to change the setting Press OK button over 5 seconds 1 \ Reactive Power Func. Mode:Const. Q Value:+1000VAR Press OK over 5s to change the setting Reactive Power Func. Mode:Curve PF(P) Value:1. 20% +1.00pf 2. 40% +1.00pf 3. 50% +1.00pf 4. 100% -0.90pf V lock-in: 241.5 V V lock-out: 230.0 V Press any button \ \ : Select char : Delete : Next Press OK button If password is correct (Password: 14914) Reactive Power Mode Const. PF Const. Q Curve PF(P) Curve Q(U) OK Reactive Power Mode Off <Off> Off/Const. PF/Const. Q/Curve PF(P)/Curve Q(U) Reactive Power Mode Const. PF Const. Q Curve PF(P) Curve Q(U) OK Const. PF +1.00pf > <+1.00pf Reactive Power Func. Mode:Curve Q(U) Type: A Value: 1. 90% +43.6% Q/S 2. 92% +0% Q/S 3. 108% +0% Q/S 4. 110% -43.6% Q/S P lock-in: 20% Pn P lock-out: 5% Pn -0.90~+0.90pf Reactive Power Mode Const. PF Const. Q Curve PF(P) Curve Q(U) OK Const. Q +1000VAR <+1000VAR> 10k model: -4358~+4358VAR 15k model: -6537~+6537VAR 20k model: -8717~+8717VAR Curve PF(P) Reactive Power Mode Const. PF Const. Q Curve PF(P) Curve Q(U) OK The reference standard VDE-AR-N 4105, does not provide settings for the parameters V lock-in/out and P lock-in/out. V lock-in: 241.5 241.5 V V lock-out: 230.0 V Node 1: 20% +1.00pf Node 2: 40% +1.00pf Node 3: 50% +1.00pf Node 4: 90% -0.90pf V lock-in: 230.0~253.0V V lock-out: 207.0~230.0V Node (X-axis): 0~100% Node (Y-axis): -0.90~+0.90pf Reactive Power Mode Const. PF Const. Q Curve PF(P) Curve Q(U) OK Curve Q(U) Type: A P lock-in: 20% Pn P lock-out: 5% Pn Node 1: 90% +43.6% Q/S Node 2: 92% +0% Q/S Node 3: 108% +0% Q/S Node 4: 110% -43.6% Q/S These two parameters affect only the CEI-021. Type: A/B P lock-in: 10~100% P lock-out: 5% Node (X-axis): 80~120% Node (Y-axis): -43.6~+43.6% IV351 Rev03 Date Issue 2012-11-22 Page 154 di 278 + FR 11. Downloading Data inside Data Logger To manage the data inside the Data Logger, please use a B type-to-A type USB cable adapter to download it to a PC or laptop PC for analysis. The Data Logger is powered directly by the PC’s USB port. 11.1 How to Access and Manage Log Data (1) Unscrew and take off the cover of B type USB port. For PC with Windows ME, 2000, and XP, Vista, Windows 7, it is not necessary to install driver to access the data logger. For PC with Windows 98, to access the data logger, driver for the data logger is needed. (2) Connect the USB cable adapter to PC. LED will show “USB CONNECT” when Data Logger is connected to PC properly. (3) Click “My Computer” – “Removable Disk” in your PC. (4) Copy the “DAILY” folder in the “Removable Disk” and paste it on the “Desktop.” (5) Execute the “Pro Control” program. Then, click “File”, select “Export/Import”. Note: Please contact your local dealer or representative for the installation for this program. IV351 Rev03 Date Issue 2012-11-22 Page 155 di 278 + FR (6) Select “Date from” and “Date to” the period which you prefer. Then, click “Import” button. IV351 Rev03 Date Issue 2012-11-22 Page 156 di 278 + FR (7) Select “DAILY.dat” file under your previous saved DAILY folder. Then, click “Open” button. (8) Click “View” button and the log data will be processed by Pro-Control software in few seconds. IV351 Rev03 Date Issue 2012-11-22 Page 157 di 278 + FR (9) Click “Export” button (10)Click “Save” button. Then, log data will be saved in .CSV format in your preferred directory in your PC IV351 Rev03 Date Issue 2012-11-22 Page 158 di 278 + FR (11)Click “OK” button. (12)Double click “DAILY.CSV” file in your preferred directory in your PC. After that, you can manipulate the log data with Microsoft Excel. IV351 Rev03 Date Issue 2012-11-22 Page 159 di 278 + FR 12. Trouble Shooting PV inverter requires very little maintenance. When unexpected situation occurs, please refer to the following table for quick troubleshooting before contacting your local service. The following table lists common fault messages and ways to cope with the fault or error. General Failures Analysis and Trouble Shooting Actions Fault Message Fault definition Possible Causes The ground current 5. Obstacle, humidity detected by Inverter or water exits is higher than between AC LINE threshold after and/or NEUTRAL inverter connected to to earth ground AC gird 6. Obstacle, humidity or water exits between AC LINE and/or NEUTRAL to earth ground in RMCU Fault the junction box 7. The Insulation of AC wires is broken that could be bit by rat or any animals 8. Inverter is abnormal Proposed Actions for End-user 5. Disconnect DC/AC connection of Inverter by turn off the switch. 6. Check the DC/AC wires of the PV system. Clear obstacle ONLY IN SAFE CONDITIONS 7. Reconnect DC/AC connection, check the status of Inverter 8. If the problem persists, call local service *Notes: An insulation gloves must be wearing during procedures Proposed Actions for Professionals 6. Disconnect AC side of Inverter by turn off the AC switch 7. Disconnect the DC side from the Inverter 8. Check both the AC and DC wiring and insulation 9. Reconnect AC/DC connection, check the status of Inverter 10. If the problem persists, please & Update the firmware according to instructions, or & Replace the Inverter System Fault *Notes: An insulation gloves must be wearing during procedures Isolation Fault The ground current 5. Obstacle, humidity or water exits detected by Inverter between DC side is higher than threshold before (PV panel) to earth ground inverter connected to AC gird 6. Obstacle, humidity or water exits between DC side (PV Panel) to earth ground in the junction box 7. The Insulation of DC wires is broken that could be bit by rat or any animals 8. Inverter is abnormal 6. Disconnect AC side of Inverter by opening AC switch 7. Disconnect the DC side from the Inverter 8. Check both the AC and DC wiring and insulation 9. Reconnect AC/DC connection, check the status of Inverter 10.If the problem persists, please & Update the firmware according to instructions, or Notes: An insulation gloves must & Replace the Inverter be wearing during procedures 5. Disconnect DC/AC connection of Inverter by turn off switch. 6. Check the DC/AC wires of the PV system. And Clear obstacle ONLY IN SAFE CONDITIONS 7. Reconnect DC/AC connection of Inverter, check the status of Inverter 8. If the problem persists, call local service Notes: An insulation gloves must be wearing during procedures IV351 Rev03 Date Issue 2012-11-22 Page 160 di 278 + FR Fault Message Fault definition Grid measured data is beyond the specification (voltage & frequency) Possible Causes 8. he detected AC voltage is beyond/under the setting of Inverter 9. he detected AC frequency is beyond/under the setting of Inverter 10. 11. 12. 13. 14. C connection is not 15. correct 11. rid condition is weak or unstable Grid Fault 16. 12. (Grid Volt) (Grid Freq) ther high-power consumption device 17. is affecting the grid system 18. 13. he setting of Inverter is deviated from its default 19. values 14. nverter is abnormal 20. No Utility Inverter is not able 6. Grid is not 4. to detect AC voltage available 7. AC connection is 5. incorrect 6. 8. AC switch between Inverter and utility is not ON 9. AC fuse and/or breaker is open 10. Inverter is abnormal The detected PV voltage is higher than specification PV over Voltage IV351 Rev03 Date Issue 2012-11-22 Proposed Actions for Professionals Proposed Actions for End-user Disconnect and reconnect the AC grid to see if inverter can be operated normally If problem still occurred, check the reading value of AC grid from the LCD display of Inverter. If this problem occurs seldom (such as 1 time a day), no action is necessary If the problem occurs frequently, do the actions below Find the device with high power consumption near your AC system Use Inverter software to check the setting of Inverter. The setting should be in the range listed in specification If the settings are not correct, call your service for changing Use Inverter software or monitoring device to collect data. Send the data to professionals for further investigation Consult your utility power supplier, understand the grid conditions Request help from the installer 11. 12. 13. 14. 15. 16. 17. 18. 19. 20. Make sure the breaker and 4. switch on AC side are close Check the AC wiring 5. If the problem continues, call 6. your local service 3. The PV array 3. Open DC connection of voltage is too high Inverter and reconnect 4. DC input side of 4. If the fault continues, call Inverter is abnormal your local service Disconnect and reconnect the AC grid to see if inverter can be operated normally If problem still occurred,, check the reading value of AC grid from the LCD display of Inverter. If reading value is within specification, check the system connection including polarities and security first Find the devices with high power consumption near the AC system Consult the utility power supplier, understand the grid conditions regarding the local grid code Use Inverter software to monitor the frequency and voltage If the measured data beyond the setting, under the permission of utility supplier, use the software to change parameters If the situation is not improved after changing parameters, please Update the firmware according to instructions, or Replace the Inverter Make sure the breaker and switch on AC side are close Check the AC wiring If the problem continues, replace the Inverter 4. Check the open PV voltage, and see if it is more than or too close to specification 5. If PV voltage is much less than specification and the problem still occurs, please replace the Inverter Page 161 di 278 + FR Fault Message Fault definition Possible Causes 13. The readings of 2 microprocessors are 14. inconsistent Consistent Fault Over Temperature 15. Software problem Circuits inside Inverter are abnormal Inverter is abnormal 5. Open all DC connections of Inverter 6. Wait for 3 minutes 7. Reconnect DC connection and check 8. If the fault continues, call your local service Proposed Actions for Professionals 5. Open all DC connections of Inverter 6. Wait for 3 minutes 7. Reconnect DC connection and check 8. If the fault continues & Update the firmware according to instructions, or & Replace the Inverter 16. Ambient The detected temperature is too temperature is high high 17. Heat dissipation problem might be occurred 18. Inverter is abnormal 6. Make sure the ambient 5. Make sure the ambient temperature of installation is temperature of installation is less than 55!C less than 55!C 6. Check the space near the heat 7. Check the installed location which should be not directly sink to the sun 7. Remove any obstacle that 8. Check the required space block the heat dissipation near the heat sink and the air near heat sink flow area of heat sink ensure 8. Call local service if the it is clear problems persists 9. Remove any obstacle that block the heat dissipation near heat sink 10. If the problem persists, replace it The checking of AC Inverter is abnormal relay is abnormal 5. Disconnect ALL PV (+) and PV (-) 6. Wait for 1 minutes 7. After no display on LCD, reconnect the DC again and check 8. If the fault message still appears again after restart, call your local service Relay Fault Inverter Failure Proposed Actions for End-user 4. Make sure installation is configured under specification 5. Processes the same actions again as left column mentioned 6. If the problem still persists, please try to & Upgrade the latest firmware according to instruction or & Replace the unit The detected DC 4. The Hall sensor at 3. Observe the faulty condition 3. Reconnect DC connection for 1 minute. current of Hall output is abnormal and check sensor component of 5. DC current of AC 4. If it does not restore to 4. If the fault continues normal operation, please call AC output side is grid is higher than & Update the firmware DC INJ High service. the permissible higher than according to permission value. instructions, or 6. Inverter is & Replace the Inverter abnormal Reading or writing 4. Operating of EEPROM of Firmware is control board inside abnormal EEPROM Inverter is abnormal 5. Circuits of control board inside Failure Inverter are abnormal 6. Inverter is abnormal . 1. Operating firmware Communication is abnormal between the two 2. Circuits of control CPUs is abnormal board inside SCI Failure Inverter are abnormal 6. Inverter is abnormal IV351 Rev03 Date Issue 2012-11-22 3. Disconnect PV (+) and PV (-) 1. Do the same actions as left from the input, start the unit column again again. 2. If the fault continues 4. If it does not work, please & Update the firmware call service. according to instructions, or & Replace the Inverter 3. Disconnect PV (+) and PV (-) 1. Do the same actions as left from the input, start the unit column again again. 2. If the fault continues 4. If it does not work, please & Update the firmware call service. according to instructions, or & Replace the Inverter Page 162 di 278 + FR Fault Message Proposed Actions for Professionals Fault definition Possible Causes DC voltage of DC BUS that inside Inverter is higher High DC Bus than expectation DC Input voltage that feed to DC BUS is too high DC voltage of DC inside Inverter is lower than expectation DC Input voltage that feed to DC BUS is too low The DC sensor at output is abnormal 3. Operation firmware 3. Disconnect PV (+) and PV (-) 1. Do the same actions as left column again from the input, start the unit is Abnormal 2. If the fault continues again. 4. Detected current of & Update the firmware 4. If it does not work, please Hall sensor is according to call service. abnormal instructions, or & Replace Inverter Low DC Bus DC Sensor Fault IV351 Rev03 Date Issue 2012-11-22 Proposed Actions for End-user 19. Do the same actions as left column again 20. Confirm the configuration of the PV 3. Disconnect PV (+) and PV (-) Panel to ensure the it is from the input, start the unit used within specification again. 21. If the fault continues 4. If so, please call service. & Update the firmware according to instructions, or & Replace the Inverter Page 163 di 278 + FR Note: During period of little or no sunlight, the PV inverter may continuously start up and shut down. This is due to insufficient power generated to operate the control circuits. Warning: Dangerous high voltage exists on both DC and AC wires and connections. For end-user, Please do NOT touch any live parts. IV351 Rev03 Date Issue 2012-11-22 Page 164 di 278 + FR 13. Preventative maintenance PV inverter requires very little maintenance. When unexpected situation occurs, please refer to the following table for quick troubleshooting before contacting your local service. The following table lists common fault messages and ways to cope with the fault or error. Although PV inverter requires very little maintenance, the following inspections at regularly would help to ensure PV Inverter operation with optimal performance. 13.1 Visual Inspection Check the Inverter and cables for any signs of external damage. Contact your installer immediately if you find any defects. Do not carry out any repairs on your own. 13.2 Checking and Maintenance Asking your installer to check for proper Inverter operation at regularly is the measure we suggested for preventative maintenance. The following check is the key points: % % % % % % Check If the fan guard is covered with debris or dust, get rid of it if find any. Check heatsink to ensure no barrier blocking its air flow. Inspect for corrosion, especially at connecting point. Verify all connections are firmly tightened periodically. Clean the exterior of the unit periodically with a damp cloth to prevent Inverter from accumulation of dust and dirt, Keep warranty label intact anyhow. To get optimal performance, PV modules cleaning periodically would also be essential due to it is prone to dust and dirt accumulation. Warning: Before cleaning PV modules or Inverter, be sure to switch off AC power and double check LCD of Inverter displaying “No Utility”, cleaning shall be restricted to the exterior surface. Warning: To avoid risk of electric shock, AC and DC power shall be switched off whenever personnel need to contact PV modules under any circumstances. Hot Surfaces: Although designed to meet international safety standards, the PV inverter can become hot during operation. Do not touch the heat sink or peripheral surfaces during or shortly after operation. IV351 Rev03 Date Issue 2012-11-22 Page 165 di 278 + FR 13.3 Cleaning and Swapping Cooling Fan Module Ask your installer to clean fans if dust or debris accumulated. (Note: This section is only applicable for models with external fan) Exchange procedures of fan module for the SOLEIL 3F-TL10K model: (8) Disconnect the AC power and the DC power of PV inverter. (9) Unfasten all the screws of fan module as figure indicated below: (10) Take off the fan module by disconnect its cable adapter as figure indicated below: (11) Clean fan with damp cloth or soft brush tenderly if needed. (12) If fan module is damaged or malfunctioned permanently, please make a replacement by a new fan module. (13) Assemble the fan module in the reverse order of above procedures. (14) Check Inverter resumes normal operation after restart. IV351 Rev03 Date Issue 2012-11-22 Page 166 di 278 + FR Exchange procedures of fan module for the SOLEIL 3F-TL15K model: (8) Disconnect the AC power and the DC power of PV inverter. (9) Unfasten all the screws of fan module as figure indicated below: (10) Take off the fan module and disconnect its cable adapter as figure indicated below: (11) Clean fan with damp cloth or soft brush tenderly if needed. (12) If fan module is damaged or malfunctioned permanently, please make a replacement by a new fan module. (13) Assemble the fan module in the reverse order of above procedures. (14) Check Inverter resumes normal operation after restart. IV351 Rev03 Date Issue 2012-11-22 Page 167 di 278 + FR Exchange procedures of fan module for the SOLEIL 3F-TL20K model: (8) Disconnect the AC power and the DC power of PV inverter. (9) Unfasten all the screws of fan module as figure indicated below: (10) Take off the fan module and disconnect its cable adapter as figure indicated below: (11) Clean fan with damp cloth or soft brush tenderly if needed. (12) If fan module is damaged or malfunctioned permanently, please make a replacement by a new fan module. (13) Assemble the fan module in the reverse order of above procedures. (14) Check Inverter resumes normal operation after restart. IV351 Rev03 Date Issue 2012-11-22 Page 168 di 278 + FR 14. Specification 14.1. Marketing vs. Regulatory Model Targeted Market Grid Interface Regulation SOLEIL 3F-TL10K SOLEIL 3F-TL15K SOLEIL 3F-TL20K Germany (DE) VDE-AR-N 4105 VDE0126-1-1/A1 VDE0126-1-1 SOLEIL 3F-TL10K SOLEIL 3F-TL15K SOLEIL 3F-TL20K Spain (ES) England (UK) Italy (IT) G83/1-1 / G59 Issue 2 CEI0-21 RD1699 14.2 Electrical Specification Model SOLEIL 3F-TL10K SOLEIL 3F-TL15K SOLEIL 3F-TL20K Input (DC) Nominal DC voltage 720 V Max. PV open voltage 1000V System start-up voltage 260V Initial feeding voltage 350 V Shutdown voltage Typical 200V Working voltage range 250 ~ 1000V MPPT Full rating voltage range 350 ~ 850 V MPPT efficiency 450 ~ 850 V > 99% Number of MPP tracker(s) Maximum DC power 400 ~ 850 V 2 10500W 15750W 21000W 16A 2 20A 2 23A 2 Max. number of parallel strings 2 2 2 2 3 2 External DC Circuit Breaker 20A x 2 25A x 2 30A x 2 Max. Inverter Backfeed Current to the PV Array 300mA 650mA 850mA Maximum DC current DC insulation resistance DC insulation > 1. 2 M# Transformerless design, input can’t connect to ground. ( Ungrounded photovoltaic power system) Output (AC) Nominal AC power 10kW/ 10kVA 15kW/ 15kVA 20kW/ 20kVA Max. AC power 10kW/ 10kVA 15kW/ 15kVA 20kW/ 20kVA 14.5A 21.7 A 29 A 16A 24A 30A Nominal AC current Max. AC current IV351 Rev03 Date Issue 2012-11-22 Page 169 di 278 + FR SOLEIL 3F-TL10K SOLEIL 3F-TL15K SOLEIL 3F-TL20K Current (Inrush) 65A 85A 90A Max. Output Fault Current 30A 45A 60A AC Max. Short Circuit Current 60A 106A 210A 20mA 50mA 70mA Model DC current injection (Max.) AC grid voltage / Range 230 / 400Vac, ˵4W+PE / ±20%, depending on country configuration (refer to 12.3) AC grid frequency / Range 50Hz / 60Hz / depending on country configuration (refer to 12.3) O/P current distortion (THD i)4 < 3% Phase shift (cos˵) at nominal output power (adjustable) >0.99 (±0.8 on demand) Efficiency Max. conversion efficiency ฺ97.8% ฺ97.7% ฺ97.7% European efficiency ฺ97.2% ฺ97.0% ฺ97.2% General Data Topology Power consumption: standby / night Transformerless ู 20W / ู 1W Protection degree Heat dissipation ู 20W / ู 1W Outdoor / Chassis: IP65 / Fan: IP55 Force air cooling, variable fan speed according to temperature on heatsink Acoustic noise level ? 55dB(A) Operating temperature range - 20 ~ + 60ഒ Continuous Output power temperature range - 20 ~ + 45ഒ Max O/P power (600C, nominal voltage, linear de-rating) Max. Operating Temp. without derating for nominal voltage 10000W 11000W 100%, condensing Altitude Up to 2000m without power derating Hazard substance restriction Lead free, complied with RoHS GP2 DC disconnect IV351 Rev03 Date Issue 2012-11-22 12000W 450C Humidity Ground fault protection ู 20W / ู 1W Internal RCMU and Isolation detection function, in accordance with VDE0126-1-1 EN/IEC standard approved DC Switch Page 170 di 278 + FR Model SOLEIL 3F-TL10K SOLEIL 3F-TL15K Communication Standard: USB B type, RS485 Modbus. RS485 Protocol Standard protocol, MODBUS RTU (See SP104 Siel) SOLEIL 3F-TL20K Data logger Front Bezel - Display: 128 64 pixels - Function key × 5 - Standard: embedded - Optional: removable Normative references Grid interface regulation Regular Safety EMC DC Switch CE IV351 Rev03 Date Issue 2012-11-22 VDE-AR-N 4105 VDE0126-1-1/A1 VDE0126-1-1 RD1699 G83/1-1 G59 Issue 2 CEI0-21 IEC 62109-1: 2010, EN 62109-1: 2010 IEC 62109-2: 2011, EN 62109-2: 2011 EN 61000-6-2: 2005 EN 61000-6-3: 2007/A1: 2011 EN 60947-1 EN 60947-3 LVD: 2006/95/EC EMC: 2004/108/EC Page 171 di 278 + FR 14.3 Grid Monitoring Model Grid Monitoring Model Name SOLEIL 3F-TL10K DE SOLEIL 3F-TL15K DE SOLEIL 3F-TL20K DE VDE-AR-N 4105 SOLEIL 3F-TL10/15/20K SOLEIL 3F-TL10K DE SOLEIL 3F-TL15K DE SOLEIL 3F-TL20K DE VDE0126-1-1/A1 SOLEIL 3F-TL10/15/20K N/A 230V / 400V, -20%+15% N/A 230V / 400V, -20%+15% limit of single phase Operational voltage range Disconnection time of excess operational voltage range Voltage value setting in the firmware Power factor Voltage tolerance Frequency tolerance Operational frequency range Frequency value setting in the firmware Reconnection time Reconnection time (FW setting) Disconnection time of excess DC current injection (sec.) DC-Injection IV351 Rev03 Date Issue 2012-11-22 -20%,+15% +10% -20%,+15% +10% <0.1 seconds <0.1 seconds ?0.2 seconds ู0.2 seconds 184V 264.5V 253V 187V 262V 0.9 lagging/leading 0.99 better than 1% N/A better than 0.1% N/A 250V 1. 47.5~51.5Hz , Disconnection within 0.2second, 2. Back frequency point: (1) 4105 : the same as the red curve (Before disconnection) 47.5 Hz 51.5Hz 47.45 Hz 51.55Hz 60s @ 85% ~ 110% voltage & 47.5Hz ~ 50.05Hz with 10% Power/min increment < 0.1 < 0.2 1A 1A Page 172 di 278 + FR SOLEIL 3F-TL10K SOLEIL 3F-TL15K SOLEIL 3F-TL20K RD1699 SOLEIL 3F-TL10/15/20K N/A 230V / 400V, -15%+10% Model Grid Monitoring Model name limit of single phase Operational voltage range Disconnection time of excess operational voltage range Voltage value setting in the firmware Operational frequency range -15% +10% +15% < 1.5 seconds < 1.5 seconds < 0.2 seconds 198V 250V 262V 48Hz 50.5Hz < 3 seconds < 0.5 seconds Reconnection @ 50Hz if over frequency Frequency value setting in the firmware Reconnection time Reconnection time(FW setting) Disconnection time of excess DC current injection (sec.) DC-Injection IV351 Rev03 Date Issue 2012-11-22 48.05 Hz 50.45 Hz NA 180 seconds < 0.2 seconds 0.5% of Nominal AC current Page 173 di 278 + FR Model SOLEIL 3F-TL15K SOLEIL 3F-TL20K SOLEIL 3F-TL10K Grid Monitoring G83/1-1 SOLEIL 3F-TL10K Model name G59 Issue 2 SOLEIL 3F-TL15 / 20 K limit of single phase < 16A/phase > 16A/phase Operational voltage range 230V / 400V, -10%+14.7% 230V / 400V, -20%+15% Disconnection time of excess operational voltage range Voltage value setting in the firmware -10% +14.7% < 1.5 s -20% -13% +10% +15% < 0.5s < 2.5s < 1s < 0.5s 210V 261V 184V 200.1V 253V 264.5V 47Hz 50.5Hz 47Hz 47.5Hz 51.5Hz 52Hz < 0.5s 20s ~ 21s 90s ~ 91s < 0.5s 47Hz 47.5Hz 51.5Hz 52Hz Operational frequency range < 0.5s Frequency value setting in the firmware Reconnection time Reconnection time (FW setting) Disconnection time of excess DC current injection (sec.) DC-Injection IV351 Rev03 Date Issue 2012-11-22 47.05 Hz 50.45Hz 180s 180s NA NA < 20mA < 0.25% of Nominal AC current Page 174 di 278 + FR SOLEIL 3F-TL10K/15K/20K Model CEI 0-21 *(1) Grid Monitoring SOLEIL 3F-10 /15 / 20K Model name limit of single phase N/A 230V / 400V, Operational voltage range 0.9 over or under excited Power Factor Range S1 Voltage *(2) FW default setting S1 V Disconnection Time FW default setting S1 Frequency FW default setting S1 F Disconnection Time 46 ~230V 230 ~276.0V 184V (80%) 264.5V (115%) 0.05~5.00S 0.20~10.00S 0.5s 0.2s 47.0 ~50.0Hz 50.0 ~52.0Hz 47Hz 51Hz 0.05~5.00S 0.05~5.00S 4s 1s FW default setting S2 Voltage 0 ~230V 230 ~299.0V 0V 264.5V (115%) 0.05~5.00S 0.05~1.00S 0.2s 0.2s 47.0 ~50.0Hz 50.0 ~52.0Hz 47Hz 51Hz 0.10~5.00S 0.10~5.00S 4s 1s FW default setting S2 V Disconnection Time FW default setting S2 Frequency FW default setting S2 F Disconnection Time FW default setting ! Limitation curves of active power via frequency (2~5%Adjustable, 2.4% as Default, can be disable/enable) ! Reconnection time (FW Setting) wait 300 sec with frequency inside "Value of frequency to reset the derating condition" Slow-Start after derating condition P(f) 20% per min to frozen load Value of frequency to reset the derating condition 49.90 - 50.10 Hz (settable for island) Reconnection voltage 195,5 V - 253 V Reconnection frequency 49,90 - 50,10 Hz default (settable from 49Hz to 51Hz by steps of 0,05Hz) Reconnection time 300s default (settable from 0s to 900s by steps 5s) Slow-Start after disconnection 20% per min to nominal Power (10kW) > 1 sec @0.5% (72.5mA) & > 0.2sec @ 1A DC-Injection IV351 Rev03 Date Issue 2012-11-22 Page 175 di 278 + FR Reactive Power control 1.Const. Cosfi!=!1! ! ! ! ! ! ! ! ! ! ! ! ! ! ! ! ! ! ! ! ! ! ! ! ! ! ! ! P=10KW! ! ! ! ! ! ! ! ! ! ! ! ! ! ! ! ! ! ! ! ! ! ! ! ! ! ! ! Q!=!0!VAR! Cosfi!=!1! ! ! ! ! ! ! ! ! ! ! ! ! ! ! ! ! ! ! ! ! ! ! ! ! ! ! ! P=15KW! ! ! ! ! ! ! ! ! ! ! ! ! ! ! ! ! ! ! ! ! ! ! ! ! ! ! ! Q!=!0!VAR! Cosfi!=!1! ! ! ! ! ! ! ! ! ! ! ! ! ! ! ! ! ! ! ! ! ! ! ! ! ! ! ! P=20KW! ! ! ! ! ! ! ! ! ! ! ! ! ! ! ! ! ! ! ! ! ! ! ! ! ! ! ! Q!=!0!VAR 10kVA 15kVA 20kVA Cosfi!=!0.9!3>! ! ! ! ! ! ! ! ! ! ! ! ! ! ! ! ! ! ! ! ! ! ! ! ! ! P!=!9KW! ! ! ! ! ! ! ! ! ! ! ! ! ! ! ! ! ! ! ! ! ! ! ! ! ! ! ! ! Q=!(3)4358!Var!~!(+)4358!Var! ! (48.43%!P)! Cosfi!=!0.9!3>! ! ! ! ! ! ! ! ! ! ! ! ! ! ! ! ! ! ! ! ! ! ! ! ! ! P!=!13,5KW! ! ! ! ! ! ! ! ! ! ! ! ! ! ! ! ! ! ! ! ! ! ! ! ! ! ! Q=(3)6537!Var!~!(+)!6537!Var!(48.43%!P)! Cosfi!=!0.9!3>! ! ! ! ! ! ! ! ! ! ! ! ! ! ! ! ! ! ! ! ! ! ! ! ! P!=!18KW! ! ! ! ! ! ! ! ! ! ! ! ! ! ! ! ! ! ! ! ! ! ! ! ! ! ! ! Q=(3)8717!Var!~!(+)!8717!Var!(48.43%!P)! (3)0.90!~(+)0.90!pf! 2. Const PF 3. Curve Q(U)with type A&B ! ! P Lock-in: ! 20% Pn P Lock-out: 5% Pn Node1: 90% (+)43.6% Q/S Node2: 92% (+) 0% Q/S Node3: 108% (+) 0% Q/S Node4: 110% (-)43.6% Q/S 4.Curve PF(P) Type A V Lock-in: 241.5 V V Lock-out:230.0 V Node1: 20% (+) 1.00pf Node2: 40% (+) 1.00pf Node3: 50% (+) 1.00pf Node4: 90% (-) 0.90pf Node1: 0% (+) 1.00pf Node2: 5% (+) 1.00pf Node3: Node4: 5% 90% (-)0.90pf (-) 0.90pf Curve PF(P) Type B (1)CEI 0-21 LV (S1=S2) LV & MV has the same default setting : V$ = 276V 0,5s, V* = 184V 1s, F* = 47Hz 4s, F$ = 52Hz 1s, Slope:2.4% (2) In CEI 0-21, Voltage & Frequency operation range & disconnection time setting are adjustable. S1 Voltage average value of the voltage measured on a time window of 10 min mode moving average (3) The inverter must start in any case when the F & V are allocated in 49.9~50.1hz & 195.5 ~253V, (included the first start) IV351 Rev03 Date Issue 2012-11-22 Page 176 di 278 + FR IV351 Rev03 Date Issue 2012-11-22 Page 177 di 278 + FR 15. Disposal The dealer or installers should remove the PV Inverter from the array and contact the supplier for disposal instructions The Inverter must not be disposed of with the household waste. Dispose of the PV Inverter at the end of its service life should be done in accordance with the disposal regulations for electronic waste which apply at the installation site at that time. Note: Please contact supplier or dealer for disposal instruction IV351 Rev03 Date Issue 2012-11-22 Page 178 di 278 + FR 16. Contact Information Should you have technical problems concerning this product, please contact our service line. We require the following information in order to provide you with the necessary assistance: • Inverter type • Serial number of the PV Inverter • Type and number of PV panel connected • Fault message • Communication method IV351 Rev03 Date Issue 2012-11-22 Page 179 di 278 + FR 17. Efficiency Chart 17.1 Load Graphs Load graphs are the typical efficiency charts that related to VDC and PAC is and the output power within the operation range can be determined by the different level of input voltage as power curve that shown in the following: Model Power Curve SOLEIL 3F-TL10K SOLEIL 3F-TL15K SOLEIL 3F-TL20K ! IV351 Rev03 Date Issue 2012-11-22 Page 180 di 278 + FR 17.2 Efficiency Chart IV351 Rev03 Date Issue 2012-11-22 Page 181 di 278 + FR IV351 Rev03 Date Issue 2012-11-22 Page 182 di 278 + FR Netzgekoppelte Wechselrichter für Photovoltaikanlagen SIEL SOLEIL 3F-TL10K DE / IT / ES / UK SOLEIL 3F-TL15K DE / IT / ES / UK SOLEIL 3F-TL20K DE / IT / ES / UK Installations- und Bedienungsanleitung IV351 Rev03 Ausstellungsdatum 2012-11-22 Seite 183 von 278 + FR Inhaltsverzeichnis 1. SICHERHEITSHINWEISE ................................................................................. 187 2. BEGRENZTE GARANTIE ................................................................................. 188 3. ÜBERSICHT ...................................................................................................... 189 3.1. 3.2. 3.3. 3.4. 3.5. PLAN DER PV-ANLAGE ..................................................................................................................... 189 VORSTELLUNG DES SIEL PV-WECHSELRICHTERS ............................................................................ 189 TYPENSCHILD ................................................................................................................................... 191 AUßENSEITE UND TEILEBEZEICHNUNG ............................................................................................. 192 EINLEITUNG DATENLOGGER MIT GRAFIKDISPLAY ............................................................................ 194 4. MERKMALE SIEL PV-WECHSELRICHTER .................................................... 196 5. INSTALLATION ................................................................................................. 197 5.1. 5.2. 5.3. 5.4. 5.5. 5.6. 5.7. 5.8. 6. VERPACKUNGSINHALT ...................................................................................................................... 197 VOR DER INSTALLATION ................................................................................................................... 198 MONTAGE DES PV-WECHSELRICHTERS ............................................................................................ 199 AC-ANSCHLUSS ............................................................................................................................... 203 ANSCHLUSS AN DIE AC-ANSCHLUSSBOX (AC-VERBUNDNETZ) ....................................................... 206 KONTROLLEN, DIE VOR DEM ANSCHLUSS DER PV-MODULE DURCHZUFÜHREN SIND ........................ 207 ANSCHLUSS DER PV-MODULE AN DEN WECHSELRICHTER ............................................................... 208 POST INBETRIEBNAHME ..................................................................................................................... 211 BETRIEB DES PV-WECHSELRICHTERS ....................................................... 213 6.1 VERWENDUNG DES DC-SCHALTERS (NUR FÜR GERÄTE MIT DC-SCHALTER) ........................................ 213 6.2 INITIALISIERUNG DER LÄNDEREINSTELLUNG ........................................................................................ 213 6.3. BETRIEBSZUSTÄNDE ......................................................................................................................... 214 6.4. BEDIENUNG DES LCD-DISPLAYS UND DES DATENLOGGERS ............................................................. 217 7. NETZWERKDIENST ......................................................................................... 223 7.1. WIRKUNGSLEISTUNG................................................................................................................................ 223 7.1.1. BEGRENZUNG DER WIRKLEISTUNG ....................................................................................................... 223 7.2. BLINDLEISTUNG ....................................................................................................................................... 224 8. BETRIEBSSTATUS DES WECHSELRICHTERS ............................................. 228 Matrix der Sprachen der angezeigten Meldungen (Fortsetzung nächste Seite) ........................................ 228 9. KOMMUNIKATION ........................................................................................... 237 9.1 9.2 9.3 9.4 9.5 9.6 USB (AM WECHSELRICHTER) ................................................................................................................ 237 KOMMUNIKATIONSSTECKPLATZ RS-485 ............................................................................................... 237 RS485 KARTENKONFIGURATION ........................................................................................................... 240 SPEZIFIKATION RS485-KARTE ............................................................................................................... 243 RS485-KARTE FEHLERBEHEBUNG ........................................................................................................ 244 USB-SCHNITTSTELLE (DATENLOGGER) ................................................................................................ 248 10. ERWEITERTE EINSTELLUNGEN .................................................................... 249 11. DOWNLOAD DER LOGGERDATEN ................................................................ 250 11.1 ZUGANG UND VERWALTUNG DER GESPEICHERTEN DATEN ................................................................ 250 12 STÖRUNGSBEHEBUNG .................................................................................. 255 13 VORBEUGENDE INSTANDHALTUNG ............................................................ 260 13.1 13.2 13.3 14 14.1 14.2 SICHTPRÜFUNG ................................................................................................................................. 260 INSPEKTION UND INSTANDHALTUNG ................................................................................................. 260 REINIGEN UND AUSTAUSCHEN DES LÜFTERS................................................................................... 261 SPEZIFIKATIONEN .......................................................................................... 264 MARKETING VS. NORMEN ................................................................................................................. 264 ELEKTRISCHE SPEZIFIKATIONEN ....................................................................................................... 264 IV351 Rev03 Ausstellungsdatum 2012-11-22 Seite 184 von 278 + FR 14.3 NETZÜBERWACHUNG ........................................................................................................................ 267 15 ENTSORGUNG ................................................................................................. 273 16 KONTAKT ......................................................................................................... 274 17 WIRKUNGSGRADKURVE ............................................................................... 275 17.1 17.2 BELASTUNGSDIAGRAMME ................................................................................................................ 275 WIRKUNGSGRADKURVE .................................................................................................................... 276 IV351 Rev03 Ausstellungsdatum 2012-11-22 Seite 185 von 278 + FR Vor Inbetriebnahme… Diese Anleitung enthält wichtige Informationen zur Installation und zum sicheren Betrieb dieses Gerätes. Lesen Sie diese Anleitung bitte sorgfältig, bevor Sie Ihren Wechselrichter einsetzen bzw. in Betrieb nehmen. Wir gratulieren Ihnen zum Kauf Ihres SIEL Netzwechselrichters (in dieser Anleitung der "PV-Wechselrichter" oder einfach der "Wechselrichter" genannt). Bei unserem PVWechselrichter handelt es sich um ein hoch zuverlässiges Produkt auf Grund der sorgfältigen Planung und des angewandten Systems der Qualitätskontrolle. Das Gerät ist für den Einsatz in anspruchsvollen, mit dem Netz verbundenen Photovoltaiksystemen vorgesehen. Sollten bei der Installation oder dem Betrieb des Gerätes Probleme auftreten, schlagen Sie bitte immer zuerst in dieser Anleitung nach, bevor Sie sich an Ihren Fachhändler oder Anbieter vor Ort wenden. Die in dieser Anleitung enthaltenen Anweisungen ermöglichen es, die meisten Probleme, die bei Installation und Betrieb bzw. Inbetriebnahme auftreten können, zu beheben. Bitte bewahren Sie diese Anleitung an einem sicheren Ort auf, so dass Sie sie jederzeit zur Hand nehmen können. IV351 Rev03 Ausstellungsdatum 2012-11-22 Seite 186 von 278 + FR 1. Sicherheitshinweise Gefahr durch elektrischen Schlag: In diesem Gerät liegen Wechselstrom- (AC) und Gleichstromquellen (DC) an. Um die Gefahr eines elektrischen Schlages zu vermeiden, achten Sie bitte darauf, dass während der Wartung oder Installation sämtliche AC- und DC-Anschlüsse freigeschaltet sind. Stellen Sie sicher, dass die Erdleitung korrekt angeschlossen ist und nicht eine Phase oder der Neutralleiter an der Erdungsklemme am Gerät angeschlossen ist. Gefahr durch elektrischen Schlag: Sobald ein PV-Generator ausreichender Lichteinstrahlung ausgesetzt ist, liegt Hochspannungsgleichstrom an. Vergewissern Sie sich deshalb vor Beginn der Wartungsmaßnahmen, dass sich der DC-Schalter in der Aus-Stellung befindet, oder stellen Sie sicher, dass keine spannungsführenden Komponenten berührt werden können. Gefahr durch elektrischen Schlag: Warnung – Hohe Ableitströme. Vor dem Anschluss des Geräts an das Stromnetz muss unbedingt eine Erdung erfolgen Gefahr durch elektrischen Schlag: Mehrere Energiequellen. Schalten Sie vor Beginn der Wartungsarbeiten alle Energiequellen frei. ACHTUNG : Nach Trennen der PV-Wechselrichter von der Energiequelle und von den PV-Modulen, können in den Kondensatoren des DC-Anschlusses noch Leckströme enthalten sein. Nach Freischalten der Energiequelle und bevor die Arbeit am Gerät begonnen wird, mindestens 1 Minute warten. Einspeisung ausschließlich in das öffentliche Stromnetz: Der PV-Wechselrichter ist ausschließlich für die direkte Einspeisung von Wechselstrom in das öffentliche Stromnetz ausgelegt. Schließen Sie keine Wechselstromgeräte an den AC-Ausgang dieses Geräts an. Heiße Oberflächen: Der PV-Wechselrichter kann trotz seiner Auslegung nach internationalen Sicherheitsstandards während des Betriebs heiß werden. Berühren Sie daher während des Betriebs oder kurz danach nicht den Kühlkörper oder die Oberflächen anliegender Komponenten. Wartung und Instandhaltung Ihres PV-Wechselrichters: Der Wechselrichter darf nur von qualifiziertem, autorisiertem Fachpersonal und nur zu Wartungszwecken geöffnet werden. ACHTUNG : Gefahr eines Stromschlags durch im Kondensator enthaltene Leckströme. Entfernen Sie die Abdeckung frühestens 2 Minuten nachdem alle Energiequellen freigeschaltet wurden. Auspacken und Installieren: Einige Modelle des SIEL PV-Wechselrichters können bis zu 57kg wiegen. Um Verletzungen zu vermeiden, verwenden Sie aus sicherheitstechnischen Gründen geeignete Hebevorrichtungen und stellen Sie dem Fachpersonal für das Auspacken und die Installation des Wechselrichters eine weitere Person zur Seite. ACHTUNG: Die Verwendung des Gerätes in einer Weise, die nicht vom Hersteller angegeben wurde, kann den durch das Gerät bereitgestellten Schutz beeinträchtigen. IV351 Rev03 Ausstellungsdatum 2012-11-22 Seite 187 von 278 + FR 2. Begrenzte Garantie Die Garantie umfasst alle Mängel der Konstruktion, Komponenten und Fertigung. Die Garantie erlischt und erstreckt sich nicht auf Mängel oder Schäden, die durch folgende Umstände verursacht werden: z z z z z z z z z z z z Das Siegel auf dem Produkt ist beschädigt Der Wechselrichter wurde unsachgemäß verwendet, außerhalb seiner Leistungen oder die Wartung wurde nicht fachgerecht durchgeführt Das Gerät wurde unsachgemäß transportiert oder geliefert Der Wechselrichter wurde außerhalb der elektrischen Spezifikationen oder Umweltanforderungen verwendet oder gelagert. Der Wechselrichter wurde für andere als die ursprünglich bei der Ausführung vorgesehenen Zwecke verwendet. Der Wechselrichter wurde außerhalb der Spezifikationen, der Betriebsparameter und der angegebenen Anwendungen verwendet. Fremdeinwirkung, atmosphärische Entladungen, zu hohe Spannungen, chemische Einflüsse, normale Abnutzung und Stürze oder Beschädigungen beim Transport Nicht fachgerecht durchgeführte Prüfungen, Fehler bei Betrieb, Wartung, Einstellung, Reparatur oder eventuelle Änderungen jeder Art, die vom Hersteller des Wechselrichters nicht schriftlich genehmigt wurden Anschluss des Wechselrichters an nicht kompatible Geräte Betrieb und Anwendung außerhalb der in dieser Anleitung beschriebenen Bedingungen Anwendung außerhalb der anwendbaren Sicherheitsstandards oder der Netzspezifikationen (VDE etc.) Naturkatastrophen oder höhere Gewalt, z.B. Blitzschläge, Brände, Stürme, Überschwemmungen, Vandalismus, etc. Der Hersteller behält sich das Recht vor, defekte Wechselrichter zu reparieren und/oder ersatzweise auszutauschen. Eventuelle Anfragen für Reparaturarbeiten während der Garantielaufzeit sind innerhalb von5 Werktagen ab Feststellung der Fehlfunktion des Gerätes an den Hersteller zu richten. Über den Garantierahmen hinaus übernimmt der Hersteller keine Garantieleistungen. IV351 Rev03 Ausstellungsdatum 2012-11-22 Seite 188 von 278 + FR 3. Übersicht 3.1. Plan der PV-Anlage Eine netzgekoppelte PV-Anlage besteht hauptsächlich aus 5 Komponenten: PV- Generator oder Batterie für PV-Generatoren, DC-Anschlussbox, PV-Wechselrichter, AC-Anschlussbox (der Anschlussschnittstelle) und ein Anschluss zum öffentlichen Stromnetz. Das normale Anschlussschema der netzgekoppelten PV-Anlage ist in der folgenden Abbildung zu sehen. . Einheit Beschreibung Versorgt den Wechselrichter mit Gleichstrom Batterie für PVGeneratoren (oder PV-Module) DC-Anschlussbox Diese “Schnittstelle” zwischen der PV-Batterie und dem PVWechselrichter muss einen DC-Schalter und die Anschlussklemmen umfassen. PV-Wechselrichter Der PV-Wechselrichter wandelt den von den PV-Generatoren erzeugten Gleichstrom (DC) in Wechsel- bzw. Drehstrom (AC) um. Da der PVWechselrichter an das Netz angeschlossen ist, kontrolliert er auf der Grundlage der vom PV-Generator erbrachten Leistung, die StromAmplitude. Der Wechselrichter versucht immer, die maximale vom PVGenerator erbrachte Leistung umzuwandeln. AC-Anschlussbox Diese “Schnittstelle” zwischen dem Netz und dem PV-Wechselrichter muss einen AC-Schalter und die Anschlussklemmen umfassen. In Übereinstimmung mit den Sicherheitsvorschriften und lokalen Sicherheitsverordnungen muss die Anschlussanlage von qualifiziertem Fachpersonal ausgelegt und umgesetzt werden. Das Netz In dieser Anleitung wird mit “Netz” die Modalität bezeichnet, mit der das Stromversorgungsunternehmen den Ort mit Strom versorgt. Es wird darauf hingewiesen, dass der PV-Wechselrichter ausschließlich an eine Niederspannungsanlage (230VCA/50Hz) angeschlossen werden darf. Anmerkung: In Deutschland muss nach DIN VDE 0100-712:2006-06 eine DC Abschaltvorrichtung für den Wechselrichter mit Gleichstromleistung zwischen PV-Modul und Wechselrichter vorgesehen werden. Nur für PV-Module Schließen Sie keine anderen Energiequellen als PV-Module an den SIEL PVWechselrichter an. 3.2. Vorstellung des SIEL PV-Wechselrichters IV351 Rev03 Ausstellungsdatum 2012-11-22 Seite 189 von 278 + FR Der netzgekoppelte SIEL PV-Wechselrichter Soleil wandelt den von den PV-Modulen erzeugten Gleichstrom (DC) in Wechselstrom (AC) um, der mit dem örtlichen Stromverteilungsnetz (auch öffentliches Stromnetz bzw. Verbundnetz) kompatibel ist. Modell Ansicht Abmessungen (mm) SOLEIL 3FTL10K 548*565*275 SOLEIL 3FTL15K 548*565*275 SOLEIL 3F-TL20K IV351 Rev03 Ausstellungsdatum 2012-11-22 548*565*275 Seite 190 von 278 + FR 3.3. Typenschild Der Installateur oder Benutzer muss eine Aufzeichnung mit den Angaben zum Wechselrichter (Modell, Seriennummer und Nummer des zugewiesenen Pols), die für die Bedienung und Wartung oder um mit dem Service-Center in Kontakt zu treten, installiert wurde, aufbewahren. Nummer des Modells und Seriennummer Das Typenschild des Wechselrichters befindet sich auf der linken Seite des Geräts. Auf dem Typenschild werden der Wechselrichtertyp, die Marke, die Modellbezeichnung, die technischen Merkmale und seine Seriennummer angegeben. Sollten bei der Installation dem Betrieb des Gerätes Probleme auftreten, notieren Sie bitte zuerst die Seriennummer (SN), bevor Sie sich an Ihren Fachhändler oder Vertreter vor Ort wenden. IV351 Rev03 Ausstellungsdatum 2012-11-22 Seite 191 von 278 + FR 3.4. Außenseite und Teilebezeichnung In der folgenden Tabelle werden die wichtigsten Komponenten des Wechselrichters beschrieben: Teilebezeichnung Beschreibung Jedes Eingangspaar besteht aus einem positiven und einem (1) DC-Eingangspaare negativen Anschluss (2) Lüfter Externer Lüfter des Wechselrichters DC-Schalter zum Freischalten des Wechselrichters vom PV(3) DC-Schalter (optional) Modul (4) Opt. Kommunikations- Optionaler Steckplatz für eine RS485-Kommunikationskarte. Die Benutzer können sich an den Wechselrichter anschließen und den Steckplatz und Abdeckung Status und den Betrieb in Echtzeit fernüberwachen. Dieses Gerät dient dazu, die Wärme in die umliegende (5) Kühlkörper Umgebung abzuführen Zum direkten Anschluss eines PCs über ein USB-Kabel. Der (6) USB-Schnittstelle Nutzer kann auf diese Weise über eine spezielle Software mit dem Wechselrichter kommunizieren. (7) AC-Anschlussklemme Anschluss des AC-Ausgangs an das Netz. Wasserdichtes Gehäuse (8) Erdungsanschluss Anschluss des Geräts an die Erdung Dieses Gerät dient der Anzeige des Betriebszustandes und der (9) Graphischer Datenlogger Einstellungen der Anlage SOLEIL 3F-TL10K DE/IT/ES/UK SOLEIL 3F-TL15K DE/IT/ES/UK SOLEIL 3F-TL20K DE/IT/ES/UK IV351 Rev03 Ausstellungsdatum 2012-11-22 Seite 192 von 278 + FR SOLEIL 3F-TL10K DE/IT/ES/UK SOLEIL 3F-TL15K DE/IT/ES/UK SOLEIL 3F-TL20K DE/IT/ES/UK IV351 Rev03 Ausstellungsdatum 2012-11-22 Seite 193 von 278 + FR 3.5. Einleitung Datenlogger mit Grafikdisplay Der Wechselrichter ist für die Anzeige der wichtigen Daten mit einem Datenlogger mit Grafikdisplay ausgerüstet. Mit diesem Datenlogger können verschiedene Wechselrichterdaten wie zum Beispiel Betriebszustände und Warnmeldungen angezeigt werden. Die Anzeige der Daten oder die Einstellung der Eigenschaften erfolgt über folgende Funktionstasten: Aufbau Datenlogger mit Grafikdisplay In der folgenden Tabelle werden die wichtigsten technischen Daten des Datenloggers aufgeführt: LCD-Anzeige Angezeigte Informationen Speicherzeitraum Speichermedium Datendownload monochrom Eingangs- und Ausgangsleistung, Betriebszustand und Warnhinweise 5 Jahre 2GB SD Karte (unterstützt bis zu 32GB) Per USB B Typ Merkmale Datenlogger mit Grafikdisplay Mehrfarbige Hintergrundbeleuchtung Die Hintergrundbeleuchtung der Display-Anzeige wechselt je nach Betriebszustand des Wechselrichters die Farbe. Es wird zwischen drei Farben unterschieden: z z z Grün: Hochfahren. Normalzustand. Rot: Fehler. Dieser Status zeigt an, dass der Wechselrichter aufgrund eines Systemfehlers oder einer Störung des Wechselrichters vom Stromnetz getrennt wurde. Die möglichen Fehler und Störungen sind in der weiter unten folgenden „Tabelle Fehlermeldungen“ aufgeführt. Gelb: Warnung. Der Wechselrichter wurde innerhalb der vergangenen 48 Stunden aufgrund eines Netz- oder Systemfehlers vom Stromnetz getrennt, eine erneute Verbindung war jedoch erfolgreich. IV351 Rev03 Ausstellungsdatum 2012-11-22 Seite 194 von 278 + FR Datendownload Über ein Mini-USB-Kabel ist es möglich, sich mit einem PC Zugang zu den gespeicherten Daten zu verschaffen und diese herunterzuladen und zu verwalten. Ausführliche Informationen hierzu erhalten Sie in Kapitel 10 Herunterladen von Daten im Datenlogger Messgenauigkeit Der Wechselrichter ist nicht für die präzise Messung von Spannung, Strom und Leistung ausgelegt. Die Messwerte auf der Display-Anzeige sind nur als Richtwerte für den Benutzer gedacht. Sie eignen sich nicht zur Bestimmung des Wirkungsgrades oder der Einspeisevergütung. Diese Daten sollten zur Kontrolle oder für die Prüfung des Systems verwendet werden. Normalerweise liegt die Messgenauigkeit bei ±2%. Die maximale Abweichung kann in allen Betriebsbereichen bei bis zu ±5% liegen. Die Toleranz der Messgenauigkeit kann bei allen Betriebsbedingungen zwischen 2% und 5% variieren. Für den Fall, dass eine präzise Messung des Systemzustands erforderlich ist, müssen die notwendigen Instrumente, wie z.B. ein Zähler, installiert werden. Struktur der LCD-Anzeige z LCD: 128 x 64 Grafikdisplay, monochrom z Navigationstasten: “•”, “•”, “Z” , “Y” und in der Mitte die Taste “OK”. z Hintergrundbeleuchtung: 3 Farben Pac:7494W Vdc:403/420V Vac:230.5/232.3/231.1V Iac:10.5/11.2/10.7A Status:Normal 21.04.12 15 :01 IV351 Rev03 Ausstellungsdatum 2012-11-22 Pac:0W Vdc:403/420V Vac:230.5/232.3/231.1V Iac:0.0/0.0/0.0A Status:Fault Isolation Fault 21. 04.12 15 :01 Pac:7494W Vdc:403/420V Vac:230.5/232.3/231.1V Iac:10.5/11.2/10.7A Status:Normal 21.04. 12 15 :01 Seite 195 von 278 + FR 4. Merkmale SIEL PV-Wechselrichter Der Wechselrichter hat folgende Merkmale: z z z z z z z z z z Bleifrei, RoHS GP2 Maximaler Wirkungsgrad • 97,5% Europäischer Wirkungsgrad • 97% P65 Gehäuse Grafikdisplay 128x64 dreiphasig 4 Drähte, 230/400V Kompaktes Design Integrierter DC-Schalter (optional) Leistungsstarke Kommunikationsschnittstelle Integrierte ENS vollständig vereinbar mit den folgenden Netzspezifikationen: VDE-AR-N 4105 VDE-0126-1-1/A1 RD1699 G83/1-1 G59 Issue2 CEI-021 Integrierte RCMU (Residual Current Monitoring Unit - allstromsensitiver FISchutzschalter) Leistungsmanagement zur Wirkleistungs- und Blindleistungsregelung (Ein zusätzliches Fernsteuerungsgerät, wie z.B. ein externer Datenlogger wird benötigt) z z Maximum Power Point Tracking (MPPT) Ein PV-Wechselrichter muss in der Lage sein, von jedem PV-Generator die maximale Leistung umzuwandeln. Aufgrund des fortschrittlichen Designs ist dieser PV-Wechselrichter in der Lage, unter allen Bedingungen, die maximale Leistung der PV-Generatoren zu registrieren. Wenn auf der Display-Anzeige ein stabiler, nicht schwankender Wert angezeigt wird, bedeutet dies, dass der Wechselrichter dabei ist, die von den Generatoren erbrachte max. Leistung umzuwandeln. Wenn die Anzeige schwankt, bedeutet dies, dass der Wechselrichter gerade diesen neuen max. Leistungspunkt ermittelt, der in Abhängigkeit der schwankenden Lichteinstrahlung variiert IPV (A) 5 4 P PV (W) 1000W/m 2 800W/m 2 600W/m 2 Maximum power point 2 @ 1000W/m ~ 120W 125 100 3 75 2 50 1 25 0 10 20 30 40 50 U PV (V) Anmerkung: Wenn die abgegebene DC-Leistung des PV-Generators gering ist, kann auch die AC-Leistung nach und nach auf dieselbe Weise variieren. Dies ist dadurch begründet, dass der PV-Wechselrichter ständig den Punkt der maximalen DC-Leistung ermittelt. IV351 Rev03 Ausstellungsdatum 2012-11-22 Seite 196 von 278 + FR 5. Installation 5.1. Verpackungsinhalt Überprüfen Sie bitte den Inhalt nach dem Öffnen der Verpackung. Folgende Komponenten sind im Lieferumfang enthalten: Artikel Menge Anmerkung (1) PV-Wechselrichter 1 Photovoltaik-Wechselrichter (2) Montageplatte 1 Wandhalterung für den PV-Wechselrichter (3) Zubehör-Box 1 Enthält das benötigte Zubehör Anmerkung: Bitte bewahren Sie die Verpackung für Rücksendungen an den ReparaturService auf. In der Zubehör-Box (3) sind folgenden Komponenten enthalten: Artikel Menge Bedienungsanleitung 1 AC-Abdeckung 1 DC-Stecker EntnahmeTool 1 Gummibuchse 1 Nylon-Dübel 6 Schrauben zur Wandbefestigung (M5 x 40L) 6 Sicherheit Feststellschraube 1 Halterung 2 Schrauben (M5 x12L) 4 Einrastbuchse RS485 1 RS485 Abdeckung 1 Schrauben RS485 Abdeckung M3 x15L IV351 Rev03 Ausstellungsdatum 2012-11-22 Artikel-Beschreibung Abbildung Installations- und Bedienungsanleitung Obere Abdeckung für den AC-Anschluss Trennwerkzeug für den DCAnschluss Zubehör für den Anschluss der AC-Drähte. Zur Befestigung der Montageplatte. Zubehör zum Aufhängen des Wechselrichters (optional) Zubehör für RS485-Karte 4 Seite 197 von 278 + FR 5.2. Vor der Installation Damit Ihr PV-Wechselrichter die optimale Leistung erbringt, beachten Sie vor der Montage des Geräts folgende Hinweise: ) Stellen Sie sicher, dass die Umgebungstemperatur bei der Installation zwischen -20 ~ +60qC liegt. ) Die Netzspannung und -frequenzen am Installationsstandort müssen im zulässigen Bereich liegen. ) Das Energieversorgungsunternehmen hat den Netzanschluss genehmigt. ) Die Installation und Wartung wird nur von qualifiziertem Personal durchgeführt. ) Ausreichender Raum zur Kühlung des Wechselrichters ist vorhanden. ) Das Gerät nicht in explosionsgefährdeten Standorten installieren. ) Keine brennbaren Stoffe in Nähe des Gerätes lagern. ) Das Gerät nicht auf brennbaren Holzoberflächen installieren Installationsort: Der SIEL PV-Wechselrichter kann an Orten montiert und betrieben werden, an denen die Umgebungstemperatur bis zu 60 °C betragen kannq. Für einen optimalen Betrieb empfiehlt es sich jedoch, den Wechselrichter an einem Ort zu installieren, an dem die Umgebungstemperatur zwischen 0 und < 45 °C liegtq. Hinweis: Setzen Sie den PV-Wechselrichter nicht der direkten Sonneneinstrahlung aus. Direkte Sonneneinstrahlung erhöht die Innentemperatur, die die Umwandlungseffizienz reduzieren kann. Anmerkung: Obwohl der Wechselrichter für den Außeneinsatz (IP 65) konzipiert wurde, empfehlen wir nicht den Betrieb des Wechselrichters in sehr feuchter, nasser oder staubiger Umgebung. Vorschläge zur Montage: Der SIEL PV-Wechselrichter kann bis zu 57kg wiegen. Um Verletzungen zu vermeiden und zur eigenen Sicherheit, verwenden Sie bitte die richtige Hebetechnik und suchen Sie bitte nach der Hilfe von jemandem, der Ihnen beim Auspacken und der Installation des Wechselrichters helfen kann. Einspeisung ausschließlich in das öffentliche Stromnetz: Zum Schutz vor elektrischen Schlägen, die durch Leckströme verursacht werden können, verfügt der SIEL PV-Wechselrichter über einen internen, 30mA allstromsensitiven Fehlerstromschutzschalter. IV351 Rev03 Ausstellungsdatum 2012-11-22 Seite 198 von 278 + FR 5.3. Montage des PV-Wechselrichters Vergewissern Sie sich bitte, dass die folgenden Installationsvorschriften beachtet werden. 1. 2. 3. Wählen Sie eine Wand oder eine feste, senkrechte Oberfläche aus, die den Wechselrichter halten kann. Der PV-Wechselrichter benötigt für die Wärmeabgabe entsprechend Platz. Lassen Sie daher über dem Wechselrichter mindestens 30 cm und unter dem Wechselrichter mindestens 90 cm Abstand. Für eine angemessene Wartung muss zwischen den Wechselrichtern ein seitlicher Abstand von mindestens 30 cm eingehalten werden Anmerkung: Installieren Sie, wenn möglich, PV-Wechselrichter nicht übereinander oder über anderen Wärmequellen. Ist dies nicht möglich, halten Sie einen Mindestabstand von 100 cm ein, damit für ausreichende Belüftung gesorgt ist. 4. Befestigen Sie die Halterung durch Verwendung der sechs Montagebohrungen und der Schrauben M5*40 mm. Mit einem Anziehdrehmoment von 30kgf-cm (oder 2,94 N-m) festziehen, wie unten dargestellt: IV351 Rev03 Ausstellungsdatum 2012-11-22 Seite 199 von 278 + FR Montagehalterung Anmerkung: Der Durchmesser der Sicherungsschraube beträgt 10mm2. IV351 Rev03 Ausstellungsdatum 2012-11-22 Seite 200 von 278 + FR 5. Der PV Wechselrichter sollte mit geeignetem Hebewerkzeug an den Installationsort gehoben werden, nachdem die Aufhänghilfen an den PV-Wechselrichter geschraubt wurden, wie unten dargestellt: Montage des PV-Wechselrichter mittels Aufhänghilfe (fakultativ) *Anmerkung: Geeignetes Hebewerkzeug muss zur Aufhängung verwendet werden. IV351 Rev03 Ausstellungsdatum 2012-11-22 Seite 201 von 278 + FR 6. Befestigen Sie den PV-Wechselrichter wie dargestellt an der Montageplatte Montage des PV-Wechselrichters an der Wand 7. Vergewissern Sie sich, dass das Gerät in der richtigen Lage fest in der Halterung sitzt. IV351 Rev03 Ausstellungsdatum 2012-11-22 Seite 202 von 278 + FR 5.4. AC-Anschluss Verbinden Sie den PV-Wechselrichter wie folgt über die AC-Anschlussleitung und die separaten Erdungskabel mit der AC-Anschlussbox: 1. 2. 3. Messen Sie die Netzspannung und -frequenz. Sie sollte um 230V (L-N) / 50Hz und die Spannung zwischen N und PE muss bei 0 Volt(der Neutralleiter muss in der Stromstation geerdet sein) liegen. Den Schalter oder die Sicherung der AC-Anschlussbox auslösen (zwischen PVWechselrichter und Stromnetz). Die Leitungen für den AC-Anschluss mit dem vorgeschriebenen Querschnitt wählen, wie in der Tabelle unten angegeben: Der Querschnitt der Leitungen für L1ᇬL2ᇬL3ᇬNᇬPE1 muss mindestens den Angaben in der nachstehenden Tabelle entsprechen. Modell SOLEIL 3F-TL10K SOLEIL 3F-TL15K SOLEIL 3F-TL20K Leistung (W) 10000 Max. Ausgangsstrom 16 A 15000 20000 24 A 30A Max. Querschnitt 10 AWG 8 AWG 8 AWG Ausgangskabel Anmerkung: Verwenden Sie möglichst keine Leitungen mit Leitungsverlusten größer 1 %. Der Querschnitt des 2. Schutzleiteranschlusses (PE2) muss die gleiche Größe wie PE1 haben (oder 10 mm2). 4. 5. Entfernen Sie die Verschlussstopfen aus der Steckerbuchse des AC- und Erdungskabels. Führen Sie alle AC-Leitungen über die AC-Abdeckplatte in der folgenden Reihenfolge ein, bevor Sie diese mit einer isolierten Aderenthülse festziehen: Æ Gummiisolierte Æ Kabelverschraubung Æ ACAbdeckung Æ Aderenthülse IV351 Rev03 Ausstellungsdatum 2012-11-22 Seite 203 von 278 + FR 6. 7. Setzen Sie vor dem Anschluss auf jede AC-Leitung eine isolierte Aderenthülse. Die ACLeitungen auf eine Länge von 10 - 12 mm abisolieren. Die AC-Leitungen mit dem entsprechenden AC-Anschluss verbinden und richtig festziehen. Nach dem Anschluss: Nachdem die AC-Leitungen mit dem entsprechenden AC-Anschluss verbunden wurden, kontrollieren Sie den Halt, indem Sie nacheinander an den Kabeln ziehen. Achtung: Während des normalen Betriebs müssen alle AC-Leitungen (Phase L1ᇬPhase L2ᇬPhase L3ᇬPhase N und Phase G) fest am AC-Anschluss des PVWechselrichters angeschlossen sein, bevor die AC-Quelle eingeschaltet werden kann. Wenn Sie die AC-Versorgung vom Wechselrichter trennen müssen, dann schalten Sie zuerst die DC-Quelle des Wechselrichters ab. Trennen Sie dann zur gleichen Zeit die AC-Quelle (Phase L1ᇬPhase L2ᇬPhase L3 und Phase N) des PVWechselrichters, um den Wechselrichter selbst zu schützen. 8. 9. Bei Nichtbeachtung der oben beschriebenen Schritte können der PVWechselrichter und eventuell angeschlossene Geräte beschädigt werden. Die Abdeckung des AC-Ausgangs mithilfe eines Schraubenziehers wieder montieren. Die Kabelverschraubung des Verbinders drehen, um die Isolierung und die Leitung sicher zu fixieren. 10. Kontrollieren Sie nochmals die Installationsanforderungen. IV351 Rev03 Ausstellungsdatum 2012-11-22 Seite 204 von 278 + FR 9 Den PV-Wechselrichter nicht auf geneigten Oberflächen installieren 9 Vergewissern Sie sich, dass der Wechselrichter oben und unten fest an der Halterung befestigt ist. Nach der Montage: Überprüfen Sie, dass der Wechselrichter ordnungsgemäß montiert ist, indem Sie versuchen, ihn leicht von unten anzuheben und zu drehen. Der Wechselrichter muss dabei fest in seiner Halterung sitzen bleiben. Nach der Montage: überprüfen Sie, dass für die Installation ein Standort ausgewählt wurde, der die freie Sicht auf die Statusanzeige ermöglicht, dass die ausgewählte Montagewand robust ist, damit Vibrationen während des Betriebs des PV-Wechselrichters vermieden werden. IV351 Rev03 Ausstellungsdatum 2012-11-22 Seite 205 von 278 + FR 5.5. Anschluss an die AC-Anschlussbox (AC-Verbundnetz) Die AC-Anschlussbox ist die Schnittstelle zwischen PV-Wechselrichter und öffentlichem Netz. Sie besteht aus einem Elektroschalter, Sicherung, Überspannungsschutzeinrichtung und Klemmen für den Anschluss des Wechselrichters an das öffentliche Netz. Die ACAnschlussbox muss von einer qualifizierten Fachkraft, in Übereinstimmung mit den lokalen Sicherheitsvorschriften ausgelegt werden. Modell Max. Ausgangsstrom Externe nominale Schutzart gegen Überströme SOLEIL 3F-TL10K SOLEIL 3F-TL15K 16A 24A 20A 25A SOLEIL 3F-TL20K 30A 35A Achtung: Eine geeignete Schutzeinrichtung gegen Überströme für den maximalen Ausgangsstrom des jeweiligen Modells auswählen, wie in Abschnitt 10.2. aufgelistet. IV351 Rev03 Ausstellungsdatum 2012-11-22 Seite 206 von 278 + FR 5.6. Kontrollen, die vor dem Anschluss der PV-Module durchzuführen sind Damit der PV-Wechselrichter optimale Ergebnisse liefert, beachten Sie bitte folgende Hinweise, bevor Sie die PV-Module an das Gerät anschließen: 9 Achten Sie in jedem Fall darauf, dass die maximale Leerlaufspannung (VOC) jedes PVStrings die zulässigen Betriebsbedingungen unter keinen Umständen übersteigt (siehe Tabelle). 9 Überprüfen Sie die den Kurzschlussstrom der PV-Strings. Der max. Kurzschlussstrom (Isc) des PV-Strings sollte nicht über dem maximalen DC-Strom des Wechselrichters liegen (siehe Tabelle). Modell SOLEIL 3F-TL10K SOLEIL 3F-TL15K SOLEIL 3F-TL20K Max. Voc VDC •1000V •1000V •1000V Leerlaufspannung (Isc) ADC 24A * 2 30A * 2 34,5A * 2 Achtung: Einen externen DC-Stecker/Leitung/Verbinder auswählen, der für einen Nennstrom ausgelegt ist, der über dem maximalen Eingangsstrom des Wechselrichters liegt. Achtung: Die PV-Generatoren mit einem Kurzschlussstrom auswählen, der kleiner als der maximale Eingangsstrom des Wechselrichters ist. 9 Stets den positiven Pol (+) der PV-Module an den positiven Eingangspol (+) des Wechselrichters anschließen und den negativen Pol (-) der PV-Module an den negativen Eingangspol (-) des Wechselrichters. Achtung: Überprüfen Sie die Polarität aller DC-Eingangspaare auf ihre Richtigkeit, bevor sie die DC-Leistung des Wechselrichters anschließen. Verpolung kann das Gerät dauerhaft beschädigen. ACHTUNG: Bei ausreichendem Lichteinfall liegen gefährlich hohe Spannungen am PVGenerator an. Um die Stromschlaggefahr zu verringern, dürfen unter Spannung stehende Teile nicht angefasst werden und die Anschlüsse dürfen nur mit Vorsicht behandelt werden. IV351 Rev03 Ausstellungsdatum 2012-11-22 Seite 207 von 278 + FR 5.7. Anschluss der PV-Module an den Wechselrichter Geeignete PV-Module Die angeschlossenen Strings sollten aus Modulen des gleichen Typs bestehen. Die folgende Tabelle zeigt welche PV-Modultypen zum Anschluss an den Wechselrichter geeignet sind. PV-Modultyp Anwendbarkeit Monokristallin Ja Multikristallin Ja Dünnschicht Ja (ohne + oder – Erdung) Spezieller Typ mit Pluspol Erdung Nein Spezieller Typ mit geerdetem Minuspol Nein Anmerkung: Lassen Sie sich von Ihrem Händler bei der Auswahl des PV-Moduls beraten. Anforderungen des PV-Moduls Für den Anschluss an den DC-Eingang eines einzigen Wechselrichters, sollten die angeschlossenen Strings aus Modulen des gleichen Typs bestehen. Der DC-Anschluss im Eingang darf nicht mit anderen Wechselrichtern geteilt werden. Die Anzahl, Ausrichtung und Neigung der Generatoren kann in Abhängigkeit der verschiedenen Anwendungen variieren. Modelltyp DC-Stecker Die Anschlüsse am Eingang des Wechselrichters sind entweder Amphenol Helios H4 oder MultiContact MC4 DC-Steckverbinder. Entsprechende DC-Stecker desselben Herstellers müssen für den Anschluss des DC-Eingangs verwendet werden. IV351 Rev03 Ausstellungsdatum 2012-11-22 Seite 208 von 278 + FR Die folgende Tabelle listet diese Stecker-Paare MultiContact PV-KST4/6I Buchse Amphenol Helios H4 Buchse PV-KBT4/6I Stecker Helios H4 Stecker IV351 Rev03 Ausstellungsdatum 2012-11-22 Seite 209 von 278 + FR Trennen der MC4 / Amphenol DC-Stecker Die folgenden Bilder zeigen, wie MC/ Amphenol DC-Stecker mit der mit dem EntnahmeTool, das in der Zubehör-Box zusammen mit dem Wechselrichter geliefert wird, getrennt werden können. (1) Setzen Sie das Entnahme-Tool wie in folgender Abbildung am Stecker an, um die Klemmen zu lösen: (2) Nachdem Sie die Klemmen gelöst haben, ziehen Sie den Stecker leicht nach unten, um die DC-Leitung zu entfernen. IV351 Rev03 Ausstellungsdatum 2012-11-22 Seite 210 von 278 + FR Achtung: Trennen Sie die Energiequelle oder die DC-Leitungen nicht während der Wechselrichter AC-Leistung ins Netz einspeist, vergewissern Sie sich, dass die AC-Leistung getrennt wurde, bevor Sie den DC-Schalter (falls vorhanden) ausschalten. Trennen Sie zuletzt die DC-Leitungen. Einspeisung ausschließlich in das öffentliche Stromnetz: Drehen Sie nicht den Stecker nicht entgegen dem Uhrzeigersinn. Der DCStecker am Wechselrichter könnte sich lösen. Achtung: Verwenden Sie ein Vielfachmessgerät und überprüfen Sie die Polarität aller DCEingangspaare auf ihre Richtigkeit, bevor sie die DC-Leistung des Wechselrichters anschließen. Verpolung kann das Gerät dauerhaft beschädigen. 5.8. Post Inbetriebnahme 9 9 9 Wenn der Generator ausreichender Lichteinstrahlung ausgesetzt wird, liegt Hochspannung an. An den ausgesetzten Anschlussklemmen des PV-Generators liegt Spannung an, sie können zu Stromschlägen führen. Vermeiden Sie es, mit diesen Teilen der Vorrichtung in Berührung zu kommen. Nach Anschluss des PV-Generators an den Wechselrichter beträgt die Ausgangsspannung mehr als 260VDC. Ist das DC-Netz nicht am Wechselrichter angeschlossen, wird auf der Display-Anzeige des Datenloggers folgendes eingeblendet: Den Anschluss zwischen PV-Wechselrichter und AC-Anschlussanlage überprüfen und anschließend den Anschluss zwischen öffentlichem Netz und AC-Anschlussbox prüfen. Den AC-Schalter oder die Sicherung der Einheit einschalten. Während des normalen Betriebs wird auf der Display-Anzeige des Datenloggers beispielsweise folgendes eingeblendet: IV351 Rev03 Ausstellungsdatum 2012-11-22 Seite 211 von 278 + FR Pac:7494W Temperature:26.8°C Iac:10.5/11.2/10.7A Vac:219.4/219.3/219.3V Status:Normal 21.04.12 15 :01 9 Wenn die Anzeige grün ist, wird vom Wechselrichter Strom ins Netz gespeist. In diesem Fall ist der Wechselrichter ordnungsgemäß installiert. Hinweis: Trennen Sie die Leistung oder die DC-Leitungen nicht während der Wechselrichter AC-Leistung ins Netz einspeist, vergewissern Sie sich, dass die AC-Leistung getrennt wurde, bevor Sie den DC-Schalter (falls vorhanden) ausschalten. Trennen Sie zuletzt die DC-Leitungen. Hinweis: Stellen Sie sicher, dass die AC-Spannung niemals außerhalb der Produktspezifikationen liegt. Achtung: Verwenden Sie ein Vielfachmessgerät und überprüfen Sie die Polarität aller DCEingangspaare auf ihre Richtigkeit, bevor sie die DC-Leistung des Wechselrichters anschließen. Verpolung kann das Gerät dauerhaft beschädigen. Achtung: Die DC-Eingangsspannung sollte gleich oder größer als die Eingangsspannung der Energiequelle sein (350 Volt), damit das Gerät Strom ins Netz speisen kann. IV351 Rev03 Ausstellungsdatum 2012-11-22 Seite 212 von 278 + FR 6. Betrieb des PV-Wechselrichters 6.1 Verwendung des DC-Schalters (nur für Geräte mit DCSchalter) Der PV-Wechselrichter fährt, sobald die DC-Leistung vom PV-Generator ausreichend hoch ist und die Sicherungen zum Schutz der Strings eingeschaltet sind, automatisch hoch. Sollte am unteren Geräteteil ein zusätzlicher DC-Schalter vorhanden sein, muss dieser aktiviert werden, um das Gerät mit Energie zu versorgen. Achtung: Die LCD-Anzeige leuchtet auf, sobald 260VDC erreicht werden. Um das Netz kontinuierlich mit Energie versorgen zu können, sollte die DC-Eingangsspannung höher als die Anfangsspannung der Anlagenversorgung (350VDC) sein, wie in Abschnitt 12.2.beschrieben 6.2 9 9 9 Initialisierung der Ländereinstellung Bei der ersten Inbetriebnahme aktiviert der Wechselrichter die Funktion “Select Safety”. Mit diesem Prozess ist es möglich, die Sprache der Anzeige und die Ländereinstellung auszuwählen, bevor mit dem normalen Betrieb begonnen wird. Solange die Ländereinstellung am Wechselrichter nicht abgeschlossen ist, kann dieser nicht normal betrieben werden, auch wenn er ordnungsgemäß an den DC-Eingang und an den AC-Ausgang angeschlossen ist. Das Diagramm unten verdeutlicht das “Select Safety”-Verfahren. Wenn beispielsweise ein deutscher Benutzer die Ländereinstellung VDE0126-1-1/A1 einzustellen wünscht, muss der Wechselrichter hochgefahren und dann das Verfahren “Select Safety” gestartet werden. Blättern Sie zuerst mit den entsprechenden Tasten durch das Menü, bis zur Seite mit der gewünschten Ländereinstellung und drücken Sie dann für weitere 5 Sekunden die Taste “OK” bis die Meldung “Regulation Setting OK” eingeblendet wird. IV351 Rev03 Ausstellungsdatum 2012-11-22 Seite 213 von 278 + FR Please Select Safety Please Select Safety Unknown VDE0126-1-1/A1 źŸ: Select Safety OK: Press Over 5 sec. Æ źŸ: Select Safety OK: Press Over 5 sec. Æ Regulation Setting OK Press any button Anmerkung: Eine falsche Ländereinstellung könnte zu einem unsachgemäßen Verhalten führen. Wenden Sie sich an Ihren Fachhändler, wenn Sie sich mit den Ländereinstellungen und nicht hinreichend auskennen. 6.3. Betriebszustände Es gibt vier Betriebszustände. Für die Anzeige jedes Zustands gibt es einen entsprechenden Text mit dazugehöriger Farbe. (1) Normal In diesem Betriebszustand wandelt der Wechselrichter ohne Unterbrechung den Strom um, der vom Solargenerator ins (öffentliche) Netz gespeist wird. In diesem Fall ist die Display-Anzeige grün. (2) Rückstellung nach einem Fehler In bestimmten Situationen, beispielsweise bei anormaler Spannung und Frequenz, kommt es vor, dass der Wechselrichter vom Netz getrennt werden muss. Ist das Problem beseitigt, kehrt der Wechselrichter wieder in den normalen Betriebszustand zurück. Die Hintergrundbeleuchtung der LCD-Anzeige leuchtet dann wie in der folgenden Abbildung die nächsten 48 Stunden gelb. Werden keine weiteren ungewöhnlichen Vorkommnisse registriert, wird die Anzeige nach Ablauf der Zeit wieder grün. IV351 Rev03 Ausstellungsdatum 2012-11-22 Seite 214 von 278 + FR Pac:7494W Vdc:403/420V Vac:230.5/232.3/231.1V Iac:10.5/11.2/10.7A Status:Normal 21.04.12 15 :01 (3) Während eines Fehlers Während einer Netzstörung oder eines Anlagenfehlers (weitere Informationen erhalten Sie in der „Tabelle Fehlermeldungen“) wird der Wechselrichter vom Netz getrennt, die Hintergrundbeleuchtung wird rot und ein Warnsignal macht den Benutzer auf die Störung aufmerksam. Um die Fehlermeldung vom Display zu entfernen, kann der Benutzer auf den Navigationstasten die “OK” -Taste drücken, um die Fehlermeldung zurückzusetzen. Lesen dazu bitte erst die Meldung. Kann die Fehlermeldung nicht beseitigt werden, wenden Sie sich bitte an das Service-Center vor Ort. ! No Utility Press OK to Clear (4) Abschalten Der Wechselrichter fährt während der Nacht und an sehr dunklen, bewölkten Tagen automatisch herunter. Dabei sind der Datenlogger und die Navigationstasten inaktiv. IV351 Rev03 Ausstellungsdatum 2012-11-22 Seite 215 von 278 + FR (5) Betriebszustände beim Hochfahren: z Standby: Während des normalen Betriebs geht der PV-Wechselrichter bei einer Spannung von 200 bis 250 V in den “Standby”-Zustand über. Pac:0W Vdc:220/210V Vac:219.4/219.3/219.3V Temperature:26.8°C Status:Standby 21.04.12 15 :01 z Warten: Bei einer Spannung von 251V bis 349V befindet sich der Wechselrichter auf DC-Seite im “Warten-Zustand”. Dabei prüft der Wechselrichter die DC- und die AC-Seite und wartet auf die Zuschaltung zum AC-Netz. Pac:0W Vdc:260/329V Vac:219.4/219.3/219.3V Temperature:26.8°C Status:Waiting 21.04.12 15 :01 z Normal: Um in den "Normal”-Betrieb zu gelangen, muss die DC-Spannung mehr als 350 VDC betragen. Um die Anschlüsse der DC-Leitungen zu überprüfen, versucht der Wechselrichter, bei jedem Hochfahren die Eingangsleistung zu regulieren. Im Verlauf dieses Verfahrens kann der Benutzer Variationen in der Anzeige der DC-Leistung beobachten. IV351 Rev03 Ausstellungsdatum 2012-11-22 Seite 216 von 278 + FR 6.4. Bedienung des LCD-Displays und des Datenloggers Betrieb (1) Tasten auf dem Datenlogger: Für die Bedienung und Änderung der Anzeige befinden sich auf dem Datenlogger 5 Tasten. Die Tastenfunktionen können generell wie folgt definiert werden. z “ Z ” : Wechseln der Anzeige auf die untere Ebene (von 1. zur 2. Ebene) bzw. Bewegen des Cursors nach rechts z “ Y” : Wechseln der Anzeige auf die obere Ebene (von 2. zur 1. Ebene) bzw. Bewegen des Cursors nach links z “ • ” : Wechseln zur vorherigen Anzeige bzw. Bewegen des Cursors nach oben z “ • ” : Wechseln zur nächsten Anzeige bzw. Bewegen des Cursors nach unten z “ OK ” : Einstellen oder Bestätigen (2) LCD-Hintergrundbeleuchtung Wie bereits im letzten Kapitel beschrieben, ändert sich die Farbe der Hintergrundbeleuchtung je nach Betriebszustand. Um Strom zu sparen, bleibt die Hintergrundbeleuchtung nach jedem Bedienvorgang nur 3 Minuten an. Tritt jedoch ein Fehler auf, leuchtet der Hintergrund der Anzeige nicht nur rot, sondern blinkt solange im Sekundentakt auf, bis der Benutzer die auf dem Display angewiesene Taste drückt. (3) Akustisches Signal Der Datenlogger generiert ein akustisches Signal, um den Benutzer auf folgende Fälle aufmerksam zu machen: z Wechselrichterstörung z Speicherkapazität des Datenloggers beträgt weniger als 5 % z Ein Lüfter dreht sich aus irgendeinem Grund nicht (4) Verhalten bei vollem Speicher Sobald die Speicherkapazität des Datenloggers weniger als 5 % beträgt, generiert der Datenlogger ein akustisches Signal. Dann sollte der Benutzer die internen Daten verwalten und mithilfe eines PCs versuchen, den Speicher zu leeren. Ignoriert der Benutzer die Warnmeldung und leert den vollen Speicher nicht, werden die vorhandenen Daten mit den neuen Daten überschrieben. IV351 Rev03 Ausstellungsdatum 2012-11-22 Seite 217 von 278 + FR Anzeige auf LCD-Anzeige (1) Hochfahren Bei Einschalten des Wechselrichters erscheinen auf dem Display ein Logo und die Angabe der Firmware-Version. Nach 3 Sekunden verschwindet diese Anzeige und es erscheint der unten stehende Text. (2) Textanzeige In der Anzeige erscheinen vier Messwerte und der Betriebszustand. Unten rechts sind Datum und Uhrzeit zu sehen. Tritt eine “Warn-” oder “Fehlermeldung” auf, wird die Statusanzeige in der letzten Zeile durch diese Fehlermeldung ersetzt. Der Benutzer kann die vier Messwerte verändern. z Drücken Sie “Z” um den Messwert in der ersten Zeile zu markieren. Mit den Tasten “•” und “•”, kann der Benutzer in die nächste Zeile wechseln. z Drücken Simeon” um mit dem Einstellen der Messwerte zu beginnen. z Drücken Sie “•” oder “•” um den Messwert dieser Zeile auszuwählen. z Drücken Simeon” um die Einstellung zu bestätigen. Pac:7494W Vdc:403/420V Vac:230.5/232.3/231.1V Iac:10.5/11.2/10.7A Status:Normal 21.04.12 15 :01 IV351 Rev03 Ausstellungsdatum 2012-11-22 Seite 218 von 278 + FR (3) Tagesdiagramm Durch Drücken der Taste “•” in der Text-Anzeige, wechselt das Display, wie unten zu sehen, zum Tagesdiagramm. In diesem Diagramm ist der Verlauf der Ausgangsleistung an einem bestimmten Tag angezeigt. Im Folgenden erhalten Sie weitere Erklärungen dazu: z z Zeitachse (X-Achse): Im Displayfenster werden höchstens 12 Stunden angezeigt. Dabei entspricht die Zahl jeweils der Uhrzeit. Die ersten gespeicherten Tagesdaten werden ganz links außen angezeigt. Gibt es für mehr als 12 Stunden gespeicherte Tagesdaten, drücken Sie zuerst auf “OK” und dann auf Z und Y , um das Diagramm zur gewünschten Uhrzeit zu verschieben. Drücken Sie erneut auf “OK” um diese Verschiebung zu bestätigen. Leistungs-Achse (Y-Achse): 0 bis 24 kW. Jeder Punkt stellt einen in einem Zeitraum von 6 Minuten gemittelten Wert dar. Jeder Punkt stellt 500W dar, es können maximal 48 Punkte dargestellt werden. Datum: Rechts oben ist das Datum der aktuellen Anzeige zu sehen. Um zum Tagesdiagramm eines bestimmten Tages zu gelangen, drücken Sie zur Auswahl auf die Tasten Z und Y ź ź z 20.04 KW 20 10 6 7 8 9 10 11 12 1 2 3 4 5 (4) Wochendiagramm Wenn Sie in der Tages-Anzeige auf die Taste “•” drücken, wechselt die LCD-Anzeige, wie unten zu sehen, zur “Wochen-Anzeige”. Im Folgenden erhalten Sie weitere Erklärungen dazu: z z z Zeit-Achse (X-Achse): 7-Tage-Woche ab Sonntag. Die Daten für Sonntag werden ganz links außen angezeigt. Erzeugte kWh (Y-Achse): Pro Tag wird der erzeugte Strom im Bereich zwischen 0 und 240 kWh angezeigt. Jeder Punkt stellt 5 kWh dar, es können maximal 48 Punkte dargestellt werden. Wochenwechsel: Drücken Sie Z und Y , um zur gewünschten Woche zu gelangen Die entsprechenden Datumsangaben rechts oben können ebenfalls geändert werden. IV351 Rev03 Ausstellungsdatum 2012-11-22 Seite 219 von 278 + FR ź ź 15.04-21.04 KWH 200 100 15 (5) 16 17 18 19 20 21 Fehlergeschichte Durch erneutes Drücken der Tasten “•” in der “Wochen-Anzeige” wechselt die LCD-Anzeige zur “Fehlergeschichte”. Auf der Anzeige erscheinen die zwei letzten gespeicherten Fehlerereignisse. Wenn Sie weitere Fehlerereignisse anzeigen möchten, drücken Sie zuerst auf “OK” und dann auf die Tasten “Z” und “Y” um die Anzeige zu wechseln. Error History E001:No Utility @ 19.04.12 15:49 Vaule=N/A E002:Grid Volt. Fault @ 21.04.12 12:34 Vaule=230,260,240 (6) Systeminformation Durch erneutes Drücken auf “•” in der “Fehlergeschichte”, erscheinen auf der LCD-Anzeige “Systeminformationen” zum Wechselrichter. Dazu gehören beispielsweise die Seriennummer und die Firmware-Version, etc.… wie unten dargestellt. System Display S/N:0123456789ABCDEF Version:MB.20-00.27 Memory:0.3% Date:21.04.2011 Sat Time:15:01:19 GMT +08 Audible Alarm:On Language:English Nachfolgend sehen Sie die Kontrollparameter, die in den “Systeminformationen” erscheinen: z z z z z z z SN: Seriennummer des Wechselrichters Version: Firmware-Version des Wechselrichters Speicher: Speicherstatus des Datenloggers Datum: Datumseinstellung des Wechselrichters Zeit: Zeiteinstellung des Wechselrichters Akustisches Signal: “An” oder “Aus”, Status der Einstellung Sprache: Spracheinstellung des Displays Um das Datum, die Uhrzeit, das akustische Signal oder die Spracheinstellung zu ändern: ᧤a᧥ Drücken Sie zuerst auf “Z” und dann auf “•” bzw.“•” um den Parameter zu den IV351 Rev03 Ausstellungsdatum 2012-11-22 Seite 220 von 278 + FR gewünschten Einstellungen zu ändern. ᧤b᧥ Drücken Sie “OK” um die Einstellung zu bestätigen. Drücken Sie auf die Tasten “•” und “•” um den Wert zu verändern ᧤c᧥ Drücken Sie “OK” um die Einstellung zu bestätigen. ᧤d᧥ Drücken Sie “Y” um die Auswahl abzubrechen und die Einstellung abzuschließen. IV351 Rev03 Ausstellungsdatum 2012-11-22 Seite 221 von 278 + FR Funktionsschema des Datenloggers IV351 Rev03 Ausstellungsdatum 2012-11-22 Seite 222 von 278 + FR 7. NETZWERKDIENST Die Netzwerke können auch ferngesteuert werden. Die extern angeschlossenen Geräte können mit dem Wechselrichter über das Standardprotokoll “MODBUS RTU (Siehe SP104 Siel) kommunizieren. Der Netzbetreiber kann die Leistungsversorgung in folgenden Begrenzungszuständen steuern. 7.1. Wirkungsleistung Um die Stabilität der Anlage zu garantieren oder die Einspeisung der überschüssigen Energie zu steuern, ist der Betreiber berechtigt, eine vorübergehende Reduktion der Wirkungsleistung ins Netz zu beantragen. 7.1.1. Begrenzung der Wirkleistung Der Wechselrichter kann die Wirkleistung zwischen 0% ~ 100%Pn in 1%Pn Schritten reduzieren. Für gewöhnlich werden folgende Einstellungen verwendet: 100% / 60% / 30% / 0%. 7.1.2. Frequenzabhängige Wirkleistungsbegrenzung Das Prinzip dieser Anforderung besteht darin, die überschüssige Leistungserbringung durch eine Erhöhung der Netzfrequenz zu erkennen. Die frequenzabhängige Wirkleistungsbegrenzung löst eine schnelle Reaktion in Abhängigkeit der plötzlichen Veränderungen der Netzfrequenz aus. Wenn die Frequenz über einen speziellen Schwellenwert steigt, wird die Wirkleistung in Abhängigkeit der Netzfrequenz reduziert. Hinsichtlich des Frequenz-Sollwerts und des Leistungsgradienten sind je nach Sicherheitsvorschrift verschiedene Implementierungen verfügbar. Das folgende Diagramm beschreibt das Konzept der frequenzabhängigen Wirkleistungsbegrenzung. Output Power (%) Power limitation 100 Disconnect region 50 0 fback fstart fend Freq. (Hz) (a) Merkmale der frequenzabhängigen Wirkleistungsbegrenzung IV351 Rev03 Ausstellungsdatum 2012-11-22 Seite 223 von 278 + FR 7.2. Blindleistung Die Überwachung der Blindleistung dient dazu, die Netzspannung an der Netzanschlussstelle einzustellen und zu festigen. Die feste Blindleistung muss in Übereinstimmung mit den Netzbedingungen in der Erzeugungsanlage festgelegt werden. In der Regel trägt ein Wechselrichter, wenn er sich als übererregter Generator verhält, zur Erhöhung der Netzspannung bei, als untererregter Generator verhält er sich auf entgegengesetzte Weise. Der Wechselrichter 2G3P unterstützt vier Formen der Blindleistung, die vom Netzbetreiber für seine Anlage verwendet werden können. Die Sollwert-Kontrolle oder die Kennlinie lassen sich über die Kommunikationsmöglichkeit einstellen. Im Folgenden werden die einzelnen Methoden beschrieben: 7.2.1. COSij-Sollwert-Kontrolle Der Betreiber weist einen festen Wert für den Leistungsfaktor Cosij innerhalb des festgelegten Bereichs cosij = da 0,8unterreregt a 0,8übererregt.zu. Die Wirkleistung im Ausgang der “cosij-Sollwert-Kontrolle ” kann folgendermaßen dargestellt werden: (Der grüne Bereich zeigt den zulässigen Betriebspunkt, z.B. beim 10 kWh-Modell) (b) Ausgangsblindleistung der Setpoint-Kontrolle cosij IV351 Rev03 Ausstellungsdatum 2012-11-22 Seite 224 von 278 + FR 7.2.2. Q-Sollwert-Kontrolle Der Netzbetreiber weist einen festen Wert der Blindleistung Q zu, mit einem zulässigen Einstellungsbereich Q = +6kVar bis -6kVar (beim 10kW-Modell). Die Wirkleistung im Ausgang der Q-Sollwert-Kontrolle” kann folgendermaßen dargestellt werden: (Der grüne Bereich zeigt den zulässigen Betriebspunkt, z.B. beim 10 kWh-Modell) (b) Ausgangsblindleistung der Setpoint-Kontrolle Q IV351 Rev03 Ausstellungsdatum 2012-11-22 Seite 225 von 278 + FR 7.2.3 Kennlinie COSij(P) Der Wert des Leistungsfaktors cosij wird als Funktion der Wirkleistung mit einer voreingestellten Kennlinie gesteuert. Die Netzbetreiber können für ihre Erzeugungsanlagen in Abhängigkeit der Netzbedingungen jedoch eine andere Kurve bereitstellen. Die vorgegebene Kennlinie COSij(P) verfügt über 4 Arbeitspunkte und einen werkseitig eingestellten Grenzwert cosij: (Der zulässige Bereich des Grenzwerts cosij liegt zwischen 0,8~1,0 und für die Arbeitspunkte zwischen 0%~100%.) (d) Werkseitig eingestellte Kennlinie COSij(P) Die Wirkleistung im Ausgang der “Kennlinie COSij(P)” kann folgendermaßen dargestellt werden: (Der grüne Bereich zeigt den zulässigen Betriebspunkt, z.B. beim 10 kWh-Modell) (e) Ausgangsblindleistung der Kennlinie COSij(P) IV351 Rev03 Ausstellungsdatum 2012-11-22 Seite 226 von 278 + FR 7.2.4 Blindleistungs-/Spannungskennlinie Q(U) Der Wert der Blindleistung Q wird als Funktion der Netzspannung mit einer voreingestellten Kennlinie gesteuert. Die Netzbetreiber können für ihre Erzeugungsanlagen in Abhängigkeit der Netzbedingungen jedoch eine andere Kurve bereitstellen. Die vorgeschriebene Kennlinie Q(U) verfügt über vier Arbeitspunkte und einen werkseitig eingestellten Grenzwert Q: (Der zulässige Bereich des Grenzwerts Q/S liegt zwischen 0%~60% und für die Arbeitspunkte zwischen 0%~100%.) (f) Die werkseitig eingestellte Kennlinie Q (U) Die Wirkleistung im Ausgang der “Kennlinie Q(U)” kann folgendermaßen dargestellt werden: (Der grüne Bereich zeigt den zulässigen Betriebspunkt, z.B. beim 10 kWh-Modell) (g) Ausgangsblindleistung der Kennlinie Q (U) IV351 Rev03 Ausstellungsdatum 2012-11-22 Seite 227 von 278 + FR 8. Betriebsstatus des Wechselrichters Der Wechselrichter wurde entwickelt, um benutzerfreundlich zu sein. Alle Betriebszustände werden in klar verständlicher Weise auf dem Display oder über Fernüberwachung angezeigt. Alle möglichen Meldungen werden in der folgenden Tabelle aufgeführt. Matrix der Sprachen der angezeigten Meldungen (Fortsetzung nächste Seite) IV351 Rev03 Ausstellungsdatum 2012-11-22 Seite 228 von 278 + FR Ein On Off Einschaltung akustisches Signal Ausschaltung akustisches Signal IV351 Rev03 Ausstellungsdatum 2012-11-22 Allgemeine Systemmeldungen Aus Alarm Zeit Datum:dd.mm.yyyy Sa Date:dd.mm.yyyy Sat Time Datum:dd.mm.yyyy Fr Date:dd.mm.yyyy Fri Alarm Datenlogger Audible Alarm Zeitangaben Datum:dd.mm.yyyy Do Date:dd.mm.yyyy Thu Datum:dd.mm.yyyy Di Date:dd.mm.yyyy Tue Datum:dd.mm.yyyy Mi Datum:dd.mm.yyyy Mo Date:dd.mm.yyyy Mon Date:dd.mm.yyyy Wed Datum:dd.mm.yyyy So Date:dd.mm.yyyy Sun Datumsangabe Speicher:xx.x% Memory:xx.x% S/N:xxxxxxxxxxxxxxxx SD-Speicherkarte S/N:xxxxxxxxxxxxxxxx Seriennummer Systemanzeige Version:xx.xx-xx.xx System Display hours:minutes ( 17:23 ) ( day.month.year 10.04.2011 ) DEUTSCH (Deutschland) Firmware-Version Version:xx.xx-xx.xx hours:minutes ( 17:23 ) Uhrzeitformat day.month.year 10.04.2011 ) Menü Systemanzeige Datenformat Betrieb ENGLISH Betriebsstatus Allgemeine Systemmeldungen Allgemeine Systemmeldungen ( Paro Marcha Alarma sonora Hora Off On Allarme sonoro Ora Data:dd.mm.yyyy Sab. Data:dd.mm.yyyy Ven. Data:dd.mm.yyyy Gio. Data:dd.mm.yyyy Mer. Data:dd.mm.yyyy Mar. Data:dd.mm.yyyy Lun. Data:dd.mm.yyyy Dom. Memoria:xx.x% Vers.FW:xx.xx-xx.xx S/N:xxxxxxxxxxxxxxxx Info. sistema ore:minuti ( 17:23 ) giorno.mese.anno 10.04.2011 ) ITALIANO Seite 229 von 278 + FR Fecha:dd.mm.yyyy Sab. Fecha:dd.mm.yyyy Vie. Fecha:dd.mm.yyyy Jue. Fecha:dd.mm.yyyy Mie. Fecha:dd.mm.yyyy Mar. Fecha:dd.mm.yyyy Lun. Fecha:dd.mm.yyyy Dom. Memoria:xx.x% Versión:xx.xx-xx.xx S/N:xxxxxxxxxxxxxxxx Pantalla inform. horas:minutos ( 17:23 ) dia.mes.año ( 10.04.2011 ) ESPAÑOL (Spanien) OFF ON Alarme sonore Heure Date:dd.mm.yyyy sam Date:dd.mm.yyyy ven Date:dd.mm.yyyy jeu Date:dd.mm.yyyy mer Date:dd.mm.yyyy mar Date:dd.mm.yyyy lun Date:dd.mm.yyyy dim Carte SD:xx.x% Version:xx.xx-xx.xx S/N:xxxxxxxxxxxxxxxx Affichage hours:minutes ( 17:23 ) ( day.month.year 10.04.2011 ) Français (Frankreich) Uit Aan Alarm Tijd Datum:dd.mm.yyyy Za Datum:dd.mm.yyyy Vr Datum:dd.mm.yyyy Do Datum:dd.mm.yyyy Wo Datum:dd.mm.yyyy Di Datum:dd.mm.yyyy Ma Datum:dd.mm.yyyy Zo Geheugen:xx.x% Versie:xx.xx-xx.xx S/N:xxxxxxxxxxxxxxxx Systeem informatie uren:minuten ( 17:23 ) ( dag.maand.jaar (10.04.2011) Nederlands (Holland) Sprache Anzeige Sprachauswahl Spanisch Italienisch Anzeige in Spanisch Spanish Italy France Dutch Anzeige in italienisch Anzeige in Französisch Anzeige in holländisch Holländisch Pac:xxxxxW Pac:xxxxxW Pdc:xxxx/xxxxW Ausgangsleistung in Echtzeit Eingangsleistung Momentanwert IV351 Rev03 Ausstellungsdatum 2012-11-22 Informationsmeldungen Messgerät Pdc:xxxx/xxxxW DEUTSCH (Deutschland) Betriebszusta ENGLISH nd Informationsmeldungen Zähler Informationsmeldungen Zähler Deutsch Anzeige in Deutsch German Französisch Englisch Anzeige in Englisch English Language DEUTSCH (Deutschland) Betrieb ENGLISH Betriebsstatus Pdc:xxxx/xxxxW Pac:xxxxxW ITALIANO Olandese Francese Italiano Spagnolo Tedesco Inglese Lingua ITALIANO Seite 230 von 278 + FR Pdc:xxxx/xxxxW Pac:xxxxxW ESPAÑOL (Spanien) Holandés Frances Italiano Español Aleman Ingles Idioma ESPAÑOL (Spanien) Pdc:xxxx/xxxxW Pac:xxxxxW Français (Frankreich) Hollandaise Français Italien Espagnol Allemand Anglais Langue Français (Frankreich) Pdc:xxxx/xxxxW Pac:xxxxxW Nederlands (Holland) Nederlands Frans Italiaans Spaans Duits Engels Taal Nederlands (Holland) Idc:xx.x/xx.xA Etot:xxxxxxxxx.xkWh Etoday:xxx.xkWh H-total:xxxxxxhr Temperature:xx.xºC Vac:xxx.x/xxx.x/xxx.xV Frequency:xx.xHz Batteriestrom der PV-Generatoren Informationen zur gespeicherten Energie Energie pro Tag Betriebsstunden Innentemperatur Netzspannung Netzfrequenz Fréquence:xx.xHz VAC:xxx.x/xxx.x/xxx.xV Température:xx.xºC H.fonction:xxxxxxhr Ejour:xxx.xkWh Etot:xxxxxxxxx.xkWh Safety:RD1699 Safety:G83/1-1 Safety:G59 Issue 2 Safety:RD1699 Safety:G83/1-1 Safety:G59 Issue 2 Safety:VDE-AR-N 4105 Safety:G59 Issue 2 Safety:G83/1-1 Safety:RD1699 Seite 231 von 278 + FR Safety:G59 Issue 2 Safety:G83/1-1 Safety:RD1699 Safety:VDE-AR-N 4105 Safety:G59 Issue 2 Safety:G83/1-1 Safety:RD1699 Safety:VDE-AR-N 4105 Safety:VDE-AR-N 4105 Frequenza:xx.xHz Vac:xxx.x/xxx.x/xxx.xV Temperatura:xx.xºC H.tot.funz.:xxxxxxhr Eoggi:xxx.xkWh Etot:xxxxxxxxx.xkWh IDC:xx.x/xx.xA VDC:xxx/xxxV Français (Frankreich) Safety:VDE-AR-N 4105 Frecuencia:xx.xHz Vac:xxx.x/xxx.x/xxx.xV Temperatura:xx.xºC H.TotalFunc.:xxxxxxhr Ehoy:xxx.xkWh Etot:xxxxxxxxx.xkWh Idc:xx.x/xx.xA Vdc:xxx/xxxV ITALIANO Safety:VDE0126-1-1/A1 Safety:VDE0126-1-1/A1 Frequenz:xx.xHz Uac:xxx.x/xxx.x/xxx.xV Temperatur:xx.xºC h-Gesamt:xxxxxxhr E-heute:xxx.xkWh Etot:xxxxxxxxx.xkWh Idc:xx.x/xx.xA Vdc:xxx/xxxV ESPAÑOL (Spanien) Safety:VDE0126-1-1/A1 Safety:VDE0126-1-1/A1 Safety:VDE0126-1-1/A1 IV351 Rev03 Ausstellungsdatum 2012-11-22 Auswahl Ländereinstellung Udc:xxx/xxxV Vdc:xxx/xxxV Batteriespannung der PVGeneratoren Idc:xx.x/xx.xA DEUTSCH (Deutschland) Betriebszusta ENGLISH nd Safety:G59 Issue 2 Safety:G83/1-1 Safety:RD1699 Safety:VDE-AR-N 4105 Safety:VDE0126-1-1/A1 Frequentie:xx.xHz Uac:xxx.x/xxx.x/xxx.xV Temperatuur:xx.xºC h-Totaal:xxxxxxhr E-today:xxx.xkWh Etot:xxxxxxxxx.xkWh Idc:xx.x/xx.xA Udc:xxx/xxxV Nederlands (Holland) Status:FLASH Status:SLAVE FLASH DSP-Aktualisierung Aktualisierung Slave IV351 Rev03 Ausstellungsdatum 2012-11-22 Status:Fault Störung an der Anlage oder am Wechselrichter Status:2.Flash Status:Flash Status:Fehler Status:Normal Status:Normal Wechselrichter speist ins Netz Status:Warten Status:Waiting Status:Netz-Prüf xxxs Status:Standby DEUTSCH (Deutschland) Status:Standby ENGLISH Netzüberwachung mit DCStatus:Checking xxxs Spannung >= 350V Standby im Eingangsbereich 200V~259V Initialisierung und Warten im Eingangsbereich 260V~349V Betriebsbedingungen Informationsmeldungen Allgemeinzustand Informationsmeldungen Allgemeinzustand Stato:Aggiorn. Slave Stato:Aggiornamento Stato:Errore Stato:Normale Stato:Test xxxs Stato:In attesa Stato:Standby ITALIANO Seite 232 von 278 + FR Estado:Flash Sec Estado:Actualizando Estado:Defecto Estado:Normal Estado:Chequeo xxxs Estado:En proceso Estado:En espera ESPAÑOL (Spanien) Etat:FLASH "esclave" Etat:Mem. FLASH Etat:En défaut Etat:Connecté réseau Etat:Vérif. xxxs Etat:Prêt Etat:En attente Français (Frankreich) Status:Slave Flash Status:Flash Status:Fout Status:Normaal Status:Controle xxxs Status:Wachten Status:Standby Nederlands (Holland) Grid Fault Grid Volt. Fault Messwerte Netz außerhalb der Bereichsspezifikation Netzspannung außerhalb des Spannungsbereichs Fehlerstrom Fehlerstrom am Erdleiter zu hoch IV351 Rev03 Ausstellungsdatum 2012-11-22 RCMU Fault SD Zugriff-Fehler DC-Überspannung Lesen der SD Card access error SD-Karte nicht möglich PV over voltage Netzüberspannung Kein Netz Speicher voll No Utility AC-Netz nicht verfügbar I dispers.Alta Err. accesso SD Memoria piena Sovratensione DC Rete assente Err.Isolamento Err. Freq. rete Err. Tens. rete Errore di rete ITALIANO Seite 233 von 278 + FR Defecto a tierra Error lectura SD Memoria llena Sobretensión DC Red ausente Def. aislamiento Def. frec. red Fehler Netzfrq. Isolationsfehler Def. tension red Defecto de red ESPAÑOL (Spanien) Fehler Netzspg. Netzfehler DEUTSCH (Deutschland) SD-Speicherkarte ist zum Speichern der Memory Full Daten nicht ausreichend Isolation Fault Isolationsfehler am PV-Generator Netzfrequenz außerhalb Grid Freq. Fault des Frequenzbereichs ENGLISH Betriebsbedingungen Allgemeine Hinweismeldungen und Fehlermeldungen Allgemeine Hinweismeldungen und Fehlermeldungen Défaut terre Err. Accès SD Mémoire pleine Surtention DC Réseau absent Défaut isolation Déf. Freq réseau Déf. U(v) réseau Défaut réseau Français(France) Aardfout SD kaart toegangsfout Geheugen vol DC-overspanning Net niet aanw. Isolatiefout Netfreq. fout Netspanningsfout Netfout Nederlands (Dutch) DC Sensor Fault CPLD Ver. Fault Low DC Bus High DC Bus Consistent Fault M-S Ver. Fault Relay Failure USB CONNECT Sensor DC-Ausgang Fehler Version CPLD nicht korrekt Niedrige Spannung an DC BUS Zu hohe Spannung an DC BUS Messung zwischen CPU Master und Slave nicht konsistent Firmware-Version DSP und CPU Slave sind nicht kompatibel Relaisausgang nicht eingeschaltet Kommunikationsfehler zwischen den Daten und CPU Slave IV351 Rev03 Ausstellungsdatum 2012-11-22 ENGLISH Betriebsbedingungen USB angeschlossen Relaisfehler M-S Ver. Fehler Konsistenzfehler DC Bus zu hoch DC Bus zu tief CPLD Ver. Fehler DC Sensor Fehler DEUTSCH (Deutschland) Connessione USB Errore Relè FW incompatibile Err. processore DC Bus alto DC Bus basso Errore CPLD Ver. Err. Sensore DC ITALIANO Seite 234 von 278 + FR Conexión USB Fallo relé Ver. M-E incomp. Defec.Coherencia Bus DC alto Bus DC bajo Fallo CPLD Ver. Defecto sensorDC ESPAÑOL (Spanien) Allgemeine Meldungen für Fehler am Wechselrichter Allgemeine Meldungen für Fehler am Wechselrichter Connection USB Défaut relais AC Err applicatif Err. processeur Entrée 1 élevée Entrée 1 faible Err CPLD Ver. Err capteur DC Français(France) USB verbonden Relaisfout M-S Ver. Fout CPU fout DC bus hoog DC bus laag CPLD Ver. Fout DC sensor fout Nederlands (Dutch) Inv Start Fault Internal Fan Lock External Fan Lock Fehler beim IGBT-Start Interner Lüfter funktioniert nicht Externer Lüfter funktioniert nicht Bus Soft Timeout Schutz DC-BUS IV351 Rev03 Ausstellungsdatum 2012-11-22 Unbekant. Fehler Unknown EEPROM-Fehler Bus Soft Timeout EEPROM Fehler Unmöglich im EEPROM zu EEPROM Failure lesen oder zu schreiben Lüfter blockiert Lüfter blockiert Inv Start Fault PV Verbdg.fehler PV Connect Fault Over Boost Curr. Identifikation des PV-Generator unmöglich Over Boost Curr. Eingangsstrom des BoostModuls zu hoch CPU Fehlfunktion Eingang Überlast Sci Failure Kommunikationsfehler zwischen CPU-Master und Slave DEUTSCH (Deutschland) Eingangsstrom des IGBT zu Over Inv Curr. hoch ENGLISH Betriebsbedingungen Bus Soft Timeout Sconosciuto Errore EEPROM Ventil.est.blocc Ventil.int.blocc Err.attivazione Err conness. PV I Inverter alta Überstrom Err.com.interna ITALIANO Seite 235 von 278 + FR LimiteTiempo Bus Desconocido Fallo EEPROM Bloq.vent.extern Bloq.vent.Intern Def.arranque Inv Defecto conex.PV Int. limite Inv Sobreint.Exc.Reg Fallo en 1 CPU ESPAÑOL (Spanien) Allgemeine Meldungen für Fehler am Wechselrichter Déf. Com. Bus Err. Inconnue ERR EEPROM Verr. Ventil Ext Verr. Ventil Int Déf. Démarrage Err. Connect. PV Courant>Onduleur Cour. Boost haut Err. Com proces. Français(France) Bus Soft Timeout Onbekend EEPROM fout Ext.vent.geblokk Int.vent.geblokk Inv Start Fault PV verbind. fout Max inv. Stroom Over Boost Curr. CPU fout Nederlands (Dutch) Inv Soft Timeout Over temperature RCMU Failure IGBT Schutz Wechselrichter Innentemperatur zu hoch Modul-Erfassung GFCI -Fehler N/A "OK" um zu Starten N/A PRESS OK TO START IV351 Rev03 Ausstellungsdatum 2012-11-22 Wert= Value= OK per start N/D Valore= Storico errori Attendere prego NO storico err. NO Dati settim. NO Dati giorno Premi OK x reset ITALIANO Err. Sens.Terra Sovratemperatura Inv Soft Timeout ITALIANO Seite 236 von 278 + FR Arrancar:PulseOK No disponible Valor= HistoricoErrores Fehlergeschichte Sem.: NoRegistro Espere por favor Keine Wochenaufzeichn No Weekly Records Dia: No registro Bitte warten Keine Tagesaufzeichng No Daily Records Borrar:Pulse OK NoHistor.Errores "OK" um zu Löschen Press OK to Clear ESPAÑOL (Spanien) FalloDiferencial Sobretemperatura LimiteTiempo Inv ESPAÑOL (Spanien) Fehlerspeicher leer DEUTSCH (Deutschland) FI-Fehler Übertemperatur Inv Soft Timeout DEUTSCH (Deutschland) ENGLISH No Error History Allgemeine SystemPlease Wait Log-Meldungen Error History Betriebsbedingungen Wechselrichter Log-Meldungen Wechselrichter Log-Meldungen ENGLISH Betriebsbedingungen Allgemeine Meldungen für Fehler am Wechselrichter OK = démarrer N/A VALEUR= Err. Historique Attendre SVP Historique OK Pas aff. semaine Pas aff. jour OK = suppression Français(France) Défaut RCMU Temp. élevée Déf. Logicel Français(France) Druk OK om te starten N/A Waarde= Foutenhistorie A.U.B. wachten Geen foutenhistorie Geen weekrecords Geen dagrecords Druk OK om te wissen Nederlands (Dutch) RCMU fout Temp. te hoog Inv Soft Timeout Nederlands (Dutch) 9. Kommunikation Der Wechselrichter verfügt über leistungsstarke Kommunikationsschnittstellen mit den entsprechenden Optionen Qualifiziertes Personal kann bei Bedarf die Firmware über die USB-Schnittstelle aktualisieren. 9.1 USB (am Wechselrichter) Der PV-Wechselrichter verfügt über eine vielseitige Kommunikationsschnittstelle, über den USB-Port an der Unterseite des Gerätes kann der Benutzer mittels der Software “Pro Control” den Echtzeit-Status mehrerer Wechselrichter aufzeichnen. Auch die Firmware wird über diese Schnittstelle aktualisiert. Anschluss eines Notebooks an den Wechselrichter via USB Typ-A auf Typ B Adapterkabel. 9.2 Kommunikationssteckplatz RS-485 Der PV-Wechselrichter verfügt über einen Steckplatz für optional erhältliche Kommunikationsschnittstellen. Durch die Installation einer RS-485-Karte oder einer kompatiblen Karte kann die Kommunikationsfähigkeit der Geräte erweitert werden. Um den Steckplatz zu verwenden, entfernen Sie zunächst die Abdeckung mit einem Schraubenzieher. Stecken Sie die Karte in den Steckplatz und schließen Sie die Kabel über die Gummiisolierung an. Weitere Informationen erhalten Sie von Ihrem Fachhändler. Als Beispiel, der Kommunikationssteckplatz am SOLEIL 3F-TL10K: IV351 Rev03 Ausstellungsdatum 2012-11-22 Seite 237 von 278 + FR Nach der Installation der RS485-Karte kann der Benutzer den PC an die Wechselrichter anschließen und den Betriebszustand fernüberwachen. Anmerkung: Die Kommunikationsabdeckung muss ordnungsgemäß montiert und installiert werden, um die Dichtigkeit des Gerätes zu gewährleisten. Die RS485 Karte verfügt über zwei RJ45-Ports mit LEDs, einen Klemmblock für die Anschlüsse und einen DIP-Schalter mit Abschlusswiderstand für den Kommunikationsbus, wie in der Zeichnung oben dargestellt. Die PWR (Leistung) LED zeigt an, dass die RS485-Karte angeschlossen ist. Sie leuchtet grün, wenn die RS485-Karte vom Wechselrichter mit ausreichender Leistung versorgt wird. IV351 Rev03 Ausstellungsdatum 2012-11-22 Seite 238 von 278 + FR Die Link-LED zeigt die Betriebsbereitschaft über den RJ45-Port an. Das bedeutet, dass sie bei Anschluss einer Ethernet-Leitung in den RJ-45-Ports während der Datenübertragung gelb leuchtet und mit einer Frequenz von 2Hz blinkt. Die folgende Tabelle zeigt die Pin-Belegung der RJ45-Ports der RS485-Karte. RJ-45 8 Pins (8P8C) 8 1 PIN BEZEICHNUNG Spannung 1 Tx+ s400mVp2 Tx- 3 Rx+ p~s15Vp-p 400mVpp~15Vp-p 4 5 GND GND 6 Rx- 400mVp-p~ 15Vp-p 7 8 VDC VDC 11V~12V RS485 Verdrahtungsinformation Am Stecker liegt DC-Spannung an. Pin 7 und Pin 8 des RJ45-Ports werden für die DC-Versorgung verwandt. Stellen Sie sicher, “dass keine anderen Geräte an diesen Port angeschlossen sind”, um Schäden zu vermeiden. IV351 Rev03 Ausstellungsdatum 2012-11-22 Seite 239 von 278 + FR 9.3 RS485 Kartenkonfiguration Verbindung der RS485-Karte Es ist möglich, alleRJ45-Ports auf jeder RS485-Karte mit einer Ethernet-Leitung anzuschließen. Dabei muss es sich um eine Leitung des Typs “Straight Through” handeln. Verbindung über Ethernet-Leitung Typ A für RS485-Karte Anschluss über Ethernet-Leitung Typ B für RS485-Karte IV351 Rev03 Ausstellungsdatum 2012-11-22 Seite 240 von 278 + FR Bestimmung der Straight Through" Leitung für den RJ-45-Port der RS485-Karte: Die Verkabelung wird nicht nur für die Ethernet-Leitung verwendet, sondern auch für die Standard-Verbindungen der RS485-Karte, wie in der Abbildung unten gezeigt wird. Als Terminierungen der RS485-Karte werden Leitungen mit verdrillten Paaren (twisted pair) verwendet. Kabelverbindungen mit verdrillten Paaren (twisted pair) für RS485-Karte Als Standard-Verbindung für die RS485-Karte können die Leitung mit verdrillten Paaren (twisted pair) und die Ethernet-Leitung auch kombiniert verwendet werden, wie in der Abbildung unten. Kombination der Anschlussvarianten für die RS485-Karte IV351 Rev03 Ausstellungsdatum 2012-11-22 Seite 241 von 278 + FR Beim Anschluss der RS485-Karte vom Wechselrichter an einen RS232 Umformer werden die Klemmen der RS485 umgekehrt angeschlossen, d.h. der Empfänger wird an den Sender und der Sender an den Empfänger angeschlossen. Weitere Details unten. Abschlusswiderstände über DIP-Schalter Der DIP-Schalter kann zur Konfiguration der RS485-Karte des letzten Wechselrichters auf derselben Linie, als Abschlusswiderstand der Kommunikation verwendet werden. DIP switch ein Pin Pin Pin 1 2 1 Ein-/Auszustand des DIP-Schalters IV351 Rev03 Ausstellungsdatum 2012-11-22 Pin2 Seite 242 von 278 + FR Wenn die Pins 1 und 2 des DIP-Schalters auf “ON” gestellt werden, wird auf der RS385Karte des letzten Wechselrichters der Abschlusswiderstand aktiviert. Diese Konfiguration ist nur für den letzten Wechselrichter erforderlich. Belassen Sie die DIP-Schalter der anderen Wechselrichter auf “Off”. 9.4 Spezifikation RS485-Karte IV351 Rev03 Ausstellungsdatum 2012-11-22 Seite 243 von 278 + FR 9.5 RS485-Karte Fehlerbehebung In der Regel hat die RS485-Karte nur einen geringen Wartungsbedarf. Sollte auf der RS485Karte ein Fehler auftreten, lesen Sie bitte die folgende Tabelle, bevor Sie sich an den Fachhändler vor Ort wenden. Mögliche Maßnahmen RS485-Karte ist nicht fest eingeschoben, setzen Sie sie richtig ein Überprüfen Sie, ob der Wechselrichter Die PWR(Leistung) aktiv ist LED ist aus Überprüfen Sie, ob der Wechselrichter angeschlossen ist. Überprüfen Sie, ob die RS485-Karte defekt ist. Überprüfen Sie, ob der Wechselrichter normal läuft Überprüfen Sie, ob das Kabel ordnungsgemäß angeschlossen ist. Siehe auch Kapitel 3.1 für die Belegung der Pins RJ-45 Die gelbe LED ist aus Überprüfen Sie, ob die Kabel für die ordnungsgemäße Übertragung zu lang sind. Die Gesamtlänge sollte kleiner 800m sein Überprüfen Sie, ob die Umgebungstemperatur innerhalb von 10°C bis 70°C liegt. Modbus-Karte INSTALLATION UND ANSCHLUSS Die PCB SERMB-Karte ist ein Zubehör der PV-Wechselrichter. Die Installation darf nur bei abgeschaltetem (OFF) Wechselrichter durchgeführt werden. Installieren Sie die Karte nicht, wenn darauf Schäden erkennbar sind. i Konfigurieren Sie zuerst die DIP-Schalter, wie auf der folgenden Seite beschrieben (die Werkseinstellungen sind_ mode 1, Baud –Rate 9600), bevor sie die Karte installieren. i Wie in Abb. 1 dargestellt, die Linie RS485/RS422 an den Verbinder, vorne am Generator anschließen. Wir empfehlen die Verwendung einer zweipoligen Leitung, 0.22mm2, (AWG24) *1. i Wenn an der RS485-Kommunikation nur ein Wechselrichter angeschlossen ist oder wenn der PV-Wechselrichter der letzte des seriellen Anschlusses ist, muss der Schalter SW3-4 auf ON gestellt werden. i Wenn an der RS422-Kommunikation nur ein Wechselrichter angeschlossen ist oder wenn der PV-Wechselrichter der letzte des seriellen Anschlusses ist, müssen der Schalter SW3-3 und der Schalter SW3-4 auf ON gestellt werden. IV351 Rev03 Ausstellungsdatum 2012-11-22 Seite 244 von 278 + FR i Die Karte in den entsprechenden Steckplatz einfügen und die Schutzabdeckung (die mit dem PV-Wechselrichter geliefert wird) so befestigen, dass das Gerät vor Wassereintritt geschützt ist. i Den PV-Wechselrichter einschalten und die MODBUS-Karte prüfen. ig.1: RS 485/RS422 Anschlüsse 1 . Die Verbindung des Erdleiters trägt dazu bei, Offset-Probleme zwischen den verschiedenen Geräten zu beseitigen. Er kann auch an das Kabelschild angeschlossen werden, um Störungen einzuschränken. IV351 Rev03 Ausstellungsdatum 2012-11-22 Seite 245 von 278 + FR KONFIGURATIONEN: Auf der Karte gibt es zwei Blöcke mit DIP-Schaltern für die Konfiguration: ID Funktion DIP Beschreibung 1 Slave-Adresse DIP1-5 ON DIP 1 2 3 4 5 6 7 8 2 Einstellung Baud Rate DIP6-7 ON DIP 1 2 3 4 5 6 7 8 3 Reserviert DIP8 ON Modbus Slave-Nummer: 1-31 DIP DIP DIP DIP DIP IND 5 4 3 2 1 OFF OFF OFF OFF ON 1 OFF OFF OFF ON OFF 2 OFF OFF OFF ON ON 3 .. .. .. .. .. .. ON ON ON ON ON 31 ANMERKUNG Adresse 0 ist reserviert. DIP DIP6 BAUD 7 OFF OFF 1200 OFF ON 2400 ON OFF 4800 ON ON 9600 DIP 1 2 3 4 5 6 7 8 ID Funktion DIP 4 Protokoll-Auswahl DIP1-2 Beschreibung DIP 1 2 3 4 5 Ladung RS485A DIP3 ON DIP DIP DIP1 PROTOKOLL 2 OFF OFF Modbus Funktion OFF ON -ON OFF -ON ON -DIP 3 OFF = No DIP 3 ON = 120Ohm 1 2 3 4 6 Ladung RS485B DIP4 ON DIP DIP 4 OFF = No DIP 4 ON = 120Ohm 1 2 3 4 LED: Aus (OFF ) Ein (ON) BLINKEN (500ms ON- 500ms OFF) GELBE LED (Modbus-Kommunikation) Keine Kommunikation mit AP -Modbus Ok 2 GRÜNE LED (Interner Status) Karte defekt Versorgung Ok. Die Karte kommuniziert mit dem Wechselrichter Die Kommunikation mit dem Wechselrichter ist Ok. 2 Die LED blinkt jedes Mal, wenn sie einen Befehl über MODBUS erhält und schaltet sich aus, wenn nach einer Sekunde keine weiteren Befehle eingehen. IV351 Rev03 Ausstellungsdatum 2012-11-22 Seite 246 von 278 + FR Störungen und Behebungen: Störung Mögliche Ursachen Behebung Die Karte schaltet sich nicht ein Die Karte ist nicht richtig befestigt. Der Wechselrichter ist ausgeschaltet. Die Karte ist defekt Die Karte kommuniziert nicht mit dem Wechselrichter (Grüne LED EINGESCHALTET) Warten auf eine Mitteilung Die Karte kommuniziert nicht mit dem SW-Modbus Falscher Anschluss an die Modbus-Linie Falsche Einstellung der Parameter Die Karte prüfen und richtig im Steckplatz befestigen. Überprüfen, ob der Wechselrichter angeschlossen ist Sollte die Störung nicht behoben werden, wenden Sie sich an den Service. Das System wartet auf einen Rücksetzungsbefehl Den Wechselrichter aus- und wieder einschalten, um die Karte zurückzusetzen. Den Anschluss prüfen Die Einstellungen zu den Abschlusswiderständen prüfen Die Einstellungen der DIPSCHALTER prüfen TECHNISCHE EIGENSCHAFTEN In der Tabelle unten werden die technischen Eigenschaften der ModbusSchnittstellenkarte aufgeführt. Eigenschaft Spezifikation Spannung Beschreibung 12VDC Umwandlungskarte Modbus-Protokoll für Solar-Wechselrichter 3F 0x03 Einzel- oder Mehrfachlesung Modbus-Befehle unterstützt Konfigurierbare Baudrate Slave-Adresse Serieller Anschluss 1200 / 2400 / 4800 / 9600 bps Knoten 1-31 (0 reserviert), via DIP-Schalter 4 Drähte RS422 oder 2 Drähte RS485 Bis zu maximal 31 Slaves auf der gleichen Linie Kompatibilität Betriebstemperatur Feuchtigkeit IP-Schutzgrad Verbrauch LEDS Standard Abmessungen LxBxH [mm] PV-Solar-Wechselrichter -10°/50°C 0÷-95% nicht kondensierend IP65 < 1W Modbus-Kommunikation EG 132 x 76 x 34 IV351 Rev03 Ausstellungsdatum 2012-11-22 Seite 247 von 278 + FR 9.6 USB-Schnittstelle (Datenlogger) Der Datenlogger ist zur Verbindung an einen PC mit einer USB-Typ B ausgerüstet. Entfernen Sie zuerst die Abdeckung der USB-Buchse. IV351 Rev03 Ausstellungsdatum 2012-11-22 Schnittstelle Seite 248 von 278 + FR 10. Erweiterte Einstellungen Im Anschluss finden Sie die Beschreibung des Konfigurationsmenüs der Parameter des Wechselrichters für die in der Norm VDE-AR-N 4105 vorgesehenen Netzdienstleistungen. Five conditions on this screen Reactive Power Func. Mode:Off Value:N/A Reactive Power Func. Mode:Off Value:N/A Press OK over 5s to change the setting Press OK over 5s to change the setting Reactive Power Func. Mode:Const. PF Value:+0.90pf Password Incorrect password ź Press OK over 5s to change the setting Press OK button over 5 seconds 1 ź Reactive Power Func. Mode:Const. Q Value:+1000VAR Press OK over 5s to change the setting Reactive Power Func. Mode:Curve PF(P) Value:1. 20% +1.00pf 2. 40% +1.00pf 3. 50% +1.00pf 4. 100% -0.90pf V lock-in: 241.5 V V lock-out: 230.0 V Press any button ź ź • • : Select char : Delete : Next Press OK button If password is correct (Password: 14914) Reactive Power Mode Const. PF Const. Q Curve PF(P) Curve Q(U) OK Reactive Power Mode Off <Off> Off/Const. PF/Const. Q/Curve PF(P)/Curve Q(U) Reactive Power Mode Const. PF Const. Q Curve PF(P) Curve Q(U) OK Const. PF +1.00pf > <+1.00pf Reactive Power Func. Mode:Curve Q(U) Type: A Value: 1. 90% +43.6% Q/S 2. 92% +0% Q/S 3. 108% +0% Q/S 4. 110% -43.6% Q/S P lock-in: 20% Pn P lock-out: 5% Pn -0.90~+0.90pf Reactive Power Mode Const. PF Const. Q Curve PF(P) Curve Q(U) OK Const. Q +1000VAR <+1000VAR> 10k model: -4358~+4358VAR 15k model: -6537~+6537VAR 20k model: -8717~+8717VAR Curve PF(P) Reactive Power Mode Const. PF Const. Q Curve PF(P) Curve Q(U) OK V lock-in: 241.5 241.5 V V lock-out: 230.0 V Node 1: 20% +1.00pf Node 2: 40% +1.00pf Node 3: 50% +1.00pf Node 4: 90% -0.90pf V lock-in: 230.0~253.0V V lock-out: 207.0~230.0V Node (X-axis): 0~100% Node (Y-axis): -0.90~+0.90pf Reactive Power Mode Const. PF Const. Q Curve PF(P) Curve Q(U) OK Curve Q(U) Type: A P lock-in: 20% Pn P lock-out: 5% Pn Node 1: 90% +43.6% Q/S Node 2: 92% +0% Q/S Node 3: 108% +0% Q/S Node 4: 110% -43.6% Q/S Die Bezugsnorm VDE-AR-N 4105 sieht keine Einstellung der Parameter V lock-in/out und P lock-in/out vor. Diese beiden Parameter beziehen sich nur auf die Norm CEI-021. Type: A/B P lock-in: 10~100% P lock-out: 5% Node (X-axis): 80~120% Node (Y-axis): -43.6~+43.6% IV351 Rev03 Ausstellungsdatum 2012-11-22 Seite 249 von 278 + FR 11. Download der Loggerdaten Die Daten des internen Datenloggers können auf den PC kopiert und hier verwaltet werden. Dazu benötigen Sie einen B-Typ USB-Kabel-Adapter. Der Datenlogger wird vom PC über den USB-Port versorgt. 11.1 Zugang und Verwaltung der gespeicherten Daten (1) Lösen Sie die Schrauben und öffnen Sie die Abdeckung des USB-Ports Typ B. Für die PCs mit Windows ME, 2000, und XP, Vista, Windows 7 wird kein zusätzlicher Treiber benötigt. Für Windows 98 wird ein zusätzlicher Treiber für den Zugriff auf den Datenlogger benötigt. (2) Verbinden Sie das USB-Adapter-Kabel mit einem PC. Die LED zeigt “USB ANGESCHLOSSEN”wenn der Datenlogger mit einem PC verbunden ist. (3) Klicken Sie auf “ Computer” und dann “Wechseldatenträger Disk” auf Ihrem PC. (4) Kopieren Sie den “DAILY”-Ordner im “Wechseldatenträger” und speichern Sie ihn auf “Desktop.” (5) Führen Sie das “Pro Control”-Programm aus. Klicken Sie dann auf “Datei” und wählen “Export/Import” aus. Anmerkung: Wenden Sie sich bezüglich der Installation des Programms Fachhändler oder Vertreter vor Ort. IV351 Rev03 Ausstellungsdatum 2012-11-22 an Ihren Seite 250 von 278 + FR (6) Wählen Sie “Datum von” und “Datum bis” zum Festlegen des gewünschten Zeitraums. Klicken Sie anschließend auf “Import”. (7) Wählen Sie in Ihrem bereits gespeicherten Ordner die Datei “DAILY.dat” aus. Klicken Sie dann auf “Öffnen”. IV351 Rev03 Ausstellungsdatum 2012-11-22 Seite 251 von 278 + FR IV351 Rev03 Ausstellungsdatum 2012-11-22 Seite 252 von 278 + FR (8) Klicken Sie nun auf “Ansicht”. Die gespeicherten Daten werden von der Software verarbeitet. (9) Klicken Sie auf “Export” IV351 Rev03 Ausstellungsdatum 2012-11-22 Seite 253 von 278 + FR (10) Klicken Sie auf “Speichern” Die Daten werden dann in dem von Ihnen bevorzugten Dateiverzeichnis auf Ihrem PC im CSV-Format gespeichert (11) Klicken Sie auf “OK” (12) Klicken Sie in Ihrem bevorzugten Dateiverzeichnis auf dem PC die “DAILY.CSV”-Datei doppelt an. Danach können Sie die gespeicherten Daten mit Microsoft Excel verwalten. IV351 Rev02 Ausstellungsdatum 2012-11-22 Seite 254 von 278 + FR 12 Störungsbehebung Der PV-Wechselrichter muss nur in sehr geringem Umfang gewartet werden. Sollte ein Fehler auftreten, lesen Sie bitte die folgende Tabelle, bevor Sie sich an das Service-Center vor Ort wenden. In dieser Tabelle sind die am häufigsten auftretenden Fehlermeldungen sowie die Lösung der Fehler aufgeführt. Fehleranalyse und Maßnahmen Fehlermeldu Fehler-Definition ng Vorgeschlagene Maßnahmen für Benutzer Vorgeschlagene Maßnahmen für Fachpersonal 1. Leitende Der vom Verbindung Wechselrichter zwischen PHASE erkannte und/oder Erdschlussstrom auf NEUTRALLEITER der AC-Seite liegt und Erde durch über dem Fremdkörper oder Schwellenwert. Feuchtigkeit 2. Leitende Verbindung zwischen PHASE und/oder NEUTRALLEITER und Erde im Anschlusskasten durch Fremdkörper oder Feuchtigkeit 3. Die Isolierung der AC-Leitungen ist beschädigt. Könnte durch einen Tierbiss (z. B. durch Ratten) ausgelöst worden sein 4. Wechselrichter arbeitet fehlerhaft 1. Trennen Sie die AC-Seite vom Wechselrichter durch Ausschalten des ACSchalters 2. Trennen Sie die DC-Seite vom Wechselrichter 3. Überprüfen Sie die AC- und DC-Leitungen und die Isolierung. 4. Schließen Sie den DC- und AC-Anschluss wieder an und überprüfen Sie den Betriebszustand des Wechselrichters 5. Besteht das Problem weiterhin, ¾ aktualisieren Sie die Firmware laut Anweisungen oder *Anmerkung: ¾ tauschen Sie den Isolationshandschuhe sollten Wechselrichter aus. während des Verfahrens getragen werden *Anmerkung: Isolationshandschuhe sollten während des Verfahrens getragen werden 1. Leitende Der vom Verbindung Wechselrichter zwischen PHASE erkannte (PV-Generator) Erdschlussstrom auf und/oder der DC-Seite liegt NEUTRALLEITER über dem und Erde durch Schwellenwert. Fremdkörper oder Feuchtigkeit 2. Leitende Verbindung zwischen PHASE (PV-Generator) Isolationsfehl und/oder er NEUTRALLEITER und Erde im Anschlusskasten durch Fremdkörper oder Feuchtigkeit 3. Die Isolierung der DC-Leitungen ist beschädigt. Könnte durch einen Tierbiss (z. B. durch Ratten) ausgelöst worden sein 4. Wechselrichter arbeitet fehlerhaft 1. Trennen Sie die DC- und AC- 1. Trennen Sie die AC-Seite Anschlüsse vom vom Wechselrichter durch Wechselrichter durch Ausschalten des ACAusschalten des Schalters. Schalters 2. Überprüfen Sie die DC- und 2. Trennen Sie die DC-Seite vom Wechselrichter AC-Leitungen der PV3. Überprüfen Sie die AC- und Anlage. Entfernen Sie DC-Leitungen und die Isolierung. Fremdkörper NUR IM GESICHERTEN ZUSTAND 4. Schließen Sie den DC- und AC-Anschluss wieder an und 3. Schließen Sie den DC- und überprüfen Sie den AC-Anschluss des Betriebszustand des Wechselrichters wieder an Wechselrichters und überprüfen Sie den 5. Besteht das Problem Betriebszustand des weiterhin, Wechselrichters ¾ aktualisieren Sie die 4. Besteht das Problem Firmware laut Anweisungen weiterhin, wenden Sie sich an oder den Service ¾ tauschen Sie den Wechselrichter aus. Anmerkung: Isolationshandschuhe sollten während des Verfahrens getragen Anmerkung: Isolationshandschuhe sollten werden während des Verfahrens getragen werden RCMUFehler Systemfehler Mögliche Ursachen IV351 Rev02 Ausstellungsdatum 2012-11-22 1. Trennen Sie die DC- und ACAnschlüsse vom Wechselrichter durch Ausschalten des Schalters. 2. Überprüfen Sie die DC- und AC-Leitungen der Anlage. Entfernen Sie Fremdkörper NUR IM GESICHERTEN ZUSTAND 3. Schließen Sie den DC- und AC-Anschluss wieder an und überprüfen Sie den Betriebszustand des Wechselrichters 4. Besteht das Problem weiterhin, wenden Sie sich an den Service Seite 255 von 278 + FR Fehlermeldu Fehler-Definition ng Mögliche Ursachen 1. Die erkannte ACDie am Netz gemessenen Werte Spannung liegt außerhalb/unter der liegen außerhalb der festgelegten Werte Wechselrichtereinst (Spannung und/oder ellungen. 2. Die erkannte ACFrequenz) Frequenz liegt außerhalb der Wechselrichtereinst ellungen. 3. Fehlerhafter ACAnschluss. 4. Die Netzqualität ist schlecht oder instabil 5. Das Netz wird von anderen Geräten mit hoher Leistung beeinträchtigt. 6. Die Wechselrichtereinst ellungen weichen Netzfehler von den Werkseinstellungen ab (Netzspannu ng) 7. Wechselrichter (Netzfrequen arbeitet fehlerhaft z) Vorgeschlagene Maßnahmen für Benutzer Vorgeschlagene Maßnahmen für Fachpersonal 1. 1. 2. 3. 4. 5. 6. 7. 8. 9. 10. Kein Netz Wechselrichter kann 1. Keine Verbindung 1. zum Netz die AC-Spannung nicht erkennen 2. Fehlerhafter ACAnschluss. 2. 3. Der AC-Schalter 3. zwischen Wechselrichter und öffentlichem Netz ist nicht eingeschaltet 4. AC-Sicherung bzw. Schutzschalter ist ausgelöst 5. Wechselrichter arbeitet fehlerhaft IV351 Rev02 Ausstellungsdatum 2012-11-22 Trennen Sie kurzzeitig den Netzanschluss über den AC-Schalter und prüfen Sie ob der Wechselrichter nach erneutem Zuschalten wieder normal arbeitet Besteht das Problem weiterhin, überprüfen Sie die WR-Messwerte am Display. Tritt dieses Problem nur selten auf (1 Mal am Tag), sind keine Maßnahmen erforderlich. Tritt dieses Problem oft auf, leiten Sie die folgenden Maßnahmen ein. Ermitteln Sie das Gerät, das in der Nähe Ihres ACAnschlusses eine hohe Leistung benötigt. Überprüfen Sie mithilfe der Wechselrichtersoftware die Einstellungen des Wechselrichters. Die Einstellungen sollten sich in dem Bereich befinden, der in den technischen Daten aufgelistet ist Sind die Einstellungen fehlerhaft, wenden Sie sich an das ServiceCenter, das die Änderungen vornimmt. Ermitteln Sie die Daten mithilfe der Wechselrichtersoftware bzw. des Überwachungsgeräts. Zur weiteren Überprüfung senden Sie die Daten an Fachpersonal. Wenden Sie sich zur Überprüfung der Netzqualität an Ihren Energieversorger. Bitten Sie Ihren Installateur um Unterstützung Stellen Sie sicher, dass der Schutzschalter auf der ACSeite eingeschaltet ist. Überprüfen Sie die ACLeitungen. Besteht das Problem weiterhin, wenden Sie sich an den Kundendienst. 2. 3. Trennen Sie kurzzeitig den Netzanschluss über den AC-Schalter und prüfen Sie ob der Wechselrichter nach erneutem Zuschalten wieder normal arbeitet Besteht das Problem weiterhin, überprüfen Sie die WR-Messwerte am Display. Wenn die Messwerte 4. 5. 6. 7. 8. 9. 10. innerhalb der Spezifikation liegen, überprüfen Sie zunächst den AC-Anschluss einschließlich zuerst Polarität und Sicherheit. Ermitteln Sie die Geräte, die in der Nähe Ihres ACAnschlusses eine hohe Leistung benötigen. Wenden Sie sich zur Überprüfung der Netzqualität und der entsprechenden Spezifikationen an Ihren Energieversorger: Überwachen Sie mit der Wechselrichtersoftware die Netzfrequenz und spannung. Wenn die Messwerte außerhalb der zulässigen Parameter liegen, können Sie die Abschaltparameter über die Software, in Abstimmung mit dem Netzbetreiber ändern. Wenn sich die Situation nach Ändern der Parameter nicht bessert: aktualisieren Sie die Firmware laut Anweisungen oder tauschen Sie den Wechselrichter aus. 1. Stellen Sie sicher, dass der Schutzschalter auf der ACSeite eingeschaltet ist. 2. Überprüfen Sie die ACLeitungen. 3. Besteht das Problem weiterhin, tauschen Sie den Wechselrichter aus Seite 256 von 278 + FR Fehlermeldu Fehler-Definition ng Mögliche Ursachen Vorgeschlagene Maßnahmen für Benutzer Vorgeschlagene Maßnahmen für Fachpersonal 1. Überprüfen Sie, ob die PV1. Zu hohe Spannung 1. Trennen Sie den DCDie erkannte DCLeerlaufspannung über oder Anschluss des der PV-Batterie Spannung liegt über nahe bei oder zu nah an dem Wechselrichters und dem zulässigen Wert 2. Wechselrichter auf max. zulässigen Wert liegt. schließen Sie ihn erneut an DC-Eingangsseite 2. Falls die PV-Spannung Udc zu hoch arbeitet fehlerhaft 2. Besteht der Fehler weiterhin, deutlich unter dem max. wenden Sie sich an den zulässigen Wert liegt und das Service Problem weiterhin besteht, tauschen Sie den Wechselrichter aus. 1. Trennen Sie alle DCDie Anzeigen von 2 1. Softwareproblem Verbindungen des 2. Die Schaltkreise im Mikroprozessoren Wechselrichters Wechselrichter sind nicht konsistent arbeiten fehlerhaft 2. Warten Sie 3 Minuten 3. Schließen Sie die DC3. Wechselrichter Anschlüsse wieder an und arbeitet fehlerhaft Konsistenzfe überprüfen Sie die Anzeige hler 4. Besteht der Fehler weiterhin, wenden Sie sich an den Service Die erkannte WRinterne Temperatur ist zu hoch Übertempera tur 1. Trennen Sie alle DCVerbindungen des Wechselrichters 2. Warten Sie 3 Minuten 3. Schließen Sie die DCAnschlüsse wieder an und überprüfen Sie die Anzeige 4. Besteht der Fehler weiterhin ¾ aktualisieren Sie die Firmware laut Anweisungen oder ¾ tauschen Sie den Wechselrichter aus. 1. Stellen Sie sicher, dass die 1. Umgebungstempera 1. Stellen Sie sicher, dass die Umgebungstemperatur der tur ist zu hoch Umgebungstemperatur der 2. Problem bei der Anlage den Wert von 55°qC Anlage den Wert von 55°qC Wärmeableitung nicht übersteigt. nicht übersteigt. 3. Wechselrichter 2. Überprüfen Sie den arbeitet fehlerhaft 2. Überprüfen Sie die Umgebung des Kühlkörpers Installationsort. Der WR 3. Entfernen Sie jedes sollte nicht direkt im Hindernis, das die Sonnenlicht sein. Wärmeableitung um den 3. Überprüfen Sie die Kühlkörper blockiert Mindestabstände zu den 4. Besteht der Fehler weiterhin, Seiten und stellen sie sicher, wenden Sie sich an den dass ein ausreichender Kundendienst Luftstrom zur Kühlung vorhanden ist. 4. Entfernen Sie jedes Hindernis, das die Wärmeableitung um den Kühlkörper blockiert 5. Besteht der Fehler weiterhin, tauschen Das AC-Relais arbeitet fehlerhaft Wechselrichterstörung Relaisfehler DC INJ zu hoch Wechselrichter arbeitet 1. Trennen Sie alle DCAnschlüsse fehlerhaft 2. Warten Sie ca. 1 Minute 3. Nachdem die Anzeige auf dem Display verschwunden ist, schließen Sie alle DCAnschlüsse wieder an und überprüfen Sie die Anzeige 4. Erscheint die Meldung danach wieder, wenden Sie sich an den Kundendienst 1. Überprüfen Sie, dass die Installation gemäß den Spezifikationen konfiguriert wurde 2. Gehen Sie wie in der Spalte links beschrieben vor 3. Besteht der Fehler weiterhin: ¾ aktualisieren Sie die Firmware laut Anweisungen oder ¾ tauschen Sie den Wechselrichter aus 1. 1. Störung am Hall- 1. Beobachten Sie den Der vom HallFehlerzustand 1 Minute lang. Ausgangssensor Sensor erfasste DC2. Der DC-Anteil des 2. Wenn der Normalzustand Anteil des 2. nicht wiederhergestellt wird, Ausgangsstroms Ausgangsstroms wenden Sie sich an den übersteigt den übersteigt die Kundendienst. zulässigen Wert. zulässigen Werte. 3. Wechselrichter arbeitet fehlerhaft IV351 Rev02 Ausstellungsdatum 2012-11-22 Sie ihn aus Schließen Sie die DCAnschlüsse wieder an und überprüfen Sie die Anzeige Besteht der Fehler weiterhin ¾ aktualisieren Sie die Firmware laut Anweisungen oder ¾ tauschen Sie den Wechselrichter aus. Seite 257 von 278 + FR Fehlermeldu Fehler-Definition ng Mögliche Ursachen 1. Softwareproblem 2. Fehler in den Schaltungen der EEPROMSteuerplatine im Fehler Innern des Wechselrichters 3. Wechselrichter arbeitet fehlerhaft . Die Kommunikation 1. Softwareproblem zwischen den zwei 2. Fehler in den Schaltungen der CPUs ist gestört SCI Steuerplatine im Fehlfunktion Innern des Wechselrichters 3. Wechselrichter arbeitet fehlerhaft Fehler bei der Messung oder Schreibung auf EEPROM der Steuerplatine im Innern des Wechselrichters Die DC-Spannung des DC-BUS im Bus DC zu Innern des Inverters ist höher als hoch vorgesehen Die DCEingangsspannung, des DC-BUS im die den DC-BUS Innern des Inverters versorgt, ist geringer als ist zu gering vorgesehen Störung am DCAusgangssensor DC-Sensor Fehlfunktion Vorgeschlagene Maßnahmen für Fachpersonal 1. Gehen Sie wie in der Spalte 1. Trennen Sie alle PV (+) und links beschrieben vor PV (-) vom Eingang und 2. Besteht der Fehler weiterhin fahren Sie das Gerät erneut ¾ aktualisieren Sie die hoch. Firmware laut 2. Wenn der Normalzustand Anweisungen oder nicht wiederhergestellt wird, ¾ tauschen Sie den wenden Sie sich an den Wechselrichter aus. Kundendienst. 1. Gehen Sie wie in der Spalte 1. Trennen Sie alle PV (+) und links beschrieben vor. PV (-) vom Eingang und 2. Besteht der Fehler weiterhin fahren Sie das Gerät erneut ¾ aktualisieren Sie die hoch. Firmware laut 2. Wenn der Normalzustand Anweisungen oder nicht wiederhergestellt wird, ¾ tauschen Sie den wenden Sie sich an den Wechselrichter aus. Kundendienst. Die DCEingangsspannung, die den DC-BUS versorgt, ist zu hoch Die DC-Spannung DC BUS zu gering Vorgeschlagene Maßnahmen für Benutzer 13. Gehen Sie wie in der Spalte links beschrieben vor 14. Bestätigen Sie die 1. Trennen Sie alle PV (+) und PV (-) vom Eingang und fahren Sie das Gerät erneut hoch. 2. In diesem Fall wenden Sie sich an den Service. Konfigurierung des PVGenerators, um zu überprüfen, dass er innerhalb der zulässigen Werte verwendet wird 15. Besteht der Fehler weiterhin ¾ aktualisieren Sie die Firmware laut Anweisungen oder ¾ tauschen Sie den Wechselrichter aus. 1. Trennen Sie alle PV (+) und 1. Gehen Sie wie in der Spalte 1. Softwareproblem links beschrieben vor PV (-) vom Eingang und 2. Störung bei der 2. Besteht der Fehler weiterhin fahren Sie das Gerät erneut Strommessung des ¾ aktualisieren Sie die hoch. Hall-Sensors Firmware laut 2. Wenn der Normalzustand Anweisungen oder nicht wiederhergestellt wird, ¾ tauschen Sie den wenden Sie sich an den Wechselrichter aus. Kundendienst. Anmerkung: mit “Netz” ist das Stromnetz gemeint IV351 Rev02 Ausstellungsdatum 2012-11-22 Seite 258 von 278 + FR Anmerkung: Bei Dunkelheit oder bei schwacher Einstrahlung kann der PV-Wechselrichter ständig neu starten und abschalten. Die erzeugte Energie ist in diesem Fall für den Betrieb der Steuerelektronik nicht ausreichend. Achtung: An den DC- und AC-Leitungen und -Anschlüssen liegen gefährlich hohe Spannungen an. Berühren Sie KEINE spannungsführenden Teile! IV351 Rev02 Ausstellungsdatum 2012-11-22 Seite 259 von 278 + FR 13 Vorbeugende Instandhaltung Der PV-Wechselrichter muss nur in sehr geringem Umfang gewartet werden. Sollte ein Fehler auftreten, lesen Sie bitte die folgende Tabelle, bevor Sie sich an das Service-Center vor Ort wenden. In dieser Tabelle sind die am häufigsten auftretenden Fehlermeldungen sowie die Lösung der Fehler aufgeführt. Die folgenden Überprüfungen sollten zur Sicherstellung eines optimalen Betriebs des PVWechselrichters regelmäßig durchgeführt werden. 13.1 Sichtprüfung Überprüfen Sie den Wechselrichter und alle Leitungen auf sichtbare Beschädigung. Fallen Ihnen Schäden auf, informieren Sie umgehend Ihren Installateur. Nehmen Sie keinesfalls selbst Reparaturen vor. 13.2 Inspektion und Instandhaltung Zur vorbeugenden Instandhaltung wird empfohlen, vom Installateur regelmäßig eine Überprüfung des ordnungsgemäßen Wechselrichterbetriebs durchführen zu lassen. Folgende Punkte sollten hierbei überprüft werden: 9 9 9 9 9 9 Überprüfung der Lüftungsgitter auf Verschmutzungen und Staub, gegebenenfalls die Gitter reinigen. Überprüfung des Kühlkörpers um sicherzustellen, dass der Luftstrom nicht behindert wird. Überprüfung auf mögliche Korrosion, insbesondere an Verbindungspunkten. Alle Verbindungen sollten regelmäßig auf Festigkeit überprüft werden. Reinigen Sie die Oberflächen des Geräts regelmäßig mit einem feuchten Tuch, um es von Staub und Verschmutzungen zu befreien. Das Garantieschild in einwandfreiem Zustand halten. Um optimale Leistungen zu erzielen, ist es von grundlegender Wichtigkeit, die PV-Module regelmäßig zu reinigen, um zu vermeiden, dass sich Staub und Schutz darauf ansammeln. Achtung: Vergewissern Sie sich, bevor Sie die PV-Module oder den Wechselrichter reinigen, dass die DC-Versorgung getrennt ist und auf der LCD-Anzeige des Wechselrichters “Kein Netz” angezeigt wird. Reinigen Sie ausschließlich die Außenflächen des Geräts. Hinweis: Um die Gefahr eines elektrischen Schlages zu vermeiden, sollte der Wechselrichter von DC- und AC-Quellen getrennt sein, für freigeschaltet sein, damit das Personal gefahrlos mit den PV-Modulen in Berührung kommen kann. Heiße Oberflächen: Obwohl der PV-Wechselrichter internationalen Sicherheitsstandards entspricht, kann er während des Betriebs heiß werden. Berühren Sie daher während des Betriebs oder kurz danach nicht den Kühlkörper oder die Oberflächen anliegender Komponenten. IV351 Rev02 Ausstellungsdatum 2012-11-22 Seite 260 von 278 + FR 13.3 Reinigen und Austauschen des Lüfters Hat sich an den Lüftern Staub oder Schmutz gesammelt, bitten Sie den Installateur, diese zu reinigen. (Anmerkung: Dieser Abschnitt gilt nur für Modelle mit externem Lüfter) Austausch der Lüfter beim Modell SOLEIL 3F-TL10K: (1) Schalten Sie den PV-Wechselrichter zuerst von den AC- und DC-Quellen frei. (2) Lösen Sie alle Schrauben des Lüfter-Moduls, wie in der Abbildung unten angeben: (3) Entnehmen Sie das Lüfter-Modul durch Trennen des Steckers wie in der Abbildung unten angegeben: (4) Falls erforderlich, reinigen Sie die Lüfter vorsichtig mit einem feuchten Tuch oder einer weichen Bürste. (5) Wenn der Lüfter beschädigt ist, ersetzen Sie ihn durch einen neuen. (6) Bringen Sie die abgenommenen Lüfterkomponenten in umgekehrter Reihenfolge wieder an. (7) Überprüfen Sie den Wechselrichter nach dem erneuten Start auf ordnungsgemäßen Betrieb. IV351 Rev02 Ausstellungsdatum 2012-11-22 Seite 261 von 278 + FR Austausch der Lüfter beim Modell SOLEIL 3F-TL15K: (1) Schalten Sie den PV-Wechselrichter zuerst von den AC- und DC-Quellen frei. (2) Lösen Sie alle Schrauben des Lüfter-Moduls wie in der Abbildung unten angeben: (3) Entnehmen Sie das Lüfter-Modul durch Trennen des Steckers wie in der Abbildung unten angegeben: (4) Falls erforderlich, reinigen Sie die Lüfter vorsichtig mit einem feuchten Tuch oder einer weichen Bürste. (5) Wenn der Lüfter beschädigt ist, ersetzen Sie ihn durch einen neuen. (6) Bringen Sie die abgenommenen Lüfterkomponenten in umgekehrter Reihenfolge wieder an. (7) Überprüfen Sie den Wechselrichter nach dem erneuten Start auf ordnungsgemäßen Betrieb. IV351 Rev02 Ausstellungsdatum 2012-11-22 Seite 262 von 278 + FR Austausch der Lüfter beim Modell SOLEIL 3F-TL20K: (1) Schalten Sie den PV-Wechselrichter zuerst von den AC- und DC-Quellen frei. (2) Lösen Sie alle Schrauben des Lüfter-Moduls wie in der Abbildung unten angeben: (3) Entnehmen Sie das Lüfter-Modul durch Trennen des Steckers wie in der Abbildung unten angegeben: (4) Falls erforderlich, reinigen Sie die Lüfter vorsichtig mit einem feuchten Tuch oder einer weichen Bürste. (5) Wenn der Lüfter beschädigt ist, ersetzen Sie ihn durch einen neuen. (6) Bringen Sie die abgenommenen Lüfterkomponenten in umgekehrter Reihenfolge wieder an. (7) Überprüfen Sie den Wechselrichter nach dem erneuten Start auf ordnungsgemäßen Betrieb. IV351 Rev02 Ausstellungsdatum 2012-11-22 Seite 263 von 278 + FR 14 Spezifikationen 14.1 Marketing vs. Normen Modell Zielmarkt Normen für Netzschnittstelle SOLEIL 3F-TL10K SOLEIL 3F-TL15K SOLEIL 3F-TL20K Deutschland (DE) VDE-AR-N 4105 VDE0126-1-1/A1 VDE0126-1-1 SOLEIL 3F-TL10K SOLEIL 3F-TL15K SOLEIL 3F-TL20K Spanien (ES) Großbritannien (UK) Italien (IT) G83/1-1 / G59 Issue 2 CEI0-21 RD1699 14.2 Elektrische Spezifikationen Modell SOLEIL 3F-TL10K SOLEIL 3F-TL15K SOLEIL 3F-TL20K Eingang (DC) DC-Nennspannung 720 V Max. PV-Leerlaufspannung 1000V Anlagenspannung beim Hochfahren 260V Einschaltspannung 350 V Ausschaltspannung In der Regel 200V Betriebsspannungsbereich 250 ~ 1000V Nennspannungsbereich MPPT 350 ~ 850 V MPPT Wirkungsgrad > 99% Anzahl MPP Tracker 2 Max. DC-Leistung 10500W 400 ~ 850 V 450 ~ 850 V 15750W 21000W Max. Eingangsstrom 16A × 2 20A × 2 23A × 2 Max. Anzahl Parallelstrings 2×2 2×2 3×2 Externer DC-Schalter 20A x 2 25A x 2 30A x 2 Max. Rückkopplungsstrom vom Wechselrichter zur PV-Batterie 300mA 650mA 850mA DC-Isolationswiderstand > 1. 2 M: Transformerlos, der Eingang kann nicht geerdet werden. (Die PV-Anlage ist nicht an die Erdleitung angeschlossen) DC-Isolierung IV351 Rev02 Ausstellungsdatum 2012-11-22 Seite 264 von 278 + FR Modell SOLEIL 3F-TL10K SOLEIL 3F-TL15K SOLEIL 3F-TL20K AC-Nennleistung 10kW/ 10kVA 15kW/ 15kVA 20kW/ 20kVA Max. AC-Leistung 10kW/ 10kVA 15kW/ 15kVA 20kW/ 20kVA AC-Nennstrom 14,5A 21,7 A 29 A Max. Ausgangsstrom 16A 24A 30A Eingangsstrom (Stromspitze) 65A 85A 90A 30A 45A 60A 60A 106A 210A Max. DC-Stromeinspeisung 20mA 50mA 70mA AC-Netzspannung /Bereich 230 / 400Vca ȥ4W+PE / ±20%, nach der landesspezifischen Konfiguration (siehe 12.3) Ausgang (AC) Max. Erdschlussstrom im Ausgan g Max. AusgangsKurzsc hlussstr om AC-Netzfrequenz /Bereich 50Hz / 60Hz / nach der landesspezifischen Konfiguration (siehe 12.3) Klirrfaktor Ausgangsstrom (THD i)4 > 3% Phasenverschiebung (cos˵) bei Nennausgangsleistung (einstellbar) >0,99 (±0,8 auf Anfrage) Wirkungsgrad Max. Umwandlungswirkungsgrad ฺ97,8% ฺ97,7% ฺ97,7% Euro Wirkungsgrad ฺ97,2% ฺ97,0% ฺ97,2% ู 20W / ู 1W ู 20W / ู 1W Allgemeine Daten Topologie Leistungsaufnahme: Standby / Nachts Transformerlos ู 20W / ู 1W Schutzgrad Wärmeableitung Außen/ Chassis: IP65 / Lüfter: IP55 Zwangskühlung, Lüfter mit einstellbarer Geschwindigkeit, in Abhängigkeit der Temperatur des Kühlkörpers Geräuschpegel ู 55dB(A) Betriebstemperaturbereich - 20 ~ + 60ഒ Temperaturbereich kontinuierliche Ausgangsleistung - 20 ~ + 45ഒ Max. Ausgangsleistung (600C, Nennspannung, lineares Derating) 10000W Max. Betriebstemperatur ohne Derating der Nennspannung 450C IV351 Rev02 Ausstellungsdatum 2012-11-22 11000W 12000W Seite 265 von 278 + FR Modell SOLEIL 3F-TL10K SOLEIL 3F-TL15K SOLEIL 3F-TL20K Feuchtigkeit 100%, Kondensbildung Höhe Bis zu 2000m ohne Derating Grenzwerte für gefährliche Stoffe Bleifrei, in Übereinstimmung mit der Richtlinie RoHS GP2 Erdschlussschutz Interner RCMU und Erfassung der Isolierung gemäß der Norm VDE0126-1-1 DC-Abschaltung (optional) DC-Schalter durch die Norm EN/IEC zugelassen Kommunikation Standard: USB Typ B, RS485 optional: RS485, Super 485, Modbus, RS485-Protokoll Datenlogger - Anzeige: 128 × 64 Pixel - Funktionstasten × 5 - Standard: integriert - Optional: abnehmbar Frontrahmen Bezugsnormen G83/1-1 G59 Issue 2 Norm für Netzschnittstelle VDE-AR-N 4105 VDE0126-1-1/A1 VDE0126-1-1/ Sicherheit IEC 62109-1: 2010, EN 62109-1: 2010 IEC 62109-2: 2011, EN 62109-2: 2011 Elektromagnetische Verträglichkeit EN 61000-6-2: 2005 EN 61000-6-3: 2007/A1: 2011 DC-Schalter EN 60947-1 EN 60947-3 EG Niederspannungsrichtlinie 2006/95/EG EMV: 2004/108/EG IV351 Rev02 Ausstellungsdatum 2012-11-22 RD1699 CEI0-21 Seite 266 von 278 + FR 14.3 Netzüberwachung SOLEIL 3F-TL10K SOLEIL 3F-TL15K SOLEIL 3F-TL20K Modell Bezugsnorm Netzwerkdienst VDE0126-1-1/A1 VDE-AR-N 4105 SOLEIL3F-TL10K Modellbezeichnung Grenzwert für die einzelne Phase N/A 230V / 400V, Betriebsspannungsbereich -20%+15% -20% +15% Abschaltzeit bei Überschreitung des Betriebsspannungsbereichs 1 < 0.1s Werkseinstellung: Spannungswert 2 Leistungsfaktor Spannungstoleranz Frequenztoleranz SOLEIL 3F-TL10K SOLEIL 3F-TL15K SOLEIL 3F-TL20K 184V 264.5V 0.9 Verzögerung/Voreilung besser als 1% besser als 0.1% SOLEIL3F-TL15 / 20K +10% N/A 230V / 400V, -20%+15% -20% +15% +10% < 0.1s ู0.2s ู0.2s 253V 187V 262V 250V 0.99 N/A N/A Betriebsfrequenzbereich 1. 2. Werkseinstellung: Frequenzwert Wiederanschlusszeit PV-Einstellung Abschaltzeit bei DC-Überstrom “Stromeinspeisung” (s) DC-Einspeisung 47.5~51.5Hz, Abschaltung innerhalb von 0.2 Sekunden Punkt Rückfrequenz: Wie die rote Linie (vor der Abschaltung) 47.5 Hz 51.5Hz 47.55 Hz 51.45Hz 1. 60s @ 85% ~ 110% Volt & 47.5Hz ~ 50.05Hz mit 10% Stromzunahme/min < 0.1s < 0.2s 1A 1A 1 Berechnung des Mittelwerts mit gleitendem Durchschnitt von 10 Minuten Wenn nur ein integrierter NS-Schutz für die Stromerzeugungsanlagen von bis zu 30 kVA verwendet wird, dann ist der Wert für den Spannungs-Steigerungsschutz U gleich 1.1. U sollte nicht verändert werden. 2 IV351 Rev02 Ausstellungsdatum 2012-11-22 Seite 267 von 278 + FR Modell Bezugsnorm Netzwerkdienst Modellbezeichnung Grenzwert für die einzelne Phase Betriebsspannungsbereich SOLEIL 3F-TL10K SOLEIL 3F-TL15K SOLEIL 3F-TL20K RD1699 SOLEIL 3F-TL10/15/20K N/A 230V / 400V, -15%+10% Abschaltzeit bei -15% Überschreitung des Betriebsspannungsbereichs < 1,5 Sekunden Einstellung der Spannungswerte in der 198V Firmware 48Hz Betriebsfrequenzbereich +10% +15% < 1,5 Sekunden < 0,2 Sekunden 250V 262V 50,5Hz < 3 Sekunden < 0,5 Sekunden Wiederanschluss @ 50Hz wenn Überfrequenz Einstellung der Frequenzwerte in der 48,05 Hz Firmware Wiedereinschaltzeit NA Wiedereinschaltzeit (PV180 Sekunden Einstellung) Abschaltzeit bei überschüssiger DC< 0,2 Sekunden Stromeinspeisung (s) DC-Stromeinspeisung IV351 Rev02 Ausstellungsdatum 2012-11-22 50,45 Hz 0,5% des AC-Nennstroms Seite 268 von 278 + FR Modell Bezugsnorm Netzwerkdienst Modellbezeichnung Grenzwert für die einzelne Phase Betriebsspannungsbereich Abschaltzeit bei Überschreitung des Betriebsspannungsbereichs 3 Werkseinstellung: Spannungswert 4 SOLEIL 3F-TL15K SOLEIL 3F-TL20K SOLEIL 3F-TL10K G83/1-1 G59 Issue 2 SOLEIL 3F-TL10K SOLEIL 3F-TL15/ 20K < 16A/Phase > 16A/Phase 230V / 400V, -10%+14.7% 230V / 400V, -20%+15% -10% +14.7% < 1.5 s -20% -13% +10% +15% < 0.5s < 2.5s < 1s < 0.5s 210V 261V 184V 200.1V 253V 264.5V 47Hz 50.5Hz 47Hz 47.5Hz 51.5Hz 52Hz < 0.5s 20s ~ 21s 90s ~ 91s < 0.5s 47Hz 47.5Hz 51.5Hz 52Hz Frequenztoleranz < 0.5s Frequenztoleranz Wiederanschlusszeit PV-Einstellung Abschaltzeit bei DC-Überstrom “Stromeinspeisung” (s) DC-Einspeisung Modell Bezugsnorm Netzwerkdienst 47.05 Hz 180s 180s NA NA < 20mA < 0.25% des AC-Nennstroms SOLEIL 3F-TL10K SOLEIL 3F-TL15K SOLEIL 3F-TL20K VDE 0126-1-1 Grenzwert für die einzelne Phase NA Betriebsspannungsbereich 230V / 400V, -20%+15% Abschaltzeit bei Überschreitung des Betriebsspannungsbereichs Werkseinstellung Spannung 50.45Hz 0.2 secondi 187V 10 minuti 262V 250V 47.5~50.2Hz Frequenztoleranz Abschaltung innerhalb von 0,2 Sekunden, wenn die Frequenz außerhalb des Bereichs Werkseinstellung Frequenz Verlust-Netzwerk 47.55 Hz Verlust-Netzwerk (Werkseinstellung FW) Wiederanschlusszeit Wiederanschlusszeit (impostazione FW) Abschaltzeit bei DC-Überstrom “Stromeinspeisung DC-Einspeisung 50.15 Hz 0.2 s 30 s <0.2 s 1A 3 Berechnung des Mittelwerts mit gleitendem Durchschnitt von 10 Minuten Wenn nur ein integrierter NS-Schutz für die Stromerzeugungsanlagen von bis zu 30 kVA verwendet wird, dann ist der Wert für den Spannungs-Steigerungsschutz U gleich 1.1. U sollte nicht verändert werden. 4 IV351 Rev02 Ausstellungsdatum 2012-11-22 Seite 269 von 278 + FR Modell SOLEIL 3F-TL10K/15K/20K Bezugsnorm Netzwerkdienst CEI 0-21 Modellbezeichnung SOLEIL 3F-10 /15 / 20K Grenzwert für die einzelne Phase N/A Betriebsspannungsbereich 230V / 400V, Leistungsfaktor 0.9 über- oder untererregt *(2) *(1) S1 Spannung 46 ~230V 230 ~276.0V Werkseinstellung Spannung S1 184V (80%) 264.5V (115%) Abschaltzeit S1 V 0.05~5.00S 0.20~10.00S Werkseinstellung Abschaltzeit S1V 0.5s 0.2s Frequenz S1 47.0 ~50.0Hz 50.0 ~52.0Hz Werkseinstellung Frequenz S1F 47Hz 51Hz Abschaltzeit S1 F 0.05~5.00S 0.05~5.00S Werkseinstellung Abschaltzeit S1F 4s 1s 0 ~230V 230 ~299.0V Werkseinstellung Spannung S2 0V 264.5V (115%) Abschaltzeit S2 V 0.05~5.00S 0.05~1.00S Werkseinstellung Abschaltzeit S2V 0.2s 0.2s Frequenz S2 47.0 ~50.0Hz 50.0 ~52.0Hz Werkseinstellung Frequenz S2 47Hz 51Hz Abschaltzeit S2 F 00:10~5.00S 00:10~5.00S Werkseinstellung Abschaltzeit S2F 4s 1s S2 Spannung *(2) Grenzleistungskurve P als Funktion der Netzüberfrequenz (Statik= 2~5% einstellbar, 2.4% Default-Wert, kann aus- oder eingeschaltet werden) Wartezeit vor Wiederanschluss wartet 300 s mit Frequenz innerhalb des korrigierten Bereichs für "Frequenzwert für die Wiederherstellung der Derating-Bedingung" Slow-Start nach Derating-Bedingung P(f) Frequenzwert, zur Wiederherstellung der Bedingungen der Wirkleistungsbegrenzung 20% pro Minute des Wertes vor der Störung Spannung für den Wiederanschluss 195,5 V - 253 V Frequenz für den Wiederanschluss 49,90 - 50,10 Hz Standard (einstellbar von 49Hz bis 51Hz in 0,05Hz-Schritten) Wiedereinschaltzeit 300s Standard (einstellbar von 0s bis 900s in 5s-Schritten) Slow-Start nach Abschaltung 20% pro Minute bei Nennleistung (10kW) DC-Stromeinspeisung > 1 s @0,5% (72,5mA) & > 0,2s @ 1A IV351 Rev02 Ausstellungsdatum 2012-11-22 49.90 - 50.10 Hz Seite 270 von 278 + FR Überwachung der Blindleistung 1.Const. Q Cosfi=1 P=10KW Q=0VAR Cosfi=1 P=15KW Q=0VAR 10kVA 15kVA Cosfi=0.9Ͳ> P=9KW Q=(Ͳ)4358Var~(+)4358Var(48.43%P) Cosfi=0.9Ͳ> P=13,5KW Q=(Ͳ)6537Var~(+)6537Var(48.43%P) Cosfi=1 Cosfi=0.9Ͳ> P=20KW P=18KW Q=(Ͳ)8717Var~(+)8717Var(48.43%P) Q=0VAR 20kVA (Ͳ)0.90~(+)0.90pf 2. Const PF 3. Kennlinie Q(U) mit Typ A&B P Lock-in: 20% Pn P Lock-out: 5% Pn Knoten1: 90% (+)43.6% Q/S Knoten2: 92% (+) 0% Q/S Knotent3: 108% (+) 0% Q/S Knoten4: 110% (-)43.6% Q/S V Lock-in: 241.5 V V Lock-out:230.0 V Knoten1: 20% (+) 1.00pf Knoten2: 40% (+) 1.00pf Knotent3: 50% (+) 1.00pf Knoten4: 90% (-) 0.90pf Knoten1: 0% (+) 1.00pf Knoten2: 5% (+) 1.00pf Knoten3: 5% (-)0.90pf Knoten4: 90% (-) 0.90pf 4.Kennlinie PF(P) Typ A Kennlinie PF(P) Type B (1) CEI 0-21 LV (S1=S2) LV & MV haben dieselben Standardwerte: VĹ = 276V 0,5s, VĻ = 184V 1s, FĻ = 47Hz 4s, FĹ = 52Hz 1s, Slope:2.4% IV351 Rev02 Ausstellungsdatum 2012-11-22 Seite 271 von 278 + FR (2) In CEI 0-21 sind die Spannungs- und Frequenzbereiche und die Abschaltzeiten einstellbar. S1 Mittlerer Spannungswert in einem Zeitfenster von 10 Minuten (3) Der Wechselrichter wird hochgefahren, wenn die Frequenz- und Spannungswerte zwischen´ 49.9~50.1Hz und 195.5 ~253V (einschließlich der ersten Inbetriebnahme) liegen IV351 Rev02 Ausstellungsdatum 2012-11-22 Seite 272 von 278 + FR 15 Entsorgung Der Händler bzw. Installateur sollte den PV-Wechselrichter deinstallieren und sich zwecks der weiteren Entsorgung an den Hersteller wenden Der Wechselrichter darf unter keinen Umständen mit dem Haushaltsabfall entsorgt werden. Die Entsorgung des PV-Wechselrichters nach Ende der Nutzungsdauer muss gemäß den zu diesem Zeitpunkt am Installationsort geltenden Bestimmungen zur Entsorgung von ElektronikAltgeräten erfolgen. Anmerkung: Anweisungen zur fachgerechten Entsorgung erhalten Sie vom Wiederverkäufer IV351 Rev02 Ausstellungsdatum 2012-11-22 Seite 273 von 278 + FR 16 Kontakt Bei technischen Fragen oder Problemen bezüglich dieses Produkts, wenden Sie sich bitte an unsere Service-Hotline. Um Ihnen den notwendigen Service bieten zu können, benötigen wir folgende Informationen: • Typ des Wechselrichters • Seriennummer des Wechselrichters • Typ und Anzahl der angeschlossenen PV-Generatoren • Fehlermeldung • Kommunikationsart IV351 Rev02 Ausstellungsdatum 2012-11-22 Seite 274 von 278 + FR 17 Wirkungsgradkurve 17.1 Belastungsdiagramme Die Belastungsdiagramme sind normale Wirkungsgraddiagramme bezogen auf VDC und PAC und die Ausgangsleistung im Betriebsbereich kann durch die unterschiedlichen Stufen der Eingangsspannung als Leistungskurve bestimmt werden, wie unten dargestellt: Modell Leistungskurve SOLEIL 3FTL10K SOLEIL 3FTL15K SOLEIL 3FTL20K IV351 Rev02 Ausstellungsdatum 2012-11-22 Seite 275 von 278 + FR 17.2 Wirkungsgradkurve IV351 Rev02 Ausstellungsdatum 2012-11-22 Seite 276 von 278 + FR IV351 Rev02 Ausstellungsdatum 2012-11-22 Seite 277 von 278 + FR SIEL S.P.A. - VIA 1° MAGGIO, 25 20060 TREZZANO ROSA (MILANO), ITALIA TEL. +39 02 90986.1 - FAX +39 02 90968490 [email protected] - WWW.SIELUPS.COM IV351 Rev02 Ausstellungsdatum 2012-11-22 Seite 278 von 278 + FR