1
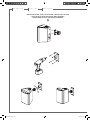
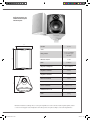
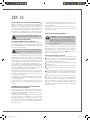
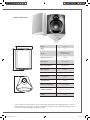
ZEF 13
notice d , installation des enceintes acoustiques
loudspeakers owner , s manual
betriebsanleitung fŸr lautsprecherboxen
www.cabasse.com
CAB Notice ZEF 13.indd 1
06/04/12 10:31
francais
english
deutsch
MONTAGE MURAL VERTICAL - VERTICAL WALL MOUNT
SENKRECHTE WANDBEFESTIGUNG
143
71,5
1
CAB Notice ZEF 13.indd 2
06/04/12 10:31
MONTAGE MURAL HORIZONTAL - HORIZONTAL WALL MOUNT
WAAGERECHTE WANDBEFESTIGUNG
2
143
71,5
ATTENTION !
En mode horizontal, positionner la Zef 13
de façon que le logo Cabasse se trouve à
droite (sens de lecture de bas en haut),
afin d’empêcher les risques d’intrusion de
liquide dans l’enceinte par l’évent en cas
d’aspersion.
ATTENTION !
For horizontal use, always position the
Zef speaker with the Cabasse logo on
the right hand side so that it reads from
bottom to top, thus preventing risks of
water intrusions inside the cabinet due to
splashes.
ACHTUNG !
En mode horizontal, positionner la Zef 13
de façon que le logo Cabasse se trouve à
droite (sens de lecture de bas en haut),
afin d’empêcher les risques d’intrusion de
liquide dans l’enceinte par l’évent en cas
d’aspersion.
CAB Notice ZEF 13.indd 3
06/04/12 10:31
francais
english
deutsch
MONTAGE MURAL AVEC LA FIXATION A ROTULE EN OPTION
WALL MOUNT WITH OPTIONAL BALL BRACKET
WAND BEFESTIGUNG MIT KUGEL-ZUBEHÖR
3
CAB Notice ZEF 13.indd 4
06/04/12 10:31
francais
Vous venez d’acheter des enceintes Cabasse et nous vous remercions de votre confiance.
Dans le but d’optimiser au maximum votre installation, nous vous recommandons de lire
attentivement cette notice.
INSTRUCTIONS DE SECURITE
Explication des symboles L’éclair dans un triangle
équilatéral avertit de
l’existence de tension élevée dangereuse non isolée à l’intérieur du
coffret du produit, d’une valeur
suffisante pour présenter un risque d’électrocution.
Le point d’exclamation dans un triangle équilatéral avertit
de l’existence d’instructions importantes quant à l’utilisation et la maintenance dans la documentation jointe à ce produit.
Instructions - Toutes les instructions de sécurité et d’utilisation doivent avoir été lues avant d’allumer tout appareil pour
la première fois.
Retenez les instructions - Elles doivent servir de référence
permanente pour tout ce qui suit.
Tenez compte des avertissements - Les avertissements
présents sur le produit ou dans les notices d’utilisation
doivent être pris en compte.
Suivez les instructions - Toutes les instructions d’utilisation et de mise en oeuvre doivent être scrupuleusement suivies.
Nettoyage - Débranchez l’appareil avant tout nettoyage.
N’utilisez pas de solutions nettoyantes sous forme liquide ou
en aérosols. Employez de préférence un chiffon humide.
Accessoires - N’utilisez pas d’accessoires qui ne soient pas
explicitement recommandés par le constructeur, sous peine
de risquer divers accidents.
Eau et humidité - L’appareil ne doit pas être utilisé près
de l’eau, par exemple à proximité d’une baignoire, d’un évier,
dans un sous-sol humide, près d’une piscine, ou de tout ce
qui y ressemble de près ou de loin.
Chariots et supports - La manutention doit
être effectuée seulement avec des chariots et supports agréés par le fabricant.
> Attention aux chariots de manutention
Installation sur mobiliers et supports - Ne placez pas
cet appareil sur un support instable, qu’il s’agisse de pieds,
trépieds, tables, étagères, etc. Il pourrait tomber et causer des
blessures sérieuses à un enfant ou un adulte qui se trouverait
à proximité.
Ventilations - L’appareil doit être positionné de telle sorte
qu’il ne gêne pas sa propre ventilation. Par exemple, il ne doit
pas être installé sur un lit, un canapé, une couverture ou des
surfaces similaires qui pourraient bloquer ses orifices d’aération. Il ne doit pas non plus être encastré dans des enceintes
confinées comme des étagères étroites ou des meubles qui pourraient limiter la quantité d’air disponible aux entrées d’air.
Alimentation - L’appareil ne doit être relié qu’à une source
électrique du type écrit dans le mode d’emploi ou conforme à
la sérigraphie sur le produit. Si vous n’êtes pas sûr du type de
courant fourni à l’endroit où vous vous trouvez, adressez-vous
à votre revendeur ou à la compagnie électrique locale.
Sacs plastiques - Ne pas laisser les sacs plastiques de
l’emballage à portée des enfants afin d’éviter tout risque
d’étouffement.
CAB Notice ZEF 13.indd 5
Protection des câbles d’alimentation - Le cheminement
des câbles d’alimentation doit être prévu de telle sorte qu’ils ne
puissent pas être piétinés, pincés, coincés par d’autres appareils posés dessus, et une attention toute particulière doit être
accordée à l’adéquation des prises et à la liaison du cordon
avec l’appareil.
Foudre - Pour une meilleure protection de l’appareil pendant les orages ou s’il doit rester inutilisé pendant une longue
période, débranchez le cordon d’alimentation et débranchez
la prise d’antenne, vous éviterez ainsi les risques de détérioration dus à la foudre ou aux surtensions.
Surcharges électriques - Ne surchargez pas les prises
d’alimentation, les prolongateurs ou les rappels d’alimentation. Il pourrait en résulter incendies ou électrocutions.
Corps et liquides étrangers - On doit être attentif à ne
jamais laisser entrer d’éléments ou de liquides étrangers dans
l’appareil. Ils pourraient occasionner incendies ou électrocutions.
Ne versez jamais aucun liquide d’aucune sorte sur l’appareil.
Entretien - L’utilisateur ne doit pas tenter de s’occuper des
opérations de maintenance au-delà de celles décrites dans le
mode d’emploi. Tout ce qui dépasse le simple niveau de l’entretien doit être effectué par un personnel qualifié.
Maintenance - Dans les cas suivants, vous devez impérativement débrancher votre appareil et le faire vérifier par un
technicien qualifié :
l’alimentation ou la prise a été endommagée.
des corps étrangers ou du liquide se sont introduits dans
l’appareil.
l’appareil a été exposé à la pluie ou a été aspergé d’eau.
l’appareil ne semble pas marcher correctement alors que
vous l’utilisez dans le cadre de ses instructions de fonctionnement normal. Ne manipulez que les contrôles couverts par le
mode d’emploi. Toute autre procédure pourrait le détériorer
et nécessiter l’intervention d’un technicien qualifié.
l’appareil est tombé ou bien sa carrosserie est endommagée.
l’appareil affiche des performances nettement modifiées.
Pièces détachées - Si la réparation a nécessité l’utilisation
de pièces détachées, assurez-vous que le technicien a bien utilisé les références préconisées par le fabricant ou présentant
les mêmes caractéristiques que les pièces originales. Des pièces
non conformes peuvent provoquer incendies, électrocutions ou
autres.
Vérifications - Après toute intervention sur l’appareil, demandez au technicien d’effectuer des tests afin de garantir
que l’appareil fonctionne en toute sécurité.
Exposition aux fortes températures - L’appareil doit
être tenu éloigné de sources de chaleur comme radiateurs,
chauffage divers, amplificateurs, ou tous autres éléments susceptibles de le placer dans des conditions de températures
anormalement élevées.
Valable aux USA, au Canada et autres pays concernés
Attention ! pour éviter les chocs électriques, introduire la lame
la plus large de la fiche dans la borne correspondante et pousser
jusqu’au fond.
06/04/12 10:31
francais
ZEF 13
DÉBALLAGE DES ENCEINTES 1
Ouvrir le côté mentionné sur le carton, replier sur les cotés les
rabats supérieurs du carton et retirer la plaque de protection.
Enlever le sachet d’accessoires de son logement, puis retirer les
demi-coque en mousse protégeant l’enceinte et sortir le cadre
puis l’enceinte de l’emballage. Nous vous conseillons de conserver l’emballage de votre enceinte à plat pour une utilisation ultérieure éventuelle.
ATTENTION : étant donné le poids élevé de ces enceintes,
2 personnes sont nécessaires pour effectuer le déballage.
MONTAGE MURAL
AVEC LA FIXATION STANDARD 1 2
1) Rassembler le matériel nécessaire : l’attache murale séparée de
l’enceinte et les inserts, vis, outils de perçage adaptés au type de
mur et niveau à bulle.
Assurez-vous que le mur est capable de supporter le poids de l’enceinte et que les modes de fixations choisies sont bien adaptées.
2) Une fois l’emplacement choisi, utiliser la fixation comme gabarit de perçage, la positionner sur la paroi en respectant bien le
sens haut-bas pour la fixation, vérifier l’aplomb avec le niveau à
bulle et percer les trous à travers la fixation. Mettre les chevilles
adéquates en place.
3) Coller les 2 patins amortissants sur le dos de la fixation murale
et la monter avec les vis adaptées.
4) Positionner l’enceinte dans les pattes de la fixation murale,
insérer et visser légèrement à la main les 2 boulons de serrage.
5) Connecter le câble haut-parleur à l’enceinte en respectant les
polarités (voir ¶ Phase)
6) orienter l’enceinte et serrer à bloc les molettes de fixation.
MONTAGE MURAL
AVEC LA FIXATION EN OPTION 3
1) Rassembler le matériel nécessaire : la fixation à rotule, l’enceinte séparée de l’attache murale en U, et les inserts, vis, outils
de perçage adaptés au type de mur et niveau à bulle.
2) boulonner au dos de la Zef la partie avec l’écrou de serrage,
utiliser l’autre partie comme gabarit de perçage en la plaquant au
mur, vérifier l’aplomb avec le niveau à bulle et percer les trous à
travers la fixation. Mettre les chevilles adéquates en place.
3) rassembler les 2 parties de la fixation, orienter la Zef et serrer
l’écrou de fixation.
4) Connecter le câble haut-parleur à l’enceinte en respectant les
polarités (voir ¶ Phase).
UTILISATION EN EXTERIEUR
ATTENTION : L’exposition directe aux intempéries et pro-
-
longée au soleil peut endommager l’aspect de vos enceintes. Nous
recommandons l’installation sous auvent à la belle saison et un
démontage et remisage hors saison.
Dans le cas d’une utilisation horizontale en extérieure et/ou en
milieu humide, veiller à positionner l’enceinte dans le sens indiqué
en 3 .
Le placement optimal
pour une écoute stéréo classique 2.0
Si l’on considère que d est la distance qui sépare les deux enceintes, celle-ci doit être supérieure à 1,5 m. Les deux enceintes
doivent être à égale distance de la zone d’écoute qui forme avec
elles un triangle équilatéral.
CAB Notice ZEF 13.indd 6
Les haut-parleurs doivent être dirigés vers la zone d’écoute.
Les enceintes doivent, de préférence, diffuser dans le sens de la
plus grande dimension de la pièce.
D’une façon générale, on doit éviter de positionner les enceintes
dans les coins d’une pièce, car la disposition en angle favorise Ies
fréquences graves.
La disposition des enceintes dans des niches est également
en général à proscrire car elle modifie la courbe de réponse de
l’enceinte, particulièrement dans les fréquences basses. S’il est
impossible d’adopter une autre disposition, on doit veiller à ce
que l’enceinte s’encastre avec le minimum de jeu dans la niche,
pour éviter l’apparition de résonances diverses. Par ailleurs, la
partie visible de la grille devra être à l’extérieur de la niche.
MARQUAGE DEEE
Traitement des appareils électriques et électroniques
en fin de vie (applicable dans les pays de l’Union européenne).
Ce symbole, représentant une poubelle sur roues barrée
d’une croix, apposé sur le produit, indique que ce produit ne doit pas être traité avec les déchets ménagers. Il
doit être remis à un point de collecte pour le traitement
des équipements électriques et électroniques en fin de
vie. En s’assurant que ce produit est bien mis au rebut de manière appropriée, vous aiderez à prévenir les conséquences négatives potentielles pour
l’environnement et la santé humaine. Le recyclage des matériaux aidera à
conserver les ressources naturelles. Pour toute information supplémentaire au sujet du recyclage de ce produit, vous pouvez contacter votre municipalité, votre déchetterie ou le magasin où vous avez acheté le produit.
BRANCHEMENT - Section des câbles
Pour conserver toutes les qualités des enceintes acoustiques et éviter les pertes de puissance, il faut que la résistance électrique des
câbles de branchement entre l’enceinte et l’amplificateur soit la
plus faible possible. Pour vous aider à choisir la section minimum
du câble de votre installation, veuillez suivre le tableau récapitulatif .
Distance maximale
ampli - enceinte
4,5 m
6 m
7,5 m
9 m
12 m
Section
1,5 mm2
2 mm2
2,5 mm2
3 mm2
4 mm2
Phase
Les enceintes et les amplificateurs ont leurs bornes de branchement repérées. Il y a deux façons courantes d’effectuer ce repère :
soit une borne rouge ou repère+, soit une borne noire ou repère -.
Dans tous les cas, il faut que les deux canaux soient branchés de
façon identique, c’est à dire par exemple que la borne rouge ou
+ de l’enceinte aille à la borne rouge ou+ de l’amplificateur ; la
borne noire ou- de l’enceinte ira dans ce cas à la borne noire oude l’amplificateur.
En suivant les conseils d’installation, de branchement et d’emploi
explicités dans cette notice, vous êtes assurés d’un fonctionnement
parfait de vos enceintes acoustiques. Nous recevons tous les jours
des lettres de clients satisfaits du choix de leurs enceintes et ces
lettres sont pour nous la plus belle récompense de nos efforts.
06/04/12 10:31
SPÉCIFICATIONS ET
CARACTÉRISTIQUES
TECHNIQUES
195
Position
195
Voies
258
Haut-parleurs
258
Efficacité 1W/1m
Filtre
Réponse en fréquences
au mur
2
1 x tweeter DOM25
1 x médium-grave
13T15AW
86 dB
3 700 Hz
70 - 22 000 Hz
4 ohms
Impédance minimale
4 ohms
Puissance nominale
60 W
Puissance crête
420 W
194
194
Impédance nominale
Finition standards
Dimensions H x L x P
Poids
blanc - noir
25,8 x 19,5 x 19,4 cm
3,2 kg
Étant donné l’évolution des techniques mises en oeuvre pour une fiabilité accrue et une recherche constante de qualité optimale, Cabasse
se réserve le droit d’apporter toutes modifications aux modèles présentés sur les fiches techniques ou les documents publicitaires.
CAB Notice ZEF 13.indd 7
06/04/12 10:31
english
Thank you very much for choosing Cabasse speakers.
Please read carefully these instructions before setting up your speakers.
SAFETY INSTRUCTIONS
Explanation of graphical
symbols -The lightning flash
with arrowhead symbol,
within an equilateral
triangle, is intended to
alert you to the presence of uninsulated “dangerous voltage”
within the product’s enclosure that may be of sufficient magnitude to constitute a risk of electric shock to persons.
The exclamation point within an equilateral triangle is
intended to alert you to the presence of important operating and maintenance (servicing) instructions in the literature accompanying the appliance.
Instructions - Carefully read through all the safety and operating instructions before switching on any device for the first
time.
Keep these instructions in mind - They will be constantly referred to through this manual.
Pay special care to warnings - All the warning labels on
the product or warning notes in the user’s manual must be
followed.
Follow the instructions - Follow carefully all the installation and operation instructions.
Cleaning - Always take off the power cord before cleaning
the device. Do not use cleaning solvent, whether liquid or air
spray. Using a soft damp cloth is recommended.
Accessories - To avoid incidents, only use accessories expressly recommended by Cabasse.
Water and moisture - The product shall not be used in
damp or wet locations, such as humid basements, next to a bathtub, sink, swimming pool
or any other similar conditions.
Carts and Stands - The appliance should be
used only with a cart or stand that is recommended by the manufacturer.
> Portable cart warning
Installation on a piece of furniture and stands Do not place this device on an unsteady surface, i.e. a stand,
tripod, table, shelf, etc. It may fall and cause serious injury to
a nearby child or adult.
Ventilation outlets - The device shall not be placed in a
Power - The device shall only be connected to a source of
power compliant to the one described in this manual or on
relevant printed labels on the product. If you are not sure of
the type of power available, please contact your reseller or the
local power company.
Power cords - The power cords must be laid out in such
a way that they cannot be walked on, pinched, bent under
other devices. Also pay special attention to the matching of
the plugs and the connection of the cord to the device.
Lightning - For better protection against lightning or if the
device must remain unused for long stretches of time, unplug
the power cord and antenna jack. This minimizes potential
damages due to lightning or line surges.
Overloads - Avoid overloading the power plugs, extension
cords or power relays. This could result in fire or electric
shocks.
Foreign bodies and liquids - Avoid letting foreign materials or liquids enter the device. They could cause fire or electric shocks. Never spill any liquid on the device.
Maintenance - Users must never attempt to maintain the
device on their own, except for those maintenance operations
described in this manual. Any task beyond regular user maintenance must be performed by qualified service operators.
Troubleshooting - You must unplug your device from the
power supply and have it checked by a qualified technician if :
The power supply or the plug is damaged.
Foreign bodies or liquid penetrated the device.
The device was exposed to dripping or splashing.
The device does not seem to work correctly under normal
operating conditions. Only operate the controls described in
this manual. Any other operation could damage the device
and require on-site visit of a qualified technician.
The device has fallen or its housing is damaged.
The performances of the device are strongly altered.
Spare parts - If spare parts are needed to repair the device,
make sure that the technician followed the manufacturer’s recommendations or that the replacing parts feature the same
specifications as the original ones. Non-compliant parts can
result in multiple damages, including fire or electric shocks.
Checks - After any servicing of the device, ask the technician
to perform appropriate testing to make sure that the device
works safely.
position that restrains the operation of its fans. Avoid installing the device on a bed, couch, blanket or other similar
surfaces that may prevent the appropriate air flow. Do not
install the device in a confined space, such as a book shelf or
other piece of furniture, that could prevent sufficient air from
flowing freely.
Exposure to high temperatures - The device should be
kept away from heating sources, such as radiators, heaters,
amplifiers or any other similar item likely to make the operating temperature rise excessively.
Plastic bags - Keep them away from children to prevent any
Caution ! To prevent electric shock, match wide blade plug to wide
slot, insert fully.
risk of suffocation.
CAB Notice ZEF 13.indd 8
Applicable for USA, Canada or where approved for usage
06/04/12 10:31
ZEF 13
UNPACKING 1
After opening the top carton flaps, fold the carton flaps right
back, remove the cardboard sheet, the bag of accessories
and the foam halfshells protecting the speakers and the front
grille. Then pull out the grill and the speaker. We suggest you
to retain the packing for future use.
These speakers are very heavy, so 2 persons minimum are
required to unpack and re-pack them.
WALL MOUNT WITH THE STANDARD
YOKE BRACKET
1) Prepare all the necessary parts and tools : the yoke bracket,
and the screws, plugs and drilling equipment suitable for the
type of wall and a spirit level.
Be assured that the wall can handle the weight of the loudspeaker and that the selected plugs do suit with the wall characteristics.
2) Position the bracket on the wall at the chosen spot, check
the up and down orientation, check it is with the spirit level
aligned and drill 2 holes through the bracket holes. Insert the
plugs in the wall.
3) Place the damping stickers on the back of the bracket and
mount the bracket with right screws.
4) Fit the loudspeaker into the arms of the bracket, gently
hand tighten both knobs.
5) Connect the loudspeaker cable to the terminals. Ensure
that polarities are correct (see ¶ Phase).
6) Swivel the loudspeaker to the right angle and tight both
nobs.
WALL MOUNT WITH THE OPTIONAL
BALL BRACKET
1) Prepare all the necessary parts and tools: the ball bracket
and screws, plugs and drilling equipment suitable for the type
of wall and a spirit level.
2) Mount the bracket part with two holes on the back of the
loudspeaker, place the other part of the bracket on the wall
and use it as a drilling template, control the alignment and
drill the holes through the bracket. Place the inserts in the
holes.
3) Assemble both bracket parts, swivel the loudspeaker in the
right direction and tighten the bolt.
4) Connect the loudspeaker cable to the terminals. Ensure
that polarities are correct (see ¶ Phase).
CAB Notice ZEF 13.indd 9
OUTDOOR MOUNT
ATTENTION : Direct long exposure to sunshine or bad
-
weather can affect the look of you loudspeakers. We recommend the mounting under a canopy for fair weather periods
followed by removal and storage in winter.
When used horizontally outside or in humid environment, be
assured that the loudspeaker is positioned as shown on page
3 with the Cabasse logo on the right hand side.
Optimal positioning for a 2.0 or stereo system
If «d» is the distance between the two speakers, this distance
must be higher than 5 ft (1.5 m) and the two speakers must
be at equal distance from the listening area which forms with
them an equilateral triangle.
The drivers must be directed towards the listening area.
The speakers should be located so that their diffusion follows the longest dimension of the room.
Generally speaking it is better to avoid putting the speakers
in the corners of a room as this amplifies the low frequencies
and tends to enhance the room resonances.
Placing the speakers in niches is not recommended. Unless
designed for this application, bookshelf placement will alter
the frequency response of the speaker, especially in the low
frequencies. If a bookshelf location cannot be avoid, the
speaker should be set up to minimize various resonance, and
the visible part of the grille must be outside the niche.
WEEE MARK
Disposal of Wastes of Electrical & Electronic
Equipment (Applicable in the European Union)
This symbol on the product, consisting of the
crossed-out wheeled bin, indicates that this
product shall not be treated as household
waste. Instead it shall be handed over to the
applicable collection point for the disposal
of electrical and electronic equipment at the end of life. By
ensuring this product is disposed of correctly, you will help
prevent potential negative consequences for the environment
and human health, which could otherwise be caused by inappropriate waste handling of this product. The recycling of
materials will help to preserve natural resources. For more
detailed information about recycling of this product, please
contact your local city office, your household waste disposal
service or the shop where you purchased the product.
06/04/12 10:31
s des entes de
english
CONNECTION
Cable section
Phase
To get the full sonic potential of Cabasse loudspeakers and
avoid power losses, the cables connecting the speakers to the
power amplifier must have the lowest possible electrical resistance. To help you in choosing the minimum correct cable
gauge, follow diagram.
Maximal lenght
betweenrecommended amplifier and loudspeakers
CAB Notice ZEF 13.indd 10
4,5 m
6 m
7,5 m
9 m
12 m
section
1,5 mm2
2 mm2
2,5 mm2
3 mm2
4 mm2
In order to maintain the phase relationship and frequency
balance of the loudspeaker system, both loudspeakers must
be properly connected to the power amplifier. When properly
connected, the cones of the drivers of both loudspeakers will
move in the same direction when driven by identical signals.
If the cones move in opposite directions, the resulting out of
phase signals will create a perceptible power loss, particularly in the low frequencies. The stereophonic message will
also be degraded.Amplifier and speaker manufacturers typically indicate connection polarity in one of two ways: red and
black or plus and minus. In either case, always connect red
or plus to red or plus and black or minus to black or minus.
Connections should be identical for both channels. To check
that the speakers are in correct phase, switch the system to
mono while music is being played. if the amplifier does not
have a phase inversion switch, it will be necessary to change
over the connections on one only of the loudspeakers. If in
correct phase, the image should be distinctly located between
the loudspeakers with a slight loss of bass and low midrange
level. If the image is confused and not centrally located and
there is a drastic loss of bass and low midrange level, recheck
your connections.
06/04/12 10:31
SPECIFICATIONS
& TECHNICAL DATA
195
195
Use
Ways
on wall
2
1 x DOM25 tweeter
Drivers
258
258
Efficiency
1W/1m
194
194
Cross-over point
1 x 13T15AW
midrange woofer
86 dB
3,700 Hz
Frequency response
70-22,000 Hz
Nominal impedance
4 ohms
Minimum impedance
4 ohms
Power handling
60 W
Peak power
420 W
Standard finish
Dimensions H x W x D
Weight
white - black
28.5 x 19.5 x 19.4 cm
10.2 x 7.7 x 7.6 in
3.2 kg - 7 lbs
Because of technical improvements already under way in our constant search for optimum quality, Cabasse reserves the right to modify
all the models presented in specification sheets, advertising materials and manuals without prior notice.
CAB Notice ZEF 13.indd 11
06/04/12 10:31
deutsch
Vielen Dank, dass Sie Lautsprecher von Cabasse erworben haben. Damit Sie deren
Klangqualität in vollem Maße und über lange Zeit genießen können, empfehlen wir Ihnen,
die vorliegende Anleitung vor Inbetriebnahme Ihrer Lautsprecher sorgfältig zu lesen.
SICHERHEITSHINWEISE
Erklärung der grafischen
Symbole - Das Blitzsymbol
mit Pfeil innerhalb eines
gleichseitigen
Dreiecks
soll den Anwender auf das Vorhandensein von gefährlichen
elektrischen Spannungen im Inneren des Gehäuses dieses Produktes aufmerksam machen. Derartige Spannungen sind hoch
genug, um für Menschen gefährliche Stromschläge zu bewirken.
Das Ausrufezeichen innerhalb eines gleichseitigen
Dreiecks soll den Anwender auf das Vorhandensein
von wichtigen Betriebs- oder Wartungshinweisen in der dem
Produkt beiliegenden Betriebsanleitung hinweisen.
Betriebshinweise - Lesen Sie vor der Inbetriebnahme alle
Sicherheits- und Verwendungshinweise aufmerksam.
Behalten Sie die Betriebshinweise im Hinterkopf
– auf sie wird in dieser Anleitung ständig Bezug genommen.
Achten Sie besonders auf Warnungen – Alle Warnungs - Symbole auf dem Produkt und Warn - Hinweise in
dieser Anleitung müssen befolgt werden.
Beachtung der Betriebshinweise – befolgen Sie alle Installations-und Bedienungs-Anweisungen sorgfältig.
Reinigung - Trennen Sie das Gerät vor jeder Reinigung vom
Stromnetz! Wir empfehlen die Reinigung mit einem feuchten
Tuch. Verwenden Sie niemals ätzende Produkte, Verdünner,
Spiritus, Waschbenzin oder chemische Lösungsmittel, da
diese die Oberfläche angreifen oder die Beschriftung ablösen
können.
Zubehör - Verwenden Sie nur Zubehör, das von Cabasse
ausdrücklich empfohlen wird.
Wasser und andere Flüssigkeiten – Das Produkt darf
nicht an feuchten oder nassen Orten, wie zum Beispiel einem
feuchten Keller, neben einer Badewanne, einem Abfluss oder
einem Swimming Pool oder ähnlichen Bedingungen betrieben
werden.
Rollwagen und Standfüße - Die Geräte sollten nur mit vom Hersteller empfohlenen Rollwagen oder Standfüßen verwendet werden.
> Warnung für transportable Rollwagen
Standflächen : Das Gerät nicht auf unstabile Standflächen, beispielsweise Standfüße, Stative, Tische, Regale oder
ähnliches. stellen, von denen es herabfallen und Verletzungen
verursachen könnte.
Belüftung - Gewährleisten Sie eine ausreichende Belüftung.
Decken Sie niemals vorhandene Lüftungsschlitze sowie Öffnungen von Ventilatoren ab. Achten Sie darauf, dass bei auf dem
Boden stehendem Gerät durch eventuell vorhandene hochflorige Teppiche die Luftzirkulation nicht blockiert wird. Stellen
Sie das Gerät ebenfalls nicht in z.B. geschlossenem Mobiliar
auf, dadurch wird verhindert, dass genügend Kühlluft zirkulieren kann.
CAB Notice ZEF 13.indd 12
Netzanschluss - Das Gerät darf nur mit dem Stromnetz
verbunden werden, wenn die Netzspannung der Steckdose,
an der das Gerät betrieben werden soll, der Betriebsspannung
entspricht, welche in der dem Gerät beiliegenden Betriebsanleitung und auf den am Gerät angebrachten Hinweisen vorgeschrieben ist. Wenn Sie sich nicht sicher sind, welche Versorgungsspannung bei Ihnen verfügbar ist, wenden Sie sich an
Ihren Händler oder den örtlichen Stromversorger.
Netzkabel - Greifen Sie das Netzkabel immer am Stecker ziehen Sie niemals am Kabel selbst! Stellen Sie nicht das Gerät
selbst oder Möbel auf das Netzkabel. Stellen Sie auch sicher,
dass das Kabel nicht eingeklemmt wird. Sorgen Sie dafür, dass
nicht auf das Netzkabel getreten werden kann und dass es nicht
abgeklemmt wird.
Gewitter - Wir empfehlen, bei Gewitter Netz- und Antennenstecker aus den jeweiligen Anschlussdosen herauszuziehen. Diese Maßnahmen sollten auch bei längerer Nichtbenutzung, beispielsweise einem Urlaub, erfolgen.
Flüssigkeiten und Fremdkörper - Achten Sie darauf,
dass weder Flüssigkeiten noch kleine Gegenstände durch vorhandene Öffnungen in das Gerät gelangen. Das könnte zu
Stromschlägen oder Bränden führen. Sorgen Sie dafür, dass
keine Flüssigkeit auf das Gerät tropft bzw. gespritzt wird.
Wartung - Bei Öffnen des Gehäuses besteht Stromschlaggefahr! Im Geräteinneren befinden sich keine vom Nutzer zu
wartenden Teile. Wenden Sie sich im Servicefall bitte an Ihren
Händler.
Schäden, die eine Reparatur erfordern - Trennen Sie
das Gerät sofort vom Netz. Überprüfung und Reparatur darf
nur von geschultem Personal durchgeführt werden. Das ist insbesondere dann der Fall, wenn
- das Netzkabel bzw. dessen Stecker beschädigt ist.
- Fremdkörper oder Flüssigkeiten ins Geräteinnere gelangt sind.
- Das Gerät hingefallen ist und/oder das Gehäuse sichtbare
Schäden aufweist.
- Das Gerät nass geworden ist (z.B. durch Regen oder Wasser).
- Das Gerät trotz Beachten von in dieser Anleitung dokumentierten Bedienschritten nicht mehr erwartungsgemäß funktioniert.
- Das Verhalten des Geräts sich merklich geändert hat.
Ersatzteile - Verwenden Sie nur Original-Ersatzteile oder
Teile, die den Spezifikationen des Herstellers entsprechen.
Prüfung – Fordern Sie bei jedem Wartungs- oder Reparaturvorgang den jeweiligen Servicetechniker dazu auf, sich durch
entsprechende Abschlussprüfungen vom in jeder Hinsicht sicheren Betrieb des Gerätes zu überzeugen
Hohe Umgebungstemperaturen – Das Gerät sollte von
Wärmequellen wie Heizkörpern, Verstärkern und ähnlichen
Einrichtungen, die die Betriebstemperatur ansteigen lassen
können, ferngehalten werden.
Plastiktüten
Eine über den Kopf gezogene Plastiktüte führt schnell zum Erstickungstod. Bewahren Sie deshalb Plastiktüten immer außerhalb der Reichweite von Kindern auf.
06/04/12 10:31
ZEF 13
AUSPACKEN DER LAUTSPRECHERBOXEN 1
Öffnen Sie den Karton auf der Seite mit der Aufschrift und
biegen Sie dann die oberen Klappen zurück. Nehmen Sie
anschließend die Abdeckung aus dem Karton. Entfernen Sie
nun den Zubehör-Beutel und die Schaumhalbschale sowie
die Frontbespannung. Nun können Sie den Lautsprecher herausnehmen. Wir empfehlen Ihnen, die Verpackung für eine
spätere Verwendung aufzubewahren und sie flach zu lagern.
Aus Gewichts- bzw. Sicherheitsgründen empfehlen wir das
Auspacken des Lautsprechers nur zu zweit vorzunehmen.
WANDMONTAGE MIT DEM
STANDARD-BEFESTIGUNGSBÜGEL
1) Bereiten Sie alle notwendigen Teile und Werkzeuge vor:
Den Befestigungsbügel, die Schrauben, zum Wandmaterial
passende Dübel und Bohrer, eine Bohrmaschine, einen Bleistift sowie eine Wasserwaage.
Stellen Sie sicher, dass die Wand das Gewicht des Lautsprechers trägt und dass die gewählte Wandhalterung dem Zweck
entspricht.
2) Halten Sie den Befestigungsbügel in der gewünschten
Orientierung (horizontal oder vertikal) an die ausgewählte
Stelle an der Wand. Kontrollieren und korrigieren Sie mit der
Wasserwaage den horizontalen Sitz und zeichnen Sie dann
mit dem Bleistift die beiden Schraubenlöcher an. Bohren Sie
diese und stecken Sie die Dübel in die Schraubenlöcher.
3) Positionieren Sie die selbstklebenden Dampfergummies
auf die Rückseite des Bügels. Schieben Sie das Lautsprecherkabel durch das Mittelloch des Befestigungsbügels und befestigen Sie diesen dann mit den beiden Schrauben.
4) Schieben Sie den Lautsprecher zwischen die beiden Arme
des Bügels und drehen Sie die beiden Gewindeschrauben mit
den großen Kunststoff-Köpfen beidseitig per Hand ein und
ziehen sie die diese leicht an.
5) Verbinden Sie das Lautsprecherkabel mit den Anschlüssen
am Lautsprecher. Achten Sie dabei auf die richtige Polung
(Siehe Kapitel „Phase“).
6) Schwenken Sie die Lautsprecher auf den vorgesehenen
Winkel und ziehen Sie die beiden Gewindeschrauben mit der
Hand fest.
3) Fügen Sie beide Halterungsteile zusammen, schwenken Sie
den Lautsprecher im Uhrzeigersinn und ziehen Sie die Fixierungsschraube fest.
4) Verbinden Sie das Lautsprecherkabel mit den Anschlüssen
am Lautsprecher. Achten Sie dabei auf die richtige Polung
(Siehe Kapitel „Phase“).
MONTAGE IM AUSSENBEREICH
ACHTUNG :
Direkte Sonneneinstrahlung über längere
Zeit und anhaltende schlechte Wetterbedingungen können
das gute Aussehen der Lautsprecher beinträchtigen. Wir
empfehlen eine Montage im Schatten. Für den Winter sollten die Lautsprecher demontiert und an einem trockenen Ort
zwischengelagert werden.
Wenn Sie die Lautsprecher im Außenbereich oder bei fechten
Raumbedingungen (z. B. Bad, Swimming Pool) horizontal
montieren, achten Sie unbedingt darauf, dass die Lautsprecher so montiert werden wie auf Seite 3 gezeigt, mit dem
Cabasse-Logo auf der rechten Seite.
Optimale Aufstellung für Stereo
«d», der Abstand zwischen den beiden Lautsprechern, sollte
größer als 1,5 Meter sein. Vom Hörplatz sollten beide Boxen
gleich weit entfernt sein wie voneinander: Sie bilden dann mit
dem Hörplatz ein gleichseitiges Dreieck.
Die Lautsprecher sollten selbstverständlich zur Hörzone hin
ausgerichtet werden.
Die Lautsprecher sollten vorzugsweise so platziert werden,
dass sie in Richtung der größten Abmessung des Raumes abstrahlen.
Grundsätzlich sollte man es vermeiden, die Lautsprecher in
Raumecken aufzustellen, da dies die Wiedergabe der Bässe
ungebührlich akzentuiert und Raumresonanzen verstärkt
anregt.
Das Aufstellen der Lautsprecher in Raumnischen ist ebenfalls nicht zu empfehlen, da auch dann die Wiedergabe-Eigenschaften insbesondere im Bassbereich verändert werden.
Falls eine Aufstellung nicht anders möglich ist, sollte man
darauf achten, die Box nicht zu tief in der Nische aufzustellen,
der sichtbare Teil der Frontbespannung sollte sich außerhalb
der Nische befinden.
WANDMONTAGE MIT DER OPTIONALEN
KUGELKOPF-HALTERUNG
1) Bereiten Sie alle notwendigen Teile und Werkzeuge vor:
Die Kugelkopf-Halterung, die Schrauben, an das Wandmaterial angepasste Dübel und Bohrer, eine Bohrmaschine, einen
Bleistift sowie eine Wasserwaage.
2) Befestigen Sie den Halterungsteil mit den zwei Montagelöchern an der Rückseite des Lautsprechers. Halten Sie den
Befestigungsbügel an die ausgewählte Stelle an der Wand
und zeichnen Sie dann mit dem Bleistift die vier Schraubenlöcher an. Bohren Sie diese und stecken Sie die Dübel in die
Schraubenlöcher.
CAB Notice ZEF 13.indd 13
06/04/12 10:31
deutsch
WEEE KENNZEICHNUNG
Entsorgung von Elektro - und Elektronik - Altgeräten (Anwendbar in der Europaïschen Union)
Dieses auf dem Produkt angebrachte Symbol,
eine durchgestrichene Mülltonne auf Rädern,
bedeutet, dass dieses Produkt nicht als Haushaltsmüll entsorgt werden darf. Es muss stattdessen einer Sammelstelle übergeben werden,
die auf die Entsorgung von Elektro- und Elektronik-Altgeräten
eingerichtet ist. Indem Sie dafür sorgen, dass dieses Produkt
auf geeignete Weise entsorgt wird, helfen Sie, die potentiellen
negativen Folgen für Umwelt und Gesundheit, die Folge einer
unsachgemäßen Entsorgung wären, zu vermeiden. Die Wiederverwendung der im Gerät vorhandenen Materialien hilft,
natürliche Ressourcen zu bewahren. Genauere Informationen
über die Entsorgung dieses Produktes halten Ihre Gemeindeverwaltung, Ihr zuständiges Müllverwertungsunternehmen
oder das Geschäft, in dem Sie das Produkt gekauft haben,
für Sie bereit.
Phase
Beim Anschluss der Lautsprecher an einen Verstärker sollte
man auf die richtige Polung achten. Beide Lautsprecher müssen gleich gepolt an den Verstärker angeschlossen werden, da
sonst die räumliche Wiedergabe stark leidet und die Basswiedergabe abgeschwächt wird. Es gibt bei Lautsprechern
und Verstärkern zwei gängige Arten, die Polkennzeichnung
vorzunehmen:
Entweder ist eine der beiden Klemmen rot und die andere
schwarz oder - analog dazu - eine Klemme mit „+“ und eine
Klemme mit „-“ gekennzeichnet. In aller Regel ist bei einem
Lautsprecherkabel eine Ader mit einer Kennzeichnung versehen. Diese gehört dann an die rote oder die mit „+“ gekennzeichnete Klemme. Die andere Ader wird an die schwarze oder
die mit „-“ gekennzeichnete Klemme angeschlossen.
Wenn Sie unsere Ratschläge für Anschluss und Aufstellung
beachten, werden Ihre Lautsprecher Sie jederzeit mit perfektem Klang erfreuen.
ANSCHLUSS
Querschnitt des Kabels
Um die Qualität von Ihren Lautsprecherboxen voll
auszuschöpfen und Leistungsverluste zu vermeiden, sollten
Sie den elektrischen Widerstand der Anschlusskabel zwischen
Box und Verstärker so gering wie möglich halten. Um Ihnen
bei der Wahl des Kabelquerschnitts zu helfen, haben wir die
folgende Tabelle für sie zusammengestellt:
aximaler Abstand M
Verstärker/Box
CAB Notice ZEF 13.indd 14
4,5 m
6 m
7,5 m
9 m
12 m
Mindestquerschnitt
1,5 mm2
2 mm2
2,5 mm2
3 mm2
4 mm2
06/04/12 10:31
TECHNISCHE DATEN
195
195
Bauart
Wand
Wege
2
Chassis
194
194
258
258
Wirkungsgrad 1W/1m
1 x DOM25 Hochtöner
1 x 13T15WA Bass
86 dB
Filtre (en Hz)
128 x 58 x 64
Übertragungsbereich
70-22000 Hz
Nenn-Impedanz
4 ohms
Impedanz-Minimum
4 ohms
Nennbelastung
60 W
Spitzenbelastung
420 W
Gehäuse Aussführungen
Abmessungen HxBxT
Gewicht
weiss, schwarz
25.8 x 19.5 x 19.4 cm
3.2 kg
Cabasse entwickelt seine Geräte permanent weiter, um die bekannt große Zuverlässigkeit und hohe Klangqualität weiter zu verbessern.
Deshalb behält sich Cabasse das Recht vor, an allen in den technischen. Unterlagen, Prospekten oder Bedienungsanleitungen gezeigten
Geräten ohne vorherige Benachrichtigung Änderungen vorzunehmen.
CAB Notice ZEF 13.indd 15
06/04/12 10:31
NOT0286 - 12/03
Cabasse SA - 210, rue René Descartes - BP 10 - 29280 Plouzané
Tel +33 (0)2 98 05 88 88 - Fax +33 (0)2 98 05 88 99
www.cabasse.com
CAB Notice ZEF 13.indd 16
06/04/12 10:31