1
Robotclean 1
Operating Instructions and Parts List
Mise en marche de votre robot nettoyeur de piscine
Bedienungsanleitung für den automatischen Bodensauger
Funzionamento del nuovo robot di pulizia per piscine
Manejo de Limpiafondos de Piscina
Gebruiksaanwijzing voor robotzwembadreiniger
820123
Ubbink Manual Robotclean 1.indd 1
www.outsideliving.com
10.12.12 16:15
Ubbink Manual Robotclean 1.indd 2
10.12.12 16:15
ENGLISH
WARNING
Dear Customer,
Thank you for choosing our Jet Unit to clean your pool. We hope that you will
enjoy using your new Jet Unit to maintain your swimming pool for years to come.
The Jet Unit is the only fully automatic robotic pool cleaner with a powerful jet drive
propulsion system. Before you begin to use the cleaner, please take a few
minutes to carefully read the Operator Instructions.
Again, thank you for choosing our Jet Unit.
Read all safety instructions carefully and keep for later reference.
Observe all warnings and instructions marked on power supply and cleaner.
Keep power supply away from heavy rain or placed in puddles of water.
Use only the power supply that was supplied with your cleaner. If there is a
question, consult your local dealer or service center.
The unit must be supplied through a residual current device (RCD) having a rated
residual operating current not exceeding 30 mA.
The connection to the branch circuit should be consistent with the local and
national wiring rules (electrical code).
Do not use your power supply if:
(1) Power cord is damaged or frayed.
Read all safety instructions carefully and keep for later reference.
(2) The power supply had been dropped in the pool or exposed to heavy rain.
Observe all warnings and instructions marked on power supply and cleaner.
If the
power
supply
has
Keep (3)
power
supply
away from
heavy
raina
orbroken
placed in socket.
puddles of water.
Use
only theconsult
power supply
was or
supplied
with your
cleaner.
If there
a
Please
yourthat
dealer
qualified
service
center
for is
help.
question, consult your local dealer or service center.
Do
not
attempt
to
repair
broken
power
cord
or
power
supply.
Contact your dealer
The unit must be supplied through a residual current device (RCD) having a rated
or service
center.
residual
operating
current not exceeding 30 mA.
The
connection to of
thethe
branch
should in
beleakage
consistentof
with
the local and
Mishandling
unitcircuit
can result
lubricants.
national wiring rules (electrical code).
pump
is not
suitable
for use by persons (including children) with reduced
DoThe
not use
your power
supply
if:
(1)
Power cordsensory
is damagedor
or frayed.
physical,
mental capabilities or lack of experience and knowledge,
(2) The power supply had been dropped in the pool or exposed to heavy rain.
unless
theysupply
are has
supervised
by a person responsible for their safety or have been
(3)
If the power
a broken socket.
Please
consult your
dealer or qualified
center
for help.Children must be supervised that they
instructed
regarding
usageservice
of the
device.
Do not attempt to repair broken power cord or power supply. Contact your dealer
13
are not playing with the device.
or service center.
DO NOTENGLISH
SWIM WHILE CLEANER
IS IN USE
1.
2.
3.
4.
5.
6.
7.
8.
WARNING
Dear Customer,
Thank you for choosing our Jet Unit to clean your pool. We hope that you will
enjoy using your new Jet Unit to maintain your swimming pool for years to come.
The Jet Unit is the only fully automatic robotic pool cleaner with a powerful jet drive
9. you
body
propulsion system. Before
begin to use the cleaner, please take a few
wheelInstructions.
cable
plugto carefully read 10.
minutes
the Operator
our Jet Unit.
11. handle
230Again,
V ~ thank
50Hzyou for choosing
fuse
transformer
transformer
power switch ON/OFF
socket
timer
floating cable plug
floating cable
12. side plate
13. jet valve
housing CLEANER
DO NOT SWIM
WHILE
14. jet outlet
IS IN USE 15. lock pin
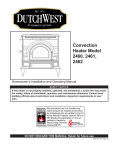
1
1.
2.
3.
4.
5.
6.
7.
8.
fuse
transformer cable plug
transformer 230 V ~ 50Hz
2
power switch ON/OFF
socket
timer
floating cable plug3
floating cable
9. body
10. wheel
11. handle
12. side plate
13. jet valve housing
14. jet outlet
15. lock pin
Mishandling of the unit can result in leakage of lubricants.
14
4
2
9
3
14
10
4
1
13
9
8
10
8
7
5
6
7
5
6
12
12
15
15
1
3
Ubbink Manual Robotclean 1.indd 3
11
11
1
3
10.12.12 16:15
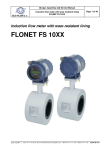
Operating Instructions
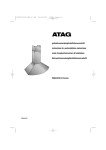
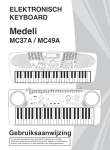
Your new automatic pool cleaner contains:
A. Robotic Pool Cleaner and floating cable.
B. Power Supply (transformer)
Please read this Manual completely before operating your Pool Cleaner.
2
1. Place the power supply (transformer) at least 3.5 meters (12 feet) from the pool. (See
figure2).
2. Uncoil the cable (See figure 3 ).
3. Make sure that the power supply switch is in the “OFF” position (See figure 4).
4. Plug the cable into the socket on the power supply (See figure 5):
5. Place the unit in the water. Turn the unit side to side in the water to allow air to escape from
the body and then let the cleaner sink to the bottom of the pool (See figure 6 ). Then spread
the floating cable over the surface of the pool as evenly as possible making sure it is not
tangled or kinked.
6. Plug the transformer cord into a 230V~ three grounded outlet (See figure 8).
7. Turn the transformer ON and adjust the timer according to the operating instructions (see
next page for details)
IMPORTANT: Please be sure to always keep the cleaner properly stored anywhere between
10 to 40 degrees Celsius (50 to 104 degrees Fahrenheit). This will keep the motor, plastics
and seals protected. Failure to comply, will result in loss of warranty.
CAUTION: Do not switch the pool cleaner “ON” if it is not fully
immersed in water. Operating the cleaner out of water will cause
severe damage immediately and will result in loss of warranty. Allow
the cleaner to remain in the pool for 15 to 20 minutes following the
end of its cleaning cycle. This will allow the motors to cool
adequately. Do not leave the cleaner in the pool all the time. Always
remember to turn the power supply “OFF” and unplug it from the
power outlet before removing the cleaner from the pool.
8
½
Power supply
½
Power supply
3.5m/12ft
3
6
4
4
Ubbink Manual Robotclean 1.indd 4
10.12.12 16:15
Operating Instructions
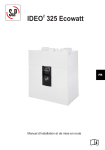
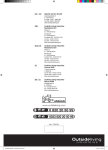
90 Seconds Timer Operating Instructions
Your Cleaner is equipped with a 90 second DIGITAL TIMER located on the power supply
To operate it please do the following:
Switch the power supply ON pressing the main switch. The display will flash two horizontal bars.
Press the C-RUN button. The machine will start to run and the green light indicator above the C-RUN button lights up to confirm the operation.
Observe the time required for the machine to move across the pool, at its widest point from one side to another.
According to your swimming pool dimensions, adjust the timer using the time selector arrows. Up arrow will increase the number of seconds, down arrow will decrease the
number of seconds. You can choose between 0 and 90 seconds.
Now your unit will work in Continuous Operation Mode and it will stop only when the operator will turn the machine OFF from the main switch.
As an option, you can set the machine to turn off automatically after 2 hours. To do so, press the OPT button. The green light indicator above the OPT button lights up to
confirm the operation. Now that the OPT button is selected the machine will stop after 2 hours.
Please Note: In addition to the user selected operation time, the timer has a default shutdown for 5 seconds every 5 minutes.
Changing the Time Setting:
The user can change the time (0-90 seconds) at any time, even as the pool cleaner is operating in the pool.
Please keep in mind that whenever the timer is in operation, you will find the LEDs labeled “I” and “0” will be lighted alternately. The Red LED “I” indicates that the timer is in
operation for the selected (0-90 seconds) time. The Green LED “0” indicates the timer is turned off (for a default 1 second).
1
2
3
6
7
8
4
5
9
1. LED display
2. Continuous Operation Mode LED
3. C-RUN Continuous Operation Mode button
4. Timer Operation Mode LED
5. OPT Timer Operation Mode button
6. Timer is in operation LED
7. Timer is turned off LED
8. Time selector button increase value
9. Time selector button decrease value
Main switch
Digital Timer
5
Ubbink Manual Robotclean 1.indd 5
10.12.12 16:15
CLEANING CYCLE
The cleaning cycle of the cleaner is two hours. After two hours of working, the cleaner will shut off automatically by an integrated timer inside
the unit. In some cases the pools are clean after less than 2 hours and sometimes two hours is not enough. The size and shape of the pool and
the amount of debris in it, will determine the total time of cleaning. When the cleaner slows down and constantly reverses directions before
reaching the end sides of the pool, it is sending a signal that it is time to clean or change the filter bag.
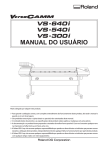
Filter bag maintenance
CLEAN THE FILTER BAG AFTER EVERY CLEANING CYCLE
a. Unplug the power supply. (Please keep the plug away from contact with water)
b. If the unit is in the pool, gently pull the cleaner toward you using the cable until the
handle is within reach. Use the side handle (not the cable) or the wheel tube (fig 9) to pull
the cleaner out of the pool after allowing most of the water to drain from the unit.
c. Lay the unit on its back on a smooth surface (in order to prevent scratches on the
machine body), unlock and remove the bottom lid assembly. (fig.10,11,12,13)
d. Remove the filter bag from the support bars (fig.14), turn it inside out and wash off all the
dirt with a garden hose or in a sink. Squeeze the bag gently until the rinse water is clear. If
necessary, machine wash the bag using only cold water with NO DETERGENT!
e. Re-install the bag on the support bars with the label in the center of one of the long
sides of the bottom lid (fig. 15)
f. Re-install the bottom lid assembly in the body. Push down on it until the lock tabs will
snap into place properly.
wheel
tube
lock tab
side handle
label
6
Ubbink Manual Robotclean 1.indd 6
10.12.12 16:15
SETTING THE CLEANING PATTERN
Your Jet cleaner is pre-set to scan and clean most pools from 70 feet ( 24 m) to 80 feet ( 27 m) in length. The Jet cleaner is factory set
to look like the picture in Fig.16 with one Lock pin installed on each side. The Jet cleaner will systematically clean your pool in a
consistent pattern.
After your Jet cleaner completes its cleaning cycle, remove the cleaner from the pool and transfer the lock-pins from the right side of
the unit to the left side (vice-versa) Next time you use your Jet cleaner the cleaning unit will clean the pool in the opposite pattern.
This will ensure that your cleaner completely cleans your pool.
16
Lockpin in
preset position
18
Lockpin in
forward position
Curves counter
clockwise in this
direction
Adjustable
axle
Curves on a
greater angle in
this direction
Adjustable
axle
Lock Pin
Fixed
axle
Fixed
axle
Goes straight
in this direction
Goes straight
in this direction
17
ADJUSTING THE CLEANER
FOR YOUR POOL
The cleaner uses a systematic
cleaning pattern that allows the
cleaner to go back and fourth in
overlapping patterns. The cleaner
may be used to clean a variety of
different size pools, from the small, to
the very large. Before its first use, you
must set up the cleaner for your pool.
To adjust the cleaner you will use the
axle locking pin. (Fig. 17). There are
two locking pins permanently
attached to the unit with a lanyard.
Only one locking pin is required for
most applications. For the very large
pools you will need to install an
additional locking pin (Located on the
jet valve housing). Follow the pin
configuration illustration for your size
pool (Fig. 18).
7
Ubbink Manual Robotclean 1.indd 7
10.12.12 16:15
TROUBLE SHOOTING:
A. Does not reverse directions:
1. Take a garden hose and spray water into the valve housing at each
opening . The high water pressure should free the jet valve system of
any debris.
2. Remove one of the jet-outlets, taking out the two lateral screws (FIG.
19). Bend a common “giant” paper clip into a hook as shown in (FIG. 20)
Push the center Flap to open it and look into the Impeller. Typically, you
may find debris like hair, string, or a small twig caught in the impeller.
Use your paper clip to hook or free the debris and remove it (FIG. 21).
B. Does not pump water:
1.Check to see if the electric outlet has power.
2.Check to see if the cable is plugged into the power supply.
3.Check the fuse in the Power Supply - if necessary replace it.
4.Check the cable for possible cuts or damage.
C. Does Not Vacuum well or at all:
1.Check to see if the filter bag is clean.
2.Check to see if the intake valve flaps on the bottom of the
cleaner are free to allow entry of water and debris.
D. Does not cover the entire pool:
1.Check to see if the wheel movement is free of obstructions like
hair or accumulated debris.
2.Check to see if the filter bag is clean.
3.Adjust timing cycle so that the cleaner reaches the other side of
the pool.
E. Reverse Direction before reaching the opposite side wall of the pool.
1. Adjust the transformer timer:
Up arrow will increase the number of seconds. You can choose
between 0 and 90 seconds. Repeat if necessary.
F. Waits too long at the wall site before reversing:
1. Adjust the transformer timer:
Down arrow will decrease the number of seconds. You can choose
between 0 and 90 seconds. Repeat if necessary.
G. Floating cable and twisting cable care
1.Your new cleaner was designed to clean most above-ground
pools. Some pool shapes may cause the cable to coil or tangle
because the cleaner operates in a systematic circular pattern.
screw
20
jet outlet
19
center flap
21
In order to keep the filter bag from wrapping around the pump and blocking the
flow of water to the pump, please install the filter bag clips as shown.
8
Ubbink Manual Robotclean 1.indd 8
10.12.12 16:15
FRANÇAIS
ATTENTION
Cher client,
Merci d’avoir choisi notre robot Jet Unit pour nettoyer votre piscine. Nous
espérons que le Jet Unit vous aidera, dans les années à venir, à entretenir plus
facilement votre piscine.
Le Jet Unit est le seul robot nettoyeur de piscine totalement automatisé, doté d’un
système de propulsion à jets très puissant. Avant de commencer à utiliser votre
nettoyeur, lisez soigneusement son mode d'emploi. Nous vous remercions
encore une fois d’avoir choisi notre Jet Unit.
Lisez soigneusement toutes les instructions de sécurité et conservez-les pour
vous en servir ultérieurement.
Respectez tous les avertissement et instructions situés sur le bloc d’alimentation
et le nettoyeur.
Ne laissez jamais le bloc d'alimentation sous la pluie battante ou dans une flaque
d'eau.
Utilisez uniquement le bloc d’alimentation fourni avec votre nettoyeur. Pour toute
question, consultez votre revendeur local ou le centre de réparation.
L’unité doit être alimentée par un appareil de courant résiduel (RCD) dont le
courant résiduel de fonctionnement ne dépasse pas les 30 mA.
Le branchement au circuit de dérivation doit être compatible avec les normes de
Read all safety instructions carefully and keep for later reference.
câblage nationales et locales (code électrique).
Observe all warnings and instructions marked on power supply and cleaner.
N’utilisez
jamais
bloc
d’alimentation
si : of water.
Keep
power supply
awayle
from
heavy
rain or placed in puddles
Use
power d’alimentation
supply that was supplied
with your cleaner.
If there is a
(1)only
Lethe
cordon
est endommagé
ou effiloché.
question, consult your local dealer or service center.
(2)
Le
bloc
d’alimentation
est
tombé
dans
la
piscine
ou est resté sous la pluie
The unit must be supplied through a residual current device (RCD) having a rated
battante.
residual
operating current not exceeding 30 mA.
The
branch
circuit should be
(3)connection
La prisetoduthebloc
d’alimentation
estconsistent
cassée.with the local and
national wiring rules (electrical code).
Veuillez
consulter
votre
revendeur
ou
un centre de réparation agréé si vous avez
Do not use your power supply if:
besoin
d’aide.
(1) Power
cord
is damaged or frayed.
(2)
power supply
had been
in thepar
pooldes
or exposed
to heavy rain.
LaThe
pompe
ne peut
êtredropped
utilisée
personnes
(y compris des enfants) aux
(3) If the power supply has a broken socket.
capacités
physiques,
sensorielles
etforintellectuelles
diminuées ou n’ayant pas
Please
consult your
dealer or qualified
service center
help.
Dol’expérience
not attempt to repair
broken
power
cord or powernécessaires,
supply. Contact your
dealer qu’elles ne soient suret les
con
naissances
à
moins
13
or service center.
veilléesofpar
personne
responsable
ou qu’elles n’aient reçu les
Mishandling
the une
unit can
result in leakage
of lubricants.de leur sécurité14
instructions relatives à l’utilisation de l’appareil. Les enfants doivent être surveillés
et il faut veiller à ce qu’ils ne jouent pas avec l’appareil
ENGLISH
NE NAGEZ
JAMAIS LORSQUE
LE NETTOYEUR FONCTIONNE
1.
2.
3.
4.
5.
6.
7.
8.
WARNING
Dear Customer,
Thank you for choosing our Jet Unit to clean your pool. We hope that you will
enjoy using your new Jet Unit to maintain your swimming pool for years to come.
The Jet Unit is the only fully automatic robotic pool cleaner with a powerful jet drive
propulsion system. Before you begin to use the cleaner, please take a few
9. corps
de l’appareil
minutes to carefully read the Operator
Instructions.
10.
du
transformateur
Again,
thank you for choosing our
Jetroue
Unit.
fusible
prise du câble
transformateur 230 V ~ 50Hz
interrupteur d’alimentation ON/OFF
prise
minuterie
prise du câble flottant
câble flottant
11. poignée
12. plaque latérale
13. boîtier de la vanne de jet
14. sortie des jets
15. goupille de verrouillage
DO NOT SWIM WHILE CLEANER
IS IN USE
1
1.
2.
3.
4.
5.
6.
7.
8.
fuse
transformer cable plug
transformer 230 V ~ 50Hz
2
power switch ON/OFF
socket
timer
floating cable plug3
floating cable
9. body
10. wheel
11. handle
12. side plate
13. jet valve housing
14. jet outlet
15. lock pin
4
2
9
3
14
10
4
1
13
9
8
10
8
7
5
6
7
5
6
12
12
15
15
1
3
Ubbink Manual Robotclean 1.indd 9
11
11
1
9
10.12.12 16:15
Mode d’emploi
Votre nouveau nettoyeur de piscine automatique contient :
A. Un robot nettoyeur de piscine et un câble flottant.
B. Un bloc d’alimentation (transformateur).
Veuillez lire ce manuel dans son intégralité avant de faire fonctionner le nettoyeur de piscine.
1. Placez le bloc d’alimentation (transformateur) à un minimum de 3,5 mètres (12 pieds) de la
piscine. (Voir la figure 2).
2. Déroulez le câble (Voir la figure 3).
3. Vérifiez que l’interrupteur du bloc d’alimentation est sur « OFF » (Voir la figure 4).
4. Branchez le câble dans la prise du bloc d’alimentation (Voir la figure 5). 5. Placez l’unité dans l'eau. Dans l’eau, penchez l’appareil d’un côté, puis de l’autre, afin que
l'air puisse s'en échapper. Laissez ensuite le nettoyeur couler jusqu’au fond de la piscine (Voir
la figure 6). Étalez ensuite le câble flottant sur la surface de l’eau, de manière aussi égale que
possible, en vous assurant qu’il n’est ni emmêlé ni plié.
6. Branchez le cordon du transformateur dans une prise de terre à trois broches (Voir la figure 8).
7. Mettez le transformateur sous tension et ajustez la minuterie conformément aux instructions
de fonctionnement (consultez la page suivante pour de plus amples détails).
IMPORTANT : Le nettoyeur doit toujours être correctement entreposé à des températures
allant de 10 à 40 degrés Celsius (50 à 104 degrés Fahrenheit). Le moteur, les éléments en
plastique et les joints seront ainsi protégés. Le non respect de cette consigne peut annuler la
garantie.
ATTENTION : Ne mettez jamais le nettoyeur de piscine sous
tension s’il n’est pas totalement immergé dans l’eau. Le
fonctionnement du nettoyeur hors de l’eau l’endommagera
immédiatement et annulera la garantie. Laissez le nettoyeur dans
la piscine pendant 15 à 20 minutes après la fin de son cycle de
nettoyage. Les moteurs auront ainsi le temps de bien refroidir. Ne
laissez jamais le nettoyeur dans la piscine de manière permanente.
N’oubliez jamais de mettre le bloc d’alimentation hors tension et de
le débrancher de la prise d’alimentation avant de retirer le nettoyeur
de la piscine.
8
2
½
Bloc d’alimentation
½
Bloc d’alimentation
3.5m/12ft
3
6
4
10
Ubbink Manual Robotclean 1.indd 10
10.12.12 16:15
Mode d’emploi
Mode d'emploi de la minuterie de 90 secondes
Votre nettoyeur est équipé d’une MINUTERIE NUMÉRIQUE de 90 secondes située sur le bloc d’alimentation.
Pour la faire fonctionner, procédez de la façon suivante :
Mettez le bloc d'alimentation sous tension en appuyant sur l'interrupteur principal. Deux barres horizontales clignotent à l'écran.
Appuyez sur la touche C-RUN. La machine se met en marche et le témoin vert situé au-dessus de la touche C-RUN s’allume pour confirmer son fonctionnement.
Observez combien de temps la machine met à traverser la partie la plus large de la piscine.
En fonction des dimensions de votre piscine, réglez la minuterie à l’aide des flèches de sélection du temps. La flèche vers le haut fait augmenter le nombre de secondes
alors que celle vers le bas les réduit. Vous pouvez choisir entre 0 et 90 secondes.
Votre appareil fonctionne désormais en Mode de fonctionnement continu et ne s’arrêtera que lorsque l’utilisateur le mettra sous tension à l’aide de l’interrupteur principal.
En option, vous pouvez configurer la machine afin qu’elle s’arrête automatiquement après 2 heures. Pour cela, appuyez sur la touche OPT. Le témoin vert situé au dessus
de la touche OPT s'allume pour confirmer l'opération. La touche OPT ayant été sélectionnée, la machine s'arrêtera au bout de 2 heures.
Veuillez noter : En plus de la durée de fonctionnement sélectionnée par l’utilisateur, la minuterie a un dispositif de coupure par défaut de 5 secondes toutes les 5
minutes.
Modification des paramètres de temps :
L’utilisateur peut modifier la durée de fonctionnement de la minuterie (0 à 90 secondes) n’importe quand, même lorsque le nettoyeur de piscine est en train de nettoyer cette
dernière. N’oubliez pas que lorsque la minuterie fonctionne, les DEL « I » et « 0 » s’allument l’une après l’autre. La DEL rouge « I » indique que la minuterie fonctionne
pendant la durée sélectionnée (0 à 90 secondes). La DEL verte « 0 » indique que la minuterie est désactivée (pendant une durée par défaut de 1 seconde).
1
2
3
6
7
8
4
5
9
1. Affichage à DEL
2. DEL Mode de fonctionnement continu
3. Touche Mode de fonctionnement continu C-RUN
4. DEL Mode de fonctionnement sous minuterie
5. Touche Mode de fonctionnement sous minuterie OPT
6. DEL Minuterie activée
7. DEL Minuterie désactivée
8. Touche d’augmentation de la durée
9. Touche de réduction de la durée
Interrupteur
principal
Minuterie numérique
11
Ubbink Manual Robotclean 1.indd 11
10.12.12 16:15
CYCLE DE NETTOYAGE
Le cycle de nettoyage du nettoyeur est de deux heures. Après deux heures de fonctionnement, le nettoyeur s’éteint automatiquement grâce à
une minuterie intégrée. Dans certains cas, les piscines sont propres en moins de 2 heures et quelquefois, les 2 heures ne suffisent pas à les
nettoyer. La durée totale du nettoyage dépend de la taille et de la forme de la piscine, ainsi que de la quantité de débris qui s’y trouvent.
Lorsque le nettoyeur ralentit et change constamment de direction avant d’avoir atteint les extrémités de la piscine, il est temps de nettoyer ou
de changer le sac du filtre.
Entretien du sac du filtre
NETTOYEZ LE SAC DU FILTRE APRÈS CHAQUE CYCLE DE NETTOYAGE
a. Débranchez le bloc d'alimentation. (La prise ne doit jamais se trouver à proximité de
l'eau)
b. Si le nettoyeur est dans la piscine, tirez-le avec précaution vers vous en le tenant par
le câble, jusqu'à ce que vous puissiez atteindre sa poignée. Après avoir laissé la
majorité de l'eau sortir de l’appareil, sortez le nettoyeur de la piscine en le tenant par
sa poignée latérale (et non par le câble) ou par le tube des roues (fig 9).
c. Posez l'appareil sur le dos, sur une surface lisse (afin d’empêcher que le corps ne se
raye). Déverrouillez et retirez l’assemblage du couvercle du bas. (fig.10,11,12,13)
d. Retirez le sac du filtre de ses supports (fig. 14), retournez-le et lavez la poussière et
les débris à l'aide du tuyau de jardin ou dans l'évier. Essorez le sac avec précaution
jusqu’à ce que l’eau de rinçage soit claire. Le cas échéant, lavez le sac à la machine, à
l’eau froide uniquement et SANS DÉTERGENT !
e. Réinstallez le sac sur ses supports, l'étiquette au centre d'une des extrémités longues
du couvercle du bas.
f. Réinstallez l’assemblage du couvercle du bas sur le corps de l’appareil. Appuyez
dessus jusqu’à ce que les pattes de verrouillage s’enclenche correctement.
tube des
roues
patte de verrouillage
poignée latérale
étiquette
12
Ubbink Manual Robotclean 1.indd 12
10.12.12 16:15
CONFIGURATION DE L’ITINÉRAIRE DE NETTOYAGE
Votre nettoyeur propulsé par jets a été préconfiguré afin de scanner et de nettoyer la plupart des piscines de 24 m (70 pi) à 27 m (80
pi) de long. Il a été configuré en usine afin de ressembler à l’illustration de la figure 16, avec une goupille de verrouillage de chaque
côté. Le nettoyeur propulsé par jets nettoie systématiquement votre piscine en suivant toujours le même itinéraire.
Une fois le cycle de nettoyage terminé, retirez le nettoyeur de la piscine et transférez les goupilles de verrouillage du côté droit au
côté gauche de l’appareil (et vice-versa). La prochaine fois que vous utilisez le nettoyeur, il nettoiera votre piscine en suivant un
itinéraire opposé. Cela garantit un nettoyage intégral de votre piscine.
16
Dans cette position,
le robot se déplace
dans le sens inverse des
aiguilles d'une montre
position du clip
programmé en
usine
Essieu
ajustable
Clip dans le trou
le plus en avant
de l'appareil
18
le robot se déplace
avec un angle plus
ouvert dans cette
direction
Essieu
ajustable
Clip
Essieu
fixe
Essieu
fixe
le robot va droit dans cette direction
le robot va droit dans cette direction
17
RÉGLAGE DU NETTOYEUR
POUR VOTRE PISCINE
Le nettoyeur suit un itinéraire de
nettoyage qui lui permet de traverser
la piscine dans tous les sens et de
repasser plusieurs fois au même
endroit. Il peut nettoyer des piscines
de toutes tailles, des plus petites aux
plus grandes. Avant sa première
utilisation, configurez-le pour votre
piscine. Pour cela, utilisez la
goupille de verrouillage de
l’essieu. (Fig. 17). Deux goupilles de
verrouillage sont fixées de manière
permanente à l’appareil, à l’aide d’un
cordon. Une seule goupille de
verrouillage est nécessaire pour la
plupart des applications. Si votre
piscine est très grande, vous devrez
installer une goupille supplémentaire
(située sur le boîtier de la valve de
jets). Consultez l’illustration de la
configuration de la goupille pour la
taille de votre piscine (Fig. 18).
13
Ubbink Manual Robotclean 1.indd 13
10.12.12 16:15
DÉPANNAGE
A. L'appareil ne change pas de direction :
1. Vaporisez de l’eau dans chaque orifice du boîtier de la valve à l'aide d’un
tuyau d’arrosage. La pression d’eau forte devrait nettoyer le système de
la valve des jets de tout débris.
2. Retirez une des sorties de jet en dévissant les deux vis latérales (FIG.
19). Dépliez un trombone « géant » normal et transformez-le en crochet,
comme cela est illustré à la figure 20. Ouvrez le volet central en appuyant
dessus et regardez à l’intérieur du rotor. Vous y trouverez probablement
des débris, tels que des cheveux, de la ficelle ou une petite branchette.
Retirez ces débris à l'aide du trombone en forme de crochet (FIG. 21).
B. L’appareil ne pompe pas l’eau.
1. Vérifiez si la prise électrique est alimentée.
2. Vérifiez si le câble est branché dans le bloc d'alimentation.
3. Vérifiez le fusible du bloc d'alimentation - remplacez-le le cas échéant.
4. Vérifiez que le câble n’est ni coupé ni endommagé.
C. L'appareil n'aspire pas correctement ou pas du tout:
1. Vérifiez que le sac du filtre est propre.
2. Vérifiez que les volets de la vanne d’admission située en bas du
nettoyeur sont dégagés et laissent passer l’eau et les débris.
D. L'appareil ne couvre pas toute la piscine.
1. Vérifiez que la rotation des roues n'est pas obstruée par des cheveux
ou des débris accumulés.
2. Vérifiez que le sac du filtre est propre.
3. Réglez la durée du cycle de manière à ce que le nettoyeur atteigne
l'autre côté de la piscine.
E. L’appareil change de direction avant d’atteindre l'autre côté de la piscine.
1. Réglez la minuterie du transformateur :
La flèche vers le haut augmente le nombre de secondes. Vous pouvez
choisir entre 0 et 90 secondes. Recommencez la procédure si besoin est.
F. L’appareil reste trop longtemps près de la paroi avant de changer de
direction :
1. Réglez la minuterie du transformateur :
La flèche vers le bas réduit le nombre de secondes. Vous pouvez choisir
entre 0 et 90 secondes. Recommencez la procédure si besoin est.
G. Entretien du câble flottant et du câble torsadé
1. Votre nouveau nettoyeur est conçu pour nettoyer la plupart des
piscines au-dessus du sol. Certaines formes de piscines peuvent causer
un enroulement ou un enchevêtrement du câble car le nettoyeur suit un
itinéraire de nettoyage circulaire.
vis
20
sortie
des jets
19
volet central
21
Pour empêcher le sac du filtre de s'enrouler autour de la pompe et de bloquer
le débit d'eau vers la pompe, installez les attaches du sac de filtre comme cela
est illustré.
14
Ubbink Manual Robotclean 1.indd 14
10.12.12 16:15
DEUTSCH
WARNUNG
Sehr geehrter Kunde,
Vielen Dank für den Kauf unseres Reinigungsgeräts für Ihren Pool. Wir hoffen,
dass Sie mit Ihrem neuen Gerät viele Jahre lang zufrieden sein werden.
Dieses Reinigungsgerät ist der einzige vollautomatische Robotreiniger mit einem
leistungsstarken Düsenantriebssystem. Bevor Sie das Reinigungsgerät
verwenden, lesen Sie bitte die Betriebsanleitung. Nochmals vielen Dank für die
Wahl unseres Geräts.
Lesen Sie alle Sicherheitshinweise und bewahren Sie diese als Referenz auf.
Beachten Sie die Warnhinweise und Anleitungen auf dem Netzteil und dem
Reinigungsgerät.
Halten Sie das Netzteil von Regen und Wasserlachen fern.
Verwenden Sie ausschließlich das Netzteil, das Sie zusammen mit dem
Reinigungsgerät erhalten haben. Falls Sie Fragen haben, wenden Sie sich an
Ihren Händler oder das Servicecenter.
Die Stromversorgung für die Einheit muss über einen Fehlerstromschutzschalter
(Fi-Schutzschalter) mit höchstens 30 mA Nennstrom erfolgen.
Die Verbindung mit dem Abzweigstromkreis muss den regionalen und nationalen
Verkabelungsregeln (Elektrocode) entsprechen.
Read
all safety instructions
andnicht,
keep for
later reference.
Verwenden
Sie dascarefully
Netzteil
wenn:
Observe
warnings
and instructions
markedoder
on power
supply and cleaner.
(1)all
Das
Stromkabel
beschädig
ausgefranst
ist.
Keep power supply away from heavy rain or placed in puddles of water.
(2)
Das
Netzteil
in
den
Pool
gefallen
ist
oder
starken
Regenfällen
ausgesetzt war.
Use only the power supply that was supplied with your cleaner. If there
is a
question,
consult
your
local dealer or service
(3) Wenn
die
Steckerbuchse
descenter.
Netzteils beschädigt ist.
The
unit must be
supplied
through a residual
currentIhrem
device (RCD)
having aoder
rated einem qualifizierten
Weitere
Hilfe
erhalten
Sie von
Händler
residual operating current not exceeding 30 mA.
Servicecenter.
The connection to the branch circuit should be consistent with the local and
Versuchen
Sie(electrical
nicht, ein
beschädigtes Stromkabel oder Netzteil zu reparieren.
national
wiring rules
code).
Do notWenden
use your power
supply
if: Ihren Händler oder das Servicecenter.
Sie sich
an
(1) Power cord is damaged or frayed.
Die falsche Handhabung der Einheit kann zum Auslaufen der Schmiermittel führen.
(2) The power supply had been dropped in the pool or exposed to heavy rain.
(3)
If the
power supply
has a broken
socket.
Die
Pumpe
ist nicht
zur Benutzung
durch Personen (einschließlich Kinder) mit
Please consult your dealer or qualified service center for help.
verringerten
physischen,
sensorischen
oder geistigen Fähigkeiten oder Mangel
Do not attempt to repair broken power cord or power supply. Contact your dealer
13
an
Erfahrung
or
service
center. und Kenntnissen geeignet, es sei denn, diese wurden von einer für
Mishandling
of the unit can
result in leakage of lubricants.
ihre Sicherheit
verantwortlichen
Person überwacht oder
14 erhielten Anweisungen
bezüglich der Verwendung des Gerätes. Kinder sind zu überwachen um sicherzustellen, dass sie nicht mit dem Gerät spielen
SCHWIMMEN
SIE NICHT WÄHREND DAS
ENGLISH
REINIGUNGSGERÄT IN BETRIEB IST
1.
2.
3.
4.
5.
6.
7.
8.
WARNING
Dear Customer,
Thank you for choosing our Jet Unit to clean your pool. We hope that you will
enjoy using your new Jet Unit to maintain your swimming pool for years to come.
The Jet Unit is the only fully automatic robotic pool cleaner with a powerful jet drive
Gehäuse
Sicherung
propulsion system. Before9.you
begin to use the cleaner, please take a few
RolleInstructions.
Transformator-Kabelstecker
minutes to carefully read the10.
Operator
Again,
you for choosing
Jet Unit.
11.ourGriff
Transformator 230
Vthank
~ 50Hz
Netzschalter Ein/Aus (ON/OFF)
Buchse
Zeitgeber
Schwimmkabelstecker
Schwimmkabel
12. Seitenteil
13. Düsenventilgehäuse
DO NOT SWIM
WHILE CLEANER
14. Düsenausgang
IS IN USE 15. Arretierstift
1
1.
2.
3.
4.
5.
6.
7.
8.
fuse
transformer cable plug
transformer 230 V ~ 50Hz
2
power switch ON/OFF
socket
timer
floating cable plug3
floating cable
9. body
10. wheel
11. handle
12. side plate
13. jet valve housing
14. jet outlet
15. lock pin
4
2
9
3
14
10
4
1
13
9
8
10
8
7
5
6
7
5
6
12
12
11
11
15
15
1
1
3
15
Ubbink Manual Robotclean 1.indd 15
10.12.12 16:15
Betriebsanleitung
Ihr neues automatisches Poolreinigungsgerät umfasst:
A. Den Robotreiniger und das Schwimmkabel.
B. Das Netzteil (Transformator).
Lesen Sie dieses Handbuch, bevor Sie den Poolreiniger in Betrieb nehmen.
2
1. Positionieren Sie das Netzteil (Transformator) mindestens 3,5 Meter vom Pool entfernt (siehe
Abbildung 2). 2. Rollen Sie das Kabel ab (siehe Abbildung 3).
3. Stellen Sie sicher, dass sich der Netzschalter in der "Aus"-Position (OFF) befindet (siehe
Abbildung 4). 4. Stecken Sie das Kabel in die Buchse des Netzteils (siehe Abbildung 5).
5. Tauchen Sie die Einheit ins Wasser. Bewegen Sie die Einheit seitwärts im Wasser, um die Luft
zu entfernen. Lassen Sie das Reinigungsgerät anschließend auf den Grund sinken (siehe
Abbildung 6). Legen Sie das Schwimmkabel so gleichmäßig wie möglich auf die
Wasseroberfläche und stellen Sie sicher, dass das Kabel nicht verheddert oder abgeknickt
ist.
6. Stecken Sie das Transformatorkabel in die dreipolige geerdete 230V~ Steckdose (siehe
Abbildung 8).
7. Schalten Sie den Transformator ein und legen Sie den Zeitgeber entsprechend der
Betriebsanleitungen fest (weitere Informationen finden Sie auf der nächsten Seite).
WICHTIG: Bewahren Sie das Reinigungsgerät in einem Raum mit einer Temperatur von 10
bis 40 Grad Celsius (50 bis 104 Grad Fahrenheit) auf, um den Motor, die Plastikteile und die
Versiegelung zu schützen. Die Nichteinhaltung dieser Richtlinie führt zum Verlust der
Garantie.
ACHTUNG: Schalten Sie das Poolreinigungsgerät nur EIN (ON),
wenn sich dieses vollständig im Wasser befindet. Der Betrieb des
Reinigungsgeräts außerhalb des Wassers führt umgehend zu
schweren Schäden und zum Verlust der Garantie. Lassen Sie das
Reinigungsgerät nach Beendigung des Reinigungszyklus 15 bis 20
Minuten im Pool, um den Motor abzukühlen. Lassen Sie das
Reinigungsgerät nicht ständig im Pool. Denken Sie daran, das
Netzteil auszuschalten (OFF) und auszustecken, bevor Sie das
Reinigungsgerät aus dem Pool nehmen.
8
½
Netzteil
½
Netzteil
3.5m/12ft
3
6
4
16
Ubbink Manual Robotclean 1.indd 16
10.12.12 16:15
Betriebsanleitung
Betriebsanleitung für den 90 Sekunden-Zeitgeber
Das Reinigungsgerät ist mit einem digitalen 90 Sekunden-Zeitgeber am Netzteil ausgestattet.
So verwenden Sie den Zeitgeber:
Schalten Sie das Netzteil ein, indem Sie den Hauptschalter drücken. Auf der Anzeige sollten zwei horizontale Linien blinken.
Drücken Sie die C-RUN-Taste. Das Gerät wird gestartet und die grüne Anzeigeleuchte über der C-RUN-Taste bestätigt, dass das Gerät in Betrieb ist. Messen Sie die Zeit,
die das Gerät benötigt, um den Pool an der breitesten Stelle zu durchqueren. Legen Sie den Zeitgeber mittels der Pfeile für die Zeitauswahl entsprechend der
Poolabmessungen fest. Der Pfeil nach oben erhöht die Anzahl der Sekunden und der Pfeil nach unten reduziert die Anzahl der Sekunden. Sie können zwischen 0 und 90
Sekunden wählen.
Das Gerät befindet sich nun im Dauerbetriebsmodus und kann nur über den Hauptschalter ausgeschaltet werden.
Sie können auch festlegen, dass das Gerät nach zwei Stunden automatisch ausgeschaltet wird. Drücken Sie hierzu die OPT-Taste. Die grüne Anzeigeleuchte über der OPTTaste bestätigt, dass das Gerät in Betrieb ist. Da Sie die OPT-Taste gedrückt haben, wird das Gerät nach zwei Stunden ausgeschaltet.
Hinweis: Zusätzlich zur vom Benutzer festgelegten Betriebszeit schaltet der Zeitgeber das Gerät alle 5 Minuten für 5 Sekunden aus.
Ändern der Zeiteinstellung
Der Benutzer kann die Zeiteinstellung (0 bis 90 Sekunden) jederzeit auch während des Betriebs ändern. Beachten Sie, dass die LED-Anzeigen “I” und “0” abwechselnd
aufleuchten, wenn der Zeitgeber aktiv ist. Die rote LED-Anzeige “I” gibt an, dass der Zeitgeber für die festgelegte Zeitdauer (0 bis 90 Sekunden) aktiv ist. Die grüne LEDAnzeige “0” gibt an, dass der Zeitgeber deaktiviert ist (standardmäßig für 1 Sekunde).
1
2
3
6
7
8
4
5
9
1. LED-Anzeige
2. LED-Anzeige für Dauerbetriebsmodus
3. C-RUN-Taste für Dauerbetriebsmodus
2. LED-Anzeige für Zeitgeberbetriebsmodus
2. OPT-Taste für Zeitgeberbetriebsmodus
2. LED-Anzeige für aktivierten Zeitgeber
2. LED-Anzeige für deaktivierten Zeitgeber
8. Zeitwahltaste für höheren Wert
9. Zeitwahltaste für niedrigeren Wert
Hauptschalter
Digitaler Zeitgeber
17
Ubbink Manual Robotclean 1.indd 17
10.12.12 16:15
REINIGUNGSZYKLUS
Der Reinigungszyklus dauert zwei Stunden. Nach zwei Stunden schaltet der integrierte Zeitgeber das Gerät automatisch aus. In einigen
Fällen kann der Pool in weniger als zwei Stunden gereinigt werden und manchmal sind zwei Stunden nicht ausreichend. Die Größe und Form
des Pool sowie der Grad der Verschmutzung bestimmt die für die Reinigung erforderliche Zeitdauer. Wenn das Reinigungsgerät langsamer
wird oder ständig die Richtung ändert, bevor das Ende des Pools erreicht wird, muss der Filterbeutel gereinigt oder gewechselt werden.
Wartung des Filterbeutels
REINIGEN SIE DEN FILTERBEUTEL NACH JEDEM REINIGUNGSZYKLUS
a. Stecken Sie das Netzteil aus. (Stellen Sie sicher, dass der Stecker nicht nass wird.)
b. Wenn das Gerät im Pool ist, ziehen Sie es vorsichtig am Kabel, bis sich der Griff in
Reichweite befindet. Ziehen Sie das Reinigungsgerät am an der Seite angebrachten Griff
oder an der Rolle (nicht am Kabel) aus dem Pool, nachdem das meiste Wasser aus dem
Gerät abgelaufen ist.
c. Legen Sie das Gerät auf einer glatten Oberfläche mit der Unterseite nach oben (um ein
Verkratzen des Gehäuses zu vermeiden) und entfernen Sie die untere Abdeckung (siehe
Abbildungen 10, 11, 12 und 13).
d. Entfernen Sie den Filterbeuteil aus der Haltevorrichtung, drehen Sie den Beutel von innen
nach außen und waschen Sie mit einem Gartenschlauch oder in einem Behälter alle
Verschmutzungen ab (siehe Abbildung 14). Drücken Sie den Beutel vorsichtig aus, bis
das Wasser klar ist. Sie können den Beuteil auch kalt OHNE WASCHMITTEL in der
Maschine waschen. e. Bringen Sie den Beutel wieder in der Haltevorrichtung an. Stellen
Sie sicher, dass sich der Label in der Mitte einer langen Seite der unteren Abdeckung
befindet (siehe Abbildung 15).
f. Bringen Sie die untere Abdeckung wieder am Gehäuse an. Drücken Sie die Abdeckung
nach unten, bis die Sperrlaschen einrasten.
Rolle
Sperrlasche
Seitlicher Griff
label
18
Ubbink Manual Robotclean 1.indd 18
10.12.12 16:15
FESTLEGEN DES REINIGUNGSSCHEMAS
Der Düsenreiniger ist für die meisten Pools mit einer Länge von 24 m bis 27 m voreingestellt. Der Düsenreiniger ist werkseitig mit einem
Arretierstift an jeder Seite ausgestattet (siehe Abbildung 16). Ihr Pool wird systematisch nach einem vorgegebenen Schema gereinigt.
Wenn ein Reinigungszyklus beendet ist, nehmen Sie das Gerät aus dem Pool und bringen Sie die Arretierstife an der anderen Seite
des Gehäuses an, damit der Pool bei der nächsten Reinigung in umgekehrter Richtigung gereinigt wird. Auf diese Weise wird die
vollständige Reinigung Ihres Pools sichergestellt.
16
Verriegelungsstift
in voreingestellter
Position
18
Verriegelungsstift
in vorderer
Position
Das Reinigungsgerät
fährt gegen den
Uhrzeigersinn in
dieser Richtung
Einstellbare
Achse
A N PA S S E N D E S R E I N I GUNGSGERÄTS AN IHREN
POOL
Das Reinigungsgerät
fährt eine engere
Kurve in
dieser Richtung
Einstellbare
Achse
Lock Pin
Feststehende
Achse
Feststehende
Achse
Das Reinigungsgerät fährt geradeaus in
dieser Richtung
Das Reinigungsgerät fährt geradeaus in
dieser Richtung
17
Das Reinigungsgerät folgt einem
systematischen Reinigungsschema,
das das Gerät in sich
überschneidenen Linien hin und her
bewegt. Das Reinigungsgerät kann
sowohl in kleinen als auch in sehr
großen Pools eingesetzt werden.
Bevor Sie das Gerät das erste Mal
verwenden, müssen Sie es für Ihren
Pool einstellen. Um das Gerät an
Ihren Pool anzupassen, verwenden
Sie den Achselarretierstift (siehe
Abbildung 17). Am Gerät sind zwei
Arretierstifte angebracht. Für die
meinsten Anwendungen reicht ein
Arretierstift aus. Für sehr große
Pools müssen Sie einen weiteren
Arretierstift anbringen (am
Düsengehäuse). In Abbildung 18 ist
die Arretierstiftkonfiguration für die
verschiedenen Poolgrößen
dargestellt.
19
Ubbink Manual Robotclean 1.indd 19
10.12.12 16:15
PROBLEMBEHANDLUNG:
A. Das Gerät ändert die Richtung nicht:
Schraube
1. Spritzen Sie alle Öffnungen im Düsengehäuse mit einem Gartenschlauch aus.
Der hohe Wasserdruck sollte alle Verunreinigungen aus dem Düsensystem
entfernen.
Entfernen Sie einen der Düsenausgänge, indem Sie die beiden seitlichen
2.
Schrauben herausdrehen (siehe Abbildung 19). Biegen Sie eine große
Büroklammer in einen Haken (siehe Abbildung 20). Öffnen Sie die mittlere
Klappe und überprüfen Sie den Impeller. Möglicherweise befinden sich Haare,
eine Schnur oder ein kleiner Zweig im Impeller. Entfernen Sie die Verunreinigung
mit der Büroklammer (siehe Abbildung 21).
B. Das Gerät pumpt kein Wasser:
1. Überprüfen Sie, ob der elektrische Anschluss funktioniert.
2. Stellen Sie sicher, dass das Kabel in das Netzteil eingesteckt ist.
3. Überprüfen Sie die Sicherung im Netzteil und ersetzen Sie diese
gegebenenfalls.
4. Überprüfen Sie, ob das Kabel beschädigt ist.
C. Das Gerät saugt nicht richtig oder überhaupt nicht:
1. Überprüfen Sie, ob der Filterbeutel sauber ist.
2. Stellen Sie sicher, dass die Ansaugventilklappen an der Unterseite des
Reinigungsgeräts nicht blockiert sind und Wasser sowie Fremdkörper
einlassen.
D. Das Gerät reinigt nicht dem gesamten Pool:
1. Stellen Sie sicher, dass die Rollen nicht durch Haare oder andere
Verunreinigungen blockiert werden.
2. Überprüfen Sie, ob der Filterbeutel sauber ist.
3. Passen Sie die Zeitdauer des Zyklus so an, dass das Gerät die
gegenüberliegende Seite des Pools erreicht.
E. Ändern Sie die Richtung bevor das Gerät die gegenüberliegende Seite des
Pools erreicht.
1. Passen Sie den Transformatorzeitgeber an: Der Pfeil nach oben erhöht die
Anzahl der Sekunden. Sie können zwischen 0 und 90 Sekunden wählen.
Wiederholen Sie den Vorgang, falls erforderlich.
F. Das Gerät bleibt zu lang an einer Seite, bevor es die Richtung ändert:
1. Passen Sie den Transformatorzeitgeber an: Der Pfeil nach unten reduziert
die Anzahl der Sekunden. Sie können zwischen 0 und 90 Sekunden wählen.
Wiederholen Sie den Vorgang, falls erforderlich.
G. Schwimmkabel und verdrehtes Kabel
1. Das Gerät kann die meisten oberirdischen Pools reinigen. Die Form von
manchen Pools kann verursachen, dass sich das Kabel verdreht oder
verheddert, da das Reinigungsgerät einem systematischen kreisförmigen
Schema folgt.
20
Düsenausgang
19
mittlere Klappe
21
Um zu verhindern, dass sich der Filterbeutel um die Pumpe wickelt und den
Wasserfluss zur Pumpe blockiert, bringen Sie die Klemmen wie in der
Abbildung dargestellt an.
20
Ubbink Manual Robotclean 1.indd 20
10.12.12 16:15
ITALIANO
AVVERTENZA:
Egregio cliente,
La ringraziamo per avere scelto il nostro Depuratore Jet per la pulizia della sua piscina. Ci
auguriamo che le faccia piacere utilizzare il suo nuovo depuratore Jet per il
mantenimento della sua piscina per molti anni a venire.
Il Jet Unit è l'unico depuratore per piscine completamente automatico dotato di un
sistema potente di propulsione a getto. Prima di incominciare a usare il depuratore la
invitiamo a dedicare qualche minuto a un'attenta lettura delle Istruzioni di funzionamento.
La ringraziamo nuovamente per avere scelto il nostro depuratore Jet.
Leggere attentamente le istruzioni di sicurezza e metterle da parte per farvi riferimento
in seguito.
Ottemperare a tutte le avvertenze e istruzioni segnate sull'alimentatore di corrente e sul
depuratore.
Tenere l'alimentatore di corrente al riparo dalla pioggia o da pozzanghere d'acqua.
Utilizzare esclusivamente l'alimentatore di corrente fornito con il depuratore. In caso di
domande rivolgersi al proprio rivenditore locale o centro di servizio.
L'apparecchio deve venire alimentata mediante un dispositivo per corrente residua
(DCR) che abbia una corrente residua di funzionamento misurata che non superi 30
mA.
Il collegamento con il circuito di corrente principale deve essere a norma delle
disposizioni locali e nazionali relative agli impianti di circuiti elettrici (codice elettrico).
Read all safety instructions carefully and keep for later reference.
Non usare
l'alimentatore
di corrente
caso
in cui:
Observe
all warnings
and instructions
marked onnel
power
supply
and cleaner.
(1)power
Il cavo
di alimentazione
o logoro.
Keep
supply
away from heavysia
raindanneggiato
or placed in puddles
of water.
Use
the power supply
was supplied
with your
cleaner.
If there
is astato esposto a pioggia
(2)only
L'alimentatore
di that
corrente
sia caduto
nella
piscina
o sia
question, consult your local dealer or service center.
intensa.
The unit must be supplied through a residual current device (RCD) having a rated
(3) L'alimentatore
di corrente
presenta
residual
operating current
not exceeding
30 mA. una presa rotta.
Rivolgersi
rivenditore
o centro
di servizio
per assistenza.
The
connectionaltoproprio
the branch
circuit should
be consistent
withautorizzati
the local and
national
wiring rules
Non tentare
di (electrical
ripararecode).
l'alimentatore o il cavo di corrente se danneggiati o rotti.
Do not use your power supply if:
Contattare il proprio rivenditore o centro di servizio autorizzati.
(1) Power cord is damaged or frayed.
UnThe
uso
inappropriato
dell'apparecchio
potrebbe
comportare
(2)
power
supply had been
dropped in the pool
or exposed
to heavy rain. una perdita di lubrificante.
ENGLISH
NON NUOTARE
IN PISCINA MENTRE
IL DEPURATORE È IN FUNZIONE
1.
2.
3.
4.
5.
6.
7.
8.
WARNING
Dear Customer,
Thank you for choosing our Jet Unit to clean your pool. We hope that you will
enjoy using your new Jet Unit to maintain your swimming pool for years to come.
The Jet Unit is the only fully automatic robotic pool cleaner with a powerful jet drive
9. youcorpo
depuratore
fusibile
propulsion system. Before
begin del
to use
the cleaner, please take a few
10.
ruotaInstructions.
spina del cavo del
trasformatore
minutes
to carefully read the
Operator
Again,
you for choosing
Jet Unit.
11.our
maniglia
trasformatore 230
V thank
~ 50Hz
interruttore ON/OFF
presa
timer
spina del cavo galleggiante
cavo galleggiante
12. piastra laterale
13. alloggiamento
della
valvola del getto
DO NOT SWIM
WHILE
CLEANER
14. ugello getto
IS IN USE 15. spina di bloccaggio
1
1.
2.
3.
4.
5.
6.
7.
8.
fuse
transformer cable plug
transformer 230 V ~ 50Hz
2
power switch ON/OFF
socket
timer
floating cable plug3
floating cable
9. body
10. wheel
11. handle
12. side plate
13. jet valve housing
14. jet outlet
15. lock pin
(3)
power supply
a broken
socket.
LaIf the
pompa
non èhas
idonea
ad
essere utilizzata da persone (compresi i bambini) con
Please consult your dealer or qualified service center for help.
capacità
fisiche,
sensoriali
o
mentali ridotte o con scarse esperienze e conoscenDo not attempt to repair broken power cord or power supply. Contact your dealer
13
ze,
tranne
nel caso che esse vengano sorvegliate
da una persona responsabile
or
service
center.
Mishandling
of thesicurezza
unit can resultoppure
in leakage
of lubricants.
per la loro
abbiano
ricevuto istruzioni
14sull‘uso dell‘apparecchio.
I bambini dovranno essere sorvegliati per assicurarsi che non giochino con
l‘apparecchio
4
2
9
3
14
10
4
1
13
9
8
10
8
7
5
6
7
5
6
12
12
11
11
15
15
1
1
3
21
Ubbink Manual Robotclean 1.indd 21
10.12.12 16:15
Istruzioni di funzionamento
Il nuovo depuratore automatico per piscina contiene:
A. Depuratore automatico per piscina dotato di cavo galleggiante
B. Alimentatore di corrente (trasformatore)
Leggere attentamente tutto il Manuale prima di azionare il depuratore per piscina.
2
1. Collocare l'alimentatore di corrente (trasformatore) non inferiore a 3,5 metri (12 piedi) dalla
piscina (vedere fig. 2)
2. Srotolare il cavo (vedere fig. 3)
3. Assicurare che l'interruttore di corrente sia in posizione "OFF" (SPENTO) (vedere figura 4).
4. Inserire il cavo nella presa di alimentazione (vedere fig. 5):
5. Immergere il depuratore nell'acqua inclinandolo su un lato e quindi sull'altro per consentire all'aria
eventualmente intrappolata di fuoriuscire dal corpo del depuratore. Lasciare scivolare il depuratore
sul fundo della piscina (vedere fig. 6) quindi svolgere il cavo galleggiante sulla superficie dell'acqua
della piscina in modo il più regolare possibile, evitandone attorcigliamenti o piegamenti.
6. Inserire il cavo del trasformatore in una presa di corrente da 230V~ dotata di messa a terra
(vedere fig. 8).
7. Accendere il trasformatore portandolo su ON e regolare il timer in base alle istruzioni di
funzionamento (vedere la pagina successiva per dettagli).
IMPORTANTE: assicurarsi di conservare adeguatamente il depuratore in locali a
temperatura tra 10 e 40 gradi Celsius (50-140 gradi Fahrenheit) per proteggere il motore, i
componenti di plastica e le tenute. L'inosservanza di tale norma comporterà l'annullamento
della garanzia sul prodotto.
ATTENZIONE: non accendere il depuratore per piscina (girando
l'interruttore su "ON") se non è completamente immerso nell'acqua.
Il funzionamento del depuratore fuori dall'acqua causa immediati
danni gravi al prodotto e comporta l'annullamento della garanzia.
Lasciare il depuratore nella piscina per 15-20 minuti dopo la fine del
ciclo di pulizia per consentire ai motori di raffreddarsi
adeguatamente. Non lasciare il depuratore sempre immerso nella
piscina. Ricordare sempre di spegnere l'alimentazione di corrente
portando l'interruttore su "OFF" e staccando la spina dalla presa
prima di estrarre il depuratore dalla piscina.
8
½
Alimentatore di corrente
½
Alimentatore di corrente
3.5m/12ft
3
6
4
22
Ubbink Manual Robotclean 1.indd 22
10.12.12 16:15
Istruzioni di funzionamento
Istruzioni di funzionamento del Timer da 90 secondi
Il depuratore è dotato di un TIMER DIGITALE da 90 secondi situato nell'alimentatore di corrente.
Per il funzionamento eseguire le seguenti operazioni:
Premere l'interruttore principale sulla posizione ON per alimentare la corrente. Il display presenterà due barre orizzontali lampeggianti.
Premere il pulsante C-RUN. La macchina comincerà a funzionare e l'indicatore luminoso verde sopra il pulsante C-RUN si accenderà per confermare il funzionamento.
Notare il tempo richiesto dalla macchina per trasferirsi dal lato più ampio della piscina all'altro.
In base alle dimensioni della piscina, regolare il timer usando le freccette di selezione della durata di funzionamento. La freccetta rivolta verso l'alto aumenta il numero di
secondi, mentre quella verso il basso li diminuisce. Si può scegliere tra 0 e 90 secondi.
Operando l'apparecchio in modalità Continuous Operation Mode (Funzionamento continuo) questa si fermerà solo quando l'operatore spegne la macchina,
portando l'interruttore principale su "OFF".
Come alterativa è possibile impostare la macchina in modo che si spenga automaticamente dopo 2 ore. Per farlo, premere il pulsante OPT. L'indicatore luminoso verde
sopra il pulsante OPT si accendere per confermare l'operazione. Una volta selezionato il pulsante OPT la macchina si fermerà dopo 2 ore.
Nota: in aggiunta al tempo di funzionamento scelto dall'utente, il timer presenta uno spegnimento preimpostato di 5 secondi ogni 5 minuti.
Cambiare le impostazioni del periodo:
L'utente può cambiare la durata (da 0 a 90 secondi) in qualsiasi momento, anche quando il depuratore sta funzionando nella piscina.
Ricordare che in qualsiasi momento il timer è in funzione, i LED connotati con "I" e "0" si illumineranno In alternativa. Il LED rosso "I" indica che il timer sta funzionando per
il periodo selezionato (da 0 a 90 secondi). Il LED verde "0" indica che il timer è spendo (per il periodo preimpostato di 1 secondo)
1
2
3
6
7
8
4
5
9
1. Display LED
2. LED di modalità di operazione continua
3. Pulsante di modalità di operazione continua
C-RUN
4. LED modalità di funzionamento del timer
5. Pulsante modalità funzionamento OPT del
timer
6. LED di indicazione di funzionamento del
timer
7 LED di indicazione di spegnimento del timer
8. Valore di aumento del pulsante di selezione
del timer
9. Valore di diminuzione del pulsante di
selezione del timer
Interruttore
principale
Timer digitale
23
Ubbink Manual Robotclean 1.indd 23
10.12.12 16:15
CICLO DI PULIZIA
Il ciclo di pulizia del depuratore ha una durata di due ore. Dopo due ore di funzionamento il depuratore si disattiva automaticamente per mezzo
del timer integrato nell'apparecchio. In alcuni casi la piscina può essere pulita in meno di due ore, in altri casi due ore non sono sufficienti. Le
dimensioni e la forma della piscina e la quantità di detriti contenuti determinano il tempo totale di pulizia. Quando il depuratore rallenta e inverte
costantemente direzione prima di raggiungere le pareti della piscina è giunto il momento di pulire o sostituire il sacchetto del filtro.
Manutenzione del sacchetto del filtro
PULIRE IL SACCHETTO DEL FILTRO DOPO OGNI CICLO DI PULIZIA
a. Disinserire la spina dell'alimentatore di corrente dalla presa (tenere la spina lontana dal
contatto con l'acqua).
b. Se il depuratore si trova nella piscina, tirarlo verso di sé gentilmente usando il cavo fino a
quando la maniglia non è a portata di mano. Usare la maniglia laterale (non il cavo) o
l'asse della ruota (fig. 9) per estrarre il depuratore dall'acqua, dopo aver lasciato
fuoriuscire la maggior parte dell'acqua dall'apparecchio.
c. Capovolgere l'apparecchio, appoggiandolo su una superficie liscia (per evitare
graffiature al corpo dell'apparecchio) quindi sganciare e rimuovere il gruppo del
coperchio inferiore (figg. 10,11,12,13).
d. Sfilare il sacchetto del filtro dalle barre di supporto (fig. 14), rovesciarlo e lavarlo dalla
sporcizia mediante un tubo flessibile da giardino o in una vasca. Strizzare leggermente il
sacchetto fino a quando l'acqua di risciacquo non esce pulita. Se necessario, lavare il
sacchetto in lavatrice solo in acqua fredda SENZA DETERSIVO!
e. Rimontare il sacchetto sulle barre di supporto con l'etichetta posizionata al centro del
lato lungo del coperchio inferiore (fig. 15).
f. Rimontare il gruppo del coperchio inferiore sul corpo dell'apparecchio. Spingerlo fino a
quando le linguette di chiusura si chiudono con uno scatto.
Staffa della
ruota
Linguetta di bloccaggio
Maniglia laterale
Etichetta
24
Ubbink Manual Robotclean 1.indd 24
10.12.12 16:15
IMPOSTAZIONE DELLA MODALITÀ DI PULIZIA
IL depuratore Jet è preimpostato per esplorare e pulire la maggior parte di piscine di lunghezza tra 24m e 27m ( tra 70 e 80 piedi). Il
depuratore Jet è impostato dalla fabbrica con l'impostazione illustrata nella fig. 16 con un spina di bloccaggio su entrambe i lati. Il
depuratore Jet pulirà la piscina in modo sistematico e con percorsi regolari.
Una volta che il depuratore Jet ha completato il ciclo di pulizia, estrarre il depuratore dalla piscina e trasferire le spine di bloccaggio
dal lato destro dell'apparecchio su quello sinistro e viceversa. La volta successiva che si usa il depuratore Jet, l'apparecchio di
pulizia pulirà la piscina con un movimento inverso per assicurare una pulizia completa di tutta la superficie.
16
Spina di bloccaggio
in posizione
preimpostata
18
Spina di bloccaggio
in posizione
avanzata
Il pulitore si
muove in senso
antiorario in
questa direzione
Asse
regolabile
Spina di bloccaggio
Asse fisso
REGOLARE IL DEPURATORE
PER LA PROPRIA PISCINA
Il pulitore
curva con un
angolo superiore
in questa
direzione
Asse
regolabile
Asse fisso
Il pulitore va dritto
in questa direzione
Il pulitore va dritto
in questa direzione
17
Il depuratore impiega un andamento
di pulizia sistematico che gli
consente di percorrere la piscina
avanti e indietro in percorsi che si
sovrappongono. Il depuratore può
venire utilizzato per pulire una varietà
di piscine dalle dimensioni diverse,
da quelle piccole a quelle molto
grandi e prima del primo uso occorre
impostarlo in base alle dimensioni
della propria piscina. Per regolare il
depuratore usare il spina di
bloccaggio dell'assale (fig. 17). Ci
sono due perni di blocco
permanentemente collegati
all'apparecchio mediante una
funicella; per la maggior parte di
applicazioni è sufficiente solo un
spina di bloccaggio. Per piscine
molto grandi occorre installare un
spina di bloccaggio addizionale
(situato nell'alloggiamento della
valvola dei getti). Seguire le
illustrazioni per la configurazione del
perno per le dimensioni della propria
piscina (fig.18).
25
Ubbink Manual Robotclean 1.indd 25
10.12.12 16:15
LOCALIZZAZIONE E RISOLUZIONE GUASTI:
A. L'apparecchio non inverte direzione:
1. Prendere un tubo flessibile da giardino e spruzzare acqua nell'apertura
dell'alloggiamento delle valvole; l'acqua ad alta pressione dovrebbe
rimuovere qualsiasi detrito dal sistema della valvola del getto.
2. Rimuovere uno degli ugelli del getto svitando le due viti laterali (fig.
19). Piegare una comune graffetta da disegno "gigante" formando un
uncino come illustrato (fig. 20). Premere il deflettore centrale per aprirlo e
guardare all'interno della ventola; usare la graffetta per agganciare o
sbloccare i detriti ed eliminarli (fig. 21).
B. L'apparecchio non pompa acqua:
1. Controllare se arriva corrente alla presa.
2. Controllare che il cavo sia inserito nella presa di corrente.
3. Controllare il fusibile dell'alimentatore e sostituirlo se necessario.
4. Controllare che il cavo non presenti tagli o danneggiamenti.
C. L'apparecchio non pompa bene o non pompa affatto:
1. Controllare che il sacchetto del filtro sia privo di detriti.
2. Controllare che i deflettori della valvola di aspirazione sul fondo del
depuratore non siano intasati per permettere l'ingresso di acqua e detriti.
D. L'apparecchio non copre l'intera piscina:
1. Controllare che il movimento delle ruote sia privo di impedimenti, quali
capelli o un accumulo di detriti.
2. Controllare che il sacchetto del filtro sia pulito.
3. Regolare il ciclo del timer in modo che il depuratore raggiunga il lato
opposto della piscina.
E. L'apparecchio inverte la direzione prima di raggiungere la parete sul lato
opposto della piscina.
1. Regolare il timer del trasformatore:
La freccetta rivolta verso l'alto aumenta il numero di secondi. Si può
scegliere tra 0 e 90 secondi. Ripetere l'operazione se necessario.
F. L'apparecchio attende troppo a lungo sul lato opposto della piscina
prima di invertire il percorso:
1. Regolare il timer del trasformatore:
La freccetta rivolta verso il basso aumenta il numero di secondi. Si può
scegliere tra 0 e 90 secondi. Ripetere l'operazione se necessario.
G. Attorcigliamento del cavo galleggiate e soluzione
1. Il depuratore è stato progettato per pulire la maggior parte delle piscine
fuori terra. Alcune forme di piscina possono causare l'attorcigliamento del
cavo o il suo impigliamento in quanto il depuratore opera in un percorso
circolare sistematico.
Vite
20
Ugello del
getto
19
Deflettore centrale
21
Per evitare che il sacchetto del filtro si avvolga intorno alla pompa e blocchi il
flusso dell'acqua alla pompa, installare le clip del sacchetto del filtro come
mostrato.
26
Ubbink Manual Robotclean 1.indd 26
10.12.12 16:15
ESPAÑOL
ADVERTENCIA
Estimado cliente:
Gracias por escoger el Jet Unit para limpiar su piscina. Esperamos que disfrute de su
nuevo Jet Unit para mantener limpia su piscina en los años que vienen.
El Jet Unit es el único limpiador robótico de piscinas totalmente automático que cuenta
con un potente sistema de propulsión a chorro. Antes de empezar a usar el limpiador,
lea atentamente las instrucciones de uso. Nuevamente, gracias por escoger el Jet
Unit.
Lea atentamente las instrucciones de seguridad y consérvelas como referencia para
el futuro.
Siga todas las advertencias e instrucciones indicadas en la fuente de poder y en el
limpiador.
No exponga la fuente de poder a las lluvias intensas ni la deje sobre charcos de agua.
Sólo use la fuente de poder incluida con el limpiador. Si tiene alguna pregunta,
comuníquese con su distribuidor local o centro de servicio.
La unidad debe usar un dispositivo de corriente residual (RCD) con una corriente
residual operacional nominal que no sobrepase los 30 mA.
La conexión con el circuito derivado debe ser coherente con las regulaciones de
cableado (códigos eléctricos) nacionales y locales.
Noalluse
la fuente
de carefully
poder si:
Read
safety
instructions
and keep for later reference.
Observe
warnings
and instructions marked
on powerosupply
and cleaner.
(1) Elall
cable
de alimentación
está dañado
desgastado.
Keep
supply away
from heavy
placedainla
puddles
of water.
(2)power
La fuente
de poder
se rain
ha or
caído
piscina
o ha estado expuesta a una lluvia
Use only the power supply that was supplied with your cleaner. If there is a
intensa.
question, consult your local dealer or service center.
(3)
Simust
el enchufe
hembra
la fuente
dedevice
poder(RCD)
estáhaving
estropeado.
The
unit
be supplied
through en
a residual
current
a rated
residual
operating
currentconsulte
not exceeding
Para recibir
ayuda,
con30sumA.
distribuidor o centro de servicio calificado.
The connection to the branch circuit should be consistent with the local and
No intente reparar las fuentes de poder ni los cables de alimentación rotos.
national wiring rules (electrical code).
con if:
su distribuidor o centro de servicio.
Do notComuníquese
use your power supply
(1)
cord is damaged
or frayed.
ElPower
uso incorrecto
de esta
unidad puede causar el goteo de lubricantes.
NO ENTRE
EN LA PISCINA MIENTRAS
ENGLISH
EL LIMPIADOR ESTÉ EN USO
WARNING
Dear Customer,
Thank you for choosing our Jet Unit to clean your pool. We hope that you will
enjoy using your new Jet Unit to maintain your swimming pool for years to come.
The Jet Unit is the only fully automatic robotic pool cleaner with a powerful jet drive
8. cable
fusible
propulsion system. Before you begin
to useflotante
the cleaner, please take a few
9. cuerpo
enchufe del cable
del totransformador
minutes
carefully read the Operator
Instructions.
Again,
you for choosing our Jet
10.Unit.
rueda
transformador 230
Vthank
~ 50Hz
1.
2.
3.
4. interruptor de ENCENDIDO/
APAGADO de la corriente
5. enchufe hembra
6. temporizador
7. enchufe del cable flotante
11. asa
placa lateralCLEANER
DO NOT SWIM12.
WHILE
13. caja de la válvula de chorro
14. salida del chorro
IS IN USE
15. clavija de seguridad
1
1.
2.
3.
4.
5.
6.
7.
8.
fuse
transformer cable plug
transformer 230 V ~ 50Hz
2
power switch ON/OFF
socket
timer
floating cable plug3
floating cable
(2) The power supply had been dropped in the pool or exposed to heavy rain.
Esta
no has
es aadecuada
para ser usada por personas (inclusive niños) con
(3)
If thebomba
power supply
broken socket.
Please
consult your
dealer or
qualified service
center for help.
capacidad
física,
sensorial
o psíquica
disminuida, o con falta de experiencia o
Do not attempt to repair broken power cord or power supply. Contact your dealer
13por una persona responsable de la
conocimientos,
a
no
ser
que
sean
vigiladas
or service center.
Mishandling
of theounit
can result
in leakage
of lubricants.
seguridad
hayan
recibido
instrucciones
para usar el
14aparato. Deben vigilarse
9. body
10. wheel
11. handle
12. side plate
13. jet valve housing
14. jet outlet
15. lock pin
los niños para asegurar que no jueguen con el aparato.
4
2
9
3
14
10
4
1
13
9
8
10
8
7
5
6
7
5
6
12
12
11
11
15
15
1
1
3
27
Ubbink Manual Robotclean 1.indd 27
10.12.12 16:15
Instrucciones de uso
Su nuevo limpiador automático de piscinas incluye:
A. Limpiador robótico de piscinas y cable flotante
B. Fuente de poder (transformador)
Lea este manual completamente antes de usar su limpiador de piscinas.
2
1. Coloque la fuente de poder (transformador) a una distancia de 3,5 metros de la piscina
como mínimo. (ver figura 2). 2. Desenrosque el cable (ver figura 3).
3. Asegúrese de que el interruptor de la fuente de poder esté en la posición de APAGADO (ver
figura 4). 4. Conecte el cable al enchufe hembra en la fuente de poder (ver figura 5).
5. Sumerja la unidad en el agua. Mueva la unidad de lado a lado en el agua para permitir que
el aire dentro se escape, y deje que el limpiador se hunda hasta el fondo de la piscina (ver
figura 6). Después, extienda el cable flotante sobre la superficie de la piscina lo más
uniformemente posible para evitar que se enrede o se enrosque.
6. Conecte el cable del transformador de tres clavijas a la toma de corriente con conexión a
tierra de 230V~ (ver figura 8).
7. ENCIENDA el transformador y ajuste el temporizador de acuerdo a las instrucciones de
uso (más detalles en la siguiente página).
IMPORTANTE: Siempre guarde el limpiador en un lugar adecuado a una temperatura de
entre 10 a 40 grados centígrados para proteger el motor, el plástico y las juntas. Si no sigue
estas instrucciones, podría hacer que la garantía quede anulada.
PRECAUCIÓN: No ENCIENDA el limpiador de piscinas hasta que
esté completamente sumergido en el agua. Si usa el limpiador fuera
del agua, podría dañarlo inmediatamente, lo que anularía la
garantía. Después del ciclo de limpieza, deje el limpiador dentro de
la piscina por 15 a 20 minutos para permitir que los motores se
enfríen adecuadamente. No deje el limpiador dentro de la piscina
permanentemente. Siempre recuerde APAGAR la fuente de poder y
desconectarla de la toma de corriente antes de sacar el limpiador de
la piscina.
8
½
Fuente de poder
½
Fuente de poder
3.5m/12ft
3
6
4
28
Ubbink Manual Robotclean 1.indd 28
10.12.12 16:15
Instrucciones de uso
Instrucciones de uso del temporizador de 90 segundos
Su limpiador de piscinas cuenta con un TEMPORIZADOR DIGITAL de 90 segundos ubicado en la fuente de poder.
Para usarlo, haga lo siguiente:
ENCIENDA la fuente de poder mediante el interruptor principal. La pantalla mostrará dos barras horizontales parpadeantes.
Presione el botón C-RUN. La máquina empezará a funcionar y la luz indicadora verde sobre el botón C-RUN se encenderá para confirmar la operación.
Tome nota del tiempo que le toma a la máquina ir de un lado a otro de la piscina, por el lado más ancho. Use las flechas para ajustar el tiempo del temporizador de acuerdo a
las dimensiones de su piscina. La flecha arriba aumenta los segundos, la flecha abajo disminuye los segundos. Puede elegir desde 0 hasta 90 segundos.
Ahora, su unidad funcionará en Modo de operación continua y se detendrá sólo cuando el usuario APAGUE la máquina desde el interruptor principal.
También puede configurar la máquina para que se apague automáticamente al cabo de 2 horas. Para hacerlo, presione el botón OPT. La luz indicadora verde sobre el
botón OPT se encenderá para confirmar la operación. Una vez que haya seleccionado el botón OPT, la máquina se detendrá al cabo de 2 horas.
Recuerde que: Además del tiempo de operación seleccionado por el usuario, el temporizador tiene un tiempo predeterminado de apagado de 5 segundos por
cada 5 minutos.
Modificación de la configuración de tiempo:
El usuario puede modificar el tiempo (0-90 segundos) cuando lo desee, incluso mientras el limpiador esté funcionando en la piscina. Recuerde que mientras el temporizador
esté activado, las luces indicadoras “I” y “0” se irán prendiendo de manera alterna. La luz indicadora roja “I” indica que el temporizador está funcionando por el tiempo
seleccionado (0-90 segundos). La luz indicadora verde “0” indica que el temporizador está apagado (por el tiempo predeterminado de 1 segundo).
1
2
3
6
7
8
4
5
9
1. Pantalla LCD
2. Luz indicadora de modo de operación
continua
3. Botón del modo de operación continua
C-RUN
4. Luz indicadora de modo de operación
con temporizador
5. Botón del modo de operación con
temporizador OPT
6. Luz indicadora del temporizador en
operación
7. Luz indicadora del temporizador
apagado
8. Botón selector para incrementar el
tiempo
9. Botón selector para reducir el tiempo
Interruptor
principal
Temporizador digital
29
Ubbink Manual Robotclean 1.indd 29
10.12.12 16:15
CICLO DE LIMPIEZA
El ciclo de limpieza del limpiador dura dos horas. Después de dos horas de funcionamiento, el limpiador se apagará automáticamente
mediante un temporizador integrado dentro de la unidad. En algunos casos, las piscinas quedan limpias en menos de dos horas y a veces
este tiempo no es suficiente. El tamaño y la forma de la piscina, así como la cantidad de residuos en ella, determinarán el tiempo total de
limpieza. Cuando el limpiador empiece a trabajar de forma lenta o cambie de dirección continuamente antes de llegar al extremo de la
piscina, está indicando que es hora de cambiar o limpiar la bolsa de filtro.
Mantenimiento de la bolsa de filtro
LIMPIE LA BOLSA DE FILTRO DESPUÉS DE CADA CICLO DE LIMPIEZA
a. Desconecte la fuente de poder. (No deje que el enchufe entre en contacto con el
agua).
b. Si la unidad está en la piscina, tire suavemente del cable para acercar el asa del
limpiador hacia usted. Use el asa lateral (no el cable) o el eje de las ruedas (fig. 9) para
sacar el limpiador de la piscina después de dejar escurrir la mayor parte del agua que
se encuentra dentro de la unidad.
c. Coloque la unidad en una superficie lisa sobre su parte posterior (para evitar arañar
el cuerpo de la máquina), saque el seguro y retire el conjunto de la tapa inferior.
(fig.10,11,12,13)
d. Extraiga la bolsa de filtro de las barras de soporte (fig. 14), vuélvala al revés y elimine
toda la suciedad con una manguera o en el lavabo. Exprima la bolsa suavemente
hasta que el agua salga limpia. Si es necesario, lave la bolsa a máquina, con agua fría
y ¡SIN DETERGENTE! e. Vuelva a colocar la bolsa en las barras de soporte, con la
etiqueta en el centro de cualquiera de los lados largos de la tapa inferior (figura 15).
f. Vuelva a colocar el conjunto de la tapa inferior en la unidad y haga presión hasta que
las lengüetas de seguridad entren en su sitio.
eje de las
ruedas
lengüeta de seguridad
asa lateral
etiqueta
30
Ubbink Manual Robotclean 1.indd 30
10.12.12 16:15
CONFIGURACIÓN DEL PATRÓN DE LIMPIEZA
Su limpiador de piscinas a chorro está preconfigurado para recorrer y limpiar la mayoría de piscinas de 24 hasta 27 metros de largo.
El limpiador a chorro está diseñado desde la fábrica como se muestra en la figura 16, con una clavija de seguridad instalada a cada
lado. El limpiador puede limpiar su piscina sistemáticamente en un patrón constante.
Cuando el limpiador a chorro termine el ciclo de limpieza, extráigalo de la piscina y transfiera las clavijas de seguridad del lado
derecho de la unidad hacia el lado izquierdo (o viceversa). Cuando vuelva a usar el limpiador a chorro, el aparato limpiará la piscina
en un patrón contrario. Esto permitirá que el limpiador pueda limpiar la piscina en su totalidad.
16
Pasador cerrojo en
posición prefijada
18
Pasador cerrojo en
posición hacia
delante
El limpiafondos se
moverá girando en
dirección contraria
a las manecillas del
reloj
eje movible
El limpiafondos
girará en un
ángulo mas
amplio en ésta
dirección
eje movible
Pasador cerrojo
eje fijo
eje fijo
El limpiafondos va recto
en ésta dirección
El limpiafondos va recto
en ésta dirección
17
AJUSTE DEL LIMPIADOR
PARA CADA PISCINA EN
PARTICULAR
El limpiador de piscinas usa un
patrón de limpieza sistemático
que le permite avanzar y
retroceder en patrones que se
superponen. Puede usar el
limpiador con piscinas de
diferentes tamaños, desde las
pequeñas hasta las más grandes.
Antes de usarlo por primera vez,
deberá configurar el limpiador
para su piscina. Use la clavija de
seguridad del eje para ajustar el
limpiador
(fig. 17). Hay dos
clavijas de seguridad
permanentemente unidas a la
unidad mediante un cable. Para la
mayoría de usos solo se necesita
una clavija de seguridad. Con
piscinas que son muy grandes,
necesitará colocar una clavija de
seguridad adicional (ubicada en
la caja de la válvula de chorro).
Utilice la imagen de la
configuración de la clavija que
corresponde al tamaño de su
piscina (fig. 18).
31
Ubbink Manual Robotclean 1.indd 31
10.12.12 16:15
SOLUCIÓN DE PROBLEMAS:
A. No cambia de dirección:
1. Con una manguera, rocíe agua a la caja de la válvula directamente a
cada una de las aberturas. El chorro de alta presión eliminará cualquier
residuo que pueda quedar en el sistema de la válvula.
2. Extraiga una de las salidas del chorro; para hacerlo, saque los dos
tornillos laterales (fig. 19). Use un clip de papel “gigante” para hacer un
gancho como se muestra en la figura 20. Empuje la aleta central para
abrirla y observe dentro del impulsor. Es normal que encuentre residuos
como cabellos, cuerdas o ramitas atrapados dentro del impulsor. Use el
clip para atrapar o soltar los residuos y sacarlos (fig. 21).
B. No bombea agua:
1. Revise si la salida de corriente está funcionando.
2. Revise si el cable está conectado a la fuente de poder.
3. Revise el fusible de la fuente de poder; cámbielo si es necesario.
4. Busque posibles cortes o daños en el cable.
C. Aspira poco o nada:
1. Revise si la bolsa de filtro está limpia.
2. Revise si las aletas en la válvula de entrada, en la parte inferior del
limpiador, están libres de obstrucciones para permitir la entrada de agua
y de residuos.
D. No cubre toda el área de la piscina:
1. Revise si las ruedas pueden moverse libremente sin obstrucciones
como cabellos o residuos acumulados.
2. Revise si la bolsa de filtro está limpia.
3. Ajuste el tiempo del ciclo para que el limpiador llegue hasta el otro
extremo de la piscina.
E. El limpiador cambia de dirección antes de llegar al extremo opuesto de
la piscina.
1. Ajuste el temporizador en el transformador:
La flecha arriba aumenta el número de segundos. Puede elegir desde 0
hasta 90 segundos. Repita si es necesario.
F. Permanece demasiado tiempo a la altura de la pared de la piscina antes
de cambiar de dirección:
1. Ajuste el temporizador en el transformador:
La flecha abajo disminuye el número de segundos. Puede elegir desde 0
hasta 90 segundos. Repita si es necesario.
G. Cuidado del cable flotante y cables enredados:
1. Su nuevo limpiador está diseñado para limpiar la mayoría de piscinas
elevadas. La forma de algunas piscinas puede hacer que el cable se
enrolle o enrede ya que el limpiador funciona en un patrón circular
sistemático.
tornillo
20
salida del
chorro
19
aleta central
21
Para evitar que la bolsa de filtro envuelva la bomba y bloquee el flujo de agua
hacia ella, instale los broches de la bolsa de filtro como se muestra en la
imagen.
32
Ubbink Manual Robotclean 1.indd 32
10.12.12 16:15
PORTUGUÊS
NEDERLANDE
WAARSCHUWING!
ADVERTÊNCIA
Beste
klant,
Caro cliente,
Gefeliciteerd
aankoopnossa
van een
zwembadreinigingsapparaat.
Wijpiscina.
hopen
Agradecemosmet
poruw
escolher
unidade
a jato para limpar a sua
dat
u nog heel
jaren
met aveel
gebruikazult
vanadit
apparaat.
Esperamos
queveel
goste
de usar
suaplezier
nova unidade
jatomaken
para fazer
manutenção
da sua
piscina por muitos
e muito
anos.volautomatische robotreiniger met een
Dit
reinigingsapparaat
is een
unieke,
A
unidade
a
jato
é
o
único
limpador
de piscina totalmente
e automático
sterk aandrijfsysteem voor de sproeikoppen.
Lees voor robotizado
dat u het reinigingsapque
possui
um
sistema
de
propulsão
a
jato.
Antes
de
começar
a
usar
o limpador,
paraat voor de eerste keer gebruikt deze gebruiksaanwijzing aandachtig
door.
pedimos
que
leia
as
instruções
de
uso
atentamente.
Novamente,
agradecemos
Nogmaals hartelijk dank dat u voor ons apparaat gekozen heeft.
por escolher a nossa unidade a jato para limpar a sua piscina.
Leestodas
alle veiligheidsrichtlijnen
goed atentamente
door en berg
deze goeda documentação
op zodat u deze
Leia
as instruções de segurança
e mantenha
para
futura
later
nogreferência.
eens kunt terug lezen. Houd rekening met de waarschuwingen en
Siga
todas as advertências
e instruções contidas
nareinigingsapparaat.
fonte de energia e no limpador.
aanwijzingen
op het bedieningselement
en het
Mantenha
fonte de energia longe
ou poças
d'água.
Houd het abedieningselement
uit de
dechuvas
regen fortes
en plaats
het nooit
in de buurt van
Use
somente
a fonte
de energia
que foi fornecida com
Se tiver alguma
plassen.
Gebruik
alleen
het bedieningselement
dato useu
bij limpador.
dit reinigingsapparaat
pergunta,
seu heeft,
revendedor
a central
serviços.
vindt.
Als u consulte
nog vragen
neemlocal
danou
contact
opdemet
uw dealer of uw
Esta
unidade deve
alimentada por meio
dispositivo
corrente
residual
servicecentrum.
Deser
stroomvoorziening
voordedeum
unit
dient viade
een
aardlekscha(RCD),
com
uma
corrente
residual
de
funcionamento
classificada
em
no
máximo
30
kelaar met maximaal 30 mA nominale stroom gerealiseerd te worden.
DemA.
aansluiting met het stroomcircuit dient te voldoen aan de regionale en natiA
conexão
com o circuito
de derivação
deve
os regulamentos
municipais
e
onale
regelgeving
(elektrocode).
Gebruik
hetseguir
bedieningselement
niet,
als
nacionais de fiação (código de eletricidade).
1) de stroomkabel beschadigd of gerafeld is,
Não
use
ainstructions
sua fontecarefully
de energia
se later reference.
Read
safety
and
2) all
het
bedieningselement
inkeep
het for
zwembad gevallen is of blootgesteld werd aan
(1) O all
cabo
estiver
ou desfiado.
Observe
warnings
anddanificado
instructions marked
on power supply and cleaner.
zware
regenbuien,
(2)
A fonte
de alimentação
piscina
ou sido exposta a chuvas fortes.
Keep
power
supply
away from heavytenha
rain orcaído
placed na
in puddles
of water.
3)only
als
stekkeraansluiting
vanum
het
bedieningselement
is.
Use
power
supply
that was supplied
with
your cleaner.
If there isbeschadigd
a
(3)
Sethe
ade
fonte
de
alimentação
tiver
soquete
quebrado.
question,
consult
your local dealer
or service
center.
Voor
meer
informatie
en
hulp
kunt
u
terecht
bij
uw
dealer
of
bij
een
gekwalifiFavor
consultar
seu revendedor ou a central autorizada de serviços para obter
The
unit must
be supplied through a residual current device (RCD) having a rated
ceerd
servicecentrum.
assistência.
residual
operating current not exceeding 30 mA.
Probeer
beschadigde
stroomkabel
ofEntre
eenlocal
beschadigd
bedieningseleNão
tentenooit
consertar
o cabo
a fonte
energia.
em
contato com
o revendedor
The
connection
to theeen
branch
circuitou
should
be de
consistent
with
the
and
national
wiring
code).
ment
terules
repareren.
Neem contact op met uw dealer of het servicecentrum.
ou azelf
central
de(electrical
serviços.
DoVerkeerd
not use your power
supply
if: de unit kan leiden tot lekken van smeermiddel.
gebruik
van
Se
a unidade
for
manuseada
de maneira incorreta, poderá ocorrer vazamento de
(1) Power cord is damaged or frayed.
lubrificantes.
DeThe
pomp
niethad
bedoeld
om gebruikt
teexposed
worden
doorrain.
personen (inclusief kinderen)
(2)
poweris
supply
been dropped
in the pool or
to heavy
ENGLISH
ZWEM
NIET IN
ZWEMBAD
ALS
NÃO NADE
NAHET
PISCINA
ENQUANTO
HET
APPARAAT
INO
GEBRUIK
IS.
ESTIVE
USANDO
LIMPADOR
WARNING
Dear Customer,
Thank you for choosing our Jet Unit to clean your pool. We hope that you will
enjoy using your new Jet Unit to maintain your swimming pool for years to come.
The Jet Unit is the only fully automatic robotic pool cleaner with a powerful jet drive
9.
behuizing
1.
zekering
9. unidade
1. fusível
propulsion system. Before you begin
to use theprincipal
cleaner, please take a few
10.
roda
2. transformator-kabelstekker
tomada para o cabo
doto transformador
minutes
carefully read the Operator
Instructions.
2.
10.
wiel
Again,
you for choosing our Jet11.
Unit.alça
3. transformador 230
V thank
~ 50Hz
11. handgreep
12. placa lateral
12.
13. zijkant
suporte para a válvula do jato
13.
14. sproeiventielbehuizing
saída do jato
14.
15. sproeiuitgang
pino de travamento
15. vergrendelingspin
3. transformator 230V ~ 50Hz
4. interruptor
LIGA/DESLIGA
4.
netschakelaar
aan/uit (ON/OFF)
5. soquete
5.
stekkeraansluiting
6. cronômetro
6.
display para o cabo flutuante
7. tomada
8. cabo
flutuante
7.
stekker
voor drijvende kabel
8. drijvende kabel 1. fuse
DO NOT SWIM WHILE CLEANER
IS IN USE
1
2.
3.
4.
5.
6.
7.
8.
transformer cable plug
transformer 230 V ~ 50Hz
2
power switch ON/OFF
socket
timer
floating cable plug3
floating cable
9. body
10. wheel
11. handle
12. side plate
13. jet valve housing
14. jet outlet
15. lock pin
(3)
If the
power supply has
a broken socket.of geestelijke beperkingen en evenmin door persomet
lichamelijke,
sensorische
Please consult your dealer or qualified service center for help.
die geen
ervaring
met cord
of kennis
hetContact
apparaat
hebben, tenzij een bevoegd
Donen
not attempt
to repair
broken power
or powervan
supply.
your dealer
persoon
op hun veiligheid let of tenzij ze 13
door een bevoegd persoon gerichte
or
service center.
Mishandling
of the unitover
can result
leakage ofvan
lubricants.
aanwijzingen
het ingebruik
het apparaat gekregen
14 hebben. Houd toezicht
op kinderen en voorkom dat ze met het apparaat gaan spelen.
4
2
9
3
14
10
4
1
13
9
8
10
8
7
5
6
7
5
6
12
12
11
11
15
15
1
1
3
33
Ubbink Manual Robotclean 1.indd 33
10.12.12 16:15
Instruções de Manipulação
Gebruiksaanwijzing
Uw
bestaat
uit:
Seuautomatische
novo limpadorzwembadreiniger
automático de piscina
contém
A. Limpador
de robotreiniger
en de
kabel.flutuante.
robotizado
dedrijvende
piscina e cabo
B. Fonte
het bedieningselement
(transformator)
de energia (transformador)
Lees
gebruiksaanwijzing
goedde
door
voordat
u dede
zwembadreiniger
in gebruik neemt.
Leia odeze
manual
completamente antes
usar
o limpador
piscina.
1. Coloque
Plaats het
bedieningselement
(transformator)
op menos
een afstand
van ten
m figura
van
a fonte
de energia (transformador)
a pelo
3,5 metros
daminste
piscina.3,5
(Ver
zwembad(Ver
(zie figura
afb. 2).
2).het
2. Desenrole
3).
2.
Rol de kabel af
3) de energia está desligada, na posição "OFF" (Ver figura 4). 4.
3. Certifique-se
de(zie
queafb.
a fonte
3.
Controleer
of no
desoquete
netschakelaar
deenergia
“uit”-positie
(OFF)5):
staat. (zie afb. 4).
Conecte
o cabo
da fonteinde
(Ver figura
4.
Steek
de
kabel
in
de
aansluiting
van
het
bedieningselement
5). dentro da água
5. Coloque a unidade na água. Movimente a unidade de um lado(zie
paraafb.
o outro
5.
Laat
het
in het
water
zakken.
Beweeg
het apparaat
en
para
que
o reinigingsapparaat
ar escape da unidade
e para
permitir
que
o limpador
vá para ozijwaarts
fundo daheen
piscina
weer
in het
lucht otecabo
verwijderen.
vervolgens
hetda
reinigingsapparaat
tot opode
(Ver
figura
6). water
Logo, om
coloque
flutuanteLaat
sobre
a superfície
piscina, arrumando-o
bodem
zinken (ziepossível
afb. 6). Leg
kabel
zo dobre
gelijkmatig
mogelijk op het wateroppervlak en
mais
uniformemente
parade
que
não se
ou enrosque.
controleer
of
de
kabel
geen
kronkels
of
kinken
vertoont.
6. Conecte o cabo do transformador na tomada de três pinos de 230V~ de ligação à terra (Ver
6.
Stop8).de stekker in de driepolige, geaarde 230V-contactdoos (zie afb. 8).
figura
7.
bedieningselement
en stelo de
timer in volgens
de aanwijzingen
(meer informa7. Schakel
Ligue o het
transformador
("ON") einajuste
cronômetro
de acordo
com as instruções
de
tie
vindt u op de(consulte
volgendea pagina).
funcionamento
próxima página para obter mais detalhes)
LET OP: Berg het reinigingapparaat op in een ruimte met een temperatuur tussen 10 en 40
IMPORTANTE:
limpador armazenado
entre 10dee motor,
40 °C. Isso
protegerá
o
graden
Celsius Mantenha
(50 tot 104sempre
gradenoFahrenheit).
Hierdoor worden
de kunststof
onmotor, plástico
lacre. O descumprimento
dessa exigência
na perda
garantia.
derdelen
en deevergrendeling
goed beschermd.
Wanneer resultará
u zich hieraan
nietda
houdt,
vervalt de
garantie.
ATENÇÃO:
Não ligue
o limpador de piscina
se als
eledeze
não
LET OP: Schakel
de zwembadreiniger
alleen ("ON")
IN (ON),
estiver
completamente
submergido
nahet
água.
Colocar o limpador
em
helemaal
onder water is.
Gebruik van
reinigingsapparaat
buiten
funcionamento
fora
da
água
causará
danos
imediatos
e
resultará
na
water leidt direct tot ernstige schade, waardoor de garantie vervalt.
perda
da
garantia.
Deixe
o
limpador
dentro
da
água
durante
15
a
20
Laat het reinigingsapparaat na het einde van een reinigingscyclus
minutos
do in
fimhet
dozwembad,
ciclo de limpeza.
permitirá
que o
15 tot 20depois
minuten
zodat deIsso
motor
kan afkoelen.
motor
esfrie
adequadamente.
Não
deixe
o
limpador
dentro
da
Laat echter het reinigingsapparaat niet permanent in het zwembad
piscina o tempo inteiro. Lembre-se sempre de desligar a fonte de
liggen. Denk eraan dat het bedieningselement uitschakelt (OFF) en
energia ("OFF") e desconectá-la da tomada antes de tirar o
loskoppelt, voordat u het reinigingsapparaat uit het zwembad
limpador da piscina.
neemt.
8
2
½
Fonte de energia
bedieningselement
½
bedieningselement
Fonte de energia
3.5m/12ft
3
6
4
34
Ubbink Manual Robotclean 1.indd 34
10.12.12 16:15
Instruções de Manipulação
Gebruiksaanwijzing
Gebruiksaanwijzing
voor de 90-secondentimer
Instruções para o cronômetro
de 90 segundos
Het
is uitgerust
een digitale DIGITAL
90-secondentimer
op hetlocalizado
bedieningselement.
Seureinigingsapparaat
limpador está equipado
com ummet
CRONÔMETRO
de 90 segundos
na fonte de energia.
Para
usá-lo, u
siga
instruções abaixo:
Zo
gebruikt
de as
timer:
Pressione
o interruptor
principal para
ligar
fonte de energia ("ON").
Duas barras
horizontais
piscarão no
Schakel
het
bedieningselement
in door
dea hoofdschakelaar
in te drukken.
Op het
display knipperen
numostrador.
twee horizontale lijnen.
Pressione
o
botão
C-RUN.
A
máquina
entrará
em
funcionamento
e
o
indicador
acima
do
botão
C-RUN
acenderá a luz
verde
confirmar
a operação.
Preste
atenção no
Druk op de C-RUN-toets. Het apparaat wordt gestart en het groene lichtje in het display boven de C-RUN-toets
geeft
aan para
dat het
apparaat
in bedrijf is.
Controleer
tempo
necessário
para
a
máquina
se
mover
de
uma
extremidade
a
outra
no
ponto
mais
amplo
da
piscina.
De
acordo
com
as
dimensões
da
sua
piscina,
ajuste
o
cronômetro
hoeveel tijd het apparaat nodig heeft om het breedste deel van het zwembad te reinigen. Op basis van de afmetingen van het zwembad stelt u dan de timer in met beusando
detijdinstelling.
seleção de tempo.
setapijltje
paraomhoog
cima aumentará
e a seta
baixo
diminuirá
o tempo
Você pode
escolher
entre
0 e 90
segundos.
hulp
vanasdeflechas
pijl voor
Als u opAhet
drukt, wordt
het para
aantal
seconden
hoger,
als uem
opsegundos.
het pijltje omlaag
drukt
gaat het
aantal
seconden
omlaag.
Agora
a
sua
unidade
funcionará
no
modo
de
operação
contínua
e
se
desligará
somente
quando
o
operador
desligar
("OFF")
a
máquina
no
interruptor
principal.
U kunt de timer instellen van min. 0 tot max. 90 seconden.
Opcionalmente, você pode programar a máquina para se desligar automaticamente depois de 2 horas. Para tanto, pressione o botão OPT. O indicador acima do botão OPT
Het apparaat is nu ingesteld in continubedrijf en kan alleen via de hoofdschakelaar uitgeschakeld worden.
acenderá a luz verde para confirmar a operação. Agora que o botão OPT está selecionado, a máquina se desligará depois de 2 horas.
U kunt ook vastleggen dat het apparaat na twee uur automatisch uitschakelt. Druk hiervoor op de OPT-toets. Het groene lichtje in de display boven de OPT-toets geeft
aan
datatenção
het apparaat
in bedrijfAlém
is. Omdat
u op de
de operação
OPT-toets selecionado
gedrukt heeft,pelo
wordt
het apparaat
na tweepossui
uur uitgeschakeld.
Preste
no seguinte:
do tempo
usuário,
o cronômetro
uma parada padrão de 5 segundos a cada 5 minutos.
Let
op:mudar
Los van
de door
de gebruiker ingestelde bedrijfstijd, zal de timer het apparaat elke 5 minuten gedurende 5 seconden uitschakelen.
Como
o padrão
de tempo:
O usuário pode mudar a duração (0 a 90 segundos) a qualquer momento, mesmo que o limpador esteja em funcionamento dentro da piscina. Lembre-se que sempre que o
Wijzigen
van
de tijdinstelling
cronômetro
estiver
ligado, você verá que as lâmpadas LEDs identificadas como "I" e "0" estarão acendidas alternadamente. O LED vermelho "I" indica que o cronômetro está
De
kan de
tijdinstelling
(0selecionado
tot 90 seconden)
op elk moment
tijdens"0"
bedrijf
Let erop
datdesligado
de LED-weergaves
en “0”de
afwisselend
oplichten als
em gebruiker
funcionamento
durante
o tempo
(0 a 90ook
segundos).
O LED verde
indicaaanpassen.
que o cronômetro
está
(durante um„I”padrão
1 segundo).
de timer geactiveerd is. De rode LED-weergave “I” geeft aan dat de timer voor de vastgelegde duur (0 tot 90 seconden) geactiveerd is. De groene LED-weergave “0”
geeft aan dat de timer niet geactiveerd is (standaard voor 1 seconde).
1
2
3
6
7
8
4
5
9
1.LED-weergave
Indicador LED
1.
2.
continubedrijfsmodus
2.LED-weergave
LED de modovoor
de operação
contínua
3.
C-RUN-toets
voor
continubedrijfsmodus
3. botão C-RUN de modo de operação contínua
4.
LED-weergave
timerbedrijfsmodus
4.LED
de modo voor
de operação
cronometrada
5.
OPT-toets
voor
timerbedrijfsmodus
5. botão OPT de modo de operação cronometrada
6.
voor geactiveerde
timer
6.LED-weergave
LED de cronômetro
em funcionamento
7.
LED-weergave
voor
gedeactiveerde
timer
7.LED de cronômetro desligado
8. Toets om hoger aantal seconden te selecteren
8. botão de seleção para aumentar o tempo
9. Toets om lager aantal seconden te selecteren
Interruptor
principal
hoofdschakelaar
9. botão de seleção para diminuir o tempo
digital timerdigital
Cronômetro
35
Ubbink Manual Robotclean 1.indd 35
10.12.12 16:15
CICLO DE LIMPEZA
REINIGINGSCYCLUS
O
de limpeza doduurt
limpador
de duas
horas.
de de
duas
horas de funcionamento,
o limpador
será automatisch
desligado automaticamente
Deciclo
reinigingscyclus
tweeéuur.
Na twee
uurDepois
schakelt
geïntegreerde
tijdschakelaar
het apparaat
uit. In bepaaldepelo
gecronômetro
integrado
dentro
da
unidade.
Em
alguns
casos,
a
limpeza
da
piscina
pode
ser
concluída
em
menos
de
2
horas
e,
outras
vezes,
2
vallen kan het zwembad in minder dan twee uur gereinigd worden en soms zijn twee uur niet voldoende. De grootte en de vorm, maar
horas
é ovan
suficiente.
O tamanho
e o formato
piscinareinigingstijd.
e a quantidade
impurezas
que se encontra
nela determinará
o tempo
total de
ook denão
mate
vervuiling
zijn bepalend
voor dedavereiste
Alsdehet
reinigingsapparaat
langzamer
wordt of continu
van richting
limpeza.
Quando
o
limpador
diminui
de
velocidade
e
muda
totalmente
de
direção
antes
de
chegar
nas
extremidades
da
piscina,
isso
é um
verandert voordat het einde van het zwembad bereikt werd, dient de filterzak gereinigd of vervangen te worden.
aviso de que está na hora de limpar ou mudar o filtro.
Manutenção dovan
filtrode filterzak
Onderhoud
LIMPE O
FILTRO
DEPOIS
DEELKE
CADAREINIGINGSCYCLUS
CICLO DE LIMPEZA SCHOON
MAAK
DE
FILTERZAK
NA
a.
hetabedieningselement
(Let erop a
dat
de stekker
absoluut
niet nat wordt.)
a. Schakel
Desligue
fonte de energia. uit.
(Mantenha
tomada
longe
da água)
b.
apparaatestiver
zich in het
bevindt,
trek para
dan voorzichtig
aan de kabel
tot de greep
b.Als
Sehet
a unidade
na zwembad
piscina, use
o cabo
puxar o limpador
cuidadosamente
binnen
bereik usando
is. Laat eerst
het meeste
water
uit het
apparaat
lopen.
Trek daarna
na
sua uw
direção
o cabo
até que
a alça
esteja
ao seu
alcance.
Usehet
as alças
apparaat(não
met de
aan de ou
zijkant
aangebrachte
of para
met depuxar
wieleno(niet
aan depara
kabel)fora
uit da
laterais
o cabo)
o tubo
da roda greep
(fig. 9)
limpador
het
zwembad.
piscina depois de permitir que a maioria da água escoe da unidade.
c. Plaats het apparaat op een glad oppervlak met de onderkant naar boven (om krassen op de
c. Coloque a unidade de cabeça para baixo em uma superfície suave (para evitar
behuizing te voorkomen) en verwijder de afdekplaat aan de onderkant (zie afb. 10, 11, 12 en 13).
arranhões no corpo da máquina), destrave-a e remova a tampa da parte inferior. (fig.
d. Maak de filterzak los van de beugels, keer het filter binnenste buiten en spoel in een bak of
10,
13) alle vuil uit de filterzak (zie afb. 14). Knijp de filterzak voorzichtig uit tot het
met11,
een12,
tuinslang
d. water
Retireweer
o filtro
dasis.barras
vire-o
do avesso
e lave as
impurezas com
helder
U kuntde
de apoio
filterzak(fig.
ook14),
koud,
ZONDER
WASMIDDEL,
in de
uma
mangueira
ou
na
pia.
Aperte
o
filtro
suavemente
até
a
água
da
limpeza ficar
wasmachine wassen.
límpida.
Se
necessário,
coloque
o
filtro
na
máquina
de
lavar
em
água
fria,
e. Plaats de filterzak weer voorzichtig op de fixeerbeugels. Controleer of het label zich inmas
het SEM
USAR
SABÃO
EM
PÓ!
midden van de lange zijde van de onderste afdekking bevindt (zie afb. 15).
Reinstale
o filtro nas
barras
de apoio,Druk
deixando
a etiqueta
centrotot
dede
um
dos lados
f.e. Plaats
de afdekking
weer
in de behuizing.
de afdekplaat
naarno
beneden
clips
compridos
vastklikken. da tampa da parte inferior (fig. 15)
f. Reinstale a tampa inferior na unidade. Aperte-a até que as abas de fechamento
estejam devidamente no lugar.
tubo da
wiel
roda
clip
aba de fechamento
greep alça
op de
zijkant
lateral
etiqueta
label
36
Ubbink Manual Robotclean 1.indd 36
10.12.12 16:15
COMO CONFIGURAR
O PADRÃO DE LIMPEZA
VASTLEGGEN
REINIGINGSCYCLUS
eu
a jato
foi pré-configurado
parastandaard
limpar a maioria
das piscinas
24 avan
27 metros
a jato
saielke
da
De limpador
reiniger met
sproeiers
is ingesteld voor
zwembaden
met een de
lengte
24 m totde
27comprimento.
m. De reinigerOislimpador
in de fabriek
aan
fábrica
com uma
semelhante(zie
à da
fig.
16,Het
com
um pinowordt
de travamento
em
cada
lado. Oschema
limpador
a jato limpará
a sua
zijde voorzien
van aparência
een vergrendelingspin
afb.
16).
zwembad
op basis van
een
consistent
systematisch
schoongepiscina
sistematicamente
em
um
padrão
coerente.
maakt.
Depois
limpador
a jato concluirneemt
o ciclou de
da piscina
transfira
pinos de travamento
doandere
lado direito
da
Aan het que
eindeo van
een reinigingscyclus
hetlimpeza,
apparaatretire-o
uit het zwembad
eneplaats
u deovergrendelingspin
aan de
kant van
unidade
para zodat
o esquerdo
(e vice ook
versa).
Da
próxima vez querichting
você usar
o limpador a wordt.
jato, a Op
unidade
de limpeza
a piscina
no
de behuizing,
het zwembad
in de
tegenovergestelde
schoongemaakt
deze manier
wordtlimpará
uw zwembad
overal
padrão
oposto.
Isso
garantirá
que
o
limpador
limpará
a
sua
piscina
completamente.
goed gereinigd.
16
O aspirador
Het apparaat
rijdt
move-se girando
tegen
wijzers
emde
direcção
aos
van contrária
de kok in,
in
ponteiros do
dezerelógio
richting.
VergrendelingTranca-ferrolho em
spin
in ingestelde
posição pré-fixa
positie
eixo
Instelbare
as móvel
18
Tranca-ferrolho em
Vergrendelingspin
posição para
in
voorste positie
a frente
Tranca-ferrolho
Vergrende-lingspin
eixo
Vaste
as fixo
Het
O apparaat
aspirador
girará
rijdt
in een
num`ângulo
korte
maisbocht
amploin
nesta
direcção
deze
richting
eixo
Instelbare
as móvel
eixo
Vaste
as fixo
O aspirador
vai
Het apparaat
rijdt rechtdoor
in
direito
nesta
direcção
deze
richting
Het apparaat
rijdt rechtdoort
in
O aspirador
vai
deze
richting
direito
nesta
direcção
17
AANPASSEN
VAN
HET REICOMO
AJUSTAR
O LIMPADOR
DE
ACORDO COM AAN
A SUA
NIGINGSAPPARAAT
UW
PISCINA
ZWEMBAD
O
usa um
padrão
de
Het limpador
reinigingsapparaat
volgt
een systelimpeza
sistemático
que
permite
que
matisch reinigingsschema, waarbij het
ele
se movimente
para frente e lijnen
para
apparaat
in elkaar overlappende
trás
em
padrões
de
sobreposição.
O
heen en weer beweegt. Het reinigingslimpador
poderá
ser
usado
para
apparaat kan gebruikt worden in grote
limpar
tamanhos
en kleine piscinas
zwembaden.deVoor
dat u het
variados,
desde
pequenas
a
apparaat voor de eerste keer gebruikt,
bastante
grandes
Antes
de
usá-lo
dient u het voor uw zwembad in te stelpela
primeira
vez,aanvocê
precisa
len. Om
het apparaat
te passen
aan
configurar
o
limpador
de
acordo
com
uw zwembad, gebruikt u de vergrendea
sua (zie
piscina.
lingspin
afb. 17).Para ajustar o
limpador, você usará o pino de
Op het apparaat
zich twee
travamento
debevinden
eixo (fig.
17).
vergrendelingspinnen.
Voortravamento
de meeste
Existem
dois pinos de
toepassingen
is één vergrendelingspin
fixos
permanentemente
na unidade
voldoende.
Voor heel de
grotesegurança.
zwembaden
por
um cordão
dient u eenum
extra
vergrendelingspin
Somente
pino
de segurança te
é
gebruiken (op de
behuizing
van de spronecessário
para
a maioria
das
eiers). In afb. Para
18 is de
configuratie
voor
aplicações.
piscinas
bastante
vergrendelingspinnen
voor instalar
zwembaden
grandes,
você precisará
um
van diverse
weergegeven.
pino
de groottes
travamento
adicional
(localizado no suporte da válvula do
jato). Siga a ilustração que mostra a
configuração do pino de acordo com
o tamanho da sua piscina (fig. 18).
37
Ubbink Manual Robotclean 1.indd 37
10.12.12 16:15
DETECÇÃO E RESOLUÇÃO DE PROBLEMAS:
PROBLEEMOPLOSSING:
DETECÇÃO E RESOLUÇÃO DE PROBLEMAS:
A. Não
Het apparaat
verandert
niet van richting:
inverta as
direções:
Não 1.
Spuit
alle
openingen
in ou
de sproeierbehuizing
met eenda
tuinslang
Use uma
mangueira
borrife água no suporte
válvulaschoon.
em cada
A.
inverta
as direções:
Door
deuma
hoge
waterdruk
alle
verontreinigingen
uit
sproeisysteem
abertura.
A pressão
altaworden
da
deverá
remover
quaisquer
impurezas
do
1.
Use
mangueira
ou água
borrife
água
no suporte
dahet
válvula
em cada
verwijderd.
sistema da
válvula do
jato.
abertura.
A pressão
alta
da água deverá remover quaisquer impurezas do
2. Verwijder
eendas
sproeiuitlaat
door
twee schroeven
opzij
los te draaien
Retireda
uma
saídas
jatoderemovendo
os dois
parafusos
laterais
sistema
válvula
do
jato. do
(zie
afb.
Buig
een
grote
paperclip
om in formando
een haak
(zie
afb.20). conforme
(fig.
19).19).
Dobre
um
clipe
grande
deremovendo
papel,
umparafusos
gancho
2.
Retire
uma
das
saídas
do
jato
os dois
laterais
Open
de Dobre
middelste
klep
en
controleer
de rotor.
Waarschijnlijk
zittenconforme
er oharen,
mostrado
na fig.um
20.
Empurre
a aba
central
para
abri-la
e observe
rotor.
(fig.
19).
clipe
grande
de papel,
formando
um gancho
Normalmente,
você
encontrará
impurezas
como
cabelo,
fiosde
outot
een touwtje
een
klein
takje ina de
waaier.
Verwijder
dit dan
met
haak
mostrado
naoffig.
20.
Empurre
aba
central
para
abri-la
e observe
ogalhos
rotor.
finos
presos
novocê
rotor.
Use
clipe
que papelcomo
para cabelo,
retirar as
impurezas
gevormde
paperclip
(zie
afb.o21)
Normalmente,
encontrará
impurezas
fios
ou galhose
limpá-lo
(fig.
21).
finos
presos
no rotor.
Use o clipe que papel para retirar as impurezas e
B. Het apparaat
pompt
geen water.
bombeie
água:
(fig.
21).
B. Nãolimpá-lo
1.
Controleer
of de elektrische aansluiting functioneert.
1.
Verifique
seofade
tomada
está funcionando.
B.
bombeie
água:
Não 2.
Controleer
kabel goed
aangesloten is op het bedieningselement.
2. Verifique
o zekering
cabo está
na fonte de energia.
1.
tomada
está
funcionando.
3.
Controleersedea
inligado
het
bedieningselement
en vervang deze
3. Verifique
o fusível
fonte
de energia
troque-o,
se necessário.
2.
se
onodig.
cabona
está
ligado
na fonteede
energia.
zekering
indien
4.
se
o
cabo
está
danificado
ou
se
possui
pequenos
cortes.
3.
Verifique
o
fusível
na
fonte
de
energia
e
troque-o,
se
necessário.
Controleer of de kabel niet beschadigd is.
sucção
nãozuigt
ése
suficiente
ouofdanificado
ézuigt
completamente
inexistente:
4. Verifique
oniet
cabo
está
ou se possui
pequenos cortes.
C. A
Het
apparaat
goed
helemaal
niet.
filtro
está
C.
não é se
suficiente
oulimpo.
éniet
completamente
A sucção
1. Verifique
Controleer
ofode
filterzak
beschadigd is. inexistente:
Verifique se
se
abas
dalimpo.
válvula de
na parte
1.
filtro
está
2. Verifique
Controleer
ofoas
de
aanzuigkleppen
aanentrada
de onderkant
vaninferior
het do limpador
não
estão obstruídas
para
permitir
a entrada
impurezas.
2.
Verifique
se as abas
da válvula
de
entrada
naágua
parteedeeltjes
inferior
do
reinigingsapparaat
geblokkeerd
zijn en
water
of de
vreemde
binnenlaten.
38limpador
cobre
a piscina
inteira:
não
estão
obstruídas
para
permitir
a entrada de água e impurezas.
D. Não
Het apparaat
reinigt
niet
het
hele
zwembad.
Verifique
se
ointeira:
movimento
da roda
está obstruído
por impurezas
D.
cobre
a piscina
Não 1.
Controleer
of de
wielen niet door
haar não
of andere
verontreinigingen
atributo
patenteado
que
permite
que
você
desenrole
o
cabo
facilmente.
acumuladas
ou ofios
de cabelo.da roda não está obstruído por
1.
Verifique worden.
se
movimento
impurezas
geblokkeerd
padrão
circular
sistemático.
Se isso
se
filtro
está
limpo.
acumuladas
ou
fios
de
cabelo.
2. Verifique
Controleer
ofode
filterzak
schoon
is. acontecer, use a rotativa E-Z, um
poderá
retorcer
ou
porque
o limpador
funciona
Ajuste
otijdsduur
tempo
de
ciclo
para que
o limpador
chegue até
o outro em
ladoum
da
2.
se
o filtro
está
limpo.
3. Verifique
Pas dese
van
deentrelaçar
cyclus
zo aan
dat het
apparaat
de
overkant
instalada
acima
da
superfície.
Dependendo
do
formato
da
piscina,
o
cabo
piscina.
3.
Ajuste
o
tempo
de
ciclo
para
que
o
limpador
chegue
até
o
outro
lado
da
van het zwembad bereikt.
1. de
Seu
limpador
foihetcriado
parade
limpar
a kant
maioria
daszwembad
piscinas
direção
antes
de chegar
na outra
parede
da
piscina.
piscina.
E. Muda
Verander
de novo
richting
voordat
apparaat
andere
van het
G.
Cuidados
com
o
cabo
flutuante
e
o
cabo
de
torção
Ajuste
o cronômetro
transformador:
E.
Muda
de
direção
antes de do
chegar
na outra parede da piscina.
van
het1.zwembad
bereikt.
escolher
entre
0ope 90
segundos.
aanders
operação
se necessário.
A Ajuste
setadepara
cima
aumentará
aRepita
quantidade
de
1.
o
cronômetro
do transformador:
Stel
timer
het
bedieningselement
in. segundos.
Met
het pijltjeVocê
naar pode
A
seta
para
baixo
diminuirá
a
quantidade
de
segundos.
Você
escolher
entre
0e
90
segundos.
aUoperação
se
necessário.
A
seta wordt
para
cima
aumentará
quantidade
de segundos.
Você
pode
boven,
het
aantal
secondenaRepita
hoger.
kunt timer
instellen
van
min.pode
0
1.
o
cronômetro
do transformador:
demais
perto
antes
de mudar
de direção.
escolher
entre
0 e da
90 parede
segundos.
a operação
se necessário.
F. Espera
totAjuste
max.
90
seconden.
Herhaal
ditRepita
desgewenst.
F.
demais
perto
da
mudar
de
direção.
1. Ajuste
o cronômetro
do transformador:
F. Espera
Espera
demais
perto
da parede
parede
antes
de
mudar
devan
direção.
Het apparaat
blijft
te lang
aan
éénantes
kant de
voordat
het
richting verandert.
escolher
entre
0
e
90
segundos.
Repita
a
operação
se
A
seta
para
baixo
diminuirá
a
quantidade
de
segundos.
Você
1.
Ajuste
o
cronômetro
do
transformador:
Stel de timer op het bedieningselement anders in. Metnecessário.
het pijltje
naar pode
A
seta
para
cima
aumentará
a
quantidade
de
segundos.
Você
pode
escolher
entre
0het
e 90
segundos.
a operação
se instellen
necessário.
A
seta para
diminuirá
aRepita
quantidade
detimer
segundos.
Você
beneden,
wordtbaixo
aantal
seconden
lager.
U kunt
van pode
1.
Ajuste
o
cronômetro
do
transformador:
com
o cabo
flutuante
e oRepita
cabo
torção se necessário.
escolher
entre
0
90
segundos.
adesgewenst.
operação
G. Cuidados
min. 0 tot
max.
90e seconden.
Herhaal
dit de
E.
de
direção
antes
de
chegar
na
outra
parede
da
1.
Seu
novo
limpador
foi
criado
para
limpar
a piscina.
maioria das piscinas
G. Muda
Cuidados
com
o
cabo
flutuante
e
o
cabo
de
torção
Drijvende kabel en kink in de kabel
piscina.
instalada
acima
superfície.
Dependendo
do de
formato
dabovengrondse
piscina,
o cabo
1.
Seuapparaat
novo
limpador
foivoor
criado
para limpar
ameeste
maioria
das piscinas
Het
isda
geschikt
het reinigen
van
3.
Ajustese
oacima
tempo
desuperfície.
ciclo
para
que o
limpador
chegue
até
o outro
da
poderá
retorcer
ou
entrelaçar
porque
o
funciona
em
um
instalada
Dependendo
dolimpador
formato
da
piscina,
o cabo
zwembaden.
Deda
vorm
van
sommige
zwembaden
kan ertoe
leiden
datlado
2.
Verifique
se
o
filtro
está
limpo.
padrão
Seeen
isso
acontecer,
use
a funciona
rotativa
poderá
se
retorcer
ou ofentrelaçar
porque
o kabel
limpador
em um
de
kabelcircular
in de
warsistemático.
raakt
dat er
knik
in de
komt
daar het E-Z,
acumuladas
ou
fios
de
cabelo.
atributo circular
patenteado
que
permite
você
desenrole
facilmente.
padrão
sistemático.
Se que
issocirkelvormig
acontecer,
useo cabo
a volgt.
rotativa
E-Z, um
reinigingsapparaat
een
systematisch,
schema
1.
Verifique
se o movimento
daque
rodavocê
nãodesenrole
está obstruído
impurezas
atributo
patenteado
que permite
o cabopor
facilmente.
D. Não cobre a piscina inteira:
38
não estão obstruídas para permitir a entrada de água e impurezas.
38
2. Verifique se as abas da válvula de entrada na parte inferior do limpador
Ubbink Manual Robotclean 1.indd 38
1. Verifique se o filtro está limpo.
schroeven
parafuso
parafuso
20
20
uitlaat
saída
sproeiers
do jato
saída
do jato
19
19
middelste
klep
aba
central
aba central
21
21
dentro dela, instale os clipes do filtro conforme indicado.
Para evitar que o filtro se enrole ao redor da bomba e bloqueie o fluxo d'água
Om teevitar
voorkomen
dat de
zich
rondda
debomba
pomp wikkelt
en de
Para
que o filtro
sefilterzak
enrole ao
redor
e bloqueie
o waterfluxo d'água
toevoer
naar
de
pomp
blokkeert,
plaatst
u
klemmen
zoals
weergegeven
de
dentro
dela,
instale
os
clipes
do
filtro
conforme
indicado.
Para evitar que o filtro se enrole ao redor da bomba e bloqueie o fluxo in
d'água
afbeeldinerboven.
dentro
dela, instale os clipes do filtro conforme indicado.
21
10.12.12 16:15
Greenmax 2500
Rated power: 35 W
230 VAC/50Hz
Hmax: 2,30 m
Qmax: 2600 l/h
,
Robotclean 1
c IPx8
IP54
30V~50Hz
max. 135W
III
Sticker Robotclean 1 Technik 250x50mm.indd 1
Ubbink Manual Robotclean 1.indd 39
Greenmax 3200
Rated power: 48 W
Powerbox
230 VAC/50Hz
Hmax: 3,00 m
Qmax: 3200 l/h
c IP24
DC Cable 230V~50Hz
18m
max. 220W
Made for
Ubbink Garden BV
Postbus 15
1800 AA Alkmaar
The Netherlands
Art.no.: 7504623
1,8m
zx
06.12.12 13:28
10.12.12 16:15
www.outsideliving.com
(D) / (A) Ubbink Garten GmbH
Eduard-Suling-Straße 17
D – 28217 Bremen
Tel.: 0049 – (0)421 – 38693- 920
Fax: 0049 - (0)421 - 38693-919
E-Mail: [email protected]
(NL) Outside Living Industries
Nederland B.V.
Postbus 15
NL – 1800 AA Alkmaar
Berenkoog 87
NL - 1822 BN Alkmaar
Tel. verkoop: 0031 – (0)72-5 671 661
Tel.: 0031 – (0)72- 5 671 671
Fax: 0031 – (0)72 5 671 673
E-Mail: [email protected]
Ubbink Manual Robotclean 1.indd 40
(Export)
Outside Living Industries
Nederland B.V.
(F)
Outside Living Industries
France SARL
Postbus 15
NL – 1800 AA Alkmaar
Berenkoog 87
NL - 1822 BN Alkmaar
Tel. Sales: 0031 – (0)72-5 671 661
Tel.: 0031 – (0)72- 5 671 671
Fax: 0031 – (0)72 5 671 673
E-Mail: [email protected]
17, Rue de la Baignerie
F - 59000 Lille
Tel. adv.: 0033 – (0)3-20 17 93 93
Fax adv.: 0033 – (0)3-20 17 93 94
E-Mail: [email protected]
(B) / (L)
Outside Living Industries
BeLux BVNR
Wondelgemkaai 10
B – 9000 Gent
Tel.: +32-(0)9-254 45 45
Fax.: +32-(0)9- 254 45 40
E-Mail: [email protected]
10.12.12 16:15