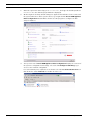
1
1200 Series/4-bay IP Video Storage
System
DLA-AIOU0
de
en
es
fr
it
ja
Schnellstartanleitung
Quick Installation Guide
Guía de instalación rápida
Guide d'installation rapide
Guida all'installazione rapida
クイックインストールガイド
nl
pl
pt
ru
zh
Beknopte installatiehandleiding
Instrukcja szybkiej instalacji
Guia de Instalação Rápida
Руководство по быстрой установке
快速安装指南
DLA-AIOU0
3
de
Schnellstartanleitung
en
Quick Installation Guide
17
es
Guía de instalación rápida
28
fr
Guide d'installation rapide
40
it
Guida all'installazione rapida
52
ja
クイックインストールガイド
64
nl
Beknopte installatiehandleiding
75
pl
Instrukcja szybkiej instalacji
87
pt
Guia de Instalação Rápida
99
ru
Руководство по быстрой установке
111
zh
快速安装指南
123
Bosch Sicherheitssysteme GmbH
5
- | V1 | 2011.03
4
- | V1 | 2011.03
DLA-AIOU0
Bosch Sicherheitssysteme GmbH
1200 Series/4-bay IP Video Storage System
Inhaltsverzeichnis | de
5
Inhaltsverzeichnis
1
Sicherheitsvorkehrungen
6
1.1
Allgemeine Sicherheitsvorkehrungen
6
1.2
Elektrische Sicherheitsvorkehrungen
6
1.3
ESD-Vorkehrungen
7
1.4
Sicherheitsvorkehrungen im Betrieb
7
2
Systemkonfiguration – Hardware
8
2.1
Einführung
8
2.2
Auspacken
8
2.3
Einrichtungsvorbereitung
8
2.3.1
Auswahl eines Aufstellungsorts
8
2.3.2
Sicherheitsvorkehrungen für das System
8
2.4
Einschalten des Systems
9
3
Systemkonfiguration – Erste Schritte
9
3.1
Einführung
9
3.2
Einrichtungsanleitung
9
3.3
Einstellen der IP-Adresse
9
3.3.1
Remotedesktopverbindung
3.3.2
Physische Verbindung
3.4
VRM Appliance
14
3.4.1
Zusätzliche Software und Dokumentation
15
3.4.2
Deaktivieren des VRM-Dienstes
15
3.5
Standard-Systemkonfiguration
15
3.6
Wartung und Reparatur
16
Bosch Sicherheitssysteme GmbH
9
12
Schnellstartanleitung
- | V1 | 2011.03
6
de | Sicherheitsvorkehrungen
1200 Series/4-bay IP Video Storage System
1
Sicherheitsvorkehrungen
1.1
Allgemeine Sicherheitsvorkehrungen
Beachten Sie diese Regeln, um die allgemeine Sicherheit zu gewährleisten:
–
Halten Sie den Bereich um das System sauber und in Ordnung.
–
Legen Sie die obere Gehäuseabdeckung sowie ausgebaute Systemkomponenten zum
Schutz vor Trittschäden in sicherer Entfernung zum System oder auf einem Tisch ab.
–
Tragen Sie bei Arbeiten am System keine losen Kleidungsstücke (z. B. Krawatten oder
aufgeknöpfte Hemdsärmel), die mit elektrischen Schaltkreisen in Berührung kommen
oder von einem Lüfter angesaugt werden können.
–
Legen Sie Schmuck oder sonstige am Körper getragene Metallgegenstände ab. Diese
stellen sehr gute metallische Leiter dar, die bei Berührung mit Leiterplatten oder Strom
führenden Teilen zu einem Kurzschluss und damit zu Verletzungen führen können.
–
Schließen Sie das System nach Arbeiten im Innenbereich wieder, und befestigen Sie es
wieder am Rack. Vergewissern Sie sich vorher, dass alle Anschlüsse befestigt sind.
–
Das System wiegt bei Vollausbau ungefähr 19,5 kg. Der Transport des Systems sollte
durch zwei Personen erfolgen, die an den gegenüberliegenden Seiten stehen (zur
besseren Gewichtsverteilung mit nach außen gestellten Füßen) und das System langsam
anheben. Dabei ist der Rücken stets gerade zu halten und das Gewicht aus den Beinen
anzuheben.
1.2
Elektrische Sicherheitsvorkehrungen
Befolgen Sie zum persönlichen Schutz sowie zum Schutz des Systems grundlegende
elektrische Sicherheitsvorkehrungen:
–
Merken Sie sich, wo sich am Gehäuse der Netzschalter sowie im Raum der
Notausschalter, der Trennschalter oder die Steckdose befinden. Dadurch können Sie das
System bei einem Stromunfall schnell von der Stromversorgung trennen.
–
Arbeiten Sie nie alleine an Hochspannungsbauteilen.
–
Unterbrechen Sie beim Entfernen oder Einbauen von Hauptsystemkomponenten, wie
z. B. von Mainboards, Speichermodulen und Diskettenlaufwerken, immer die
Stromversorgung des Systems. Bevor die Stromversorgung unterbrochen wird, schalten
Sie zunächst das System über das Betriebssystem aus, und ziehen Sie anschließend die
Netzkabel von allen Netzteileinheiten des Systems ab.
–
Bei der Arbeit an freiliegenden elektrischen Schaltkreisen sollte eine weitere Person
anwesend sein, die mit den Abschaltvorrichtungen vertraut ist und bei Bedarf die
Stromversorgung unterbrechen kann.
–
Arbeiten Sie nur mit einer Hand an eingeschalteten elektrischen Geräten. Dadurch wird
vermieden, dass sich ein Stromkreis schließt, der zu einem elektrischen Schlag führt.
Seien Sie mit Metallwerkzeugen äußerst vorsichtig, da sie elektrische Bauteile oder
Platinen bei Berührung beschädigen können.
–
Verwenden Sie zum Schutz vor Stromunfällen keine Matten, die zur Verringerung
elektrostatischer Entladungen dienen. Verwenden Sie stattdessen spezielle Matten, die
zur elektrischen Isolierung dienen.
–
Die Netzkabel müssen über einen Schutzkontaktnetzstecker verfügen und an
Schutzkontaktsteckdosen angeschlossen werden. Das Gerät verfügt über mehr als ein
Netzkabel. Ziehen Sie vor Wartungsarbeiten beide Netzkabel ab, um Stromunfälle zu
vermeiden.
- | V1 | 2011.03
Schnellstartanleitung
Bosch Sicherheitssysteme GmbH
1200 Series/4-bay IP Video Storage System
–
Sicherheitsvorkehrungen | de
7
Mainboard-Batterie:
VORSICHT – Wenn die Mainboard-Batterie mit umgekehrter Polarität eingesetzt wird,
kann sie explodieren. Tauschen Sie diese Batterie nur gegen Batterien desselben oder
eines vom Hersteller empfohlenen gleichwertigen Typs aus (CR2032). Entsorgen Sie
leere Batterien entsprechend den Herstelleranweisungen.
–
DVD-ROM-Laser:
VORSICHT – Dieses System wird ohne DVD-ROM-Laufwerk geliefert. Falls jedoch ein
solches hinzugefügt wird: Öffnen Sie nicht die Abdeckung, und verwenden Sie das
Laufwerk nicht unsachgemäß. Andernfalls besteht die Gefahr einer direkten Exposition
gegenüber Laserstrahlung bzw. einer gefährlichen Strahlenexposition.
–
Auswechselbare Einlötsicherungen auf dem Mainboard: Die selbstrückstellenden PTCSicherungen (Kaltleiter) auf dem Mainboard dürfen nur durch geschulte
Servicemitarbeiter ausgewechselt werden. Die neue Sicherung muss den gleichen oder
einen gleichwertigen Typ aufweisen wie die vorherige. Für weitere Informationen und
Unterstützung wenden Sie sich an den Technischen Kundendienst.
1.3
ESD-Vorkehrungen
Wenn sich zwei Gegenstände mit unterschiedlicher elektrischer Ladung berühren, treten
elektrostatische Entladungen (ESD) auf. Der Ladungsunterschied wird durch die Entladung
ausgeglichen. Diese kann zu Schäden an elektronischen Bauteilen und Leiterplatten führen.
Um die Geräte vor ESD zu schützen, können Ladungsunterschiede durch die folgenden
Maßnahmen ausreichend ausgeglichen werden:
–
–
Tragen Sie ein geerdetes Antistatikband.
Entnehmen Sie Komponenten und Leiterplatten (PCBs) erst bei Gebrauch aus ihren
Antistatikhüllen.
–
Berühren Sie einen geerdeten Metallgegenstand, bevor Sie eine Leiterplatte aus der
Antistatikhülle entnehmen.
–
Lassen Sie Komponenten oder Leiterplatten (PCBs) nicht mit Ihrer Kleidung in Berührung
kommen. Diese kann selbst beim Tragen eines Antistatikbandes eine Restladung
enthalten.
–
Fassen Sie Leiterplatten nur an den Rändern an; berühren Sie nicht ihre Komponenten,
Peripherie-Schaltkreisen, Speichermodule oder Kontakte.
–
Berühren Sie nicht die Anschlussstifte von integrierten Schaltkreisen oder Modulen.
–
Legen Sie das Mainboard und die Peripheriemodule bei Nichtgebrauch wieder in die
zugehörigen Antistatikhüllen.
–
Achten Sie aus Gründen der Erdung darauf, dass bei Ihrem Rechnergehäuse eine sehr
gute Leitfähigkeit zwischen Stromversorgung, Gehäuse, Befestigungselementen und
Mainboard besteht.
1.4
Sicherheitsvorkehrungen im Betrieb
Es ist darauf zu achten, dass im Betrieb des Systems die Gehäuseabdeckung richtig
angebracht ist, damit eine ausreichende Kühlung gewährleistet ist. Wird diese Vorkehrung
nicht streng beachtet, können am System Schäden entstehen, die nicht der Gewährleistung
unterliegen.
Hinweis:
Gebrauchte Batterien müssen mit Sorgfalt gehandhabt werden. Die Batterien dürfen nicht
beschädigt werden. Beschädigte Batterien können umweltgefährdende Stoffe freisetzen.
Gebrauchte Batterien dürfen nicht im Hausmüll oder auf öffentlichen Deponien entsorgt
Bosch Sicherheitssysteme GmbH
Schnellstartanleitung
- | V1 | 2011.03
8
de | Systemkonfiguration – Hardware
1200 Series/4-bay IP Video Storage System
werden. Beachten Sie die Vorschriften Ihrer örtlichen Abfallwirtschaftsbehörde, um
gebrauchte Batterien ordnungsgemäß zu entsorgen.
2
Systemkonfiguration – Hardware
2.1
Einführung
Lieferumfang:
–
–
1200 Serie – 4-Schacht-MiniTower-System, Vollausbau mit 4 Festplatten
Zusätzlich zum eigentlichen System sollten die folgenden Komponenten im Lieferumfang
enthalten sein:
2.2
–
Ein Netzkabel für jedes Netzteil im System
–
Die vorliegende Kurzanleitung zur Installation
Auspacken
Untersuchen Sie den Transportkarton des Systems auf Beschädigungen, und notieren Sie
diese. Wenn das System beschädigt ist, müssen Sie Schadenersatzansprüche an den
liefernden Spediteur richten und die entsprechende Bosch RMA-Abteilung benachrichtigen.
Aufgrund des Gewichts des Systems: Nach dem Öffnen der Oberseite des Transportkartons
sollten zwei Personen, die an den gegenüberliegenden Seiten des Kartons stehen, das DiskArray gemeinsam herausheben.
Wählen Sie einen geeigneten Standort für das System. Das System muss sich in einem
sauberen, staubfreien und ausreichend belüfteten Bereich befinden. Vermeiden Sie Bereiche,
in denen hohe Temperaturen, elektrische Störsignale und elektromagnetische Felder
vorkommen. In der Nähe muss sich außerdem eine Schutzkontaktsteckdose befinden. Lesen
Sie unbedingt die Sicherheitshinweise im nächsten Abschnitt durch.
2.3
Einrichtungsvorbereitung
Wenn Sie die einzelnen Schritte in der angegebenen Reihenfolge ausführen, lässt sich die
Installation mit minimalem Zeitaufwand bewältigen. Lesen Sie diesen Abschnitt durch, bevor
Sie entsprechend den nachfolgenden Abschnitten mit dem Einbau beginnen.
2.3.1
Auswahl eines Aufstellungsorts
Achten Sie an der Front und an den Seiten des Systems, an denen die Gehäuseabdeckung
angebracht ist, für einen ausreichenden Abstand, sodass die austauschbaren Laufwerke
entnommen werden können, ein ausreichender Luftstrom gegeben ist und Wartungsarbeiten
problemlos erledigt werden können.
Dieses Produkt ist ausschließlich für die Aufstellung an Standorten mit beschränktem Zugang
vorgesehen (wie z. B. in Spezialgeräteräumen oder Technikschränken).
2.3.2
Sicherheitsvorkehrungen für das System
–
Beachten Sie die Hinweise zur allgemeinen und elektrischen Sicherheit.
–
Schützen Sie das System mithilfe einer selbstregulierenden unterbrechungsfreien
Stromversorgung (USV) vor Überspannung und Spannungsspitzen. Durch die USV läuft
das System auch bei einem Stromausfall weiter.
–
Lassen Sie die SATA-Festplatten und die Netzteilmodule abkühlen, bevor Sie sie
anfassen.
–
Wenn keine Wartungsarbeiten stattfinden, müssen die Gehäuseabdeckungen stets
angebracht und befestigt sein, damit eine ausreichende Kühlung gewährleistet ist.
- | V1 | 2011.03
Schnellstartanleitung
Bosch Sicherheitssysteme GmbH
1200 Series/4-bay IP Video Storage System
2.4
Systemkonfiguration – Erste Schritte | de
9
Einschalten des Systems
Der letzte Schritt umfasst das Bereitstellen der Stromversorgung für das System.
1.
Verbinden Sie das Netzkabel der Netzteileinheit mit einer qualitativ hochwertigen
Steckdosenleiste, die über Schutzeinrichtungen gegen elektrische Störsignale und
Überspannungen verfügt. Es wird empfohlen, eine unterbrechungsfreie Stromversorgung
(USV) zu verwenden.
2.
Betätigen Sie den Netzschalter im Bedienpanel, um das System zu starten.
3
Systemkonfiguration – Erste Schritte
3.1
Einführung
Die folgende Installationsanleitung bezieht sich auf die Bosch DLA Disk-Array Serie und
umfasst Informationen zur Installation, Konfiguration, Wartung und Reparatur.
Die Bosch DLA Disk-Arrays basieren auf Microsoft Storage Server 2008. Das Betriebssystem
Microsoft Windows Storage Server 2008 bietet eine Benutzeroberfläche für die
Erstkonfiguration des Servers, eine einheitliche Verwaltung von Speichergeräten, die
vereinfachte Einrichtung und Verwaltung der Archivierung und der freigegebenen Ordner
sowie Unterstützung für Microsoft iSCSI-Softwareziele.
Es ist speziell optimiert, um für über Netzwerkdienste bereitgestellte Speichersysteme
(Network-Attached Storage, NAS) die bestmögliche Leistung zu liefern. Windows Storage
Server 2008 bietet signifikante Verbesserungen für Freigabe- und SpeichermanagementSzenarios sowie eine Integration der Komponenten und der Funktionalität für die Verwaltung
von Speichergeräten.
3.2
Einrichtungsanleitung
Alle Bosch DLA Serie Disk-Arrays sind mit einer Standard-IP-Adresse und StandardiSCSI-Einstellungen vorkonfiguriert.
–
IP-Adresse: 10.10.10.10 (1. Port) und 10.10.10.11 (2. Port)
–
Netzmaske: 255.255.255.0
–
Benutzer: Administrator
–
Passwort: WSS4Bosch
Detailinformationen, wie z. B. Datenblätter und Benutzerhandbücher, finden Sie auf der
Bosch Website www.boschsecurity.com unter Product Catalog > CCTV > IP Video > Disk
Arrays.
Die iSCSI-Standardeinstellungen sind für die Verwendung mit VRM optimiert. Änderungen an
diesen Einstellungen sollten nur von erfahrenen Speichersystemadministratoren
vorgenommen werden. Eine Änderung der Standardkonfiguration ist nur dann erforderlich,
wenn entweder VRM nicht verwendet wird oder wenn die Standardeinstellungen für eine
andere Bosch iSCSI-Anwendung nicht geeignet sind.
3.3
Einstellen der IP-Adresse
Die Standard-IP-Adresse kann auf eine der zwei folgenden Weisen geändert werden.
3.3.1
Remotedesktopverbindung
1.
Verbinden Sie das System über Port 1 oder Port 2 mit Ihrem Netzwerk, und starten Sie
das System. Im Auslieferungszustand des Systems ist die Remotedesktopverbindung
aktiviert. Melden Sie sich auf einem geeigneten Client-System an, auf dem Windows XP,
Windows Vista oder Windows 7 installiert sein muss (die Client-Hardware und -Software
Bosch Sicherheitssysteme GmbH
Schnellstartanleitung
- | V1 | 2011.03
10
de | Systemkonfiguration – Erste Schritte
1200 Series/4-bay IP Video Storage System
ist nicht im Lieferumfang enthalten) und dass über eine IP-Adresse im selben Netzwerk
verfügen muss, wie z. B. 10.10.10.12 (Netzmaske: 255.255.255.0).
2.
Öffnen Sie auf dem Client-System die Remote Desktop Connection. Geben Sie im Feld
Computer die IP-Adresse des Disk-Arrays ein, zu dem Sie eine Verbindung herstellen
möchten.
Standard-IP-Adresse: 10.10.10.10 (Port 1)
3.
Klicken Sie auf Connect, drücken Sie Ctrl+Alt+Del (falls angezeigt), und geben Sie
dann, sobald das Anmeldefenster des Disk-Arrays angezeigt wird, das Standardpasswort
WSS4Bosch ein.
4.
Bei der ersten Anmeldung werden die Desktop-Standardeinstellungen angewendet.
Dieser Vorgang nimmt einige Sekunden in Anspruch, und das System wird neu gestartet.
Melden Sie sich nach dem Neustart des Systems erneut an. Anschließend wird das Bosch
VRM Appliance initial configuration-Fenster angezeigt. Mit diesem Programm können
Sie die IP-Adresse des Systems konfigurieren.
5.
Die oberste Ebene von Bosch VRM Appliance initial configuration zeigt einen Überblick
der Konfiguration und der Einstellungen des Systems an.
- | V1 | 2011.03
Schnellstartanleitung
Bosch Sicherheitssysteme GmbH
1200 Series/4-bay IP Video Storage System
Systemkonfiguration – Erste Schritte | de
11
Wählen Sie den Link Configure networking aus, um Zugriff auf die Netzwerkkonfiguration
zu erhalten.
Für jeden Netzwerkanschluss wird ein eigenes Symbol angezeigt. Wählen Sie das Symbol
Local Area Connection aus, das den Status network anzeigt, und doppelklicken Sie dann
auf das Symbol.
6.
Klicken Sie auf Properties, wählen Sie Internet Protocol Version 4 (TCP/IPv4) aus, und
klicken Sie dann auf Properties.
Bosch Sicherheitssysteme GmbH
Schnellstartanleitung
- | V1 | 2011.03
12
de | Systemkonfiguration – Erste Schritte
7.
1200 Series/4-bay IP Video Storage System
In diesem Dialogfeld können Sie die IP-Adresskonfiguration den Anforderungen Ihres
Netzwerks entsprechend einstellen.
8.
3.3.2
Starten Sie das System neu.
Physische Verbindung
Das System verfügt über eine VGA-Grafikkarte und PS2-Steckverbinder für Maus und Tastatur.
1.
Schließen Sie an das Disk-Array einen Monitor, eine Maus und eine Tastatur an (nicht im
Lieferumfang enthalten), und starten Sie das System.
Hinweis:
Wird an den PS2-Steckverbinder erst nach dem Systemstart eine Maus oder Tastatur
angeschlossen, funktionieren diese Geräte möglicherweise nicht ordnungsgemäß.
2.
Nachdem das System gestartet wurde, drücken Sie Ctrl+Alt+Del, und geben Sie dann,
sobald das Anmeldefenster des Disk-Arrays angezeigt wird, das Standardpasswort
WSS4Bosch ein.
3.
Bei der ersten Anmeldung werden die Desktop-Standardeinstellungen angewendet.
Dieser Vorgang nimmt einige Sekunden in Anspruch, und das System wird neu gestartet.
Melden Sie sich nach dem Neustart des Systems erneut an. Anschließend wird das Bosch
- | V1 | 2011.03
Schnellstartanleitung
Bosch Sicherheitssysteme GmbH
1200 Series/4-bay IP Video Storage System
Systemkonfiguration – Erste Schritte | de
13
VRM Appliance initial configuration-Fenster angezeigt. Mit diesem Programm können
Sie die IP-Adresse des Systems konfigurieren.
4.
Die oberste Ebene von Bosch VRM Appliance initial configuration zeigt einen Überblick
der Konfiguration und der Einstellungen des Systems an.
Wählen Sie den Link Configure networking aus, um Zugriff auf die Netzwerkkonfiguration
zu erhalten.
Für jeden Netzwerkanschluss wird ein eigenes Symbol angezeigt. Wählen Sie das Symbol
Local Area Connection aus, das den Status network anzeigt, und doppelklicken Sie dann
auf das Symbol.
Bosch Sicherheitssysteme GmbH
Schnellstartanleitung
- | V1 | 2011.03
14
de | Systemkonfiguration – Erste Schritte
5.
1200 Series/4-bay IP Video Storage System
Klicken Sie auf Properties, wählen Sie Internet Protocol Version 4 (TCP/IPv4) aus, und
klicken Sie dann auf Properties.
6.
In diesem Dialogfeld können Sie die IP-Adresskonfiguration den Anforderungen Ihres
Netzwerks entsprechend einstellen.
7.
3.4
Starten Sie das System neu.
VRM Appliance
Auf dem System ist der Bosch Video Recording Manager (VRM) mit einer vollständigen Lizenz
für 32 Kanäle vorinstalliert. Diese Lizenz kann nur einmal um eine weitere 32-Kanal-Lizenz
erweitert werden.
VRM bietet ein leistungsstarkes Aufzeichnungsmodul, das zusammen mit BVC oder Bosch
VMS zur Liveanzeige und zur Wiedergabe aufgezeichneter Daten verwendet werden kann.
BVC und Bosch VMS müssen über die jeweiligen Bosch Vertriebskanäle erworben werden.
- | V1 | 2011.03
Schnellstartanleitung
Bosch Sicherheitssysteme GmbH
1200 Series/4-bay IP Video Storage System
Systemkonfiguration – Erste Schritte | de
15
VRM Appliance bietet eine VRM-Aufzeichnungslösung mit vollem Funktionsumfang, der nur in
der Anzahl der konfigurierbaren Kanäle eingeschränkt ist. Für Anwendungen, die die VRMSoftware nicht benötigen, sollte der VRM-Dienst deaktiviert werden.
3.4.1
Zusätzliche Software und Dokumentation
Software zur Konfiguration von Hardware und Software (VRM) steht auf dem VRM Appliance
im Ordner C:\Bosch\resources bereit.
VRM Configurator: Software zur einfachen Konfiguration von VRM, einschließlich von DiskArray, Kameras, Aufzeichnungsplaner usw. Sollte auf einem separaten Client-System installiert
werden, wie z. B. auf einer Bosch Arbeitsstation.
Bitte beachten Sie, dass für alle anzeigebezogenen Konfigurationsaufgaben, wie z B. für IVA,
der VRM Configurator zusammen mit dem Bosch Video SDK (auf der Bosch Website
erhältlich) auf einem separaten Client-System installiert werden muss.
Dokumentation für Bosch DLA und VRM finden Sie unter:
www.boschsecurity.com > Wählen Sie Ihre Region und Ihr Land aus > Wählen Sie Product
Catalog aus > Starten Sie eine Suche nach Ihrem Produkt > Wählen Sie das Produkt aus den
Suchergebnissen aus, um die vorhandenen Dokumente anzuzeigen.
3.4.2
Deaktivieren des VRM-Dienstes
Im Auslieferungszustand des Systems ist die VRM-Anwendung stets vorinstalliert. Soll das
System jedoch nur als Disk-Array eingesetzt werden, kann der VRM-Dienst deaktiviert werden:
1.
Melden Sie sich am Speichersystem an, und rufen Sie dann das Bosch VRM Appliance
initial configuration-Fenster auf. In der obersten Ebene des Bosch VRM Appliance initial
configuration-Fensters wird ein Überblick der Konfiguration und der Einstellungen des
Systems angezeigt.
Wenn das Bosch VRM Appliance initial configuration-Fenster nicht angezeigt, klicken
Sie auf Start > Run > oobe.
2.
Wählen Sie den Link Disable/Enable Bosch VRM Appliance aus, um den VRMAufzeichnungsdienst anzuhalten bzw. zu starten.
Um den Dienst neu zu starten, klicken Sie auf den Link enable Bosch VRM Appliance im
Bosch VRM Appliance initial configuration-Fenster.
Siehe auch Abschnitt 3.3 Einstellen der IP-Adresse.
3.5
Standard-Systemkonfiguration
Das System wird mit vollständig konfiguriertem iSCSI-Ziel und 4 vorkonfigurierten LUNs
geliefert.
Der Standardzielname lautet TG0 und umfasst alle iSCSI LUNs.
Die Benennungskonvention für die LUNs lautet VHDxx.vhd, wobei <xx> je nach verwendetem
System von 01 bis 08 reichen kann. In der Standardkonfiguration kann jeder iSCSI-Initiator
eine Verbindung zum System herstellen.
Im Auslieferungszustand des Systems ist der iSCSI-Zieldienst aktiviert, der von der
vorinstallierten VRM-Anwendung verwendet wird.
Bosch Sicherheitssysteme GmbH
Schnellstartanleitung
- | V1 | 2011.03
16
de | Systemkonfiguration – Erste Schritte
3.6
1200 Series/4-bay IP Video Storage System
Wartung und Reparatur
Das Speichersystem ist durch eine dreijährige Garantie geschützt. Garantiefälle werden
gemäß den Kundendienst- und Wartungsrichtlinien von Bosch bearbeitet. Für Bosch DLA
Disk-Arrays wird die standardmäßige Vorgehensweise des Bosch Kundendiensts angewendet.
Die folgenden Module können bei einem Ausfall vor Ort ausgetauscht werden, ohne das Gerät
einzusenden:
–
Festplatten: Als Austauschfestplatten werden nur Original-Festplatten von Bosch
unterstützt. Andernfalls erlischt die Garantie.
Anforderung einer RMA
Fordern Sie für ausgefallene Komponenten bitte eine RMA von einer der folgenden Bosch
RMA-Kontaktadressen an.
–
RMA-Kontakt AMEC
Bosch ST, RMA Swapstock, 8601 East Cornhusker Hwy, Lincoln, NE 68507, USA
Telefon: +1 402 467-6610
Fax: entfällt
E-Mail: [email protected]
Geschäftszeit: Montag bis Freitag, 06:00–16:30 Uhr
–
RMA-Desk APR
Robert Bosch (SEA) Pte Ltd, 11 Bishan Street 21, (Ebene 5, vom Güteraufzug), Singapur
573943
Telefon: +65 6571 2872
Fax: entfällt
E-Mail: [email protected]
Geschäftszeit: Montag bis Freitag, 08:30–17:45 Uhr
–
RMA-Kontakt China
Bosch (Zhuhai) Security Systems Co. Ltd. Ji Chang Bei Road 20#, Qingwan Industrial
Estate; Sanzao Town, Jinwan District, Zhuhai; P.R. China; PLZ: 519040
Telefon: +86 756 7633117/121
Fax: entfällt
E-Mail: [email protected]
Geschäftszeit: Montag bis Freitag, 08:30–17:30 Uhr
–
RMA-Kontakt EMEA
Bosch Security Systems, c/o EVI Audio GmbH, Ernst-Heinkel-Str. 4, 94315 Straubing,
DEUTSCHLAND
Ansprechpartner: RA Desk Supervisor
Telefon: +49 9421 706-366
Fax: entfällt
E-Mail: [email protected]
Geschäftszeit: Montag bis Freitag, 07:00–18:00 Uhr
- | V1 | 2011.03
Schnellstartanleitung
Bosch Sicherheitssysteme GmbH
1200 Series/4-bay IP Video Storage System
Table of Contents | en
17
Table of Contents
1
Safety precaution
18
1.1
General Safety Precautions
18
1.2
Electrical Safety Precautions
18
1.3
ESD Precautions
19
1.4
Operating Precautions
19
2
System Setup - Hardware
19
2.1
Introduction
19
2.2
Unpacking
20
2.3
Preparing for Setup
20
2.3.1
Choosing a Setup Location
20
2.3.2
System Precautions
20
2.4
Powering On the System
20
3
System Setup – First Steps
20
3.1
Introduction
20
3.2
Setup Instruction
21
3.3
Setting the IP Address
21
3.3.1
Remote Desktop Connection
21
3.3.2
Physical Connection
23
3.4
VRM Appliance
25
3.4.1
Additional Software and Documentation
26
3.4.2
Disabling the VRM Service
26
3.5
Standard System Configuration
26
3.6
Service and Repair
26
Bosch Sicherheitssysteme GmbH
Quick Installation Guide
- | V1 | 2011.03
18
en | Safety precaution
1200 Series/4-bay IP Video Storage System
1
Safety precaution
1.1
General Safety Precautions
Follow these rules to ensure general safety:
–
Keep the area around the system clean and free of clutter.
–
Place the chassis top cover and any system components that have been removed away
–
While working on the system, do not wear loose clothing such as neckties and
from the system or on a table so that they won't accidentally be stepped on.
unbuttoned shirt sleeves, which can come into contact with electrical circuits or be
pulled into a cooling fan.
–
Remove any jewelry or metal objects from your body, which are excellent metal
conductors that can create short circuits and harm you if they come into contact with
printed circuit boards or areas where power is present.
–
After accessing the inside of the system, close the system back up and secure it to the
rack unit after ensuring that all connections have been made.
–
The system weighs approximately 43 lbs. (19.5 kg) when fully loaded. When lifting the
system, two people at either end should lift slowly with their feet spread out to distribute
the weight. Always keep your back straight and lift with your legs.
1.2
Electrical Safety Precautions
Basic electrical safety precautions should be followed to protect you from harm and the
system from damage:
–
Be aware of the locations of the power on/off switch on the chassis as well as the room's
emergency power-off switch, disconnection switch or electrical outlet. If an electrical
accident occurs, you can then quickly remove power from the system.
–
Do not work alone when working with high voltage components.
–
Power should always be disconnected from the system when removing or in stalling main
system components, such as the mainboard, memory modules and floppy drive. When
disconnecting power, you should first power down the system with the operating system
first and then unplug the power cords of all the power supply units in the system.
–
When working around exposed electrical circuits, another person who is familiar with the
power-off controls should be nearby to switch off the power if necessary.
–
Use only one hand when working with powered-on electrical equipment. This is to avoid
making a complete circuit, which will cause electrical shock. Use extreme caution when
using metal tools, which can easily damage any electrical components or circuit boards
they come into contact with.
–
Do not use mats designed to decrease static electrical discharge as protection from
electrical shock. Instead, use rubber mats that have been specifically designed as
electrical insulators.
–
The power supply power cords must include a grounding plug and must be plugged into
grounded electrical outlets. The unit has more than one power supply cord. Disconnect
both power supply cords before servicing to avoid electrical shock.
–
Mainboard Battery:
CAUTION - There is a danger of explosion if the onboard battery is installed upside down,
which will reverse its polarities. This battery must be replaced only with the same or an
equivalent type recommended by the manufacturer (CR2032). Dispose of used batteries
according to the manufacturer's instructions.
- | V1 | 2011.03
Quick Installation Guide
Bosch Sicherheitssysteme GmbH
1200 Series/4-bay IP Video Storage System
–
System Setup - Hardware | en
19
DVD-ROM Laser:
CAUTION - this system comes without a DVD-ROM drive but if added: To prevent direct
exposure to the laser beam and hazardous radiation exposure, do not open the enclosure
or use the unit in any unconventional way.
–
Mainboard replaceable soldered-in fuses: Self-resetting PTC (Positive Temperature
Coefficient) fuses on the mainboard must be replaced by trained service technicians
only. The new fuse must be the same or equivalent as the one replaced. Contact
technical support for details and support.
1.3
ESD Precautions
Electrostatic Discharge (ESD) is generated by two objects with different electrical charges
coming into contact with each other. An electrical discharge is created to neutralize this
difference, which can damage electronic components and printed circuit boards. The
following measures are generally sufficient to neutralize this difference before contact is
made to protect your equipment from ESD:
–
–
Use a grounded wrist strap designed to prevent static discharge.
Keep all components and printed circuit boards (PCBs) in their antistatic bags until ready
for use.
–
Touch a grounded metal object before removing the board from the antistatic bag.
–
Do not let components or PCBs come into contact with your clothing, which may retain a
charge even if you are wearing a wrist strap.
–
Handle a board by its edges only; do not touch its components, peripheral chips, memory
modules or contacts.
–
When handling chips or modules, avoid touching their pins.
–
Put the mainboard and peripherals back into their antistatic bags when not in use.
–
For grounding purposes, make sure your computer chassis provides excellent
conductivity between the power supply, the case, the mounting fasteners and the
mainboard.
1.4
Operating Precautions
Care must be taken to assure that the chassis cover is in place when the system is operating
to assure proper cooling. Out of warranty damage to the system can occur if this practice is
not strictly followed.
Note:
Please handle used batteries carefully. Do not damage the battery in any way. A damaged
battery may release hazardous materials into the environment. Do not discard a used battery
in the garbage or a public landfill. Please comply with the regulations set up by your local
hazardous waste management agency to dispose of your used battery properly.
2
System Setup - Hardware
2.1
Introduction
Scope of delivery:
–
1200 Series – 4-bay MiniTower system, fully equipped with 4 hard drives
Bosch Sicherheitssysteme GmbH
Quick Installation Guide
- | V1 | 2011.03
20
en | System Setup – First Steps
–
1200 Series/4-bay IP Video Storage System
In addition to the system itself, the following items should have been shipped along with
each system
2.2
–
One AC power cable for each power supply in the system
–
This quick install guide
Unpacking
You should inspect the box the system was shipped in and note if it was damaged in any way.
If the system itself shows damage you should file a damage claim with the carrier who
delivered it and notify the respective Bosch RMA desk.
Due to the weight of the system: After opening the top of the shipping box, one person should
stand at either end and lift the disk array out together.
Decide on a suitable location for the system. The system should be situated in a clean, dustfree area that is well ventilated. Avoid areas where heat, electrical noise and electromagnetic
fields are generated. You will also need it placed near a grounded power outlet. Be sure to
read the Precautions in the next section.
2.3
Preparing for Setup
Follow the steps in the order given to complete the installation process in a minimum amount
of time. Read this section before you begin the installation procedure outlined in the sections
that follow.
2.3.1
Choosing a Setup Location
Leave enough clearance in front and side where the chassis cover is located of the system to
be able to remove swappable drives and to allow for sufficient airflow and ease in servicing.
This product is for installation only in a Restricted Access Location (dedicated equipment
rooms, service closets and the like).
2.3.2
System Precautions
–
Review the electrical and general safety precautions.
–
Use a regulating uninterruptible power supply (UPS) to protect the system from power
surges, voltage spikes if you want to keep your system operating in case of a power
failure
–
–
Allow the SATA drives and power supply modules to cool before touching them.
Always keep the chassis covers in place and secured when not servicing to maintain
proper cooling.
2.4
Powering On the System
The last thing to be done is to provide input power to the system.
1.
Plug the power cord from the power supply unit into a high-quality power strip that
offers protection from electrical noise and power surges. We recommended using an
uninterruptible power supply (UPS).
2.
Press the power button on the control panel to start up the system.
3
System Setup – First Steps
3.1
Introduction
The following installation directive applies to the Bosch DLA disk array series and provides
information on Installation, Configuration and Service and Repair.
- | V1 | 2011.03
Quick Installation Guide
Bosch Sicherheitssysteme GmbH
1200 Series/4-bay IP Video Storage System
System Setup – First Steps | en
21
The Bosch DLA disk arrays are based on Microsoft Storage Server 2008. Microsoft Windows
Storage Server 2008 operating systems provide a user interface for initial server
configuration, unified storage appliance management, simplified setup and management of
storage and shared folders, and support for Microsoft iSCSI Software Target.
It is specially tuned to provide optimal performance for network-attached storage. Windows
Storage Server 2008 provides significant enhancements in share and storage management
scenarios, as well as integration of storage appliance management components and
functionality.
3.2
Setup Instruction
All Bosch DLA Series disk arrays are preconfigured with a default IP address and with default
iSCSI settings.
–
IP Address: 10.10.10.10 (1st port) and 10.10.10.11 (2nd port)
–
Net mask: 255.255.255.0
–
User: Administrator
–
Password: WSS4Bosch
Detailed information, such as data sheets and user manuals, are available on the Bosch web
site www.boschsecurity.com under Product Catalog > CCTV > IP Video > Disk Arrays.
Default iSCSI settings are optimized for use with VRM. Only an experienced storage
administrator should make changes to these settings. Changing the default configuration is
only required either if VRM is not used or if the default settings are not appropriate for
another Bosch iSCSI application.
3.3
Setting the IP Address
The default IP address may be changed by either of two ways.
3.3.1
Remote Desktop Connection
1.
Connect the system to your network through port 1 or port 2 and start up the system.
The system comes with the Remote Desktop Connection enabled. Log on to an
appropriate Client system either with Windows XP, Windows Vista or Windows 7
installed (Client hardware and software is not part of the shipment) with an IP Address in
the same network, e.g. 10.10.10.12 (net mask: 255.255.255.0).
2.
Open the Remote Desktop Connection on your client system. In the Computer box,
enter the IP Address of the disk array you want to connect to.
Default IP Address: 10.10.10.10 (port 1)
3.
Click Connect, press Ctrl+Alt+Del (if shown), then type the default password
WSS4Bosch once the disk array login window is displayed.
4.
On first login the desktop default settings are applied. This will take a few seconds and
the system will reboot. After system reboot, log on again and the Bosch VRM Appliance
Bosch Sicherheitssysteme GmbH
Quick Installation Guide
- | V1 | 2011.03
22
en | System Setup – First Steps
1200 Series/4-bay IP Video Storage System
initial configuration window will be shown. Use this program to configure the disk
array’s IP Address.
5.
The top level view of Bosch VRM Appliance initial configuration displays an overview of
the system’s configuration and settings. Select the link Configure networking to get
access to the network configuration.
For each network port a separate icon is shown. Select the Local Area Connection icon
that shows the status network, then double-click the icon.
- | V1 | 2011.03
Quick Installation Guide
Bosch Sicherheitssysteme GmbH
1200 Series/4-bay IP Video Storage System
System Setup – First Steps | en
23
6.
Click Properties, select Internet Protocol Version 4 (TCP/IPv4), then click Properties.
7.
This dialog box allows you to set the IP address configuration according to the
requirements of your network.
8.
3.3.2
Reboot the system.
Physical Connection
The system comes with a VGA graphic connector and with PS2 connectors for mouse and
keyboard.
1.
Connect a monitor, mouse and keyboard (not part of the shipment) to the disk array and
start up the system.
Note:
When connecting a PS2 mouse or keyboard device after the system has been booted it
will most likely not operate properly.
Bosch Sicherheitssysteme GmbH
Quick Installation Guide
- | V1 | 2011.03
24
en | System Setup – First Steps
2.
1200 Series/4-bay IP Video Storage System
When the system has started up, press Ctrl+Alt+Del, then type the default password
WSS4Bosch once the disk array login window is displayed.
3.
On first login the desktop default settings are applied. This will take a few seconds and
the system will reboot. After system reboot, log on again and the Bosch VRM Appliance
initial configuration window will be shown. Use this program to configure the disk
array’s IP Address.
4.
The top level view of Bosch VRM Appliance initial configuration displays an overview of
the system’s configuration and settings. Select the link Configure networking to get
access to the network configuration.
For each network port a separate icon is shown. Select the Local Area Connection icon
that shows the status network, then double-click the icon.
- | V1 | 2011.03
Quick Installation Guide
Bosch Sicherheitssysteme GmbH
1200 Series/4-bay IP Video Storage System
System Setup – First Steps | en
25
5.
Click Properties, select Internet Protocol Version 4 (TCP/IPv4), then click Properties.
6.
This dialog box allows you to set the IP address configuration according to the
requirements of your network.
7.
3.4
Reboot the system.
VRM Appliance
The system is pre-installed with the Bosch Video Recording Manager (VRM) and fully licensed
with a 32 channel license. This license might be expanded only once by another 32 channel
license.
VRM provides a powerful recording engine to be used with the BVC or Bosch VMS for live
viewing and replay of recorded data. BVC and Bosch VMS must be purchased through the
respective Bosch sales channels.
Bosch Sicherheitssysteme GmbH
Quick Installation Guide
- | V1 | 2011.03
26
en | System Setup – First Steps
1200 Series/4-bay IP Video Storage System
VRM Appliance offers a fully functional VRM recording solution only restricted in the number
of configurable channels. Applications that do not need the VRM software should disable the
VRM service.
3.4.1
Additional Software and Documentation
Software for configuration of hardware and software (VRM) is available on the VRM Appliance
in folder C:\Bosch\resources.
VRM Configurator: Software for easy configuration of VRM including disk array, cameras,
recording scheduler etc. Should be installed on a separate Client system, e.g. Bosch
workstation hardware.
Please note, that for all viewing related configuration tasks, e.g IVA, the VRM configurator
along with the Bosch Video SDK (available from the Bosch web site) must be installed on a
separate client system.
Documentation for Bosch DLA and VRM can be found on:
www.boschsecurity.com > select your region and your country > select Product Catalog >
start a search for your product > select the product in the search results to show the existing
documents.
3.4.2
Disabling the VRM Service
The system always comes with the VRM application preinstalled but if these are intended to
be used only as a disk array the VRM Service can be disabled:
1.
Log on to the storage system, then start the Bosch VRM Appliance initial configuration
window. The top level view of the Bosch VRM Appliance initial configuration window
displays an overview of the system’s configuration and settings.
If the Bosch VRM Appliance initial configuration window is not displayed, click Start >
Run > oobe.
2.
Select the link Disable/Enable Bosch VRM Appliance to stop/start the VRM recording
service.
To restart the service, on the Bosch VRM Appliance initial configuration window, click the
enable Bosch VRM Appliance link.
Siehe auch Section 3.3 Setting the IP Address.
3.5
Standard System Configuration
The system is delivered with the fully configured iSCSI target and 4 preconfigured LUNs.
The default target name is TG0 and holds all of the iSCSI LUNs.
The naming convention for the LUNs is VHDxx.vhd where <xx> ranges from 01 up to 08
depending on the system used. The default setup allows every iSCSI Initiator to connect to
the system.
The system comes with iSCSI Target Service enabled which is used by the preinstalled VRM
application.
3.6
Service and Repair
The storage systems is backed by a 3-year warranty. Issues will be handled according to
Bosch Support and Service guidelines. For Bosch DLA disk arrays the standard Bosch support
way of working applies.
- | V1 | 2011.03
Quick Installation Guide
Bosch Sicherheitssysteme GmbH
1200 Series/4-bay IP Video Storage System
System Setup – First Steps | en
27
The following modules may be replaced on-site in case of a failure without sending the unit in:
–
Hard Drives: As replacement hard drives only original Bosch hard drives are supported.
Otherwise the warranty is void.
Request for RMA
Please request an RMA for failed parts from one of the following Bosch RMA contacts.
–
RMA Contact AMEC
Bosch ST, RMA Swapstock, 8601 East Cornhusker Hwy, Lincoln, NE 68507 -USA
Phone: +1(402)467-6610
Fax: n.a.
E-mail: [email protected]
Opening Hours: Monday to Friday, 06:00 – 16:30
–
RMA Desk APR
Robert Bosch (SEA) Pte Ltd, 11 Bishan Street 21, (level 5, from service lift), Singapore
573943
Phone: +65 6571 2872
Fax: n.a.
Email: [email protected]
Opening Hours: Monday to Friday, 08:30 – 17:45
–
RMA contact China
Bosch (Zhuhai) Security Systems Co. Ltd. Ji Chang Bei Road 20#, Qingwan Industrial
Estate; Sanzao Town, Jinwan District, Zhuhai; P.R. China; Postal Code : 519040
Phone: +86 756 7633117 / 121
Fax: n.a.
Email: [email protected]
Opening Hours: Monday to Friday, 08:30 – 17:30
–
RMA Contact EMEA
Bosch Security Systems, C/o EVI Audio GmbH, Ernst-Heinkel Str. 4, 94315 Straubing,
GERMANY
Contact person: RA Desk Supervisor
Phone: +49(9421)706-366
Fax: n.a.
E-mail: [email protected]
Opening Hours: Monday to Friday, 07:00 – 18:00
Bosch Sicherheitssysteme GmbH
Quick Installation Guide
- | V1 | 2011.03
28
es | Índice
1200 Series/4-bay IP Video Storage System
Índice
1
Precauciones de seguridad
29
1.1
Precauciones de seguridad generales
29
1.2
Precauciones de seguridad eléctrica
29
1.3
Precauciones de ESD
30
1.4
Precauciones de uso
30
2
Instalación del sistema - Hardware
31
2.1
Introducción
31
2.2
Desembalaje
31
2.3
Preparación de la instalación
31
2.3.1
Selección de una ubicación de instalación
31
2.3.2
Precauciones del sistema
31
2.4
Alimentación del sistema
31
3
Configuración del sistema – Primeros pasos
32
3.1
Introducción
32
3.2
Instrucciones de configuración
32
3.3
Configuración de la dirección IP
32
3.3.1
Conexión de escritorio remoto
32
3.3.2
Conexión física
35
3.4
Unidad VRM
37
3.4.1
Documentación y software adicional
38
3.4.2
Desactivación del servicio VRM
38
3.5
Configuración estándar del sistema
38
3.6
Mantenimiento y reparación
39
- | V1 | 2011.03
Guía de instalación rápida
Bosch Sicherheitssysteme GmbH
1200 Series/4-bay IP Video Storage System
Precauciones de seguridad | es
1
Precauciones de seguridad
1.1
Precauciones de seguridad generales
29
Siga estas normas para garantizar la seguridad en condiciones generales:
–
Mantenga el área alrededor del sistema limpia y despejada.
–
Coloque la cubierta superior del chasis y los componentes del sistema que se hayan
retirado lejos del sistema o sobre una mesa, para que no se pisen accidentalmente.
–
Cuando trabaje en el sistema no lleve ropa holgada (como corbatas y mangas de camisa
desabrochadas) que pueda entrar en contacto con circuitos eléctricos o quedar atrapada
en un ventilador de refrigeración.
–
Quítese las joyas u objetos metálicos del cuerpo, ya que son excelentes conductores
metálicos que pueden crear cortocircuitos y provocarle lesiones si entran en contacto
con tarjetas de circuitos impresos o áreas que reciben alimentación.
–
Tras acceder al interior del sistema, cierre la parte trasera y fíjela a la unidad de rack
después de asegurarse de que se han establecido todas las conexiones.
–
El sistema pesa aproximadamente 19,5 kg (43 libras) cuando está totalmente cargado.
Para levantar el sistema, debe colocarse una persona en cada uno de los extremos y
elevarlo lentamente con los pies separados para distribuir el peso. Mantenga siempre la
espalda en posición recta y levante el sistema flexionando las piernas.
1.2
Precauciones de seguridad eléctrica
Debe seguir unas precauciones de seguridad eléctrica básicas para evitar que tanto usted
como el sistema sufran daños:
–
Tenga presente la ubicación tanto del interruptor de encendido del chasis como del
interruptor de corte de alimentación de emergencia de la sala, el interruptor de
desconexión y la toma de alimentación eléctrica. De esta forma, si se produce un
accidente eléctrico, podrá desconectar rápidamente la alimentación del sistema.
–
No trabaje solo cuando emplee componentes de alta tensión.
–
Desconecte siempre la alimentación del sistema cuando retire o instale componentes
principales del mismo, como la placa base, los módulos de memoria y la unidad de
disquete. Cuando desconecte la alimentación, primero debe apagar la unidad con el
sistema operativo y, a continuación, desenchufar los cables de todas las unidades de
fuente de alimentación del sistema.
–
Cuando trabaje alrededor de circuitos eléctricos expuestos, debe haber cerca otra
persona que conozca los controles de desconexión de la alimentación para apagarla si es
necesario.
–
Utilice sólo una mano cuando trabaje con equipos eléctricos encendidos. Con ello evitará
crear un circuito completo, lo que le provocaría una descarga eléctrica. Tenga mucho
cuidado al utilizar herramientas metálicas, ya que pueden dañar fácilmente los
componentes eléctricos o placas de circuitos con los que entren en contacto.
–
No utilice alfombras de reducción de electricidad estática para protegerse de las
descargas eléctricas. En su lugar, utilice alfombras de goma diseñadas específicamente
como aislantes eléctricos.
–
El cable de alimentación debe tener una toma de tierra y enchufarse a una toma de
corriente con conexión a tierra. La unidad cuenta con más de un cable de alimentación.
Desconecte todos los cables de alimentación cuando realice cualquier operación de
mantenimiento o reparación para evitar descargas eléctricas.
Bosch Sicherheitssysteme GmbH
Guía de instalación rápida
- | V1 | 2011.03
30
es | Precauciones de seguridad
–
1200 Series/4-bay IP Video Storage System
Batería de la placa base:
PRECAUCIÓN - Existe peligro de explosión si la batería incorporada se instala al revés, lo
que invertiría sus polaridades. Esta batería sólo debe sustituirse por otra batería del
mismo tipo o uno equivalente recomendado por el fabricante (CR2032). Deseche las
baterías utilizadas según las instrucciones del fabricante.
–
Láser del DVD-ROM:
PRECAUCIÓN - Este sistema no incluye una unidad de DVD-ROM. Si se añade, para evitar
la exposición directa al haz de láser y una exposición peligrosa a la radiación, no abra la
carcasa ni utilice la unidad de un modo no convencional.
–
Fusibles soldados sustituibles de la placa base: los fusibles de restablecimiento
automático PTC (coeficiente de temperatura positiva) de la placa base sólo pueden ser
sustituidos por técnicos de asistencia especialmente cualificados. Los nuevos fusibles
deben ser del mismo tipo que los sustituidos o de un tipo equivalente. Póngase en
contacto con el equipo de asistencia técnica para obtener ayuda e información detallada.
1.3
Precauciones de ESD
Las descargas de electricidad estática (ESD) se generan cuando dos objetos con cargas
eléctricas diferentes entran en contacto. Esto crea una descarga eléctrica para neutralizar esa
diferencia, lo que puede dañar los componentes electrónicos y las placas de circuitos
impresos. Las siguientes medidas suelen bastar para neutralizar esa diferencia antes de que
se produzca el contacto y proteger así su equipo frente a descargas de ESD:
–
Utilice una muñequera de conexión a tierra diseñada para evitar descargas estáticas.
–
Mantenga todos los componentes y placas de circuitos impresos (PCB) en sus bolsas
antiestáticas hasta el momento en que estén listos para su uso.
–
Toque un objeto metálico con conexión a tierra antes de retirar una placa de su bolsa
–
No permita que los componentes o las PCB entren en contacto con su ropa, ya que ésta
antiestática.
podría conservar la carga aunque lleve una muñequera de protección.
–
Manipule las tarjetas únicamente por sus bordes; no toque sus componentes, chips
periféricos, módulos de memoria ni contactos.
–
Cuando manipule chips o módulos, evite tocar sus patillas.
–
Vuelva a colocar la placa base y los periféricos en sus bolsas antiestáticas cuando no
estén en uso.
–
Para la conexión a tierra, asegúrese de que el chasis de su ordenador proporciona una
excelente conductividad entre la fuente de alimentación, la carcasa, los remaches de
montaje y la placa base.
1.4
Precauciones de uso
Debe asegurarse de que la cubierta del chasis está bien colocada cuando el sistema está
funcionando, para garantizar una refrigeración adecuada. Si no se sigue estrictamente esta
práctica, pueden producirse daños en el sistema que quedarían fuera de la cobertura de la
garantía.
Nota:
Tenga cuidado al manejar las baterías usadas. No dañe las baterías de ningún modo; una
batería dañada puede liberar sustancias peligrosas en el medio ambiente. No deseche las
baterías usadas en la basura ni en un vertedero público. Siga las normas establecidas por su
organismo local de gestión de residuos peligrosos para desechar las baterías usadas de forma
adecuada.
- | V1 | 2011.03
Guía de instalación rápida
Bosch Sicherheitssysteme GmbH
1200 Series/4-bay IP Video Storage System
Instalación del sistema - Hardware | es
2
Instalación del sistema - Hardware
2.1
Introducción
31
Dispositivos suministrados:
–
Sistema de minitorre Serie 1200 de 4 módulos, totalmente equipado con 4 unidades de
disco duro
–
2.2
Además del propio sistema, éste debe ir acompañado de los siguientes elementos.
–
Un cable de alimentación CA para cada suministro de alimentación del sistema
–
La presente guía de instalación rápida
Desembalaje
Debe examinar la caja en la que se envía el sistema en busca de cualquier tipo de daños. Si el
propio sistema está dañado, debe presentar una reclamación por daños al transportista que
se lo entregó y notificar al centro de RMA de Bosch que corresponda.
Debido al peso del sistema, una vez abierta la parte superior del embalaje, debe colocarse
una persona en cada extremo para levantar el array de discos a la vez.
Decida la ubicación más adecuada para el sistema. Éste debe situarse en una zona limpia, sin
polvo y bien ventilada. Evite las zonas donde se genere calor, ruido eléctrico y campos
electromagnéticos. También deberá ubicarlo cerca de una toma de alimentación con conexión
a tierra. Asegúrese de leer las precauciones de la siguiente sección.
2.3
Preparación de la instalación
Siga los pasos en el orden en el que se indican para completar el proceso de instalación en el
menor tiempo posible. Lea esta sección antes de comenzar el proceso de instalación descrito
en las siguientes secciones.
2.3.1
Selección de una ubicación de instalación
Deje suficiente espacio en la parte delantera y lateral (donde se encuentra la cubierta de
chasis del sistema) para poder extraer las unidades intercambiables, así como para que haya
un flujo de aire adecuado y se puedan llevar a cabo con facilidad las operaciones de
mantenimiento y reparación.
Este producto sólo puede instalarse en una ubicación de acceso restringido (salas específicas
para equipos, armarios de servicio y similares).
2.3.2
Precauciones del sistema
–
Revise las precauciones eléctricas y de seguridad general.
–
Use una fuente de alimentación ininterrumpida para proteger el sistema frente a subidas
de tensión y picos de voltaje y mantenerlo en funcionamiento en caso de un fallo de
suministro.
–
Deje que los discos SATA y los módulos de alimentación se enfríen antes de tocarlos.
–
Mantenga siempre las cubiertas del chasis bien aseguradas en su lugar cuando no realice
ninguna operación de mantenimiento o reparación, con el fin de garantizar una
refrigeración adecuada.
2.4
Alimentación del sistema
La última operación que debe realizar es activar la alimentación del sistema.
Bosch Sicherheitssysteme GmbH
Guía de instalación rápida
- | V1 | 2011.03
32
es | Configuración del sistema – Primeros pasos
1.
1200 Series/4-bay IP Video Storage System
Conecte el cable de la unidad de fuente de alimentación a una regleta de alta calidad que
ofrezca protección frente al ruido eléctrico y las subidas de tensión. Le recomendamos
que utilice una fuente de alimentación ininterrumpida.
2.
Pulse el botón de encendido del panel de control para arrancar el sistema.
3
Configuración del sistema – Primeros pasos
3.1
Introducción
El array de discos Serie DLA de Bosch está sujeto a las siguientes directrices de instalación,
configuración, mantenimiento y reparación.
Los arrays de discos DLA de Bosch están basados en Microsoft Storage Server 2008. Los
sistemas operativos Microsoft Windows Storage Server 2008 proporcionan una interfaz de
usuario para la configuración inicial del servidor, así como una gestión unificada de los
dispositivos de almacenamiento, una configuración y gestión simplificadas del espacio de
almacenamiento y las carpetas compartidas, y compatibilidad con Microsoft iSCSI Software
Target.
Estos sistemas están especialmente diseñados para ofrecer un rendimiento óptimo del
almacenamiento en red. Windows Storage Server 2008 proporciona unas mejoras
significativas en cuanto a la gestión del almacenamiento y los recursos compartidos, así como
para la integración de los componentes y funciones de gestión de los dispositivos de
almacenamiento.
3.2
Instrucciones de configuración
Todos los arrays de discos Serie DLA de Bosch están preconfigurados con una dirección IP y
unos ajustes
iSCSI predeterminados.
–
Dirección IP: 10.10.10.10 (primer puerto) y 10.10.10.11 (segundo puerto)
–
Máscara de red: 255.255.255.0
–
Usuario: Administrator
–
Contraseña: WSS4Bosch
Dispone de información detallada, como hojas de datos y manuales de usuario, en la sección
Product Catalog > CCTV > IP Video > Disk Arrays (Catálogo de productos > CCTV > Vídeo IP
> Arrays de discos) del sitio Web de Bosch www.boschsecurity.com.
Los ajustes iSCSI predeterminados están optimizados para su uso con VRM. Estos ajustes
sólo debe cambiarlos un administrador de almacenamiento debidamente cualificado. Sólo se
deberá cambiar la configuración predeterminada si no se usa VRM o si los ajustes
predeterminados no son apropiados para otra aplicación iSCSI de Bosch.
3.3
Configuración de la dirección IP
La dirección IP predeterminada puede cambiarse de dos formas.
3.3.1
Conexión de escritorio remoto
1.
Conecte el sistema a la red a través del puerto 1 o 2 e inicie el sistema. El sistema ya
tiene habilitada la función de conexión de escritorio remoto. Inicie sesión en un sistema
cliente que tenga Windows XP, Windows Vista o Windows 7 instalado (el software y el
hardware cliente no forman parte del equipo suministrado) con una dirección IP de la
misma red, por ejemplo 10.10.10.12 (máscara de red: 255.255.255.0).
- | V1 | 2011.03
Guía de instalación rápida
Bosch Sicherheitssysteme GmbH
1200 Series/4-bay IP Video Storage System
2.
Configuración del sistema – Primeros pasos | es
33
Abra la Remote Desktop Connection en el sistema cliente. En la casilla Computer,
introduzca la dirección IP del array de discos al que desea conectarse.
Dirección IP predeterminada: 10.10.10.10 (puerto 1)
3.
Haga clic en Connect, pulse Ctrl+Alt+Del (si se muestra) y, a continuación, escriba la
contraseña predeterminada WSS4Bosch cuando aparezca la ventana de inicio de sesión
del array de discos.
4.
Se aplicará la configuración predeterminada del equipo de escritorio la primera vez que
inicie sesión. Tras esta operación, que tardará unos segundos, el sistema se reiniciará.
Una vez reiniciado el sistema, inicie sesión de nuevo y aparecerá la ventana de Bosch
VRM Appliance initial configuration. Use este programa para configurar la dirección IP
del array de discos.
Bosch Sicherheitssysteme GmbH
Guía de instalación rápida
- | V1 | 2011.03
34
es | Configuración del sistema – Primeros pasos
5.
1200 Series/4-bay IP Video Storage System
La vista del nivel superior de Bosch VRM Appliance initial configuration muestra un
resumen de la configuración y los ajustes del sistema. Seleccione el enlace Configure
networking para acceder a la configuración de red.
Aparecerá un icono de cada uno de los puertos de red. Seleccione el icono de Local Area
Connection que muestra el estado network y, a continuación, haga doble clic en el
icono.
6.
Haga clic en Properties, seleccione Internet Protocol Version 4 (TCP/IPv4) y, a
continuación, haga clic en Properties.
- | V1 | 2011.03
Guía de instalación rápida
Bosch Sicherheitssysteme GmbH
1200 Series/4-bay IP Video Storage System
7.
Configuración del sistema – Primeros pasos | es
35
Este cuadro de diálogo le permite configurar la dirección IP según los requisitos de su
red.
8.
3.3.2
Reinicie el sistema.
Conexión física
El sistema incluye un conector de tarjeta gráfica VGA y conectores PS2 para el ratón y el
teclado.
1.
Conecte un monitor, un ratón y un teclado (no incluidos en el equipo suministrado) al
array de discos e inicie el sistema.
Nota:
Si conecta un ratón o un teclado PS2 después de que el sistema se reinicie, es probable
que no funcionen adecuadamente.
2.
Una vez iniciado el sistema, pulse Ctrl+Alt+Del y, a continuación, escriba la contraseña
predeterminada WSS4Bosch cuando aparezca la ventana de inicio de sesión del array de
discos.
3.
Se aplicará la configuración predeterminada del equipo de escritorio la primera vez que
inicie sesión. Tras esta operación, que tardará unos segundos, el sistema se reiniciará.
Una vez reiniciado el sistema, inicie sesión de nuevo y aparecerá la ventana de Bosch
Bosch Sicherheitssysteme GmbH
Guía de instalación rápida
- | V1 | 2011.03
36
es | Configuración del sistema – Primeros pasos
1200 Series/4-bay IP Video Storage System
VRM Appliance initial configuration. Use este programa para configurar la dirección IP
del array de discos.
4.
La vista del nivel superior de Bosch VRM Appliance initial configuration muestra un
resumen de la configuración y los ajustes del sistema. Seleccione el enlace Configure
networking para acceder a la configuración de red.
Aparecerá un icono de cada uno de los puertos de red. Seleccione el icono de Local Area
Connection que muestra el estado network y, a continuación, haga doble clic en el
icono.
- | V1 | 2011.03
Guía de instalación rápida
Bosch Sicherheitssysteme GmbH
1200 Series/4-bay IP Video Storage System
5.
Configuración del sistema – Primeros pasos | es
37
Haga clic en Properties, seleccione Internet Protocol Version 4 (TCP/IPv4) y, a
continuación, haga clic en Properties.
6.
Este cuadro de diálogo le permite configurar la dirección IP según los requisitos de su
red.
7.
3.4
Reinicie el sistema.
Unidad VRM
El sistema cuenta con una unidad Bosch Video Recording Manager (VRM) preinstalada con
licencia para 32 canales. Esta licencia se puede ampliar una sola vez con otra licencia de
32 canales.
VRM proporciona un potente motor de grabación que se puede utilizar con BVC o Bosch VMS
para la visualización en directo y la reproducción de los datos grabados. BVC y Bosch VMS se
deben adquirir a través de los canales de venta respectivos de Bosch.
Bosch Sicherheitssysteme GmbH
Guía de instalación rápida
- | V1 | 2011.03
38
es | Configuración del sistema – Primeros pasos
1200 Series/4-bay IP Video Storage System
VRM es una solución de grabación VRM totalmente funcional cuya única limitación es el
número de canales configurables. El servicio VRM se debe desactivar en aquellas aplicaciones
que no necesiten el software VRM.
3.4.1
Documentación y software adicional
Dispone de software para la configuración de hardware y software (VRM) en la siguiente
carpeta de la unidad VRM: C:\Bosch\resources.
VRM Configurator: software que permite configurar VRM de forma sencilla, incluidos los
arrays de discos, cámaras, planificadores de grabación, etc. Debe instalarse en un sistema
cliente independiente, por ejemplo en una estación de trabajo de Bosch.
Tenga en cuenta que, para todas las tareas de configuración relacionadas con la visualización
(por ejemplo, IVA), se debe instalar el configurador de VRM y Bosch Video SDK (disponible en
el sitio Web de Bosch) en un sistema cliente independiente.
Puede encontrar diversa documentación acerca de los sistemas DLA y VRM de Bosch en:
www.boschsecurity.com > seleccione su región y su país > seleccione Catálogo de productos
> busque el producto > seleccione el producto en los resultados de la búsqueda para
consultar los documentos existentes.
3.4.2
Desactivación del servicio VRM
El sistema siempre incluye la aplicación VRM preinstalada, pero si sólo desea utilizarlo como
array de discos, puede desactivar el servicio VRM:
1.
Conéctese al sistema de almacenamiento y, a continuación, abra la ventana de Bosch
VRM Appliance initial configuration. En la vista del nivel superior de la ventana de Bosch
VRM Appliance initial configuration se muestra un resumen de la configuración y los
ajustes del sistema.
Si no aparece la ventana de Bosch VRM Appliance initial configuration, haga clic en
Start > Run > oobe.
2.
Seleccione el enlace Disable/Enable Bosch VRM Appliance para iniciar/detener el
servicio de grabación VRM.
Para reiniciar el servicio, en la ventana de Bosch VRM Appliance initial configuration, haga
clic en el enlace enable Bosch VRM Appliance.
Consulte también la Sección 3.3 Configuración de la dirección IP.
3.5
Configuración estándar del sistema
El sistema se suministra con el destino iSCSI completamente configurado y cuatro LUN
preconfigurados.
El nombre del sistema predeterminado (que contiene todos los LUN iSCSI) es TG0.
La convención de nomenclatura de los LUN es VHDxx.vhd, en donde <xx> puede ir de 01 a 08
en función del sistema utilizado. La configuración predeterminada permite que todos los
iniciadores iSCSI se conecten al sistema.
El sistema tiene activado un servicio de destino iSCSI utilizado por la aplicación VRM
preinstalada.
- | V1 | 2011.03
Guía de instalación rápida
Bosch Sicherheitssysteme GmbH
1200 Series/4-bay IP Video Storage System
3.6
Configuración del sistema – Primeros pasos | es
39
Mantenimiento y reparación
Este sistema de almacenamiento está respaldado por una garantía de 3 años. Los problemas
que puedan surgir se tratarán siguiendo las directrices de mantenimiento y asistencia técnica
de Bosch. Para los arrays de discos DLA de Bosch, se aplicará la metodología de asistencia
estándar.
Los siguientes módulos se pueden sustituir in situ en caso de fallo sin necesidad de enviar la
unidad:
–
Unidades de disco duro: sólo se admite la sustitución de unidades de disco duro
originales de Bosch. La garantía será nula en cualquier otro caso.
Solicitud de RMA
Solicite la RMA de las piezas defectuosas a uno de los siguientes centros de contacto de RMA
de Bosch.
–
Centro de contacto de RMA para AMEC
Bosch ST, RMA Swapstock, 8601 East Cornhusker Hwy, Lincoln, NE 68507, EE. UU.
Teléfono: +1(402)467-6610
Fax: n.a.
Correo electrónico: [email protected]
Horario: de lunes a viernes, de 06:00 a 16:30
–
Centro de contacto de RMA para APR
Robert Bosch (SEA) Pte Ltd, 11 Bishan Street 21, (level 5, from service lift), Singapore
573943
Teléfono: +65 6571 2872
Fax: n.a.
Correo electrónico: [email protected]
Horario: de lunes a viernes, de 08:30 a 17:45
–
Centro de contacto de RMA para China
Bosch (Zhuhai) Security Systems Co. Ltd. Ji Chang Bei Road 20#, Qingwan Industrial
Estate; Sanzao Town, Jinwan District, Zhuhai; P.R. China; Código postal 519040
Teléfono: +86 756 7633117 / 121
Fax: n.a.
Correo electrónico: [email protected]
Horario: de lunes a viernes, de 08:30 a 17:30
–
Centro de contacto de RMA para EMEA
Bosch Security Systems, C/o EVI Audio GmbH, Ernst-Heinkel Str. 4, 94315 Straubing,
ALEMANIA
Persona de contacto: Supervisor del centro de RMA
Teléfono: +49(9421)706-366
Fax: n.a.
Correo electrónico: [email protected]
Horario: de lunes a viernes, de 07:00 a 18:00
Bosch Sicherheitssysteme GmbH
Guía de instalación rápida
- | V1 | 2011.03
40
fr | Table des matières
1200 Series/4-bay IP Video Storage System
Table des matières
1
Mesures de sécurité
41
1.1
Mesures de sécurité générales
41
1.2
Mesures de sécurité relatives à l'équipement électrique
41
1.3
Précautions contre les décharges électrostatiques
42
1.4
Précautions d'utilisation
42
2
Configuration matérielle du système
43
2.1
Introduction
43
2.2
Déballage
43
2.3
Préparation de l'installation
43
2.3.1
Choix d'un endroit pour l'installation
43
2.3.2
Précautions concernant le système
43
2.4
Mise sous tension du système
43
3
Configuration du système – Premières étapes
44
3.1
Introduction
44
3.2
Instructions de configuration
44
3.3
Définition de l'adresse IP
44
3.3.1
Connexion au Bureau à distance
44
3.3.2
Connexion physique
47
3.4
Système VRM
49
3.4.1
Logiciel et documentation supplémentaires
50
3.4.2
Désactivation du service VRM
50
3.5
Configuration système standard
50
3.6
Maintenance et réparation
51
- | V1 | 2011.03
Guide d'installation rapide
Bosch Sicherheitssysteme GmbH
1200 Series/4-bay IP Video Storage System
Mesures de sécurité | fr
1
Mesures de sécurité
1.1
Mesures de sécurité générales
41
Pour assurer la sécurité générale, suivez ces règles :
–
Gardez la zone autour du système propre et nette.
–
Placez le capot supérieur du châssis et tout composant du système déposé à distance du
système ou sur une table afin d'éviter qu'ils soient piétinés par inadvertance.
–
Lorsque vous intervenez sur le système, ne portez rien autour du cou et évitez les
vêtements amples/déboutonnés, qui pourraient toucher les circuits électriques ou être
happés dans un ventilateur de refroidissement.
–
Retirez tout bijou ou objet métallique que vous portez, car ils sont d'excellents
conducteurs susceptibles de créer des courts-circuits et d'entraîner des blessures s'ils
entrent en contact avec des cartes à circuits imprimés ou avec des zones où un courant
est présent.
–
Une fois que vous avez accès à l'intérieur du système, fermez le système par l'arrière et
fixez-le au rack à l'aide des vis de maintien après vous être assuré que toutes les
connexions sont effectuées.
–
Le système pèse environ 19,5 kg lorsqu'il est totalement chargé. Lors du levage du
système, deux personnes, positionnées à l'une des extrémités, doivent lever lentement le
système, les pieds écartés, pour répartir le poids. Gardez toujours le dos droit et levez en
vous aidant de vos jambes.
1.2
Mesures de sécurité relatives à l'équipement électrique
Il convient de respecter les mesures de sécurité de base en matière d'équipement électrique
pour éviter de vous blesser et d'endommager le système :
–
Mémorisez les emplacements de l'interrupteur marche/arrêt sur le châssis, ainsi que du
bouton d'arrêt d'urgence, de l'interrupteur bipolaire et de la prise électrique dans la
pièce. En cas de problème électrique, vous pourrez alors rapidement couper le courant
du système.
–
Ne travaillez pas seul sur des composants haute tension.
–
Le courant doit toujours être coupé lors de la dépose ou de la pose des principaux
composants du système, comme la carte mère, les modules de mémoire et les lecteurs
optiques. Lorsque vous coupez le courant, vous devez tout d'abord éteindre le système à
l'aide du système d'exploitation, puis débrancher les cordons d'alimentation des blocs
d'alimentation du système.
–
En cas d'intervention autour de circuits électriques exposés, une autre personne
familière avec les commandes de coupure du courant doit se trouver à proximité pour
couper le courant, si nécessaire.
–
N'utilisez qu'une seule main lorsque vous intervenez sur un équipement électrique sous
tension. Cela permet d'éviter de créer une boucle pouvant provoquer une électrocution.
Soyez très vigilant lorsque vous utilisez des outils en métal, qui peuvent facilement
endommager tout composant électrique ou carte de circuit qu'ils touchent.
–
N'utilisez pas de tapis conçus pour diminuer la décharge électrostatique comme
protection contre l'électrocution. Préférez des tapis en caoutchouc conçus
spécifiquement comme isolants électriques.
–
Les cordons d'alimentation doivent inclure une fiche de terre et doivent être branchés
sur une prise reliée à la terre. L'appareil possède plusieurs cordons d'alimentation.
Bosch Sicherheitssysteme GmbH
Guide d'installation rapide
- | V1 | 2011.03
42
fr | Mesures de sécurité
1200 Series/4-bay IP Video Storage System
Débranchez les deux cordons d'alimentation avant la maintenance pour éviter un choc
électrique.
–
Pile de la carte mère :
ATTENTION : risque d'explosion si la pile intégrée est installée à l'envers, ce qui a pour
effet d'inverser la polarité. Cette pile doit être remplacée uniquement par un type
identique ou équivalent recommandé par le fabricant (CR2032). Débarrassez-vous de la
pile usagée conformément aux instructions de son fabricant.
–
Laser du lecteur DVD-ROM :
ATTENTION : ce système n'est pas équipé d'un lecteur DVD-ROM, mais si ça devait être
le cas, n'ouvrez pas le boîtier et n'utilisez pas l'appareil de façon non conventionnelle
pour empêcher l'exposition directe au faisceau laser et l'exposition à un rayonnement
dangereux.
–
Fusibles soudés remplaçables de la carte mère : les fusibles intelligents PTC (coefficient
de température positive) de la carte mère doivent être remplacés par des techniciens de
maintenance qualifiés uniquement. Le nouveau fusible doit être identique ou équivalent
au fusible remplacé. Pour plus d'informations, contactez le support technique.
1.3
Précautions contre les décharges électrostatiques
Une décharge électrostatique est générée par deux objets présentant des charges électriques
différentes entrant en contact l'un avec l'autre. Une décharge électrique est créée pour
annuler cet écart, ce qui peut endommager les composants électroniques et les cartes à
circuits imprimés. Les mesures ci-dessous suffisent généralement pour annuler cet écart
avant tout contact afin de protéger l'équipement contre les décharges électrostatiques :
–
Utilisez un bracelet antistatique relié à la terre et conçu pour prévenir toute décharge
statique.
–
Gardez tous les composants et cartes à circuits imprimés dans leurs sachets
antistatiques jusqu'à ce qu'ils soient prêts à être utilisés.
–
Touchez un objet métallique relié à la terre avant de retirer toute carte de son sachet
antistatique.
–
Ne laissez pas les composants ni les cartes à circuits imprimés toucher vos vêtements
dans lesquels une charge peut subsister même si vous portez un bracelet antistatique.
–
Manipulez une carte par ses bords uniquement. Ne touchez pas ses composants, les
puces périphériques, les modules de mémoire ou les contacts.
–
Lors de la manipulation des puces ou des modules, évitez de toucher les broches.
–
Replacez la carte mère et les périphériques dans leurs sachets antistatiques s'ils ne sont
–
Aux fins de mise à la terre, assurez-vous que le châssis de votre ordinateur offre une
plus utilisés.
excellente conductivité entre l'alimentation, le boîtier, la boulonnerie et la carte mère.
1.4
Précautions d'utilisation
Vous devez veiller à ce que la protection du châssis soit en place lorsque le système
fonctionne pour assurer son bon refroidissement. Si cette précaution n'est pas respectée, des
dommages non couverts par la garantie peuvent se produire.
Remarque :
Manipulez les piles usagées avec précaution. N'endommagez pas la pile de quelque manière
que ce soit. Une pile endommagée peut libérer des matériaux dangereux dans
l'environnement. Ne jetez pas une pile usagée avec les déchets ménagers ou dans une
décharge publique. Pour vous débarrasser des piles usagées de la manière appropriée,
- | V1 | 2011.03
Guide d'installation rapide
Bosch Sicherheitssysteme GmbH
1200 Series/4-bay IP Video Storage System
Configuration matérielle du système | fr
43
conformez-vous aux réglementations mises en place par l'agence de gestion de l'élimination
des déchets dangereux de votre région.
2
Configuration matérielle du système
2.1
Introduction
Contenu de l'emballage :
–
–
Système MiniTower série 1200, 4 emplacements, entièrement équipé de 4 disques durs
Outre le système proprement dit, les composants ci-dessous doivent être fournis avec
chaque système :
2.2
–
un cordon d'alimentation CA pour chaque alimentation du système
–
le présent manuel d'installation
Déballage
Vous devez inspecter l'emballage avec lequel le système a été expédié et relever toute
dégradation. Si le système proprement dit est endommagé, vous devez déposer une
réclamation auprès du transporteur qui l'a livré et en avertir le service RMA de Bosch.
Compte tenu du poids du système : une fois que le haut du carton d'expédition est ouvert,
une personne doit se placer à l'une des extrémités et sortir l'unité de disques.
Déterminez l'endroit adapté pour le système. Le système doit être placé dans un endroit
propre, sans poussière et parfaitement aéré. Évitez les zones où de la chaleur, du bruit
électrique et des champs électromagnétiques sont générés. Il convient également de
l'installer à proximité d'une prise reliée à la terre. Veillez à lire la section Précautions ci-après.
2.3
Préparation de l'installation
Suivez la procédure dans l'ordre indiqué pour effectuer l'installation en un minimum de
temps. Lisez cette section dans son intégralité avant d'entreprendre toute procédure
d'installation décrite dans les sections ci-dessous.
2.3.1
Choix d'un endroit pour l'installation
Laissez un dégagement suffisant à l'avant et à l'arrière, au niveau de la protection du châssis
du système, pour pouvoir retirer les lecteurs remplaçables, assurer une ventilation suffisante
et faciliter la maintenance.
Ce produit doit être installé uniquement dans une zone à accès restreint (pièces dédiées
regroupant les équipements, armoires de service, etc.).
2.3.2
Précautions concernant le système
–
Consultez les mesures de sécurité électriques et les mesures de sécurité générales.
–
Utilisez un onduleur pour protéger le serveur contre les surtensions et les pics de tension
si vous souhaitez que le système reste opérationnel en cas de coupure de courant.
–
Laissez les disques SATA et les modules d'alimentation refroidir avant de les toucher.
–
En dehors des opérations de maintenance, laissez toujours les protections du châssis en
place et fixées pour garantir un refroidissement approprié.
2.4
Mise sous tension du système
Il ne reste plus qu'à mettre le système sous tension.
Bosch Sicherheitssysteme GmbH
Guide d'installation rapide
- | V1 | 2011.03
44
fr | Configuration du système – Premières étapes
1.
1200 Series/4-bay IP Video Storage System
Branchez le cordon d'alimentation du bloc d'alimentation dans une multiprise de bonne
qualité, offrant une protection contre le bruit électrique et les surtensions. Il est
recommandé d'utiliser un onduleur.
2.
Appuyez sur le bouton marche/arrêt du panneau de commande pour démarrer le
système.
3
Configuration du système – Premières étapes
3.1
Introduction
Les instructions d'installation ci-dessous s'appliquent aux unités de disques série DLA Bosch.
Elles contiennent des informations sur l'installation, la configuration, la maintenance et la
réparation.
Les unités de disques DLA Bosch utilisent Microsoft Storage Server 2008. Le système
d'exploitation Microsoft Windows Storage Server 2008 offre une interface utilisateur unique
pour la configuration initiale du serveur, la gestion unifiée des dispositifs de stockage, la
configuration et la gestion simplifiées des dossiers de partage et de stockage et la prise en
charge de Microsoft iSCSI Software Target.
Il est spécialement configuré pour permettre aux systèmes de stockage en réseau d'atteindre
des performances optimales. Windows Storage Server 2008 apporte des améliorations
considérables en termes de gestion du stockage et du partage, mais aussi en termes
d'intégration des composants et des fonctionnalités de gestion des dispositifs de stockage.
3.2
Instructions de configuration
Toutes les unités de disques de la série DLA Bosch sont préconfigurées à l'aide d'une
adresse IP et de paramètres
iSCSI par défaut.
–
Adresse IP : 10.10.10.10 (1er port) et 10.10.10.11 (2e port)
–
Masque de sous-réseau : 255.255.255.0
–
Utilisateur : Administrator
–
Mot de passe : WSS4Bosch
Pour plus d'informations, notamment pour vous procurer des fiches techniques ou des
manuels d'utilisation, reportez-vous au site Web Bosch www.boschsecurity.com sous
Catalogue de produits > CCTV > Vidéo IP > Unités de disques.
Les paramètres iSCSI par défaut sont optimisés pour une utilisation avec VRM. Seul un
administrateur de stockage expérimenté est autorisé à modifier ces paramètres. Il n'est
nécessaire de modifier la configuration par défaut que si VRM n'est pas utilisé ou si les
paramètres par défaut ne sont pas appropriés pour une autre application iSCSI Bosch.
3.3
Définition de l'adresse IP
L'adresse IP par défaut peut être modifiée de deux façons.
3.3.1
Connexion au Bureau à distance
1.
Connectez le système au réseau par le biais du port 1 ou 2 et démarrez-le. Le système est
fourni avec la connexion au Bureau à distance activée. Connectez-vous au système client
approprié équipé de Windows XP, Windows Vista ou Windows 7 (le matériel et les
logiciels du client ne sont pas fournis) via une adresse IP appartenant au même réseau,
par exemple 10.10.10.12 (masque de sous-réseau : 255.255.255.0).
- | V1 | 2011.03
Guide d'installation rapide
Bosch Sicherheitssysteme GmbH
1200 Series/4-bay IP Video Storage System
2.
Configuration du système – Premières étapes | fr
45
Ouvrez Remote Desktop Connection sur le système client. Dans le champ Computer,
entrez l'adresse IP de l'unité de disques à laquelle vous souhaitez vous connecter.
Adresse IP par défaut : 10.10.10.10 (port 1)
3.
Cliquez sur Connect, appuyez sur Ctrl+Alt+Del (le cas échéant), puis entrez le mot de
passe par défaut, WSS4Bosch, une fois que la fenêtre de connexion de l'unité s'affiche.
4.
Lors de la première connexion, les paramètres par défaut du bureau sont appliqués.
L'opération prend quelques secondes, puis le système redémarre. Après le redémarrage
du système, reconnectez-vous et la fenêtre Bosch VRM Appliance initial configuration
s'affiche. Utilisez ce programme pour configurer l'adresse IP de l'unité de disques.
Bosch Sicherheitssysteme GmbH
Guide d'installation rapide
- | V1 | 2011.03
46
fr | Configuration du système – Premières étapes
5.
1200 Series/4-bay IP Video Storage System
La partie supérieure de l'écran Bosch VRM Appliance initial configuration affiche une
vue d'ensemble de la configuration et des paramètres du système. Cliquez sur le lien
Configure networking pour accéder à la configuration réseau.
Pour chaque port réseau, une icône distincte s'affiche. Cliquez sur l'icône Local Area
Connection, qui affiche l'état network, puis double-cliquez sur l'icône.
6.
Cliquez sur Properties, sélectionnez Internet Protocol Version 4 (TCP/IPv4), puis
cliquez sur Properties.
- | V1 | 2011.03
Guide d'installation rapide
Bosch Sicherheitssysteme GmbH
1200 Series/4-bay IP Video Storage System
7.
Configuration du système – Premières étapes | fr
47
Cette boîte de dialogue sert à définir la configuration de l'adresse IP en fonction des
besoins du réseau.
8.
3.3.2
Redémarrez le système.
Connexion physique
Le système possède un connecteur graphique VGA et des connecteurs PS2 pour la souris et le
clavier.
1.
Connectez un moniteur, une souris et un clavier (non fournis) à l'unité de disques et
démarrez le système.
Remarque :
Lorsque vous connectez une souris ou un clavier PS2 une fois que le système est
démarré, il risque de ne pas fonctionner correctement.
2.
Lorsque le système a démarré, appuyez sur Ctrl+Alt+Del, puis entrez le mot de passe
par défaut, WSS4Bosch, une fois que la fenêtre de l'unité de disques s'affiche.
3.
Lors de la première connexion, les paramètres par défaut du bureau sont appliqués.
L'opération prend quelques secondes, puis le système redémarre. Après le redémarrage
Bosch Sicherheitssysteme GmbH
Guide d'installation rapide
- | V1 | 2011.03
48
fr | Configuration du système – Premières étapes
1200 Series/4-bay IP Video Storage System
du système, reconnectez-vous et la fenêtre Bosch VRM Appliance initial configuration
s'affiche. Utilisez ce programme pour configurer l'adresse IP de l'unité de disques.
4.
La partie supérieure de l'écran Bosch VRM Appliance initial configuration affiche une
vue d'ensemble de la configuration et des paramètres du système. Cliquez sur le lien
Configure networking pour accéder à la configuration réseau.
Pour chaque port réseau, une icône distincte s'affiche. Cliquez sur l'icône Local Area
Connection, qui affiche l'état network, puis double-cliquez sur l'icône.
- | V1 | 2011.03
Guide d'installation rapide
Bosch Sicherheitssysteme GmbH
1200 Series/4-bay IP Video Storage System
5.
Configuration du système – Premières étapes | fr
49
Cliquez sur Properties, sélectionnez Internet Protocol Version 4 (TCP/IPv4), puis
cliquez sur Properties.
6.
Cette boîte de dialogue sert à définir la configuration de l'adresse IP en fonction des
besoins du réseau.
7.
3.4
Redémarrez le système.
Système VRM
Le Bosch Video Recording Manager (VRM) est préinstallé sur le système, qui dispose d'une
licence complète 32 voies. Cette licence peut être complétée par un maximum de 32 voies
supplémentaires.
Le VRM fournit un moteur d'enregistrement puissant à utiliser avec le système BVC ou Bosch
VMS pour afficher et lire en direct les données enregistrées.Les systèmes BVC et Bosch VMS
doivent être achetés par les canaux de vente Bosch appropriés.
Bosch Sicherheitssysteme GmbH
Guide d'installation rapide
- | V1 | 2011.03
50
fr | Configuration du système – Premières étapes
1200 Series/4-bay IP Video Storage System
Le système VRM offre une solution d'enregistrement VRM très fonctionnelle, limitée
seulement par le nombre de voies configurables. Les applications qui n'utilisent pas le logiciel
VRM doivent désactiver le service VRM.
3.4.1
Logiciel et documentation supplémentaires
Le logiciel de configuration du matériel et du logiciel (VRM) se trouve sur le système VRM
dans le dossier C:\Bosch\resources.
VRM Configurator : le logiciel permettant de configurer facilement VRM, dont l'unité de
disques, les caméras, le planificateur d'enregistrement, etc. doit être installé sur un système
client distinct, par exemple, un poste de commande Bosch.
Notez que pour toutes les tâches de configuration liées à l'affichage, par exemple, IVA, le
programme de configuration VRM et le SDK vidéo Bosch (disponible sur le site Web de Bosch)
doit être installé sur un système client distinct.
La documentation des systèmes DLA et VRM Bosch est disponible sous :
www.boschsecurity.com > sélectionnez votre région et votre pays > sélectionnez Catalogue
de produits > commencez une recherche du produit > sélectionnez le produit dans les
résultats de la recherche pour afficher les documents existants.
3.4.2
Désactivation du service VRM
L'application VRM est toujours préinstallée sur le système, mais s'il ne doit être utilisé que
comme unité de disques, il est possible de désactiver le service VRM :
1.
Connectez-vous au système de stockage, puis affichez la fenêtre Bosch VRM Appliance
initial configuration. La partie supérieure de la fenêtre Bosch VRM Appliance initial
configuration affiche une vue d'ensemble de la configuration et des paramètres du
système.
Si la fenêtre Bosch VRM Appliance initial configuration ne s'affiche pas, cliquez sur
Start > Run > oobe.
2.
Cliquez sur le lien Disable/Enable Bosch VRM Appliance pour arrêter/démarrer le
service d'enregistrement VRM.
Pour redémarrer le service, dans la fenêtre Bosch VRM Appliance initial configuration ,
cliquez sur le lien enable Bosch VRM Appliance.
Reportez-vous également à la Section 3.3 Définition de l'adresse IP.
3.5
Configuration système standard
Le système est fourni avec la cible iSCSI entièrement configurée et quatre numéros d'unité
logique (LUN) préconfigurés.
Le nom par défaut de la cible est TG0. Il contient l'ensemble des LUN iSCSI.
La convention de dénomination des LUN est VHDxx.vhd, où la valeur <xx> est comprise entre
01 et 08 en fonction du système utilisé. La configuration par défaut permet de connecter tous
les initiateurs iSCSI au système.
Le système est fourni avec le service Microsoft iSCSI Software Target activé, qui est utilisé
par l'application VRM préinstallée.
- | V1 | 2011.03
Guide d'installation rapide
Bosch Sicherheitssysteme GmbH
1200 Series/4-bay IP Video Storage System
3.6
Configuration du système – Premières étapes | fr
51
Maintenance et réparation
Le système de stockage bénéficie d'une garantie de 3 ans. Les problèmes sont gérés en
fonction des instructions de support et de maintenance Bosch. Pour les unités de disques
DLA Bosch, le support Bosch standard s'applique.
En cas de panne, les modules ci-après peuvent être remplacés sur site sans avoir à retourner
l'appareil :
–
Disques durs : seuls les disques durs Bosch d'origine sont pris en charge comme disques
durs de remplacement. Autrement, la garantie ne s'applique pas.
Demande de RMA
Pour les pièces défectueuses, demandez une RMA auprès d'un des représentants RMA Bosch
suivants.
–
Contact RMA pour la région AMEC
Bosch ST, RMA Swapstock, 8601 East Cornhusker Hwy, Lincoln, NE 68507 - État-Unis
Téléphone : +1(402)467-6610
Fax : s/o
E-mail : [email protected]
Heures d'ouverture : lundi au vendredi, 06h00 à 16h30
–
Assistance RMA pour la région APR
Robert Bosch (SEA) Pte Ltd, 11 Bishan Street 21, (level 5, from service lift),
Singapore 573943
Téléphone : +65 6571 2872
Fax : s/o
E-mail : [email protected]
Heures d'ouverture : lundi au vendredi, 08h30 à 17h45
–
Contact RMA pour la Chine
Bosch (Zhuhai) Security Systems Co. Ltd. Ji Chang Bei Road 20#, Qingwan Industrial
Estate ; Sanzao Town, Jinwan District, Zhuhai ; P.R. Chine ; Code postal : 519040
Téléphone : +86 756 7633117 / 121
Fax : s/o
E-mail : [email protected]
Heures d'ouverture : lundi au vendredi, 08h30 à 17h30
–
Contact RMA pour la région EMEA
Bosch Security Systems, C/o EVI Audio GmbH, Ernst-Heinkel Str. 4, 94315 Straubing,
Allemagne
Contact : RA Desk Supervisor
Téléphone : +49(9421)706-366
Fax : s/o
E-mail : [email protected]
Heures d'ouverture : lundi au vendredi, 07h00 à 18h00
Bosch Sicherheitssysteme GmbH
Guide d'installation rapide
- | V1 | 2011.03
52
it | Sommario
1200 Series/4-bay IP Video Storage System
Sommario
1
Norme di sicurezza
53
1.1
Norme di sicurezza generale
53
1.2
Norme di sicurezza elettrica
53
1.3
Precauzioni ESD
54
1.4
Precauzioni d'uso
54
2
Configurazione del sistema - Hardware
55
2.1
Introduzione
55
2.2
Disimballaggio
55
2.3
Preparazione per la configurazione
55
2.3.1
Scelta di una posizione di configurazione
55
2.3.2
Norme relative al sistema
55
2.4
Accensione del sistema
55
3
Configurazione del sistema - Fasi iniziali
56
3.1
Introduzione
56
3.2
Istruzioni di configurazione
56
3.3
Impostazione dell'indirizzo IP
56
3.3.1
Connessione desktop remoto
56
3.3.2
Collegamento fisico
59
3.4
Dispositivo VRM
61
3.4.1
Software aggiuntivo e documentazione
62
3.4.2
Disabilitazione del servizio VRM
62
3.5
Configurazione standard del sistema
62
3.6
Assistenza e riparazione
63
- | V1 | 2011.03
Guida all'installazione rapida
Bosch Sicherheitssysteme GmbH
1200 Series/4-bay IP Video Storage System
Norme di sicurezza | it
1
Norme di sicurezza
1.1
Norme di sicurezza generale
53
Attenersi a queste norme per garantire la sicurezza generale:
–
Mantenere l'area intorno al sistema pulita ed ordinata.
–
Posizionare il coperchio superiore del telaio e tutti i componenti del sistema che sono
stati rimossi dal sistema o riposti su un tavolo in modo che non vengano calpestati
accidentalmente.
–
Mentre si eseguono interventi sul sistema, non indossare indumenti penzolanti, come
cravatte e maniche di camicia sbottonate, in quanto potrebbero entrare in contatto con i
circuiti elettrici o impigliarsi nel ventilatore di raffreddamento.
–
Rimuovere qualsiasi gioiello od oggetto metallico dal proprio corpo, poiché sono
eccellenti conduttori di metallo che possono creare corto circuiti e provocare lesioni se
entrano in contatto con schede a circuiti stampati o aree in cui è presente alimentazione.
–
Dopo aver eseguito l'accesso all'interno del sistema, chiudere la parte laterale e fissarla
all'unità per rack dopo aver verificato che tutti i collegamenti siano stati effettuati.
–
A pieno carico, il sistema pesa all'incirca 19,5 kg. Quando si solleva il sistema, è
necessario che due addetti posti a ciascuna estremità del sistema lo sollevino lentamente
tenendo le gambe aperte per distribuire il peso. Tenere sempre la schiena dritta e fare
leva sulle gambe.
1.2
Norme di sicurezza elettrica
È necessario attenersi alle principali norme di sicurezza elettrica onde evitare lesioni a
persone e danni al sistema:
–
Tenere in mente la posizione dell'interruttore di accensione/spegnimento sul telaio,
dell'interruttore di spegnimento di emergenza della stanza, dell'interruttore di
scollegamento o della presa elettrica. In caso di incidente elettrico, è possibile rimuovere
rapidamente l'alimentazione dal sistema.
–
Non lavorare da soli quando si utilizzano componenti ad alta tensione.
–
È necessario scollegare sempre l'alimentazione dal sistema quando si rimuovono o
installano i componenti principali, come ad esempio la scheda madre, i moduli di
memoria e le unità dischetto. Quando si scollega l'alimentazione, prima di tutto è
necessario spegnere il sistema con il sistema operativo, quindi scollegare i cavi di
alimentazione da tutte le unità di alimentazione del sistema.
–
Quando si lavora in prossimità di circuiti elettrici esposti, è necessario che un'altra
persona addetta ai comandi di spegnimento sia nelle vicinanze per spegnere
l'alimentazione in caso di necessità.
–
Utilizzare solo una mano quando si lavora con apparecchiature elettriche accese per
evitare di generare un circuito chiuso che può causare scosse elettriche. Prestare la
massima attenzione quando si utilizzano strumenti metallici, in quanto possono
facilmente danneggiare qualsiasi componente elettrico o scheda a circuiti con cui si viene
a contatto.
–
Non utilizzare tappetini progettati per diminuire le scariche elettrostatiche come
protezione dalle scosse elettriche. Utilizzare invece tappetini in gomma appositamente
ideati per fungere da isolatori elettrici.
–
Il cavo di alimentazione dell'alimentatore deve includere una spina e deve essere inserito
in prese elettriche con messa a terra. L'unità è provvista di più di un cavo di
Bosch Sicherheitssysteme GmbH
Guida all'installazione rapida
- | V1 | 2011.03
54
it | Norme di sicurezza
1200 Series/4-bay IP Video Storage System
alimentazione. Prima di eseguire un intervento di manutenzione, scollegare i due cavi di
alimentazione onde evitare una scossa elettrica.
–
Batteria scheda madre:
ATTENZIONE - Esiste rischio di esplosione se la batteria integrata viene installata al
contrario, invertendo le polarità. È necessario sostituire la batteria solo con batterie dello
stesso tipo o di un tipo equivalente consigliato dal produttore (CR2032). Smaltire le
batterie usate in base alle istruzioni fornite dal produttore.
–
Laser DVD-ROM:
ATTENZIONE - Questo sistema viene fornito senza l'unità DVD-ROM ma qualora fosse
disponibile, per prevenire l'esposizione diretta al raggio laser o a radiazioni pericolose,
non aprire la custodia né utilizzare l'unità contrariamente alle norme previste.
–
Sostituzione fusibili saldati internamente alla scheda madre: i fusibili ad autoripristino
PTC (coefficiente temperatura positivo) installati sulla scheda madre possono essere
sostituiti solo da personale tecnico qualificato. Il nuovo fusibile deve essere identico o
equivalente a quello sostituito. Per ulteriori dettagli e assistenza, contattare il personale
tecnico.
1.3
Precauzioni ESD
Le scariche elettrostatiche (ESD) vengono generate dal contatto tra due oggetti aventi cariche
elettriche diverse. Per neutralizzare questa differenza, viene creata una scarica elettrica, che
può danneggiare i componenti elettronici e le schede a circuiti stampati. Le seguenti misure
consentono in generale di neutralizzare tale differenza prima che si realizzi il contatto al fine
di proteggere le apparecchiature dalle scariche elettrostatiche ESD:
–
Utilizzare una fascetta da polso dotata di messa a terra in grado di prevenire la scarica
statica.
–
Tenere tutti i componenti e le schede a circuiti stampati (PCB) nelle borse antistatiche
finché non vengono utilizzati.
–
Toccare un oggetto metallico dotato di messa a terra prima di rimuovere la scheda dalla
borsa antistatica.
–
Evitare il contatto tra i componenti o le PCB e i propri indumenti, in quanto potrebbero
mantenere una carica pur indossando una fascetta da polso.
–
Maneggiare una scheda tenendola solo dai bordi; non toccarne i componenti, i chip
periferici, i moduli di memoria o i contatti.
–
Quando si maneggiano chip o moduli, evitare di toccarne i pin.
–
Se non vengono utilizzate, riporre la scheda madre e le periferiche nelle borse
antistatiche.
–
Per garantire la messa a terra, assicurarsi che il telaio del computer fornisca un'ottima
conduttività tra l'alimentazione, il rivestimento, i dispositivi di fissaggio e la scheda
madre.
1.4
Precauzioni d'uso
Per garantire un raffreddamento appropriato, assicurarsi che il coperchio del telaio sia in
posizione quando il sistema è in funzione. In caso contrario, potrebbero verificarsi danni al
sistema non coperti da garanzia.
Nota
Maneggiare con cura le batterie usate. Non danneggiare la batteria in nessun modo. Una
batteria danneggiata potrebbe rilasciare materiali nocivi nell'ambiente. Non smaltire le
batterie usate insieme ai rifiuti domestici o in una discarica pubblica. Per smaltire
- | V1 | 2011.03
Guida all'installazione rapida
Bosch Sicherheitssysteme GmbH
1200 Series/4-bay IP Video Storage System
Configurazione del sistema - Hardware | it
55
correttamente le batterie usate, attenersi alle norme previste dall'ente locale di gestione dei
rifiuti pericolosi.
2
Configurazione del sistema - Hardware
2.1
Introduzione
Elementi in dotazione:
–
–
2.2
Sistema MiniTower serie 1200 a 4 alloggiamenti completo di 4 unità disco rigido
In aggiunta al sistema vengono forniti anche i seguenti componenti
–
Un cavo di alimentazione AC per ciascun alimentatore presente nel sistema
–
La presente guida rapida all'installazione
Disimballaggio
Ispezionare la confezione in cui è stato spedito il telaio e verificare che non sia stata
danneggiata in alcun modo. Se il sistema presenta danni, inoltrare una richiesta di
risarcimento danni al corriere incaricato della consegna e informare il rispettivo ufficio RMA
Bosch.
A causa del peso del sistema, dopo aver aperto il coperchio della confezione di trasporto,
sollevare il disk array facendosi aiutare da un'altra persona posta all'estremità opposta.
Individuare una posizione idonea dove collocare il sistema. È necessario posizionare il sistema
in un'area pulita, priva di polvere e ben ventilata. Evitare le aree esposte a fonti di calore,
rumori elettrici e campi elettromagnetici. Assicurarsi che nelle vicinanze ci sia una presa di
corrente dotata di messa a terra. Accertarsi di leggere le precauzioni riportate nella sezione
successiva.
2.3
Preparazione per la configurazione
Attenersi alle istruzioni nell'ordine indicato per completare il processo di installazione con un
minimo dispendio di tempo. Leggere questa sezione prima di iniziare la procedura di
installazione descritta nelle successive sezioni.
2.3.1
Scelta di una posizione di configurazione
Lasciare uno spazio sufficiente nella parte anteriore e laterale dove viene posizionato il
coperchio del telaio in modo da poter rimuovere le unità swap e assicurare sufficiente flusso
d'aria e facilità di manutenzione.
Questo prodotto è destinato esclusivamente all'installazione in luoghi ad accesso limitato
(sale per apparecchiature dedicate, armadi di assistenza e simili).
2.3.2
Norme relative al sistema
–
Consultare le norme di sicurezza generale ed elettrica.
–
Utilizzare un gruppo di continuità (UPS) di regolazione per proteggere il sistema da
sovratensioni, picchi di tensione e per mantenere il sistema in funzione in mancanza di
alimentazione.
–
Far raffreddare le unità SATA e i moduli dell'alimentazione prima di toccarli.
–
Per assicurare un raffreddamento appropriato, tenere sempre i coperchi del telaio in
posizione e bloccati quando non si effettuano interventi di manutenzione.
2.4
Accensione del sistema
L'ultima operazione prevede l'accensione del sistema.
Bosch Sicherheitssysteme GmbH
Guida all'installazione rapida
- | V1 | 2011.03
56
it | Configurazione del sistema - Fasi iniziali
1.
1200 Series/4-bay IP Video Storage System
Collegare il cavo di alimentazione dall'alimentatore alla ciabatta di alta qualità dotata di
un sistema di protezione da rumori elettrici e sovratensioni. Si raccomanda di utilizzare
un gruppo di continuità (UPS).
2.
Premere il pulsante di alimentazione sulla centrale di controllo per accendere il sistema.
3
Configurazione del sistema - Fasi iniziali
3.1
Introduzione
La seguente guida all'installazione si applica alla serie di disk array DLA Bosch e fornisce
informazioni relative alle procedure di installazione, configurazione, assistenza e riparazione.
I disk array DLA Bosch sono basati su Microsoft Storage Server 2008. I sistemi operativi di
Microsoft Windows Storage Server 2008 offrono un'interfaccia utente per la configurazione
iniziale del server, gestione unificata dei dispositivi di archiviazione, semplice configurazione e
gestione di cartelle condivise e archiviazione, nonché il supporto di Destinazione Software
iSCSI Microsoft.
Ciò rappresenta la soluzione ideale per fornire prestazioni ottimali per l'archiviazione con
connessione in rete. Windows Storage Server 2008 offre notevoli miglioramenti relativi alla
gestione di condivisione e archiviazione e all'integrazione di funzionalità e componenti per la
gestione dei dispositivi di archiviazione.
3.2
Istruzioni di configurazione
Tutti i disk array Bosch serie DLA sono preconfigurati con un indirizzo IP predefinito e
impostazioni
iSCSI predefinite.
–
Indirizzo IP: 10.10.10.10 (porta 1) e 10.10.10.11 (porta 2)
–
Maschera di rete: 255.255.255.0
–
Utente: Administrator
–
Password: WSS4Bosch
Informazioni dettagliate, ad esempio schede tecniche e manuali utente, sono disponibili nel
sito Web Bosch www.boschsecurity.com nella sezione Product Catalog > CCTV > IP Video >
Disk Arrays.
Le impostazioni iSCSI predefinite sono ottimizzate per l'uso con VRM. Tali impostazioni
possono essere modificate solo da amministratori esperti addetti all'archiviazione. La
configurazione definita può essere modificata solo se VRM non viene utilizzato o le
impostazioni predefinite non sono adatte a un'altra applicazione iSCSI Bosch.
3.3
Impostazione dell'indirizzo IP
L'indirizzo IP predefinito può essere modificato in due modi.
3.3.1
Connessione desktop remoto
1.
Connettere il sistema alla rete mediante la porta 1 o 2 e avviarlo. Il sistema viene fornito
con l'opzione Connessione desktop remoto abilitata. Accedere a un sistema client
appropriato tramite Windows XP, Windows Vista o Windows 7 installati (hardware e
software client non inclusi nella fornitura) con un indirizzo IP della stessa rete, ad es.
10.10.10.12 (maschera di rete: 255.255.255.0).
- | V1 | 2011.03
Guida all'installazione rapida
Bosch Sicherheitssysteme GmbH
1200 Series/4-bay IP Video Storage System
2.
Configurazione del sistema - Fasi iniziali | it
57
Aprire l'opzione Remote Desktop Connection nel sistema client. Nella casella Computer
inserire l'indirizzo IP del disk array a cui collegarsi.
Indirizzo IP predefinito: 10.10.10.10 (porta 1)
3.
Fare clic su Connect, premere Ctrl+Alt+Del (se disponibile), quindi immettere la
password predefinita WSS4Bosch non appena viene visualizzata la finestra di accesso al
disk array.
4.
Al primo accesso vengono applicate le impostazioni predefinite del desktop. Questa
operazione richiederà alcuni istanti e il sistema verrà riavviato. Dopo il riavvio del
sistema, effettuare nuovamente l'accesso. Verrà visualizzata la finestra Bosch VRM
Appliance initial configuration. Utilizzare questo programma per configurare l'indirizzo
IP del disk array.
Bosch Sicherheitssysteme GmbH
Guida all'installazione rapida
- | V1 | 2011.03
58
it | Configurazione del sistema - Fasi iniziali
5.
1200 Series/4-bay IP Video Storage System
La parte superiore della schermata Bosch VRM Appliance initial configuration riporta
una panoramica della configurazione e delle impostazioni del sistema. Selezionare il
collegamento Configure networking per accedere alla configurazione di rete.
Per ciascuna porta di rete, viene visualizzata un'icona separata. Selezionare l'icona Local
Area Connection indicante lo stato network, quindi fare doppio clic sull'icona.
6.
Fare clic su Properties, selezionare Internet Protocol Version 4 (TCP/IPv4), quindi fare
clic su Properties.
- | V1 | 2011.03
Guida all'installazione rapida
Bosch Sicherheitssysteme GmbH
1200 Series/4-bay IP Video Storage System
7.
Configurazione del sistema - Fasi iniziali | it
59
La finestra di dialogo consente di impostare la configurazione dell'indirizzo IP secondo i
requisiti di rete.
8.
3.3.2
Riavviare il sistema.
Collegamento fisico
Il sistema è dotato di un connettore VGA e di connettori PS2 per il mouse e la tastiera.
1.
Collegare monitor, mouse e tastiera (non inclusi nella fornitura) al disk array e avviare il
sistema.
Nota
Quando si collega un mouse o tastiera PS2 dopo aver riavviato il sistema, è probabile che
non funzioni correttamente.
2.
Dopo aver avviato il sistema, premere Ctrl+Alt+Del, quindi immettere la password
predefinita WSS4Bosch non appena viene visualizzata la finestra di accesso al disk array.
3.
Al primo accesso vengono applicate le impostazioni predefinite del desktop. Questa
operazione richiederà alcuni istanti e il sistema verrà riavviato. Dopo il riavvio del
sistema, effettuare nuovamente l'accesso. Verrà visualizzata la finestra Bosch VRM
Bosch Sicherheitssysteme GmbH
Guida all'installazione rapida
- | V1 | 2011.03
60
it | Configurazione del sistema - Fasi iniziali
1200 Series/4-bay IP Video Storage System
Appliance initial configuration. Utilizzare questo programma per configurare l'indirizzo
IP del disk array.
4.
La parte superiore della schermata Bosch VRM Appliance initial configuration riporta
una panoramica della configurazione e delle impostazioni del sistema. Selezionare il
collegamento Configure networking per accedere alla configurazione di rete.
Per ciascuna porta di rete, viene visualizzata un'icona separata. Selezionare l'icona Local
Area Connection indicante lo stato network, quindi fare doppio clic sull'icona.
- | V1 | 2011.03
Guida all'installazione rapida
Bosch Sicherheitssysteme GmbH
1200 Series/4-bay IP Video Storage System
5.
Configurazione del sistema - Fasi iniziali | it
61
Fare clic su Properties, selezionare Internet Protocol Version 4 (TCP/IPv4), quindi fare
clic su Properties.
6.
La finestra di dialogo consente di impostare la configurazione dell'indirizzo IP secondo i
requisiti di rete.
7.
3.4
Riavviare il sistema.
Dispositivo VRM
Il sistema è dotato di Bosch Video Recording Manager (VRM) preinstallato e licenza completa
per 32 canali. Questa licenza può essere estesa solo una volta a un massimo di altri 32 canali.
VRM vanta un potente motore di registrazione da utilizzare in combinazione con BVC o Bosch
VMS per la visualizzazione live e la riproduzione di dati registrati. BVC e Bosch VMS sono
acquistabili mediante i rispettivi canali di vendita Bosch.
Bosch Sicherheitssysteme GmbH
Guida all'installazione rapida
- | V1 | 2011.03
62
it | Configurazione del sistema - Fasi iniziali
1200 Series/4-bay IP Video Storage System
Il dispositivo VRM offre una soluzione VRM interamente funzionale limitata solo nel numero di
canali configurabili. Nelle applicazioni che non richiedono il software VRM bisognerebbe
disabilitare il servizio VRM.
3.4.1
Software aggiuntivo e documentazione
Il software di configurazione dell'hardware e software (VRM) è disponibile nel dispositivo VRM
nella cartella C:\Bosch\resources.
VRM Configurator: software per una facile configurazione del VRM, compresi disk array,
telecamere, pianificatore registrazione, ecc. Da installare su un sistema client separato, ad
esempio hardware workstation Bosch.
Notare che tutte le attività di configurazione relative alla visualizzazione, ad es. IVA, il VRM
configurator e Bosch Video SDK (disponibile dal sito Web Bosch) devono essere installati su
un sistema client separato.
La documentazione relativa a Bosch DLA e VRM è disponibile all'indirizzo:
www.boschsecurity.com > selezionare la regione e il paese d'appartenenza > selezionare
Catalogo dei prodotti > eseguire una ricerca del prodotto > selezionare il prodotto tra i
risultati di ricerca per visualizzare i relativi documenti disponibili.
3.4.2
Disabilitazione del servizio VRM
Il sistema viene fornito sempre con l'applicazione VRM preinstallata, ma se va utilizzato solo
come disk array, il servizio VRM può essere disabilitato:
1.
Effettuare l'accesso al sistema di memorizzazione, quindi aprire la finestra Bosch VRM
Appliance initial configuration. La parte superiore della finestra Bosch VRM Appliance
initial configuration riporta una panoramica della configurazione e delle impostazioni del
sistema.
Se la finestra Bosch VRM Appliance initial configuration non viene visualizzata, fare clic
su Start > Run > oobe.
2.
Selezionare il collegamento Disable/Enable Bosch VRM Appliance per interrompere/
avviare il servizio di registrazione VRM.
Per riavviare il servizio, nella finestra Bosch VRM Appliance initial configuration, fare clic sul
collegamento enable Bosch VRM Appliance.
Vedere anche Sezione 3.3 Impostazione dell'indirizzo IP.
3.5
Configurazione standard del sistema
Il sistema viene fornito con la destinazione iSCSI interamente configurata e 4 LUN
preconfigurati.
Il nome di destinazione predefinito è TG0 e presenta tutti i iSCSI LUN.
Per convenzione LUN è denominato VHDxx.vhd dove <xx> va da 01 a 08 a seconda del
sistema utilizzato. La configurazione predefinita consente a ciascun iniziatore iSCSI di
collegarsi al sistema.
Il sistema è dotato del servizio di destinazione iSCSI abilitato che viene utilizzato
dall'applicazione VRM preinstallata.
- | V1 | 2011.03
Guida all'installazione rapida
Bosch Sicherheitssysteme GmbH
1200 Series/4-bay IP Video Storage System
3.6
Configurazione del sistema - Fasi iniziali | it
63
Assistenza e riparazione
I sistemi di memorizzazione hanno una garanzia di 3 anni. Eventuali controversie saranno
gestite in base alle direttive Bosch Support & Service. Per i disk array DLA Bosch si applicano
le normali procedure di assistenza Bosch.
I seguenti moduli potrebbero essere sostituiti in loco in caso di malfunzionamento senza
dover restituire l'unità:
–
Unità disco rigido: sostituire le unità disco rigido solo con dischi rigidi originali Bosch. In
caso contrario, la garanzia risulterà nulla.
Richiesta per RMA
Richiedere una procedura RMA per le parti guaste a uno dei seguenti contatti RMA Bosch.
–
Contatto RMA (AMEC)
Bosch ST, RMA Swapstock, 8601 East Cornhusker Hwy, Lincoln, NE 68507 -USA
Telefono: +1(402)467-6610
Fax: n/a
E-mail: [email protected]
Orario di apertura: dal lunedì al venerdì, 06:00 – 16:30
–
Ufficio RMA (APR)
Robert Bosch (SEA) Pte Ltd, 11 Bishan Street 21, (level 5, from service lift), Singapore
573943
Telefono: +65 6571 2872
Fax: n/a
E-mail: [email protected]
Orario di apertura: dal lunedì al venerdì, 08:30 – 17:45
–
Contatto RMA (Cina)
Bosch (Zhuhai) Security Systems Co. Ltd. Ji Chang Bei Road 20#, Qingwan Industrial
Estate; Sanzao Town, Jinwan District, Zhuhai; P.R. Cina; Codice postale: 519040
Telefono: +86 756 7633117 / 121
Fax: n/a
E-mail: [email protected]
Orario di apertura: dal lunedì al venerdì, 08:30 – 17:30
–
Contatto RMA (EMEA)
Bosch Security Systems, C/o EVI Audio GmbH, Ernst-Heinkel Str. 4, 94315 Straubing,
GERMANIA
Referente: supervisore ufficio RA
Telefono: +49(9421)706-366
Fax: n/a
E-mail: [email protected]
Orario di apertura: dal lunedì al venerdì, 07:00 – 18:00
Bosch Sicherheitssysteme GmbH
Guida all'installazione rapida
- | V1 | 2011.03
64
ja |
1200 Series/4-bay IP Video Storage System
目次
1
安全に関する表示
65
1.1
全般的な安全に関する注意
65
1.2
電気的な安全に関する注意
65
1.3
ESD に関する注意
66
1.4
操作に関する注意
66
2
システムのセットアップ - ハードウェア
66
2.1
はじめに
66
2.2
開梱
66
2.3
セットアップの準備
67
2.3.1
セットアップ場所の選択
67
2.3.2
システムに関する注意
67
2.4
システムの電源を入れる
67
3
システムのセットアップ - 最初の手順
67
3.1
はじめに
67
3.2
セットアップ手順
67
3.3
IP アドレスの設定
68
3.3.1
リモートデスクトップ接続
68
3.3.2
物理的な接続
70
3.4
VRM アプライアンス
72
3.4.1
その他のソフトウェアとマニュアル
73
3.4.2
VRM サービスを無効にする
73
3.5
標準的なシステム設定
73
3.6
保守と修理
73
- | V1 | 2011.03
クイックインストールガイド
Bosch Sicherheitssysteme GmbH
安全に関する表示 | ja
1200 Series/4-bay IP Video Storage System
1
安全に関する表示
1.1
全般的な安全に関する注意
65
安全のため、次のルールに従ってください。
-
システムの周辺は清潔にし、物を置かないでください。
シャーシの上面カバーや、システムから取り外したシステムコンポーネントは、机の上に置
き、不注意で踏みつけることがないようにしてください。
-
システムを操作するときは、ネクタイやボタンを外したシャツの袖など、身体にフィットしな
い衣類は着用しないでください。電気回路と接触したり、冷却ファンに巻き込まれたりする可
能性があります。
-
アクセサリー類や金属製の物は身体から外してください。伝導性に優れているため、通電して
いるプリント回路基板などに接触すると、回路がショートして怪我を負う可能性があります。
-
システム内部にアクセスしたら、すべて接続されていることを確認し、システムを閉じて戻
し、ラックユニットに固定してください。
-
システムの重さは完全搭載した場合、約 19.5kg です。システムを持ち上げる際は、2 人で両端
を持ち、足をしっかり広げて重さを分散させてゆっくり持ち上げてください。 必ず背中をまっ
すぐ伸ばしたまま脚を使って持ち上げるようにしてください。
1.2
電気的な安全に関する注意
作業者の安全を守り、システムが損傷しないように、電気的な安全に関する基本的な注意事項に従
ってください。
-
シャーシの電源オン/オフスイッチ、部屋の緊急電源オフスイッチ、切断スイッチ、電源コン
セントなどの位置に注意してください。 電気的な事故が発生したら、システムの電源をすばや
くオフにします。
-
高電圧コンポーネントを扱うときは、1 人で作業しないでください。
-
メインシステムのコンポーネント (メインボード、メモリモジュール、フロッピードライブな
ど)を取り外したり取り付けたりするときは、必ずシステムの電源を切断してください。 電源
を切断するときは、まずオペレーティングシステムからシステムの電源をオフにし、システム
のすべての電源ユニットから電源コードを抜きます。
-
むき出しの電気回路の周囲で作業するときは、電源オフの方法がわかっている別の作業者に近
くにいてもらい、必要に応じて電源をオフにしてもらいます。
-
通電している電気機器を操作するときは、片手のみを使用してください。 これは、閉回路によ
る感電を防ぐためです。 金属製の工具を使用する場合は、慎重に作業してください。接触する
ことで電子部品や回路基板が簡単に破損してしまう場合があります。
-
静電気を抑えるために設計されたマットを感電防止のために使用しないでください。 代わり
に、絶縁体として専用に設計されたゴム製のマットを使用してください。
-
電源コードにはアースプラグが付いており、アース端子付きの電源コンセントに差し込まれて
いる必要があります。 ユニットには複数の電源コードが付いています。 感電防止のため、作業
を行う前に両方の電源コードを抜いてください。
-
メインボードの電池:
注意 - オンボードの電池を上下逆に取り付けると、極性が反転し、爆発する危険性があります。
この電池を交換する場合は、必ず同じものまたは製造元が推奨する同等品 (CR2032)のみを
使用してください。 使用済みの電池は、製造元の指示に従って廃棄してください。
-
DVD-ROM レーザー:
注意 - このシステムには DVD-ROM ドライブが付属していませんが、追加する場合は、レーザ
ービームや有害な放射線を浴びないようにするため、通常と異なる方法で筐体を開けたりユニ
ットを使用したりしないようにしてください。
Bosch Sicherheitssysteme GmbH
クイックインストールガイド
- | V1 | 2011.03
66
ja | システムのセットアップ - ハードウェア
-
1200 Series/4-bay IP Video Storage System
ヒューズで固定されている交換可能なメインボード:メインボードの PTC (正温度係数)ヒュ
ーズを自分で設置しなおす場合、その交換は、熟練したサービス技術者のみが行ってくださ
い。 新しいヒューズは、交換前のヒューズと同じまたは同等のものである必要があります。詳
細については、テクニカルサポートに問い合わせてサポートを受けてください。
1.3
ESD に関する注意
電荷量が異なる 2 つの物体が接触しようとすると、静電気 (ESD)が発生します。静電気がこの差
異をなくすために生じるため、電気部品やプリント回路基板に損傷を与えることがあります。 通常、
接触前にこの差異をなくして機器を ESD から保護するには、次の方法で十分です。
-
静電気を防止するために設計された、アース端子付きのリストストラップを使用してくださ
い。
-
すべての部品およびプリント回路基板 (PCB)は、使用するまで静電気防止用の袋に入れてお
いてください。
-
アースに接続された金属に触れてから、基板類を静電気防止用の袋から取り出します。
-
部品や PCB が衣類に触れないようにしてください。リストストラップを装着していても、衣類
の方が帯電していることがあります。
-
基板を扱うときは、基板の縁のみに触れてください。部品、周辺チップ、メモリーモジュー
ル、接続部などには触れないでください。
-
チップやモジュールを扱うときは、ピンに触れないでください。
-
メインボードや周辺機器を使用しないときは、静電気防止用の袋に戻してください。
-
コンピューターのシャーシは、電源、ケース、取付留め具、メインボードなどの間で伝導性が
優れていてアースとして使用できます。
1.4
操作に関する注意
システムの稼動時には、シャーシカバーを必ず取り付けて冷却が適切に行われるようにしてくださ
い。 この指示に従わないと、システムに保証対象外の損傷が発生する場合があります。
注意:
使用済みの電池は慎重に処理してください。 電池を破損しないようにしてください。 電池が破損す
ると、環境に有害な物質が出る場合があります。 使用済みの電池をゴミ箱や公共のごみ廃棄場に捨
てないでください。 お住まいの地域の有害廃棄物の管理機関が定める規則に従って、使用済みの電
池を正しく処分してください。
2
システムのセットアップ - ハードウェア
2.1
はじめに
機器構成:
2.2
-
1200 シリーズ -4 ベイミニタワーシステム、4 台のハードドライブをフル装備
-
システム本体には、次のアイテムが付属して出荷されます。
-
AC 電源ケーブル ×1 (システムの各電源用)
-
クイックインストールガイド (本書)
開梱
システムの出荷に使用された梱包箱を点検し、損傷がないかどうかを確認してください。 システム
自体が破損している場合は、システムの運送業者に対して損傷のクレームを出し、各 BoschRMA デ
スクにお知らせください。
システムは重量があるため、梱包箱の上を開けてからもう 1 人が箱の向かい側に立ち、ディスクア
レイを一緒に持ち上げて取り出してください。
- | V1 | 2011.03
クイックインストールガイド
Bosch Sicherheitssysteme GmbH
システムのセットアップ - 最初の手順 | ja
1200 Series/4-bay IP Video Storage System
67
システムの適切な設置場所を決めてください。換気状態のよい、清潔でほこりのないエリアに設置
します。高温、電気ノイズ、電磁場の生じるエリアは避けてください。 アース端子付きの電源コン
セントの近くに設置する必要もあります。次のセクションの注意事項を必ずお読みください。
2.3
セットアップの準備
指定の順序どおりに手順を行えば、最小限の時間で取付作業を完了できます。取付手順の概要につ
いては次のセクションで説明しますが、取付を開始する前に、このセクションをお読みください。
2.3.1
セットアップ場所の選択
システムの前面と側面のシャーシカバーのある場所に十分なスペースを確保して、交換可能なドラ
イブを取り外したり、十分なエアフローを確保したり、簡単に保守を行ったりできるようにしてく
ださい。
この製品は、アクセス制限のある場所 (専用の機器ルーム、サービスクローゼットなど)のみに設
置してください。
2.3.2
システムに関する注意
-
電気的および全般的な安全に関する注意を確認してください。
調整用の無停電電源装置 (UPS)を使用して、電源サージや電圧スパイクからシステムを保護
し、電源障害時にもシステムが動作するようにしてください。
-
SATA ドライブや電源モジュールに触れるときは、温度が下がるまでお待ちください。
保守中でない場合は、適切に冷却するため、シャーシカバーを所定の位置で固定しておいてく
ださい。
2.4
システムの電源を入れる
最後にシステムの電源を入れます。
1.
電源ユニットの電源コードを高品質な電源コード (電気ノイズと電源サージを防ぐもの)に差
し込みます。当社では無停電電源装置 (UPS)の使用を推奨しています。
2.
コントロールパネルの電源ボタンを押してシステムを起動します。
3
システムのセットアップ - 最初の手順
3.1
はじめに
次の取付方法は、Bosch DLA ディスクアレイシリーズ向けのものです。ここでは、取り付け、設
定、保守、修理について説明します。
Bosch DLA ディスクアレイは、Microsoft Storage Server 2008 をベースとしています。 Microsoft
Windows Storage Server 2008 オペレーティングシステムは、サーバーの初期設定用のユーザーイン
ターフェース、ストレージアプライアンスの統一管理、ストレージおよび共有フォルダーの簡便な
設定と管理、Microsoft iSCSI Software Target のサポートを提供します。
このオペレーティングシステムは、ネットワークに接続したストレージでパフォーマンスが最適に
なるように特別に調整されています。Windows Storage Server 2008 は、共有とストレージの管理シ
ナリオ、ストレージアプライアンスの管理コンポーネントと機能の統合という点で、大幅に拡張さ
れています。
3.2
セットアップ手順
すべての Bosch DLA シリーズのディスクアレイは、デフォルトの IP アドレスと
iSCSI 設定があらかじめ設定されています。
-
IP アドレス:10.10.10.10 (1 番目のポート)および 10.10.10.11 (2 番目のポート)
-
ネットマスク:255.255.255.0
Bosch Sicherheitssysteme GmbH
クイックインストールガイド
- | V1 | 2011.03
68
ja | システムのセットアップ - 最初の手順
1200 Series/4-bay IP Video Storage System
-
ユーザー:Administrator
-
パスワード:WSS4Bosch
データシートやユーザーマニュアルなどの詳細情報については、Bosch の Web サイト (製品カタロ
グ > CCTV> IP ビデオ > ディスクアレイにある www.boschsecurity.com)を参照してください。
iSCSI のデフォルト設定は、VRM での使用向けに最適化されています。経験豊富なストレージ管理
者のみが、この設定を変更してください。 デフォルト設定は、VRM を使用しないか、デフォルト設
定が他の BoschiSCSI アプリケーションに合わない場合にのみ変更が必要です。
3.3
IP アドレスの設定
デフォルトの IP アドレスは、次のいずれかの方法で変更できます。
3.3.1
リモートデスクトップ接続
1.
ポート 1 またはポート 2 経由でシステムをネットワークに接続し、システムを起動する システ
ムの納品時には、リモートデスクトップ接続が有効になっています。 同じネットワーク内の IP
アドレス (10.10.10.12 (ネットマスク:255.255.255.0)など)を使用して、Windows XP、
Windows Vista、Windows 7 のいずれかがインストールされている適切なシステムにログオンし
ます (クライアントのハードウェアとソフトウェアは、出荷内容に含まれません)。
2.
クライアントシステムで Remote Desktop Connection を開きます。Computer のボックスに、
接続先のディスクアレイの IP アドレスを入力します。
デフォルト IP アドレス:10.10.10.10 (ポート 1)
3.
Connect をクリックし、 Ctrl+Alt+Del が表示される場合はこれを押します。ディスクアレ
イのログインウィンドウが表示されたらデフォルトパスワード WSS4Bosch を入力します。
4.
最初のログイン時には、デスクトップのデフォルト設定が適用されます。 数秒後にシステムが
再起動します。 システムの再起動後に、再度ログオンすると、[Bosch VRM Appliance initial
configuration]ウィンドウが表示されます。このプログラムを使用して、ディスクアレイの IP
アドレスを設定します。
- | V1 | 2011.03
クイックインストールガイド
Bosch Sicherheitssysteme GmbH
システムのセットアップ - 最初の手順 | ja
1200 Series/4-bay IP Video Storage System
5.
69
Bosch VRM Appliance initial configuration で最初に表示される画面には、システムの構成と設
定の概要が表示されます。 リンク Configure networking を選択し、ネットワーク設定を表示し
ます。
ネットワークポートごとに、アイコンが個別に表示されます。network のステータスの Local
Area Connection アイコンを選択し、ダブルクリックします。
6.
Properties をクリックし、Internet Protocol Version 4 (TCP/IPv4) を選択してから Properties を
クリックします。
Bosch Sicherheitssysteme GmbH
クイックインストールガイド
- | V1 | 2011.03
70
ja | システムのセットアップ - 最初の手順
3.3.2
1200 Series/4-bay IP Video Storage System
7.
このダイアログボックスで、ネットワーク要件に合う IP アドレスを設定できます。
8.
システムを再起動します。
物理的な接続
システムには、VGA グラフィックコネクターと、マウスとキーボード用の PS2 コネクターが付属し
ています。
1.
ディスクアレイにモニター、マウス、キーボード (出荷内容には含まれません)を接続してシ
ステムを起動します。
注意:
システムの起動後に PS2 のマウスやキーボードデバイスを接続すると、正しく動作しない場合
があります。
2.
システムが起動済みの状態でディスクアレイのログインウィンドウが表示された場合は、
Ctrl+Alt+Del を押して、デフォルトパスワード WSS4Bosch を入力します。
- | V1 | 2011.03
クイックインストールガイド
Bosch Sicherheitssysteme GmbH
システムのセットアップ - 最初の手順 | ja
1200 Series/4-bay IP Video Storage System
3.
71
最初のログイン時には、デスクトップのデフォルト設定が適用されます。 数秒後にシステムが
再起動します。システムの再起動後に、再度ログオンすると、[Bosch VRM Appliance initial
configuration]ウィンドウが表示されます。このプログラムを使用して、ディスクアレイの IP
アドレスを設定します。
4.
Bosch VRM Appliance initial configuration で最初に表示される画面には、システムの構成と設
定の概要が表示されます。 リンク Configure networking を選択し、ネットワーク設定を表示し
ます。
ネットワークポートごとに、アイコンが個別に表示されます。network のステータスの Local
Area Connection アイコンを選択し、ダブルクリックします。
5.
Properties をクリックし、Internet Protocol Version 4 (TCP/IPv4) を選択してから Properties を
クリックします。
Bosch Sicherheitssysteme GmbH
クイックインストールガイド
- | V1 | 2011.03
72
ja | システムのセットアップ - 最初の手順
3.4
1200 Series/4-bay IP Video Storage System
6.
このダイアログボックスで、ネットワーク要件に合う IP アドレスを設定できます。
7.
システムを再起動します。
VRM アプライアンス
システムには、Bosch Video Recording Manager (VRM)があらかじめインストールされており、
32 チャンネルのライセンスが与えられています。 このライセンスには、さらに 32 チャンネルライ
センスを 1 回だけ追加できます。
VRM には、BVC や Bosch VMS で使用する強力な録画エンジンが搭載されており、ライブ表示や録
画データの再生を行うことができます。 BVC と Bosch VMS は、Bosch の各販売チャネルで購入し
てください。
VRM アプライアンスは、十分な機能を持つ VRM 録画ソリューションです。ただし、設定可能なチ
ャンネル数のみが限定されます。 VRM ソフトウェアが不要なアプリケーションでは、VRM サービ
スを無効にする必要があります。
- | V1 | 2011.03
クイックインストールガイド
Bosch Sicherheitssysteme GmbH
システムのセットアップ - 最初の手順 | ja
1200 Series/4-bay IP Video Storage System
3.4.1
73
その他のソフトウェアとマニュアル
ハードウェアとソフトウェア (VRM)の設定用ソフトウェアは、 C:\Bosch\resources のフォル
ダーにある VRM アプライアンスから入手できます。
VRM Configurator:ディスクアレイ、カメラ、録画スケジューラーなど VRM を簡単に設定するため
のソフトウェアです。Bosch ワークステーションハードウェアなどのクライアントシステムに個別
にインストールする必要があります。
IVA など、設定タスクに関する内容をすべて表示するには、Bosch Video SDK (Bosch の Web サイ
トから入手可能)に付属している VRM Configurator をクライアントシステムに個別にインストール
する必要があります。
Bosch DLA と VRM のマニュアルは、以下の方法で入手してください。
www.boschsecurity.com > 国と地域の選択 > 製品カタログの選択 > 製品の検索を開始 > 検索結果か
ら製品を選択し、既存のマニュアルを表示
3.4.2
VRM サービスを無効にする
システムは必ず VRM アプリケーションがプリインストールされた状態で納品されますが、もしディ
スクアレイとしてのみ使用する場合は、次の方法で VRM サービスを無効にすることができます。
1.
ストレージシステムにログオンし、[Bosch VRM Appliance initial configuration]ウィンドウを
表示します。Bosch VRM Appliance initial configuration で最初に表示されるウィンドウには、
システムの構成と設定の概要が表示されます。
[Bosch VRM Appliance initial configuration]ウィンドウが表示されていない場合は、
[Start]> [Run]> [oobe]をクリックします。
2.
Disable/Enable Bosch VRM Appliance のリンクを選択して、VRM 録画サービスを停止/開始し
ます。
サービスを再起動するには、[Bosch VRM Appliance initial configuration]ウィンドウで enable
Bosch VRM Appliance リンクをクリックします。
Siehe auch セクション 「3.3 IP アドレスの設定」
3.5
標準的なシステム設定
システムは設定済みの iSCSI ターゲットと 4 つの LUN と一緒に納品されます。
デフォルトのターゲット名は TG0 で、すべての iSCSI LUN を保持します。
LUN の命名規約は VHDxx.vhd です。ここで、 <xx> の範囲は 01 ~ 08 で、使用するシステムによ
って異なります。デフォルトのセットアップでは、システムへの接続にすべての iSCSI イニシエー
ターを使用できます。
システムは iSCSI ターゲットサービスが有効となっている状態で納品されます。プリインストール
されている VRM アプリケーションがこのサービスを使用します。
3.6
保守と修理
ストレージシステムには 3 年間の保証が付いています。 問題が発生した場合は、Bosch のサポート
およびサービスのガイドラインに従って処理されます。Bosch DLA ディスクアレイの場合、Bosch
の標準的な作業のサポート方法が適用されます。
問題が発生した場合、次のモジュールはユニットを送付しなくても設置場所で交換できる場合があ
ります。
-
ハードドライブ:交換できるハードドライブとしては、Bosch 純正のハードドライブのみがサ
ポートされます。 これ以外の場合は、保証が無効となります。
Bosch Sicherheitssysteme GmbH
クイックインストールガイド
- | V1 | 2011.03
74
ja | システムのセットアップ - 最初の手順
1200 Series/4-bay IP Video Storage System
RMA の要求
部品に問題がある場合は、次のいずれかの Bosch RMA contact で、RMA を要求してください。
-
RMA Contact AMEC
Bosch ST, RMA Swapstock, 8601 East Cornhusker Hwy, Lincoln, NE 68507 -USA
電話番号:+1(402)467-6610
FAX:なし
E- メール:[email protected]
営業時間:月曜日~金曜日、6:00 ~ 16:30
-
RMA Desk APR
Robert Bosch (SEA) Pte Ltd, 11 Bishan Street 21, (5 階、業務用エレベーターを使用 ),
Singapore 573943
電話番号:+65 6571 2872
FAX:なし
E- メール:[email protected]
営業時間:月曜日~金曜日、8:30 ~ 17:45
-
RMA contact China
Bosch (Zhuhai) Security Systems Co. Ltd. Ji Chang Bei Road 20#, Qingwan Industrial Estate;
Sanzao Town, Jinwan District, Zhuhai; P.R. China; 郵便番号:519040
電話番号:+86 756 7633117 / 121
FAX:なし
E- メール:[email protected]
営業時間:月曜日~金曜日、8:30 ~ 17:30
-
RMA Contact EMEA
Bosch Security Systems, C/o EVI Audio GmbH, Ernst-Heinkel Str. 4, 94315 Straubing,
GERMANY
連絡先:RA デスク管理者
電話番号:+49(9421)706-366
FAX:なし
E- メール:[email protected]
営業時間:月曜日~金曜日、7:00 ~ 18:00
- | V1 | 2011.03
クイックインストールガイド
Bosch Sicherheitssysteme GmbH
1200 Series/4-bay IP Video Storage System
Inhoudsopgave | nl
75
Inhoudsopgave
1
Veiligheidsmaatregelen
76
1.1
Algemene veiligheidsmaatregelen
76
1.2
Veiligheidsmaatregelen voor elektriciteit
76
1.3
ESD-voorzorgsmaatregelen
77
1.4
Voorzorgmaatregelen voor bedrijf
77
2
Systeemconfiguratie - hardware
78
2.1
Inleiding
78
2.2
Uitpakken
78
2.3
De installatie voorbereiden
78
2.3.1
Een locatie voor de installatie kiezen
78
2.3.2
Voorzorgsmaatregelen systeem
78
2.4
Het systeem inschakelen
78
3
Systeemconfiguratie – Eerste stappen
79
3.1
Inleiding
79
3.2
Installatie-instructie
79
3.3
IP-adres instellen
79
3.3.1
Bureaubladaansluiting op afstand
79
3.3.2
Fysieke aansluiting
82
3.4
VRM Appliance
84
3.4.1
Aanvullende software en documentatie
85
3.4.2
De VRM Service uitschakelen
85
3.5
Standaard systeemconfiguratie
85
3.6
Onderhoud en reparatie
86
Bosch Sicherheitssysteme GmbH
Beknopte installatiehandleiding
- | V1 | 2011.03
76
nl | Veiligheidsmaatregelen
1200 Series/4-bay IP Video Storage System
1
Veiligheidsmaatregelen
1.1
Algemene veiligheidsmaatregelen
Volg onderstaande maatregelen om de algemene veiligheid te waarborgen:
–
Houd de omgeving rond het systeem schoon en vrij van rommel.
–
Plaats de bovenkap van het chassis en eventuele systeemcomponenten die zijn
verwijderd uit de buurt van het systeem of op een tafel, zodat er niet per ongeluk op kan
worden getrapt.
–
Draag bij het werken met het systeem geen losse kleding zoals stropdassen en
losgeknoopte mouwen, die in aanraking kan komen met elektrische circuits of in een
koelventilator kunnen worden getrokken.
–
Draag geen sieraden of metalen voorwerpen op uw lichaam. Dit zijn uitstekende
metaalgeleiders die kortsluiting kunnen veroorzaken en u kunnen verwonden wanneer ze
in contact komen met printplaten of plaatsen waar spanning aanwezig is.
–
Na de werkzaamheden in het systeem sluit u het systeem weer en maakt u het vast aan
het rek nadat u hebt gecontroleerd of alle aansluitingen tot stand zijn gebracht.
–
Het systeem weegt ongeveer 19,5 kg (volledig belast). Het systeem moet langzaam
worden opgetild (twee personen met gespreide benen aan beide zijden) om het gewicht
te verdelen. Houd altijd uw rug recht en til met uw benen.
1.2
Veiligheidsmaatregelen voor elektriciteit
De volgende basisveiligheidsmaatregelen voor elektriciteit moeten worden getroffen om
persoonlijk letsel en schade aan het systeem te voorkomen:
–
Houd rekening met de locatie van de aan/uit-schakelaar op het chassis en met de locaties
van de noodstopschakelaar, de afsluitschakelaar of het stopcontact in de ruimte. Bij een
ongeval met de elektriciteit kunt u dan snel de voeding van het systeem loskoppelen.
–
–
Werk nooit alleen met hoogspanningscomponenten.
De stroom moet altijd van het systeem af als u systeemcomponenten verwijdert of
installeert, zoals het moederbord, geheugenmodules en diskettestation. Schakel bij het
loskoppelen van de voeding eerst het systeem uit via het besturingssysteem en
ontkoppel daarna de netsnoeren van alle voedingseenheden in het systeem.
–
Bij het werken rond blootliggende elektrische circuits moet een andere persoon die
bekend is met de uitschakelelementen van de voeding in de buurt zijn om indien nodig de
voeding uit te schakelen.
–
Gebruik slechts één hand bij het werken aan elektrische apparatuur die is ingeschakeld.
Zo voorkomt u dat er een volledig circuit wordt gevormd, wat een elektrische schok
veroorzaakt. Wees uiterst voorzichtig met het gebruik van metalen gereedschappen, die
elektrische componenten of printplaten waarmee ze in contact komen snel kunnen
beschadigen.
–
Gebruik geen matten die zijn bedoeld om elektrostatische ontlading te verminderen als
beveiliging tegen elektrische schokken. Gebruik in plaats daarvan rubbermatten die
specifiek zijn bedoeld als isolatie tegen elektriciteit.
–
De netsnoeren moeten een aardingsstekker hebben en worden aangesloten op geaarde
stopcontacten. De unit beschikt over meerdere netsnoeren. Ontkoppel beide netsnoeren
voordat er onderhoudswerkzaamheden worden uitgevoerd, om elektrische schokken te
voorkomen.
- | V1 | 2011.03
Beknopte installatiehandleiding
Bosch Sicherheitssysteme GmbH
1200 Series/4-bay IP Video Storage System
–
Veiligheidsmaatregelen | nl
77
Batterij van moederbord:
VOORZICHTIG - Er bestaat gevaar voor explosie als de batterij op de kaart verkeerd om
wordt geplaatst, waardoor ompoling ontstaat. Vervang deze batterij uitsluitend door een
batterij van hetzelfde type of een vergelijkbaar type dat wordt aanbevolen door de
fabrikant (CR2032). Werp lege batterijen weg volgens de voorschriften van de fabrikant.
–
DVD-ROM-laser:
VOORZICHTIG - Dit systeem wordt geleverd zonder DVD-ROM-station, maar als deze is
toegevoegd: om rechtstreekse blootstelling aan de laserstraal en gevaarlijke straling te
voorkomen, mag de behuizing niet worden geopend en mag het station op geen enkele
manier worden gebruikt die afwijkt van het gebruiksdoel.
–
Vervangbare gesoldeerde zekeringen van moederbord: Zelfherstellende PTC (Positive
Temperature Coefficient) zekeringen op het moederbord mogen alleen worden
vervangen door geschoolde onderhoudsmonteurs. De nieuwe zekering moet gelijk of
gelijkwaardig zijn aan de te vervangen zekering. Neem contact op met de technische
ondersteuning voor meer informatie en ondersteuning.
1.3
ESD-voorzorgsmaatregelen
Elektrostatische ontlading (ESD) wordt gegenereerd door twee objecten met verschillende
elektrische ladingen die met elkaar in contact komen. Een elektrische ontlading wordt
gegenereerd om dit verschil te neutraliseren. Zo'n ontlading kan schade toebrengen aan
elektronische componenten en printplaten. De volgende maatregelen zijn in het algemeen
afdoende om dit verschil te neutraliseren voordat er contact wordt gemaakt om uw
apparatuur te beveiligen tegen ESD:
–
Gebruik een geaarde polsband die is bedoeld om statische ontlading te voorkomen.
–
Laat alle componenten en printplaten (PCB's) in hun antistatische verpakking totdat ze
worden gebruikt.
–
Raak een geaard metalen voorwerp aan alvorens een printplaat uit zijn antistatische
verpakking te halen.
–
Laat geen componenten of PCB's in contact komen met uw kleding, die een lading kan
bevatten, zelfs wanneer u een polsband draagt.
–
Pak een printplaat uitsluitend aan de randen vast; raak de componenten, chips,
geheugenmodules of contacten niet aan.
–
Raak bij het hanteren van chips of modules de pinnen ervan niet aan.
–
Berg het moederbord en randapparatuur op in hun antistatische verpakking wanneer ze
niet worden gebruikt.
–
Zorg er met het oog op de aarding voor dat het computerchassis een optimale geleiding
heeft tussen de voeding, de behuizing, de montagebevestigingen en het moederbord.
1.4
Voorzorgmaatregelen voor bedrijf
U dient ervoor te zorgen dat de chassiskap op zijn plek zit wanneer het systeem in bedrijf is
om een goede koeling te waarborgen. Als deze instructie niet strikt wordt opgevolgd, kan
schade aan het systeem ontstaan die niet door de garantie wordt gedekt.
Opmerking:
Gebruikte batterijen moeten zorgvuldig worden behandeld. De batterij mag op generlei wijze
worden beschadigd. Bij een beschadigde batterij kunnen stoffen vrijkomen die schadelijk zijn
voor het milieu. Gooi een gebruikte batterij niet bij het huisvuil of op een openbare vuilstort.
Lever gebruikte batterijen in volgens de geldende milieuvoorschriften.
Bosch Sicherheitssysteme GmbH
Beknopte installatiehandleiding
- | V1 | 2011.03
78
nl | Systeemconfiguratie - hardware
1200 Series/4-bay IP Video Storage System
2
Systeemconfiguratie - hardware
2.1
Inleiding
Meegeleverde onderdelen:
2.2
–
1200 Serie – MiniTower systeem met 4 eenheden, volledig uitgerust met 4 harde schijven
–
Naast het systeem moeten de volgende onderdelen bij ieder systeem zijn meegeleverd
–
Eén AC-voedingskabel voor iedere voedingseenheid in het systeem
–
Deze beknopte installatiehandleiding
Uitpakken
Inspecteer de doos waarin het systeem is vervoerd en bekijk of de doos op enigerlei wijze is
beschadigd. Als het systeem zelf schade vertoont, dien dan een schadeclaim in bij de
vervoerder die uw systeem heeft afgeleverd en stel de betreffende Bosch RMA desk op de
hoogte.
Vanwege het gewicht van het systeem: na het openen van de bovenzijde van de transportdoos
moet door twee personen (één persoon per zijde) de disk-array uit de doos worden getild.
Kies een geschikte locatie voor het systeem. De ruimte waarin het systeem komt, moet
schoon, stofvrij en goed geventileerd zijn. Vermijd ruimtes waar hitte, elektrische ruis en
elektromagnetische velden worden gegenereerd. Plaats het chassis tevens in de buurt van
minimaal één geaard stopcontact. Lees de voorzorgsmaatregelen in het volgende gedeelte.
2.3
De installatie voorbereiden
Als u de stappen in de aangegeven volgorde uitvoert, kunt u de installatieprocedure in de
kortst mogelijke tijd voltooien. Lees dit gedeelte door voordat u aan de installatieprocedure
begint die in de volgende gedeelten wordt beschreven.
2.3.1
Een locatie voor de installatie kiezen
Laat voldoende ruimte vrij aan de voorkant en de zijkant waar de chassiskap van het systeem
is aangebracht voor het verwijderen van verwisselbare schijven en voor voldoende
luchtstroming en makkelijke toegang voor onderhoud.
Dit product mag uitsluitend worden geïnstalleerd op een locatie met beperkte toegang
(speciale apparatuurruimtes, onderhoudskasten en dergelijke).
2.3.2
Voorzorgsmaatregelen systeem
–
Lees de elektriciteitsmaatregelen en de algemene veiligheidsmaatregelen door.
–
Gebruik een UPS (Uninterruptable Power Supply) om het systeem te beveiligen tegen
stroomstoten en spanningspieken en om ervoor te zorgen dat uw systeem blijft werken
bij een stroomstoring.
–
Laat de SATA-schijven en voedingsmodules afkoelen voordat u ze aanraakt.
–
Houd voor een goede koeling de chassiskappen altijd op de plaats en vastgezet als geen
onderhoudswerkzaamheden worden uitgevoerd.
2.4
Het systeem inschakelen
Het laatste wat u moet doen is het systeem voorzien van ingangsvoeding.
1.
Steek het netsnoer van de voedingseenheid in een voedingsstrip van hoge kwaliteit die
bescherming biedt tegen elektrische ruis en spanningspieken. We raden u aan een UPS
(Uninterruptible Power Supply, continue voeding) te gebruiken.
2.
- | V1 | 2011.03
Druk op de aan/uit-knop op het bedieningspaneel om het systeem op te starten.
Beknopte installatiehandleiding
Bosch Sicherheitssysteme GmbH
1200 Series/4-bay IP Video Storage System
Systeemconfiguratie – Eerste stappen | nl
3
Systeemconfiguratie – Eerste stappen
3.1
Inleiding
79
De onderstaande installatierichtlijn geldt voor de DLA Serie disk-array en bevat informatie
over installatie, configuratie en onderhoud en reparatie.
De Bosch DLA disk-arrays zijn gebaseerd op Microsoft Storage Server 2008. Microsoft
Windows Storage Server 2008 besturingssystemen hebben een gebruikersinterface voor
initiële serverconfiguratie, universeel beheer van opslagapparaten, eenvoudige configuratie,
eenvoudig beheer van opslag en gedeelde mappen en ondersteuning voor Microsoft iSCSI
Software Target.
Het systeem is speciaal afgestemd voor optimale prestaties voor op netwerk aangesloten
opslag. Windows Storage Server 2008 zorgt voor aanzienlijke verbeteringen met betrekking
tot scenario's voor deeldoeleinden en opslagbeheer en de integratie van onderdelen en
functionaliteiten voor beheer van opslagapparaten.
3.2
Installatie-instructie
Alle Bosch DLA Serie disk-arrays zijn vooraf geconfigureerd met een standaard IP-adres en
standaard
iSCSI-instellingen.
–
IP-adres: 10.10.10.10 (1e poort) en 10.10.10.11 (2e poort)
–
Netmasker: 255.255.255.0
–
Gebruiker: Administrator
–
Wachtwoord: WSS4Bosch
Gedetailleerde informatie zoals specificatiebladen en gebruikershandleiding vindt u op de
Bosch website www.boschsecurity.com onder Productcatalogus > CCTV > IP-video > Diskarrays.
Standaard iSCSI-instellingen zijn geoptimaliseerd voor gebruik met VRM. Alleen een ervaren
opslagbeheerder mag wijzigingen doorvoeren aan deze instellingen. De standaard configuratie
hoeft alleen te worden gewijzigd wanneer VRM niet wordt gebruikt of wanneer de standaard
instellingen niet geschikt zijn voor een andere Bosch iSCSI-applicatie.
3.3
IP-adres instellen
Het standaard IP-adres kan op twee manieren worden gewijzigd.
3.3.1
Bureaubladaansluiting op afstand
1.
Sluit het systeem aan op het netwerk via poort 1 of poort 2 en start het systeem op. Het
systeem wordt geleverd met geactiveerde bureaubladaansluiting op afstand. Meld u aan
bij een geschikt clientsysteem waar Windows XP, Windows Vista of Windows 7 is
geïnstalleerd (clienthardware en -software zijn niet meegeleverd) met een IP-adres in
hetzelfde netwerk (bijv. 10.10.10.12, netmasker 255.255.255.0).
Bosch Sicherheitssysteme GmbH
Beknopte installatiehandleiding
- | V1 | 2011.03
80
nl | Systeemconfiguratie – Eerste stappen
2.
1200 Series/4-bay IP Video Storage System
Open Remote Desktop Connection op het clientsysteem. Voer in het vak Computer het
IP-adres van de disk-array in waar u verbinding mee wilt maken.
Standaard IP-adres: 10.10.10.10 (poort 1)
3.
Klik op Connect, druk op Ctrl+Alt+Del (indien weergegeven) en voer het standaard
wachtwoord WSS4Bosch in nadat het aanmeldingsvenster van de disk-array wordt
weergegeven.
4.
Bij de eerste keer aanmelden worden de standaard instellingen van het bureaublad
toegepast. Dit duurt enkele seconden, waarna het systeem opnieuw wordt opgestart.
Meld u na opstarten van het systeem opnieuw aan. Het venster Bosch VRM Appliance
initial configuration wordt dan weergegeven. Gebruik dit programma om het IP-adres
van de disk-array te configureren.
- | V1 | 2011.03
Beknopte installatiehandleiding
Bosch Sicherheitssysteme GmbH
1200 Series/4-bay IP Video Storage System
5.
Systeemconfiguratie – Eerste stappen | nl
81
De bovenste weergave van Bosch VRM Appliance initial configuration is een overzicht
van de systeemconfiguratie en -instelllingen. Selecteer de link Configure networking
voor toegang tot de netwerkconfiguratie.
Voor iedere netwerkpoort wordt een afzonderlijk pictogram weergegeven. Selecteer het
pictogram Local Area Connection (geeft de status network weer) en dubbelklik op het
pictogram.
6.
Klik op Properties, selecteer Internet Protocol Version 4 (TCP/IPv4) en klik op
Properties.
Bosch Sicherheitssysteme GmbH
Beknopte installatiehandleiding
- | V1 | 2011.03
82
nl | Systeemconfiguratie – Eerste stappen
7.
1200 Series/4-bay IP Video Storage System
Via dit dialoogvenster kunt u de configuratie van het IP-adres instellen aan de hand van
de vereisten van het netwerk.
8.
3.3.2
Start het systeem opnieuw op.
Fysieke aansluiting
Het systeem wordt geleverd met een VGA grafische stekker en met PS2 stekkers voor muis en
toetsenbord.
1.
Sluit een monitor, een muis en een toetsenbord (niet meegeleverd) aan op de disk-array
en start het systeem op.
Opmerking:
Een na het opnieuw opstarten aangesloten PS2 muis of toetsenbord werkt
hoogstwaarschijnlijk niet correct.
2.
Druk na opstarten van het systeem op Ctrl+Alt+Del en voer het standaard wachtwoord
WSS4Bosch in nadat het aanmeldingsvenster van de disk-array wordt weergegeven.
3.
Bij de eerste keer aanmelden worden de standaard instellingen van het bureaublad
toegepast. Dit duurt enkele seconden, waarna het systeem opnieuw wordt opgestart.
Meld u na opstarten van het systeem opnieuw aan. Het venster Bosch VRM Appliance
- | V1 | 2011.03
Beknopte installatiehandleiding
Bosch Sicherheitssysteme GmbH
1200 Series/4-bay IP Video Storage System
Systeemconfiguratie – Eerste stappen | nl
83
initial configuration wordt dan weergegeven. Gebruik dit programma om het IP-adres
van de disk-array te configureren.
4.
De bovenste weergave van Bosch VRM Appliance initial configuration is een overzicht
van de systeemconfiguratie en -instelllingen. Selecteer de link Configure networking
voor toegang tot de netwerkconfiguratie.
Voor iedere netwerkpoort wordt een afzonderlijk pictogram weergegeven. Selecteer het
pictogram Local Area Connection (geeft de status network weer) en dubbelklik op het
pictogram.
Bosch Sicherheitssysteme GmbH
Beknopte installatiehandleiding
- | V1 | 2011.03
84
nl | Systeemconfiguratie – Eerste stappen
5.
1200 Series/4-bay IP Video Storage System
Klik op Properties, selecteer Internet Protocol Version 4 (TCP/IPv4) en klik op
Properties.
6.
Via dit dialoogvenster kunt u de configuratie van het IP-adres instellen aan de hand van
de vereisten van het netwerk.
7.
3.4
Start het systeem opnieuw op.
VRM Appliance
Op het systeem is de software Bosch Video Recording Manager (VRM) al geïnstalleerd, met
een volledige licentie voor 32 kanalen. Deze licentie kan slechts eenmaal worden uitgebreid
met een licentie voor nog eens 32 kanalen.
VRM biedt een veelzijdige opname-engine die kan worden gebruikt in combinatie met de BVC
of de Bosch VMS voor live-weergave en het afspelen van opgenomen materiaal. BVC en Bosch
VMS dienen te worden aangeschaft via de desbetreffende verkoopkanalen van Bosch.
- | V1 | 2011.03
Beknopte installatiehandleiding
Bosch Sicherheitssysteme GmbH
1200 Series/4-bay IP Video Storage System
Systeemconfiguratie – Eerste stappen | nl
85
VRM Appliance biedt een volledig functionele VRM opname-oplossing die alleen beperkt wordt
door het aantal configureerbare kanalen. Applicaties waarvoor de VRM software niet nodig is,
moeten de VRM service uitschakelen.
3.4.1
Aanvullende software en documentatie
Software voor het configureren van hardware en software (VRM) is verkrijgbaar op de VRM
Appliance in de map C:\Bosch\resources.
VRM Configurator: Software voor eenvoudige configuratie van VRM inclusief disk-array,
camera's, opnameplanner enz. moet worden geïnstalleerd op een afzonderlijk clientsysteem
(bijv. Bosch werkstation).
Houd er rekening mee dat voor alle weergavegerelateerde configuratietaken (bijv. IVA) de
VRM-configurator en de Bosch Video SDK (verkrijgbaar op de Bosch website) moeten worden
geïnstalleerd op een afzonderlijk clientsysteem.
Documentatie voor Bosch DLA en VRM vindt u op:
www.boschsecurity.com > selecteer uw regio en uw land > selecteer Productcatalogus > start
een zoekopdracht voor uw product > selecteer het product in de zoekresultaten om de
bestaande documenten te tonen.
3.4.2
De VRM Service uitschakelen
Het systeem wordt altijd geleverd met vooraf geïnstalleerde VRM applicatie. Als deze echter
alleen wordt gebruikt als een disk-array, dan kan de VRM Service worden uitgeschakeld:
1.
Meld u aan bij het opslagsysteem en start het venster Bosch VRM Appliance initial
configuration. De bovenste weergave van het venster Bosch VRM Appliance initial
configuration is een overzicht van de systeemconfiguratie en -instelllingen.
Als het venster Bosch VRM Appliance initial configuration niet wordt weergegeven, klik
dan op Start > Run > oobe.
2.
Selecteer de link Disable/Enable Bosch VRM Appliance om de VRM opnameservice te
stoppen/starten.
Om de service opnieuw te starten klikt u in het venster Bosch VRM Appliance initial
configuration op de koppeling enable Bosch VRM Appliance.
Zie ook Paragraaf 3.3 IP-adres instellen.
3.5
Standaard systeemconfiguratie
Het systeem wordt geleverd met het volledig geconfigureerde iSCSI doel en 4 vooraf
geconfigureerde LUN's.
De standaard doelnaam is TG0 en bevat alle iSCSI LUN's.
De aanduiding voor de LUN's is VHDxx.vhd, waar <xx> varieert van 01 tot 08, afhankelijk van
het gebruikte systeem. Via de standaard instellingen kan iedere iSCSI initiator verbinding
maken met het systeem.
Het systeem wordt geleverd met geactiveerde iSCSI Target Service, die wordt gebruikt door
de vooraf geïnstalleerde VRM applicatie.
Bosch Sicherheitssysteme GmbH
Beknopte installatiehandleiding
- | V1 | 2011.03
86
nl | Systeemconfiguratie – Eerste stappen
3.6
1200 Series/4-bay IP Video Storage System
Onderhoud en reparatie
Op de opslagsystemen wordt 3 jaar garantie verleend. Storingen worden behandeld in
overeenstemming met de richtlijnen voor ondersteuning en service van Bosch. Voor Bosch
DLA disk-arrays is de standaard werkwijze voor de Bosch ondersteuning van toepassing.
De volgende modules kunnen in geval van een storing ter plaatse worden vervangen zonder de
unit retour te zenden:
–
Harde schijven: alleen originele harde schijven van Bosch worden voor vervanging
ondersteund. In andere gevallen komt de garantie te vervallen.
Verzoek om RMA
Vraag om een RMA voor defecte onderdelen bij een van de onderstaande Bosch RMA
contacten.
–
RMA-contact AMEC
Bosch ST, RMA Swapstock, 8601 East Cornhusker Hwy, Lincoln, NE 68507-VS
Telefoon: +1 (402) 467-6610
Fax: n.v.t.
E-mail: [email protected]
Openingstijden: maandag t/m vrijdag 06:00 – 16:30
–
RMA Desk APR
Robert Bosch (SEA) Pte Ltd, 11 Bishan Street 21, (etage 5, vanaf dienstlift), Singapore
573943
Telefoon: +65 6571 2872
Fax: n.v.t.
E-mail: [email protected]
Openingstijden: maandag t/m vrijdag 08:30 – 17:45
–
RMA-contact China
Bosch (Zhuhai) Security Systems Co. Ltd. Ji Chang Bei Road 20#, Qingwan Industrial
Estate; Sanzao Town, Jinwan District, Zhuhai; P.R. China; postcode : 519040
Telefoon: +86 756 7633117 / 121
Fax: n.v.t.
E-mail: [email protected]
Openingstijden: maandag t/m vrijdag 08:30 – 17:30
–
RMA-contact EMEA
Bosch Security Systems, C/o EVI Audio GmbH, Ernst-Heinkel Str. 4, 94315 Straubing,
DUITSLAND
Contactpersoon: RA Desk Supervisor
Telefoon: +49(9421)706-366
Fax: n.v.t.
E-mail: [email protected]
Openingstijden: maandag t/m vrijdag 07:00 – 18:00
- | V1 | 2011.03
Beknopte installatiehandleiding
Bosch Sicherheitssysteme GmbH
1200 Series/4-bay IP Video Storage System
Spis treści | pl
87
Spis treści
1
Uwagi dotyczące bezpieczeństwa
88
1.1
Ogólne zalecenia dotyczące bezpieczeństwa
88
1.2
Zalecenia dotyczące bezpieczeństwa – instalacja elektryczna
88
1.3
Zapobieganie wyładowaniom elektrostatycznym
89
1.4
Zalecenia dotyczące eksploatacji
89
2
Konfigurowanie systemu – elementy sprzętowe
90
2.1
Wstęp
90
2.2
Rozpakowanie
90
2.3
Przygotowanie do konfiguracji
90
2.3.1
Wybór lokalizacji na instalację
90
2.3.2
Zalecenia dotyczące systemu
90
2.4
Włączanie zasilania systemu
91
3
Konfigurowanie systemu – pierwsze kroki
91
3.1
Wstęp
91
3.2
Instrukcje konfigurowania
91
3.3
Ustawianie adresu IP
91
3.3.1
Podłączanie pulpitu zdalnego
92
3.3.2
Podłączanie elementów zewnętrznych
94
3.4
Urządzenie VRM
96
3.4.1
Dodatkowe oprogramowanie i dokumentacja
97
3.4.2
Wyłączanie usługi VRM
97
3.5
Standardowa konfiguracja systemu
97
3.6
Serwisowanie i naprawa
98
Bosch Sicherheitssysteme GmbH
Instrukcja szybkiej instalacji
- | V1 | 2011.03
88
pl | Uwagi dotyczące bezpieczeństwa
1200 Series/4-bay IP Video Storage System
1
Uwagi dotyczące bezpieczeństwa
1.1
Ogólne zalecenia dotyczące bezpieczeństwa
Zapewnienie ogólnego bezpieczeństwa wymaga przestrzegania następujących zasad:
–
Przestrzeń wokół systemu należy utrzymywać w czystości i bez zbędnych przedmiotów.
–
Górną pokrywę obudowy i inne podzespoły systemu należy po wymontowaniu
umieszczać z dala od urządzenia lub na stole, tak aby nie można było przez przypadek na
nie nadepnąć.
–
Podczas pracy przy systemie nie należy mieć na sobie luźnych elementów ubioru, jak
krawaty czy niezapięte rękawy koszuli, które mogą zetknąć się z obwodami elektrycznymi
lub zostać wciągnięte w wentylator chłodzący.
–
Zdjąć biżuterię lub metalowe przedmioty, które stanowią dobre przewodniki prądu
elektrycznego mogące powodować zwarcia w przypadku zetknięcia się z płytkami
drukowanymi lub elementami przewodzącymi prąd elektryczny.
–
Po uzyskaniu dostępu do wnętrza systemu, zamknąć jego tylną pokrywę i zamocować ją
do szafy Rack, upewniając się wcześniej, że wszystkie połączenia przebiegają
prawidłowo.
–
System z pełnym wyposażeniem waży około 19,5 kg). System powinien być podnoszony
przez dwie osoby trzymające go z przeciwległych stron i stojące na lekko rozstawionych
nogach, aby ciężar ciała rozkładał się równomiernie na obie stopy. Należy utrzymywać
plecy w pozycji wyprostowanej i podczas podnoszenia uginać i wyprostowywać tylko
nogi.
1.2
Zalecenia dotyczące bezpieczeństwa – instalacja elektryczna
Aby uchronić się przed obrażeniami, a system przed uszkodzeniem, przestrzegać
podstawowych, ogólnych zaleceń dotyczących bezpieczeństwa prac przy instalacjach
elektrycznych:
–
Zapoznać się z umiejscowieniem wyłącznika zasilania na obudowie, jak również z
lokalizacją głównego wyłącznika awaryjnego w pomieszczeniu, bądź odłącznikiem
gniazda elektrycznego. Dzięki tym wyłącznikom można szybko odłączyć zasilanie
elektryczne od systemu w razie awarii lub wypadku związanego z instalacją elektryczną.
–
–
Podczas prac przy podzespołach wysokiego napięcia powinna uczestniczyć druga osoba.
Napięcie powinno być odłączone przez cały czas trwania demontażu lub montażu
głównych podzespołów systemu, jak np. płyty głównej, modułów pamięci i stacji
dyskietek. Chcąc odłączyć zasilanie, należy w pierwszej kolejności wyłączyć system
operacyjny, a następnie odłączyć przewody zasilania od wszystkich zasilaczy systemu.
–
Podczas prac w pobliżu nieosłoniętych obwodów elektrycznych powinna asystować
druga osoba zaznajomiona z działaniem wyłączników zasilania, która będzie mogła w
razie konieczności odłączyć zasilanie.
–
Podczas pracy przy podłączonych do zasilania urządzeniach elektrycznych wymagane
czynności wykonywać tylko jedną ręką. Ma to na celu zapobieganie utworzeniu drogi
przepływu prądu elektrycznego przez ciało, co skutkowałoby porażeniem prądem
elektrycznym. Zachowywać szczególną ostrożność podczas używania metalowych
narzędzi, które mogą łatwo uszkodzić podzespoły elektryczne lub płytki drukowane w
przypadku bezpośredniego kontaktu.
–
Do ochrony przed porażeniem prądem elektrycznym nie używać mat chroniących przed
wyładowaniami elektrostatycznymi. Zamiast tego używać mat gumowych,
zaprojektowanych specjalnie jako izolatory prądu elektrycznego.
- | V1 | 2011.03
Instrukcja szybkiej instalacji
Bosch Sicherheitssysteme GmbH
1200 Series/4-bay IP Video Storage System
–
Uwagi dotyczące bezpieczeństwa | pl
89
Przewody zasilania muszą być wyposażone w żyłę uziemiającą i należy je podłączać
wyłącznie do uziemionych gniazd elektrycznych. W urządzeniu znajduje się więcej niż
jeden przewód zasilania. Przed rozpoczęciem prac serwisowych należy odłączyć oba
przewody zasilania.
–
Bateria płyty głównej:
PRZESTROGA – W przypadku zainstalowania baterii na płycie w sposób nieprawidłowy i
zamiany biegunów miejscami, może dojść do eksplozji. Baterię należy wymieniać
wyłącznie na element dokładnie tego samego typu lub na baterię zamienną, zalecaną
przez producenta (CR2032). Zużyte baterie należy usuwać zgodnie z instrukcjami
producenta.
–
Laser w napędzie DVD-ROM:
PRZESTROGA – System jest dostarczany bez napędu DVD-ROM, jednak w razie jego
dołączenia należy przestrzegać następującego zalecenia: aby nie wystawić się na
bezpośrednie działanie wiązki lasera i niebezpiecznego promieniowania, nie otwierać
obudowy, ani nie używać modułu w żaden nietypowy sposób.
–
Wymienne bezpieczniki przylutowane do płyty głównej: samoczynnie resetujące się PTC
(dodatni współczynnik temperatury) bezpieczniki na płycie głównej mogą być
wymieniane wyłącznie przez odpowiednio przeszkolonych techników serwisu. Nowy
bezpiecznik musi być taki sam jak wymieniany lub stanowić jego odpowiednik. Wszelkie
informacje oraz pomoc można uzyskać, kontaktując się z działem pomocy technicznej.
1.3
Zapobieganie wyładowaniom elektrostatycznym
Wyładowanie elektrostatyczne (ESD) zachodzi między dwoma przedmiotami o różnych
ładunkach elektrycznych w momencie ich zetknięcia. Wyładowanie elektrostatyczne powstaje
w celu zneutralizowania tej różnicy i może uszkodzić podzespoły elektryczne i płytki
drukowane. W celu ochrony urządzeń przed ESD należy podejmować niżej wymienione kroki w
celu zneutralizowania różnicy ładunków elektrycznych przed zetknięciem się przedmiotów:
–
Używać opaski uziemiającej chroniącej przed wyładowaniami elektrostatycznymi.
–
Wszystkie podzespoły i płytki drukowane (PCB) przechowywać jak najdłużej w ich
torbach antystatycznych, aż do momentu wykorzystania.
–
Przed wyjęciem podzespołu/płytki z torby antystatycznej dotknąć uziemionego
metalowego przedmiotu.
–
Uważać, aby podzespoły lub płytki PCB nie zetknęły się z ubraniem, które może
przechowywać ładunek elektryczny nawet wtedy, gdy używana jest opaska antystatyczna.
–
Płytki trzymać wyłącznie za krawędzie; nie dotykać zamontowanych na płytkach
podzespołów, układów scalonych, modułów pamięci lub styków.
–
W przypadku przenoszenia układów scalonych lub modułów, starać się nie dotykać ich
–
Jeżeli płyta główna lub urządzenia peryferyjne nie są używane, umieścić je z powrotem w
styków.
torbach antystatycznych.
–
Sprawdzić, czy obudowa komputera zapewnia doskonałe przewodzenie prądu między
zasilaczem, pokrywą, elementami mocującymi i płytą główną, co pozwoli na prawidłowe
uziemienie.
1.4
Zalecenia dotyczące eksploatacji
Podczas pracy systemu musi być założona obudowa, aby zapewnić poprawne chłodzenie.
Nieprzestrzeganie tej zasady grozi uszkodzeniem systemu, które nie jest objęte gwarancją.
Bosch Sicherheitssysteme GmbH
Instrukcja szybkiej instalacji
- | V1 | 2011.03
90
pl | Konfigurowanie systemu – elementy sprzętowe
1200 Series/4-bay IP Video Storage System
Uwaga:
Z zużytymi bateriami należy się obchodzić ostrożnie. Baterii nie wolno w jakikolwiek sposób
niszczyć. Z uszkodzonych baterii mogą wyciekać niebezpieczne związki do środowiska.
Zużytych baterii nie wolno wrzucać do śmieci ani wywozić na publiczne wysypisko. Zużyte
baterie należy oddawać do wyspecjalizowanego punktu zbiórki odpadów niebezpiecznych.
2
Konfigurowanie systemu – elementy sprzętowe
2.1
Wstęp
Elementy wchodzące w skład zestawu:
–
Seria 1200 — system w obudowie MiniTower z 4 wnękami, w pełni wyposażony w 4 dyski
twarde
–
Oprócz samego systemu otrzymany w dostawie zestaw powinien obejmować następujące
elementy:
2.2
–
Po jednym sieciowym kablu zasilania do każdego zasilacza w systemie
–
Niniejsza skrócona instrukcja obsługi
Rozpakowanie
Należy obejrzeć opakowanie, w którym urządzenie zostało dostarczone, i zanotować wszelkie
ewentualne uszkodzenia. Jeżeli uszkodzony jest sam system, należy zgłosić reklamację w
firmie kurierskiej, która dostarczyła system, i powiadomić o tym odpowiedni dział RMA firmy
Bosch.
Ze względu na ciężar systemu po otwarciu pokrywy opakowania transportowego macierz
dyskową powinny wyjmować dwie osoby stojące po jej przeciwległych stronach.
Wybrać odpowiednią lokalizację, gdzie system zostanie ustawiony. System powinien stać w
miejscu czystym, bez zapylenia i zakurzenia, wyposażonym w dobrą wentylację. Unikać miejsc,
w których występują wysokie temperatury, zakłócenia elektryczne lub są generowane pola
elektromagnetyczne. Urządzenie należy umieścić również obok gniazda elektrycznego z
uziemieniem. Przeczytać zalecenia zamieszczone w następnej części instrukcji.
2.3
Przygotowanie do konfiguracji
Wykonanie czynności w podanej kolejności umożliwi zakończenie procesu montażu w
najkrótszym możliwym czasie. Przed przystąpieniem do montażu, którego procedura została
opisana w następnych częściach instrukcji, należy przeczytać niniejszą część.
2.3.1
Wybór lokalizacji na instalację
Pozostawić na tyle dużo wolnej przestrzeni z przodu i z boku, gdzie znajduje się pokrywa
obudowy, aby umożliwić wyjmowanie dysków wymiennych, swobodną cyrkulację powietrza i
bezproblemowe wykonywanie czynności serwisowych.
Produkt jest przeznaczony do montażu wyłącznie w miejscach o ograniczonym dostępie
(wydzielone pomieszczenia na sprzęt, szafy serwisowe itp.).
2.3.2
Zalecenia dotyczące systemu
–
Przeczytać zalecenia dotyczące układu elektrycznego oraz ogólne zalecenia dotyczące
bezpieczeństwa.
–
Używać stabilizowanego zasilacza bezprzerwowego (UPS) w celu ochrony systemu przed
udarami i skokami napięcia, jeśli wymagane jest podtrzymanie pracy systemu w
przypadku awarii zasilania sieciowego.
- | V1 | 2011.03
Instrukcja szybkiej instalacji
Bosch Sicherheitssysteme GmbH
1200 Series/4-bay IP Video Storage System
Konfigurowanie systemu – pierwsze kroki | pl
91
–
Przed dotknięciem dysków twardych SATA i modułów zasilaczy poczekać, aż ostygną.
–
W czasie, gdy system nie jest poddawany czynnościom serwisowym, pokrywa obudowy
musi być zawsze założona i przymocowana, aby zapewnić poprawne chłodzenie systemu.
2.4
Włączanie zasilania systemu
Ostatnią czynnością, jaką należy wykonać, jest włączenie zasilania systemu.
1.
Podłączyć przewód zasilania wychodzący z modułu zasilacza do wysokiej jakości listwy
zasilającej zapewniającej ochronę przed zakłóceniami elektrycznym i udarami napięcia.
Zaleca się korzystanie z zasilacza awaryjnego (UPS).
2.
Nacisnąć przycisk zasilania na panelu sterującym, aby uruchomić system.
3
Konfigurowanie systemu – pierwsze kroki
3.1
Wstęp
Następujące instrukcje montażu dotyczą macierzy dyskowych Bosch DLA i obejmują montaż,
konfigurowanie, serwisowanie i naprawianie systemu.
Macierze dyskowe Bosch DLA działają pod kontrolą systemu operacyjnego Microsoft Storage
Server 2008. W systemie operacyjnym Microsoft Windows Storage Server 2008 dostępne są
rozwiązania w zakresie interfejsu użytkownika do wstępnej konfiguracji serwera,
ujednoliconego zarządzania urządzeniami pamięci masowych, uproszczonej konfiguracji oraz
zarządzania przechowywanymi danymi i folderami udostępnionymi, a także obsługi
oprogramowania Microsoft iSCSI Software Target.
Jest on specjalnie dostosowany do zapewnienia optymalnego działania pamięci masowej
podłączonej przez sieć. System Windows Storage Server 2008 oferuje znaczne ulepszenia w
zakresie zarządzania udostępnianiem i danymi, a także integracji składników i funkcji
zarządzania urządzeniami pamięci masowych.
3.2
Instrukcje konfigurowania
Wszystkie macierze dyskowe Bosch DLA są konfigurowane fabrycznie przy użyciu domyślnego
adresu IP i domyślnych ustawień
iSCSI.
–
Adres IP: 10.10.10.10 (1. port) i 10.10.10.11 (2. port)
–
Maska sieci: 255.255.255.0
–
Użytkownik: Administrator
–
Hasło: WSS4Bosch
Szczegółowe informacje, w tym karty katalogowe i instrukcje obsługi, są dostępne na stronie
internetowej Bosch www.boschsecurity.com, w części Product Catalog (Katalog
produktów) > CCTV > IP Video (Sieciowe systemy wizyjne) > Disk Arrays (Macierze
dyskowe).
Domyślne ustawienia iSCSI są zoptymalizowane pod kątem używania z oprogramowaniem
VRM. Zmiany tych ustawień powinien wykonywać tylko doświadczony administrator urządzeń
pamięci masowej. Zmiana konfiguracji domyślnej jest wymagana tylko wtedy, gdy nie jest
używane oprogramowanie VRM lub ustawienia domyślne nie są odpowiednie dla innego
zastosowania macierzy Bosch iSCSI.
3.3
Ustawianie adresu IP
Istnieją dwa sposoby zmiany domyślnego adresu IP.
Bosch Sicherheitssysteme GmbH
Instrukcja szybkiej instalacji
- | V1 | 2011.03
92
pl | Konfigurowanie systemu – pierwsze kroki
3.3.1
1200 Series/4-bay IP Video Storage System
Podłączanie pulpitu zdalnego
1.
Podłącz system do sieci poprzez port 1 lub port 2 i uruchom go. W systemie jest
fabrycznie włączone podłączanie pulpitu zdalnego. Zaloguj się do odpowiedniego
systemu klienckiego, na którym jest zainstalowany system Windows XP, Windows Vista
lub Windows 7 (komputer i oprogramowanie klienckie nie wchodzą w zakres dostawy) o
adresie IP w tej samej sieci, np. 10.10.10.12 (maska sieci: 255.255.255.0).
2.
Otwórz program Remote Desktop Connection w systemie klienckim. W polu Computer
wpisz adres IP macierzy dyskowej, z którą chcesz się połączyć.
Domyślny adres IP: 10.10.10.10 (port 1)
3.
Kliknij Connect, naciśnij Ctrl+Alt+Del (jeśli zostanie wyświetlona taka instrukcja), a
następnie wpisz domyślne hasło WSS4Bosch w wyświetlonym oknie logowania do
macierzy dyskowej.
4.
Podczas pierwszego logowania zostaną zastosowane domyślne ustawienia pulpitu.
Potrwa to kilka sekund, po czym system zostanie ponownie uruchomiony. Po ponownym
uruchomieniu systemu zaloguj się jeszcze raz. Tym razem zostanie wyświetlony ekran
Bosch VRM Appliance initial configuration. Przy użyciu tego programu skonfiguruj adres
IP macierzy dyskowej.
- | V1 | 2011.03
Instrukcja szybkiej instalacji
Bosch Sicherheitssysteme GmbH
1200 Series/4-bay IP Video Storage System
5.
Konfigurowanie systemu – pierwsze kroki | pl
93
Widok najwyższego poziomu okna Bosch VRM Appliance initial configuration
przedstawia konfigurację i ustawienia systemu. Kliknij łącze Configure networking, aby
przejść do konfiguracji sieci.
Każdy port sieci jest przedstawiony jako osobna ikona. Wybierz ikonę Local Area
Connection, przy której jest podany status network, a następnie kliknij ją dwukrotnie.
6.
Kliknij przycisk Properties, wybierz opcję Internet Protocol Version 4 (TCP/IPv4), a
następnie kliknij przycisk Properties.
Bosch Sicherheitssysteme GmbH
Instrukcja szybkiej instalacji
- | V1 | 2011.03
94
pl | Konfigurowanie systemu – pierwsze kroki
7.
1200 Series/4-bay IP Video Storage System
W tym oknie dialogowym można ustawić konfigurację adresu IP stosownie do wymagań
danej sieci.
8.
3.3.2
Ponownie uruchom system.
Podłączanie elementów zewnętrznych
System jest wyposażony w złącze monitora VGA i złącza PS2 myszy i klawiatury.
1.
Podłącz monitor, mysz i klawiaturę (nie wchodzą w skład dostarczanego zestawu) do
macierzy dyskowej i uruchom system.
Uwaga:
Jeśli mysz lub klawiaturę PS2 podłączono po uruchomieniu systemu, prawdopodobnie
system nie będzie działać poprawnie.
2.
Po uruchomieniu systemu naciśnij Ctrl+Alt+Del, a następnie wpisz hasło domyślne
WSS4Bosch, gdy zostanie wyświetlone okno logowania do macierzy dyskowej.
3.
Podczas pierwszego logowania zostaną zastosowane domyślne ustawienia pulpitu.
Potrwa to kilka sekund, po czym system zostanie ponownie uruchomiony. Po ponownym
uruchomieniu systemu zaloguj się jeszcze raz. Tym razem zostanie wyświetlony ekran
- | V1 | 2011.03
Instrukcja szybkiej instalacji
Bosch Sicherheitssysteme GmbH
1200 Series/4-bay IP Video Storage System
Konfigurowanie systemu – pierwsze kroki | pl
95
Bosch VRM Appliance initial configuration. Przy użyciu tego programu skonfiguruj adres
IP macierzy dyskowej.
4.
Widok najwyższego poziomu okna Bosch VRM Appliance initial configuration
przedstawia konfigurację i ustawienia systemu. Kliknij łącze Configure networking, aby
przejść do konfiguracji sieci.
Każdy port sieci jest przedstawiony jako osobna ikona. Wybierz ikonę Local Area
Connection, przy której jest podany status network, a następnie kliknij ją dwukrotnie.
Bosch Sicherheitssysteme GmbH
Instrukcja szybkiej instalacji
- | V1 | 2011.03
96
pl | Konfigurowanie systemu – pierwsze kroki
5.
1200 Series/4-bay IP Video Storage System
Kliknij przycisk Properties, wybierz opcję Internet Protocol Version 4 (TCP/IPv4), a
następnie kliknij przycisk Properties.
6.
W tym oknie dialogowym można ustawić konfigurację adresu IP stosownie do wymagań
danej sieci.
7.
3.4
Ponownie uruchom system.
Urządzenie VRM
W systemie jest fabrycznie zainstalowane oprogramowanie Bosch Video Recording Manager
(VRM) z pełną licencją na 32 kanały. Licencję tę można rozszerzyć tylko o kolejne 32 kanały.
VRM to wydajny menedżer zapisu obrazu, który umożliwia podgląd na żywo i odtwarzanie
zapisanych danych w systemach BVC lub Bosch VMS. BVC i Bosch VMS można kupić za
pośrednictwem dystrybutora firmy Bosch.
- | V1 | 2011.03
Instrukcja szybkiej instalacji
Bosch Sicherheitssysteme GmbH
1200 Series/4-bay IP Video Storage System
Konfigurowanie systemu – pierwsze kroki | pl
97
Urządzenie VRM stanowi w pełni funkcjonalny system VRM zapisu obrazu obsługujący
ograniczoną liczbę kanałów, które można konfigurować. W zastosowaniach, w których
oprogramowanie VRM nie jest wymagane, należy wyłączyć usługę VRM.
3.4.1
Dodatkowe oprogramowanie i dokumentacja
Program do konfigurowania elementów sprzętowych i oprogramowania VRM jest dostępny w
urządzeniu VRM, w folderze C:\Bosch\resources.
VRM Configurator: program umożliwiający łatwe konfigurowanie VRM, w tym macierzy
dyskowej, kamer, harmonogramu zapisu itp. Należy go zainstalować na osobnym systemie
klienckim, np. stacji roboczej Bosch.
Wszystkie czynności konfiguracyjne związane z podglądem, np. konfigurowanie układu IVA,
wymagają zainstalowania konfiguratora VRM oraz pakietu Bosch Video SDK (który można
pobrać ze strony internetowej Bosch).
Dokumentacja oprogramowania DLA i VRM jest dostępna na stronie internetowej:
www.boschsecurity.com > wybierz region i kraj > wybierz opcję Katalog produktów >
wyszukaj produkt > wybierz produkt w wynikach wyszukiwania (zostaną wyświetlone
dostępne dokumenty).
3.4.2
Wyłączanie usługi VRM
Aplikacja VRM jest zawsze fabrycznie zainstalowana w systemie, ale jeśli ma on być używany
tylko jako macierz dyskowa, usługę VRM można wyłączyć:
1.
Zaloguj się do systemu dyskowego i otwórz okno Bosch VRM Appliance initial
configuration. Widok najwyższego poziomu okna Bosch VRM Appliance initial
configuration przedstawia konfigurację i ustawienia systemu.
Jeśli okno Bosch VRM Appliance initial configuration nie zostanie wyświetlone, kliknij
Start > Run > oobe.
2.
Kliknij łącze Disable/Enable Bosch VRM Appliance, aby uruchomić/zatrzymać usługę
zapisu obrazu VRM.
Aby uruchomić usługę ponownie, w oknie Bosch VRM Appliance initial configuration kliknij
łącze enable Bosch VRM Appliance.
Patrz także Punkt 3.3 Ustawianie adresu IP.
3.5
Standardowa konfiguracja systemu
W systemie jest fabrycznie skonfigurowana lokalizacja docelowa iSCSI oraz są wstępnie
skonfigurowane 4 jednostki LUN.
Lokalizacja docelowa domyślnie nosi nazwę TG0 i obejmuje wszystkie jednostki LUN iSCSI.
Jednostkom LUN są nadawane nazwy według wzorca VHDxx.vhd, gdzie <xx> to liczba od 01
do 08 zależnie od używanego systemu. W domyślnej konfiguracji z systemem może się
połączyć każdy inicjator iSCSI.
W systemie jest domyślnie włączona usługa iSCSI Target Service używana przez fabrycznie
zainstalowaną aplikację VRM.
Bosch Sicherheitssysteme GmbH
Instrukcja szybkiej instalacji
- | V1 | 2011.03
98
pl | Konfigurowanie systemu – pierwsze kroki
3.6
1200 Series/4-bay IP Video Storage System
Serwisowanie i naprawa
Systemy dyskowe są objęte 3-letnią gwarancją. Wszelkie problemy są rozwiązywane zgodnie z
zasadami obsługi klienta i serwisu Bosch. Obsługa techniczna macierzy dyskowych Bosch DLA
jest realizowana w standardowy sposób.
Następujące moduły można wymieniać na miejscu w razie awarii bez wysyłania całego
systemu:
–
Dyski twarde: jako części zamienne mogą być stosowane tylko oryginalne dyski twarde
Bosch. W przeciwnym razie gwarancja traci ważność.
Wnioski w sprawie RMA
Wnioski w sprawie RMA, dotyczące uszkodzonych części należy kierować do jednego z
następujących punktów kontaktowych Bosch RMA.
–
Dane kontaktowe dot. RMA – AMEC
Bosch ST, RMA Swapstock, 8601 East Cornhusker Hwy, Lincoln, NE 68507 – Stany
Zjednoczone
Tel.: +1(402)467-6610
Faks: niedostępny
E-mail: [email protected]
Godziny pracy: od poniedziałku do piątku 06:00–16:30
–
Dane kontaktowe dot. RMA – pomoc techniczna APR
Robert Bosch (SEA) Pte Ltd, 11 Bishan Street 21, (level 5, from service lift), Singapore
573943
Tel.: +65 6571 2872
Faks: niedostępny
E-mail: [email protected]
Godziny pracy: od poniedziałku do piątku 08:30–17:45
–
Dane kontaktowe dot. RMA – Chiny
Bosch (Zhuhai) Security Systems Co. Ltd. Ji Chang Bei Road 20#, Qingwan Industrial
Estate; Sanzao Town, Jinwan District, Zhuhai; P.R. Chiny; kod pocztowy: 519040
Tel.: +86 756 7633117 / 121
Faks: niedostępny
E-mail: [email protected]
Godziny pracy: od poniedziałku do piątku 08:30–17:30
–
Dane kontaktowe dot. RMA – EMEA
Bosch Security Systems, C/o EVI Audio GmbH, Ernst-Heinkel Str. 4, 94315 Straubing,
NIEMCY
Osoba kontaktowa: kierownik pomocy technicznej RA (RA Desk Supervisor)
Tel.: +49(9421)706-366
Faks: niedostępny
E-mail: [email protected]
Godziny pracy: od poniedziałku do piątku 07:00–18:00
- | V1 | 2011.03
Instrukcja szybkiej instalacji
Bosch Sicherheitssysteme GmbH
1200 Series/4-bay IP Video Storage System
Índice | pt
99
Índice
1
Precaução de Segurança
100
1.1
Precauções Gerais de Segurança
100
1.2
Precauções de Segurança Eléctrica
100
1.3
Precauções Contra Descargas Electrostáticas
101
1.4
Precauções de Utilização
101
2
Configuração do Sistema - Hardware
102
2.1
Introdução
102
2.2
Desembalamento
102
2.3
Preparar para a Configuração
102
2.3.1
Seleccionar um Local de Instalação
102
2.3.2
Precauções do Sistema
102
2.4
Ligar o Sistema
103
3
Configuração do Sistema – Primeiros Passos
103
3.1
Introdução
103
3.2
Instruções de Configuração
103
3.3
Definir o Endereço IP
103
3.3.1
Ligação Remota ao Ambiente de Trabalho
103
3.3.2
Ligação Física
106
3.4
Aplicação do VRM
108
3.4.1
Documentação e Software Adicional
109
3.4.2
Desactivar o Serviço VRM
109
3.5
Configuração Padrão do Sistema
109
3.6
Assistência e Reparação
110
Bosch Sicherheitssysteme GmbH
Guia de Instalação Rápida
- | V1 | 2011.03
100 pt | Precaução de Segurança
1200 Series/4-bay IP Video Storage System
1
Precaução de Segurança
1.1
Precauções Gerais de Segurança
Siga estas regras para garantir a segurança geral:
–
Mantenha a área em volta do sistema limpa e ordenada.
–
Afaste do sistema a tampa superior do chassis e quaisquer componentes que tenham
sido retirados ou coloque-os sobre uma mesa para que não sejam pisados
acidentalmente.
–
Enquanto trabalha no sistema, não use peças de vestuário soltas, tais como gravatas e
mangas de camisa desabotoadas, as quais podem entrar em contacto com os circuitos
eléctricos ou com uma ventoinha de arrefecimento.
–
Retire quaisquer peças de joalharia ou objectos metálicos que, enquanto excelentes
condutores, podem originar curto-circuitos e provocar ferimentos se entrarem em
contacto com placas de circuitos impressos ou com áreas onde existe passagem de
corrente eléctrica.
–
Depois de aceder ao interior do sistema, feche a parte posterior do sistema e fixe-o à
unidade de bastidor, após se certificar de que todas as ligações foram efectuadas.
–
O sistema pesa aproximadamente 19,5 kg (43 lbs) quando completamente carregado. O
sistema deve ser levantado lentamente por duas pessoas, posicionadas uma em cada
extremidade e com os pés afastados para distribuir o peso. Mantenha sempre as costas
direitas e exerça a força nas pernas.
1.2
Precauções de Segurança Eléctrica
Deve respeitar as precauções básicas de segurança eléctrica para sua própria protecção e
para protecção do sistema:
–
Tenha em mente a localização do interruptor de ligar/desligar no chassis, bem como do
interruptor de emergência da divisão, do interruptor para desligar a energia ou da
tomada eléctrica. Se ocorrer um acidente eléctrico, pode interromper rapidamente a
alimentação do sistema.
–
Não trabalhe sozinho quando manusear componentes de alta tensão.
–
A alimentação deve estar sempre desligada quando remover ou instalar componentes do
sistema principal, tais como a placa principal, os módulos de memória ou a unidade de
disquetes. Ao desligar a alimentação, desligue primeiro o sistema através do sistema
operativo e, em seguida, desligue os cabos de alimentação de todas as fontes de
alimentação do sistema.
–
Ao trabalhar junto a circuitos eléctricos expostos, é imperativo que exista outra pessoa
familiarizada com os interruptores eléctricos nas proximidades, para desligar a
alimentação, se necessário.
–
Utilize apenas uma mão quando trabalhar com equipamento eléctrico alimentado. Isto
evita que o circuito fique completo, o que provocará choques eléctricos. Tenha todo o
cuidado ao utilizar ferramentas metálicas, que podem danificar facilmente quaisquer
componentes eléctricos ou placas de circuitos impressos com os quais entrem em
contacto.
–
Não utilize tapetes concebidos para diminuir a descarga electrostática como protecção
contra choques eléctricos. Utilize antes tapetes de borracha especificamente concebidos
como isoladores eléctricos.
–
Os cabos da fonte de alimentação têm de incluir uma ficha com ligação à terra e têm de
ser ligados a tomadas eléctricas com terra. A unidade tem mais do que um cabo de
- | V1 | 2011.03
Guia de Instalação Rápida
Bosch Sicherheitssysteme GmbH
1200 Series/4-bay IP Video Storage System
Precaução de Segurança | pt
101
alimentação. Desligue ambos os cabos de alimentação antes de efectuar a manutenção
para evitar choques eléctricos.
–
Pilha da placa principal:
ATENÇÃO - Existe um risco de explosão se a pilha incorporada for instalada ao contrário,
o que inverte as respectivas polaridades. Esta pilha só pode ser substituída por outra do
mesmo tipo ou equivalente, recomendado pelo fabricante (CR2032). Elimine as pilhas
usadas de acordo com as instruções do fabricante.
–
Laser da unidade de DVD-ROM:
ATENÇÃO - Este sistema não está equipado com uma unidade de DVD-ROM. No entanto,
se tiver adicionado esta unidade, não abra a caixa nem utilize a unidade de outra forma
que não a recomendada de modo a evitar uma exposição directa a raios laser ou a
radiações perigosas.
–
Fusíveis soldados na placa principal substituíveis: a substituição de fusíveis PTC
(coeficiente de temperatura positivo) com reposição automática da placa principal só
pode ser efectuada por técnicos especializados. Os novos fusíveis devem ser iguais ou
equivalentes aos fusíveis substituídos. Contacte a assistência técnica para obter mais
informações e assistência.
1.3
Precauções Contra Descargas Electrostáticas
A descarga electrostática (ESD) é gerada por dois objectos com cargas eléctricas diferentes,
que entram em contacto um como o outro. É criada uma descarga eléctrica para neutralizar
esta diferença, a qual pode danificar os componentes electrónicos e as placas de circuitos
impressos. As medidas que se seguem são normalmente suficientes para neutralizar esta
diferença antes de existir contacto, de forma a proteger o equipamento contra ESD:
–
Use uma pulseira antiestática com ligação à terra concebida para evitar descargas de
electricidade estática.
–
Mantenha todos os componentes e placas de circuitos impressos (PCBs) nos sacos
–
Toque num objecto metálico com ligação à terra antes de remover a placa do respectivo
antiestáticos até ao momento da respectiva instalação.
saco antiestático.
–
Não deixe que os componentes ou PCBs entrem em contacto com o seu vestuário, o qual
pode reter uma carga eléctrica, mesmo quando utiliza uma pulseira antiestática.
–
Manuseie uma placa apenas nas respectivas extremidades; não toque nos seus
componentes, chips periféricos, módulos de memória ou contactos.
–
Quando manuseia chips ou módulos, evite tocar nos respectivos pinos.
–
Coloque a placa principal e os periféricos nos respectivos sacos antiestáticos quando
não estão a ser utilizados.
–
Para fins de ligação à terra, certifique-se de que o chassis do computador proporciona
uma excelente condutividade entre a fonte de alimentação, a caixa, os fixadores de
montagem e a placa principal.
1.4
Precauções de Utilização
Quando o sistema estiver a funcionar, certifique-se de que a tampa do chassis está no devido
lugar para assegurar o arrefecimento adequado. Se esta prática não for estritamente
cumprida, o sistema pode sofrer danos não cobertos pela garantia.
Nota:
Manuseie as pilhas usadas com cuidado. Não danifique as pilhas. Uma pilha danificada pode
libertar materiais perigosos para o meio ambiente. Não elimine uma pilha usada deitando-a
Bosch Sicherheitssysteme GmbH
Guia de Instalação Rápida
- | V1 | 2011.03
102 pt | Configuração do Sistema - Hardware
1200 Series/4-bay IP Video Storage System
para o lixo ou para um aterro público. Cumpra os regulamentos definidos pelo organismo de
gestão de resíduos perigosos da sua região relativamente à eliminação correcta de pilhas
usadas.
2
Configuração do Sistema - Hardware
2.1
Introdução
Componentes incluídos:
–
Série 1200 – sistema MiniTower de 4 compartimentos, totalmente equipado com 4
discos rígidos
–
Além do sistema propriamente dito, são enviados também os seguintes itens com cada
sistema
2.2
–
Um cabo de alimentação de CA para cada fonte de alimentação do sistema
–
Este guia de instalação rápida
Desembalamento
Deve inspeccionar a caixa de expedição do sistema e tomar nota de eventuais danos. Se o
sistema propriamente dito estiver danificado, preencha uma reclamação de danos junto do
transportador que fizer a entrega e notifique o escritório correspondente de RMA da Bosch.
Devido ao peso do sistema, quando abrir a parte superior da caixa de expedição, é
recomendável que uma pessoa se coloque em cada extremidade e ambas devem levantar o
conjunto de discos em simultâneo.
Escolha um local de instalação adequado para o sistema. O sistema deverá estar situado
numa área limpa, sem pó e bem ventilada. Evite áreas quentes ou que geram ruído eléctrico e
campos electromagnéticos. Também será necessário posicioná-la junto a uma tomada de
corrente com terra. Leia atentamente as Precauções na secção seguinte.
2.3
Preparar para a Configuração
Siga as indicações de modo a concluir o processo de instalação num período de tempo
mínimo. Leia esta secção antes de iniciar o procedimento de instalação descrito nas secções
seguintes.
2.3.1
Seleccionar um Local de Instalação
Deixe espaço suficiente nas partes frontal e lateral da tampa do chassis do sistema de modo a
que possa remover os discos de substituição, para que haja uma suficiente circulação de ar e
para que a manutenção seja fácil.
Este produto destina-se exclusivamente a instalação num Local de Acesso Restrito (salas de
equipamento, quadros de assistência técnica e semelhantes).
2.3.2
Precauções do Sistema
–
Reveja as precauções de segurança gerais e eléctricas.
–
Use uma fonte de alimentação ininterrupta (UPS) reguladora para proteger o sistema
contra sobrecargas e picos de tensão, caso pretenda manter o seu sistema a funcionar
em caso de corte de energia
–
Deixe os discos SATA e módulos de fonte de alimentação arrefecerem antes de lhes
tocar.
–
Para manter o arrefecimento adequado, mantenha sempre as tampas do chassis fixas no
lugar, excepto se estiver a efectuar a manutenção.
- | V1 | 2011.03
Guia de Instalação Rápida
Bosch Sicherheitssysteme GmbH
1200 Series/4-bay IP Video Storage System
2.4
Configuração do Sistema – Primeiros Passos | pt 103
Ligar o Sistema
O último passo é fornecer alimentação ao sistema.
1.
Ligue o cabo de alimentação da fonte de alimentação a uma tomada de elevada
qualidade que tenha protecção contra ruído eléctrico e picos de tensão. Recomendamos
a utilização de uma fonte de alimentação ininterrupta (UPS).
2.
Prima o botão de ligar/desligar no painel de controlo para iniciar o sistema.
3
Configuração do Sistema – Primeiros Passos
3.1
Introdução
A seguinte directiva de instalação é aplicável às séries de conjuntos de discos DLA da Bosch e
fornece informação sobre a instalação, configuração, assistência e reparação.
Os conjuntos de discos DLA da Bosch são baseados no servidor de armazenamento do
Windows 2008 da Microsoft. Os sistemas operativos do servidor de armazenamento do
Windows 2008 da Microsoft fornecem uma interface do utilizador para a configuração inicial
do servidor, gestão unificada de aplicações de armazenamento, configuração simples, gestão
de armazenamento e de pastas partilhadas e suporte para o Microsoft iSCSI Software Target.
Está especialmente configurado para proporcionar um desempenho optimizado em
armazenamento ligado à rede. O servidor de armazenamento do Windows 2008 oferece
melhorias significativas em contextos de gestão de partilha e de armazenamento, assim como
a integração de componentes e funcionalidades de gestão de aplicações de armazenamento.
3.2
Instruções de Configuração
Todos os conjuntos de discos da série DLA da Bosch estão pré-configurados com um
endereço IP predefinido e predefinições
iSCSI.
–
Endereço IP: 10.10.10.10 (1.ª porta) e 10.10.10.11 (2.ª porta)
–
Máscara de rede: 255.255.255.0
–
Utilizador: Administrator
–
Palavra-passe: WSS4Bosch
Estão disponíveis mais informações, como folhas de dados e manuais de utilizador, no sítio da
Web da Bosch www.boschsecurity.com, em Catálogo de produtos > CCTV > Vídeo IP >
Conjunto de discos.
As predefinições iSCSI estão optimizadas para utilização com VRM. Apenas um administrador
de armazenamento experiente deverá alterar estas definições. Só é necessário alterar a
configuração predefinida se o VRM não for utilizado ou se as predefinições não forem
adequadas a outra aplicação iSCSI da Bosch.
3.3
Definir o Endereço IP
É possível alterar o endereço IP predefinido de duas formas.
3.3.1
Ligação Remota ao Ambiente de Trabalho
1.
Ligue o sistema à sua rede através da porta 1 ou da porta 2 e inicie o sistema. O sistema
é fornecido com a função de ligação remota ao ambiente de trabalho activada. Inicie
sessão num sistema Client adequado que tenha o Windows XP, Windows Vista ou
Windows 7 instalado (o hardware e o software Client não são fornecidos) com um
endereço IP na mesma rede, por ex. 10.10.10.12 (máscara de rede: 255.255.255.0).
Bosch Sicherheitssysteme GmbH
Guia de Instalação Rápida
- | V1 | 2011.03
104 pt | Configuração do Sistema – Primeiros Passos
2.
1200 Series/4-bay IP Video Storage System
Abra a Remote Desktop Connection no seu sistema Client. No campo Computer
introduza o endereço IP do conjunto de discos ao qual pretende estabelecer ligação.
Endereço IP predefinido: 10.10.10.10 (porta 1)
3.
Clique em Connect, prima Ctrl+Alt+Del (se visível) e, quando for apresentada a janela
de início de sessão do conjunto de discos, introduza a palavra-passe predefinida
WSS4Bosch.
4.
Quando iniciar sessão pela primeira vez são aplicadas as predefinições. Isto demora
alguns segundos e, em seguida, o sistema é reiniciado. Depois de o sistema reiniciar,
volte a iniciar sessão e é apresentada a janela Bosch VRM Appliance initial configuration
. Utilize este programa para configurar o endereço IP do conjunto de discos.
- | V1 | 2011.03
Guia de Instalação Rápida
Bosch Sicherheitssysteme GmbH
1200 Series/4-bay IP Video Storage System
5.
Configuração do Sistema – Primeiros Passos | pt 105
A vista de nível superior da Bosch VRM Appliance initial configuration apresenta uma
descrição geral das configurações e definições do sistema. Seleccione a ligação
Configure networking para aceder à configuração de rede.
É apresentado um ícone em separado para cada porta de rede. Seleccione o ícone Local
Area Connection que apresenta o estado network e, em seguida, faça duplo clique no
ícone.
6.
Clique em Properties, seleccione Internet Protocol Version 4 (TCP/IPv4) e clique em
Properties.
Bosch Sicherheitssysteme GmbH
Guia de Instalação Rápida
- | V1 | 2011.03
106 pt | Configuração do Sistema – Primeiros Passos
7.
1200 Series/4-bay IP Video Storage System
Esta caixa de diálogo permite definir as configurações do endereço IP de acordo com os
requisitos da sua rede.
8.
3.3.2
Reinicie o sistema.
Ligação Física
O sistema está equipado com um conector gráfico VGA e com conectores PS2 para o rato e o
teclado.
1.
Ligue o monitor, o rato e o teclado (não incluídos) ao conjunto de discos e inicie o
sistema.
Nota:
Se ligar um teclado ou rato PS2 depois de o sistema ter sido reiniciado, é provável que
esse dispositivo não funcione correctamente.
2.
Quando o sistema arrancar, prima Ctrl+Alt+Del e, quando for apresentada a janela de
início de sessão do conjunto de discos, introduza a palavra-passe predefinida
WSS4Bosch.
3.
Quando iniciar sessão pela primeira vez são aplicadas as predefinições. Isto demora
alguns segundos e, em seguida, o sistema é reiniciado. Depois de o sistema reiniciar,
- | V1 | 2011.03
Guia de Instalação Rápida
Bosch Sicherheitssysteme GmbH
1200 Series/4-bay IP Video Storage System
Configuração do Sistema – Primeiros Passos | pt 107
volte a iniciar sessão e é apresentada a janela Bosch VRM Appliance initial configuration
. Utilize este programa para configurar o endereço IP do conjunto de discos.
4.
A vista de nível superior da Bosch VRM Appliance initial configuration apresenta uma
descrição geral das configurações e definições do sistema. Seleccione a ligação
Configure networking para aceder à configuração de rede.
É apresentado um ícone em separado para cada porta de rede. Seleccione o ícone Local
Area Connection que apresenta o estado network e, em seguida, faça duplo clique no
ícone.
Bosch Sicherheitssysteme GmbH
Guia de Instalação Rápida
- | V1 | 2011.03
108 pt | Configuração do Sistema – Primeiros Passos
5.
1200 Series/4-bay IP Video Storage System
Clique em Properties, seleccione Internet Protocol Version 4 (TCP/IPv4) e clique em
Properties.
6.
Esta caixa de diálogo permite definir as configurações do endereço IP de acordo com os
requisitos da sua rede.
7.
3.4
Reinicie o sistema.
Aplicação do VRM
O sistema tem o Bosch Video Recording Manager (VRM) pré-instalado e licença de 32 canais.
Esta licença pode ser alargada apenas uma vez e para mais 32 canais.
O VRM proporciona um potente motor de gravação para utilizar com o BVC ou o Bosch VMS
para visualização em directo e reprodução de dados gravados.O BVC e o Bosch VMS devem
ser adquiridos através dos respectivos canais de vendas da Bosch.
- | V1 | 2011.03
Guia de Instalação Rápida
Bosch Sicherheitssysteme GmbH
1200 Series/4-bay IP Video Storage System
Configuração do Sistema – Primeiros Passos | pt 109
A aplicação VRM oferece uma solução de gravação VRM totalmente funcional, limitada apenas
no número de canais configuráveis. As aplicações que não necessitarem do software VRM
devem desactivar o serviço de VRM.
3.4.1
Documentação e Software Adicional
A pasta C:\Bosch\resources da aplicação VRM contém software para configuração do
hardware e do software (VRM).
VRM Configurator: Software para fácil configuração do VRM que inclui conjuntos de discos,
câmaras, programador de gravação, etc. Deve ser instalado num sistema Client separado, por
ex. no hardware de uma estação de trabalho Bosch.
Tenha em atenção que para todas as tarefas de configuração relacionadas com a visualização,
por ex. IVA, o configurador VRM e o Bosch Video SDK (disponível no sítio da Web da Bosch)
devem estar instalados num sistema Client separado.
Pode consultar documentação sobre DLA e VRM da Bosch em:
www.boschsecurity.com > seleccione a sua região e o país > seleccione Catálogo de produtos
> procure o produto > seleccione o produto entre os resultados de pesquisa para apresentar
os documentos existentes.
3.4.2
Desactivar o Serviço VRM
O sistema é sempre fornecido com a aplicação VRM pré-instalada, mas se o pretender utilizar
apenas como conjunto de discos pode desactivar o serviço VRM:
1.
Inicie sessão no sistema de armazenamento e depois inicie a janela Bosch VRM
Appliance initial configuration. A vista de nível superior da janela Bosch VRM Appliance
initial configuration apresenta uma descrição geral das configurações e definições do
sistema.
Se a janela Bosch VRM Appliance initial configuration não for apresentada, clique em
Start > Run > oobe.
2.
Seleccione a ligação Disable/Enable Bosch VRM Appliance para iniciar/parar o serviço
de gravação VRM.
Para reiniciar o serviço, na janela Bosch VRM Appliance initial configuration , clique na
ligação enable Bosch VRM Appliance .
Consulte também a Secção 3.3 Definir o Endereço IP.
3.5
Configuração Padrão do Sistema
O sistema é fornecido com o destino iSCSI totalmente configurado e com 4 LUNs préconfigurados.
O nome do destino predefinido é TG0 e contém todas as LUNs iSCSI.
A designação convencionada das LUNs é VHDxx.vhd, sendo que <xx> varia entre 01 e 08,
consoante o sistema utilizado. A configuração predefinida permite que todos os iniciadores
iSCSI estabeleçam ligação ao sistema.
O sistema é fornecido com o serviço iSCSI Target Service activado e este serviço é utilizado
pela aplicação VRM pré-instalada.
Bosch Sicherheitssysteme GmbH
Guia de Instalação Rápida
- | V1 | 2011.03
110 pt | Configuração do Sistema – Primeiros Passos
3.6
1200 Series/4-bay IP Video Storage System
Assistência e Reparação
Os sistemas de armazenamento têm uma garantia de 3 anos. Os problemas serão
solucionados de acordo com as directrizes de assistência e apoio da Bosch. Para os conjuntos
de discos DLA da Bosch aplicam-se as práticas de assistência normais da Bosch.
Em caso de avaria, os módulos seguintes podem ser substituídos no local sem que seja
necessário enviar a unidade:
–
Discos rígidos: só são suportados discos rígidos genuínos da Bosch como discos rígidos
de substituição. Caso contrário, a garantia será anulada.
Pedido para RMA
Solicite uma RMA de peças com avarias através de um dos seguintes contactos de RMA da
Bosch.
–
Contacto de RMA - AMEC
Bosch ST, RMA Swapstock, 8601 East Cornhusker Hwy, Lincoln, NE 68507 - USA
Telefone: +1(402)467-6610
Fax: n/a
E-mail: [email protected]
Horário de funcionamento: segunda a sexta-feira, das 06h00 às 16h30
–
Escritório de RMA - APR
Robert Bosch (SEA) Pte Ltd, 11 Bishan Street 21, (5.º andar, a partir do elevador de
serviço), Singapore 573943
Telefone: +65 6571 2872
Fax: n/a
E-mail: [email protected]
Horário de funcionamento: segunda a sexta-feira, das 08h30 às 17h45
–
Contacto de RMA - China
Bosch (Zhuhai) Security Systems Co. Ltd. Ji Chang Bei Road 20#, Qingwan Industrial
Estate; Sanzao Town, Jinwan District, Zhuhai; P.R. China; Código postal: 519040
Telefone: +86 756 7633117 / 121
Fax: n/a
E-mail: [email protected]
Horário de funcionamento: segunda a sexta-feira, das 08h30 às 17h30
–
Contacto de RMA - EMEA
Bosch Security Systems, C/o EVI Audio GmbH, Ernst-Heinkel Str. 4, 94315 Straubing,
GERMANY
Pessoa de contacto: supervisor do escritório de RA
Telefone: +49(9421)706-366
Fax: n/a
E-mail: [email protected]
Horário de funcionamento: segunda a sexta-feira, das 07h00 às 18h00
- | V1 | 2011.03
Guia de Instalação Rápida
Bosch Sicherheitssysteme GmbH
1200 Series/4-bay IP Video Storage System
Содержание | ru 111
Содержание
1
Техника безопасности
112
1.1
Общие правила техники безопасности
112
1.2
Правила электробезопасности
112
1.3
Меры предотвращения электростатических разрядов
113
1.4
Техника безопасности при эксплуатации
113
2
Установка системы: оборудование
114
2.1
Введение
114
2.2
Распаковка
114
2.3
Подготовка к установке
114
2.3.1
Выбор места установки
114
2.3.2
Техника безопасности при работе с системой
114
2.4
Подключение питания к системе
115
3
Установка системы: первые шаги
115
3.1
Введение
115
3.2
Инструкции по установке
115
3.3
Настройка IP-адреса
115
3.3.1
Подключение к удаленному рабочему столу
116
3.3.2
Физическое соединение
118
3.4
Устройство VRM
120
3.4.1
Дополнительное программное обеспечение и документация
121
3.4.2
Отключение службы VRM
121
3.5
Стандартная конфигурация системы
121
3.6
Обслуживание и ремонт
122
Bosch Sicherheitssysteme GmbH
Руководство по быстрой установке
- | V1 | 2011.03
112 ru | Техника безопасности
1200 Series/4-bay IP Video Storage System
1
Техника безопасности
1.1
Общие правила техники безопасности
Для обеспечения общей безопасности следуйте данным ниже правилам:
–
Содержите систему и область вокруг нее в чистоте и не допускайте попадания туда
посторонних предметов.
–
При снятии верхней крышки шасси или другой детали системы отложите ее в сторону
или положите на стол, чтобы случайно не наступить на нее.
–
Во время работы с системой не надевайте свободную одежду и аксессуары (галстуки,
рубашки с незастегнутыми рукавами и т. п.), которые могут зацепиться за
электрические схемы или попасть в охлаждающий вентилятор.
–
Снимите с себя все украшения или металлические предметы, так как они являются
хорошими металлическими проводниками и в случае контакта с печатными платами
или областями под напряжением могут вызвать короткое замыкание и нанести вам
травму.
–
При работе с внутренней частью системы закройте заднюю крышку системы и
закрепите ее в стойке, убедившись, что подключены все соединения.
–
Масса системы составляет около 19,5 кг при полной загрузке. Систему должны
медленно поднимать два человека (по одному с каждой стороны), заняв устойчивое
положение. Поднимая систему, держите спину и прямо и не наклоняйтесь.
1.2
Правила электробезопасности
Выполняйте следующие базовые правила электробезопасности, чтобы избежать
получения травм и повреждения оборудования:
–
Выясните, где на шасси расположен выключатель питания, а также где в помещении
находится кнопка аварийного выключения, главный выключатель или электрическая
розетка. Тогда в случае повреждения электрической цепи вы сможете быстро
отключить питание системы.
–
С компонентами, находящимися под высоким напряжением, необходимо работать
вместе с помощником.
–
При установке или удалении основных компонентов системы (системной платы,
модулей памяти, дисковода для гибких дисков и т.п.) питание всегда должно быть
отключено. При отключении питания следует сначала отключить питание с помощью
операционной системы, а затем отсоединить кабели питания от всех источников
питания системы.
–
При работе с открытыми электрическими цепями необходимо, чтобы поблизости
находился еще один человек, знающий расположение выключателей, чтобы при
необходимости отключить питание.
–
Выполняйте любые операции с включенным электрооборудованием только одной
рукой. Это делается для того, чтобы избежать поражения электрическим током
вследствие замыкания цепи. При использовании металлических инструментов будьте
осторожны, так как они могут легко повредить электрические компоненты или
печатные платы.
–
Не используйте в качестве защиты от поражения электрическим током
антистатические коврики. Вместо этого используйте резиновые коврики,
предназначенные специально для электроизоляции.
- | V1 | 2011.03
Руководство по быстрой установке
Bosch Sicherheitssysteme GmbH
1200 Series/4-bay IP Video Storage System
–
Техника безопасности | ru
113
Вилки кабелей питания и электрические розетки должны быть заземлены.
Устройство имеет несколько кабелей питания. Перед началом обслуживания
отсоедините оба кабеля питания, чтобы избежать поражения электрическим током.
–
Элемент питания системной платы:
ВНИМАНИЕ! Существует опасность взрыва, если элемент питания установлен в
перевернутом положении, что приводит к изменению полярности. Для замены
следует использовать только такие же или аналогичные элементы питания,
рекомендованные производителем (CR2032). Использованные элементы питания
следует утилизировать в соответствии с инструкциями производителя.
–
Лазер привода компакт-дисков:
ВНИМАНИЕ! Данная система поставляется без привода компакт-дисков, но если он
установлен позднее, выполняйте следующее требование: не открывайте корпус и не
используйте устройство не по назначению, чтобы избежать прямого воздействия
лазерного луча и воздействия опасного радиоактивного излучения.
–
Заменяемые впаянные предохранители системной платы: замена
самовосстанавливающихся PTC (с положительным температурным коэффициентом)
предохранителей системной платы должна производиться только
квалифицированным специалистом про обслуживанию. Для замены следует
использовать такие же или аналогичные предохранители. Для получения подробной
информации и поддержки обратитесь в службу технической поддержки.
1.3
Меры предотвращения электростатических разрядов
Электростатический разряд (ESD) генерируется двумя вступающими в контакт объектами
с различными электрическими зарядами. Для нейтрализации разности возникает
электрический разряд, который может повредить электронные компоненты и печатные
платы. Для нейтрализации разности до возникновения контакта и защиты оборудования
от ESD обычно достаточно соблюдать следующие меры предосторожности:
–
Надевайте специальные антистатические браслеты, предназначенные для
предотвращения статического разряда.
–
Храните все компоненты и печатные платы (PCB) в антистатических пакетах до
момента монтажа.
–
Перед извлечением платы из антистатического пакета коснитесь заземленного
металлического объекта.
–
Следите, чтобы компоненты или PCB не касались вашей одежды, так как она может
сохранять заряд, даже если вы надели антистатический браслет.
–
Плату следует держать только за края; не прикасайтесь к ее компонентам,
периферийным микросхемам, модулям памяти и контактам.
–
–
При обращении с микросхемами и модулями не касайтесь их контактов.
Если системная плата и периферийные микросхемы не используются, поместите их
обратно в антистатическую тару.
–
Для обеспечения заземления убедитесь, что шасси компьютера обеспечивает
хорошую проводимость между источником питания, корпусом, креплениями и
системной платой.
1.4
Техника безопасности при эксплуатации
Для обеспечения охлаждения необходимо позаботиться о том, чтобы во время
эксплуатации системы крышка шасси была закрыта. Несоблюдение этих мер может стать
причиной повреждения системы после окончания гарантийного срока.
Bosch Sicherheitssysteme GmbH
Руководство по быстрой установке
- | V1 | 2011.03
114 ru | Установка системы: оборудование
1200 Series/4-bay IP Video Storage System
Примечание.
С использованными батареями следует обращаться осторожно. Не допускайте
повреждения батареи. Повреждение батареи может привести к попаданию в окружающую
среду вредных веществ. Не выбрасывайте использованную батарею вместе с обычным
мусором или на мусорные свалки. При утилизации батареи следуйте нормам,
установленным отделом обработки опасных отходов в вашем регионе.
2
Установка системы: оборудование
2.1
Введение
Комплект поставки:
–
Серия 1200 – система MiniTower на 4 отсека, полностью оснащенная 4 жесткими
дисками
–
2.2
Кроме самой системы в комплект поставки входят следующие компоненты:
–
По одному кабелю питания переменного тока на каждый блок питания в системе
–
Данное руководство по быстрой установке
Распаковка
Следует осмотреть упаковку, в которой была доставлена система, на предмет наличия
повреждений. Если на системе имеются признаки повреждения, необходимо подать
заявку о повреждении в компанию-перевозчик, доставившую систему, и уведомить об
этом соответствующий отдел Bosch RMA.
Система имеет большой вес, поэтому после открытия упаковки поднимать дисковый
массив должны два человека (по одному с каждой стороны).
Определите подходящее место для установки системы. Систему следует располагать в
чистом, защищенном от пыли помещении с достаточной вентиляцией. Не устанавливайте
систему рядом с источниками тепла, электрических помех и электромагнитных полей.
Кроме того, систему следует располагать рядом с заземленной розеткой. Обязательно
изучите правила техники безопасности, приведенные в следующем разделе.
2.3
Подготовка к установке
Чтобы максимально быстро выполнить установку, выполните следующие действия в
указанном порядке. Перед началом процедуры установки, описанной в следующем
разделе, изучите данный раздел.
2.3.1
Выбор места установки
Оставьте достаточный зазор спереди и со стороны расположения крышки корпуса, чтобы
обеспечить удаление заменяемых дисков, достаточный приток воздуха и простоту
обслуживания.
Данную систему следует устанавливать только в помещении с контролируемым доступом
(специальных аппаратных, служебных помещениях и т.п.).
2.3.2
Техника безопасности при работе с системой
–
Изучите правила электробезопасности и общие правила техники безопасности.
–
Используйте регулирующий источник бесперебойного питания (ИБП), чтобы
защитить систему от скачков и всплесков напряжения, если необходимо обеспечить
работоспособность системы в случае сбоя питания.
–
- | V1 | 2011.03
Перед тем как прикасаться к дискам SATA и блоку питания, дайте им остыть.
Руководство по быстрой установке
Bosch Sicherheitssysteme GmbH
1200 Series/4-bay IP Video Storage System
–
Установка системы: первые шаги | ru 115
Крышки шасси всегда должны быть установлены и закреплены (кроме случаев
обслуживания), чтобы обеспечить достаточное охлаждение.
2.4
Подключение питания к системе
Последнее, что осталось сделать – подключить систему к питанию.
1.
Подключите кабель питания от блока питания к качественному удлинителю, который
обеспечивает защиту от электрических помех и скачков напряжения. Рекомендуется
использовать источник бесперебойного питания (ИБП).
2.
Для запуска системы нажмите кнопку питания на панели управления.
3
Установка системы: первые шаги
3.1
Введение
Следующие указания по установке относятся к дисковым массивам Bosch серии DLA и
содержат сведения об установке, настройке, обслуживании и ремонте системы.
Дисковые массивы Bosch DLA работают под управлением ОС Microsoft Storage Server
2008. Операционная система Microsoft Windows Storage Server 2008 предоставляет
пользовательский интерфейс для начальной настройки сервера и обеспечивает
объединенное управление устройствами хранения, простоту установки и управления
устройствами хранения и общими папками, а также поддержку для Microsoft iSCSI
Software Target.
Эта ОС настроена для обеспечения оптимальной производительности для сетевых
хранилищ (NAS). В Windows Storage Server 2008 значительно усовершенствованы
возможности общего доступа и управления устройствами хранения, а также улучшена
интеграция компонентов управления хранилищами и их функциональность.
3.2
Инструкции по установке
Все дисковые массивы Bosch серии DLA предварительно настроены и имеют
присвоенный IP-адрес по умолчанию и
параметры iSCSI по умолчанию.
–
IP-адрес: 10.10.10.10 (1-й порт) и 10.10.10.11 (2-й порт)
–
Маска подсети: 255.255.255.0
–
Имя пользователя: Administrator
–
Пароль: WSS4Bosch
Подробные сведения (технические характеристики, руководства пользователя и т. д.)
можно найти на веб-сайте Bosch www.boschsecurity.com в разделе Каталог продукции >
CCTV > IP-видео > Дисковые массивы.
Параметры iSCSI по умолчанию можно оптимизировать с помощью VRM. Изменять
данные параметры рекомендуется только опытным администраторам устройств хранения.
Изменение конфигурации по умолчанию требуется только в случае, если VRM не
используется или если параметры по умолчанию не подходят для другого приложения
Bosch iSCSI.
3.3
Настройка IP-адреса
IP-адрес по умолчанию можно изменить двумя способами.
Bosch Sicherheitssysteme GmbH
Руководство по быстрой установке
- | V1 | 2011.03
116 ru | Установка системы: первые шаги
3.3.1
1200 Series/4-bay IP Video Storage System
Подключение к удаленному рабочему столу
1.
Подключите систему к сети через порт 1 или порт 2 и запустите ее. В системе
разрешено подключение к удаленному рабочему столу. Выполните вход в
соответствующую клиентскую систему под управлением Windows XP, Windows Vista
или Windows 7 (клиентское оборудование и программное обеспечение
приобретаются отдельно), имеющую IP-адрес в той же подсети, например 10.10.10.12
(маска подсети: 255.255.255.0).
2.
Откройте программу Remote Desktop Connection в вашей клиентской системе. В
поле Computer введите IP-адрес дискового массива, к которому необходимо
подключиться.
IP-адрес по умолчанию: 10.10.10.10 (порт 1)
3.
Щелкните Connect и нажмите Ctrl+Alt+Del (если отображается). Когда отобразится
4.
При первом входе применяются параметры рабочего стола по умолчанию. Это
окно входа в дисковый массив, введите пароль по умолчанию WSS4Bosch.
занимает несколько секунд, и система перезапустится. После перезапуска выполните
вход повторно, после чего отобразится окно Bosch VRM Appliance initial
configuration. Для настройки IP-адреса дискового массива используйте данную
программу.
- | V1 | 2011.03
Руководство по быстрой установке
Bosch Sicherheitssysteme GmbH
1200 Series/4-bay IP Video Storage System
5.
Установка системы: первые шаги | ru 117
Вид Bosch VRM Appliance initial configuration верхнего уровня представляет собой
обзор конфигурации и параметров системы. Для получения доступа к конфигурации
сети щелкните ссылку Configure networking.
Для каждого сетевого порта отображается отдельный значок. Выберите значок Local
Area Connection, обозначающий состояние network, затем дважды щелкните этот
значок.
6.
Щелкните Properties, выберите Internet Protocol Version 4 (TCP/IPv4), затем
щелкните Properties.
Bosch Sicherheitssysteme GmbH
Руководство по быстрой установке
- | V1 | 2011.03
118 ru | Установка системы: первые шаги
7.
1200 Series/4-bay IP Video Storage System
В этом диалоговом окне можно настроить конфигурацию IP-адреса в соответствии с
требованиями вашей системы.
8.
3.3.2
Перезапустите систему.
Физическое соединение
Система поставляется с графическим разъемом VGA и разъемами PS2 для мыши и
клавиатуры.
1.
Подключите монитор, мышь и клавиатуру (приобретаются отдельно) к дисковому
массиву и запустите систему.
Примечание.
Если подключить мышь или клавиатуру PS2 после запуска системы, она, вероятнее
всего, будет работать неправильно.
2.
После запуска системы нажмите Ctrl+Alt+Del. Когда отобразится окно входа в
3.
При первом входе применяются параметры рабочего стола по умолчанию. Это
дисковый массив, введите пароль по умолчанию WSS4Bosch.
занимает несколько секунд, и система перезапустится. После перезапуска выполните
вход повторно, после чего отобразится окно Bosch VRM Appliance initial
- | V1 | 2011.03
Руководство по быстрой установке
Bosch Sicherheitssysteme GmbH
1200 Series/4-bay IP Video Storage System
Установка системы: первые шаги | ru 119
configuration. Для настройки IP-адреса дискового массива используйте данную
программу.
4.
Вид Bosch VRM Appliance initial configuration верхнего уровня представляет собой
обзор конфигурации и параметров системы. Для получения доступа к конфигурации
сети щелкните ссылку Configure networking.
Для каждого сетевого порта отображается отдельный значок. Выберите значок Local
Area Connection, обозначающий состояние network, затем дважды щелкните этот
значок.
Bosch Sicherheitssysteme GmbH
Руководство по быстрой установке
- | V1 | 2011.03
120 ru | Установка системы: первые шаги
5.
1200 Series/4-bay IP Video Storage System
Щелкните Properties, выберите Internet Protocol Version 4 (TCP/IPv4), затем
щелкните Properties.
6.
В этом диалоговом окне можно настроить конфигурацию IP-адреса в соответствии с
требованиями вашей системы.
7.
3.4
Перезапустите систему.
Устройство VRM
Система имеет предустановленную программу Bosch Video Recording Manager (VRM) и
полную лицензию на 32 канала. Эту лицензию можно расширить только один раз, добавив
еще одну лицензию на 32 канала.
VRM обеспечивает мощный механизм записи, который используется с BVC или Bosch VMS
для просмотра в реальном времени и воспроизведения записанных данных. BVC и Bosch
VMS следует приобретать через соответствующие каналы продаж Bosch.
- | V1 | 2011.03
Руководство по быстрой установке
Bosch Sicherheitssysteme GmbH
1200 Series/4-bay IP Video Storage System
Установка системы: первые шаги | ru 121
Устройство VRM представляет собой полнофункциональную систему видеозаписи VRM,
ограниченную лишь числом настраиваемых каналов. В приложениях, которые не
используют ПО VRM, должна быть отключена служба VRM.
3.4.1
Дополнительное программное обеспечение и документация
Программное обеспечение для настройки аппаратуры и программного обеспечения
(VRM) находится на устройстве VRM в папке C:\Bosch\resources.
VRM Configurator: Программное обеспечение для быстрой настройки VRM (включая
дисковый массив, камеры, планировщик записи и т.д.) следует устанавливать на
отдельную клиентскую систему (например, на рабочую станцию Bosch).
Обратите внимание, что для настройки всех задач, относящихся к просмотру (например,
IVA), на отдельном клиентском компьютере должны быть установлены конфигуратор VRM
и пакет Bosch Video SDK (его можно загрузить с веб-сайта Bosch).
Документация для Bosch DLA и VRM содержится на сайте:
www.boschsecurity.com > выберите ваш регион и страну > перейдите в Каталог
продукции > запустите поиск вашего продукта > выберите продукт в результатах поиска,
чтобы просмотреть существующие документы.
3.4.2
Отключение службы VRM
Система всегда поставляется с предустановленным приложением VRM, но если вы
планируете использовать систему только как дисковый массив, службу VRM можно
отключить:
1.
Войдите в систему хранения и откройте окно Bosch VRM Appliance initial
configuration. Общий вид окна Bosch VRM Appliance initial configuration
представляет собой обзор конфигурации и параметров системы.
Если окно Bosch VRM Appliance initial configuration не отображается, выберите
пункт Start > Run > oobe.
2.
Щелкните ссылку Disable/Enable Bosch VRM Appliance, чтобы остановить или
запустить службу записи VRM.
Чтобы перезапустить службу, щелкните ссылку enable Bosch VRM Appliance в окне Bosch
VRM Appliance initial configuration.
См. также Раздел 3.3 Настройка IP-адреса.
3.5
Стандартная конфигурация системы
В поставленной системе полностью настроена цель iSCSI и 4 предварительно
настроенных LUN.
По умолчанию цель имеет имя TG0 и содержит все LUN iSCSI.
Схема именования для LUN следующая: VHDxx.vhd, где <xx> имеет значение от 01 до 08 в
зависимости от используемой системы. Настройки системы по умолчанию позволяют
любому инициатору iSCSI подключаться к системе.
Система поставляется с включенной службой получателя iSCSI, которая используется
предустановленным приложением VRM.
Bosch Sicherheitssysteme GmbH
Руководство по быстрой установке
- | V1 | 2011.03
122 ru | Установка системы: первые шаги
3.6
1200 Series/4-bay IP Video Storage System
Обслуживание и ремонт
На системы хранения предоставляется трехлетняя гарантия. Претензии рассматриваются
в соответствии с инструкциями по технической поддержке и обслуживанию Bosch. Для
дисковых массивов Bosch DLA обеспечивается стандартная техническая поддержка
Bosch.
В случае сбоя следующие модули могут быть заменены на месте без отправки
первоначального устройства:
–
Жесткие диски: в качестве сменных жестких дисков разрешается использовать
только оригинальные жесткие диски Bosch. В противном случае гарантия
аннулируется.
Запрос разрешения RMA
Запросите RMA (разрешение на возврат материалов) для неисправных компонентов по
одному из следующих адресов RMA Bosch.
–
Контакт для запроса RMA в региона AMEC
Bosch ST, RMA Swapstock, 8601 East Cornhusker Hwy, Lincoln, NE 68507 USA / США
Телефон: +1 (402) 467-6610
Факс: нет
Эл. почта: [email protected]
Часы работы: понедельник – пятница, 06:00 – 16:30
–
Отдел RMA для региона APR
Robert Bosch (SEA) Pte Ltd, 11 Bishan Street 21, (level 5, from service lift), 573943
Singapore / Сингапур
Телефон: +65 6571 2872
Факс: нет
Эл. почта: [email protected]
Часы работы: понедельник – пятница, 08:30 – 17:45
–
Контакт RMA для Китая
Bosch (Zhuhai) Security Systems Co. Ltd. Ji Chang Bei Road 20#, Qingwan Industrial
Estate; Sanzao Town, Jinwan District, Zhuhai 519040, P.R. China / Китай
Телефон: +86 756 7633117
Факс: нет
Эл. почта: [email protected]
Часы работы: понедельник – пятница, 08:30 – 17:30
–
Контакт RMA для региона EMEA
Bosch Security Systems, C/o EVI Audio GmbH, Ernst-Heinkel Str. 4, 94315 Straubing,
Germany / Германия
Контактное лицо: RA Desk Supervisor (начальник отдела по разрешениям на возврат)
Телефон: +49 (9421) 706-366
Факс: нет
Эл. почта: [email protected]
Часы работы: понедельник – пятница, 07:00 – 18:00
- | V1 | 2011.03
Руководство по быстрой установке
Bosch Sicherheitssysteme GmbH
| zh 123
1200 Series/4-bay IP Video Storage System
目录
1
安全预防措施
124
1.1
一般安全预防措施
124
1.2
电气安全预防措施
124
1.3
ESD 预防措施
124
1.4
操作预防措施
125
2
系统安装 — 硬件
125
2.1
简介
125
2.2
拆开包装
125
2.3
准备安装
125
2.3.1
选择安装位置
125
2.3.2
系统预防措施
125
2.4
打开系统电源
125
3
系统安装 — 第一步
126
3.1
简介
126
3.2
安装说明
126
3.3
设置 IP 地址
126
3.3.1
远程桌面连接
126
3.3.2
物理连接
128
3.4
VRM 设备
130
3.4.1
其它软件和文档
130
3.4.2
禁用 VRM 服务
131
3.5
标准系统配置
131
3.6
服务和维修
131
Bosch Sicherheitssysteme GmbH
快速安装指南
- | V1 | 2011.03
124 zh | 安全预防措施
1200 Series/4-bay IP Video Storage System
1
安全预防措施
1.1
一般安全预防措施
为了确保安全,请遵循以下准则:
-
系统周围的区域应清洁整齐。
-
已卸下的机箱顶盖或任何系统组件应放置在远离系统的地方,或者放置在桌面上,以避免被意外
踩踏。
-
维修系统时,不要穿宽松的衣服,例如领带和解开钮扣的衬衫袖口,它们会与电路接触,或者吸
入冷却风扇中。
-
取下身上的任何珠宝或金属物件,它们是极好的金属导体,当与印刷电路板或带电区域接触时,
会造成短路并造成人身伤害。
-
维修系统内部组件后,请确保所有连接都已接好,然后再装回系统并将它固定在机柜单元内。
-
装备齐全的系统的重量大约为 43 磅 (19.5 千克)。 抬起系统时,两人应站在系统两侧缓慢抬起,
并且双腿叉开以分布系统重量,。始终保持背部挺直,并用双腿的力量抬起系统。
1.2
电气安全预防措施
应遵守基本的电气安全预防措施以防止人身伤害和系统损坏:
-
了解机箱电源开关的位置以及机房的紧急断电开关、断路开关或电气插座。 这样,当发生电气事
故时,您可以快速断开系统的电源。
-
切勿单独一人处理高压组件。
-
当拆卸或安装主要系统组件 (例如主板、内存模块以及软盘驱动器)时,应始终断开系统电源。
当断开电源时,应先通过操作系统关闭系统,然后从系统的所有电源设备拔下电源线。
-
当在裸露的电路周围工作时,另一位熟悉断电控制装置的人员应在附近待命,以便在必要时关闭
-
维修通电的电气设备时,请仅使用一只手。 这旨在防止形成完整的回路,从而避免电击。使用金
电源。
属工具时,请万分小心,因为当它们接触电气组件或电路板,容易造成损坏。
-
不要使用旨在减少静电释放 (从而防止电击)的静电垫,而应使用专门用作电气绝缘材料的橡胶
垫。
-
电源设备的电源线必须包括接地插头,并且必须插入接地的电气插座中。 装置有多条电源线。在
维修之前,应将所有电源线都断开,以免受到电击。
-
主板电池:
小心 — 如果板载电池巅倒安装 (造成电极反接),则可能发生爆炸。 更换此电池时,必须使用相
同型号的电池或制造商推荐的同类电池 (CR2032)。按照制造商的说明书处理废旧电池。
-
DVD-ROM 激光:
小心 — 本系统不随附 DVD-ROM 驱动器,但如果已添加 DVD-ROM 驱动器:为了防止直接暴露
在激光束下和危险的辐射,请不要打开机壳或以任何非常规的方式使用此装置。
-
主板可更换焊入式保险丝:只有经过培训的服务技术人员才能更换主板上的自恢复式 PTC (正温
度系数)保险丝。 新保险丝必须与所更换的保险丝属于同一或同类型号。如需了解详细信息和支
持,请联系技术支持人员。
1.3
ESD 预防措施
静电释放 (ESD) 是两个带不同电荷的物体相互接触而产生的。 为了中和此电势,将会形成静电释放,
这会损坏电子组件和印刷电路板。 以下措施通常足以在接触之前中和此电势,从而保护您的设备免受
ESD 的损坏:
- | V1 | 2011.03
-
使用旨在防止静电释放的接地腕带。
-
在准备使用之前,始终让所有组件和印刷电路板 (PCB) 留在防静电袋内。
-
从防静电袋取出电路板之前,触摸接地的金属物体。
-
不要让组件或 PCB 接触您的衣物 (可能存有电荷),即使您戴了腕带。
快速安装指南
Bosch Sicherheitssysteme GmbH
系统安装 — 硬件 | zh 125
1200 Series/4-bay IP Video Storage System
-
仅拿住电路板的边缘;不要触摸其组件、周边芯片、内存模块或触点。
-
当处理芯片或模块时,避免接触其插针。
-
不使用时,请将主板和周边设备放回防静电袋。
-
为实现接地,确保您的计算机机箱在电源设备、机壳、安装紧固件和主板之间提供极佳的导电性
能。
1.4
操作预防措施
在系统工作时,必须确保机箱盖安装到位以维护正常的冷却。如果不严格遵守这项规定,则对系统造
成的损坏不在保修范围内。
注:
请小心处理废旧电池。不得以任何方式损坏电池。 损坏的电池可能在环境中释放有害物质。 不要把废
旧电源丢入垃圾或公共垃圾填埋地。请按照当地有害废品管理机构颁布的条例正确处理废旧电池。
2
系统安装 — 硬件
2.1
简介
交货物品:
-
2.2
1200 系列 – 4 托架小型塔式系统,完整配备 4 个硬盘驱动器
除系统自身之外,每个系统还应随附以下物品
-
一根交流电源线,适用于系统中的每个电源设备
-
本快速安装指南
拆开包装
您应检查系统的运输箱,留意是否有任何损坏迹象。如果系统自身显示损坏,则应就损坏情况向承运
商索赔,并通知相应的博世 RMA 服务台。
由于系统较重:在打开运输箱的顶部后,两人应各自站在运输箱的两侧,一起将磁盘阵列抬出运输箱。
确定适合安放系统的位置。系统应安放在干净无尘且通风良好的区域内。 请避开可能产生热量、电气
噪声和电磁场的区域。此外,还应靠近接地电源插座。 确保阅读下一节的 “ 预防措施 ”。
2.3
准备安装
按照指定的顺序执行所述步骤,以便用最少的时间完成安装过程。开始后面几节所述的安装过程之前,
请先阅读本节。
2.3.1
选择安装位置
在机箱盖所在的系统前部和侧面留出足够的空隙,以便拆卸可交换式驱动器、保证充足的气流和便于
维修。
本产品只能安装在限制访问的场所 (专用设备机房、服务机柜等等)。
2.3.2
系统预防措施
-
查阅电气和一般安全预防措施。
使用合规的不间断电源设备 (UPS) 来保护系统不受电涌、尖峰电压的损坏,并可在电源发生故障
时保持系统正常操作。
2.4
-
在触摸之前,请先让 SATA 驱动器和电源设备模块冷却下来。
-
在不进行维修工作时,始终确保机箱盖安装到位且稳固,以维持正常的冷却。
打开系统电源
最后要做的事情是为系统接通电源。
Bosch Sicherheitssysteme GmbH
快速安装指南
- | V1 | 2011.03
126 zh | 系统安装 — 第一步
1.
1200 Series/4-bay IP Video Storage System
将从电源设备引出的电源线插入高质量的插线板 (可防护电气噪声和电涌)。 建议使用不间断电
源设备 (UPS)。
2.
按控制面板上的电源按钮以启动系统。
3
系统安装 — 第一步
3.1
简介
以下安装原则适用于博世 DLA 磁盘阵列系列,并提供了有关安装、配置和维修的信息。
博世 DLA 磁盘阵列基于 Microsoft Storage Server 2008。Microsoft Windows Storage Server 2008 操
作系统提供了用于初始服务器设置的用户界面、统一的存储设备管理、简化的存储和共享文件夹安装
及管理,并对 Microsoft iSCSI Software Target 提供支持。
该软件进行了专门调整,以便为联网存储设备提供最佳性能。 Windows Storage Server 2008 能在共享
和存储管理场合中提供更强的性能,并集成了存储设备管理组件和功能。
3.2
安装说明
所有博世 DLA 系列磁盘阵列都预先配置了默认 IP 地址和默认
iSCSI 设置。
-
IP 地址:10.10.10.10 (第 1 个端口)和 10.10.10.11 (第 2 个端口)
-
网络掩码:255.255.255.0
-
用户:Administrator
-
密码:WSS4Bosch
有关详细信息,例如数据页和用户手册,请访问博世网站 www.boschsecurity.com 上的 Product
Catalog (产品目录)> CCTV > IP Video (IP 视频)> Disk Arrays (磁盘阵列)。
对默认 iSCSI 设置进行优化,以便与 VRM 一起使用。只有经验丰富的存储管理员才能更改这些设置。
仅在以下情况下,才允许更改默认配置:VRM 未使用,或默认设置不适用于其它博世 iSCSI 应用程
序。
3.3
设置 IP 地址
默认 IP 地址可通过两种方法更改。
3.3.1
远程桌面连接
1.
通过端口 1 或 2 将系统接入网络,然后启动系统。 系统出厂前已启用了 Remote Desktop
Connection (远程桌面连接)。登录符合以下条件的适当客户端系统:安装了 Windows XP、
Windows Vista 或 Windows 7 (不随附客户端硬件和软件),且 IP 地址处于同一网络,例如
10.10.10.12 (网络掩码:255.255.255.0)。
2.
在客户端系统上打开 Remote Desktop Connection。 在 Computer 框中,输入要连接的磁盘阵列
的 IP 地址。
默认 IP 地址:10.10.10.10 (端口 1)
- | V1 | 2011.03
快速安装指南
Bosch Sicherheitssysteme GmbH
系统安装 — 第一步 | zh 127
1200 Series/4-bay IP Video Storage System
3.
在显示磁盘阵列登录窗口后,单击 Connect,按下 Ctrl+Alt+Del (如果显示),然后键入默认
密码 WSS4Bosch。
4.
首次登录时,系统会采用桌面默认设置。 这将需要数秒钟,而且系统会重新启动。 在系统重新启
动后,再次登录,将会显示 Bosch VRM Appliance initial configuration 窗口。使用此程序配置磁
盘阵列的 IP 地址。
5.
Bosch VRM Appliance initial configuration 的顶层视图概要显示了系统的配置和设置。 选择链接
Configure networking 以访问网络配置。
对于每个网络端口,均会显示单独的图标。 选择用于显示状态 network 的 Local Area Connection
图标,然后双击图标。
6.
Bosch Sicherheitssysteme GmbH
单击 Properties,选择 Internet Protocol Version 4 (TCP/IPv4),然后单击 Properties。
快速安装指南
- | V1 | 2011.03
128 zh | 系统安装 — 第一步
3.3.2
1200 Series/4-bay IP Video Storage System
7.
该对话框允许您根据网络要求设置 IP 地址配置。
8.
重新启动系统。
物理连接
系统随附了 VGA 图形连接器和 PS2 连接器,用于连接鼠标和键盘。
1.
将监视器、鼠标和键盘 (不随附)连接到磁盘阵列并启动系统。
注:
如果在系统启动后连接 PS2 鼠标或键盘,则可能不能正常工作。
2.
3.
在系统启动后显示磁盘阵列登录窗口时,按 Ctrl+Alt+Del,然后键入默认密码 WSS4Bosch。
首次登录时,系统会采用桌面默认设置。 这将需要数秒钟,而且系统会重新启动。在系统重新启
动后,再次登录,将会显示 Bosch VRM Appliance initial configuration 窗口。使用此程序配置磁
盘阵列的 IP 地址。
- | V1 | 2011.03
快速安装指南
Bosch Sicherheitssysteme GmbH
系统安装 — 第一步 | zh 129
1200 Series/4-bay IP Video Storage System
4.
Bosch VRM Appliance initial configuration 的顶层视图概要显示了系统的配置和设置。 选择链接
Configure networking 以访问网络配置。
对于每个网络端口,均会显示单独的图标。 选择用于显示状态 network 的 Local Area Connection
图标,然后双击图标。
5.
Bosch Sicherheitssysteme GmbH
单击 Properties,选择 Internet Protocol Version 4 (TCP/IPv4),然后单击 Properties。
快速安装指南
- | V1 | 2011.03
130 zh | 系统安装 — 第一步
3.4
1200 Series/4-bay IP Video Storage System
6.
该对话框允许您根据网络要求设置 IP 地址配置。
7.
重新启动系统。
VRM 设备
系统预先安装了 Bosch Video Recording Manager (VRM),并带有完全许可的 32 通道许可证。 此许可
证只能扩展一次,并且最多可以扩展 32 个通道。
VRM 提供了功能强大的录像引擎,可与 BVC 或 Bosch VMS 配合使用,用于实时查看录像和回放记录
的数据。 BVC 和 Bosch VMS 必须通过相应的博世销售渠道进行订购。
VRM 设备提供了功能完备的 VRM 录像解决方案,只是可配置通道的数量受到限制。不需要 VRM 软件
的应用场合应禁用 VRM 服务。
3.4.1
- | V1 | 2011.03
其它软件和文档
VRM 设备上的 C:\Bosch\resources 文件夹中提供了硬件配置软件和软件 (VRM)。
快速安装指南
Bosch Sicherheitssysteme GmbH
系统安装 — 第一步 | zh 131
1200 Series/4-bay IP Video Storage System
VRM Configurator:用于方便配置 VRM (包括磁盘阵列、摄像机、记录时间表等)的软件应安装在单
独的客户端系统上,例如博世工作站硬件。
请注意,为了执行所有与查看相关的配置任务 (例如 IVA),随 Bosch Video SDK (可从博世网站获
取)一起提供的 VRM 配置程序必须安装在单独的客户端系统上。
可从以下位置找到博世 DLA 和 VRM 的文档:
www.boschsecurity.com > 选择您的地区和国家 > 选择 Product Catalog (产品目录)> 开始搜索您的
产品 > 在搜索结果中选择产品以显示现有的文档。
3.4.2
禁用 VRM 服务
系统始终在出厂前预先安装了 VRM 应用程序,但如果仅用作磁盘阵列,则可禁用 VRM 服务:
1.
登录存储系统,然后启动 Bosch VRM Appliance initial configuration 窗口。Bosch VRM
Appliance initial configuration 窗口的顶层视图概要显示了系统的配置和设置。
如果未显示 Bosch VRM Appliance initial configuration 窗口,则单击 Start > Run > oobe。
2.
选择链接 Disable/Enable Bosch VRM Appliance 以停止 / 启动 VRM 录像服务。
要重新启动服务,请在 Bosch VRM Appliance initial configuration 窗口中单击 enable Bosch VRM
Appliance 链接。
参见章节 3.3 设置 IP 地址。
3.5
标准系统配置
系统在交付时随附了完全配置的 iSCSI 目标和 4 个预先配置的 LUN。
默认目标名称为 TG0,可容纳所有 iSCSI LUN。
LUN 的命名惯例为 VHDxx.vhd,其中 <xx> 的范围是 01 至 08,具体取决于所用的系统。默认安装
允许每个 iSCSI 启动程序均连接到系统。
系统在出厂时已启用了 iSCSI 目标服务,它由预先安装的 VRM 应用程序使用。
3.6
服务和维修
存储系统提供三年保修。相关问题将根据博世支持和服务指南加以处理。 对于博世 DLA 磁盘阵列,将
采用标准的博世支持方法。
以下模块可在发生故障时现场更换,无需运回装置:
-
硬盘驱动器:对于硬换用的硬盘驱动器,仅支持博世原装硬盘驱动器。 否则,保修无效。
请求 RMA
对于发生故障的部件,请向以下博世 RMA 联系人之一请求 RMA。
-
RMA 联系人 (AMEC)
Bosch ST, RMA Swapstock, 8601 East Cornhusker Hwy, Lincoln, NE 68507 -USA
电话:+1(402)467-6610
传真:不适用
电子邮件:[email protected]
营业时间:星期一至星期五,6:00 – 16:30
-
RMA 服务中心 (APR)
Robert Bosch (SEA) Pte Ltd, 11 Bishan Street 21, (level 5, from service lift), Singapore 573943
电话:+65 6571 2872
传真:不适用
Bosch Sicherheitssysteme GmbH
快速安装指南
- | V1 | 2011.03
132 zh | 系统安装 — 第一步
1200 Series/4-bay IP Video Storage System
电子邮件:[email protected]
营业时间:星期一至星期五,8:30 – 17:45
-
RMA 联系人 (中国)
中国珠海金湾区三灶镇青湾工业区机场北路 20 号博世 (珠海)安保系统有限公司,邮编:
519040
电话:+86 756 7633117 / 121
传真:不适用
电子邮件:[email protected]
营业时间:星期一至星期五,8:30 – 17:30
-
RMA 联系人 (EMEA)
Bosch Security Systems, C/o EVI Audio GmbH, Ernst-Heinkel Str. 4, 94315 Straubing,
GERMANY
联系人:RA 服务中心主管
电话:+49(9421)706-366
传真:不适用
电子邮件:[email protected]
营业时间:星期一至星期五,7:00 – 18:00
- | V1 | 2011.03
快速安装指南
Bosch Sicherheitssysteme GmbH
Bosch Sicherheitssysteme GmbH
Werner-von-Siemens-Ring 10
85630 Grasbrunn
Germany
www.boschsecurity.com
© Bosch Sicherheitssysteme GmbH, 2011