1
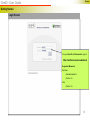
One45 – Curriculum Information Management System User Guide
Faculty Access
One45 Basics
Curriculum Mapping
Course Delivery
http://one45.usask.ca
I.T.Unit
College of Medicine
University of Saskatchewan
One45 Faculty Full User Guide v6
1
One45 - User Guide
Overview
Curriculum Mapping
3
•
Getting Around One45
4
•
TASK 1: Accessing Curriculum Explorer for a Course
5
•
TASK 1.1 : Accessing Curriculum Explorer for all Courses in a Phase
8
•
TASK 1.2 : Accessing the Curriculum Calendar for all Courses
14
•
TASK 2: Curriculum Mapping: Course Menu
18
•
TASK 2.1: Selecting a Session
19
•
TASK 2.2: Editing Session Information (CurrMIT Tab)
20
•
TASK 2.3: Mapping a Session
22
•
TASK 2.4: Editing Course Information
27
•
TASK 2.5: Mapping a Course
28
•
TASK 2.6: Bulk Mapping (Multiple Sessions)
30
TASK 3: Curriculum Search
•
•
TASK 3.1: Curriculum search: By Keyword
34
TASK 4: Course Delivery
•
TASK 4.1: Adding Learning Objects for a Session
37
•
TASK 4.2: Editing a Session (Name and Type)
45
•
TASK 4.3: Editing a Session schedule (Date, Time, Room Number)
46
•
TASK 4.4: Adding/ updating people associated with a section.
47
•
TASK 4.5: Adding a New Session
51
•
TASK 4.6: Adding a New Section
54
•
TASK 4.7: Deleting a Session
61
•
TASK 4.8: Sending Group Email
64
Course Delivery
Course Delivery
•
Basics
Basics
Getting Started (Logging in)
Curriculum Mapping
•
Basics
Basics
This user guide is intended for ‘Faculty’ users and is divided into 3 main parts covering common, curriculum mapping
and course delivery tasks. The titles for each section are colour coded. The tasks covered in this guide are listed
below.
2
Basics
One45 - User Guide
Getting Started
Login Screen
Use your User ID and Password to Login at:
http://medicine.usask.ca/webeval
Supported Browsers:
Windows:
• Internet Explorer 6+
• Firefox 1.3+
Mac:
• Firefox 1.3+
3
Basics
One45 - User Guide
Getting Around One45 - Main Menu Navigation elements
Schedules Menu
1. User Role
Navigation Elements
1.User Role
2. Logout Link
2.Logout Link
3.Main Menu
3. Main Menu
4
Basics
One45 - User Guide
TASK 1 : Accessing Curriculum Explorer for a Course
Schedules Menu
TASK Start
Step 1 : Click on the ‘My Courses’ item under the Schedules
menu.
5
Basics
One45 - User Guide
TASK 1 : Accessing Curriculum Explorer for a Course
Schedules Menu
Step 2 : Click on the “view details” link to open the curriculum
explorer screen.
•
Check the from and to dates for a course to make sure
you are selecting the course for the right academic year.
Courses that are completed have a check mark at the left
hand column.
My Courses
The ‘My Courses’ screen lists all courses that are associated
with your profile as an Instructor, Course Co-ordinator or
Module Co-ordinator.
6
Basics
One45 - User Guide
TASK 1 : Accessing Curriculum Explorer for a Course
Curriculum Explorer Screen
TASK Complete.
This page will open in the same window or as a new tab/window
depending on your browser.
7
Basics
One45 - User Guide
TASK 1.1 : Accessing Curriculum Explorer for all Courses in a Phase
eDossier View
TASK Start
Step 1 : Click on the ‘Handouts & Links’ item in the left-hand
menu.
8
Basics
One45 - User Guide
TASK 1.1 : Accessing Curriculum Explorer for all Courses in a Phase
eDossier View
Step 2 : Click on the “Undergrad program objects” link to
expand the handouts and links screen.
Undergrad program objects
Handouts and links which are related to specific courses are
not listed here. The ‘Undergrad program objects’ screen
lists all handouts and links that are associated with the
UGME program as a whole.
9
Basics
One45 - User Guide
TASK 1.1 : Accessing Curriculum Explorer for all Courses in a Phase
eDossier View
Step 3 : Click on the desired “Curriculum Browser: Phase…”
link to open the Curriculum Explorer in a new window or
tab.
10
Basics
One45 - User Guide
TASK 1.1 : Accessing Curriculum Explorer for all Courses in a Phase
Curriculum Explorer Screen
This page will open as a new tab/window depending on your
browser.
Step 4 : Click on the desired Course link to discover it’s content.
11
Basics
One45 - User Guide
TASK 1.1 : Accessing Curriculum Explorer for all Courses in a Phase
Curriculum Explorer Screen
Step 5: To view Curriculum information for the course:
Option 1: Click the “Info” menu item to view course Objectives,
Notes, Comments, etc.
Option 2: Click the “Mappings” menu item to view associated
Mappings information.
Option 3: Click the “Handouts” menu item to view associated
Handout / Learning Object information.
Option 4: Click the “Sessions” menu item to view a listing of all
sessions within a course.
Option 4: Click on a Session link to discover curriculum
information about that specific session.
12
Basics
One45 - User Guide
TASK 1.1 : Accessing Curriculum Explorer for all Courses in a Phase
Curriculum Explorer Screen
To navigate back to the Course or
Portfolio listings, click the applicable area
of the Navigation ribbon.
Step 6: To view Curriculum information about a particular
session:
Option 1: Click the “Info” menu item to view course Objectives,
Notes, Comments, etc.
Option 2: Click the “Mappings” menu item to view associated
Mappings information.
Option 3: Click the “Handouts” menu item to view associated
Handout / Learning Object information.
TASK Complete.
13
Basics
One45 - User Guide
TASK 1.2 : Accessing the Curriculum Calendar for all Courses
eDossier View
TASK Start
Step 1 : Click on the ‘Handouts & Links’ item in the left-hand
menu.
14
Basics
One45 - User Guide
TASK 1.2 : Accessing the Curriculum Calendar for all Courses
eDossier View
Step 2 : Click on the “Undergrad program objects” link to
expand the handouts and links screen.
Undergrad program objects
Handouts and links which are related to specific courses are
not listed here. The ‘Undergrad program objects’ screen
lists all handouts and links that are associated with the
UGME program as a whole.
15
Basics
One45 - User Guide
TASK 1.2 : Accessing the Curriculum Calendar for all Courses
eDossier View
Step 3 : Click on the “Curriculum Calendar” link to open the
Curriculum Calendar in a new window or tab.
16
Basics
One45 - User Guide
TASK 1.2 : Accessing the Curriculum Calendar for all Courses
Curriculum Calendar Screen
This page will open as a new tab/window depending on your
browser.
Navigation Options: Views
Navigation Options: Years
Click on the desired
“Academic Year”.
Click on the desired Phase
of Curriculum for the
Academic Year.
Navigation Options:
Back and Forward
Navigation Options:
Jumping Directly to a
Month/Year
Click on the forward or
back button to view the
previous or next week /
month of schedules.
Click on the “jump”
button to view a
particular month/year.
Click on the desired
chronological view to see the
schedule for a day, week, or
month. Choosing “Today” will
take you directly to the
current date in the calendar.
Navigation Options: Session Details
Clicking on any of the sessions within the
calendar will pop up a Session Details box. This
contains details such as start & end time, course
name, session name, location, instructor, and
applicable handouts/links.
Clicking the Course, Lecture, or Today’s details
links within this box will open the Curriculum
Explorer for that course or session.
TASK Complete.
17
One45 - User Guide
Curriculum Mapping
Task 2: Curriculum Mapping: Course Menu
Curriculum Explorer Screen
Course Details
This section displays general information about
the course.
Location Bar
This bar displays your current navigation
location. Use this to go back up to
year/course/session/section levels.
Curriculum Menu
All curriculum management options are
available through this menu.
Current Context
The current navigation context is indicated at
the top right corner of the window.
18
Curriculum Mapping
One45 - User Guide
TASK 2.1 : Curriculum Mapping: Selecting a Session
Curriculum Explorer Screen
Sessions are sorted alphabetically by default.
•
The sort criteria can be changed by clicking on the
field name (e.g. from date, to date, to time etc.)
•
The sort order can be changed by clicking on the
arrow next to the field name.
TASK Start
•Curriculum Mapping: Course vs. Session Level: Curriculum
mapping can be done both at the course level or the session
level.
• Refer Task 2.4 for Course level curriculum mapping.
Step 1 : To select a session, start by selecting the sessions menu
for the course.
Step 2 : Click and select the session from the list, which will take
you to the session screen.
TASK Complete.
•Please refer the Curriculum Mapping Guidelines document
for information on which mappings should be recorded at which
level.
•Sessions include lectures and labs.
19
Curriculum Mapping
One45 - User Guide
TASK 2.2 : Curriculum Mapping: Editing Session Information (CurrMIT Tab)
Curriculum Explorer Screen
TASK Start
Step 1 : Check the location bar to ensure you are on the right
session screen
Step 2 : Click and select the ‘CurrMIT Fields’ menu to open the
information screen for the current session.
HINT: You can confirm the current context by looking at the top
corner of the window.
20
Curriculum Mapping
One45 - User Guide
TASK 2.2 : Curriculum Mapping: Editing Session Information (CurrMIT Tab)
Curriculum Explorer Screen
CurrMIT Fields
In the session context, the CurrMIT screen
displays information specific to the current session.
Fill in the session objectives and other relevant fields, before
proceeding to the sessions Mappings menu.
TASK Complete.
21
Curriculum Mapping
One45 - User Guide
TASK 2.3 : Curriculum Mapping: Mapping a Session
Curriculum Explorer Screen
TASK Start
Step 1 : Check the location bar to ensure you are on the right
session screen
Step 2 : Click and select the ‘Mappings’ menu to open the
mappings screen for the current session.
HINT: You can confirm the current context by looking at the top
corner of the window.
22
One45 - User Guide
Curriculum Mapping
TASK 2.3 : Curriculum Mapping: Mapping a Session
Curriculum Explorer Screen
Step 3: To start mapping the session, click on + sign. This will
pop-up a mapping dialog box.
Mappings Menu
The session mappings menu lists current session mappings and provides
the mapping tools for the session where you can associate different:
•
Educational Methods
•
Educational Sites
•
Topics
•
AAMC/LCME Hot Topics (Subcategory of Topics)
•
U of S General Objectives of the Medical Curriculum
•
Medical Council of Canada Objectives
•
U of S CASE Curriculum
•
U of S Keywords
NOTE:
Use this screen to add or delete session mappings
23
One45 - User Guide
Curriculum Mapping
TASK 2.3 : Curriculum Mapping: Mapping a Session
Curriculum Explorer Screen
Step 4: Click on the mappings drop-down list to pick a mapping
category.
24
One45 - User Guide
Curriculum Mapping
TASK 2.3 : Curriculum Mapping: Mapping a Session
Curriculum Explorer Screen
Step 5: Select one or more mappings and click ‘Ok’
25
Curriculum Mapping
One45 - User Guide
TASK 2.3 : Curriculum Mapping: Mapping a Session
Curriculum Explorer Screen
Step 6: To add more mappings, click on the + sign and repeat
the above steps.
OR
Mapping Result
Step 7: To map another session, click on the course name in the
location bar to return to the course context. Select the
sessions menu item from the left menu and repeat the
steps from page 22.
TASK Complete
26
Curriculum Mapping
One45 - User Guide
TASK 2.4 : Curriculum Mapping: Editing Course Information (CurrMIT Fields)
Curriculum Explorer Screen
TASK Start
Step 1: To manage a course, start at the course menu screen by
selecting the course from “My Courses” menu in the One45
Main screen as shown on page 6 or by clicking on the
course name in the location bar.
Step 2: Click on the CurrMIT fields to edit/enter course
information.
*All information is saved automatically
CurrMIT Menu
TASK Complete
Here you can edit general course
information provided to CurrMIT, including
course objectives.
27
Curriculum Mapping
One45 - User Guide
TASK 2.5 : Curriculum Mapping: Course Mapping
Curriculum Explorer Screen
TASK Start
Step 1: To start mapping a course, select the course from “My
Courses” menu in the One45 Main screen as shown on
page 6.
Step 2: Select the Mappings menu item in the left menu.
Please refer the Curriculum Mapping Guidelines
document for information on which mappings are
recorded at the course level.
28
Curriculum Mapping
One45 - User Guide
TASK 2.5 : Curriculum Mapping – Course Mapping
Curriculum Explorer Screen
Start mapping the course by following the same steps for
mapping sessions as shown from pages 22 – 26.
NOTE:
Always check the location bar or top corner of the screen to make
sure you are in the right context.
TASK Complete
29
Curriculum Mapping
One45 - User Guide
TASK 2.6 : Curriculum Mapping: Adding Bulk Mappings
Curriculum Explorer Screen
TASK Start
Step 1: To manage bulk mappings for one or more sessions in a
course, select the bulk mappings menu item in the course
menu.
30
Curriculum Mapping
One45 - User Guide
TASK 2.6 : Curriculum Mapping: Adding Bulk Mappings
Curriculum Explorer Screen
1
2
BULK MAPPING
3
• All sessions in a course are listed in the bulk mappings window.
• Use the check boxes to select one or more sessions before
selecting a bulk mapping option.
The bulk mappings function is similar to the mapping function for
individual sessions of a course but can be used to map elements
to multiple sessions at once.
Bulk Mappings Options
1. Show Common Mappings: This option shows all common
mappings for selected sessions.
2. Add Mappings: This option allows you to add mappings for
multiple selected sessions at once.
3. Delete Mappings: This option allows you to delete common
mappings for selected sessions.
31
One45 - User Guide
Curriculum Mapping
TASK 2.6 : Curriculum Mapping: Adding Bulk Mappings
Curriculum Explorer Screen
Step 2: Select one or more sessions to add bulk mappings.
Step 3: Click and select the ‘add mappings’ button.
32
Curriculum Mapping
One45 - User Guide
TASK 2.6 : Curriculum Mapping: Adding Bulk Mappings
Curriculum Explorer Screen
Step 4: Follow the same steps as in previous mapping examples
to add mappings.
TASK Complete
33
Basics
One45 - User Guide
TASK 3 : Curriculum Search
Curriculum Explorer Screen
TASK Start
Step 1: To perform a curriculum search, start at the curriculum
explorer window for the preferred course.
Step 2: Select the search menu from the course menu on the left.
Curriculum Search
This feature can be used to search the curriculum database to
find where specific topics, MCC objectives etc. are covered.
34
Basics
One45 - User Guide
TASK 3.1 : Curriculum Search – By Keyword
Curriculum Explorer Screen
Step 3: Click on the search input box and enter the search
text. This can be any keyword related to the course,
session, curriculum etc.
Step 4: Hit Search.
Search Results
The search option returns results based on a free-form text
match of the objectives and other fields of the CurrMIT tab
and mappings for sessions and courses.
35
Basics
One45 - User Guide
TASK 3.1 : Curriculum Search – By Keyword
Curriculum Explorer Screen
Search results are displayed in the same window.
•
You can export the results to excel by clicking on the
‘export to excel’ link.
OR
•
OR
•
You can select a course/session from the search results to
view full information for this course or session.
Perform another search.
TASK Complete
Search Results
The results lists all courses and sessions which matched the
search criteria.
A blank session field indicates that the search found results at the
course level. If the session is specified, the result was found at
the session level.
36
Course Delivery
One45 - User Guide
TASK 4.1: Course Delivery: Adding Learning Objects to Sessions
Curriculum Explorer Screen
TASK Start
To start course delivery tasks, start at the One45 main screen
and select the desired course as demonstrated in the
General section pages 5 -7.
Step 1: To add learning objects at the session level, start at the
session listings screen by selecting the ‘Sessions’ menu
from the left.
Step 2: Select a session from the list by clicking on the desired
session.
Note
Learning objects / handouts
must be under 50MB
(megabytes). Attempting to
upload a file larger than
50MB will not work.
37
Course Delivery
One45 - User Guide
TASK 4.1: Course Delivery: Adding Learning Objects to Sessions
Curriculum Explorer Screen
Step 3: Select the handouts link from the left menu.
*Check the top corner of the screen to make sure you are in
the session context
38
Course Delivery
One45 - User Guide
TASK 4.1: Course Delivery: Adding Learning Objects to Sessions
Curriculum Explorer Screen
Step 4: In the handouts screen, click on the add learning objects
link to pop up the ‘Add Learning Object’ window.
Only handouts for the selected session are
listed.
39
Course Delivery
One45 - User Guide
TASK 4.1: Course Delivery: Adding Learning Objects to Sessions
Curriculum Explorer Screen
Step 2 : Find the item to upload from your file system by clicking
on “Browse” or specify a web location by typing in the web
address of the object
*Clicking the Browse button will display a directory window from
which the file can be located and uploaded to One45
40
Course Delivery
One45 - User Guide
TASK 4.1: Course Delivery: Adding Learning Objects to Sessions
Curriculum Explorer Screen
Step 3 : Find the item to upload on your local disc/network drive
and select open.
41
Course Delivery
One45 - User Guide
TASK 4.1: Course Delivery: Adding Learning Objects to Sessions
Curriculum Explorer Screen
Step 4 : Enter a title for the item
Step 5 : Select the type of the item
Step 6 : Select the format of the item (doc, pdf, ppt etc.)
Step 7 : Select who can access the item by clicking on the check
boxes ‘for faculty’ or ‘for students’
42
One45 - User Guide
Course Delivery
TASK 4.1: Course Delivery: Adding Learning Objects to Sessions
Curriculum Explorer Screen
Step 7 : If desired, restrict access to the item for a specific period
of time by checking the restrict access radio button.
Step 8 : Select the start date by clicking on the calendar icon to
pop up the calendar as shown in the inset.
Step 9: Select the start date from the calendar. This will select
the date and close the calendar.
Step 10 : Repeat steps 7 – 9 for the end date by clicking on the
second calendar icon.
43
Course Delivery
One45 - User Guide
TASK 4.1: Course Delivery: Adding Learning Objects to Sessions
Curriculum Explorer Screen
Results of adding a learning object
Deleting a Session Learning Object
Delete Session level learning objects by clicking on the ‘del’ link beside
the learning object. This will pop up the delete confirmation box as
shown in the inset above.
Adding Learning Objects for a Course
Learning objects can be added for a course by following the same steps
as demonstrated above. Start at the course level and select the
‘handouts’ menu option while in the course context. This would be
useful for course level handouts like course syllabus, outlines or
objectives.
TASK Complete
44
Course Delivery
One45 - User Guide
TASK 4.2: Course Delivery: Editing a Session (Name and Type)
Curriculum Explorer Screen
TASK Start
To edit a session name and type, start at the session main
screen as shown in pages 37 and 38.
Step 1: Click and select the ‘edit’ option from above, to pop up
the edit window as show in the inset on the left.
Step 2: Click and select an activity type from the activity dropdown menu, if required.
Step 3: Click in the session name input box and enter the new
session name, if required.
Step 4: Click ‘save’ to confirm changes or ‘cancel’ to cancel the
changes.
TASK Complete
45
Course Delivery
One45 - User Guide
TASK 4.3: Course Delivery: Editing a Session schedule (date, time, location)
Curriculum Explorer Screen
TASK Start
To edit a session schedule, start at the session main screen
as shown in pages 37 and 38.
Step 1: Click and select the sections menu from the left menu.
Step 2: Select the section to edit by clicking on the section name.
46
Course Delivery
One45 - User Guide
TASK 4.3: Course Delivery: Editing a Session schedule (date, time, location)
Curriculum Explorer Screen
Step 3: Check the top corner of the screen to confirm you are
now in the section context.
Step 2: Click and select the ‘edit’ option from above, to pop up
the edit window as shown in the inset o the left.
Step 3: Enter/edit the date information, using the input box or the
pop up calendar.
Step 4: Enter/edit the ‘from’ and ‘to’ time.
Step 5: Select a different room from the ‘Room/Building’ drop
down list, if required.
Step 6: Click save to confirm changes or cancel to cancel the
changes.
TASK Complete
47
Course Delivery
One45 - User Guide
TASK 4.4: Course Delivery: Adding/ updating people associated with a section
Curriculum Explorer Screen
TASK Start
To add or update people associated with section start at
sessions screen in the curriculum explorer window.
Step 1: Click and select the sections menu from the left menu.
Step 2: Select the section to edit by clicking on the section name.
People should be associated at the Section level (not the
Session level) for each lecture
Only users with "Course Co-ordinator" or "Admin Sender" role for
a course will be able to add / update People
48
Course Delivery
One45 - User Guide
TASK 4.4: Course Delivery: Adding/ updating people associated with a section
Curriculum Explorer Screen
Step 3: Check the top corner of the screen to confirm you are
now in the section context.
Step 4: Click on the People menu item in the left menu.
49
Course Delivery
One45 - User Guide
TASK 4.4: Course Delivery: Adding/ updating people associated with a section
Curriculum Explorer Screen
People
Students are already assigned to all Sections for all Sessions
listed. Only Facilitators need to be added/updated for
sections in the system.
Roles
The only role that should be selected at the Section level is
Lecturer.
Step 5: Associate Facilitators with the section by clicking on the
Facilitators link and the add option. This will pop up the add
window as shown.
Step 6: Type in the last name of the person to be associated with
the course in the search box and hit search.
Step 7: Select and highlight the name of the facilitator to add it to
the Individuals list.
Step 8: Click on the ‘Add facilitator as’ drop down list and select
the “Lecturer” as the role of the person to be associated
with the class.
Step 9: Hit Save to confirm addition or cancel.
TASK Complete
50
Course Delivery
One45 - User Guide
TASK 4.5: Course Delivery: Adding a New Session
Curriculum Explorer Screen
TASK Start
To Add a New Session for a Course, start at the sessions screen
in the Curriculum Explorer window.
Step 1: Click on the ‘add sessions’ option.
51
One45 - User Guide
Course Delivery
TASK 4.5: Course Delivery: Adding a New Session
Curriculum Explorer Screen
Tip:
To add more than one session at a time, use the:
Add another option to add another row for session
information.
Add multiple option to add multiple rows for sessions.
Step 2: Enter the session name and select the session type.
Step 3: Click submit to add the session. This will take you back to
the sessions screen, with the updated sessions list.
52
Course Delivery
One45 - User Guide
TASK 4.5: Course Delivery: Adding a New Session
Curriculum Explorer Screen
The new session is created with the information provided.
TASK Complete
53
Course Delivery
One45 - User Guide
TASK 4.6: Course Delivery: Adding a New Section
Curriculum Explorer Screen
TASK Start
Step 1: To add scheduling information for the session a section
must be added to the session. Click on the session name
and proceed to the session window.
54
One45 - User Guide
Course Delivery
TASK 4.6: Course Delivery: Adding a New Section
Curriculum Explorer Screen
Step 2: Add a section by clicking on the ‘add section’ option.
55
One45 - User Guide
Course Delivery
TASK 4.6: Course Delivery: Adding a New Section
Curriculum Explorer Screen
Step 3: Use the default ‘Auto Number’ option for
the session name field.
Step 4: Select :
- start and end time
- session date
- room location.
Step 5: Click on the ‘add’ link for Learners, to add a
list of students who will attend this session.
This will pop up the Learners window as
shown on the next page.
56
One45 - User Guide
Course Delivery
TASK 4.6: Course Delivery: Adding a New Section
Curriculum Explorer Screen
Step 5a: Select the appropriate student group,
from the ‘Families’ list.
Step 5b: If the section is intended for all students in
the selected group, double click on the group
name in the ‘Groups’ list.
OR
To select specific students from the list,
double click student names to populate the
‘Individuals’ list.
Step 5c: Click Add to confirm selections.
57
One45 - User Guide
Course Delivery
TASK 4.6: Course Delivery: Adding a New Section
Curriculum Explorer Screen
Step 6: Click on the ‘add’ link for Facilitators, to
add a faculty role to the section. This will pop
up the Facilitators window as shown on the
next page.
58
One45 - User Guide
Course Delivery
TASK 4.6: Course Delivery: Adding a New Section
Curriculum Explorer Screen
Step 6a: Search for the faculty member by typing
in the last name in the search field and
clicking search.
Step 6b: Double click on the faculty name in the
search results list, to add it to the individuals
list below.
Step 6c: Assign a role to the faculty member from
the ‘Add facilitators as:’ drop-down list.
Step 6d: Click ‘Add’ to confirm changes. .
Faculty Role:
Assign the ‘Lecturer’ role to faculty when creating a section.
59
Course Delivery
One45 - User Guide
TASK 4.6: Course Delivery: Adding a New Section
Curriculum Explorer Screen
TASK Complete
60
Course Delivery
One45 - User Guide
TASK 4.7: Course Delivery: Deleting a Session
Curriculum Explorer Screen
TASK Start
Step 1: To delete a session, all sections in the session must first
be deleted. Click on the session name to proceed to the
sections list.
Deleting Sessions:
Although Sessions can be deleted, it is imperative that the full
schedule of lectures / labs for a course remain complete at all
times, since this drives the student calendar.
If a particular lecture topic is cancelled, instead of deleting the
Session altogether, follow the procedures outlined in the
“UGME Curriculum Scheduling Procedures” document (
https://share.usask.ca/medicine/one45/Shared%20Documents/
UGME%20Curriculum%20Scheduling%20Procedures.doc )
61
One45 - User Guide
Course Delivery
TASK 4.7: Course Delivery: Deleting a Session
Curriculum Explorer Screen
Step 2: Click the ‘del’ link for the section to delete the section.
Step 3: Confirm the delete action by selecting ‘yes’ in the popup.
Step 4: Return to the course sessions list using the location bar.
62
Course Delivery
One45 - User Guide
TASK 4.7: Course Delivery: Deleting a Session
Curriculum Explorer Screen
Step 5: Delete the session using the ‘del’ link and confirming the
action in the pop up window.
TASK Complete
63
Course Delivery
One45 - User Guide
TASK 4.8: Course Delivery: Sending Group Email
Curriculum Explorer Screen
TASK Start
To start group email tasks, start at the One45 main screen and
select the desired course as demonstrated in the General
section pages 5 -7.
Step 1: To send a group email to the students in the selected
course, select the ‘People’ menu for the course. This will
take you to the ‘People’ screen.
Step 2: Click the ‘send email’ link.
64
Course Delivery
One45 - User Guide
TASK 4.8: Course Delivery: Sending Group Email
Curriculum Explorer Screen
Step 3 : Select the appropriate group by clicking to check the
appropriate box. Selecting ‘Learners’ will address the email
message to all students who are taking the class.
Step 4 : Fill-in the email details
Step 5 (optional) : Add any attachments by browsing for the file
on your drives.
Step 6 : Add your email message
Step 7 (optional) : Add a link to the One45 login page. The
option to ‘include an auto-login link’ does not apply when
emailing students.
Step 8 (optional) : Send a copy of the email to yourself.
Step 9 : Click Send
TASK Complete
65