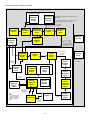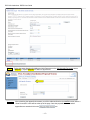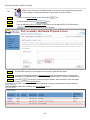
1
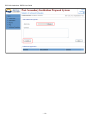
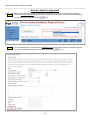
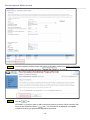
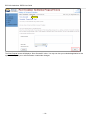
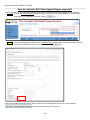
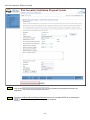
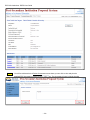
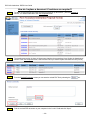
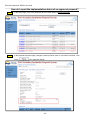
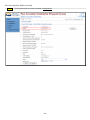
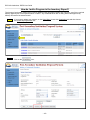
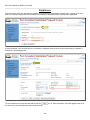
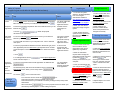
Ministry of Advanced Education
Post-Secondary Institution Proposal
System (PSIPS)
For
BC Public Institutions
User Guide
Contents
Document Purpose ..................................................................................................................... 1 Overview ...................................................................................................................................... 1 Degree Quality Assessment Board (DQAB) Process ............................................................................... 1 The System in a Nutshell .......................................................................................................................... 1 About Documents and Comments ............................................................................................................ 1 Why do we use Adobe Acrobat PDF files?............................................................................................... 2 Where can I get help?............................................................................................................................... 2 Application States ..................................................................................................................................... 2 System Basics ............................................................................................................................ 4 Minimum Requirements ............................................................................................................................ 4 Browser Navigation Buttons ..................................................................................................................... 4 Applicant Actions – BC Public Institutions ................................................................................................ 4 Screen Reference ....................................................................................................................... 5 Visual Reference Guide.............................................................................................................. 6 How do I log in? ........................................................................................................................................ 6 How do I update contact information? ...................................................................................................... 7 How do I modify my password? ................................................................................................................ 8 How do I re-assign an Institutional Contact? .......................................................................................... 10 How do I confirm organization information and attach an organization profile?..................................... 11 How do I upload Institution Appendices? ............................................................................................... 12 How do I submit a proposal? .................................................................................................................. 14 How do I submit a BC Public Applied Degree proposal? ....................................................................... 20 How do I submit a Non Degree proposal? .............................................................................................. 23 Who will review my proposal? ................................................................................................................ 32 How do I view proposal information and provide peer comments? ........................................................ 32 How do I replace a document if revisions are required? ........................................................................ 36 How do I view the status history of a proposal? ..................................................................................... 38 How do I provide response to a proposal with “Expert Review Completion Confirmed” status? ........... 39 How do I withdraw a proposal? .............................................................................................................. 40 How do I put a proposal on hold? ........................................................................................................... 40 How do I view my invoice? ..................................................................................................................... 40 How do I report the implementation status of an approved proposal? ................................................... 42 When will my proposal expire? ............................................................................................................... 44 How do I add a Program in the Inventory Report? ................................................................................. 45 How do I modify a Program in the Inventory Report? ............................................................................ 47 Error Messages ......................................................................................................................... 49 Log-in Errors ........................................................................................................................................... 49 Timeout Errors ........................................................................................................................................ 49 Field Errors ............................................................................................................................................. 50 Glossary .................................................................................................................................... 51 PSIPS Quick Reference Guide (BC Public Institutions) ........................................................ 54 BC Public Institutions: PSIPS User Guide
Document Purpose
The Post-Secondary Institution Proposal System (PSIPS) is a web-based system for supporting the post-secondary
program proposal and quality assessment review processes for degree-granting institutions in British Columbia. The
purpose of this guide is to document the functions of PSIPS for BC public post-secondary institutions.
Overview
Degree Quality Assessment Board (DQAB) Process
In British Columbia, public universities are subject to the Universities Act (UA) while colleges and institutes are subject to
the College and Institute Act (CIA) to operate as degree-granting institutions or make use of the word “university.”
Universities, colleges and institutes must undergo a quality assessment process and meet established criteria prior to the
Minister granting approval for new degree programs. The full text of the UA can be found at: University Act and the full
text of the CIA can be found at: College and Institute Act.
The Degree Quality Assessment Board (DQAB) is appointed by the Minister to conduct quality assessment reviews and
make recommendations on whether institutions and proposals meet the established criteria. The Board Secretariat within
the Ministry provides administrative support to the DQAB, the quality assessment process and applicant institutions.
The quality assessment process is initiated with a 30-day public/peer review of the proposal. The proposal is posted on
the Degree Authorization website via PSIPS, enabling the general public (including academic experts from inside and
outside British Columbia) the opportunity to review the proposal and provide comments to the applicant institution and the
Board for consideration in the review process. Other BC public institutions can view the proposal via PSIPS and provide
peer comments directly within the system to the applicant institution. The Board’s recommendation and the Minister’s
decision to approve or deny degree program proposals are also posted on the Degree Authorization website via PSIPS.
This is to reflect the Board and the Ministry’s commitment to ensuring the interests of the public are served by having an
open and accountable process.
Applicants should review the Degree Authorization website that includes complete information on the submission, review
and approval processes and the quality assessment criteria established by the Minister prior to submitting a proposal.
Institutions are encouraged to submit proposals on PSIPS 12-18 months prior to the planned implementation date of the
program to allow enough time for the quality assessment process to be completed.
The System in a Nutshell
PSIPS is a central online program for institutions to submit proposals for degree programs and applications for Qualified
for Expedited Review. Key documents and decisions about an institution’s program proposal are stored in a database.
Documents and data are entered electronically and Institutional Contacts are notified automatically by email at key review
points. Comments can be entered directly on an online screen or documents can be attached to a proposal.
About Documents and Comments
The system is designed to be somewhat like a message board and does not limit the number of comments or documents
that can be posted regarding a proposal. Unlike an informal message board, all postings become part of the government
record. Institutions are encouraged to post only official communications (i.e., no draft documents or unofficial responses).
If the applicant institution wishes to clarify a posted statement, an additional comment or document must be posted.
Detailed discussions or questions about the proposal should be conducted offline with the Board Secretariat via phone or
e-mail. The results of these discussions may then be posted as a single comment. Following this guideline will create a
clear record of specific issues, responses and positions related to the proposal.
The PSIPS system allows for online comments to be recorded (up to 4500 characters). If a more detailed comment is
required, a PDF document may be attached.
–1–
BC Public Institutions: PSIPS User Guide
Why do we use Adobe Acrobat PDF files?
We want everyone to be able to view attachments regardless of what type of computer, word processor or toolset was
used to create a document. If your institution does not have Adobe Acrobat software, Adobe offers a free reader and an
affordable online subscription service to convert your documents at www.adobe.com. If you have specific questions on the
creation of PDF documents, please refer to Adobe Acrobat documentation.
Where can I get help?
In addition to this manual, the following help is available:
Ministry web site outlining application and review steps Degree Authorization website
The Degree Quality Assessment Board Secretariat at 250-356-5406 (Monday to Friday 8:30 am to 4:30 pm)
Application States
An application will be in one of several states depending on the type of application, applicant actions, time in review, and
Board Secretariat actions. Allowable actions are limited based on user role.
For the most part, users will not need to worry about status changes as the system manages status changes
automatically, but it is useful to know the stages an application must go through before a Ministerial decision is made.
The diagram covers three types of applications:
•
BC Public Degree Proposals
•
BC Public Applied Degree Proposals
•
BC Public Qualified for Expedited Review Proposals
–2–
BC Public Institutions: PSIPS User Guide
BC Public Proposals for Degrees, Applied Degrees and Qualified for Expedited Review – Status Transitions
Peer Review Stage
Peer Review
Revisions
Pending
(Hold)
Peer Review
Withdrawn
(Closed)
If the Application Withdraws it, the application is closed
(permanently).
If the Application sets to “Revisions Pending”, can only
resume through Requesting a Peer Review.
Applicant can revise or Withdraw
at any point prior to Submission.
Ready for
Peer Review
(Open)
Initial Entry
(Open)
Peer Review
Requested
(Open)
Peer Review
(Open)
End of Peer
Review
(Open)
Withdrawn
(Closed)
Revisions
Required
(Open)
Full Review
Required
(Open)
* Secretariat may place
the submission on hold,
or withdraw it anytime.
Degree Quality Assessment Process
Submitted to
Secretariat
(Open)
Verified
(Open)
Under
Review
(Open)
When
Paid
Does not apply to
Non-Degrees
Proposals
Expert
Review
Assigned
(Open)
Only
Secretariat
may reset
Not OK to
Fast Track
Degree Quality Assessment Board Recommendation
Exempt
Verification
(Open)
DQAB
Recommend
Approval
(Open)
(automatic)
OK to
Fast Track
DQAB
Recommend
Denial
(Open)
Expert
Review
Completed
(Open)
Minister Decision
Expert
Review
Completion
Confirmed
(Open)
Minister
Denied
(Closed)
Minister
Approved
(Open)
PostApproval
Change
(Open)
Applicant set
proposal active
status & active
date
Note:
Statuses:
- Exempt Verification and
- Full Review Required do
not apply to Application for
Qualified for Expedited
Review
Expired
Implemented
* Set by
Secretariat 3
years after
approval
–3–
Due date
expired
Expert
Review
Response
(Open)
On Hold
(Hold)
*If Hold removed,
application returns to
last status.
BC Public Institutions: PSIPS User Guide
Institutions that have obtained Qualified for Expedited Review to a particular degree level are eligible to submit new
degree proposals at or below this degree level directly to the Minister for approval (i.e. the Board review of the application
is most often waived).
NOTE: Information on the submission process for Non-Degree Proposals can be found on page 15 of this manual.
System Basics
Minimum Requirements
A web browser is required to access PSIPS; recommended are MS Internet Explorer version 7 or higher and Mozilla
Firefox.
Most of proposal document attachments must be saved in the Adobe Acrobat Portable Document Format (PDF) to
address software compatibility issues. You must have the Adobe Acrobat software installed on your system to create PDF
files, or subscribe to Adobe’s online PDF service. In order to view PDF files, you must have Adobe Acrobat Reader
(version 4 or higher) installed.
For Institution Appendices, other document formats such MS Excel spreadsheets and MS Word documents are also
acceptable.
It is also advisable that users have and maintain current anti-virus software and updates.
Browser Navigation Buttons
After you sign on, use of your browser BACK and FORWARD buttons is not recommended as their use could lead to
unexpected results on the screen. For instance, after using the BACK button, the system could lose track of you as a
logged in user; the screens may appear to be functioning normally, but your work may not be saved. As a rule, navigation
must be performed using the links presented in the system, normally found along the top (e.g. breadcrumbs) or at the
bottom of each screen (e.g. links).
However, given the nature of Internet applications, there may be times when you might encounter an error that forces you
to use the BACK button to return to a screen such as “The page cannot be found (HTTP 404) error.” If this happens, you
may press BACK and then click on the HOME tab to return to a ‘clean’ screen. (See TIP below and Error message
sections for further information.)
If a print copy of a screen’s contents is desired, the browser’s PRINT button may be used.
The use of the STOP button is not recommended as this may also lead to unexpected results on the screen.
Please log out of the system and shut down your browser when finished on the system. ‘Surfing’ to another page on the
Internet while logged on is not recommended.
Applicant Actions – BC Public Institutions
Applicants (Institutional Contacts) will use the system to post degree program applications and applications to obtain
Qualified for Expedited Review. This section details the most common steps to posting applications, using the degree
program application as an example.
–4–
BC Public Institutions: PSIPS User Guide
An application cannot be modified unless the Board Secretariat moves the status to “Revisions required”. If the applicant
chooses to withdraw the application or put it on hold, he/she must do so by notifying the Board Secretariat in writing.
Screen Reference
The following diagrams outline the screen flows.
Applicant (Institutional Contact) is able to perform the following actions:
•
Submit applications;
•
View own application and its status history;
•
Submit peer comments on proposals posted by other BC Public Institutions;
•
Maintain own password and contact information and reassign user ID responsibility (in case of job change).
Application Summary
Data
----- ----------------Document Details
-----
Login
Online Comments
Home Page
Document List
------ ---- ------ ------ ------ --------- ---- ------ ------ ------ --------- ---- ------ ------ ------ ---Attach File
Adobe Acrobat to
View Document
(PDF)
Add Documents
Submit
View Status History
(of selected application)
Maintain
Contact
Maintain
Password
Query/Comment
on Peer
Proposals
Run Public
Reports
The following sections comprise a visual reference guide including sample screen shots of these screens with
descriptions of the data and functions.
* Note: All sample screens use illustrative data and are not actual proposals.
–5–
BC Public Institutions: PSIPS User Guide
Visual Reference Guide
How do I log in?
Step 1:
To access the system, select the “Sign on to the Post Secondary Institution Proposal System” link on
the Degree Authorization website at www.aved.gov.bc.ca/degree-authorization or bookmark
https://www.aved.gov.bc.ca/psips/.
The following screen will be displayed:
Step 2:
Enter your user ID and password to begin using the system. The Home Page is the first page to
display after logging in:
The Home Page is the gateway to managing your contact and organization information, creating and managing new
proposals and accessing information about the proposal process.
TIP:
If you find yourself ‘lost’ in the screen navigation, you may always click the “Home” tab at the top left-hand
corner of the screen to return to the Home Page.
–6–
BC Public Institutions: PSIPS User Guide
How do I update contact information?
Step 1:
To access and update your contact information on the Home Menu choose the Contact Info tab and
choose the Update Phone/Email link
Step 2:
Fill in the new information and choose the
choose the
icon. If you do not want to change your information
icon.
After saving you will be redirected back to the Home Page with a “Save Successful” notice at the top of the page.
–7–
BC Public Institutions: PSIPS User Guide
How do I modify my password?
Step 1:
To change your password on the Home Menu select the Contact Info tab and then choose the Change
Password link.
Step 2:
You will be redirected to the Change Password page. Follow the instructions at the top of the page.
Step 3:
After choosing a new password, enter the information into the fields and click the
icon. If you do
not wish to change your password click the
icon. If you are successful at changing your password
you will be redirected back to the Home Page with a “Save Successful” notice at the top of the page.
–8–
BC Public Institutions: PSIPS User Guide
If you are not successful at changing your password you will be redirected to the Home Page with a notice in red at the
top of the page.
If you are not successful, follow the instructions in red and try again from the Change Password tab.
–9–
BC Public Institutions: PSIPS User Guide
How do I re-assign an Institutional Contact?
Step 1:
If you would like to change your Institutional Contact on the Home Menu click on the Organization tab
and choose the Reassign Contact link. Follow the instructions on the page.
– 10 –
BC Public Institutions: PSIPS User Guide
How do I confirm organization information and attach an organization profile?
Step 1:
If you want to change your organization information on the Home Menu choose the Organization tab
and then choose the Update My Organization link.
Step 2:
Enter the desired information into the fields, and/or attach an Organization Profile using the
icon to locate the document on your computer.
Step 3:
Once you are finished making your changes choose the
changes choose the
icon.
– 11 –
icon. If you decide not to make any
BC Public Institutions: PSIPS User Guide
How do I upload Institution Appendices?
All institutions, i.e. institutions having the type ‘University’, ‘College, Institute or Agency’, ‘University College Or Provincial
Institute’, ‘Private an Out-of-Province Public’, have a possibility to upload one or many appendices related to their
Institution, i.e. appendices such as the financial calculation spreadsheet, Periodic Reviewed financial statements, etc.
These appendices may have any proprietary format.
Step 1:
Step 2:
Step 3:
Go to the Home Menu and choose the Organization tab then choose the Update My Organization
link.
Click on the
Click on the
icon when done.
icon
icon to attach file. Provide any comment for the document. Click on the
– 12 –
BC Public Institutions: PSIPS User Guide
– 13 –
BC Public Institutions: PSIPS User Guide
How do I submit a proposal?
NOTE: Information on the submission process for Non-Degree Proposals can be found on page 20 of this manual.
From the Add a new proposal dropdown menu, choose ‘BC Public Degree’ (or another option depending
Step 1:
on your application) and then click the
icon.
Step 2:
You will automatically be redirected to the Add/Edit Public Degree screen. Enter the information required
for each of the fields and when you are finished choose the
– 14 –
icon.
BC Public Institutions: PSIPS User Guide
Once the information has been saved a “Save Successful” notice will appear at the top of the screen and the
icon will appear at the bottom of the screen.
Step 3:
Step 4:
Click on the
icon to attach the proposal documents to the application.
From the Add Initial Proposal Document screen you can attach a PDF file by selecting the
icon to locate the proposal document on your computer.
– 15 –
BC Public Institutions: PSIPS User Guide
Step 5:
Find the PDF document on your computer in the “Look in” field and click “Open”.
Step 6:
Once the proposal file is attached choose the attachment type (in this case “Proposal”) from the
Attachment Type dropdown menu. Provide a short description of the attached document in the “Online
Comment” field (i.e. Proposal or Appendix A – Full Course Outlines, etc).
Click the
icon. Once the Proposal Document has been submitted you will automatically return to
the Add/Edit Degree Program screen and a “Save Successful” notice will appear at the top of the page.
Step 7:
Step 8:
To add an appendix file choose the
icon.
– 16 –
BC Public Institutions: PSIPS User Guide
Step 9:
Step 10:
Follow the same directions for Adding an Initial Document on the Add Appendix Document screen
(Steps 4-7). Repeat Steps 8-9 to add more appendices.
After submitting the appendix documents you will be redirected back to the Add/Edit screen where a
“Save Successful” notice will be at the top of the page. Once the proposal document and all
appendices are attached click on the
icon.
– 17 –
BC Public Institutions: PSIPS User Guide
Step 11:
You will be asked to read the privacy and access to information notice on the Submit to Secretariat
screen. When you are ready choose the
Step 12:
Click the
icon to continue.
icon.
OPTIONAL: You have the option to add a comment by entering it into the “Online Comment” field.
Once you are finished choose the
icon. Your comment will be displayed in a separate
comment line below your proposal and appendices documents.
– 18 –
BC Public Institutions: PSIPS User Guide
The View Proposal screen will display a “Save Successful” notice. You may now view your submitted application but the
system will not permit you to edit documents or make other changes.
– 19 –
BC Public Institutions: PSIPS User Guide
How do I submit a BC Public Applied Degree proposal?
NOTE: Information on the submission process for Non-Degree Proposals can be found on page 20 of this manual.
From the Add a new proposal dropdown menu, choose ‘BC Public Applied Degree’ (or another option
Step 1:
depending on your application) and then click the
icon.
Step 2:
You will automatically be redirected to the Add/Edit Public Degree screen. Enter the information required
for each of the fields and when you are finished choose the
icon.
Once the information has been saved a “Save Successful” notice will appear at the top of the screen and the
icon will appear at the bottom of the screen
– 20 –
BC Public Institutions: PSIPS User Guide
Step 3:
Step 4:
Click on the
application.
icon to attach the proposal documents to the
From the Add Ministry Review Request Document screen you can attach a PDF file by selecting the
icon to locate the proposal document on your computer.
– 21 –
BC Public Institutions: PSIPS User Guide
Step 5:
Find the PDF document on your computer in the “Look in” field and click “Open”.
Step 6:
Once the review request file is attached choose the attachment type (in this case “Ministry Review
Request”) from the Attachment Type dropdown menu. Provide a short description of the attached
document in the “Online Comment” field (i.e. Ministry Review Request – Full Course Outlines, etc).
Step 7:
Click the
icon. Once the Proposal Document has been submitted you will automatically return to
the Add/Edit Degree Program screen and a “Save Successful” notice will appear at the top of the page.
Step 8:
Please continue the rest of the steps by following Step 3 of “How do I submit a proposal” section.
– 22 –
BC Public Institutions: PSIPS User Guide
How do I submit a Non Degree proposal?
Step 1:
From the Add a new proposal dropdown menu, choose ‘BC Public Non Degree’ and then click
Step 2:
You will automatically be redirected to the Add/Edit Public Non Degree screen. Enter the information
required for each of the fields and when you are finished choose the
icon.
Once the information has been saved a “Save Successful” notice will appear at the top of the screen and the
icon will appear at the bottom of the screen.
– 23 –
.
BC Public Institutions: PSIPS User Guide
Step 3:
Step 4:
Click on the
icon to attach the proposal documents to the application.
From the Add Initial Proposal Document screen you can attach a PDF file by selecting the
icon to locate the proposal document on your computer.
– 24 –
BC Public Institutions: PSIPS User Guide
Step 5:
Find the PDF document on your computer in the “Look in” field and click “Open”.
Step 6:
Once the proposal file is attached choose the attachment type (in this case “Application”) from the
Attachment Type dropdown menu. Provide a short description of the attached document in the “Online
Comment” field (i.e. Proposal).
Step 7:
Click
. Once the Proposal Document has been submitted you will automatically return to the
Add/Edit Non Degree Program screen and a “Save Successful” notice will be at the top of the page.
Step 8:
To add another proposal document choose the
– 25 –
icon.
BC Public Institutions: PSIPS User Guide
Step 9:
Follow the same directions for Adding an Initial Document on the Add More Proposal Documents
screen (Steps 4-7). Repeat Steps 8-9 to add more appendices.
– 26 –
BC Public Institutions: PSIPS User Guide
Step 10:
After submitting the proposal documents you will be redirected back to the Add/Edit screen where a
“Save Successful” notice will appear at the top of the page. Once the proposal document and all
appendices are attached click on the
Step 11:
You will be asked to read the privacy and access to information notice on the Submit to Peers
screen. When you are ready choose the
Step 12:
icon.
icon to continue.
Click the
icon.
OPTIONAL: You have the option to add a comment by entering it into the “Online Comment” field. Once
– 27 –
BC Public Institutions: PSIPS User Guide
you are finished choose the
icon. Your comment will be displayed in a separate comment line
below your proposal and appendices documents.
The View Proposal screen will display a “Save Successful” notice.
You may now view your submitted application but the system will not permit you to edit documents or make other changes
for the 30-day peer review period. Once the 30-day period is complete the proposal status will automatically be set to
“End of Peer Review” and you will receive an automatic email notification.
Step 13:
Once you are ready to respond to the peer comments, select the
NOTE: Even if you did not receive any peer comments, you must still select
and follow step 14b in order to move the application forward to
implementation.
– 28 –
icon.
BC Public Institutions: PSIPS User Guide
Step 14a:
If peer comments were received, enter a short description in the Online Comment field and attach
the response as a PDF file by following Steps 4-7.
– 29 –
BC Public Institutions: PSIPS User Guide
Step 14b:
Step 15:
If no peer comments were received, enter a short comment in the Online Comment field noting that
comments were not received and click the
icon.
After a response to comments has been posted the
of the View/Edit screen. Click the
icon will appear at the bottom
icon to continue.
– 30 –
BC Public Institutions: PSIPS User Guide
Step 16:
Fill in all of the data entry fields on the Implementation (Non Degree) - Part 1 screen and choose the
icon.
Step 17:
On the Implementation (Non Degree)-Part 2 screen attach a final program proposal by following Steps 4-7.
The Non-Degree Proposal can now be implemented.
– 31 –
BC Public Institutions: PSIPS User Guide
Who will review my proposal?
Any BC Public institution and Private and Out-Of-Province Institution will review your proposal and provide comment. You
can also review any BC Public institution and Private and Out-Of-Province Institution’s proposal and provide peer
comments.
How do I view proposal information and provide peer comments?
Step 1:
Step 2:
Step 3:
To view other institutions’ proposals select the
Select Peer Review in the Filter and press
icon.
icon.
To review a proposal, appendices or comments, select the proposal link (in blue) from the Proposal #
column. You will be redirected to the View Proposal screen.
– 32 –
BC Public Institutions: PSIPS User Guide
Step 4:
The Attachments section is where all documents related to the proposal are listed. Under the
Attachments section of the View Proposal screen, select the document you wish to view and select the
link (in blue).
– 33 –
BC Public Institutions: PSIPS User Guide
Step 5:
You will be redirected to the Review Comments screen where you can click to view and print the
attached PDF document by clicking on the
icon. The document will open in Adobe Acrobat.
– 34 –
BC Public Institutions: PSIPS User Guide
TIP:
Step 6:
Step 7:
Step 8:
While viewing a document in Adobe Acrobat do not exit out of the document by closing your
browser window. Instead use the browser’s back button to return to PSIPS.
To return to the View Proposal screen choose the
To add a comment select the
icon
icon.
From the Add Document or Comment – Peer screen you can attach a PDF file by selecting the
icon to locate the document on your computer.
Step 9:
Find the PDF document on your computer in the “Look in” field and click “Open”.
Step 10:
Once the file is attached choose the Attachment Type from the dropdown menu. Provide a short
description of the attached document in the “Online Comment” field (i.e. Comment to Proposal etc).
Step 11:
Click the
icon. After the comment has been added a “Save Successful” notice will appear
at the top of the View Proposal screen.
If you prefer to not leave a comment but would like the institution to know you reviewed their proposal select the
icon and it will be noted on the View Proposal screen.
– 35 –
BC Public Institutions: PSIPS User Guide
How do I replace a document if revisions are required?
Step 1:
To add a revised proposal document select the proposal link (in blue with a *) from the Proposal #
column. You will be redirected to the View Proposal screen.
Step 2:
The Attachments section is where all documents related to the proposal are listed. Under the Attachments
section of the View Proposal screen, select the document you wish to replace and select the link (in blue).
Step 3:
From the Revised Document screen you can attach a revised PDF file by selecting the
Step 4:
Find the revised PDF document on your computer in the “Look in” field and click “Open”.
– 36 –
icon.
BC Public Institutions: PSIPS User Guide
Step 5:
Once the revised file is attached confirm the attachment type (in this case “Application”) from the
Attachment Type dropdown menu. Provide a short description of the attached document in the
“Online Comment” field (i.e. Revised Proposal or Revised Appendix A – Full Course Outlines, etc).
Step 6:
Click the
icon.
You will be redirected to the Add/Edit screen with a “Save Successful” notice at the top.
– 37 –
BC Public Institutions: PSIPS User Guide
How do I view the status history of a proposal?
Step 1:
Step 2:
To review the status history of a proposal, select the
icon on the View Proposal screen.
To return to the View Proposal screen from the Status History screen select the
– 38 –
icon.
BC Public Institutions: PSIPS User Guide
How do I provide response to a proposal with “Expert Review Completion
Confirmed” status?
The Expert Review process has been introduced in 2012. The general idea is to provide additional audit for proposals
which have reached the Under Review status. During the Expert Review process a proposal will undergo a review by a
team of experts assigned by the Secretariat. A deadline for the review is defined by the Review Due date, which is set by
Secretariat at the initial point and may be changed by the Secretariat later.
When experts finish their job and upload an expert review document, the Secretariat confirms that review is completed. At
this point a notification is sent to a proponent by e-mail saying that the proponent has to provide a response in a form of
comments or a PDF document. As soon as it is done, the expert review process is considered as completed, and the next
day the proposal will return to the Under Review status. This transition is also followed by an e-mail notifying that the
proposal has successfully completed the Expert Review process and will be reviewed by the Degree Quality Assessment
Board at its next available meeting
Note that if the Review Due date is expired no actions can be done to a proposal unless the Secretariat extends the date
manually.
Steps below describe in details how a proponent can submit a response to expert review results.
Step 1:
On your home page, click on any proposal number with have “Expert Review Completion Confirmed”
status.
Step 2:
Review all comments provided by expert reviewer. Those documents are labelled “Expert Review
Document”.
Step 3:
Once you have reviewed documents, scroll to the bottom of the proposal detail page and click on the
.button.
Step 4:
Provide comment in the “Online Comment” field. If your comment is more than 1000 words, please
add your comment as an attachment by clicking on the “Browse” button. Click “Submit” button to add
the comment.
– 39 –
BC Public Institutions: PSIPS User Guide
Step 5:
Once you have submitted your comment, the proposal will change to the status of “Expert Review
Response”.
How do I withdraw a proposal?
An application may be withdrawn at any time. The applicant must contact the Board Secretariat in writing to request the
application be withdrawn.
How do I put a proposal on hold?
An application may be put on hold at any time. The applicant must contact the Board Secretariat in writing to request the
application be put on hold. Applications can be put on hold for a maximum of two years after which the application will be
automatically withdrawn by the Board Secretariat. Institutions wishing to proceed with an application once it has been
withdrawn must re-apply by creating a new proposal in PSIPS.
How do I view my invoice?
If you chose not to print the invoice at the time of submission or if you would like to print an additional copy of your invoice
go to the Home Page and click on the appropriate “Invoice” link (in red) under the Payment column. Please note your
invoice is only available on PSIPS until payment has been processed by the Ministry.
– 40 –
BC Public Institutions: PSIPS User Guide
– 41 –
BC Public Institutions: PSIPS User Guide
How do I report the implementation status of an approved proposal?
Step 1:
In the Home page, click on any proposal’s blue link which status is Minister Approved.
Step 2:
In the proposal information page, change the Active pull down menu to Yes and fill in the date. Click
on the
icon to apply the change.
– 42 –
BC Public Institutions: PSIPS User Guide
Step 3:
The proposal should now have the status of Implemented.
– 43 –
BC Public Institutions: PSIPS User Guide
When will my proposal expire?
Proposals of any type can be transferred to the Expired status by Secretariat manually. Normally it happens when a
proposal has spent a significant amount of time in one of the following states:
•
•
•
Ministerial Consent
Minister Approved
Post Consent Change
This means that the proposal has not been implemented yet and is unlikely to be implemented in the future. For how to
set a proposal as implemented refer to the “How do I report the implementation status of an approved proposal?” section.
Here is a brief description of how expiration notifications are dispatched:
• As soon as the proposal has spent 2 years in the Ministerial Consent phase, an e-mail is sent to a proponent and
members of Secretariat, notifying them that the proposal is about to expire within one year.
• The next expiration notification is sent 6 month later, if the proposal is still in the Ministerial Consent state, and a
proponent has not submitted a renewal document. The e-mail is also sent to a proponent and the Secretariat.
• The final notification comes out 3 years after the approval date if the proposal is in the Minister Approved state or
3 years after the status change date for proposals in the Ministerial Consent state. It is also sent to a proponent
and the Secretariat.
– 44 –
BC Public Institutions: PSIPS User Guide
How do I add a Program in the Inventory Report?
The Inventory functionality allows users to add or update all other programs program they may offer, even if they received
Ministry approval prior to the implementation of PSIPS. Any Credential which are not being offered but approved by
Ministry will need to be entered as well.
Step 1:
Step 2:
If you want to update your program, on the Home Menu choose the Organization tab and then choose
the Update My Organization link.
Click on the
icon.
– 45 –
BC Public Institutions: PSIPS User Guide
Step 3:
In the Edit Program page, enter your program information with current active status. If you checked
in Active field, you need to fill the Active Since date. Click
change.
– 46 –
icon to save the
BC Public Institutions: PSIPS User Guide
How do I modify a Program in the Inventory Report?
Step 1:
Step 2:
Step 3:
If you want to update your program, on the Home Menu choose the Organization tab and then choose
the Update My Organization link.
Click on the
icon.
Click on the
icon beside any of the program you want to edit. To edit a proposal, click
on the proposal number (in blue).
– 47 –
BC Public Institutions: PSIPS User Guide
Step 3:
In the Edit Program page, enter your program information with current active status. If you checked
Yes with Active field, you need to fill the Active Since date. Click
icon to save the change.
– 48 –
BC Public Institutions: PSIPS User Guide
Error Messages
Log-in Errors
If you incorrectly enter your user name or password, the following screen will appear:
To continue, enter the correct username and password and click the
or password contact the Board Secretariat by phone or email.
icon. If you have forgotten your user name
Timeout Errors
As a measure of enhanced security, users are automatically logged out of PSIPS after 35 minutes of inactivity. If this
occurs, the system will return a timeout error. This may also occur if the Ministry servers are experiencing problems or a
high transaction load. To recover from this, press the REFRESH button on the browser window. If this does not rectify the
problem, try accessing the system again later.
– 49 –
BC Public Institutions: PSIPS User Guide
Field Errors
Field errors occur when the user does not complete a required field or inputs data incorrectly into the system. If the user
does not complete a required field the following error message is displayed and the required field is highlighted.
If a field is entered in the incorrect format, a notification is displayed at the top of the screen and the entry in question is
marked by a yellow background.
To correct field errors re-input the data and choose the
the screen once the information has been saved correctly.
– 50 –
icon. A “Save Successful” notice will appear at the top of
BC Public Institutions: PSIPS User Guide
Glossary
Term
Definition or Synonym
Applicant
The organization submitting a proposal for a degree program, a non-degree program, or to
obtain Qualified for Expedited Review.
This board is responsible for reviewing degree program proposals and applications to obtain
Qualified for Expedited Review from BC public institutions and private and out-of-province
public institutions. The Board may consult with subject experts, as required, and is responsible
for making recommendations for approval or consent to the Minister.
Ministry Staff providing administrative support to the DQAB including administering the quality
assessment process and communicating with applicants regarding issues and outcomes.
The individual who is the assumed owner of the PSIPS ID for their institution. This individual is
usually the Vice President of Academics for an institution. The VP Academic is the assumed
owner of the PSIPS user ID; however, they may delegate their responsibilities to others within
their institution who have the authority to act on their behalf.
The Ministry of Advanced Education, Innovation and Technology works with the DQAB to
assist in the quality assessment process. The Ministry also provides the overall technical
infrastructure as well as requiring specialized reporting from the system.
An Institutional Contact in the same institutional grouping as the Applicant (BC public degree
and non-degree institutions).
Same as applicant – the institution submitting an application.
A document outlining an application for a degree program or to obtain Qualified for Expedited
Review.
Degree Quality
Assessment Board
(DQAB)
DQAB Secretariat (the
Board Secretariat)
Institutional Contact
Ministry
Peer
Proponent
Proposal
Status
Description
DQAB Recommend
Approval
Once the DQAB assessment is complete, if the Board decides to recommend the application
for approval to the Minister, the Board Secretariat will record the status as “DQAB
Recommend Approval” with a recommendation date and synopsis of the DQAB’s assessment.
Once the DQAB assessment is complete, if the Board decides not to recommend the
application for approval to the Minister, the Board Secretariat will record the status as “DQAB
Recommend Denial” with a recommendation date and synopsis of the DQAB’s assessment.
Peer review is complete and peers may no longer post comments.
Only for institutions that have obtained Qualified for Expedited Review. Application is under
review.
Only for institutions that have obtained Qualified for Expedited Review. If after review, the
application is not deemed to be within the guidelines for Qualified for Expedited Review, the
Board Secretariat will change the status to “Full Review Required”. The Board Secretariat will
contact the applicant directly. The applicant will take the next steps to either submit a full
application and fees or withdraw.
The applicant has entered and saved some data related to an application, but has not yet
attached a proposal document.
The Minister’s written decision based on the Board’s recommendation.
DQAB Recommend
Denial
End of Peer Review
Exempt Verification
Full Review Required
Initial Entry
Minister Approved/
Denied
On Hold
Peer Review
Post-approval Change
(Degree Program Only)
Request Peer Review
The applicant wishes to temporarily suspend the review of the application. This action must be
vetted and executed by the Board Secretariat. To resume the process, the applicant must
contact the Board Secretariat. If appropriate, the Board Secretariat will remove the hold, which
will reset the application to its “pre-hold” state.
The application is under peer review for a 30-day period. All peers will be notified once the
application has been put to peer review and other BC public institutions can post comments
on PSIPS regarding the application. The application is also posted to the Degree Authorization
website for the general public to have the opportunity to review the proposal and provide
comments to the submitting institution and the Board.
To record a change after ministerial approval is in place.
The applicant has attached the proposal document and appendices, if applicable and submits
to the Board Secretariat to request peer review.
– 51 –
BC Public Institutions: PSIPS User Guide
Revisions Required
After an application is submitted, the Board Secretariat deems that it requires revisions or
additions by the applicant. The status “Revisions Required” allows the applicant to edit the
application and re-submit.
After a proposal has been approved, there are two fields displayed in the proposal detail page.
They are “Active” and “Active Since”. By setting the “Active” field to “Yes” and add a date in
the “Active Since” the proposal will changed from “Minister Approved” to “Implemented” status.
Setting the “Active” status to “No” will revert the status from “Implemented” to “Minister
Approved”.
3 years after a proposal has approved, the proposal is expired.
Implemented
Expired
Status (cont)
Description
Under Review
The application is officially under review by the DQAB after being verified by the Board Secretariat
and having all fees paid. When the status changes to Under Review, auto-emails are sent to the
applicant, Board Secretariat, and the DQAB. The application will remain in this state until the DQAB
makes its recommendation.
The Board Secretariat has verified the application and deems it to be complete and ready to begin
the quality assessment process, but related fees are outstanding.
The applicant has provided the Board Secretariat with a written request to withdraw the application.
Verified
Withdrawn
Data Entry Field
Description
Approval Body
Record any prior accrediting body approvals that may help the DQAB decide how to proceed
in reviewing an application.
This field is where the PDF file is located and then attached to the proposal.
A one-word descriptor of the type of file that has been attached (e.g. letter). This defaults to
letter if a proposal document has already been attached, but a drop-down list provides other
options (proposal, addendum, précis), or you may type in a one word description of your own.
To ensure the correct password was entered, information entered in this field must be exactly
the same as what was entered in the new password field.
E-mail address of the Institutional Contact. Automatic e-mail notifications are sent to this
address at significant points in the proposal review process. Format: [email protected]
This is a free screen field that allows the institutional contact to provide a business phone
number. Format: xxx.xxx.xxx
The credential applicable to the program proposal.
Full name of the credential/program as it will appear on the student's transcript. (e.g.
Bachelor of Science, Physics)
This is the new password for the account. It must be a least eight characters long and contain
at least one numeric and one upper case character.
This set of fields identifies the primary contact for this particular proposal. This individual may
be different than the Institutional Contact. All official correspondence on the outcome of the
application will be sent only to the Institutional Contact.
This is the date that the institution's senior governance body approved the proposal. Note: An
institution must receive approval from its senior governing bodies before submitting an
application.
This is a free screen field where a summary of the proposal may be entered. The maximum
size of this field is 4500 characters. It is recommended that the summary be kept to the size
of one or two paragraphs or less.
Attach File
Attachment Type
Confirm New Password
Contact Email
Contact Phone
Credential Level
Degree Name on
Transcript
New Password
Primary Program
Contact Information
Senior Governance
Body Approval Date
Short Description of
Proposal
Icons
Description
Add Appendix
This displays a screen that allows the applicant to post appendices as PDF documents. For
example, an applicant may wish to post proprietary information or full course outlines in an
appendix. Appendix documents will not be posted on the public Degree Authorization
website.
This displays a screen that allows the applicant to post additional PDF documents or
comments. For example, an applicant may wish to post additional background material that
– 52 –
Add Comments
BC Public Institutions: PSIPS User Guide
complements the main proposal document.
Add Documents
Add Initial Proposal
Document
Request Peer Review
This displays a screen that allows the applicant to post additional PDF documents or
comments. For example, an applicant may wish to post additional background material that
complements the main proposal document.
This allows the applicant to post the main proposal PDF document. This is the first step after
initial entry.
This displays a screen that allows the applicant to submit an application to the Board
Secretariat for peer review.
– 53 –
PSIPS Quick Reference Guide (BC Public Institutions)
Adding A Proposal
(Degree Program and Qualified for Expedited Review Status)
Login/Logout
Screen
Step
Notes
Home
1. On the Home screen choose from the Add New Proposal Dropdown
You will be redirected
to the Proposal
Application Screen
Menu the type of proposal you would like to add and then click
Proposal
Application
2. Enter the information required for each of the fields and when you are
finished click
.
3. Click on
documents to the application.
Add Initial
Proposal
Document
5. Find the PDF document on your computer in the “Look in” field and
click “Open.”
The online comment
will appear in the
Document Summary
List on the View
Application Screen.
6. Once the proposal file is attached choose the attachment type (in this
case “Application) from the Attachment Type dropdown menu. Provide
a short description of the attached document in the “Online Comments”
field.
A record of the
document(s) will
appear on the View
Application Screen.
.
8. To add appendices choose
screen and follow steps 4-7.
on the Proposal Application
Proposal
Application
9. Once the proposal document and all appendices are attached click
.
Request
Peer
Review
10. Read the privacy and access to information notice on the Request
Peer Review screen. When you are ready choose
to
continue.
All fields must be
entered prior to
saving.
to attach the proposal
4. From the Add Initial Proposal Document screen you can attach a
PDF file by selecting
.
7. Click
Comments
.
12. Choose
Adding a
Peer Review
Comment
You must already
have added all
required documents
to the application
on the Comments screen.
From the home screen choose the
icon.
Select the proposal to view by its PSIPS code (in blue).
Select the document you would like to review by clicking the link (in blue) under
attachments.
After review select
icon on the proposal screen and attach your
document by following steps 4-7 under Adding a Proposal.
1. To access the system,
select the “Online Application”
Link on the Degree
Authorization website at
www.aved.gov.bc.ca/degreeauthorization or bookmark
www.aved.gov.bc.ca/psips/.
2. Enter your user ID and
password to begin using the
system.
3. When finished using the
system choose Logout at the
top right hand corner of the
Home screen.
Update Organization Info
1. On the Home screen from
the Home Menu choose
Organization then choose
Update My Organization.
2. Enter the information
required and/or change the
Organization Profile document
by selecting
and
locating the document on your
computer.
3. Once you are finished with
your changes choose
.
Change Password
1. On the Home screen from
the Home Menu choose the
Contact Info tab and choose
Change Password.
2. Follow the directions on the
Change Password screen.
3. After changing your
password a notice will be
shown if the password was
changed successfully.
Revising Documents
1. On the Home screen click
on the Application from the
application list with the status
“Revisions Required.”
2. Under the View Application
screen click on the document
that will be replaced from the
document list.
3. Attach the new document by
and
selecting
choosing the new document
from your computer using the
“Look in” field and then click
“Open.”
4. Once the revised document
has been attached check to
Update Institutional Contact
make sure the attachment type
is correct from the Attachment
Type dropdown menu.
1. On the Home Menu choose
Organization and then choose
5.Click
.
the Reassign Contact link.
2. Follow the directions on the
Reassign Contact screen.
6. Repeat Steps 2-5 to revise
more documents.