1
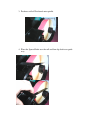
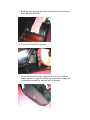
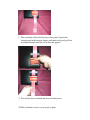
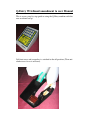
Q-Entry Wristband amendment to user Manual
This is an easy step-by-step guide to using the Q-Entry machine with the
new wristband set up.
Lift front cover and ensure key is switched to the off position. (Turn anti
clockwise as far as it will turn).
1. Remove the spacer/guide by pushing forward and unclipping. DO
NOT BEND.
2. Remove the roll core or tickets that are left on the spindle.
3. Push new roll of Wristbands onto spindle.
4. Place the Spacer/Guide over the roll and then clip back over guide
way.
5. Feed the ticket through the Guide and behind the thermal print
head (Metallic Red Part)
6. Turn the key to the user position.
7. On the left hand side of the machine you will see a small red
button, marked as paper feed. Push this once whilst feeding the
wristband down until the machine pulls it through.
8. The wristband will not be lined up at this point. Squeeze the
thermal print head between fingers and thumb and gently pull the
wristband through until the end of that one appears.
9. Tear off the first wristband and close the front cover.
10. The wristbands are now set up ready to print.
11. Remember when you do an X or Z read you must remove the
Spacer/Guide and put a roll of full size tickets into the printer.
12. Remember, when you first switch the machine on it will always go
through a set up and run a couple of tickets off to ensure it is
operating correctly. When this happens refer to instruction No.8.
13. For all other user instructions refer to the Manual supplied.
14. If you require any further assistance please contact us direct on
0870-873-0200 or e-mail [email protected]