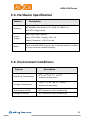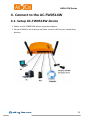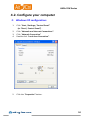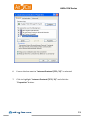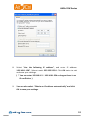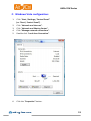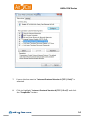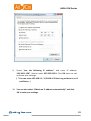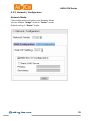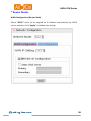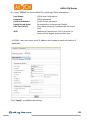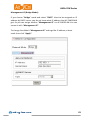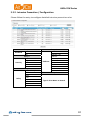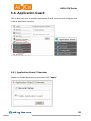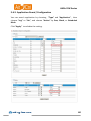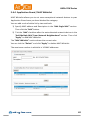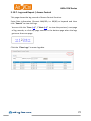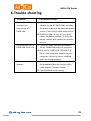
1
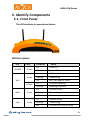
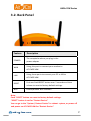
AltCtrl FW Series AC‐FW0514W User Manual Version: 1.0.101001 Release Date: 2010 / 10 / 01 AltCtrl FW Series Table of Contents 1. GETTING STARTED WITH THE AC‐FW0514W ................................................4 2. SECURITY FUNCTIONAL FEATURES ................................................................5 3. IDENTIFY COMPONENTS................................................................................6 3.1. FRONT PANEL ..................................................................................................6 3.2. BACK PANEL ....................................................................................................7 3.3. HARDWARE SPECIFICATION ................................................................................8 3.4. ENVIRONMENT CONDITIONS ..............................................................................8 4. CONNECT TO THE AC‐FW0514W ...................................................................9 4.1. SETUP AC‐FW0514W DEVICE ..........................................................................9 4.2. CONFIGURE YOUR COMPUTER ...........................................................................10 4.3. LOG IN AC‐FW0514W..................................................................................19 5. CONFIGURATION ..........................................................................................20 5.1. SYSTEM ........................................................................................................20 5.1.1. System / Overview.............................................................................21 5.1.2. System / Time Settings......................................................................22 5.1.3. System / Change Password ...............................................................23 5.1.4. System / Web Access .........................................................................24 5.1.5. System / CMS Settings.......................................................................25 5.1.6. System / Config Manager ..................................................................26 5.1.7. System / Firmware Upgrade..............................................................27 5.1.8. System / Restart Device.....................................................................28 5.2. NETWORK.....................................................................................................29 5.2.1. Network Config Wizard .....................................................................30 5.2.2. Network / Overview ..........................................................................34 5.2.3. Network / Configuration ...................................................................35 5.2.4. Network / Wireless............................................................................42 5.2.5. Network / Dynamic DNS ...................................................................43 5.2.6. Network / IPv6...................................................................................44 5.3. FIREWALL......................................................................................................47 5.3.1. Firewall / Port Forwarding ................................................................48 5.3.2. Firewall / UPnP ..................................................................................49 5.3.3. Firewall / Access Control List ............................................................50 5.4. ANTI‐VIRUS ..................................................................................................51 5.4.1. Anti‐Virus / Overview........................................................................51 2 AltCtrl FW Series 5.4.2. Anti Virus / Signature ........................................................................52 5.4.3. Anti Virus / Configuration .................................................................53 5.5. INTRUSION PREVENTION .................................................................................55 5.5.1. Intrusion Prevention / Overview ......................................................56 5.5.2. Intrusion Prevention / Configuration................................................57 5.6. APPLICATION GUARD ......................................................................................58 5.6.1. Application Guard / Overview ..........................................................58 5.6.2. Application Guard / Schedule ...........................................................59 5.6.3. Application Guard / Configuration....................................................60 5.6.4. Application Guard / MAC Whitelist ..................................................62 5.7. WEB GUARD .................................................................................................63 5.7.1. Web Guard / Overview......................................................................63 5.7.2. Web Guard / Configuration ...............................................................64 5.7.3. Web Guard / Keyword Filter .............................................................64 5.8. URL FILTER ...................................................................................................65 5.8.1. URL Filter / Overview ........................................................................65 5.8.2. URL Filter / Configuration .................................................................66 5.9. SIGNATURE UPDATE ........................................................................................67 5.9.1. Signature Update / Auto Update ......................................................68 5.9.2. Signature Update / Manual Update..................................................69 5.10. LOG AND REPORT .........................................................................................70 5.10.1. Logs and Report / Configuration.....................................................71 5.10.2. Logs and Report / Anti‐Virus...........................................................72 5.10.3. Logs and Report / Intrusion Prevention .........................................73 5.10.4. Logs and Report / Application Guard .............................................74 5.10.5. Logs and Report / Web Guard.........................................................75 5.10.6. Logs and Report / URL Filter ...........................................................76 5.10.7. Logs and Report / Access Control ...................................................77 6. TROUBLE‐SHOOTING....................................................................................78 3 AltCtrl FW Series 1. Getting Started with the AC‐FW0514W The AC‐FW0514W is a useful UTM device that provides L7 security protections to the connected equipments after internet access devices. Any network equipments with standard WiFi connection, or 10/100 Mbps fast Ethernet port can connect to it, or to the switching device under its gateway coverage for protection. It is suitable to home or SMB users who has broadband internet service provided by lease line, xDSL, cable modem, or entry level of FTTX fiber optics. AC‐FW0514W has friendly web based graphic user interface for system configuration, inspection, and management control. Without additional host CPU resource or installation process, AC‐FW0514W provides transparent security features such as anti‐virus, IPS, instant messaging and peer‐to‐peer application control, malicious web drive‐by download protection, and category‐based URL filtering. Features and Benefits The simplest and most cost effective security device. No additional host‐CPU resources consumption / No Installation needed. High throughput that provides rapid network Download and Access. Firewall, Anti‐Virus, IPS , IM / P2P, Anti‐Malicious URL, URL Protocol filterer. Friendly graphic user interface control, inspection report and management. Easy use with “Network Config Wizard”. Support PPPoE, DHCP, NAT Suitable for Home, SOHO and SMB users. 4 AltCtrl FW Series 2. Security Functional Features Anti‐Virus ‐ Packet‐based Virus Scanning ‐ Support HTTP / FTP / SMTP / POP3 / IMAP4 / TCP STREAM ‐ Packet‐Based Decoding for Base64 / UUencode / QP ‐ Packet‐Based Decompression for Zip / Gzip / Rar ‐ Detect Viruses Across in Multi‐Packets Intrusion Prevention System(IPS) ‐ Packet‐Based Intrusion Scanning ‐ Support TCP Reassembly ‐ Protocol Anomaly Detection ‐ Traffic Anomaly Detection ‐ URI Normalization Application Guard ‐ Detection for Well‐Known Protocols ‐ HTTP / FTP / SMTP / POP3 ‐ AOL / Jabber / MSN / QQ ‐ eDonkey / Fasttrack / Thunder Web Guard ‐ Website Hijacking Prevention ‐ Concise URL Malicious Website Database ‐ Smaller Database Size ‐ URL Path Only and URL Host+Path Support URL Filter ‐ High Speed Filtering ‐ Category‐Based Blacklist Function ‐ Low Rates of Overblocking ‐ World’s Best Site Coverage ‐ Comprehensive Categories 5 AltCtrl FW Series 3. Identify Components 3.1. Front Panel The LEDs indicate its operational status. LED Description LED POWER Color Condition Green Green WiFi Orange WAN LAN Green Green Status On Power on Off Power off On WiFi enabled Blinking Transmitting Off WiFi not ready or failed On Firmware updating Blinking Resetting to default On Physical link ok Blinking Transmitting Off Ethernet not ready or failed On Physical link ok Blinking Transmitting Off Ethernet not ready or failed 6 AltCtrl FW Series 3.2. Back Panel Feature Description POWER The receptacle where you plug in the power adapter WAN Using this port to connect your modem to AC‐FW0514W. LAN Using those ports to connect your PC or NB to AC‐FW0514W. RESET Push and hold RESET button over 5 seconds and then release to reset to factory default settings. WiFi Enable/disable WiFi function Note: Push “RESET” button can reset to factory default settings. “RESET” button is not for “Restart Device”. You can go to the “System / Restart Device” to reboot system, or power off and power on AC‐FW0514W for “Restart Device”. 7 AltCtrl FW Series 3.3. Hardware Specification Feature Description Network 10/100Mbps Fast Ethernet X 5 (LAN X 4, WAN X 1) IEEE 802.11b/g/n draft Power Supply Switching Power Adapter Input: 100~240V ; Output: 12V / 1A Power Connector: +5V DC‐in Lack Reset Push and hold RESET button over 5 seconds and then release to reset to factory default settings. 3.4. Environment Conditions Feature Description Operating Temperature 0oC ~ 45 oC (0 oF ~ 113 oF) ambient temperature Storage Temperature ‐30 oC ~ 70 oC (‐86 oF ~ 158 oF) ambient temperature Operating Humidity 90% maximum (non‐condensing) Storage Humidity 90% maximum (non‐condensing) 8 AltCtrl FW Series 4. Connect to the AC‐FW0514W 4.1. Setup AC‐FW0514W device 1. Power the AC‐FW0514W device by power adaptor. 2. Connect WAN to the Internet and then connect LAN to your networking devices. 9 AltCtrl FW Series 4.2. Configure your computer Windows XP configuration: 1. 2. 3. 4. Click “Start / Settings / Control Panel” (or “Start / Control Panel”) . Click “Network and Internet Connections”. Click "Network Connection” Double‐click “Local Area Connection”. 5. Click the “Properties” button. 10 AltCtrl FW Series 6. Ensure the box next to “Internet Protocol (TCP / IP)” is selected. 7. Click to highlight “Internet Protocol (TCP / IP)” and click the “Properties” button. 11 AltCtrl FW Series 8. Select “Use the following IP address”, and enter IP address: 192.168.1.150*, Subnet mask: 255.255.255.0. Click OK twice to exit and save your settings. ( * You can enter 192.168.1.2 ~ 192.168.1.254 as long as there is no IP confliction. ) 9. You can also select “Obtain an IP address automatically” and click OK to save your settings. 12 AltCtrl FW Series Windows Vista configuration: 1. 2. 3. 4. 5. Click “Start / Settings / Control Panel” (or “Start / Control Panel”) . Click “Network and Internet”. Click “Network and Sharing Center”. Click “Manage network connections”. Double‐click “Local Area Connection”. 6. Click the “Properties” button. 13 AltCtrl FW Series 7. Ensure the box next to “Internet Protocol Version 4 (TCP / IPv4)” is selected. 8. Click to highlight “Internet Protocol Version 4 (TCP / IP v4)” and click the “Properties” button. 14 AltCtrl FW Series 9. Select “Use the following IP address”, and enter IP address: 192.168.1.150*, Subnet mask: 255.255.255.0. Click OK twice to exit and save your settings. ( * You can enter 192.168.1.2 ~ 192.168.1.254 as long as there is no IP confliction. ) 10. You can also select “Obtain an IP address automatically” and click OK to save your settings. 15 AltCtrl FW Series Windows 7 configuration: 1. 2. 3. 4. 5. Click “Start / Settings / Control Panel” (or “Start / Control Panel”) . Click “Network and Internet”. Click “Network and Sharing Center”. Click “Change adapter settings”. Double‐click “Local Area Connection”. 6. Click the “Properties” button. 16 AltCtrl FW Series 7. Ensure the box next to “Internet Protocol Version 4 (TCP / IPv4)” is selected. 8. Click to highlight “Internet Protocol Version 4 (TCP / IPv4)” and click the “Properties” button. 17 AltCtrl FW Series 9. Select “Use the following IP address”, and enter IP address: 192.168.1.150*, Subnet mask: 255.255.255.0. Click OK twice to exit and save your settings. ( * You can enter 192.168.1.2 ~ 192.168.1.254 as long as there is no IP confliction. ) 10. You can also select “Obtain an IP address automatically” and click OK to save your settings. 18 AltCtrl FW Series 4.3. Log in AC‐FW0514W This section will show you how to configure AC‐FW0514W by using the web‐based configuration utility. Please be noted that the best supporting browsers are IE7, IE8 and Firefox 3.x. (IE6 and Firefox 2.x are not supported). 1. To access the configuration utility, open a web browser and enter: http://192.168.1.1 (or: 192.168.1.1) 2. Once the log in page successfully appeared, please continue to enter username and password. For the first time, please select your language and enter default username and password. Username: admin Password: 123456 19 AltCtrl FW Series 5. Configuration 5.1. System The system menu is where you carry out the basic setup of AC‐FW0514W. It includes Time Settings, Change Password, Web Access, CMS Settings, Config Manager, Firmware Upgrade and Restart Device. 20 AltCtrl FW Series 5.1.1. System / Overview Overview After you log in, go to the “System” and click “Overview” to see the system information and security service status. 21 AltCtrl FW Series 5.1.2. System / Time Settings Time Settings To configure the correct time in the local zone of the internal system clock, select your time zone from the drop‐down “Select Timezone” manual and then click “Apply”. Also you can tick “Enable NTP Client” check bottom and input the NTP Servers, or click “Synchronize now” button to correct system time immediately or input synchronization interval time (seconds) for auto time correction. You can untick “Enable NTP Client” check bottom then setup date and time manually. Also you can untick “Enable NTP Client” check bottom then click “Get” button to get time from your computer, it will correct system time from your computer’s system time. 22 AltCtrl FW Series 5.1.3. System / Change Password Change Password It is highly recommended you change the default password. Enter a new password and confirm by entering the new password again. And then click “Apply” to change. 23 AltCtrl FW Series 5.1.4. System / Web Access Web Access L AN / WAN web access means that you can connect to web GUI via LAN / WAN IP address. We provide both HTTPS and HTTP web access, and you can change HTTPS port or HTTP port by entering a new port, and then click “Apply” to change. WAN port web access is disabled by default settings for security reason. You can select “Enable WAN Web Access” and then click “Apply” to enable WAN web access. Note: You can access “Bridge IP” or “Management IP” from internal(LAN) or external(WAN) when you choose “Bridge” mode. "Web Access" page will not be showed when you choose “Bridge” mode. 24 AltCtrl FW Series 5.1.5. System / CMS Settings CMS Settings CMS: Central Management System You need to build CMS Server first to manage and receive logs for AC‐ FW0514W. In this page, you can enable or disable CMS with “Enable CMS Support” check box, and then click “Apply”. T ick the “Enable CMS Support” check box and fill in: Management Port (1‐65535) (Default: 8000). Management Username. Management Password. Send keepalive message every xx minutes. Click “Apply” to validate the setting. 25 AltCtrl FW Series 5.1.6. System / Config Manager Config Manager In this page, you can export or import config file to restore. In the “Config Export”, you can click “Export” to download config file to your computer. In the “Config Import”, you can assign and browse config file in your computer and then click “Upload” to upload profile and restore system. In the “Profile Manager”, you can save three profiles in the system by filling in profile name and click “Create”. You can choose “Factory Default Config” or any profile you create, and click “Restore” to restore system. And you can choose any profile you create, and click “Export” to download config file to your computer. You can choose one profile, and click “Delete” to delete the profile. Note: You cannot Export or Delete the “Factory Default Config”. 26 AltCtrl FW Series 5.1.7. System / Firmware Upgrade F irmware Upgrade Upgrade the firmware of AC‐FW0514W when a new version of firmware releases. When you got the new firmware file, assign it at this page, choose “Keep Configuration” or “Reset Configuration”,then click “Apply” to complete the firmware upgrade. Note: The orange LED “WiFi” lights on and the message “System is upgrading firmware, please don’t power off or reboot now.” shows during the upgrading process. DO NOT power off or prevent power cut‐off during the process of firmware upgrade, it may cause the system breakdown and can not be recovered to normal operating condition. 27 AltCtrl FW Series 5.1.8. System / Restart Device Restart Device Click to the “System” menu and then goes to “Restart Device” icon. In this screen, click “Reboot” button to reboot your system. 28 AltCtrl FW Series 5.2. Network Default Network Settings: ‐ Network Mode : Router Mode ‐ WAN IP : DHCP ‐ LAN IP : 192.168.1.1 (Enable DHCP Server) 29 AltCtrl FW Series 5.2.1. Network Config Wizard When you log in AC‐FW0514W ,the browser will popup “Network Config Wizard”. Or you can click the " Network Config Wizard" manually on the top to start Wizard. 30 AltCtrl FW Series 1. Step 1/5 : Choose “Network Mode”. You can choose “Router Mode” or “Bridge Mode”. 2. Step 2/5 : WAN/Bridge IP Configuration : In "Router Mode",you can select “DHCP”, “Static” or “PPPoe” for the WAN IP. In "Bridge Mode",you can select “DHCP”or “Static” for the Bridge IP. 31 AltCtrl FW Series 3. Step 3/5 : LAN/Management IP Configuration: In "Router Mode",you can“Enable DHCP Server” for the LAN. In "Bridge Mode",you can access AC‐FW0514W with “Management IP” even in the “DHCP” client for the WAN. 4. Step 4/5 : Wireless Configuration: 32 AltCtrl FW Series 5. Step 5/5 : Summery 33 AltCtrl FW Series 5.2.2. Network / Overview Overview shows the current connecting status. 34 AltCtrl FW Series 5.2.3. Network / Configuration Network Mode: Click configuration and select your Network Mode. You can choose “Bridge” mode or “Router” mode. Default setting is “Router” mode. 35 AltCtrl FW Series * Router Mode: WAN Configuration (Router Mode) Select “DHCP” client to be assigned an IP address automatically by DHCP server and then click “Apply” to validate the setting. 36 AltCtrl FW Series Or, select “Static” to input your own static IP that was provided by network administrator or by ISP. You may have to fill in subnet mask and gateway in this case. Then click “Apply” to validate the setting. 37 AltCtrl FW Series Or, select “PPPoE” to access WAN IP by entering PPPoE information. User Name PPPoE user information Password PPPoE password Confirm Password Confirm user password Redial Period (secs) Re‐connection time period if failed Idle Time (mins) Auto disconnecting if network idle for some time MTU Maximum Transmission Unit is the size (in bytes) of the largest protocol data unit. In PPPoE, users can enter static IP address and network mask information if applicable. Click “Apply” to validate the setting. 38 AltCtrl FW Series LAN Configuration (Router Mode) To change the default LAN setting, setup your IP address and subnet mask then click “Apply”. AC‐FW0514W can function as a DHCP server in Router mode. Please choose “DHCP Server” in “Type” and input the Start IP address and the number of DHCP client range from 1 to 240. 39 AltCtrl FW Series * Bridge Mode: Bridge IP (Bridge Mode): Select “DHCP” client to be assigned an IP address by DHCP server. Or select “Static” to input effective static IP provided by network administrator or by ISP. You may have to fill in subnet mask and gateway in this case. Click “Apply” to activate the setting. 40 AltCtrl FW Series Management IP (Bridge Mode): If you choose “Bridge” mode and select “DHCP” client to be assigned an IP address by DHCP server, you do not know what IP address that AC‐FW0514W get. So you can assign another “Management IP” on AC‐FW0514W. You can access it with “Management IP”. To change the default “Management IP” settings like IP address, subnet mask then click “Apply”. 41 AltCtrl FW Series 5.2.4. Network / Wireless Wireless communication is supported by 802.11b / g / n draft. Enable Wireless Enable / Disable Wireless function to display the setting. Network Mode This identifies the networking standards available to your network. SSID SSID is a 32‐character alphanumeric key uniquely identifying a wireless LAN. Hide SSID Enable this Hide SSID feature to improve the security of your WLAN. Frequency Choose you wireless radio channel or auto Channel by default. Security Mode We provide WEP / WPAPSK / WPA2PSK Encryption Protocols. WPAPSK / WPA2PSK is more secure than WEP. WPA Algorithm WPA Algorithm is the encryption algorithm of Security mode. You can choose TKIP / AES / TKIP+AES encryption algorithm. WEP / WPA Key The WEP / WPA key is used for authentication. Click “Apply” to activate the wireless settings. 42 AltCtrl FW Series 5.2.5. Network / Dynamic DNS Dynamic DNS is a domain name service allowing aliasing of dynamic IP addresses to static hostnames. If you have registered with a DDNS service provider, select the “Enable Dynamic DNS Client” check box, and fill out hostname / username / password provided by DDNS service provider. You can click “Check Doman” to test your DDNS is “Active” or “Inactive” . 43 AltCtrl FW Series 5.2.6. Network / IPv6 The AC‐FW0514W provides basic IPv6 function support. Include IPv6 DHCP server and IPv6 routing. All security protections of AC‐FW0514W are base on IPv4, not on IPv6. AC‐FW0514W can not filter and protect IPv6 network traffic. * Preparation: Make sure your ISP has supported IPv6, Reference follow steps: 1. Get all information about your IPv6 address from ISP. 2. Connect xDSL with your PC ( Only PC to xDSL Router). 3. Try to use ping6 ipv6.google.com to get response. 4. Try to visit http://ipv6.google.com web site. 5. If you can see web page, it’s normally work on IPv6. 6. If not, pleases contact your ISP to enable IPv6 support. * IPv6 Feature: The AC‐FW0514W providers based IPv6 support function: In Bridge mode : 1. All network interface to support IPv6 Agreement. 2. AC‐FW0514W can recognize IPv6 packets. In Router mode : 1. All network interface to support IPv6 Agreement. 2. AC‐FW0514W can recognize IPv6 packets. 3. Provide IPv6 based DHCP server. 4. IPv6 routing support. 44 AltCtrl FW Series * Router Mode: Note: Your client PC can get IPv6 address, use DHCP and working in LAN area only in “Router” Mode with “Static” WAN IP. W ith “DHCP” or “PPPoe” WAN IP in “Router” Mode can only “Enable IPv6” for AC‐FW0514W, your client PC can not work for IPv6. You can tick the “Enable IPv6” and set IPv6 address to: Wan IP Address: Example: 2001:abcd:c2dd:1400:8000:0080:ad1c:0001 Gateway: Example: fe80::92e6:baff:fe43:be2f Lan IP Address: Example: 2001:abcd:c2dd:1500:8000:0080:ad1c:0001 And you can tick the “Enable IPv6 DHCP Server” to enable DHCP Server. Click “Apply” to validate the setting. You can connect to AC‐FW0514W LAN Port with your client PC and setting IPv6 use DHCP. Your client PC will get IPv6 address from AC‐FW0514W. When your client PC get IPv6 address , try to ping ipv6.google.com with DOS command: “ping6 ipv6.google.com” can get result. Open http://ipv6.google.com web site. If you can see ipv6.google.com web page, it’s normally work on your client PC. If not, Please re‐check your network setting. 45 AltCtrl FW Series * Bridge Mode: You just need to tick the “Enable IPv6”. Click “Apply” to validate the setting. You can connect AC‐FW0514W WAN Port to xDSL Router and LAN Port with your client PC, and client PC setting IPv6 address which get from ISP. When your client PC get IPv6 address , try to ping ipv6.google.com with DOS command: “ping6 ipv6.google.com” can get result. Open http://ipv6.google.com web site. If you can see ipv6.google.com web page, it’s normally work on your client PC. If not, Please re‐check your network setting. 46 AltCtrl FW Series 5.3. Firewall The firewall category provides three kinds of function: Port forwarding. UPnP. Access Control List. 47 AltCtrl FW Series 5.3.1. Firewall / Port Forwarding “Port Forwarding” can help you to access those servers which are behind the LAN port of AC‐FW0514W. But the function is only enabled automatically when the network is set as “Router” mode. Input the port forwarding information and click “Add Service” to add Port Forwarding Service List entry. T ick “Delete” and click “Apply” to delete the selected services. The maximum port forwarding is 10 services. 48 AltCtrl FW Series 5.3.2. Firewall / UPnP UPnP can do automatically NAT traversal, enumerate existing port mappings, and adding and removing port mappings automatically. The function is enabled automatically when the network is set as “Router” mode. 49 AltCtrl FW Series 5.3.3. Firewall / Access Control List Access Control List (ACL) allows you to set firewall rules. You need to choose “Priority” for ACLs first. The Priority range is 1~10. 1 is the highest priority. Choose “LAN ‐> WAN” or “WAN ‐> LAN” for “Direction” . Choose “Any” or “Specific” one IP address or subnet for “Source Address” and “Destination Address”. Choose “TCP” or “UDP” for “Protocol”. Choose “Any” or “Range” to input port range for “Destination Port”. Choose “ACCEPT”, “REJECT” or “DROP” for “Action”. • ACCEPT – Allow access • REJECT – Denies access and message will be sent to the source. • DROP – Silently discards. T ick the “Log” to record ACL logs. Specify description of the rule in “Description”. Then click “Add ACL” to validate the setting. T ick “Delete” and click “Apply” to delete the selected ACLs. The maximum number of ACL is 10 rules. 50 AltCtrl FW Series 5.4. Anti‐Virus W ith virus protection, the Anti‐Virus screen lets you to setup your category of virus and check the infected severity. 5.4.1. Anti‐Virus / Overview This page displays the overview of the Anti‐Virus function, please select the required function and click “Apply”. Enable Anti‐Virus: Enable Anti‐Virus function. The default setting is ON. Enable ZIP File Scan: Enable ZIP file (ZIP / RAR / GZ) scan function. The default setting is ON. 51 AltCtrl FW Series 5.4.2. Anti Virus / Signature You can check AV signature list here. 52 AltCtrl FW Series 5.4.3. Anti Virus / Configuration Action Configuration Setup the action of Anti Virus, which includes Log and Destroy file. Log: Virus detection and record log in the system; you can check the log list at the Log and Report / Anti Virus page. The default setting is ON. Destroy File: Enable or disable the infected file destroy function. If this function is on, the infected files by viruses will be destroyed when AC‐ FW0514W detects them. If this function is OFF, then the destroy file function will not be administered. The default setting is ON. Click “Restore” to change the settings to factory default values. 53 AltCtrl FW Series Ignored File Type You can select or deselect multiple “File Type/ Extensions” such as “Microsoft Word document (.doc .dot)” to ignore anti‐virus scanning. Click “Apply” to change the configuration. Click “Restore” to change the settings to factory default values. 54 AltCtrl FW Series 5.5. Intrusion Prevention Intrusion Prevention screen lets you to enable Intrusion Prevention function and check the infected severity. 55 AltCtrl FW Series 5.5.1. Intrusion Prevention / Overview Select Intrusion Prevention / Overview to do General Setup. Enable or disable : Intrusion Prevention. Protocol Anomaly Detection. Traffic Anomaly Detection. PortScan Prevention. Click “Apply” to validate the setting. 56 AltCtrl FW Series 5.5.2. Intrusion Prevention / Configuration Please follow the entry to configure detailed intrusion prevention rules. Entry 1 Yes Outbreak No Entry 2 Sever High Severity Medium Low Lowest Entry 3 Access Control Suffer Overflow DDos Scan Policy Trojan House Virus Worm Web Attacks Others Entry 4 All Win95 / 98 WinNT WinXP / 2000 Linux Platform FreeBSD Solaris SGI OtherUnix Network Device Entry 5 Type in ID or Name to Search 57 AltCtrl FW Series 5.6. Application Guard This screen lets you to enable Application Guard function and configure the rules of application control. 5.6.1. Application Guard / Overview Enable or disable Application Guard and click “Apply”. 58 AltCtrl FW Series 5.6.2. Application Guard / Schedule You can set “Schedule” to apply to Application Guard configurations. You can tick multiple “Week Days” from Monday to Sunday, then set “Start Time” and “Stop Time” for “Day Time”. Choose “Any” or “Specific” one IP address or subnet for “Source Address” and “Destination Address”. Click “Add” to add Schedule. The maximum number of Schedule is 3 schedules. 59 AltCtrl FW Series 5.6.3. Application Guard / Configuration You can search application by choosing “Type” and “Application” , then choose “Log” or “No”, and choose “Action” by Pass, Block, or Scheduled Block. Click “Apply” to validate the setting. 60 AltCtrl FW Series Here the supported applications are listed as below table. IM P2P AOL-ICQ eBuddy jabber meebo MSN PoPo QQ Rediff Skype WangWang WebICQ WebMSN WebYahoo Yahoo Ares BitTorrent Clubbox eDonkey ezpeer fasttack gnutella Kuro Poco PP2008 Shareex Soulseek Thumber WinNY COMMON Remote Control Tunnel DNS FTP HTTP ICMP irc NTP POP3 Radius SMTP SNMP PcAnyWhere RDC SSH TeamViewer Telnet UltraVNC gTunnel HTTP-Tunnel Hopster RealTunnel SoftEther Tor UltraSurf VNN Buboo Facebook Social MySpace Web Plurk Site Renren Twitter 610 Gfstation MajiPass Game OMG Roomi Tensu Travian AppletFLV FLV PodCast Streaming PPLive PPS QQLive RTSP H323 VoIP SIP 61 AltCtrl FW Series 5.6.4. Application Guard / MAC Whitelist MAC Whitelist allows you to set some exceptional network devices to pass Application Guard even you have blocked the category. You can add a rule of white list by two methods. 1) Specify MAC address and Description in the “Add Single MAC” section. Then click the “Add” button. 2) Tick the “Add” checkbox after the auto detected network devices in the “Add Multiple MAC From Network Neighborhood” section. Then click “Apply” to add MAC Whitelist. The “MAC Whitelist” section shows the current rules. You can tick the “Delete” and click “Apply” to delete MAC Whitelist. The maximum number in whitelist is 10 MAC addresses. 62 AltCtrl FW Series 5.7. Web Guard This screen lets you to enable Web Guard and overview the number of URL inspected and malicious URL blocked. 5.7.1. Web Guard / Overview Enable or disable Web Guard and click “Apply”. 63 AltCtrl FW Series 5.7.2. Web Guard / Configuration You can just log malicious URL only but don’t blocking. T ick “Log only and not blocking” and click “Apply” to validate the setting. 5.7.3. Web Guard / Keyword Filter Keyword Filter allows you to set Keyword to block URL. Click “Apply” to validate the setting. The maximum number in Keyword Filter is 10 Keyword. 64 AltCtrl FW Series 5.8. URL Filter This screen lets you to enable URL Filter function and configure the rules of web control. 5.8.1. URL Filter / Overview Enable or Disable URL Filter and click “Apply”. 65 AltCtrl FW Series 5.8.2. URL Filter / Configuration Enable or disable the categories to be blocked. You can select or deselect multiple categories and click “Apply” to change the configuration. Click “Select All” will enable all categories. Click “Unselect All” will disable all categories. You can just log URL only but don’t blocking. T ick “Log only and not blocking” and click “Apply” to validate the setting. 66 AltCtrl FW Series 5.9. Signature Update 67 AltCtrl FW Series 5.9.1. Signature Update / Auto Update This page shows auto update information. Click “Enable / Disable” to Enable / Disable the Auto Updates. Click “Update” to update signature automatically and view the signature update status. Select the “Check Period” stroll for the auto update signature time period, and click “Apply” to validate the setting. Select the “Enable” radio button to and input the proxy server to text field then click “Apply” to enable HTTP Proxy setting. 68 AltCtrl FW Series 5.9.2. Signature Update / Manual Update Besides auto update method, AC‐FW0514W also supports manually signature update. By assigning and browsing local signature file and then click “Apply”, you can update new signature by yourself. 69 AltCtrl FW Series 5.10. Log and Report 70 AltCtrl FW Series 5.10.1. Logs and Report / Configuration You can choose “Enable all logs” to Enable / Disable all logs, and click “Apply” to validate the setting. When you enable all logs, you can choose “Enable System Log” to record system logs to the system. Or you can choose “Enable Remote Syslog Server” to record system logs to the remote syslog server. You need fill in a server name or IP address, network port information of system log server so that all system logs will be passed to the assigned server(Default syslog port: 514, you can input port from 1 to 65535). You can enable “Use UTC Time” to use UTC: Coordinated Universal Time. Click “Apply” to validate the setting. Note: “Enable System Log” just record logs to the system, all logs will erased if you reboot. You need to choose “Enable Remote Syslog Server” if you want to record logs to remote syslog server. 71 AltCtrl FW Series 5.10.2. Logs and Report / Anti‐Virus Anti‐Virus Log records are distinguished into different protocols and listed. Please check HTTP / FTP / SMTP / POP3 / IMAP4 / TCP STREAM pages for each single protocol. Enter Date information (Format: MM/DD, i.e: 09/30) or keyword and then click “Search” to view the logs. You can click the “Prev (<<)” / “Next (>>)” to view the previous / next page of log records, or click any page number in the bottom page when the logs get more than one page. Click the “Clear Logs” to erase log data. 72 AltCtrl FW Series 5.10.3. Logs and Report / Intrusion Prevention Intrusion Prevention Log records are separated into Intrusion Prevention, Traffic Anomaly and Protocol Anomaly. Enter Date information (Format: MM/DD, i.e: 09/30) or keyword and then click “Search” to view the logs. You can click the “Prev (<<)” / “Next (>>)” to view the previous / next page of log records, or click any page number in the bottom page when the logs get more than one page. Click the “Clear Logs” to erase log data. 73 AltCtrl FW Series 5.10.4. Logs and Report / Application Guard This page shows the log records of Application Guard function. Enter Date information (Format: MM/DD, i.e: 09/30) or keyword and then click “Search” to view the logs. You can click the “Prev (<<)” / “Next (>>)” to view the previous / next page of log records, or click any page number in the bottom page when the logs get more than one page. Click the “Clear Logs” to erase log data. 74 AltCtrl FW Series 5.10.5. Logs and Report / Web Guard This page shows the log records of Web Guard function. Enter Date information (Format: MM/DD, i.e: 09/30) or keyword and then click “Search” to view the logs. You can click the “Prev (<<)” / “Next (>>)” to view the previous / next page of log records, or click any page number in the bottom page when the logs get more than one page. Click the “Clear Logs” to erase log data. 75 AltCtrl FW Series 5.10.6. Logs and Report / URL Filter This page shows the log records of URL Filter function. Enter Date information (Format: MM/DD, i.e: 09/30) or keyword and then click “Search” to view the logs. You can click the “Prev (<<)” / “Next (>>)” to view the previous / next page of log records, or click any page number in the bottom page when the logs get more than one page. Click the “Clear Logs” to erase log data. 76 AltCtrl FW Series 5.10.7. Logs and Report / Access Control This page shows the log records of Access Control function. Enter Date information (Format: MM/DD, i.e: 09/30) or keyword and then click “Search” to view the logs. You can click the “Prev (<<)” / “Next (>>)” to view the previous / next page of log records, or click any page number in the bottom page when the logs get more than one page. Click the “Clear Logs” to erase log data. 77 AltCtrl FW Series 6.Trouble‐shooting Problem Corrective Action None of the LEDs turn Make sure the connection of power on when you adaptor to the AC‐FW0514W, and plug turn on the AC‐ the power lead to an appropriate power FW0514W source. Check all the cable connections. If LED’s still do not turn on, you may have a hardware problem. In this case, please contact with vendor for product service. Cannot access the AC‐ Check the cable connection between FW0514W from LAN the AC‐FW0514W and your computer. Ping the AC‐FW0514W (192.168.1.1) from a LAN computer. Make sure your computer’s Ethernet card is installed and functioning properly. Cannot access the Check the AC‐FW0514W’s connection to internet the broadband devices such as ADSL / cable modem / Router device. Check WAN to verify setting. 78 AltCtrl FW Series FCC Interference Statement: This device complies with Part 15 of FCC rules. Operation is subject to the following two conditions: (1) This device may not cause harmful interference. (2) This device must accept any interference received, including interference that may cause undesired operations. FCC Warning! This equipment has been tested and found to comply with the limits for a Class A digital device, pursuant to Part 15 of the FCC Rules. These limits are designed to provide reasonable protection against harmful interference in a commercial environment. This equipment generates, uses, and can raditate radio frequency energy and, if not installed and used in accordance with the instruaction manual, may cause harmful interference to radio communications. Operation of this equipment in a residential area is likely to cause harmful interference in which cause the user will be required to correct the interference at his ownexpense. 79