1
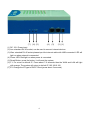
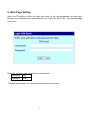
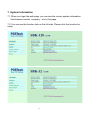
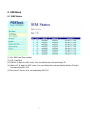
SBK-32/SBK-128
Remote SIM Bank
User Manual
SBK-32
SBK-128
PORTech Communications Inc.
The Most updated version of this User Manual is available at our website,
Please check our site for the latest updates, www.portech.com.tw
【Content】
1. Introduction........................................................................................................... 1
2. Function description ............................................................................................ 1
3. Parts list ................................................................................................................ 2
4. Dimension ............................................................................................................. 2
5. Chart of SBK-32/SBK-128 .................................................................................... 3
5.1 SIM Card Slot.................................................................................................... 3
5.2 Back of SBK-32/SBK-128 ................................................................................. 3
6. Web Page Setting ................................................................................................. 5
7. System Information .............................................................................................. 6
8. SIM Bank ............................................................................................................... 7
8.1 SIM Status ........................................................................................................ 7
8.2 Bank Setting...................................................................................................... 8
9. Network ............................................................................................................... 10
9.1 Status.............................................................................................................. 10
9.2 WAN settings .................................................................................................. 11
9.3 LAN Settings ................................................................................................... 12
9.4 STNP Settings ................................................................................................ 13
10. Update ............................................................................................................... 14
10.1 Update Firmware........................................................................................... 14
10.2 Restore Default Settings ............................................................................... 15
11. System Authority .............................................................................................. 16
12. Save Change ..................................................................................................... 17
13. Reboot ............................................................................................................... 18
14. MV-37X Remote SIM Setting ............................................................................ 19
1. Introduction
SBK-32/SBK-128 is a Remote SIM Bank with 32/128 SIMs that can connect
with serial MV-37X via internet. With SBK-32/SBK-128, SIM cards no longer
need to be installed in MV-37X anymore; you can deploy your GSM gateways in
different locations and countries.
New concept of using SBK-32/SBK-128 solution, you can centralize and
supervise all SIMs in one place. With SBK-32/SBK-128, you can place physical
SIMs in office or change SIM corresponding port directly on web any second.
MV-37X through internet connects with SBK-32/SBK-128 to read the SIM
information and register it on the GSM network.
2. Function description
2.1 Wan port*1, Lan port*1, All settings set on web
2.2 Handle 32/128 SIM cards per SBK-32/SBK-128
2.3 Central management and secure storage of all SIM card
2.4 Control and Supervision of your SIMs from your office
2.5 Allow you to choose the best GSM operators price plan
2.6 Immediate control of all your SIM cards from your office
2.7 Easy and powerful web based management, Easy to configure
convenience any time!
2.8 Switch SIM cards between connected gateways, configuration via remote
client
2.9 Save huge costs on technicians and traveling to the installation sites
1
3. Parts list
Please check the parts for any missing parts. If do, please contact our
agents:
3.1 「SBK-32/SBK-128」main body
3.2 Power adaptor AC-DC (110V AC – 12V DC) or (220V AC – 12V DC)
3.3 Network cable
3.4 Rack-mount accessories (SBK-128)
3.5 User Manual
(3.1)
(SBK-32)
(SBK-128)
3.2 Power adaptor
Network Cable
(3.3)
(SBK-32)
(SBK-128)
(3.2)
4. Dimension: 20cm x 14cm x 16.5cm (SBK-32)
Dimension: 44cm x 14cm x 5.7cm (SBK-128)
2
Rack-Mount
(3.4)
5. Chart of SBK-32/SBK-128
5.1 SIM Card Slot
There are 32/128 SIM slots as follows diagram, please install the SIM card and make sure the
chip is in left side.
When you install the SIM in right position, the Green LED will flicker for 2 seconds then still
lighting.
If not, please reinstall the SIM card.
Notice!
All SIM-Holders are
ESD sensitive area
5.2 Back of SBK-32/SBK-128
3
(7) (6) (5)
(4) (3)
(2) (1)
(1) DC 12V: Power input
(2) Lan: standard RJ-45 socket, can be used to connect internet devices
(3) Wan: standard RJ-45 socket please input the internet cable with HUB connected. LED will
light on when network is connected
(4) Power LED: Red light on when power is connected.
(5) Reset Button: press the button, it will reset the system
(6) F1: For return to default IP. Press about 7~8 seconds then the WAN and LAN will light
with orange. The system will return to default IP 192.168.0.100
(7) F2: Change the IP type to DHCP Client (press about 3 seconds)
4
6. Web Page Setting
When the IP setting is done, the User may setup all the rest parameters via web page.
Browse the IP address from Internet Explorer (e.g. http://192.168.0.100)。The following page
shows up:
Enter the username and password for authentication.
Username:
voip
Password
1234
The page follows when the username and password are correct.
5
7. System Information
7.1 When you login the web page, you can see the current system information
like firmware version, company…etc in this page.
7.2 You can see the function lists on the left side. Please click the function for
setup
6
8. SIM Bank
8.1 SIM Status
(1) No: SIM Card Slot number
(2) C/S: Card/Slot
(3) SIM ID: 8 digits for HEX code. You can define the code as Identity ID
(4) Mobile ID: 8 digits for HEX code. You can define the code as Identity Mobile ID at the
corresponding MV-37X
(5) Remote IP: it’s the IP of corresponding MV-37X
7
8.2 Bank Setting
(1) Bank ID: 8 digits for HEX code(0~f), it’s the auto number for SIM card ID
The default is b0000000, user can’t change to 0000 or ffff in first four
Code. Please make the Submit and Save Change after the setting.
Ex. If you make the setting code like ba000000, the follow SIM card ID will add automatically,
like ba000001, ba000002, and etc. Please see follow diagram as example
(2) Bank Port: it’s SIM bank Port used for the Data transfer, the default is 1200 and can able
to change. If SIM Bank is virtual IP or IP behind firewall, please mapping port to the fixed
IP from Router or firewall setting. After you make the Submit, please clink Save Change
for whole process.
8
Please check SIM server setting on SIM Bank as follow:
When finished the setting, please click the Submit button and Save Change.
Bank Setting ---->Register to SIM server
(Follows are the related setting for SIM Bank to connect SIM Server)
1. Active
a. ON : Enable SIM Server Feature
b. OFF: Disable SIM server feature (Default value). MV connect SIM card via remote
SIM Bank instead of SIM Server.
2. Bank Num: Fill in the number (0~99) to correspond to the SIM Bank ID with the SIM
Server. Please refer to SIM Server’s setting, and default is 1.
3. Bank Name: Fill in bank name to correspond to SIM Bank Name of SIM Server. Please
refer to SIM Server’s setting.
4. Server URL: Fill in “SIM server IP: Listen port number” for SIM Bank connection.
9
9. Network
9.1 Status
You can check the current Network Setting in this page
10
9.2 WAN settings
(1) The TCP/IP Configuration item is to setup the WAN port’s network environment. You may
refer to your current network environment to configure the system properly.
(2) The PPPoE Configuration item is to setup the PPPoE Username and Password. If you
have the PPPoE account from your Service Provider, please input the Username and the
Password correctly.
(3) The Bridge Item is to setup the system Bridge mode Enable/Disable. If you set the Bridge
On, then the two Fast Ethernet ports will be transparent.
(4) When you finished the setting, please click the Submit button.
11
9.3 LAN Settings
(1) The TCP/IP Configuration item is to setup the WAN port’s network environment. You may
refer to your current network environment to configure the system properly.
(2)DHCP Server: You may refer to your current network environment to configure the system
properly
12
9.4 STNP Settings
SNTP Setting function:
You can setup the primary and second SNTP Server IP Address, to
get the date/time information. Also you can base on your location to
set the Time Zone, and how long need to synchronize again. When
you finished the setting, please click the Submit button.
13
10. Update
10.1 Update Firmware
In Update section, you can update the system’s firmware to the new one or do the factory
reset to let the system back to default setting.
Update firmware
(1) In New Firmware function you can update new firmware via HTTP in this page. You can
upgrade the firmware by the following steps:
(2)Select the firmware code type, Risc code.
(3)Click the “Browse” button in the right side of the File Location or you can type the correct
path and the filename in File Location blank.
(4)Select the correct file you want to download to the system then click the Update button.
(5) Please click update/default setting after update firmware
14
10.2 Restore Default Settings
Update/ Default Settings, you could restore the factory default settings to the system.
15
11. System Authority
In System Authority you can change your login name and password.
16
12. Save Change
In Save Change you can save the changes you have done. If you want to use new setting in
the SIM Bank system, you have to click the Save button.
After you click the Save button, the system will automatically restart with the new setting
17
13. Reboot
Reboot function you can restart the system. If you want to restart the system, you can just
click the Reboot button, then the system will automatically restart.
18
14. MV-37X Remote SIM Setting
Please go to MV-37X web setting, and check the Mobile SIM Setting.
1.
2.
a.
b.
CU ID: It’s for SIM Server mode. Please omit it when you don’t’ use SIM Server program.
Mode
Local: Disable Remote SIM feature
Bank: Enable Remote SIM Bank feature, and manage SIM card on SBK-32/SBK-128 SIM
Bank
c. Server: Enable Remote SIM Server feature, and allocate SIM cards on SBK-32/SBK-128
SIM Bank.
3. Mobile ID: 8 digits for HEX code (0~f), it’s the auto number for Remote Transfer Identity
and can able to change the parameter. The default is a0000000, it can’t change to 0000 or
ffff in fist four code. Please make the Submit and Save Change after the setting.
4. Card ID: Please enter the SIM card ID corresponding to SIM bank, you can check SIM
Card ID from REMOTE SIM BANK web setting as below.
5. Bank URL: Fill in the corresponding REMOTE SIM BANK IP and Port
6. Status: User can check the SIM Card ID of GSM module and IP, Port Number of SIM
bank.
19