1
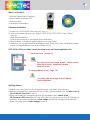
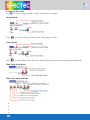
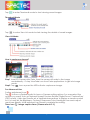
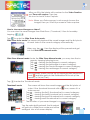
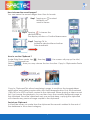
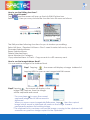
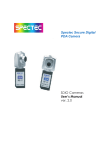
TM
Spectec Secure Digital
Palm Camera
SDIO Cameras
User’s Manual
ver. 2.0
Contents
What’s in the Box? ----------------------------------------------- --- -P.1
Software installation ----------------------------------------- --- ---- -P.1
Getting started ---------------------------------------------------- -- -P.1
Overview of 5-function modes and icons ---------------------- -- -P.2
5-function bar icons ------------------------------------------------P.3
* Image mode ------------------------------------------------------P.3
* Video mode --------------------------------------------------- ---P.3
* Slide show auto mode--------------------------------------------P.3
* Slide show mode--------------------------------------------------P.3
* Thumbnail manual mode ------------------------------------ --- P.4
* View List mode --------------------------------------------------- P.4
How to capture an image? ------------------------------------------ P.4
How to capture a video? -------------------------------------------- P.5
How to set the capture timer? ------------------------------------P.5 P.6
How to view saved images or videos? --------------------------P.6 P7
How to view the Image Record Info & add a note? ----------------P.7
How to beam saved images? --------------------------------------- P.8
How to use the ClipBoard ? ------------------------------------------ P.8
How to use the Editing functions ? ----------------------------------- P.9
How to use the ImageAddress Book? ------------------------------- P.9
How to transfer the saved images and videos to your PC ?-------P.10
Warranty ------------------------------------------------------ --------P.11
What’s in the Box?
1.Secure Digtal Palm Camera
2.Application Software CD
3.Travel pouch
4. Waranty information
Software installation
1. Insert the CD ROM into the drive of your PC.
2. Auto-run screen will pop-up. Select “SDC-001A/ SDC-003A” then “Palm ”
icon to
start the installation.
Follow the prompts to complete the installation.
3. Run Hotsync to load the applications onto your Palm.
4. After you’ve completed the installation task. Then your Palm will display 2main
icons. ( ImageAddress icon & ViewTake icons )
SDC-001A/ 003A provides 2 main function icons on Palm Application list:
1. ViewTake icon ( Page 3 )
You may select an image mode / video mode/
slide show mode, Thumbnails mode /
View list mode
2. ImageAddress icon ( Page 14 )
You may add an image to the Address
Book database.
Getting started
1.Make sure your Palm is fully charged before you insert the camera.
2.Before you Insert the Camera into your Palm, please make sure the direction of
your Palm SD Card slot.( see 1 )
3.After you insert the camera into the SD expansion slot, check if the
SD Camera’s LED is on.(See 2)If the LED light is on, that means the SD Camera is
working. The screen will display a live image under the Image mode directly.
Then you may start to take images. (see 3)
1
The 5-way button on the Palm models have special functions
Center Button:Captureswhile in Image and Video modes.Up/Down:Controls brightness
in preview modes. Moves Page Up / Page Downin all other modes.Left Button:
In Slideshow, Thumbnail and View List modes, functions as Rewind.Right Button:
In Slideshow, Thumbnail and View List modes, functions as End of file.
Overview of the 5-function modes and icons
ViewTake icon provides 5-function modes for capturing images or viewing saved
images. Also you can edit a note to your images.
1. Image mode: Capturing an image.
2. Video mode: Capturing a video.
3. Slide show mode:
* Play back the saved images automatically or by
manual operation.
* Adding a note or info to images or viewing the
details of saved note and info.
* Beaming or Deleting selected images.
4. Thumbnail mode: Previewing the saved images.
5. View List mode:
* Viewing the details of saved images or adding
a note to images.
* Changing the saved full size images to palm size.
* Beaming or Deleting selected images directly.
2
5- function bar icons
Tap
to enter Image mode to start capturing an Image.
Image Mode
Tap
to enter Video mode to srart capturing a Video.
Video Mode
Tap
to enter Sllde Show mode to start playing back saved images automatically.
Slide Show Auto Mode
Slide Show Manual Mode
3
Tap
to enter Thumbnail mode to start viewing saved images.
Thumbnail Mode
Tap
to enter View List mode to start viewing the details of saved images.
View List Mode
How to capture an image?
Step1 Insert SD Camera into Palm, then the screen will enter to the image
modedirectly . Or tap ViewTake icon from Palm applications to get into Image
mode.
Step2 Tap
icon or press the LED buttonto capture an image.
For Advanced User
Further adjustment icon
Tap
to show a Preferenceslist to have a Camera setting options.You may select the
options you want( Such as Playback Speed/ Preview Rotate/ Digital Zoom/ Capture Size/
JPEG quality ), then tap Doneto set or taptheAdvancedicon to display a camera control
list. You may set the Brightness, Contract, Sharpness,Color, BackLight form each adjustment bars directly. After adjusted, tap Doneto complete the setting.
Timer icon
-Image capture timer ( Please refer to P.9 )
4
How to capture a video?
Step1 Tap
to enter a video mode.
Step2 Start filming by tap
and stop filming by tap
For Advanced User
( Please refer to P.7 )
Further adjustment icon
-Video capture timer ( Please refer to P.9 )
Timer icon
If the image shows flickering, you may choose the correct anti-flicker control to
improve this issue. This control allows you to switch the anti-flicker control based
on the local power system with choices of 60 or 50 Hertz.
When checked 60 Hz is selected, when unchecked means based on 50Hz.
How to set the capture timer?
You can find the timer icon under the image mode or video mode.
1. Under Image mode:
to show a Image Capture timer screen. You may set up the timer for asingle
Tap
capture or multiple captures.
Tap this icon to capture single image after a 10 second
pause.
After you set up the Number of Captureand Time between
Capture. Then Tap this icon to
2. Under Video mode:
to show a Video Capture timerscreen. You may set up the duration of a video.
Tap
5
After you fill in the blanks with number for the Video Duration
and Time until capture. Then tap
this icon to start a Video Capture.
Note: When your Palm memory is not enough to save the
images, then you’ll fail to proceed a video capture.
How to view saved images or videos?
You can view the saved images from Slide Show / Thumbnail / View List modeby
tapping
Tap
to enter the Slide Show Auto mode.
Slide Show Auto mode The screen will playback the saved images and the first photo
of each video in the current category automatically.
When you tap
, then the display will be paused and get
into the Slide Show manual mode.
Slide Show Manual mode Under the Slide Show Manual mode, you may view the im
ages by tapping following icons:
Tap
, viewing the firstimages in current category.
Tap
, viewing the lastimages in current category.
Tap
, viewing the Previousimages in current category.
Tap
, viewing the nextimages in current category.
The playback speed can be set by tappingfurther adjustment
icon
and then get into the Preferences list to set up the
speed (1x/ 2x/ 4x/ Fast ).
Tap
to enter the Thumbnail mode.
Thumbnail mode
The screen will show the saved images and the first photo of
video. If the thumbnail showed with a
icon, means it’s a
video record.
Tap
, viewing the first 9-thumbnail set in current category.
Tap
, viewing the last9-thumbnail set in current category.
Tap
, viewing Previous9-thumbnail set in current category.
Tap
, viewing next9-thumbnail set in current category.
The location of your saved images in current category.
Tap the selected thumbnail, the thumbnai
will get into a Slide Show mode and will be
enlarged into a full screen display.
6
to enter the View List mode.
Tap
View List mode
The View List mode will list the saved images and videos on the screen.
Category of saved images.
Tapping the selected item to enter the Slide Show mode.
Then the display will show a full screen images or videos.
Indicate the locations of saved images
in current category.
How to view the Image Record Info & add a note?
You can view the Image Record Info from Slide Show Manual mode.
Tapping
to open the Image Record Info list.
Tap Noteto add a note.
You can add a note for a saved image from Slide Show Manual mode.
Tapping
to open the Image Record Info Note.
Entering the content and tapping
Ok to save the attach note.
7
How to beam the saved images?
You can beam the saved images from View List mode.
Step1 Tapping on
to select
theitems you
want to beam.
Step2 Tapping
to beam the
selected items.
The display will show a Confirm Beamscreen.
Step3 Tapping OK to
beamthe selected items toother
Palm handheld.
How to use the ClipBoard ?
Under Slide Show mode, tap
, then tap
, the screen will pop-up the Info/
Options/ Clipboard bar.
Select
, then you may choose the two function: Copy to Clipboardor Paste
from Clipboard
Copy to Clipboard-This allows transferring images to and from the ImageAddress
application and making copies within the ViewTakeapplication.Only the thumbnail
(160x120) of a JPEG record is copied to the clipboard. When playing a video record
set, if you pause the playback, you can then copy the currently displayed image to
the clipboard. Since the clipboardis only one record deep, copying the clipboard
will overwrite any previous image copied to the clipboard.
Paste from ClipboardIn ViewTake when you paste from the clipboard the record is added to the end of
the database in the current category.
8
How to use the Editing functions ?
Under ViewList mode
Tap
and the screen will pop-up the Info/Edit/Options bar.
Select
, then you may choose the function from list menu as follows:
The Edit provides following functions for you to shorten your editing:
Select All items / Deselect All Items—Don’t need to select all one by one.
Downsize Selected Items
Beam Selected Items
Delete Selected Items
Move Selected to Category
Copy selected Items to Card---Copy records to a SD memory card.
How to use the ImageAddress Book?
You can add an image to the Address Book.
Step1 Tapping
, the screen will display a Image Address list.
tapping NEW to open a new ImageAddr Edit screen.
Step2 Tapping
, the screen will display a live
image.Tap Capture, then the image
will be captured and saved
* You may tape
to copy the current
captured image.And it will be saved in
clipboard.
When you open a new ImageAddr Editscreen, tape
, then the copied
image which saved in clipboard will paste on the image frameor
permanently replace the existing image.
* The clipboard only can keep one record image, copying to the clipboard will
overwrite any previous image copied to the clipboard.
9
Step3 Enter a name for the captured image (or you may tap
Noteto add a note for the captured image).
Step4 Under the ImageAddr Edit screen, tap Done to save.Then the screen will
backto the Image Address List automatically. The saved image data will be
showedon the list. It means the image saved process is completed.
How to transfer the saved images and videos to your PC?
* Place the handheld in the cradle and connect the cable to your PC.
* Press the HotSync button to synchronize the Image and Video data on your
handheld.
* After you’ve completed the HotSync operation, the Image and Video records will be
transferred to your PC in the specified folder.
~ C:\Program files\Palm\user’s name\ViewTake Photos\or
~ C:\Palm\user’s name\ViewTake Photos\·Image and Video will be saved to PC
as JPG for full size images,BMP for Palm size images, and AVI format for videos.
For further information:
Please visit our website : www.spectec.com.tw for further complete and frequently
updated compatibility.
Palm OS and HotSync are registered trademarks of Palm computing,Inc.Other product
and brand names are trademarks or registered trademarks of their respective owners.
10
LIMITED WARRANTY
HARDWARE: SPECTEC CO., LTD (SDC-001A / SDC-003A) Warrants to the original enduser “Customer”that SPECTEC branded products will be free from defects in
workmanship and material under normal use for 90 days from the original
purchasedate.
SOFTWARE: SPECTEC CO., LTD. (SDC-001A / SDC-003A) warrants to the end-user
“Customer”that SDC-001A / SDC-003A Palm CAMERA software, the SDC-001A / SDC-003A
Palm camera soft-ware performs a compatible product in substantial conformance to the
specifications for 90 days from the original purchase date.
EXCLUSION: This warranty excludes (a) physical damage to the surface of the product
including scratches, crack, or outside casing; (b) damage causedby mishandle,
disregard, incorrect installation or testing, unauthorized endeavor to open, repair or
any other cause beyond the range of the intend use; (c) damage cause by accident,
fire, power changes, acts of God or risks; (d) other products with any non SDC-001A
camera compatible, if this product causes the problem.
PURCHASEING WARRANTY SERVICE: Its necessary for customer to contact SDC-001A
/ SDC-003A camera representatives or near by authorized stores with theapplicable
warranty period. Require a receipt or warranty card for the original purchase date.
SPECTEC is not liable for customer products accepted without a warranty, service authorization provided it might be refused.
Thanks for choosing the SDC-001A / SDC-003A Palm Camera, SPECTEC and any Authorized stores are pleased to serve you if any difficult issues occurred.
11