1
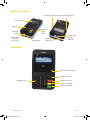
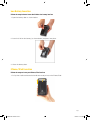
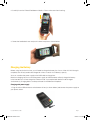
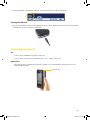
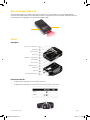
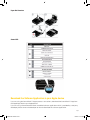
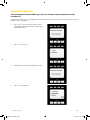
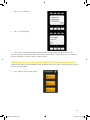
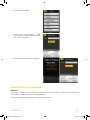
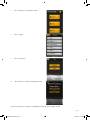
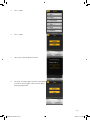
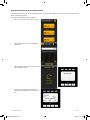
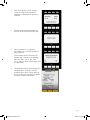
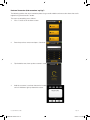
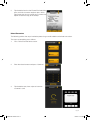
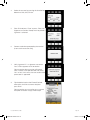
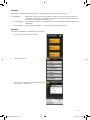
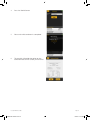
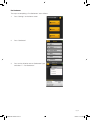
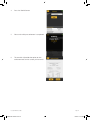
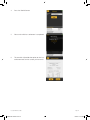
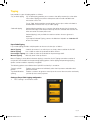
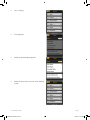
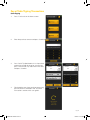
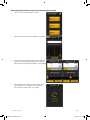
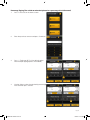
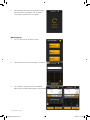
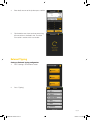
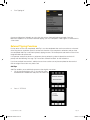
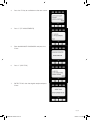
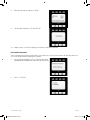
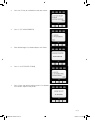
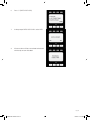
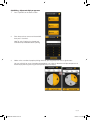
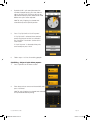
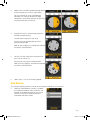
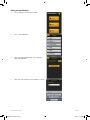
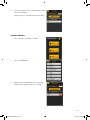
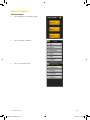
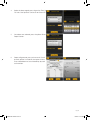
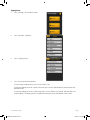
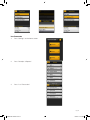
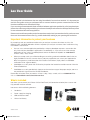
Leo User Guide This user guide is for businesses that are using CommBank’s Leo merchant terminal. it is important you read this user guide so that you understand how to connect hardware, process transactions and use the functions available on the CommBank Pi App. If you are using a Commonwealth Bank accredited software application provided by a 3rd party developer, please refer to the user guide provided by your software developer and contact the developer with any issues on how to download the software application. Please note that while we provide you the Leo merchant terminal and your merchant facility, we do not cover the cost of the communications costs (e.g. mobile bandwidth) relating to your operating the Leo device. Important information to protect your business By accepting cards you provide convenience for you and your customers but there are risks, the following steps should be followed at all times to protect you and your customers from fraud when using CommBank’s Leo terminal. You can use a software application provided by a 3rd party developer to process transactions but only if that 3rd party developer’s application is accredited by us. If you are unsure if the software application you are using is accredited please contact the Merchant Helpdesk on 1800 230 177 24 hours a day 7 days a week. When you accept cards, you will be handling or transmitting card and cardholders details that are highly confidential. You must ensure that any 3rd party application you use on your Apple device does not capture any card information this includes card numbers, expiry dates or cardholder verification PIN or signature details. Cardholders must only enter their PIN into the pin pad on the Leo device and do not enter it into the iPhone/iPod device. Cardholders must only provide their signature on the merchant copy of the paper receipt, and must not provide their signature on the iPhone/iPod device. Remember we’re here when you need us 24 hours a day, 7 days a week, call us on 1800 230 177 or visit us at CommBank.com.au/merchantservices What’s included Leo allows you to convert your iPhone 4/4S or iPod Touch (4th Generation or below) into a secure and fully portable merchant terminal. Leo comes with the following elements: 1. Leo device 2. Power supply for charging 3. USB connection cable 4. Lithium-ion Battery USB cable Leo Power Supply Lithium-ion Battery CBA3078 190413 CBA3078 190413.indd 1 8/05/13 2:46 PM Getting to know Leo Bar code scanner activation buttons (optional) Display Screen Keypad Magnetic stripe reader Chip card reader Micro USB connector for charger Charge pads iPhone/iPod ON/OFF key 2D bar code scanner (optional) Leo keypad Menu NAVIGATION keys FUNCTION key [F] NUMERIC keys CANCEL key (red) CLEAR key (yellow) ENTER key (green) Leo Quick Reference Guide CBA3078 190413.indd 2 Page 2 8/05/13 2:46 PM Leo Battery Insertion Follow the steps below to insert the Lithium-ion battery into Leo 1. Open the battery door as shown below. 2. Insert the Lithium-ion battery (as shown below) and press into place. 3. Close the battery door. iPhone/iPod Insertion Follow the steps to insert your iPhone/iPod into Leo 1. Pull up the cradle and rotate the handle over ready to insert the iPhone/iPod. Page 3 CBA3078 190413.indd 3 8/05/13 2:46 PM 2. Carefully insert the iPhone/iPod bottom side first. Please take care when inserting. 3. Rotate the handle back over and push it down into place as shown below. Charging the Battery Before using Leo for the first time, you will need to charge the battery for 4 hours. After this initial charge is complete, Leo will only need to be charged for 3 hours to reach its full battery capacity. You can use either the power supply or the USB cable to charge Leo. Note that charging Leo via a wall socket power supply or USB connector will only charge the battery in the Leo device, it will not charge the iPhone or iPod. If you require both devices to be charged simultaneously, charging docks can be purchased via the Merchant Helpdesk. Charging with power supply 1. Plug the micro-USB connector to the bottom of Leo (as shown below) and connect the power supply to your power socket. Leo Quick Reference Guide CBA3078 190413.indd 4 Page 4 8/05/13 2:46 PM 2. A battery indicator is provided on the Leo screen, indicating the charge of the device. Charging with USB cable 1. Plug the micro-USB connector to the bottom of Leo (as shown below) and connect the USB connector to a USB port on your computer or USB hub. Turning the power on/off Leo To turn Leo on, hold down the green ‘Enter’ key. To turn Leo off, simultaneously hold down the ‘-‘ key + yellow ‘Clear’ key. iPhone/iPod The power button is located on the holster’s handle. Press and hold down the button to turn the iPhone/iPod on and off. ON/OFF key Page 5 CBA3078 190413.indd 5 8/05/13 2:46 PM Barcode Reader (Optional) The barcode reader is activated using the two side keys as shown below. Once activated hold the terminal’s barcode reader over the barcode until the scanned information has been received. Note that the CommBank Pi App does not utilise the barcode reader. Printer Description Paper roll compartment OPEN key Paper sensor Paper out Batteries compartment Card reader Status LED USB connector FEED key Belt clip Anti-slip rubbed pods Printer Power On/Off To power on the printer, push the FEED key once To power off the printer, push the FEED key twice in quick succession Leo Quick Reference Guide CBA3078 190413.indd 6 Page 6 8/05/13 2:46 PM Paper Roll Insertion Status LED Download the Software Application to your Apple device If you are using the CommBank Pi App to process transactions, download the CommBank Pi App from the Apple App Store to your Apple device. If you are using a Commonwealth Bank accredited software application which is provided by a 3rd party developer, please contact the developer on how to download the software application. Page 7 CBA3078 190413.indd 7 8/05/13 2:46 PM Terminal Configuration Terminal Management System (TMS) logon (If you are utilising a software application other than CommBank Pi) A logon to the TMS must be completed at initial installation and at least once a month to pick up any new terminal software updates. 1. Press the ‘F’ key on the Leo terminal which is located directly above the red ‘cancel’ key, followed by ‘Enter’ 2. Press ‘2’ for Terminal 3. Enter Manager Password followed by ‘Enter’ 4. Press ‘1’ for Configure Leo Quick Reference Guide CBA3078 190413.indd 8 Page 8 8/05/13 2:46 PM 5. Press ‘F4’ to scroll down 6. Press ‘4’ for TMS logon 7. Please wait until logon/download is complete where you’ll be taken back to the home screen If you are utilising a software application other than the ‘CommBank Pi App’, please refer to the relevant software application instructions from this point onward. TMS logon (If you are using the CommBank Pi software application) A logon to the TMS must be completed at initial installation and at least once a month to pick up any new terminal software updates. 1. Press ‘Settings’ on the home screen Page 9 CBA3078 190413.indd 9 8/05/13 2:46 PM 2. Press ‘Software Update’ 3. Ensure the Txn Type selected is ‘T – TMS Software and Parameter Download’ and press ‘Software Update’ 4. Please wait until download is complete CommBank Pi App Configuration Get Status A ‘Get Status’ function must be completed at initial setup of the CommBank Pi App to ensure your trading name appears on receipts and user generated reports. The steps to completing the ‘Get Status’ function are as follows: Leo Quick Reference Guide CBA3078 190413.indd 10 Page 10 8/05/13 2:46 PM 5. Press ‘Settings’ on the home screen 6. Press ‘Logon’ 7. Press ‘Get Status’ 8. The ‘Get Status’ function will be processed Once the ‘Get Status’ function is completed it will return to the Logon screen. Page 11 CBA3078 190413.indd 11 8/05/13 2:46 PM Optional Configuration Settings The following CommBank Pi App configuration settings are optional depending on the nature of your business and your individual requirements: Tipping (for more details refer the Tipping section of this user guide) Primarily utilised in the hospitality industry, ‘Tipping’ functionality enables you to provide the option for your customers to give you a tip when accepting transactions. Split Bill (for more details refer to the ‘Split Bill’ section of this user guide) Primarily utilised in the hospitality industry, ‘‘Split Bill’’ enables you to offer your customers the option to easily split their bill at the table in an easy and flexible manner. Staff Member (for more details refer to the Staff Member section of this user guide) The ‘Staff Members’ function enables you to assign individual transaction tracking across your staff, making it easy to track transactions and tips. Common Functions Terminal Logon A ‘Terminal Logon’ must be completed at the start of each day, transactions can not be processed prior to a ‘Terminal Logon’. Please note that your Leo device is pre-configured with your Merchant and Terminal ID’s , this means that you can interchange multiple Apple devices with each Leo device. The steps to completing a ‘Terminal Logon’ are as follows: 1. Press ‘Settings’ on the home screen Leo Quick Reference Guide CBA3078 190413.indd 12 Page 12 8/05/13 2:46 PM 2. Press ‘Logon’ 3. Press ‘Logon’ 4. Please wait while the device initialises. 5. Once the ‘Terminal Logon’ function is completed it will return to the Logon screen with the Status displaying ‘Approved’. Page 13 CBA3078 190413.indd 13 8/05/13 2:46 PM Purchase Transaction (with card swipe or insert) The following outlines the steps involved to processing a credit or debit card transaction where the card is either swiped or inserted. The steps to completing are as follows: 1. Press ‘Purchase’ on the home screen. 2. Enter the purchase amount and press ‘Continue’. 3. Flip the device over, then swipe or insert the customer’s card. 4. Select the account by pressing the function keys below the CHQ, SAV, CR text Leo Quick Reference Guide CBA3078 190413.indd 14 Page 14 8/05/13 2:46 PM 5. Enter PIN and press ‘Enter’ or press ‘Enter’ for a Signature transaction. Receipt must be printed if signature is selected. 6. Remove card when prompted by the terminal (Insert card transactions only) 7. Verify signature if it is a signature transaction. Press [YES] to approve or [NO] to decline (Please note that the transaction will timeout after 3 minutes if the operator does not select ‘Yes’ or ‘No’, if this occurs the transaction will be processed as ‘approved’) 8. Flip the device back to the iPhone/iPod and either print, email the customer receipt or press finish. Please note that you must offer your customer the option to receive a copy of the receipt. Page 15 CBA3078 190413.indd 15 8/05/13 2:46 PM Purchase Transaction (with contactless ‘tap & go’) The following outlines the steps involved to processing a credit or debit card transaction where the card is tapped using the contactless reader. The steps to completing are as follows: 1. Press ‘Purchase’ on the home screen. 2. Enter the purchase amount and press ‘Continue’. 3. Flip the device over, then tap the customer’s card. 4. Hold the customer’s card over the terminal screen until all 4 indicators light up above the screen. Leo Quick Reference Guide CBA3078 190413.indd 16 Page 16 8/05/13 2:46 PM 5. Flip the device back to the iPhone/iPod and either print, email the customer receipt or press finish. Please note that you must offer your customer the option to receive a copy of the receipt. Refund Transaction The following outlines the steps involved to processing a credit or debit card refund transaction. The steps to completing are as follows: 1. Press ‘Refund’ on the home screen. 2. Enter the refund amount and press ‘Continue’. 3. Flip the device over, then swipe or insert the customer’s card. Page 17 CBA3078 190413.indd 17 8/05/13 2:46 PM 4. Select the account by pressing the function keys below the CHQ, SAV, CR text 5. Enter PIN and press ‘Enter’ or press ‘Enter’ for a Signature transaction. Receipt must be printed if signature is selected. 6. Remove card when prompted by the terminal (Insert card transactions only) 7. Verify signature if it is a signature transaction. Press YES to approve or NO to decline. Please note that the transaction will timeout after 3 minutes if the operator does not select ‘Yes’ or ‘No’, if this occurs the transaction will be processed as ‘approved’ 8. Flip the device back to the iPhone/iPod and either print, email the customer receipt or press finish. Please note that you must offer your customer the option to receive a copy of the receipt. Leo Quick Reference Guide CBA3078 190413.indd 18 Page 18 8/05/13 2:46 PM Settlement Leo provides 3 different Settlement options, an explanation of each option is as follows: S - Settlement P – Pre-Settlement L – Last Settlement Settlement initiates the end of day processing of all transactions processed since the previous settlement and provides a total of all transactions for that period. Only 1 Settlement can be processed per day. Pre-Settlement provides a sub total of all transactions processed since the previous ‘Settlement’. Last Settlement provides a summary of the previous ‘Settlement’. Settlement The steps to completing a ‘Settlement’ are as follows: 1. Press ‘Settings’ on the home screen 2. Press ‘Settlement’ 3. Press on the white bar next to ‘Settlement Type’ and select ‘S – Settlement’. Page 19 CBA3078 190413.indd 19 8/05/13 2:46 PM 4. Press the ‘Settle’ button 5. Please wait while settlement is completed 6. The terminal will provide the option to view settlement totals on the screen, print or email. Leo Quick Reference Guide CBA3078 190413.indd 20 Page 20 8/05/13 2:46 PM Pre-Settlement The steps to completing a ‘Pre-Settlement’ are as follows: 1. Press ‘Settings’ on the home screen 2. Press ‘Settlement’ 3. Press on the white bar next to ‘Settlement Type’ and select ‘P – Pre-Settlement’. Page 21 CBA3078 190413.indd 21 8/05/13 2:46 PM 4. Press the ‘Settle’ button 5. Please wait while pre-settlement is completed 6. The terminal will provide the option to view settlement totals on the screen, print or email. Leo Quick Reference Guide CBA3078 190413.indd 22 Page 22 8/05/13 2:46 PM Last Settlement The steps to completing a ‘Last Settlement’ are as follows: 1. Press ‘Settings’ on the home screen 2. Press ‘Settlement’ 3. Press on the white bar next to ‘Settlement Type’ and select ‘L – Last Settlement’. Page 23 CBA3078 190413.indd 23 8/05/13 2:46 PM 4. Press the ‘Settle’ button 5. Please wait while last settlement is completed 6. The terminal will provide the option to view last settlement totals on the screen, print or email. Leo Quick Reference Guide CBA3078 190413.indd 24 Page 24 8/05/13 2:46 PM Tipping Leo provides 2 types of tipping options as follows: ‘Pay at table’ tipping Pay at table tipping provides your customers the ability to enter tips at the table. It also allows tipping transactions to be processed on credit and debit card transactions with a PIN. ‘Pay at Table’ tipping provides several options on how tips can be calculated as outlined below in the section ‘Pay at Table Tipping’. ‘Deferred’ tipping Deferred tipping provides your customers the option to enter the tip amount on the merchant copy of the receipt and the tip amount is entered into Leo after the initial transaction has been processed. Deferred tipping is only available for card transactions where a signature is required. If you require Deferred Tipping, contact the Merchant Helpdesk on 1800 230 177 to have it activated. Pay at Table Tipping Pay at table tipping provides multiple options on how to calculate tips as follows: Quick Tipping Dollar Tipping Percentage Tipping Manual Tipping A default tip amount is set which you can simply select to add to the final bill. Use a slider to select the tip based on dollar amount. Use a slider to select the tip based on the percentage of bill. Manually enter in the tip amount. Manual Tipping is set to default whenever tipping is turned on. Quick Tipping cannot be turned on in conjunction with the dollar or the percentage tipping options. Dollar tipping and percentage tipping options can be turned on separately or together. The following options are available when ‘Split Bill’ functionality is turned on: Tip each split bill portion Tip whole bill before splitting Enables each customer to individually select their tip amount and add to their portion of the bill. Enables customers to agree on a total tip at the start of the transaction and evenly split the tip across each payment. Setting up ‘Pay at Table’ tipping configuration 1. Press ‘Settings’ on the home screen. Page 25 CBA3078 190413.indd 25 8/05/13 2:46 PM 2. Press ‘Tipping’ 3. Turn tipping on 4. Select the desired tipping options: 5. Select the back arrow to return to the ‘Settings’ screen Leo Quick Reference Guide CBA3078 190413.indd 26 Page 26 8/05/13 2:46 PM Pay at Table Tipping Transactions Quick Tipping 1. Press ‘Purchase’ on the home screen. 2. Enter the purchase amount and press ‘Continue’ 3. Press Quick Tip (defaulted to 10% of purchase amount) to include the tip or for a manual tip press ‘Please Enter Tip’ and enter in the value and press ‘Confirm’ 4. Flip the device over, then continue processing the transaction as outlined in the ‘Purchase Transaction’ section of this user guide’. Page 27 CBA3078 190413.indd 27 8/05/13 2:46 PM Dollar Tipping (Use a slider to select the tip based on dollar amount) 1. Press ‘Purchase’ on the home screen. 2. Enter the purchase amount and press ‘Continue’ 3. Use the slider to select the desired tip value and then press confirm (Dollar tipping is the default option when multiple tipping options are enabled) 4. Flip the device over, then continue processing the transaction as outlined in the ‘Purchase Transaction’ section of this user guide’. Leo Quick Reference Guide CBA3078 190413.indd 28 Page 28 8/05/13 2:46 PM Percentage Tipping (Use a slider to select the tip based on a percentage of the bill amount) 1. Press ‘Purchase’ on the home screen. 2. Enter the purchase amount and press ‘Continue’ 3. Press % Tip button ($ Tip is the default option when multiple tipping options are enabled) 4. Use the slider to select the desired tip percentage value and then press confirm. Page 29 CBA3078 190413.indd 29 8/05/13 2:46 PM 5. Flip the device over, then continue processing the transaction as outlined in the ‘Purchase Transaction’ section of this user guide’. Manual Tipping 1. Press ‘Purchase’ on the home screen. 2. Enter the purchase amount and press ‘Continue’ 3. Press Manual Tip button ($ Tip is the default option when multiple tipping options are enabled) Leo Quick Reference Guide CBA3078 190413.indd 30 Page 30 8/05/13 2:46 PM 4. Enter the $ amount of the tip then press confirm. 5. Flip the device over, then continue processing the transaction as outlined in the ‘Purchase Transaction’ section of this User Guide’. Deferred Tipping Setting up ‘Deferred’ tipping configuration 1. Press ‘Settings’ on the home screen. 2. Press ‘Tipping’ Page 31 CBA3078 190413.indd 31 8/05/13 2:46 PM 3. Turn Tipping off Contact our Merchant Helpdesk on 1800 022 966 to have ‘Deferred’ tipping activated. Once the Merchant Helpdesk has activated ‘Deferred Tipping’ you must complete a ‘TMS Logon’ as outlined in this ‘User Guide’ Deferred Tipping Functions For tips to be successfully completed, ‘Add Tips’ must be completed after each transaction or at the end of the day prior to settlement of each Leo terminal. Note that if you complete a settlement and you have not completed ‘Add Tips’ and ‘Batch Upload’, tipping amounts will not be processed and the value will no longer be able to be processed. If an operator attempts to perform a settlement prior to performing a batch upload, the terminal will prompt with the following message ‘Tip Transactions Stored Proceed?’ on the Leo device. If you have multiple Leo terminals, add tips for each transaction can only be completed on the terminal that the original transaction was processed. Add Tips Add Tips enables you to add the tip amount to the original transaction. 1. On the Leo terminal press the ‘F’ function key, enter the MANAGER PASSWORD and press the ‘Enter’ key 2. Press ‘1’ EFTPOS Leo Quick Reference Guide CBA3078 190413.indd 32 Page 32 8/05/13 2:46 PM 3. Press the ‘F4’ key to scroll down to the next screen. 4. Press ‘5’ (TIP ADJUSTMENTS) 5. Enter the MANAGER PASSWORD and press the ‘Enter’. 6. Press ‘1’ (ADD TIPS) 7. ENTER TIP NO. from the original receipt and press ‘Enter’. Page 33 CBA3078 190413.indd 33 8/05/13 2:46 PM 8. Enter the tip amount and press ‘Enter’. 9. The terminal will display ‘TIP ACCEPTED’. 10. Repeat steps 7 to 9 until all tipping transactions have been updated. List Stored Transactions The List Stored Transaction function allows you to print out a list of all transactions for the day which can assist with reconciliation of tipping transactions. 1. On the Leo terminal press the ‘F’ (function) key, enter the MANAGER PASSWORD and press the ‘Enter’ key 2. Press ‘1’ EFTPOS Leo Quick Reference Guide CBA3078 190413.indd 34 Page 34 8/05/13 2:46 PM 3. Press the ‘F4’ key to scroll down to the next screen. 4. Press ‘5’ (TIP ADJUSTMENTS) 5. Enter the Manager Password and press the ‘Enter’. 6. Press ‘2’ (LIST STORED TRANS) 7. Press ‘Enter’, the terminal will then print a ‘List Stored Transactions’ report to the printer. Page 35 CBA3078 190413.indd 35 8/05/13 2:46 PM Batch Upload Batch Upload transmits the updated transaction amount including the Tip amount to the Bank. 1. On the Leo terminal press the ‘F’ function key, enter the MANAGER PASSWORD and press the ‘Enter’ key 2. Press ‘1’ EFTPOS 3. Press the ‘F4’ key to scroll down to the next screen. 4. Press ‘5’ TIP ADJUSTMENTS 5. Enter the MANAGER PASSWORD and press the ‘Enter’. Leo Quick Reference Guide CBA3078 190413.indd 36 Page 36 8/05/13 2:46 PM 6. Press ‘3’ (BATCH UPLOAD) 7. At the prompt BATCH UPLOAD? select YES 8. All transactions will be transmitted to the bank with the tip amount included. Page 37 CBA3078 190413.indd 37 8/05/13 2:46 PM Split Bill Setting up ‘Split Bill’ 1. Press ‘Settings’ on the home screen. 2. Press ‘Split Bill’ 3. Turn Configure Split ‘ON’. There are two split billing options - only one can be selected at one time. Adjust each Split per payment The split amount can only be adjusted one at a time before each split payment is made. E.g. Only person 1 can adjust his/her split prior to the first payment, person 2 can only adjust his/her split after the first payment is made and so on. Adjust all splits before payment All split amounts are adjusted before the first payment is made. Leo Quick Reference Guide CBA3078 190413.indd 38 Page 38 8/05/13 2:46 PM Split Billing - Adjust each Split per payment 1. Press ‘Split Bill’ on the home screen. 2. Enter the purchase amount of the total bill, then press ‘Continue’. Add Tip *only if tipping is activated and selected for tip whole bill before splitting 3. Add or minus number of people splitting the bill by pressing the plus or minus sign buttons. You can split bills for up to 10 people and individuals can select or deselect multiple components of the bill for payment by pressing on each portion they wish to pay. Page 39 CBA3078 190413.indd 39 8/05/13 2:46 PM 4. By default, bill is split evenly between the number of people paying. Use the slider to adjust the split value. Only one split can be adjusted and the payment needs to be made before next split can be adjusted. Add Tip *only if tipping is activated and selected for tip each split bill portion. 5. Press ‘Pay By Card’ or ‘Cash Payment’. If ‘Pay By Card’ is selected, then continue processing the transaction as outlined in the ‘Purchase Transaction’ section of this User Guide. If ‘Cash Payment’ is selected, either print, email receipt or press finish. 6. Follow steps 4 & 5 for all remaining people. Split Billing – Adjust all splits before payment 1. Press ‘Split Bill’ on the home screen. 2. Enter the purchase amount of the total bill, then press ‘Continue’. Add Tip *only if tipping is activated and selected for tip whole bill before splitting. Leo Quick Reference Guide CBA3078 190413.indd 40 Page 40 8/05/13 2:46 PM 3. Add or minus number of people splitting the bill by pressing the plus or minus sign buttons. You can split bills for up to 10 people and individuals can select or deselect multiple components of the bill for payment by pressing on each portion they wish to pay. 4. By default, the bill is split evenly between the number of people paying. Use the slider to adjust the split value. All splits must be adjusted prior to the first payment being made. Add Tip *only if tipping is activated and selected for tip each split bill portion. 5. Person 1 will then select the first portion and press Pay for Person P1. Each person can pay for multiple portions. Add ‘Tip’ only if tipping is activated and selected for tip each split bill portion. 6. Follow steps 4 & 5 for all remaining people. Staff Member This function enables payments and tips to be tracked to individual staff members. 1. When the ‘Staff Member’ function is enabled, you will be prompted to select a relevant staff member at the beginning of each transaction after the ‘Purchase’ or ‘Split Bill’ button is selected on the home screen Page 41 CBA3078 190413.indd 41 8/05/13 2:46 PM Adding new Staff Members 1. Press ‘Settings’ on the home screen. 2. Press ‘Staff Members’ 3. Turn ‘Capture Staff Member’ ‘ON’ and press ‘Add Staff Member’ 4. Enter the staff member name and press ‘Save’ Leo Quick Reference Guide CBA3078 190413.indd 42 Page 42 8/05/13 2:46 PM 5. The staff members name will now appear under the staff member list. Repeat steps 3 & 4 to add more staff members Delete Staff Members 1. Press ‘Settings’ on the home screen. 2. Press ‘Staff Members’ 3. Swipe across Staff Member name so the red ‘Delete’ button appears and press ‘Delete’. Page 43 CBA3078 190413.indd 43 8/05/13 2:46 PM Receipts & Reports Transaction Totals 1. Press ‘Settings’ on the home screen. 2. Press ‘Receipts & Reports’ 3. Press ‘Transaction Totals’ Leo Quick Reference Guide CBA3078 190413.indd 44 Page 44 8/05/13 2:46 PM 4. Select the date range by pressing on the ‘From’ & ‘To’ tabs. Staff tip totals can be set to ON or OFF. 5. Once dates are selected, press the yellow ‘Show Report’ button. 6. Report will generate, press print or email. If staff tip totals option is turned on, the report will also show a breakdown of accumulated tips by each staff member. Page 45 CBA3078 190413.indd 45 8/05/13 2:46 PM Tipping Count 1. Press ‘Settings’ on the home screen. 2. Press ‘Receipts & Reports’ 3. Press ‘Tipping Count’ 4. Press on one of the three options: To view today’s tipping count, press on the ‘Today’ tab. To view the tipping count for a particular month, press on the ‘Select Month’ tab and select the desired month. To view the tipping counts by a date range, press on the ‘Select Date Range’ tab and select the required dates. The tipping counts will generate automatically on the bottom of the screen. Leo Quick Reference Guide CBA3078 190413.indd 46 Page 46 8/05/13 2:46 PM Last Transaction 1. Press ‘Settings’ on the home screen. 2. Press ‘Receipts & Reports’ 3. Press ‘Last Transaction’ Page 47 CBA3078 190413.indd 47 8/05/13 2:46 PM 4. Press on one of the two options. To retrieve last receipt, press the yellow ‘Get Last Receipt’ tab. To retrieve last transaction, press ‘Get Last Transaction’. Details will automatically generate on the screen. Changing Print Settings You can change the Leo print settings to make sure both the customer and merchant copies of the receipt are printed at every transaction. 1. Go into Settings on your Apple device and scroll down and go into CommBank Pi 2. Under ‘Printer’, go into Target 3. Select ‘Leo Device’ Leo Quick Reference Guide CBA3078 190413.indd 48 Page 48 8/05/13 2:46 PM