1
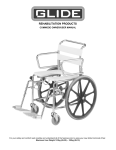
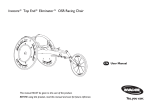
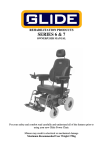
REHABILITATION PRODUCTS
SPX
OWNER/USER MANUAL
IMPORTANT
For your safety and comfort read carefully and understand all of the features prior to
using your new Glide Chair.
Misuse may result in mechanical damage.
Maximum Recommended User Weight 125kg
TABLE OF CONTENTS
SECTION 1.
INTRODUCTION
SECTION 2.
STANDARD FEATURES
SECTION 3.
WARNINGS
SECTION 4.
ROUTINE MAINTENANCE
SECTION 5.
OPERATING YOUR WHEELCHAIR
SECTION 6.
OPTIONS
SECTION 7.
SPARE PARTS
SECTION 8.
WARRANTY
SECTION 1. INTRODUCTION
Thank you for choosing the SPX Manual Wheelchair.
An Australian designed and manufactured product and has a manufacturers
recommended maximum user weight of 125kg.
With proper care and operation your wheelchair will provide years of trouble free
mobility.
Please take the time to familiarise yourself with the functions and features of your
manual chair by reading this owners manual. If you have any queries about the
functions of the chair you can call Glide Rehabilitation Products or your nearest Glide
Rehabilitation Products dealer.
GLIDE REHABILITATION PRODUCTS
25 LEDGAR RD
BALCATTA
PERTH. WA. 6021
AUSTRALIA
PH: +61 8 9345 3400
Fax: +61 8 9345 1384
SECTION 2. STANDARD FEATURES
The illustration below lists the standard features of the SPX Manual Chair.
1. Fold Down Adjustable Height Backrest
2. Adjustable Angle Backrest
3. Single Piece Angle Adjustable Footplate
4. Quick Release Axles
5. 100mm(4”) Blade Type Castor Wheels
6. 610mm(24”) High Pressure Rear Tyres
7. 20mm Diameter Stainless Steel Pushrims
8. Scissor Brakes
9. 4 Degree Rear Wheel Camber
10. 7 Degree Seat Fall
11. 15 Degree Front Frame Taper
12. Sailcloth Upholstery
13. Sailcloth Clothing Protectors (not shown)
FIGURE 1. STANDARD FEATURES
SECTION 3. WARNINGS
Read and understand the warnings stated in this section.
WARNING!
To the Occupant
Before using this chair, obtain advice and training from your health professional.
1. Each chair is custom designed to suit individual needs. Take time to become
familiar with each feature before you begin using.
2. Depending on your level of function and ability, you will need to develop
your own methods for its safe use.
3. Understanding the environment where the chair will be used will help
identify potential hazards and how to avoid them.
4. Read this manual before operating chair.
5. Never take chair onto stairs or escalators.
WARNING!
Modifications
Never make any modifications or use non-approved Glide Rehabilitation Products
parts on your manual chair. Doing so may cause a safety hazard and could void
Warranty.
Unauthorised changes constitute remanufacturing of the manual chair. This voids any
warranty. The person or group who make the changes will have full liability of the
manual chair.
WARNING!
Safety/Performance Check
Make sure the chair operates as it is designed to do.
If there is a change in the performance of the chair or in your functional ability,
contact your nearest Glide Rehabilitation Products agent to adjust chair to match your
needs.
Check for any uncharacteristic noises, vibration or any difficulty in its use.
If a problem is found, notify your carer and Glide Rehabilitation Products agent for
repair or advice on how to repair. Do not use your manual chair if your safety is at
risk.
Make sure all tyres are inflated to recommended pressures and in good condition
Make sure all accessories are secure and in correct position
WARNING!
Rear Wheel Position
Moving the rear wheels forward reduces the stability of the chair and makes it less
stable. Caution should be taken when using the chair in this configuration as it may
cause the chair to tip back and a fall may result.
WARNING!
When your chair is on a ramp or incline the centre of balance of your chair will
change.
Your chair is less stable when on ramps or inclines and should not be used unless you
feel it is safe to do so. If in doubt have someone with you.
When going up an incline or ramp you must:
• Approach the ramp or incline straight on. Do not approach on an angle (cut
the corner)
• Make sure that you are in the centre of the ramp and that the ramp is wide
enough for your wheelchair
• Not use ramp if you feel that a wheel may drop off the side
• Not veer or turn while on ramp. This may cause chair to tip and a fall may
result.
When going down a ramp or descent you must:
• Always use the centre of the ramp or descent
• Not veer or turn while on ramp or descent.
• Restrict chair to a slow steady speed .Do not allow chair to accelerate over
normal speed.
• Never use the manual brakes to slow or stop the chair. This may cause the
chair to veer or change direction erratically.
• Use pushrim to control chair.
SECTION 4. . ROUTINE MAINTENANCE
WEEKLY
1. Check tyre pressures are 620kpa (90psi) for High Pressure
345kpa (50psi) for Standard Tyres
2. Check condition of tyres and castor wheels
3. Clean frame parts with mild soapy solution.
4. Wipe upholstery with a clean damp cloth
5. Check function of brakes.
6. Remove Quick Release axles and wipe clean socket and axle. Apply dry lube to
axles when reassembling.
7. Check spokes on rear wheels and re-tension if required.
MONTHLY
1. Give the chair a general inspection for loose nuts and bolts.
2. Check the function of fold down back mechanism. Ensure that release lever
and plunger are free.
3. Check tension of seat upholstery. Re-tension if necessary.
ANNUALLY
It is advisable to have an annual inspection of the SPX Manual Chair performed by an
authorised Glide Rehabilitation Products Agent. Their knowledge and experience
enables them to identify and correct problems that might otherwise go undetected.
For any questions concerning procedures or service, contact your nearest Glide
Rehabilitation Products Agent or Glide Rehabilitation Products direct.
USER & MANUFACTURER SERVICEABLE PARTS
The only user serviceable parts are as per Section 6.
All other components are to be repaired by Glide Rehabilitation Products.
PACKING & SHIPPING
The SPX Manual Chair is shipped to Glide Rehabilitation Products agents in a fully
enclosed cardboard box to minimise damage during transport.
Your chair should arrive to you fully assembled and ready to use.
If your chair needs to be transported interstate or overseas, it is recommended that a
shipping box is used. These can be purchased from your nearest Glide Rehabilitation
Products agent or dealer.
SECTION 5. OPERATING YOUR CHAIR
Adjustable Height Backrest
The backrest upholstery is incrementally adjustable in height. To adjust do the
following: Note: All upholstery is secured by the use of Velcro Tabs
1. Undo seat to backrest connecting flap by pulling up on Velcro flap at bottom
of back upholstery.
2. Undo backrest upholstery by pulling up on both sides of folded over section
of back upholstery and pull centre upholstery panel away from back frame
3. Undo clothing protectors on either side of back upholstery by pulling out on
Velcro tabs
4. Lift centre tensioning straps off either back bar.
5. Undo screws in back bars and move tube to nearest hole to suit desired
height. Ensure that tubes on either side are at the same height.
6. Replace screw and tighten firmly.
7. Refitting of upholstery is the reverse of procedures 1 to 4
Adjustable Tension Back Upholstery
Your chair is fitted with back upholstery that can be tensioned to suit your individual
needs. To adjust do the following:
1. From behind the chair lift upholstery panel away from Velcro to access
tensioning straps
2. Each strap can then be adjusted to suit your requirements by either loosening o
tightening each strap.
3. Once the desired tension has been achieved fold back upholstery down onto
Velcro fasteners
Adjustable Angle Backrest
Your chair has 4 increments of seat to back angle. To adjust do the following:
1. Remove Quick release wheels.
2. Undo clothing protectors on either side of back upholstery by pulling out on
Velcro tabs
3. Undo and remove Top screw in side hinge plates. Ensure that oval shaped
insert does not fall out.
4. Move backrest bar, forward or back, to next position. Note: The oval shaped
insert in the side hinge plate provides adjustment for 2 increments.
Reversing this insert provides the next 2 increments. The increments
are: 90 and 80 degrees, 85 and 75 degrees.
5. Replace screw and tighten firmly
6. Replace clothing protectors by reversing point 2.
Fold Down Backrest
Your chair is fitted with a fold down backrest. To fold down do the following:
1. Remove seat cushion.
2. Position chair so that back of chair is facing you.
3. By using thumb depress button on back of backrest side hinge plates.
4. With button depressed use forefinger to push lever outwards (wheel side)
5. Backrest will now fold down onto the seat.
6. To reposition backrest ready for use it is the reverse of points 5 to 1.
Adjustable Angle Footplate
Your chair is fitted with an infinitely adjustable angle footplate. To adjust do the
following:
1. Lift front of chair up until you can clearly see the series of clamps under the
footplate.
2. Loosen screws on one side of clamps only
3. Move footplate to desired position
4. Retighten screws in clamps
Adjustable Height Footplate
Your chair has an incrementally adjustable height footplate. To adjust do the
following:
1. Loosen footplate clamps as per points 1 & 2 of above procedure.
2. Undo and remove screws on the rear of front chair frame.
3. Move footplate to nearest hole to suit desired position.
4. Replace screws and tighten firmly
5. Reposition footplate as per above procedure
Rear Wheel Position
The position of the rear wheels can be set up to suit your ability. WARNING: By
moving the wheels forward it reduces the stability of the chair and makes it tip
up easily. Caution should be taken when using the chair in this configuration.
To adjust do the following:
1. Remove Quick release wheels.
2. Loosen the 4 screws on each axle mounting plate.
3. Move to desired position. Ensure that both axle-mounting plates are
positioned evenly along the side frame.
4. Retighten the 4 screws on each axle mounting plate. Ensure that these are
tightened evenly as uneven tightening will change the camber position of the
wheels.
5. Refit rear wheels and check that camber angle is equal on both sides.
Loosening and tightening the 4 screws on each axle mounting plate can make
small adjustments. When wheels are equal ensure screws on each axle
mounting plate are tightened very firmly.
SECTION 6. SPARE PARTS
USER SERVICABLE PARTS
TYRES
610 X 25 HP (24” x 1 1/16”) P/N 202631
WHEELS
76mm (3”) Castor Wheel P/N 2012
100mm (4”) Castor Wheel P/N 20117
125mm (5”) Castor Wheel P/N 2013
150mm (6”) Castor Wheel P/N 20123
Tube P/N 202531
(blade type)
(blade type)
(sport type)
(urethane type)
CASTOR PINTLE AXLE ASSEMBLY
1. Dust Cap
2. Circlip
3. Top Nylon Bush & Bearing
4. Pintle Axle
5. Bottom Bearing Housing
6. Bearing
7. Top & Bottom Castor Fork Retaining Nuts
8. Castor Fork
9. Castor Wheel
10. Bearing Spacer
11. Castor Wheel Bearings
12. Spacer Washers
13. Axle Bolt
14. Nyloc Axle Retaining Nut
20118 (urethane type)
20119 (urethane type)
SECTION 7. AVAILABLE OPTIONS
Spoke Guards
Plastic Coated Push rims
Anti Tip Wheels
High Mounted Lever Action Brakes
Removable Rear Push Handles
Under Seat Carry Bag
5-Degree Bend in Backrest Bar
Black Castor and Rear Wheel Components
SECTION 8. WARRANTY
Lendal Pty Ltd (trading as Glide Rehabilitation Products) warrants all manufactured
and distributed products against defects in materials and workmanship for a period of
one year from purchase date.
Lendal Pty Ltd will repair or replace any part, as required, provided the purchased
product is delivered intact and prepaid to a location authorised by Lendal Pty Ltd
within the prescribed period of warranty.
This warranty does not extend to parts or electrical components damaged by misuse,
neglect, accident or improper installation, nor those tampered with, altered or serviced
by an agency not authorised by Lendal Pty Ltd.
The foregoing in lieu of all other warranties expressed, implied or statutory, Lendal
Pty Ltd’s sole liability shall be to repair or replace parts of components as specified
above.
1.
2.
IMPORTANT
Lendal Pty Ltd (trading as Glide Rehabilitation Products) does not
warrant either expressly or impliedly the suitability of the Glide SPX
wheelchair for the purchaser or any intended user. Purchasers and
intended users are advised that advice from an appropriate registered
medical practitioner should be obtained prior to using a manual
wheelchair.
Except insofar as is prohibited by statute, Lendal Pty Ltd shall not be
responsible for damage, injury or loss of any kind to any property or
person howsoever caused arising from or in connection with the Glide
SPX. All conditions and warranties that (but for this provision) would be
implied in favour of, and all rights and remedies that (but for this
provision) would be conferred upon the purchaser or other persons
against Lendal Pty Ltd arising under or as a result of the Trade Practices
Act 1974, any other legislation or the general law are excluded and
limited to the maximum extent possible and in cases where Lendal Pty
Ltd’s liability cannot be completely excluded but may be limited, the
liability of Lendal Pty Ltd is limited to one of the following (at the
option of Lendal Pty Ltd)
a)
The replacement of the Glide SPX or the supply of an
equivalent wheelchair
b)
The repair of the Glide SPX
c)
The payment of the cost of replacing the Glide SPX or of
acquiring an equivalent wheelchair
d)
The payment of the cost of having the Glide SPX repaired
REHABILITATION PRODUCTS
Glide Rehabilitation Products are manufactured in Australia by Lendal
Pty. Ltd. (ACN 009 003 694)
25 Ledgar Rd Balcatta, Western Australia 6021
Australia
Phone: +61 8 93453400 Fax: +61 8 93451384
Email: [email protected]
Web: www.glide.com.au