1
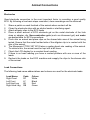
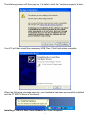
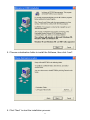
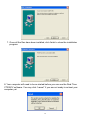
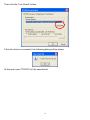
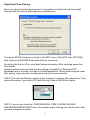
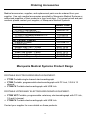
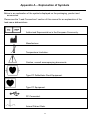
CT200CV Veterinarian Electrocardiograph User Manual www.machealth.com.au CT200CV Electrocardiograph User Manual Designed and manufactured in Australia Manual Revision 3.0 © Macquarie Medical Systems May 2007 2 Warnings and Cautions Please read the following information before using your CT200CV. A DANGER: Risk of explosion if used in the presence of flammable anaesthetics. A WARNING: Do not operate the unit in the presence of electromagnetic interference. Interference may be caused by electrosurgery, diathermy, or magnetic resonance imaging equipment. A WARNING: Use only the defibrillator protected animal cable as supplied by Macquarie Medical Systems Pty Ltd. Use of a non- defibrillator protected vet patient cable can cause damage to equipment or harm to animal or give an incorrect reading. A CAUTION: The type of electrodes used can effect the systems recovery from overload, especially recovery time after defibrillator pulses. Use electrodes that minimise electrode polarisation. A CAUTION: This device is intended for use by persons trained in animal health care. The operator must be thoroughly familiar with the contents of this manual before using the device. A CAUTION: Do not operate near high voltage equipment that may generate sparks or in an environment where high static electricity is present. A CAUTION: Please ensure the animal leads are in the correct locations on the animals body, and ensure that all leads are connected. A CAUTION: To maintain animal safety ensure that equipment connected to the output socket of the unit does not exceed enclosure leakage current limits. A CAUTION: The CT200CV should not be subjected to water or liquid spillage. It should only be used in a dry environment. A CAUTION: Dropping the CT200CV may cause device failure or intermittent operation. Contact service if this occurs. A CAUTION: Do not mix disposable and reusable electrodes together on the same animal at the same time. This may cause electrode polarisation. A CAUTION: Conductive parts of electrodes and associated connectors including the neutral electrode should not contact other conductive parts including earth. 3 Contents Warnings and Cautions Manual Introduction Connecting the CT200CV to your PC Animal Connections Installing the USB Driver Installing the CT200CV Real Time Software on PC Running the CT200CV Real Time Software Recording an ECG Reading Trouble Shooting Guide Service and Maintenance Ordering Accessories Medical Product Range Technical Information Warranty Appendix A – Explanation of Symbols 4 3 5 6 7 8 8 13 15 17 18 19 19 20 21 22 Introduction CT200CV Electrocardiograph The CT200CV Electrocardiograph (ECG) is a simple to use but very powerful ECG recorder. Its compact size and light weight make it suitable for portable use. It is ideal for use by veterinarians in a vet clinic or out in the field as it requires only a standard personal computer (PC) and optional printer for use. Intended Use The CT200CV is intended to be used on animals as a diagnostic device, which receives, records and produces a visual display of the electric signal produced by the heart. Indications for Use All devices should only be used by those persons competent in the safe use of animal contact electro-medical diagnostic equipment, animal monitoring equipment, and in possession of the manufacturers’ detailed safe working instructions contained in this manual. CT200CV Electrocardiograph User Manual This Manual is divided into two sections. The first part of the manual, starting on page 6, are the instructions on connecting the ECG unit to a animal and PC. The second section of the manual, starting on page 8, are the instructions and procedures for installing and using the Real Time Animal Monitoring software. If you have any difficulties using the unit or the software, and the procedures set out in this manual do not help you solve your problem, please contact the sales department at Macquarie Medical Systems: Website: www.machealth.com.au Email: [email protected] Phone: Australian Customers Call: 02 9692 7911 International Customers Call: +612 9692 7911 During Australian Eastern Standard Time Business Hours (GMT + 10:00) After Hours phone calls will be diverted to Message bank Fax: Australian Customers: International Customers: 02 9692 7965 +612 9692 7965 5 Connecting CT200CV to PC Connecting the CT200CV To connect the CT200CV to your PC, all that is required is the Universal Serial Bus (USB) cable supplied with the CT200CV. Follow the steps below to ensure you link the CT200CV correctly. 1. Locate a spare USB Port on your PC as shown in the picture below. Connect the host end (Type A) of the USB cable into a spare USB port. Figure 1 – Host End (Type A of USB Cable) Figure 2 - Type B USB Cable USB Ports 2. The same USB ports are present on notebook computers and desktop computers. Most computers will have more than one USB port. 3. Connect the other end of the USB cable to the CT200CV as shown below. USB Port Animal Cable Port 6 Animal Connections Electrodes Good electrode connection is the most important factor in recording a good quality ECG. By following a few basic steps consistent, clean recordings can be achieved. 1. 2. 3. 4. 5. 6. 7. 8. 9. Shave a patch on each forelimb of the animal where contact will be. Clean the electrode sites with an alcohol swab or sterilising agent. Attach alligator clips to the ECG leads Place a small amount of ECG electrode gel on the metal electrode of the limb strap or adapter clip. Non-conductive gels (such as ultrasound gel) and water are not suitable for ECG connections. Pinch skin on animal and place clips on the shaved skin area of the animal being tested. Ensure that the metal toothed side of the alligator clip is in contact with the skin of the animal. The Macquarie CT200 VET ECG takes a resting heart rate reading of the animal. To achieve this, the animal must be kept still at all times. Check the LCD display for a constant heart reading. If there is no heart reading you have a contact problem with one or more of the leads. Recheck the leads on the ECG machine and reapply the clips to the shaven skin of the animal. Lead Connections The following lead name abbreviations and colours are used for the electrode leads: Lead Name Right Front Left Front Left Hind Leg Right Hind Leg Code RF LF LB RB Colour White Black Red Green 7 Installing the USB Driver & Real Time Software System Requirements The following table shows the minimum software and hardware requirements needed to install and run CT200CV Real Time Software Operating System Microprocessor Memory Hard Disk space Disk Drive Video Adapter 1 free USB Port Microsoft Windows 98, Windows 2000 and XP Celeron 800Mhz 128 MB 4 MB + 48K for each ECG file. CD-ROM drive (for the installation disc). SVGA monitor (used for recording from the CT200CV, and powering the CT200CV). Installing the USB Driver As soon as you plug in the CT200CV to the USB port, your computer will prompt a message as shown below: Please ensure the CT200CV Installation Disk is inserted into your CD-ROM drive. The following screen will pop up. Please select “Install the software automatically” then click next. 8 The following screen will then pop up. It is safe to click the “continue anyway” button. Your PC will then install the necessary USB Files. Click finish when complete. When the following message pops up, your hardware has been successfully installed and the CT200CV driver is functional. Installing CT200CV Real Time Software on Your Computer 9 1. Please ensure the CT200CV CD-ROM Disk is inserted into your CD-ROM Drive. 2. Click the Start button, then “Run…” 3. Enter in the “Open” Dialogue box as follows, then click ok. Please note that the drive letter should be your CD ROM Drive where the CT200CV installation disk is inserted: 4. The installation screen will come up on your PC Screen. Click Next. 10 5. Choose a destination folder to install the Software, then click “next”: 6. Click “Next” to start the installation process: 11 7. Once all the files have been installed, click finish to close the installation program: 8. Your computer will need to be re-started before you can use the Real Time CT200CV software. You may click “cancel” if you are not ready to re-boot your computer yet: 12 Running the CT200CV Real Time Software for the First Time Before you can record any ECG, you need to select and verify the communications. Click on the “Set up button” located on the toolbar, as shown below: On the “General” tab, select communication device “CP2101 USB to UART Bridge Controller” 13 Then click the “Link Check” button: If the link check is successful, the following dialog will be shown. At this point your CT200CV is fully operational. 14 Digital Real Time Filtering On a very noisy recording environment, it is possible to enable the real time digital filtering option to remove high frequency interferences: The above RT200 Setup box is found in the EDIT menu (Click EDIT then OPTIONS, then click on the ADVANCE tab when the box comes up). By setting the filter to 40Hz, most high frequencies above 40Hz including power line and muscle artefacts will be removed. Note that this setting is actually the "Exercise ECG" bandwidth and is normally not used in clinical diagnostics. Rather than using the lower filter setting, improving the recording environment is recommended. NOTE: The real time filtering requires a fast computer to perform the calculations. Only enable this option if you have a PC with Pentium Celeron 800 MHz or better. NOTE: If you do not check the “PERFORM REAL TIME FILERING DURING RECORDING/MONITORING” box in the options menu, filtering can only be done after you have stopped recording. 15 Recording an ECG Reading The Real Time Screen will look similar to the one as shown below: The CT200CV Real Time Monitoring Software allows you to view all 6 leads simultaneously (as shown above) or a single lead at a time on your PC Screen. To toggle between the two selections, select the format icon on the tool bar, as shown below: 6 Toggle button between 6 lead viewing and single lead monitoring Once the animal is connected to the unit and they are lying still, press the “RECORD” Button on the tool bar to bring up the continuous stream on the PC screen. 16 Trouble Shooting Guide PROBLEM The quality of the recorded ECG is poor CAUSE The animal's skin is not clean SOLUTION Wash with alcohol or soap and reapply ECG Electrode Gel The suction bulbs or Wash with alcohol or soap after each use. limb straps have built Very dirty electrodes may need to be cleaned with a metal polish or replaced. up a residue of gel. Electrode terminals are loose or in poor contact with the animal leads Tighten the terminals and make sure that the electrical connections are clean Limb straps are loose Tighten the straps so that the electrodes are held firmly against the animal The animal moved during the recording or the animal is tense (not relaxed) Make sure that the animal is warm and comfortable, and ask them to relax during the recording Not enough ECG electrode gel has been applied Apply more gel to the electrodes. Use extra gel if there is hair at the electrode sites. Switch off the interfering equipment or use X-Ray, mobile phones, diathermy or the CT200CV in another room. Also, try other equipment are recording with the plug-pack disconnected causing interference A metal bed is causing interference Make sure that the bed is grounded. If not, ask a biomedical technician to ground it The animal patient cable is faulty Replace the cable (see How to Order Accessories) The CT200CV is faulty Call service Service and Maintenance 17 Maintaining the CT200CV The CT200CV needs no special maintenance for reliable operation. Suction bulbs and limb straps should be cleaned after each use with warm soapy water. Electrodes with a build up of gel or corrosion can be cleaned with a metal polish, but may need to be replaced for best results. Animal cable connectors should be cleaned with alcohol after each use. The USB cable is a standard off-the-shelf USB cable. Cleaning should be as per the manufacturer’s advice. Clean the CT200CV with warm soapy water, taking care to avoid water ingress. Do not use acetone, alcohol or other solvents to clean the CT200CV as they may damage surfaces. Service If problems do occur with the CT200CV first check the Problems and Solutions section of the manual. If the problem persists, contact your supplier, an authorised service centre, or Macquarie Medical Systems at the address below: Service Department Dock 2, 35 Moore Lane (Off White Street) Leichhardt NSW 2040 Australia Phone: +612 9692 7911 Fax: +612 9692 7965 18 Ordering Accessories Medical accessories, supplies, and replacement parts can be ordered from your supplier. Use only medical accessories provided by Macquarie Medical Systems or authorised suppliers of their products in your local area. For current prices and part numbers please contact your supplier, or Macquarie Medical Systems: ORDER CODE MANUALS CT200CV user manual COMPUTER ACCESSORIES CT200CV Software/Installation CD CT200CV USB cable VET PATIENT CABLES 6 lead ECG cable ELECTRODES Alligator clips (Vet) – 4 pack Small Limb Plates – 4 pack Small Limb Straps – 4 pack Large Limb Plates – 4 pack Large Limb Straps – 4 pack MANUAL-05 PCLINK-08 PCLINK-09 PATCAB-19 ELECTR-04 ELECTR-11 ELECTR-12 ELECTR-08 ELECTR-09 Macquarie Medical Systems Product Range PORTABLE ELECTROCARDIOGRAPH EQUIPMENT: CT100 Portable single channel electrocardiograph CT200 Portable, programmable electrocardiograph with PC Link, 1/3/6 & 12 channel. CT200CV Portable electrocardiograph with USB Link PORTABLE VETERINARY ELECTROCARDIOGRAPH EQUIPMENT: CT200 VET Portable, programmable veterinary electrocardiograph with PC Link, 1/3 and 6 channel. CT200CV Portable electrocardiograph with USB Link Contact your supplier for more details on these products. 19 Technical Information Classification Class IIa, Type CF Defibrillator Proof, non-sterile, intermittent operation, enclosed equipment without protection against ingress of water. Not suitable for use in the presence of a flammable anaesthetic mixture with air or with oxygen or with nitrous oxide. Input Standard 6 lead as per IEC 62D Power Supply USB Bus Powered internally isolated from PC Weight 220gm (unit only) Dimensions 157mm Length x 84mm Wide x 38mm Height Environmental Conditions The CT200CV should be stored and transported at a temperature between 0°C and 35°C. Performance Characteristics AAMI EC11 IEC 60601-2-51 Safety Standards IEC601-1 IEC601-1-1 IEC601-2-25 AS3200.1.0 AS3200.1.2 AS3200.2.25 20 Warranty MMS warrants that if defects appear in products, under proper and normal use, it will, at its option, replace or repair the product or refund the purchase price. This warranty is subject to the customer making a claim in writing to MMS within the given warranty period which starts on the date of the dispatch of the order. The standard warranty period of all MMS produced goods shall be 12 months from the invoice/dispatch date from MMS. Returned products or the returned parts of any product must be accompanied by an advice note stating the original invoice number(s) relating to the products and the nature of any claimed defect, together with such further information as MMS may require. The warranty does not apply in circumstances where: 1. The goods are not defective; 2. The goods were used for a purpose other than for which they were intended; 3. The goods were repaired, modified or altered by any person other than MMS; 4. The defect has arisen due to misuse, neglect or accident; 5. The defect has arisen due to the incorrect installation of the goods; 6. The warranty seal on the back of the unit has been broken and/or removed; 7. The goods have not been stored or maintained as recommended by MMS; or 8. The customer is in breach of any of these Conditions of Sale. Due to their nature, cables, connectors and batteries cannot be covered by this warranty. Where the customer returns products otherwise in accordance with this condition, MMS may refuse to repair, replace or refund the purchase price of the products and return them to the customer at the customer’s cost. No agent or representative of MMS is authorised to make any representations, warranties, conditions or agreements not expressly confirmed by MMS in writing and MMS is not bound in any way by such unauthorised statements nor can such statements be taken to form part of these terms and conditions. 21 Appendix A – Explanation of Symbols Below is an explanation of the symbols displayed on the packaging, product and accessories. Please see the “Lead Connections” section of this manual for an explanation of the lead name abbreviations. Authorised Representative in the European Community. Manufacturer. Temperature Limitation. Caution, consult accompanying documents. Type CF Defibrillator Proof Equipment. Type CF Equipment. PC Connected. Animal Patient Data. 22