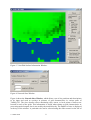
1
TAPM V4. User Manual.
Peter Hurley
CSIRO Marine and Atmospheric Research Internal Report No. 5
October 2008
ISBN: 978-1-921424-73-1
TABLE OF CONTENTS
1
INTRODUCTION..........................................................................................................2
2
GETTING STARTED....................................................................................................2
2.1
Configuring and Running the Software............................................................................................... 2
2.2
The Databases...................................................................................................................................... 3
2.3
Some Limitations of the Modelling Approach .................................................................................... 4
3
TAPM_GUI....................................................................................................................4
3.1
Selecting Inputs, Accessing Databases, and Running the Model ........................................................ 4
3.1.1
Optional Inputs – Meteorology ................................................................................................... 9
3.1.2
Optional Inputs – Pollution ....................................................................................................... 12
3.1.3
File – User-Defined Databases.................................................................................................. 17
3.2
Analysing Outputs ............................................................................................................................. 18
3.2.1
GIS Visualisation ...................................................................................................................... 19
3.2.2
Meteorology .............................................................................................................................. 21
3.2.3
Pollution .................................................................................................................................... 24
3.3
4
Utilities .............................................................................................................................................. 26
TAPM FILES ...............................................................................................................28
4.1
Meteorological Data Assimilation File (*.obs).................................................................................. 29
4.2
Emission Files (*.pse, *.lse, *.ase, *.gse, *.bse, *.whe, *.vpx, *.vdx, *.vlx, and *.vpv) .................. 30
4.3
Building File (*.bld) .......................................................................................................................... 32
4.4
Background Concentration File (*.cbg) ............................................................................................ 33
5
ACKNOWLEDGEMENTS .........................................................................................34
6
REFERENCES.............................................................................................................34
© CSIRO 2008
1
1
INTRODUCTION
The Air Pollution Model (TAPM) predicts three-dimensional meteorology and air pollution
concentrations. Technical details of the model equations, parameterisations, and numerical
methods are described in the Technical Paper by Hurley (2008). A summary of some verification
studies using TAPM is also given in Hurley et al. (2008). This User Manual describes how to
run TAPM from the Graphical User Interface (GUI) provided with the model.
TAPM_GUI is a PC-based interface that allows the user to set up and run TAPM under the
Windows operating systems. It is connected to databases of terrain, vegetation and soil type, leaf
area index, sea-surface temperature, and synoptic-scale meteorological analyses for various
regions around the world. Model inputs can be selected and saved, the model can be run and
model outputs can be analysed through the interface.
Section 2 of this Manual describes how to configure and run the software, lists the databases of
input information available to the software, and discusses some limitations of the modelling
approach. Section 3 gives details on the use of TAPM_GUI and Section 4 describes the input
and output files used by TAPM.
2
2.1
GETTING STARTED
Configuring and Running the Software
To install/uninstall TAPM V4 software, the user needs to be logged-on as a user with
Administrative privileges in some versions of the Windows operating system.
Uninstalling previous versions
Before installing a new version of TAPM_GUI or the GIS Visualisation Software, the user must
first uninstall previous versions of the software using the Start-Settings-Control PanelAdd/Remove Programs utility in Windows.
Installing TAPM V4
The TAPM software is in a directory called TAPM_V4.0_setup that contains a setup.exe
installation program. TAPM_GUI can be installed by running setup.exe either manually or by
using the Start-Settings-Control Panel-Add/Remove Programs utility in Windows. It is
recommended that the directory name should be something like C:\TAPM. Note that the
directory name must not contain spaces (e.g., ‘Program Files’), as spaces in directory or file
names can cause problems in some of the command-line batch files used by TAPM_GUI, and
the name is restricted to be less than or equal to fifteen characters. After installing the software,
the GUI can be started by running the TAPM_GUI.EXE program from the installed directory.
Installing the GIS V1.5
The GIS visualisation software is in a directory called GIS_V1.5_setup that contains a setup.exe
installation program. The GIS can be installed by running setup.exe either manually or by using
the Start-Settings-Control Panel-Add/Remove Programs utility in Windows. It is recommended
that the directory name should be something like C:\GIS. Note that the directory name must not
contain spaces (e.g., ‘Program Files’), as spaces in directory or file names can cause problems in
some of the command-line batch files used by TAPM_GUI. After installing the software, the
GIS can be started by running the GIS_PC1.EXE program from the installed directory, or
through the TAPM_GUI interface using the Utilities menu or Analyse Output – GIS
Visualisation Window.
© CSIRO 2008
2
TAPM V4 Free Updates
TAPM V4.0.x updates (if available) that fix known bugs, can be downloaded from the CSIRO
ftp server (ftp.dar.csiro.au) using the following commands at the Windows Command Prompt:
ftp ftp.dar.csiro.au
tapm00
TAPM_USER
binary
mget tapm*
(note that the userid is case sensitive)
(note that the password is case sensitive)
bye
The update to tapm.exe (and possibly other files) is contained in the tapm_v4.0.x.zip file (e.g.
tapm_v4.0.1.zip), and needs to be extracted using Windows or winzip software, and then copied
over the existing installed tapm.exe file on your PC. The TAPM V4.0.x version number will be
shown when the model (tapm.exe) is run – note that the GUI will still show V4.0 in the ‘Help –
About TAPM’ Window, unless an update to tapm_gui.exe is also available.
2.2
The Databases
Some databases are provided with the software free of charge to TAPM users, and include
gridded global terrain height, vegetation and soil type, Leaf Area Index (LAI), sea-surface
temperature, and synoptic-scale meteorology. A condition of the use of these datasets with
TAPM is that the data sources must be acknowledged in any publications, and that the data
cannot be passed on to or used by unlicensed TAPM users.
The surface information datasets provided with the software are
• Global terrain height data on a longitude/latitude grid at 30-second grid spacing
(approximately 1 km) based on public domain data available from the US Geological Survey,
Earth Resources Observation Systems (EROS) Data Center Distributed Active Archive
Center (EDC DAAC).
• Australian terrain height data on a longitude/latitude grid at 9-second grid spacing
(approximately 0.3 km) based on data from Geoscience Australia.
• Global land cover characterisation data on a longitude/latitude grid at 30-second grid spacing
(approximately 1 km) based on public domain data available from the US Geological Survey,
Earth Resources Observation Systems (EROS) Data Center Distributed Active Archive
Center (EDC DAAC).
• Global soil texture types on a longitude/latitude grid at 2-degree grid spacing (approximately
4 km) based on FAO/UNESCO soil classes dataset.
• Global 5-year monthly mean LAI on a longitude/latitude grid at 2-degree grid spacing
(approximately 4 km) based on Boston University LAI datasets (derived from MODIS
products).
• Rand’s global 10-year monthly mean sea surface temperatures on a longitude/latitude grid at
1-degree grid spacing (approximately 100 km). They are based on public domain information
available from the US National Center for Atmospheric Research (NCAR).
The synoptic scale meteorology datasets currently available are
• Six-hourly synoptic scale analyses on a longitude/latitude grid at 0.75- or 1.0-degree grid
spacing (approximately 75 km or 100 km). The database is derived from LAPS or GASP
analysis data from the Australian Bureau of Meteorology, who have kindly allowed us to
provide the data used by TAPM. The regions available are shown on the TAPM web site.
Note that user-defined databases of terrain, vegetation, soil, LAI and synoptic analyses can be
used by the model, as described in Section 3.1.3.
© CSIRO 2008
3
2.3
Some Limitations of the Modelling Approach
•
TAPM is suitable for horizontal domain sizes below approximately 1500 km by 1500 km. It
should not generally be used for larger domains because of the neglect in the model of the
curvature of the earth.
•
TAPM cannot be used to accurately represent deep atmospheric circulations or extreme
weather events, due to the above reasons, the assumption of incompressibility in the model,
and the fact that non-hydrostatic effects are not represented above 5000 m. The winds,
temperature and humidity are increasingly smoothed from this level up to the model top at
8000 m, in order to minimise reflections of waves from the model top back into the lower
part of the model.
•
TAPM cannot be used for very steep terrain because of the use of a terrain following
coordinate system in the model. This approach cannot represent discontinuities in terrain
height (for example, cliffs or bluff bodies).
•
TAPM assumes that cloud processes are resolved by the typical inner grid spacings used in
the model (i.e. 3 km or less). Therefore no large-scale cloud convection parameterisation is
included.
•
The GRS photochemistry option in the model may not be suitable for examining small
perturbations in emissions inventories, particularly in VOC emissions, due to the highly
lumped approach taken for VOCs in this mechanism. VOC reactivities should also be chosen
carefully for each region of application (see the Technical Paper by Hurley, 2008).
3
TAPM_GUI
TAPM_GUI is a graphical user interface that allows TAPM to be configured for a particular
application (see Section 2.1 for installation information). The main window of the interface
shown in Figure 1, and the pull-down menus shown in Figure 2, allow the user to select model
inputs, including those from various databases (see Section 2.2), and then run the model. After
the model has run, the user can process the data in various ways through the interface and
analyse the results. The selections made in TAPM_GUI can be saved in a default file (*.def) to
allow the same settings for a particular model run to be re-loaded at some later time. The File –
Open/Save GUI Default File menu items are available on the main window menu selection bar.
The File – User-Defined Databases menu item allows user-defined databases to be accessed, as
described in Section 3.1.3. The File – Exit menu item allows the user to exit the GUI.
3.1
Selecting Inputs, Accessing Databases, and Running the Model
The main inputs can be selected through the controls on the Main Window shown in Figure 1.
Below we describe the various sections of this Window.
The DataBase Directory section specifies where the database input files (terrain, meteorology,
etc) are stored. The appropriate directory needs to be selected before extracting database
information.
The Run File Name Prefix section specifies the file name prefix used for the outer grid that is
used for various input and output files. For example, if the run file name prefix is set to t300a,
then the model run files will be named t300a.bat, t300a.inp, t300a.lis, t300a.top, t300a.syn,
t300a.syg, t300a.pse, etc. See Section 4 for a description of file name types used by the model.
The Grid Centre Coordinates section requires selection of a latitude and longitude coordinate
corresponding to the centre of the grids that are set up in the Grid Parameters section. This
position is used in the database retrieval process to locate the correct position for extraction of
© CSIRO 2008
4
input information. A local coordinate system can also be set up; the default system has the origin
at the centre latitude and longitude. The local system uses units of metres in the usual (x, y)
Cartesian system where the x is positive from west to east and y is positive from south to north,
and specifies the centre of the local system with respect to the latitude/longitude grid centre. This
local coordinate system is used both in locating pollution sources (see Section 3.1.2), and in the
Analyse Output option (Section 3.2) to map selected grid points for output to the local coordinate
system.
The Date Parameters section sets the start and end dates for the simulation in the form
yyyymmdd (e.g. 19970608 corresponds to the 8 June 1997). The value of the Local Solar Time
(LST) relative to Greenwich Mean Time (GMT) is also displayed for information (calculated
from the selected grid centre longitude). LST is not affected by daylight saving and
approximately corresponds to the regional standard time. For example, Eastern Standard Time
on the east coast of Australia is EST = GMT + 10 and Western Standard Time in Western
Australia is WST = GMT + 8.
Figure 1. Main Window.
© CSIRO 2008
5
Figure 2. Top-sections of the Main Window showing the pull-down menus.
The Run Directory section specifies where to store the input files set up by TAPM_GUI
operations and the output files from the TAPM run. A new run directory may be created using
the text-box and button provided.
The Grid Parameters section specifies the number of west-east (x) and south-north (y) grid
points, the outer grid spacing (m) in these directions, and the number of pre-set staggered
vertical grid points. The same number of grid points and the same vertical model levels are used
for each grid nest. Generally, any outer grid spacing or number of points can be chosen, as long
as the outer grid domain is typically somewhere between 400 km by 400 km and 1000 km by
© CSIRO 2008
6
1000 km, in order to remove the boundary regions as far away as possible from the central
region of interest. It is also recommended that a minimum number of grid points for a realistic
simulation should be 20 × 20 × 20 points in the x, y, z directions respectively, although a grid of
25 × 25 × 25 points or more is preferred. Note that the disk storage needed for the output files
can be large, depending on the number of grid points and the start and end dates selected. Under
some versions of the Windows operating system, these parameters need to be selected so that file
sizes do not exceed the system limit of 2GB per file – this can be estimated by doing a 1-day test
simulation for the preferred grid configuration to obtain an idea of the file storage needed per
simulation day, and if the projected sizes are too large, then either decreasing the number of grid
points or splitting the run into several runs for different date configurations.
The buttons on the right of the main window shown in Figure 1 are used once the model
simulation has been configured. They extract surface information and synoptic analyses from the
databases, save model input files and allow the model to be run. The Get Surface Information
from Database button extracts terrain height, vegetation type and soil type from files contained
in the currently selected database directory. Alternatively, this information may be recalled using
the Get Surface Information from Previously Saved Files (*.top) button if files (*.top and
*.inp) exist in the current Run Directory with the Run File Name Prefix that matches the current
GUI selections. Once this information has been obtained, it can be viewed and edited in the
Surface Window (see below) by pressing the View/Edit Surface Information button. The Save
Run Files (*.bat, *.inp) and Surface Files (*.top) button saves these files in the Run File
Directory using the Run File Name Prefixes for each grid. For example, if there are three grids
selected (see Section 3.1.1) with file name prefixes for the outer to inner grids of t300a, t100a
and t30a respectively, then the files t300a.bat, t300a.inp, t300a.top, t100a.top and t30a.top will
be saved. The Get Synoptic Analyses from Database and Save to Files (*.syn, *.syg) button
accesses synoptic meteorological and sea-surface temperature analyses from the currently
selected Database Directory and outputs this information to files using the Run File Name Prefix
(e.g. t300a.syn and t300a.syg). Once the Save Run Files (*.bat, *.inp) and Surface Files
(*.top) button and the Get Synoptic Analyses from Database and Save to Files (*.syn, *.syg)
button have been pressed, then the model can be run using the saved files by pressing the Run
TAPM from Information in Saved Files button, or by running the batch file from outside of
the GUI and saving the default file from within the GUI. When the Run TAPM from
Information in Saved Files button is pressed, the user is also prompted to save the GUI Default
File (*.def). Note that optional input, which includes nested domains and pollution calculations,
should be set up before saving files and running the model (see Sections 3.1.1 and 3.1.2).
The Surface Window shown in Figure 3 (viewed by pressing the View/Edit Surface
Information button), allows the user to view and optionally edit the terrain height, vegetation
type, soil type and monthly Leaf Area Index (LAI). This information is stored in the (*.top) files
for each grid when the Save Run Files (*.bat, *.inp) and Surface Files (*.top) button is
pressed. The grid domain (e.g. t300a, t100a, t30a) and surface type can be selected and viewed,
and the information at any grid point in the domain can be selected by using the left mouse
button in the picture region. If edit mode is turned on, then the Grid Value can be modified using
the slider control. A range of grid points can be selected and changed by holding down the left
mouse button, dragging out a rectangular region, and then changing the slider control. Any
changes to the gridded information will be saved in the *.top files when the Save Run Files
(*.bat, *.inp) and Surface Files (*.top) button on the Main Window is pressed, but changes
made on one grid nest will not affect the other grid nests. The Show Grid Lines check box
controls whether grid lines are overlayed on the picture. The Show Network Sites and Show Site
Names check boxes control whether site positions and labels are shown in the picture
respectively, while the Edit Network Sites button allows the user to update the network.
© CSIRO 2008
7
Figure 3. View/Edit Surface Information Window.
Figure 4. Network Sites Window.
Figure 4 shows the Network Sites Window, which allows a set of site positions and descriptions
to be input and used as overlays in pictures of grid characteristics in various parts of
TAPM_GUI. The sites describe where monitoring sites, towns, or local points of interest are
located on each of the grids. This information is useful when setting up grid characteristics or
processing model outputs, but is not used by the model directly. The number of sites is displayed
at the top of the window. A particular site can be selected using the slider control on the left of
© CSIRO 2008
8
the window, and a text description can be entered in the text box next to the slider. Sites can be
added or deleted using the Add Site and Delete Sites buttons respectively. The horizontal site
(x,y) coordinates in local units (m) can be selected using the slider controls provided, using the
same coordinate system as for the Grid Centre Coordinates (local values) on the Main
Window shown in Figure 1. The network site information is stored in the GUI Default File.
3.1.1
Optional Inputs – Meteorology
Figure 5 shows the Optional Inputs – Meteorology Window, which can be selected from the
main window menu bar at the top of Figure 1. This window consists of two sections.
The Grid Options section controls the grid nesting options for a nested simulation and specifies
the number of model levels to be stored in the output file. The number of nested grid domains
can be selected, and for each nest, the file name prefix and x, y grid spacings (m) should be
chosen. It is recommended that the ratio of grid spacings from one nest to another be in the range
2 to 4, as this has been found to optimise both model run time and numerical noise generated in
the nesting regions. For example, the default grid spacings of 30000, 10000, 3000, 1000 m have
nesting ratios of 3.0, 3.33 and 3.0. The maximum number of grid domains is five. If a smaller
number is selected, the grid spacings set for the unused grids are ignored by the model. An
option is available to not prefix the Run File Directory to the Run File Names when they are
stored in the input file (*.inp). The number of model levels to be stored in the meteorological
output file (*.out) is specified with reference to nz, the number of vertical grid levels in the
model. If predictions from only the first few model levels will be analysed, the size of the output
file can be decreased by reducing the number of levels stored. The meteorological (and
pollution) output can also skip up to the first 10 days of the simulation, which, for example, is
useful if one or more model spin-up days are used (this is strongly recommended for case studies
of only a few days, but not necessary for annual runs) and the output is not needed/desired. An
option to output meteorological fields into *.m3d files is available, and once saved, these files
can be used in new runs (with the same meteorological grid characteristics) to do pollution runs
without re-running the meteorology. File name prefixes for the *.m3d files can be selected in the
Options to Bypass Meteorology Calculations Section of the Window. Meteorology in the
*.m3d files at each hour (not hourly-averaged) are interpolated linearly in time for use in
pollution calculations at each model time step. When running with *.m3d files, a pollution run
can be nested, non-nested (i.e. using only the inner-most grid), non-nested with a non-centred
pollution grid, or non-nested and using only those sources specified to use LPM mode (no EGM
mode, and so only LPM point sources, without chemistry or deposition). This set of options can
be considered for use when a large number of pollution runs are needed for the same
meteorology.
The Advanced/Experimental Options section controls some extra model features, and should
generally not be changed. The first one is the model advection and gravity wave timestep scaling
factor, which is set by default to 1, and which should only be changed (decreased) if numerical
instability occurs for a particular simulation. Increasing this value will slow the model down, and
so other changes to the model configuration should be tried first in the case of numerical
instability (such as shifting grid centre or boundaries). The next option controls the way synoptic
analyses are used by the model (through *.syn and *.syg files), with the recommended option to
vary synoptic conditions in three-dimensional space and time, and to feed the synoptic fields into
the model at the boundaries of the outer-most grid. Three other simpler options are available
© CSIRO 2008
9
•
•
•
synoptic winds, temperature and humidity vary with height,
synoptic winds, temperature and humidity vary with height and time,
synoptic winds, temperature and humidity vary with height and time, and synoptic winds also
vary with horizontal position,
all of which use zero gradient boundary conditions on the outer-most grid. Note that when
horizontal variations of synoptic meteorology for some variables are not used in the simpler
options, then values of these variables are taken at the central point of the model grid. Note also
that the scaled pressure gradient option will only have an effect when the simpler synoptic
options are used.
Figure 5. Optional Inputs – Meteorology Window.
The next option controls the choice of land surface scheme with the default being to use the V4
land surface scheme. The next option controls the choice of turbulence scheme with the default
being the TKE-EPS-EDMF scheme introduced in V4. The rain and snow options can be used
when these processes are important. The default is to have rain switched on and snow switched
off, as rain affects the soil moisture content and evaporative fluxes, while snow is only important
in a very limited number of situations/locations. Currently snow cover is unaccounted for in the
land surface scheme. Theoretically, the non-hydrostatic option potentially only needs to be
turned on when the grid spacing is less than about 1000 m and then only if the terrain is steep
and the winds are strong, otherwise this option will have little effect other than to increase the
run time. However, in practice for local scale environmental meteorology and air pollution work,
the hydrostatic option gives good results, and so is the default. Note that the non-hydrostatic
option is currently not as robust as the hydrostatic default, and can cause numerical instability in
some cases.
© CSIRO 2008
10
The next control is a command button that gets sea surface temperature (SST) from the database
and allows it and deep soil parameters to be changed in the Extra Surface Parameters
Window.
The Extra Surface Parameters Window shown in Figure 6, allows the user to view and
optionally modify sea-surface temperature and deep soil parameters. By default, the monthly
varying deep soil volumetric moisture content in units of m3 m-3 (i.e. volume of water per
volume of soil) is set to a value of 0.15. When using the default V4 land surface scheme, this
value will only be used to initialise the soil moisture content, and so only potentially needs to be
changed when modelling case studies of a few days duration, as the dynamic model solution for
all soil levels will then adjust the values as the model runs.
When using the old land surface scheme, the default value of 0.15 is a reasonable value to use
for most times of the year in regions dominated by sandy clay loam soil (wilting value of 0.175
and saturation value of 0.420). Generally, for sandy soils and dry months a lower value should be
used (e.g. 0.05–0.10), while for clay soils and wet months a higher value is appropriate (e.g.
0.20–0.35). The monthly variations in this parameter should usually be chosen to reflect the
monthly variations in evaporation and rainfall in a particular location, if this data is available.
The deep soil temperature and sea-surface temperature can also be offset from the values derived
from the SST database, although generally this is not necessary.
Figure 6. Extra Surface Parameters Window.
© CSIRO 2008
11
3.1.2
Optional Inputs – Pollution
Figure 7 shows the Optional Inputs – Pollution Window, which can be selected from the Main
Window menu bar at the top of Figure 1.
The top control on the left of the window controls which (if any) pollutants will be simulated by
the model. The options are no pollution calculations (None), one tracer mode (TR1), two tracer
mode (TR1, TR2), four tracer mode (TR1, TR2, TR3, TR4), a chemistry mode without sulfur
and fine particle chemistry (APM, NOX, NO2, O3), a chemistry mode with sulfur and fine
particle chemistry (APM, NOX, NO2, O3, SO2, FPM), and a dust mode with four particle sizes for
PM2.5, PM10, PM20 and PM30 (denoted as TR1, TR2, TR3 and TR4 respectively in the model)
with aerodynamic diameter less than 2.5, 10, 20 and 30 microns respectively. APM and FPM
usually represent particles with aerodynamic diameter less than 10 microns (PM10) and 2.5
microns (PM2.5) respectively. Emission characteristics for each pollutant are set up though the
Emission Files. The tracer modes do not include chemistry or deposition processes and predicted
pollutant concentrations are output in units of µg m-3. Each tracer can represent either specific
groups of sources or emissions for the same pollutant, different pollutants, or a combination of
both of these. In the chemistry and deposition modes specific pollutants and their interaction
with each other are represented. In chemistry and dust mode, PM processes include particle
gravitational settling and deposition, but dust mode doesn’t include chemistry, although firstorder decay can be used.
Figure 7. Optional Inputs – Pollution Window.
The next set of controls allows the selection of the pollution grid. The grid may be the same as
the meteorology grid – same grid dimensions and grid spacing (the default), or it may be a subset
of the meteorology grid with different grid dimensions and/or grid spacing. There is a set of
© CSIRO 2008
12
controls for the x and the y directions, and these allow the user to decrease the pollution grid
width (width isx–iex and depth isy–iey in meteorological grid units, centred on the meteorology
grid) and the grid spacing (by pre-set factors facx and facy). These changes will be reflected in
the picture of the region in the right of the window by changes in the white grid lines that
represent the pollution grid. Underneath these grid controls, the number of grid points in the
pollution grid is displayed for information. If a large number of grid points is used, this can
become the dominant factor controlling the run time. An extra set of sliders is also available to
allow non-centred pollution grids when running from *.m3d saved meteorology for the innermost grid, and a check-box has been added to allow use of LPM mode sources only (no EGM
mode) for this option.
The next options control:
• whether an equation for concentration variance is used for each pollutant. This option
must be selected if outputs of maximum (annual) concentration statistics are needed for
averaging periods less than one hour. This option will approximately double the
computational time for pollution calculations in tracer mode.
• whether to output three-dimensional concentration into *.c3d files that will automatically
be processed (if they exist) when the *.glcr files are processed.
• whether to output final plume rise heights into a *.plr file for those point sources with
non-zero plume rise.
• the number of model levels over which gridded surface emissions are mixed (1 or 2
levels for *.gse, *.bse, *.whe, *.vpx, *.vdx, *.vlx and *.vpv files).
• the pH value used in the aqueous chemistry and wet deposition calculations.
The Set Extra Pollutant Inputs command button pops-up a Window (Figure 8) that allows the
selection of the pollutant species (SO2, HF, VOC, NOX, CO or CO2) to be assigned to Tracers
TR1-TR4, and/or a first-order decay rate, in tracer mode. This option allows a species selection
that has associated with it various characteristics (currently deposition or variation with
temperature for vehicle emission files). In chemistry mode, temperature correction for particular
emission types and species is automatically determined.
The top-right of the Window has a group of sliders that control background pollution
concentrations. The background concentrations are used to initialise pollutant concentrations and
are also used as inflow boundary conditions on the outer grid. The slider labels for the first four
background concentrations change depending on the selected pollutant mode (tracer or
chemistry), as do the concentration units (µg m-3 or ppb).
Underneath the background concentration controls, the next group of four controls is only
relevant if one or more point sources is selected to be represented by a near-source Lagrangian
approach (LPM mode). This mode for individual sources can be selected in the point source
emission file described later, and is only used on the inner-most grid. As this option is
computationally intensive, it should be used selectively. The first control allows selection of the
initial seed for the random number generator. Each different seed will produce a different set of
random numbers that is used by the simulation. The next control allows selection of the travel
time after which Lagrangian particles are converted to grid concentration and from then on
represented by the Eulerian transport equation (EGM mode). The default of 900 seconds is long
enough to allow the maximum ground level concentration from elevated point sources to be
represented by the LPM, while keeping the run time to a minimum. The next control specifies
the number of particles released per second per source for sources in LPM mode. The default of
one is large enough to restrict the statistical sampling error in LPM mode to be about ±10% for
hourly average concentration; larger values will linearly increase the run time, while increasing
the concentration accuracy as the square root of the number of particles. The last control in this
group specifies the maximum number of particles that may be on the grid at any one time. If this
number is exceeded, the simulation will stop and print out (in the *.lis file) that the maximum
© CSIRO 2008
13
number of particles has been exceeded. This number must then be increased and the simulation
repeated.
Figure 8. Extra Pollution Inputs Window.
Beneath the picture shown in Figure 7, are various sliders and check boxes that allow the user to
control aspects of the picture display, including which grid domain is shown, display of grid
lines, display of emission source positions, building positions, emission grids, and display of
network sites. The network site information can also be edited through the Edit Network Sites
command button described previously.
In Figure 7, there are also four command buttons for manipulating point (see Figure 9), line or
area/volume source emission files, and for input of building characteristics (see Figure 10).
The Point Source Emissions Window shown in Figure 9 allows the creation of a point source
emissions inventory. The top left-hand side of the window shows the number of sources. Sources
can be added or deleted from the inventory using the Add Source and Delete Source command
buttons. A particular source can be selected using the source selection control, and a source text
description can be entered. The list of source descriptions is stored in a (*.pst) file that is only
used by the GUI. The user can select whether a particular source in the inventory is turned off, is
represented by the EGM, or is represented by the LPM near to the source and the EGM far from
the source. Note that the LPM option should be used selectively for the most important sources
to be modelled. Although this is theoretically the most accurate approach for predicting nearsource maximum ground level concentrations, it is also the slowest option to use and, unlike the
EGM, the run time increases with each source using this mode. LPM particle positions are
© CSIRO 2008
14
dumped every 15 minutes for all sources. They consist of the horizontal position of the puff
centroid and the vertical position of the particle, and are available only for the lifetime of a
particle (i.e. for particle age less than the maximum travel time). They are used by the GIS
Visualisation software to complement the concentration data. The gradual plume rise file (*.plrg)
includes hourly plume rise information for sources in LPM mode (see also the optional final
plume rise output in the *.plr file described previously).
The local source location should be entered using the same local coordinate system as specified
for the Grid Centre Coordinates on the Main Window. Other non-time varying source
information are the stack height (m), the stack radius (m), the buoyancy enhancement factor
(used when emissions from adjacent stacks influence each other’s plume rise – see Technical
Paper of Hurley, 2008), the fraction of NOX emitted as NO and the fraction of APM emitted as
FPM.
Figure 9. Point Source Emissions Window.
On the right-hand side of the window, time varying emissions can be entered. The top slider
controls the number of hours of emission information. The default is that emissions are constant
in time, but the slider can be moved to allow time varying emissions. For example, if the slider is
set at 24, then emissions vary over a 24-hour period and then the same emissions are used again
by the model for every 24-hour period during the model run (i.e. emissions cycle daily). For each
hour, emission characteristics need to be input using the controls provided. The variables include
stack exit velocity (m s-1), stack exit temperature (K), and up to four stack emission rates (g s-1).
The pollutant emissions needed depend on which pollution mode is being used, as specified in
the Optional Inputs – Pollution Window (Figure 7). If any of the three tracer modes was
selected, the emission rates need to be input for those source or pollutant groups that correspond
to the appropriate variables TR1, TR2, TR3 and TR4 shown in the control labels (i.e. if in
1-tracer mode, then only TR1 needs to be specified, if in 4-tracer mode, then TR1–TR4 need to
© CSIRO 2008
15
be specified). If one of the two chemistry modes was selected, then the corresponding pollutants
to those used in the selected mode need to be specified (i.e. APM, NOX, SO2 and Rsmog), as
indicated in the control labels. If dust mode is used, TR1–4 values need to be specified for the
PM variables.
The Line or Area Source Emissions Window (not shown here, as it is similar to the Point
Source Window) allows the creation of a line or area/volume source emissions inventory. The
top left-hand side of the window shows the number of sources. Sources can be added or deleted
from the inventory using the Add Source and Delete Source command buttons. A particular
source can be selected using the source selection control. The user can select whether a
particular source in the inventory is turned off, or is represented by the EGM mode.
The local source locations and heights should be entered using the same local coordinate system
as specified for the Grid Centre Coordinates on the Main Window. Other non-time varying
source information is the fraction of NOX emitted as NO and the fraction of APM emitted as
FPM.
On the right-hand side of the window, time varying emissions can be entered. The top slider
controls the number of hours of emission information. The default is that emissions are constant
in time, but the slider can be moved to allow time varying emissions. For example, if the slider is
set at 24, then emissions vary over a 24-hour period and then the same emissions are used again
by the model for every 24-hour period during the model run (i.e. emissions cycle daily). For each
hour, emission characteristics need to be input using the controls provided. The variables include
up to four stack emission rates (g s-1). The pollutant emissions needed depend on what pollution
mode is being used. If any of the three tracer modes was selected, the emission rates need to be
input for those source or pollutant groups that correspond to the appropriate variables TR1, TR2,
TR3 and TR4 shown in the slider labels (i.e. if in 1-tracer mode, then only TR1 needs to be
specified, if in 4-tracer mode, then TR1-TR4 need to be specified). If one of the two chemistry
modes was selected, then the corresponding pollutants to those used in the selected mode need to
be specified (i.e. APM, NOX, SO2 and Rsmog), as indicated in the control labels. If dust mode is
used, TR1–4 values need to be specified for the PM variables.
Figure 10. Buildings Window.
© CSIRO 2008
16
3.1.3
File – User-Defined Databases
Figure 11 shows the File – User-Defined Databases Window, which can be selected from the
Main Window menu bar at the top of Figure 1. In this window, user-defined databases of
surface information and synoptic analyses can be specified for use by TAPM_GUI.
User-defined databases of terrain height, vegetation type, soil type and monthly LAI can
optionally be included by specifying up to four extra files for each variable. These files are read
for each variable in the order specified in the Window (top to bottom), and information read
from each file in turn, replaces information already on the model grid. The data must be on a
latitude/longitude grid with constant and equal grid spacing in each direction. Linear
interpolation in space is used for all variables to go from the database grid to the model grids.
The file formats for these files are as follows (free format)
READ: nlon, nlat, blon, blat, dl
READ: ((data(i, j), i=1,nlon), j=1,nlat)
with variables
nlon
number of grid points in the longitudinal direction (west-east),
nlat
number of grid points in the latitudinal direction (south-north),
blon
longitude of the south-west corner of the grid (values within range: –180 to 180 degrees),
blat
latitude of the south-west corner of the grid (values within range: –80 to 80 degrees),
dl
grid spacing (same in both directions) (degrees),
data
data grid - either terrain height above mean sea level (m), vegetation type (–1 to 38), soil
type (0 to 9) or LAI (0-10) (for categories, see Technical Paper by Hurley, 2008),
where
data(1, 1) corresponds to the south-west corner,
data(nlon, 1) corresponds to the south-east corner,
data(nlon, nlat) corresponds to the north-east corner,
data(1, nlat) corresponds to the north-west corner.
Note that for LAI datasets the second READ line above needs to be repeated another 11 times in
order to have a total of 12 months of LAI represented (Jan-Dec).
User-defined databases of synoptic analyses can also be included as an alternative to the default
datasets. The data must be on a latitude/longitude grid with constant and equal grid spacing in
each direction. Linear interpolation in space and time is used for all variables to go from the
database grid to the model grids. This information can be made available to TAPM_GUI by
supplying a grid file (gridN.EXT, with N a single digit integer (2–9), and EXT a three letter code
(e.g. AUS)) with file format as follows (free format)
READ: nlon, nlat, nlev
READ: (lon(i), i=1,nlon)
READ: (lat(j), j=1,nlat)
READ: (p_lev(j), j=1,nlev)
with variables
nlon
number of grid points in the longitudinal direction (west-east),
nlat
number of grid points in the latitudinal direction (south-north),
nlev
number of grid points in the vertical direction,
lon
grid longitudes from west to east (values within range: –180 to 180 degrees),
lat
grid latitude from south to north (values within range: –80 to 80 degrees),
p_lev
pressure level of the synoptic analyses vertical coordinate system (either pressure (Pa)
or scaled pressure (pressure/surface pressure)),
and by supplying associated synoptic analyses files (SYNyyyymmdd.EXT) with file format as
follows (free format)
Repeated for each available time during the day (preferably four times)
READ: Date
© CSIRO 2008
17
READ: Hour
READ: ((Psurf(i, j), i=1,nlon), j=1,nlat)
READ: (((Z(i, j, k), i=1,nlon), j=1,nlat), k=1,nlev)
READ: (((U(i, j, k), i=1,nlon), j=1,nlat), k=1,nlev)
READ: (((V(i, j, k), i=1,nlon), j=1,nlat), k=1,nlev)
READ: (((T(i, j, k), i=1,nlon), j=1,nlat), k=1,nlev)
READ: (((Q(i, j, k), i=1,nlon), j=1,nlat), k=1,nlev)
with variables
Date
GMT date (yyyymmdd) (e.g. 20010831 is 31 August 2001),
Hour
GMT hour (hhhh) (e.g. 2100 is 9 pm),
Psurf
Surface Pressure (Pa),
Z
Height above sea level (m),
U
West-east (x) component of the wind (m s-1),
V
South-north (y) component of the wind (m s-1),
T
Temperature (K),
Q
Specific humidity of water vapour (kg kg-1).
These free format ASCII files of synoptic analyses then need to be processed (using the
command button) into a BINARY format file (yyyymmdd.EXT) that can be read by
TAPM_GUI.
Figure 11. User-Defined Databases Window.
3.2
Analysing Outputs
Three menu options for analysing outputs can be selected from the Main Window menu bar at
the top of Figure 1. Output files that can be processed are described in Section 4. Note that all
© CSIRO 2008
18
model output is hourly averaged and specified at the end hour (i.e. an hourly average at hour 2 is
the average of values between hours 1 and 2).
3.2.1
GIS Visualisation
Figure 12 shows the Analyse Outputs – GIS Visualisation Window, which allows
visualisation of two-dimensional fields of meteorology and pollution using the Graphical
Information System (GIS) provided with the TAPM software. Note that the GIS software needs
to be installed before this option can be used.
At the top of the window there is a slider control that allows a particular grid to be chosen. The
next slider controls how many meteorological levels will be processed for potential viewing by
the GIS. Model levels can then be selected with the series of sliders down the left side of the
window for the number of levels chosen. Each level selected allows extraction of meteorological
information in an x-y plane (plan view) for variables at that model level. For example, if level 1
(klev1 = 1) is chosen, the first model level (approximately 10 m above the ground) will be used.
Optionally associated with each level is an x-z or y-z plane (vertical cross-section), which is
extracted and stored in the file with the model level information. The vertical cross-section
information is along a particular i or j grid line, where i is the grid unit value in the west-east (x)
direction (range 1 to nx), and j is the grid unit value in the south-north (y) direction (range 1 to
ny). For example, if x-z and cross1 = 20 are chosen, then an x-z cross-section is extracted along
the grid line j = 20. If cross1 = 0 is chosen, then no cross-section information is extracted. The
file name used for the meteorological information uses the Run File Name Prefix for the
particular grid chosen, and appends the level number and a file name extension corresponding to
a particular variable. For example, the processed file for the above selections would be
t100a1.wnd for winds (m s-1). Other three-dimensional meteorological variables can be viewed
in the GIS as scalars. For example
• potential temperature (K) t100a1.pt,
• temperature (K) t100a1.tt,
• specific humidity of water vapour (kg kg-1) t100a1.qv,
• specific humidity of cloud water (kg kg-1) t100a1.qc,
• turbulent kinetic energy (m2 s-2) t100a.tke.
If at least one level of information is selected with the slider near the top of the window, then
some two-dimensional variables are also output (with a zero level value in the file name) and can
be loaded into the GIS as scalars. For example:
• surface net radiation (W m-2) t100a0.nfx,
• surface sensible heat flux (W m-2) t100a0.hfx,
• surface evaporative heat flux (W m-2) t100a0.efx,
• surface temperature (K) t100a0.ts,
• mixing height (m) t100a0.zi,
• convective velocity scale (m s-1) t100a0.wst.
All available pollution concentration output files (*.glcr and *.c3d) are processed for use by the
GIS, using the selected averaging period, including optional running averages, with averages
specified at the end hour (i.e. a 4-hour running average for data at hours 1–4 is denoted by a
value at hour 4). If 3-d concentrations are available, then concentrations will be extracted at the
same levels as for extraction of the meteorological data. Optionally, the locations (without
labels) of the network sites previously entered in the Network Sites Window can be output for
use by the GIS when a region is loaded. The name of the directory where the GIS has been
installed can also be entered, if it differs from the default installation directory (C:\GIS). A
scaling factor can also be chosen if concentrations are expected to be outside the short-integer
range (0–32,768) used to store concentrations in the GIS.
© CSIRO 2008
19
Once the desired options for processing TAPM output files for the GIS have been chosen, the
user then presses the button to Process TAPM Output and Run the GIS. The processing is
done through a batch file called tapm2gis.bat with input file tapm2gis.inp. This can take some
time to run, depending on the characteristics of the model run.
After the processing has finished, the GIS software runs automatically, and then the user needs
to load a Region file from the TAPM Run Directory using the File – Region menu item in the
GIS. Other files can then be loaded including winds (File – Winds), meteorological scalars (File
– Scalars) and concentrations/LPM-particles (File – Concentrations). Visualisation over time
can be viewed by pressing the F-key or K-key (forward in time), the B-key or J-key (backward
in time), and paused using the space-bar key. A clock window can be displayed using the View –
Clock menu item. Other menu options can be selected, including View and Options menus, that
allow GIS parameters to be changed or saved/loaded from a parameter options file. See the Help
menu item in the GIS for more detail.
Figure 12. Analyse Output – GIS Visualisation Window.
© CSIRO 2008
20
3.2.2
Meteorology
Figure 13 shows the Analyse Outputs – Meteorology Window, which allows extraction of time
series, profiles and summary statistics of meteorology, independent of the GIS Visualisation
analyses.
At the top of the window is a slider control that allows a particular grid to be chosen.
Information on the particular grid dimensions and grid spacing are also displayed for
information. Below this are three sliders that control an (i, j, k) grid point selection in (x, y, z)
coordinates, which is used for the model output extraction process. The horizontal grid point (i,
j) can also be selected graphically with the left mouse button in the picture at the right of the
window. The local coordinate (m) of the selected horizontal grid point is displayed under these
sliders for information. The Process TAPM Output and View button at the bottom of the
window processes the TAPM meteorological output files and generates various forms of
processed output files as described below. The processing is done through a batch file
tapm2ts.bat.
Time series of meteorological variables are output in various formats including a comma
delimited form (*.csv), which can be viewed with the default text editor, or with Microsoft
Excel, which includes various statistics and plots of the information. The file name uses the Run
File Name Prefix for the grid selected (e.g. t100a), then ‘_m’ for ‘meteorology’, with the (i, j, k)
grid coordinate and the file name extension. For example, if the grid point (3, 2, 1) was chosen
along with the *.csv option, the file name would be t100a_m00300201.csv. The first three
columns of information in the file are the
• date,
• hour of the day (e.g. hour 1 is the hourly average from hours 0–1),
• model run time (elapsed hour from the start of the model run).
The next four columns are the
• vector wind speed WSPD (m s-1),
• vector wind direction WDIR (°),
• temperature TEMP (°C),
• relative humidity RHUM (%),
at the model (i, j, k) grid point selected. The next two columns are
• screen level temperature TEMPSCR (°C),
• relative humidity RHUMSCR (%),
at the horizontal (i, j) grid point. The remaining columns are surface based variables including
the
• total solar radiation TSR (W m-2),
• net radiation NETR (W m-2),
• sensible heat flux SENS (W m-2),
• evaporative heat flux EVAP (W m-2),
• convective velocity scale WSTAR (m s-1),
• mixing height ZMIX (m),
• friction velocity scale USTAR (m s-1),
• Obukhov length scale LSTAR (m),
• rainfall rate RAINR (mm hr-1),
all at the selected horizontal (i, j) grid point. Note that for grid points over water the value of
NETR, SENS and EVAP are not used in the model and so are set to zero.
Other forms of time series information can be output (and viewed with the default text editor) as
basic forms of meteorology input files used by various regulatory air pollution dispersion models
including
© CSIRO 2008
21
•
AUSPLUME (*.apl), containing all of the standard variables needed by the model, as well as
the optional standard deviation of horizontal wind direction,
• DISPMOD (*.dmd), containing all of the standard variables needed by the model,
• ISCST (*.isc), containing all of the standard variables needed by the model, as well as the
optional friction velocity scale and Obukhov length,
• CALMET (*.geo, *.sur and *.up) (the diagnostic wind field component of CALPUFF),
containing all of the standard variables needed by the model,
• AERMOD (*.sur and *.up), containing all of the standard variables needed by the model.
The detailed formats of these files are described in the particular model documentation, and it is
recommended that the files generated be checked before use to ensure that they conform to the
versions of the software being used. Common to several of these files is a variable called the
stability category, which is calculated using TAPM outputs of wind speed, sensible heat flux and
total solar radiation, in equations fitted to curves in Figure 6.13 of Pasquill (1974).
Figure 13. Analyse Output – Meteorology Window.
The next type of file that can optionally be viewed with the default text editor or by Profile
Plotting/Animation (see Section 3.3 and Figure 14) are files of meteorological vertical profiles,
either as hourly averaged profiles (*.pr1), or time-averaged profiles for each hour of the day and
for all hours of the day (*.pr2). The file names use the Run File Name Prefix for the grid selected
(e.g. t100a), then ‘_m’ for ‘meteorology’, with the (i, j) grid coordinate and the file name
extension. For example, if the grid point (3, 2) was chosen, the file names would be
© CSIRO 2008
22
t100a_m003002.pr1 and t100a_m003002.pr2. The files contain comma delimited columns of
meteorological variables, including the
• vector wind speed WSPD (m s-1),
• vector wind direction WDIR (°),
• temperature TEMP (°C),
• relative humidity RHUM (%),
• potential temperature POTTEMP (K),
• specific humidity of water vapour QVAP (kg kg-1),
• specific humidity of cloud water QCLD (kg kg-1),
• turbulence kinetic energy TKE (m2 s-2),
• scalar wind speed SWSPD (m s-1),
• potential wind power density WPDEN (W m-2) (equal to half the density of air multiplied by
the cube of the scalar wind speed),
• height above the ground HEIGHT (m).
Figure 14. Profile Plotting/Animation Window.
The last types of file that can optionally be viewed with the default text editor, Excel or
(optionally) Surfer (Golden software), are files of gridded meteorological summary statistics at
the selected model level. These grids are averaged over the length of the model run for all
variables, except for rainfall, which is the total rainfall (mm) for the run. The files are Surfer type
grid files (ASCII format) with information for a particular variable contained in each file. The
variables are the
© CSIRO 2008
23
• vector wind speed WSPD (m s-1),
• vector wind direction WDIR (°),
• temperature TEMP (°C),
• relative humidity RHUM (%),
• scalar wind speed SWSPD (m s-1),
• potential wind power density WPDEN (W m-2),
• rainfall total for the run RAINT (mm).
The file names use the Run File Name Prefix for the grid selected (e.g. t100a), then ‘_’ with the
variable name, then the model level k and the file name extension. For example, if the grid level
k = 1 was chosen, the file name for vector wind speed would be t100a_wspd01.grd. If a Surfer
option (Version 6 or 7/8 Scripts) is chosen for viewing these files, then a batch file (surfer.bat)
and script file (surfer.inp) are used to plot the grids and save them to file (*.srf). The network
positions and labels are also included on the Surfer plots as overlays, obtained from a separately
saved file (e.g. t100a_netw.csv). Note that the x, y coordinates are in meteorological grid units,
not local coordinates (m), but this can be changed by editing the header in the grid files, or
within Surfer.
The controls along the bottom of the window allow selection of the default text editor, the
directory name for Surfer, the display of grid lines in the picture, and the display and editing of
network sites as described in Section 3.1.
3.2.3
Pollution
Figure 15 shows the Analyse Outputs – Pollution Window, which allows extraction of time
series, profiles and summary statistics of pollution, independent of the GIS Visualisation
analyses. Each pollutant needs to be analysed separately.
At the top of the window is a slider control that allows a particular grid to be chosen.
Information on the particular grid dimensions and grid spacing is also displayed for information.
Below this are two sliders that control an (i, j) horizontal grid point selection, which is used for
the model output extraction process. The horizontal grid point (i, j) can also be selected
graphically with the left mouse button in the picture at the right of the window. The local
coordinates (m) of the selected horizontal grid point are displayed under these sliders for
information. Particular pollutants need to be chosen for processing, along with an averaging
period (hour-ending – optionally a running average), and whether it is a concatenated or subset
file (see Utilities in Section 3.3), using the controls provided. A non-standard or externally
generated species can also be processed by entering the species name. The Process TAPM
Output and View button at the bottom of the window processes the TAPM pollution output files
and generates various forms of processed output files as described below. The processing is done
through a batch file glc2ts.bat. Once a pollutant species has been processed, the Load button at
the top right of the window can be selected to display a colour-shaded map of concentration
statistics, with controls for various types of statistics (see below) also displayed underneath the
Load button. The statistics are obtained from a file (*_cstats.csv) that can also be examined
outside of the GUI, and that can be easily input into a spreadsheet package or a Geographical
Information System.
Time series of pollution variables are output in various formats including a comma delimited
form (*.csv), which can be viewed with the default text editor, or with Excel which includes
various statistics and plots of the information. The file name uses the Run File Name Prefix for
the grid and pollutant selected (e.g. t100aso2), then ‘_c’ for ‘concentration’, with the (i, j) grid
coordinate and the .csv extension. For example, if the grid point (3, 2) was chosen, the file name
would be t100aso2_c003002.csv. The first three columns of information in the file are the date,
the hour of the day (e.g. hour 1 is the hourly average from hours 0–1) and the model run time
© CSIRO 2008
24
(elapsed hour from the start of the model run). The next three columns are the concentration at
the selected grid point CONC (µg m-3 or ppb), maximum concentration on the grid CMAX
(µg m-3 or ppb) and the local maximum concentration for a 5 × 5 sub-grid region surrounding the
selected grid point CLOC (µg m-3 or ppb). The concentration units depend on the pollutant mode
being used, and are µg m-3 in tracer mode, or µg m-3 for APM and ppb for the other pollutants in
chemistry mode. If a *.c3d file exists, then a *.pr3 file is also produced that contains
concentration profiles for all model heights output.
Figure 15. Analyse Output – Pollution Window.
Gridded summary statistics can optionally be viewed with the default text editor, Excel or Surfer.
The files are Surfer type grid files with information for a particular variable contained in each
file. The variables are the average concentration AVG (µg m-3 or ppb), the highest or maximum
concentration MAX (µg m-3 or ppb), the 2nd–10th highest concentration (µg m-3 or ppb), the
number of averaging periods when the concentration is greater than some threshold value NPG,
and the number of days that concentration is greater than some threshold value NDG. For an
annual run, the 2nd and 9th highest concentration correspond to the hourly-averaged 99.98 and
99.9 percentiles, while other statistics available are the 88th highest (annual hourly-averaged 99th
percentile), 176th highest (annual hourly-averaged 98th percentile), 440th highest (annual hourlyaveraged 95th percentile), and 880th highest (annual hourly-averaged 90th percentile). If the
optional concentration variance calculation was used for the model run, then other statistics
include the standard deviation of the concentration (square-root of the variance) corresponding to
the maximum mean concentration STDM, and the MAX10min, MAX03min, MAX01min and
MAX01sec statistics (corresponding to the 10, 3 and 1 minute average, and 1 second average
© CSIRO 2008
25
maximum concentration, respectively). These peak concentrations will only be meaningful for
long (e.g. annual) runs. The mean concentration threshold value can be set using the slider
provided at the bottom left of the window. Note that not all grid files are automatically viewed.
The file names use the Run File Name Prefix for the grid selected and the pollutant (e.g.
t100aso2), then ‘_c’ with the variable name and optionally the threshold value and the extension
.grd. For example, for the pollutant SO2 with a threshold value of 1, two sample file names
would be t100aso2_cavg.grd and t100aso2_cnpg001.grd. If the Surfer option is chosen for
viewing these files, then a batch file (surfer.bat) and script file (surfer.inp) are used to plot the
grids and save them to file (*.srf). The network positions and labels are also included on the
plots as overlays, obtained from a separately saved file (e.g. t100a_netw.csv). Similarly, the
gridded option allows viewing of dry and wet deposition files directly output from the model
when in chemistry mode, with deposition in units of µg m-2 per run-length (e.g. for a year-long
run the units will be µg m-2 year-1).
The controls along the bottom of the window allow selection of the default text editor, the
directory name for Surfer, the display of grid lines in the picture, the display of various emission
source positions or grid outlines, building block positions, and the display and editing of network
sites as described in Section 3.1.
3.3
Utilities
Several Utilities can be selected from the Main Window menu bar at the top of Figure 1:
• Run GIS Visualisation: allows the GIS Visualisation software to be run without processing
TAPM results first (this can also be done by running GIS_PC1.exe from explorer or the
command line);
• Run Profile Plotting/Animation: allows TAPM *.pr1 and *.pr2 formatted files to be viewed
and animated in time graphically without processing TAPM results first (this can also be
done by running PRF_PLOT.exe from explorer or the command line);
• Convert selected *.out and *.rfl files for a particular date range to an ASCII *.outa file using
TAPM2OUTA.exe, with *.outa file format described below;
• Convert *.glcr file to ASCII *.glca file: converts a selected TAPM *.glcr file into an ASCII
*.glca file, using GLC2GLCA.exe, with *.glca file format described below;
• Concatenate *.glcr file(s) into a *cat.glcr file: concatenates selected *.glcr file(s) (in
alphabetical order) into a single *.glcr file with the file name taken from the file name prefix
of the first selected file (e.g. t100atr1) and *cat.glcr appended (e.g. t100atr1cat.glcr). Note
that grid dimensions of the selected files are checked for consistency, but other
characteristics such as dates/times/coordinates/units/etc are not checked – these extra checks
are left to the user, so proceed with caution;
• Convert a *.glcr file for a particular date range to a *sub.glcr file using GLC2GLCSUB.exe;
• Calculate a weighted sum of multiple *.glcr files (for each grid point for each hour) using
GLC2GLCMATH.EXE, and save the resulting concentration in a new *.glcr file that can
itself be processed through the GUI. Note that grid dimensions of the selected files are
checked for consistency, but other characteristics such as dates/times/coordinates/units/etc
are not checked – these extra checks are left to the user, so proceed with caution.
The file format for the *.outa file is as follows (fixed format with READ1 using format 10i8 (10
integers per line with each integer using eight characters), and READ2 using format 10f8.2 (10
floating point numbers per line with each number using eight characters with two digits after the
decimal point)
READ1: nx, ny, nz, dx, dy
READ2: ((zs(i,j),i=1,nx),j=1,ny)
READ2: (((z(i,j,k),i=1,nx),j=1,ny),k=1,nz)
Repeated for each simulation hour:
© CSIRO 2008
26
READ1: date, hour
READ2: ((tsr(i,j),i=1,nx),j=1,ny)
READ2: ((net(i,j),i=1,nx),j=1,ny)
READ2: ((sens(i,j),i=1,nx),j=1,ny)
READ2: ((evap(i,j),i=1,nx),j=1,ny)
READ2: ((ustar(i,j),i=1,nx),j=1,ny)
READ2: ((pvstar(i,j),i=1,nx),j=1,ny)
READ2: ((ptstar(i,j),i=1,nx),j=1,ny)
READ2: ((wstar(i,j),i=1,nx),j=1,ny)
READ2: ((zmix(i,j),i=1,nx),j=1,ny)
READ2: ((tscr(i,j),i=1,nx),j=1,ny)
READ2: ((rhscr(i,j),i=1,nx),j=1,ny)
READ2: ((tsurf(i,j),i=1,nx),j=1,ny)
READ2: ((rain(i,j),i=1,nx),j=1,ny)
READ2: (((ws(i,j,k),i=1,nx),j=1,ny),k=1,nz)
READ2: (((wd(i,j,k),i=1,nx),j=1,ny),k=1,nz)
READ2: (((ww(i,j,k),i=1,nx),j=1,ny),k=1,nz)
READ2: (((tt(i,j,k),i=1,nx),j=1,ny),k=1,nz)
READ2: (((rh(i,j,k),i=1,nx),j=1,ny),k=1,nz)
READ2: (((pt(i,j,k),i=1,nx),j=1,ny),k=1,nz)
READ2: (((tke(i,j,k),i=1,nx),j=1,ny),k=1,nz)
with variables
nx
number of west-east (x) grid points for the meteorological grid,
ny
number of south-north (y) grid points for the meteorological grid,
nz
number of vertical (z) grid points (levels) for the meteorological grid,
dx
west-east (x) grid spacing (m) for the meteorological grid,
dy
south-north (y) grid spacing (m) for the meteorological grid,
zs
smoothed terrain height (m),
z
height above the terrain (m),
date
date (yyyymmdd),
hour
hour of simulation (1–24),
tsr
total solar radiation (W m-2),
net
net radiation (W m-2),
sens
sensible heat flux (W m-2),
evap
evaporative heat flux (W m-2),
ustar
friction velocity scale (m s-1),
pvstar
potential virtual temperature scale (K),
ptstar
potential temperature scale (K),
wstar
convective velocity scale (m s-1),
zmix
mixing height (m),
tscr
screen-level temperature (K),
rhsrc
screen-level relative humidity (%),
tsurf
surface temperature (K),
rain
rainfall (mm hr-1),
ws
horizontal wind speed (m s-1),
wd
horizontal wind direction (o),
ww
vertical velocity (m s-1),
tt
temperature (K),
rh
relative humidity (%),
pt
potential temperature (K),
tke
turbulence kinetic energy (m2 s-2).
Note that the meteorological grid (array) is oriented so that
© CSIRO 2008
27
grid( 1, 1, 1) is the south-west corner at the surface,
grid(nx, 1, 1) is the south-east corner at the surface,
grid( 1,ny, 1) is the north-west corner at the surface,
grid(nx,ny, 1) is the north-east corner at the surface,
and similarly for array index k = nz at the top of the grid.
The file format for *.glca files is as follows (space delimited free format)
READ: nx, ny
Repeated for each simulation hour:
READ: idate, itime
READ: ((ic(i,j),i=1,nx),j=1,ny)
with variables
nx
number of west-east (x) grid points for the concentration grid,
ny
number of south-north (y) grid points for the concentration grid,
idate
date (yyyymmdd),
itime
hour of simulation,
ic
concentration array oriented so that
ic( 1, 1) is the south-west corner,
ic(nx, 1) is the south-east corner,
ic(1 ,ny) is the north-west corner,
ic(nx,ny) is the north-east corner.
4
TAPM FILES
The GUI (TAPM_GUI.EXE) sets up all of the TAPM input files needed by the model
(TAPM.EXE). These include
• a batch file to run the model (*.bat),
• a general input file read by the model (*.inp),
• surface information for each grid nest (*.top),
• synoptic information at the grid centre and some time-varying surface parameters (*.syn),
• three-dimensional gridded synoptic analyses (*.syg),
• optional near-surface wind data assimilation (*.obs) (not through GUI – see Section 4.1),
• optional pollution background file (*.cbg) (not through GUI),
Emission Files (see Section 4.2)
• optional point sources (*.pse),
• optional line or area/volume sources (*.lse and *.ase),
• optional grid-based surface sources (*.gse, *.bse, *.whe, *.vpx, *.vdx, *.vlx, and *.vpv) (not
through GUI),
and a Building File (see Section 4.3)
• optional building file (*.bld).
When the model is run, two types of nesting files are generated to provide boundary conditions
for the inner nested grids
• meteorology (*.nes),
• pollution (*.tbc).
These nesting files can be deleted by the user when the model run is finished.
The model output files
• general meteorology (*.out),
• rainfall (*.rfl),
• snowfall (*.sfl),
• pollution concentration at ground level (*.glcr),
© CSIRO 2008
28
• pollution concentration at available output levels (*.c3d),
• deposition (*_dry.grd and *_wet.grd),
• LPM particle positions (*tr1.p3da in tracer mode, or *apm.p3da in chemistry mode),
• final plume rise centreline heights for the point sources (*.plr),
• gradual plume rise centreline heights for the point sources in LPM mode (*.plrg),
are used by the GUI when analysing the output. Note that all model output that is averaged is
specified at the end hour (i.e. an hourly average at hour 2 is the average of values between hours
1 and 2). General meteorology is output as hourly averages, rainfall is output as hourly total
(mm hr-1), ground level concentrations are output as hourly averages in either µg m-3 (tracer
mode or for APM and FPM) or ppb (chemistry mode except for APM and FPM) and deposition
(dry and wet in chemistry mode) are output as µg m-2 for the model run period (i.e. an example
file name for SO2 would be t100aso2_dry.grd, and if the run length was for one month, then the
units would be µg m-2 month-1).
The final plume rise heights file (*.plr) includes those point sources with non-zero plume rise.
The file is comma delimited with columns for hour, source number, and final plume height (m).
The gradual plume rise file (*.plrg) includes hourly plume rise information for sources in LPM
mode (see also the optional final plume rise output in the *.plr file described previously). The
values output are: src# - the source number; t - the plume material travel time (s); w - the plume
vertical velocity (m s-1); z - the plume centreline height (m) above ground; Ry, Rz - the lateral
and vertical plume radius (m), respectively; and Dx, Dy - the west-east and south-north plume
distance (m) from the source, respectively.
A listing file (*.lis) is also produced when the model is run, and contains information which
reflects the options chosen by the user and other diagnostic information for the model run.
This file should be checked by the user to ensure that the model has run as expected.
4.1
Meteorological Data Assimilation File (*.obs)
Assimilation of winds can optionally be included in a model simulation. The existence of an
extra file with name: Run File Name Prefix plus a *.obs extension (e.g. if the outer grid Run File
Name Prefix is t300a, then the wind observations need to be in a file called t300a.obs) turns on
the assimilation option. The wind speed and direction observations are used to nudge the
predicted solution towards the observations.
The file format for the wind data assimilation *.obs files is as follows (free format)
READ: nsite
READ: sdate, shour, (x_site(i),y_site(i),i=1,nsite)
READ: sdate, shour, (z_site(i),r_site(i),i=1,nsite)
READ: sdate, shour, (k_site(i),q_site(i),i=1,nsite)
Repeated for each simulation hour
READ: idate, ihour, (ws_site(i),wd_site(i),i=1,nsite)
with variables
nsite
number of observation sites,
sdate
start date of simulation (yyyymmdd),
shour
start hour of simulation (1–24),
x_site
west-east (x) site location in local coordinates (m),
y_site
south-north (y) site location in local coordinates (m),
z_site
vertical (z) site location above the ground (m),
r_site
radius of influence (m) for each site,
k_site
number of vertical model levels to assimilate each side of the nearest model level to the
observation,
q_site
data quality indicator (0.0–1.0) (0.0 = ignore, 1.0 = reliable),
idate
date of observations (yyyymmdd),
© CSIRO 2008
29
ihour
ws_site
wd_site
hour of observations (1–24),
site wind speed (m s-1),
site wind direction (°).
Note that missing values are assumed when the observed wind speed and direction are out of the
normal range (speed < 0 m s-1 or > 90 m s-1; direction < 0° or > 360°), and dates and times are
assumed to be sequential hourly averages (end hour of average).
Nudging is done at the number of model levels specified, and care should be taken when nudging
to near-surface winds, as winds can change significantly with height in the lowest 100 m or so of
the atmosphere. The representative horizontal radius of influence for a site can vary according to
the terrain surrounding the observation. For example, data measured in a valley should not
unduly influence the model solution outside the valley. This also applies to how well an
observation is representative of the general flow in the surrounding region. It is recommended
that values of r_site lie between 5000 m and 30000 m, with 20000 m being a typical value in flat
or gentle terrain.
4.2
Emission Files (*.pse, *.lse, *.ase, *.gse, *.bse, *.whe, *.vpx, *.vdx, *.vlx, and *.vpv)
Hourly varying emission information can optionally be read by the model for files with
• Point Source Emissions (*.pse),
• Line Source Emissions (*.lse),
• Area/volume Source Emissions (*.ase),
and seven grid-based surface emission files
• Gridded Surface Emissions (*.gse), independent of temperature,
• Biogenic Surface Emissions (*.bse), at T = 30°C and PAR = 1000 µmol m-2 s-1 for VOC,
• Wood Heater Emissions (*.whe), at T = 10°C for all pollutant species,
• Vehicle Petrol eXhaust emissions (*.vpx), at T = 25°C for VOC, NOX and CO,
• Vehicle Diesel eXhaust emissions (*.vdx), independent of temperature,
• Vehicle Lpg eXhaust emissions (*.vlx), at T = 25°C for VOC, NOX and CO,
• Vehicle Petrol eVaporative emissions (*.vpv), at T = 25°C for VOC,
with grid-based emissions adjusted to model temperature T (°C) and photo-synthetically active
radiation PAR (µmol m-2 s-1) throughout a particular simulation. Note that vegetation
temperature is used for biogenic emissions, a running 24-hour average screen-level temperature
is used for wood heater emissions, and screen-level temperature is used for vehicle emissions.
The temperature corrections used in the model are based on curve-fits to data described by Ng et
al. (2000), which for vehicle emissions are based on the US model MOBILE5. The model
assumes that the file names of these files for a particular run use the Run File Name Prefix of the
outer grid with the corresponding extension (e.g. t300a.pse, t300a.lse, t300a.ase, t300a.gse,
t300a.bse, t300a.whe, t300a.vpx, t300a.vdx, t300a.vlx, and t300a.vpv). The model can be run
with any combination of these files, or no emission files at all, but care should be taken when
changing pollutant mode (tracer or chemistry). The listing file (*.lis) will indicate what types of
emission information is being used by the model. If generated by the user, these files should be
in ASCII, free format, and should be placed in the Run Directory. If the end of file is reached
before the end of the TAPM run, the file is rewound and read again (i.e. the emissions cycle over
time).
The required format for the *.pse file can be seen from the following (also see Section 3.1.2 for
GUI entry of emissions)
READ: nsource, nhour
do i = 1, nsource
READ: mode, x_pse, y_pse, h_pse, r_pse, e_pse, f_no_pse, f_fpm_pse
enddo
© CSIRO 2008
30
do Until End of File
do i = 1, nsource
IF TRACER MODE, READ: w_pse, t_pse, tr1_pse, tr2_pse, tr3_pse, tr4_pse
IF CHEMISTRY MODE, READ: w_pse, t_pse, apm_pse, nox_pse, so2_pse, rs_pse
enddo
enddo
where
nsource
number of point sources,
nhour
number of hours over which the time-varying emissions cycle (1=constant),
mode
controls the source mode (-1=OFF, 0=EGM, 1=EGM+LPM),
x_pse
west-east (x) local coordinate of the stack (m),
y_pse
south-north (y) local coordinate of the stack (m),
h_pse
stack height above the ground (m),
r_pse
internal stack radius (m),
e_pse
buoyancy enhancement factor (1=no enhancement due to near-by stacks),
f_no_pse
fraction of the NOX emission that is NO (0 = no NO, 1 = all NO),
f_fpm_pse fraction of the APM emission that is FPM (0 = no FPM, 1 = all FPM),
w_pse
stack exit velocity (m s-1),
t_pse
stack exit temperature (K),
tr1_pse
emission rate of TR1 (g s-1),
tr2_pse
emission rate of TR2 (g s-1),
tr3_pse
emission rate of TR3 (g s-1),
tr4_pse
emission rate of TR4 (g s-1),
apm_pse
emission rate of APM (g s-1),
nox_pse
emission rate of NOX (g s-1) (expressed as NO2),
so2_pse
emission rate of SO2 (g s-1),
rs_pse
emission rate of Rsmog (g s-1).
The required format for the *.lse or *.ase file can be seen from the following
READ: nsource, nhour
do i = 1, nsource
READ: mode, x0, y0, h0, x1, y1, h1, f_no, f_fpm
enddo
do Until End of File
do i = 1, nsource
IF TRACER MODE, READ: tr1, tr2, tr3, tr4
IF CHEMISTRY MODE, READ: apm, nox, so2, rs
enddo
enddo
where
nsource
number of sources,
nhour
number of hours over which the time-varying emissions cycle (1=constant),
mode
controls the source mode (-1=OFF, 0=EGM),
x0
west-east (x) local coordinate of the source (m) (start coordinate),
y0
south-north (y) local coordinate of the source (m) (start coordinate),
h0
source height above the ground (m) (start coordinate),
x1
west-east (x) local coordinate of the source (m) (end coordinate),
y1
south-north (y) local coordinate of the source (m) (end coordinate),
h1
source height above the ground (m) (end coordinate),
f_no
fraction of the NOX emission that is NO (0 = no NO, 1 = all NO),
f_fpm
fraction of the APM emission that is FPM (0 = no FPM, 1 = all FPM),
© CSIRO 2008
31
tr1
tr2
tr3
tr4
apm
nox
so2
rs
emission rate of TR1 (g s-1),
emission rate of TR2 (g s-1),
emission rate of TR3 (g s-1),
emission rate of TR4 (g s-1),
emission rate of APM (g s-1),
emission rate of NOX (g s-1) (expressed as NO2),
emission rate of SO2 (g s-1),
emission rate of Rsmog (g s-1).
Note that although the format is the same for both line and area/volume source files, line sources
have emissions uniformly distributed along a straight line using the start and end points
specified, whereas area/volume sources have emissions uniformly distributed within a volume
(or x-y plane area, if heights are the same) with sides aligned along the Cartesian coordinate axes
and side lengths |x1-x0|, |y1-y0| and |h1-h0|, in the x, y, z directions respectively.
The required format for the *.gse file can be seen from the structure of the following
READ: nx_gse, ny_gse, dx_gse, dy_gse, cx_gse, cy_gse
do Until End of File
do j = 1, ny_gse
do i = 1, nx_gse
IF TRACER MODE, READ: tr1_gse, tr2_gse, tr3_gse, tr4_gse, dum_gse, dum_gse
IF CHEMISTRY MODE, READ: apm_gse, nox_gse, so2_gse, rs_gse, no2_gse, fpm_gse
enddo
enddo
enddo
where
nx_gse
number of west-east (x) grid points for the emissions grid,
ny_gse
number of south-north (y) grid points for the emissions grid,
dx_gse
west-east (x) grid spacing (m) for the emissions grid,
dy_gse
south-north (y) grid spacing (m) for the emissions grid,
cx_gse
west-east (x) grid centre local coordinate value (m) for the emissions grid,
cy_gse
south-north (y) grid centre local coordinate value (m) for the emissions grid,
tr1_gse
emission rate of TR1 (g s-1),
tr2_gse
emission rate of TR2 (g s-1),
tr3_gse
emission rate of TR3 (g s-1),
tr4_gse
emission rate of TR4 (g s-1),
dum_gse
not used,
apm_gse
emission rate of APM (g s-1),
nox_gse
emission rate of NOX (g s-1) (expressed as NO2),
so2_gse
emission rate of SO2 (g s-1),
rs_gse
emission rate of Rsmog (g s-1),
no2_gse
emission rate of NO2 (g s-1).
fpm_gse
emission rate of FPM (g s-1).
The format for the other grid-based emission files (*.bse, *.whe, *.vpx, *.vdx, *.vlx, and *.vpv)
are the same as for the *.gse file, but the grid characteristics do not necessarily have to match the
*.gse emission grid characteristics.
4.3
Building File (*.bld)
The effect of building wakes on plume rise and dispersion is based on the Plume Rise Model
Enhancements (PRIME) approach of Schulman et al. (2000). The PRIME model uses an alongwind coordinate system, and so first each building is transformed to be in this system. Effective
building dimensions and cavity and wake dimensions are then calculated for each building and
© CSIRO 2008
32
are used to determine the combined wake meteorology and turbulence. Plume rise is affected by
the modified meteorology and turbulence for point sources in both EGM and LPM modes, while
dispersion is influenced only for point source plumes in LPM mode. LPM calculations in the
model are done for both the cavity and wake regions, rather than specifying a uniform
concentration in the cavity as is done in PRIME.
We use the PRIME procedure to define wake characteristics for each building block. The effects
of overlapping wakes from multiple building blocks, whether from the same multi-level or multitiered physical building, or from multiple physical buildings, can be treated by combining the
meteorology and turbulence. For a particular point in space, the combined (over all building
blocks)
• streamline slope can be calculated by first calculating the maximum slope and the
minimum slope, and then if the absolute value of the maximum value is greater than the
absolute value of the minimum value, use the maximum value. Otherwise use the
minimum value.
• horizontal wind speed factor is the minimum value.
• turbulence intensity is the maximum value.
The combined effects can then be used for the calculation of plume rise and dispersion – the
above approach attempts to be conservative for expected ground-level pollution concentration.
The model assumes that the name for the building file (*.bld) file uses the Run File Name Prefix
of the outer grid with the corresponding extension (e.g. t300a.bld). This information can be input
through the GUI or by creating the file externally as described below.
The required format for the *.bld file can be seen from the following
READ: nbld
do i = 1, nbld
READ: nbldc(i), hbld(i)
do j = 1, nbldc(i)
READ: xbld(i,j), ybld(i,j)
enddo
enddo
where
Nbld
number of building blocks,
nbldc
number of corners for each building blocks (2–25),
hbld
height of each building block,
xbld
west-east (x) local coordinate of the building block corner (m),
ybld
south-north (y) local coordinate of the building block corner (m).
4.4
Background Concentration File (*.cbg)
An optional concentration background file can be provided (*.cbg) that contains hourly
concentrations for six species. If this file is available, it is used as inflow boundary conditions for
the outer-most model grid. If *.m3d files are being used to run the inner-most grid only, then the
*.cbg file will be used to provide boundary conditions for this grid. The file format is:
do Until End of File
IF TRACER MODE, READ: date, hour, tr1_cbg, tr2_ cbg, tr3_ cbg, tr4_ cbg, dum_ cbg, dum_ cbg
IF CHEMISTRY MODE, READ: date, hour, apm_ cbg, nox_ cbg, so2_ cbg, rs_ cbg, o3_ cbg, fpm_ cbg
enddo
where
date
hour
tr1_cbg
tr2_cbg
Date (yyyymmdd),
Hour (1–24),
Concentration of TR1 (µg m-3),
Concentration of TR2 (µg m-3),
© CSIRO 2008
33
tr3_cbg
tr4_cbg
dum_cbg
apm_cbg
nox_cbg
so2_cbg
rs_cbg
o3_cbg
fpm_cbg
Concentration of TR3 (µg m-3),
Concentration of TR4 (µg m-3),
Not used,
Concentration of APM (µg m-3),
Concentration of NOX (ppb),
Concentration of SO2 (ppb),
Concentration of Rsmog (ppb),
Concentration of O3 (ppb),
Concentration of FPM (µg m-3),
Note that nitrogen dioxide background concentration is set equal to the nitrogen oxides
background concentration, as is normally done for non-time-varying background concentration
(available in the GUI).
5
ACKNOWLEDGEMENTS
Thanks to the US Geological Survey, Earth Resources Observation Systems (EROS) Data Center
Distributed Active Archive Center (EDC DAAC) for the public domain global datasets of terrain
height and land-use. Thanks to FAO/UNESCO for the global soil texture dataset. Thanks to
Boston University and MODIS for the global monthly mean LAI datasets. Thanks to Geoscience
Australia for the Australian terrain height dataset. Thanks to the US National Center for
Atmospheric Research (NCAR) for the public domain dataset of long-term monthly average sea
surface temperatures. Thanks to Paul Stewart, Terry Hart and the Bureau of Meteorology for
allowing the LAPS and GASP analyses to be distributed with the model.
Thanks to Bill Physick and Julie Noonan for helping with the global terrain/land-use datasets, to
Marcus Thatcher for additional processing of the global soil and leaf area index datasets, to Mary
Edwards for updating the Surfer v6 scripts to Surfer v7 and for reviewing this manual, and to
Russell Howden for his work on the GIS Visualisation software package.
The encouragement and feedback from both internal CSIRO users and externally licensed users
of TAPM is much appreciated.
6
REFERENCES
Hurley P.J. (2008). ‘TAPM V4. Part 1: Technical Description’, CSIRO Marine and Atmospheric
Research Paper No. 25. 59 pp.
Hurley P., Edwards M. and Luhar A. (2008). ‘TAPM V4. Part 2: Summary of some verification
studies’, CSIRO Marine and Atmospheric Research Paper No. 26. 31 pp.
Ng Y., Serebryanikova R. and Wong L. (2000). ‘Application of the emissions modelling system
EMS-95 to the Victorian Inventory’, Proceedings of the 15th International Clean Air
Conference of CASANZ, Sydney, 26-30 November 2000.
Pasquill F. (1974). ‘Atmospheric Diffusion’, 2nd Edition, Wiley and Sons, London, 429 pp.
Schulman L., Strimaitis D. and Scire J. (2000). ‘Development and evaluation of the PRIME
plume rise and building downwash model’, J. Air & Waste Manage. Assoc., 50, 378-390.
© CSIRO 2008
34
© CSIRO 2008
35