1
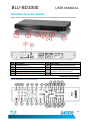
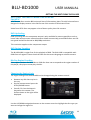
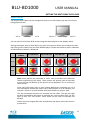
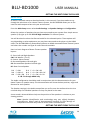
BLU-BD1000 Blu-ray Disc Player User Manual BLU-BD1000 USER MANUAL IMPORTANT SAFETY INSTRUCTIONS AND PRECAUTIONS IMPORTANT SAFETY INSTRUCTIONS AND PRECAUTIONS Please read the instructions carefully before using this product Observe all warnings and cautions when using this product. Retain all manuals and documentation for future referral. Only use this product in the manner described in this manual. Do not use this device in extremely hot, cold, humid, dusty or sandy environments. Do not use this device in electrical storms or other conditions if the likely hood of lightning is possible. Do not attempt to clean this product using liquid cleaners or aerosol cleaners. Use only a damp soft cloth to clean the surface of this device. This device may become hot during use. Do not cover vent holes and place in a well ventilated area. This device is not waterproof. Do not use this device in the open if there is a high level of moisture in the air. Only place the device on a stable surface and ensure that cables attached to the device can not cause the device to fall. There are no serviceable parts in this device. Attempts to open this device by unauthorised personnel may cause further damage and void the warranty. Images of the product and accessories are indicative only and may vary slightly from actual the product. We reserve the right to make changes to this document and the product without notification. The lightning flash with arrowhead symbol, within an equilateral triangle, is intended to alert the user to the presence of uninsulated “dangerous voltage” within the product's enclosure that may be of sufficient magnitude to constitute a risk of electric shock to persons The exclamation point within an equilateral triangle is intended to alert the user to the presence of important operation and maintenance (servicing) instruction in the literature accompanying the appliance 1 BLU-BD1000 USER MANUAL IMPORTANT SAFETY INSTRUCTIONS AND PRECAUTIONS THIS PRODUCT UTILIZES A LASER. USE OF CONTROLS OR ADJUSTMENTS OR PERFORMANCE OF PROCEDURES OTHER THAN THOSE SPECIFIED HEREIN MAY RESULT IN HAZARDOUS RADIATION EXPOSURE. DO NOT OPEN COVERS AND DO NOT REPAIR YOURSELF. REFER SERVICING TO QUALIFIED PERSONNEL. TRADEMARKS DVD Logo is a trademark of DVD Format/Logo Licensing Corp., registered in the U.S., Japan and other countries. Manufactured under license from Dolby Laboratories. “Dolby” and the double-D symbol are trademarks of Dolby Laboratories. “AVCHD” and the “AVCHD” logo are trademarks of Panasonic Corporation and Sony Corporation. Designed for Windows Media, Microsoft, HDCD, and the HDCD logo are trademarks or registered trademarks of Microsoft Corporation in the United States and/or other countries. HDMI, the HDMI logo and HighDefinition Multimedia Interface are trademarks or registered trademarks of HDMI Licensing LLC. All other trademarks are the properties of their respective owners. DTS is a registered trademark and the DTS logos, Symbol, DTS-HD and DTS-HD Master Audio | Essential are trademarks of DTS, Inc. © 1996-2008 DTS, Inc. All Rights Reserved. 2 BLU-BD1000 USER MANUAL TABLE OF CONTENTS TABLE OF CONTENTS IMPORTANT SAFETY INSTRUCTIONS AND PRECAUTIONS....................................................... 1 TRADEMARKS ........................................................................................................................ 2 MEDIA COMPATIBILITY.......................................................................................................... 6 Blu-ray............................................................................................................................... 6 DVD ................................................................................................................................... 6 CD ..................................................................................................................................... 7 USB ................................................................................................................................... 7 INCOMPATIBLE MEDIA .......................................................................................................... 7 REGION INFORMATION ......................................................................................................... 7 Blu-ray............................................................................................................................... 7 DVD ................................................................................................................................... 8 PLAYER & DISC CARE ............................................................................................................. 8 Cleaning the BLU-BD1000 Player ....................................................................................... 8 Lens Cleaning .................................................................................................................... 8 Handling Discs ................................................................................................................... 8 Cleaning Discs ................................................................................................................... 9 WHATS IN THE BOX ............................................................................................................... 9 KNOWING YOUR BLU-BD1000 ............................................................................................. 10 THE REMOTE CONTROL ....................................................................................................... 10 Installing the Remote Control Batteries ........................................................................... 12 CONNECTING THE PLAYER ................................................................................................... 13 CONNECTING VIDEO ........................................................................................................... 13 GOOD: Connecting By Composite Video .......................................................................... 13 BETTER: Connecting By Component Video ...................................................................... 14 BEST: Connection By HDMI Cable .................................................................................... 14 CONNECTING AUDIO ........................................................................................................... 15 GOOD: Connecting RCA Stereo ........................................................................................ 15 BETTER: Connecting Coaxial Digital Audio ....................................................................... 15 BEST: Connecting the HDMI cable to a Home Theatre system ......................................... 16 CONNECTING A USB DEVICE ................................................................................................ 18 CONNECTING POWER ......................................................................................................... 19 START-UP WIZARD .............................................................................................................. 20 3 BLU-BD1000 USER MANUAL SETUP MENU....................................................................................................................... 22 GENERAL SETTING ............................................................................................................... 22 System ............................................................................................................................ 23 Screen Saver ................................................................................................................ 23 Disc Auto Playback ...................................................................................................... 23 Load Default ................................................................................................................ 23 Upgrade ...................................................................................................................... 23 Easy Setup ................................................................................................................... 23 OSD (On Screen Display) .............................................................................................. 23 MENU .......................................................................................................................... 23 AUDIO ......................................................................................................................... 23 SUBTITLE ..................................................................................................................... 23 Playback .......................................................................................................................... 24 Closed Caption ............................................................................................................ 24 Angle Mark .................................................................................................................. 24 Secondary Audio Mark ................................................................................................ 24 Security ........................................................................................................................... 24 DISPLAY SETTINGS ............................................................................................................... 25 TV.................................................................................................................................... 26 TV SCREEN ................................................................................................................... 26 Resolution ................................................................................................................... 26 TV System.................................................................................................................... 26 Colour Space ............................................................................................................... 26 HDMI Deep Colour ...................................................................................................... 26 (For TVs with this feature) ........................................................................................... 26 Video Process .................................................................................................................. 26 Sharpness .................................................................................................................... 26 Motion Video Process ..................................................................................................... 26 Video Mode ................................................................................................................. 26 AUDIO SETTINGS ................................................................................................................. 27 Audio Output .................................................................................................................. 27 HDMI ........................................................................................................................... 27 Down Sample .............................................................................................................. 27 DRC ............................................................................................................................. 27 4 BLU-BD1000 USER MANUAL Speaker Setting ............................................................................................................... 28 Configuration .............................................................................................................. 28 Test tone ..................................................................................................................... 28 Post Process .................................................................................................................... 28 UpMix ......................................................................................................................... 28 SYSTEM INFORMATION ....................................................................................................... 28 PLAYING A DISC ................................................................................................................... 29 OSD (On Screen Control) ..................................................................................................... 29 Disc now playing .......................................................................................................... 30 Current File ................................................................................................................. 30 Current title or track number ...................................................................................... 30 Current Chapter number ............................................................................................. 30 Playback time .............................................................................................................. 30 Playback type .............................................................................................................. 30 Audio track .................................................................................................................. 30 Angle ........................................................................................................................... 30 Subtitle ........................................................................................................................ 30 Code Page ................................................................................................................... 30 Subtitle Style ............................................................................................................... 30 Second Video (PIP) ...................................................................................................... 30 Second Audio .............................................................................................................. 30 Audio/Video Bitrate..................................................................................................... 30 Still Off ........................................................................................................................ 30 INS Search* ................................................................................................................. 30 INS Replay* ................................................................................................................. 30 Creating and Using Bookmarks ........................................................................................ 31 Programming a Disc ........................................................................................................ 31 Cancelling a Program ....................................................................................................... 31 MEDIA CENTRE .................................................................................................................... 32 Playing a file .................................................................................................................... 32 Creating a Playlist ............................................................................................................ 33 Playing a Playlist .............................................................................................................. 34 GETTING THE BEST FROM THE PLAYER ................................................................................ 35 PAL/NTSC ........................................................................................................................ 35 5 BLU-BD1000 USER MANUAL DVD Up-Scaling ............................................................................................................... 35 DVD Region Encoding ...................................................................................................... 35 Blu-Ray Region Encoding ................................................................................................. 35 Changing the Region Code............................................................................................... 35 DVD Region Change ..................................................................................................... 36 BD Region Change ....................................................................................................... 36 Resolution ....................................................................................................................... 36 Aspect Ratios................................................................................................................... 37 HDMI Deep Colour .......................................................................................................... 38 HDMI 1080P 24Hz ........................................................................................................... 38 Audio Setup..................................................................................................................... 39 TROUBLESHOOTING ............................................................................................................ 41 TECHNICAL SPECIFICATIONS ................................................................................................ 43 CONTACT INFORMATION .................................................................................................... 44 FOR OTHER ACCESSORIES AND PRODUCTS .......................................................................... 44 MEDIA COMPATIBILITY MEDIA COMPATIBILITY Since the Blu-ray Disc specifications are new and evolving, some discs may not play properly depending on the disc type, version and encoding. It is possible that a Blu-ray disc manufactured after the player was manufactured uses certain new features of the Blu-ray Disc specifications. To ensure the best possible viewing experience, the player may need a firmware or software update from time to time. Blu-ray Media Type Blu-Ray Disk Compatibility BD-ROM (SL/DL) Limitations Supports high bit rate audio (Dolby Digital Plus, Dolby TrueHD, DTS-HD High Resolution Audio and DTS-HD Master Audio) adopted in BD-Video. Compatibility DVD-ROM, DVD+R(SL/DL), DVD-R (SL/DL), DVD-RW (SL/DL). Limitations DVD Video or files compatible with the BLU-BD1000 only. DVD Media Type DVD Recordable DVD media must be finalised by a recorder before playback on the BLU-BD1000. 6 BLU-BD1000 USER MANUAL CD Media Type CD Compatibility CD-Audio, CD-R. CD-RW Limitations Recordable CD media must be finalised by a recorder before playback on the BLU-BD1000. Compatibility Flash Drives Limitations Formatted in FAT or FAT32 only up to 16GB USB Media Type USB USB hard drives connect to the BLU-DB1000 should be powered by another source as well as the USB port. A secondary power source may be required for some Notebook style USB hard drives. INCOMPATIBLE MEDIA INCOMPATIBLE MEDIA The following media may not be playable or produce erratic or substandard playback. DVD-RAM Super Audio CD Photo CD DVD- Audio WMA discs DivX discs BDs With cartridge DVDs with cartridge HD DVD Data files on CD-Extra discs CD Audio with DRM Non-finalised media BD-Video discs recorded at a rate of 50 fields (frames) per second. NOTE: It may not be possible to play the above media in some cases due to the type of media, the condition of the recording, the recording method and how the files were created. The producers of the disc can control how discs are played, so you may not always be able to control play as described in this Owner’s Manual. Read the disc’s instructions carefully. REGION INFORMATION Blu-ray This player is designed and manufactured to respond to the region management information. If the region number of a BD-Video or DVD disc does not correspond to the current region number of this player, the player cannot play the disc. The BLU-BD1000 is preset to play discs meant for region B 7 BLU-BD1000 Region Code USER MANUAL Region Country North America, Central America, South America, Korea, Japan, Taiwan, Hong Kong, South East Asia Europe, Greenland, French territories, Middle East, Africa, Australia, and New Zealand India, China, Russia, Central Asia, and South Asia DVD This player is designed to play DVDs from all regions. Note: Please refer to the GETTING THE BEST FROM THE PLAYER section later in this manual for information on changing BD & DVD Region Codes. PLAYER & DISC CARE PLAYER & DISC CARE Cleaning the BLU-BD1000 Player Always turn the player off and unplug the power cord before cleaning. Never use alcohol, paint thinner or benzene to clean this unit. Before using chemically treated cloth, carefully read the instructions that came with the cloth. Please use a damp soft cloth. Wring out any excess liquid and gently wipe the external case of the player. Let the player dry before using again. Lens Cleaning Use a commercially available CD/DVD/BD lens cleaner (not supplied) to periodically clean the lens in this player. Please read the instructions supplied with the lens cleaner carefully before use. Handling Discs Handle discs by the edges to avoid inadvertent scratches or fingerprints on the disc. Do not attach labels or stickers to discs. Do not use record cleaning sprays, benzene, thinner, static electricity prevention liquids or any other solvent. Do not use the following discs Discs with exposed adhesive from removed stickers or 8 BLU-BD1000 USER MANUAL Labels (rented discs etc) that are lifting or torn. Discs that are warped or cracked. Irregularly shaped discs, such as heart shapes. Cleaning Discs DO Don’t Wipe discs with a soft damp cloth and allow to dry before placing disc in the players tray. Never use alcohol, paint thinner or benzene to clean discs. KNOWING YOUR BLU-BD1000 WHATS IN THE BOX BLU-BD1000 Blu-ray disc player Remote control 2 x AAA Batteries Composite (RCA) Video/Audio cable User Manual (This Document) 9 BLU-BD1000 USER MANUAL KNOWING YOUR BLU-BD1000 Please make yourself familiar with the layout of the BLU-BD1000 and the remote control. Item 1 2 3 4 5 Description STANDBY (On/Off) Disc load tray OPEN/CLOSE tray button PLAY loaded disc PAUSE loaded disc Item 6 7 8 9 Description STOP loaded disc during playback USB port COMPOSITE/COMPONENT/DIGITAL COAXIAL Audio/Video Output HDMI port THE REMOTE CONTROL THE REMOTE CONTROL . 10 BLU-BD1000 1 2 3 4 5 6 7 8 9 10 11 12 13 14 15 16 17 18 19 20 USER MANUAL LABEL STANDBY NUMERIC KEYPAD SETUP/HOME NAVIGATION ARROWS POPUP/TITLE PREVIOUS/NEXT VOLUME PLAY BONUS VIEW (BD1080 model only) MUTE OSC BOOKMARK PROG AUDIO SUBTITLE REPEAT A-B FUNCTION Press to turn player On or OFF For search function Access/Exit Setup menu Navigate Menus To View or Exit POPUP menu on supported discs Skip to previous or next track Adjust the Volume Level up or down Press to play loaded disc or current media file Press to view multiple videos (picture in picture) BD Press to must volume Press to view On Screen Controls Press to add Book mark for a loaded disc Program sequence of track to be played Press to switch between available audio tracks Press to switch between available subtitles Press to repeat the current track, chapter or disc Press to set start and end point for loop playback OPEN/CLOSE Clear GOTO Press to open or close the disc tray Press to clear numbers entered by Keypad Press to go to specific track or time DVD/CD MC 11 BLU-BD1000 USER MANUAL THE REMOTE CONTROL 21 22 23 24 25 26 27 28 29 30 31 32 33 34 28 29 30 31 32 33 34 LABEL RETURN ENTER MENU FORWARD/REVERSE STOP PAUSE HDMI INFO DIGEST ZOOM RANDOM ANGLE Media Center SECONDARY AUDIO INFO DIGEST ZOOM RANDOM ANGLE Media Center SECONDARY AUDIO BD=Blu-ray Disc; BD FUNCTION Press to return to the previous menu Press to confirm menu selection Press to show the Main Menu for current disk Press to fast forward/fast rewind Press to stop current playback Press to Pause current playback Press to cycle through Video Resolutions Press to display information on current playback Press to display additional information on discs Press to zoom in or out on current screen image Press to play chapters or track in a random order Press to view alternate angles on supported discs Press to open or close Media Center Console Press to Activate Secondary Audio Languages Press to display information on current playback Press to display additional information on discs Press to zoom in or out on current screen image Press to play chapters or track in a random order Press to view alternate angles on supported discs Press to open or close Media Center Console Press to Activate Secondary Audio Languages DVD/CD = DVD or CD audio discs; MC = Media Center DVD/CD MC *Please note: Some features on this remote control require the feature to be available and supported by the disc/media being played. Installing the Remote Control Batteries Before using the BLU-DB1000 Blu-ray player, please take a moment to fit the supplied AAA batteries to the remote control. Unclip the compartment lid and insert the batteries as shown to the right. When the batteries are fitted. Locate the lugs on the bottom of the lid and clip back in to place. When using the remote control, the front window of the remote control should be pointed to the infrared sensor on the front panel within an angle of ±30° and a range of about 4.5 meters. 12 BLU-BD1000 USER MANUAL CONNECTING THE PLAYER CONNECTING THE PLAYER Before connecting the BLU-BD1000 please consider the following. Distance from TV: Make sure that you have the correct length cables to allow the connection of the BLU-BD1000 to your display. Ventilation: Where ever the BLU-BD1000 is to be setup it must be in a well ventilated area. Once the decision has been made on where to place the player in relation to the TV, please select the connection method that best suits your needs and equipment. Image and sound quality will vary between connection types. Please connect the Video, Audio and Ethernet cable before connecting to a mains power outlet. CONNECTING VIDEO GOOD: Connecting By Composite Video Requires an RCA video cable (included) The standard colour for composite video ports is yellow. 1. Plug the RCA video cable into the COMPOSITE VIDEO OUTPUT on the player and a COMPOSITE VIDEO INPUT on the television. 2. Select the AV Channel on the TV which corresponds to the video input. E.g. AV1, AV2 etc. 3. This will allow video from the player to show on the connected television. Please see AUDIO CONNECTION for the best audio connection. 13 BLU-BD1000 USER MANUAL CONNECTING THE PLAYER BETTER: Connecting By Component Video Requires an RCA component video cable (not included). The standard colours for component video ports are GREEN, BLUE, and RED. 1. Plug the 3 RCA video cables into the COMPONENT VIDEO OUTPUT on the player and a COMPONENT VIDEO INPUT on the television. Typically these are colour coded and marked as PbPrY. 2. Select the AV Channel on the TV which corresponds to the video input. E.g. COMPONENT. 3. This will allow video from the player to show on the connected television. Please see AUDIO CONNECTION for the best audio connection. BEST: Connection By HDMI Cable Requires a HDMI cable (not included). 1. Plug the HDMI cable into the HDMI OUTPUT on the player and into the HDMI input on the television. 2. Select the AV Channel on the TV which corresponds to the video input. E.g. HDMI 1, HDMI 2 etc. 3. This will allow video and audio from the player to play on the connected television. 14 BLU-BD1000 USER MANUAL CONNECTING THE PLAYER CONNECTING AUDIO Audio from the BLU-BD1000 can be played through a connected television or a full home theatre surround sound system. GOOD: Connecting RCA Stereo Requires RCA Stereo Audio cable (included) Standard colours for RCA stereo is WHITE=LEFT channel, RED= RIGHT channel. 1. Plug the RED and White RCA cables in to the WHITE and RED RCA STEREO AUDIO OUTPUT on the player and plug the other end in to the RCA Stereo input on the television or the stereo or Home Theatre system. 2. Set the connected television, stereo or Home Theatre system to the input source used in step #1. 3. This will allow audio from the player to play on the connected device. NOTE: The STEREO AUDIO OUT terminals will always provide a down-mixed stereo signal from multi-channel sources. The “Down Mix” and other speaker settings in the Audio Setup do not affect the STEREO AUDIO OUT. CONNECTING THE PLAYER BETTER: Connecting Coaxial Digital Audio Requires a Coaxial Digital Audio Cable (75 ohm RCA) (not included) Standard colour for coaxial digital audio ports is ORANGE. 1. Plug the COAXIAL DIGITAL AUDIO Cable in to the COAXIAL DIGITAL AUDIO OUTPUT on the player and plug the other end in to the COAXIAL DIGITAL AUDIO Cable input on the television or Home Theatre system. 2. Set the connected home theatre system to the input source used in step #1. 15 BLU-BD1000 USER MANUAL BEST: Connecting the HDMI cable to a Home Theatre system Requires 2 x HDMI V1.3 cables (not included). 1. Plug the first HDMI cable (A) into the HDMI OUTPUT on the player and into the HDMI input on the Home Theatre System. 2. Plug the second HDMI cable (B) into the HDMI OUTPUT on the Home Theatre System and into the HDMI input on the television. NOTE: If you have connected the BLU-BD1000 to a Home Theatre System using the Coaxial Digital Audio cable you may need to also connect the RCA Stereo Connection to your TV To allow Audio to be heard through the TV when it is not convenient to have the Home Theatre System turned on. Combinations of Audio and Video Connections are possible depending on the equipment the player is to be connected to. Please refer to the equipment user manual to determine the method or combination that best suits your needs. 16 BLU-BD1000 USER MANUAL CONNECTING THE PLAYER HDMI can transmit both audio and video signals over a single cable. If you have an HDMI capable receiver that can support HDMI audio, you can simply run an HDMI cable from the player to your receiver and enable HDMI audio on the receiver (see your receiver’s owners’ manual for more information). The receiver usually has an HDMI output that you can connect to your TV to pass the video signal. HDMI is a wonderful thing. A single cable can transport both audio AND video from your player to your display. Be aware, however, that HDMI is an evolving standard, and there could be compatibility issues. A receiver that supports audio input over HDMI is required. Some receivers offer HDMI ports solely for video switching. If your receiver does not have audio input capability, please read the following sections regarding other connection methods. In order to play multi-channel audio for all formats, the receiver must support HDMI v1.1 or later. For Blu-ray Disc, a receiver that supports HDMI v1.3 with decoding capability for Dolby TrueHD and DTS-HD Master Audio is preferred. Please check the specifications of your receiver to ensure that it meets the requirements. Due to bandwidth limitations, high resolution audio formats such as Dolby Digital Plus, Dolby TrueHD, DTS-HD High Resolution and DTS-HD Master Audio cannot be sent through the coaxial digital audio output. A reduced resolution version of the same audio track will be output instead. To listen to high resolution audio formats in their best quality, please use the HDMI connection if you have a receiver that handles HDMI audio. Due to copyright restrictions and bandwidth limitations, full resolution audio from DVDAudio discs cannot be sent through the coaxial or optical digital audio output. To listen to DVD-Audio in full resolution, please use the HDMI or analogue audio connections. 17 BLU-BD1000 USER MANUAL CONNECTING THE PLAYER CONNECTING A USB DEVICE Requires a USB Flash drive or an external USB HDD (not included). 1. Insert the USB drive (or cable) into the USB port on the front of the player. 2. To access the content of the USB device for playback please see the Media Center section later in this manual. NOTE: The USB ports are rated to provide a maximum of 5V, 500mA power to the USB drive. It is sufficient for all USB thumb drives and flash memory card readers, but may not be sufficient for USB hard disks. It is recommended that you use a USB hard disk with an external power supply. This unit supports “USB Mass Storage Class Bulk-Only Transport” devices only. Most USB thumbs drives, portable hard disk drives and card readers conform to this device class. Other USB devices such as MP3 players, digital cameras, and mobile phones may not be compatible. Supported USB drives must be formatted with the FAT (File Allocation Table) or FAT32 file system. In some cases, an incompatible USB device may cause the player to stop responding. If this occurs simply turn off the power, remove the USB device, and turn the player back on. The player accesses the USB drive in read and write mode. In order to minimize the risk of data corruption, it is recommended that you only unplug the USB device when playback is completely stopped. 18 BLU-BD1000 USER MANUAL CONNECTING THE PLAYER CONNECTING POWER 1. Connect the power plug from the player to a mains power outlet and then turn the switch on. 2. The red stand-by power LED on the front panel of the player should now be off. 3. Allow for up to 10 seconds for Blu-ray disc data to load 4. The BLU-BD1000 is now ready to use. 19 BLU-BD1000 USER MANUAL START-UP WIZARD START-UP WIZARD Press the Power button on the remote control to start the player. 1. The first time the player is started a Wizard guides you through the basic settings of the player. Press the Enter Button to Continue 2. First shown is the On Screen Language Option Press the Enter Button to continue 3. Use the UP & DOWN Navigation buttons on the remote control to select the correct resolution for your Television or monitor you are using. Please refer to the manufacture documentation to confirm compatible resolutions. Press the Enter Button to continue Note: If you are connecting the player using the Composite Video Connection method please select the 480I/576I or 480P/576P options only. Higher resolutions will not be displayed. 20 BLU-BD1000 USER MANUAL STARTUP WIZARD 4. In case the select resolution is not compatible with the attached television the BLU-BD1000 will ask you to confirm the resolution change. By default it will time out after 15 seconds and revert to the previous settings. Using the UP &DOWN navigation buttons on the remote control please select YES and press enter. If you do not see this screen please wait for 15 second the BLU-BD1000 will revert to the previous resolution. 5. If the message shown to the right is displayed it means that the current selected resolution is not compatible with the display. Press the HDMI button on the remote control to adjust the output resolution of the player. Repeat until the Start-up Wizard is visible again. 6. With the display resolution set you will need to set the Aspect Ratio for the Display. In most cases Selecting the “16:9 Normal” option is the best. If you do not have a wide screen TV please select the “4:3 Letterbox” option. (please see further for A detailed explanation of Aspect Ratios) Press the Enter Button to continue 21 BLU-BD1000 USER MANUAL SETUP MENU SETUP MENU When the Start-up Wizard is complete The Main Setup Menu will be displayed so you can fine tune the settings on the BLU-BD1000 to suit the environment it is being used in and the equipment it is being used with. The Setup Menu can be accessed at any other time by press the SETUP/HOME button on the remote control at any time. Use the LEFT, RIGHT, UP and DOWN navigation buttons on the remote to navigate the Setup Menu. Use the ENTER button on the remote to confirm the selection. Other Keys to be used are displayed on screen throughout the menu. Note: Some options in the Setup menu may not be available if a disc is being played. Please stop all play back to access all features. GENERAL SETTING First shown screen is the General Settings menu. Use the UP and Down navigation button on the remote control to select the sub setting to change. Use the Right navigation button to access the option. The Current set option is marked. Press the Left navigation button on the remote control to go back a level or the SETUP/HOME button to exit the Setup Menu entirely. 22 BLU-BD1000 USER MANUAL Menu SETUP MENU Feature Option ON Starts Screen saver if no video is being played or not used for 60 seconds. OFF Turns Screen Saver feature OFF Screen Saver Disc Auto Playback ON OFF Load Default Upgrade DISC USB STORAGE Easy Setup OSD (On Screen Display) MENU AUDIO ENGLISH ENGLISH SPANISH DUTCH ENGLISH SWEDISH SPANISH KOREAN DUTCH SWEDISH KOREAN SUBTITLE Description ENGLISH SPANISH DUTCH SWEDISH KOREAN Playback of recognised discs starts when inserted. Playback of disc to be started manually. Restores All settings on the BLU-BD1000 to factory default and launches the START-UP WIZARD Upgrade Player firmware By CD Upgrade Player Firmware by USB device Launches STARTUP WIZARD The Menu Language for the BLU-BD1000 is set at English only. Select the language you wish the Disc menu to automatically be displayed in. Select the language you wish the Disc audio to automatically be played in. Note: Selected language must be available on the disc being played. Other language options also available. Select the language you wish the movie subtitles to automatically be displayed in. Note: Selected language must be available on the disc being played. Other language options also available. SETUP MENU 23 Menu BLU-BD1000 Feature Option USER MANUAL Description ON Turns the Closed Caption feature ON OFF Turns Closed Caption feature OFF ON Shows if extra scene angles are available on current disc. Closed Caption Angle Mark (Use with ANGLE button on remote control) OFF ON Secondary Audio Mark (SAM) OFF AUST Rating Parental Control Password = 0000 Will not show alternative Angles Turns the SAM feature ON for discs that contain this feature. Icons will be displayed on the screen when available. Turns the SAM feature OFF for discs that contain this feature. Icons will not be displayed. Player Rating OFF KID SAFE G PG PG-13 PGR R Turns the Parental control features OFF Only plays Discs classifieds as Kid Safe Only plays Discs classifieds as G and lower Only plays Discs classifieds as PG and lower Only plays Discs classifieds as PG-13 and lower Only plays Discs classifieds as PGR and lower Only plays Discs classifieds as R and lower NC-17 Only plays Discs classifieds as NC-17 and lower ADULT Only plays Discs classifieds as ADULT and lower Note: Select a player rating that is equal to the Australian classification. E.g.: Selecting the PGR or R rating on the player will allow movies with the Australian M classification to be played. 24 BLU-BD1000 USER MANUAL DISPLAY SETTINGS The Display Settings menu allows you to fine tune the way the BLU-BD1000 presents the video on your Television or monitor. Use the UP and Down navigation button on the remote control to select the sub setting to change. Use the Right navigation button to access the option. The Current set option is marked. Press the Left navigation button on the remote control to go back a level or the SETUP/HOME button to exit the Setup Menu entirely. 25 BLU-BD1000 USER MANUAL Menu SETUP MENU Feature TV SCREEN Resolution TV System Option Description 16: FULL 16:9 NORMAL 4:3 PAN&SCAN 4:3 LETTERBOX Scales image to fill 16:9 screen Shows image without distortion Scales image to fill the 4:3 screen Shows image without distortion Some content may appear distorted due to the original material AUTO 480I/576I 480P/576P 720P 1080I 1080P NTSC PAL Resolution is set by TV with HDMI cable only 720x480/576 Interlaced image 720x480/576 Progressive Scan image 1280x720 Progressive Scan image 1920x1080 Interlaced image 1920x1080 Progressive Scan image Output is in NTSC Output is in PAL Both formats are permitted. Must be support by TV Multi YCbCr Colour Space YCbCr 422 (For TVs with this feature) HDMI Deep Colour (For TVs with this feature) 30 bits 36 bits 48 bits OFF High Sharpness Middle Low Video Mode The HDMI output uses YCbCr 4:4:4 colour space. The HDMI output uses YCbCr 4:2:2 colour space. Generally this is the colour space that is closest to the colour space encoded on the discs. (All discs are encoded in YCbCr 4:2:0 colour space and the video decoder decodes it into YCbCr 4:2:2.) Use the 30-bit per pixel Deep Colour mode. Use the 36-bit per pixel Deep Colour mode Use the 48-bit per pixel Deep Colour mode Do not use HDMI Deep Colour Sets the edge level detail to high Sets the edge level detail to medium Sets the edge level detail to low. Standard Sets the display to standard Vivid Brightens the video Display Smooth Set the colour transitions to Smooth Note: Please note that some of the Display Settings require a compatible television or monitor and connection method that supports those features. Please see the rear of this manual for more detailed information on some of the features and settings that are available. 26 BLU-BD1000 USER MANUAL SETUP MENU AUDIO SETTINGS The AUDIO Settings menu allows you to fine tune the way the BLU-BD1000 decodes the audio and presents the signal to your Television or Home Theatre system Use the UP and Down navigation button on the remote control to select the sub setting to change. Use the Right navigation button to access the option. The Current set option is marked. Menu Press the Left navigation button on the remote control to go back a level or the SETUP/HOME button to exit the Setup Menu entirely. Feature Option Bitstream HDMI Down Sample DRC (Dynamic Range Compression) PCM Re-encode OFF 48K 96K 192K Off On Auto Description Digital Audio Output via HDMI will be in Bitstream format Digital Audio Output via HDMI will be multichannel Linear PCM format. Recode PCM to DTS bitstream format Turns HDMI Audio output off Sets the PCM down sample rate to 48Khz Sets the PCM down sample rate to 96khz Sets the PCM down sample rate to 192Khz Turns DRC features OFF Turns DRC features ON Allows DRC to be set automatically 27 BLU-BD1000 USER MANUAL Menu SETUP MENU Feature Option 2.X 3.X Configuration 4.X 5.X 6.X 7.X Follow the on screen instructions to Test tone More UpMix OFF PL2 NE06 Description Adjust the Audio for 2.X Speaker setup Adjust the Audio for 3.X Speaker setup Adjust the Audio for 4.X Speaker setup Adjust the Audio for 5.X Speaker setup Adjust the Audio for 6.X Speaker setup (HDMI only) Adjust the Audio for 7.X Speaker setup (HDMI only) adjust the audio for your speaker set up. Sends a Test tone to the current speaker setup Turns the Audio Post Processing OFF Set the Audio Post Processing to PL2 Set the Audio Post Processing to NE06 Note: Please note that some of the Audio Settings require a compatible television, monitor and Home Theatre system and connection method that supports those features. Please see the rear of this manual for more detailed information on some of the features and settings that are available. SYSTEM INFORMATION The System Information screen shows the current software version as well as the player MAC (Media Access Control) address. Press the SETUP/HOME button to exit the SetUp menu and return the normal playback screen. 28 BLU-BD1000 USER MANUAL PLAYING A DISC PLAYING A DISC With the player setup it is time to play a disc in the BLU-BD1000 player. Press the STANDBY button to turn the play on Press the OPEN/CLOSE button on the remote or the player to open the DISC TRAY Place the disc in to the centre of the tray with the label facing up. Press the OPEN/CLOSE button on the remote or the player to close the DISC TRAY If the Disc does not begin playback automatically press the PLAY button on the remote or the remote controller or on the player. Use the LEFT, RIGHT, UP and DOWN navigation buttons on the remote to navigate the Disc menu and press the Enter button to confirm the selection. Please refer to the Remote control details on page 10 for available options during disc playback. Note: Not all options on the remote control will be available on all discs. Some options require the content of information to be available on the disc itself to work. Please refer to the Disc case to determine available features or options on the disc. OSD (On Screen Control) Press the OSC button on the remote control during disc playback for control options. Use the UP, DOWN, LEFT and RIGHT buttons to navigate through the options. Press the ENTER button to confirm selection. Numeric keypad may be used for some entries. 29 BLU-BD1000 USER MANUAL ON SCREEN CONTROL Icon BD DVD CDDA MC Description OPTION Playback time Playback type Audio track Disc content dependant Angle Disc content dependant Subtitle Disc content dependant Code Page Displays Code page of current file. Subtitle Style Disc content dependant Second Video (PIP) Disc content dependant Second Audio Disc content dependant Audio/Video Bitrate Toggle between Audio or Video Bitrate display Still Off Disc content dependant INS Search* Fast forward at 2 x. INS Replay* Fast rewind at 2 X. Disc now playing Current File Select another file to player Current title or track number Current Chapter number Select a title or track to skip directly to. Select a chapter to skip directly to Current Chapter remaining Title remaining Normal Random Chapter Random Title Random All BD=Blu-ray Disc; DVD = DVD; CDDA= CD Audio discs; MC = Media Center *Press the PLAY button to resume normal playback. Note: Not features or options shown here may be available for all discs or files. Some features require the disc or file to contain extra content for these features. Please check the disc case or file source to determine if the feature are available. 30 BLU-BD1000 USER MANUAL DVD PLAYBACK Creating and Using Bookmarks (BD & DVD only) The bookmark feature works for DVD and Blu-ray discs only. 1. Follow the instructions for Playing a Disc. 2. Press the BOOKMARK button on the remote control to bookmark the current point in the playing disc. You can create up to 12 bookmarks. 3. To access saved bookmarks, press and hold the BOOKMARK button for 5 seconds. The on-screen bookmark menu will appear. 4. Use the NAVIGATION buttons on the remote to select and view a saved bookmark and press the enter button to confirm the selection. Programming a Disc (DVD & CD audio only) 1. Follow the instructions for Playing a Disc. 2. While the disc is playing, press the PROGRAM button on the remote control. A program menu will appear on the television. 3. Press the ENTER button. 4. Use the ARROW buttons to select a title and chapter. Press the ENTER button. 5. Press the PLAY button to begin playing the programmed disc. Cancelling a Program (DVD & CD only) 1. While the disc is playing, press the PROGRAM button on the remote control. 2. Press the RETURN button on the remote control to clear the set program 31 BLU-BD1000 USER MANUAL MEDIA CENTRE MEDIA CENTRE The media centre allows some multimedia files to be played on the BLU-BD1000 Blu-ray player. The files can be stored on compatible CD, DVD, USB flash drive or USB hard drive. Load the disc containing the files in the tray or Plug the device containing the files in to the USB port on the front of the Player as described earlier in this manual. Allow a few second for the USB device to be detected correctly and then press the Media Center Button on the remote control. 1. The left hand panel of the Media Center Screen shows the type of media in the tray or USB port. 2. The right hand panel show the Type, size and file system of the current selected item. Use the UP & Down navigation buttons on the remote to select the media to open. The Playlist folder will show all files that are currently added to the Playlist. Playing a file Once the device that contains the media files has been selected use the UP & DOWN navigation buttons to select the type of files to be viewed. Photo: Will only display compatible image files. Music: Will only display compatible Music files. Video: Will only display compatible Video files. Press ENTER when media type has been selected or use the … icon to go back a screen. 32 BLU-BD1000 USER MANUAL MEDIA CENTER Use the UP, DOWN and ENTER buttons to navigate your way to find the file that you wish to play. The Path is listed in the top bar The File names are list in the left panel The file type is shown in the right panel. When the correct file to be played is found press the ENTER button to begin playback. Press ENTER when media type has been selected or use the … icon to go back a screen. To control the playback of the file, please see Remote Control and On Screen Control section. Creating a Playlist Individual files or the contents of a folder can be added to a playlist. Once the playlist has been created it can be used to playback files one after the other. Files can be added by selecting the file to be added and pressing the Right navigation button. The file will be marked with a . Repeat until you have several files to add to the playlist. Press the POPUP/TITLE button to show the Play list options. Add To Playlist: Adds the selected file(s) to the Playlist. Select All: Selects all files and folders in the current folder and adds to the Playlist. Clear All: Clears all tagged files from the Playlist. Cancel: Cancels Menu. Use the UP and Down navigation buttons to make the selection and then press the ENTER button to confirm. Note: Playlists are created per file type. Mixed playlists cannot be created. 33 BLU-BD1000 USER MANUAL MEDIA CENTER Playing a Playlist Press the Media Center button on the remote control to launch the Media Center. Use the UP and Down navigation buttons to select the Playlist option and press the ENTER button. Use UP and Down navigation button to select the file to start playing from and then press the ENTER button. During playback use the PREVIOUS/NEXT buttons to skip to the previous or next file in the playlist. The playlist can be edited by selecting the file to be removed and pressing the Right navigation button. The file will be marked with a . Press the POPUP/TITLE button to display the options menu for the playlist. Remove From Playlist: Removes the selected file(s) from the Playlist. Select All: Selects all files in the Playlist. Clear All: Clears all marked files. Cancel: Cancels Menu. Use the UP and Down navigation buttons to make the selection and then press to the ENTER button to confirm. NOTE: USB devices connected to the BLU-BD1000 must be formatted in the FAT32 or NTFS file system only. 34 BLU-BD1000 USER MANUAL GETTING THE BEST FROM THE PLAYER GETTING THE BEST FROM THE PLAYER PAL/NTSC NTSC format discs contain 480 horizontal lines of information. Most TVs sold in Australia are designed to display content in the PAL format. PAL contains 576 horizontal lines. Video from NTSC discs may appear to be of lower quality than PAL content. DVD Up-Scaling DVD up-Scaling over the component output is only available for unencrypted discs such as home video and consumer-created contents. Most commercially pressed DVD discs are CSSencrypted and will be limited to 480i/480p resolution. This restriction applies to the component output. DVD Region Encoding The BLU-BD1000 is region free for the playback of DVD. The BLU-1000 is compatible with DVDs from all regions. Please check the DVD for the correct language or subtitle content. Blu-Ray Region Encoding If the region number of a BD-Video or DVD disc does not correspond to the region number of this player, this player cannot play the disc. Changing the Region Code The region coding of eth BLU-BD1000 can be changed using the remote control. Remove any disk that may be in the tray. On the remote control press the SETUP/HOME button Press 8-5-2-0 on the Numeric Keypad on the remote. The Screen shown to the right will be displayed. Use the UP/DOWN navigation buttons on the remote control to highlight the disc type you want to change the region for 35 BLU-BD1000 USER MANUAL GETTING THE BEST FROM THE PLAYER DVD Region Change The BLU-BD1000 is factory preset to region 0 to play all regions and it is recommended that the DVD region not be changed unless absolutely necessary. To change the region, please follow the steps as above and so the DVD Region Code box is highlighted. Using the Numeric Keypad on the remote control, press the number of the region code for the disc to be played. When the code is set, press the SETUP/MENU button on the remote control to return to the main screen and play discs as normal. Acceptable Region codes are 1, 2, 3, 4, 5, 6 or 0. If the code is set from 1 through 6, only discs coded for that region can be played and the Region code will need to be reset before disks from other regions can be played. BD Region Change The BLU-BD1000 is factory preset to region B. To play BD titles from any other region it is necessary to change the Region Code on the player before playback. To change the region, please follow the steps as above and so the DVD Region Code box is highlighted. Using the Numeric Keypad on the remote control, press the number of the region code for the disc to be played. When the code is set, press the SETUP/MENU button on the remote control to return to the main screen and play discs as normal. Acceptable Region codes are 1 (Region A), 2 (Region B), 3 (Region C). There is no All region code for Blu-ray discs. Resolution Blu-ray playback is possible through any connection method although the output resolution will be limited by the connection method the display or home theatre system or the content of the Blu-ray disc being played. FULL-HD (1080p) is only possible on devices that support a resolution of 1080p. Please refer to the documentation of your display device to confirm the supported resolutions. If you are connecting the BLU-BD1000 through other devices such as a Home Theatre System these also must be 1080p compatible. 36 BLU-BD1000 USER MANUAL GETTING THE BEST FROM THE PLAYER Aspect Ratios The Picture Aspect Ratio can be changed not only to suit the Display type but the content being played as well. 4:3 or Standard Aspect Ratio TV 16:9 or Widescreen Aspect Ratio TV You can set the way that a Wide screen image will be displayed on the display device. Setting the Aspect ratio as described in the main Set-Up menu allows you to adjust the way that you view the video from your BLU-BD1000 player. Please see below to see an indication of how different content is displayed. Original content 4:3 Letterbox 4:3 Pan & Scan 16:9 Normal 16:9 Full Screen 4:3 16:9 Note: Some movies are presented in 2:35.1 ratio to preserve the Theatrical release originality of the movie. These movies will present with a black bar across the top and bottom of the picture during playback. This is normal for these movies. Some early DVD titles prior to main stream Widescreen television use a 4:3 non-anamorphic widescreen aspect ratio. When played on a 16:9 display, the content is shown in a small window with black borders on all four sides. The top and bottom borders are encoded into the video. The left and right borders are added by the player to maintain the correct aspect ratio. For this type of discs the “Full Screen” zoom mode can be used to eliminate the borders. Please check the original disc case to determine the aspect ration the movie is presented in. 37 BLU-BD1000 USER MANUAL GETTING THE BEST FROM THE PLAYER HDMI Deep Colour Deep Colour is an OPTION for some TVs or projectors that feature HDMI v1.3 inputs. Normally, each pixel of the video image is transmitted using 24-bit data (8-bit per channel for R, G, B or Y, Cb, Cr). If Deep Colour is supported, each pixel of the video image can be transmitted using 30-bit (10-bit per channel), 36-bit (12-bit per channel) or 48-bit (16 bit per channel) data. The increased bit depth should result in smoother colour transitions and better gradients. The available options are: 30 bits: 36 bits: 48 bits: OFF: Sets the colour depth at 32 bit mode. Sets the colour depth at 36 bit mode. Sets the colour depth at 48 bit mode. Turns Deep Colour Mode OFF Note: Deep Colour mode may not be supported by all Televisions and these settings may result in no change to the picture quality being displayed. At this time no disc is encoded with Deep Colour. Enabling deep colour will not make colour richer but will help preserve the maximum precision as a result of video processing and picture control. HDMI V1.3 or later cable must be used. HDMI 1080P 24Hz Also known as 24P, this option only applies to the HDMI output at 1080p resolution. Many Blu-ray Discs that originated from theatrical movies are encoded using 24Hz frame rate, the same number of frames per second as the original theatrical film. If the TV properly supports 1080p 24Hz, smoother motion can be achieved by enabling 1080p 24Hz Output for such discs. The available options are ON: Video encoded in 24Hz frame rate will be output as 1080p 24Hz without regard to whether the TV can support the 1080p24 signal or not. If the TV cannot support 1080p24, selecting this option will result in no video. *Please ensure that your television support this features before selecting. OFF: Video Encoded in the 24Hz frame rate will be converted to 50Hz (PAL) or 60Hz (NTSC). 38 BLU-BD1000 USER MANUAL GETTING THE BEST FROM THE PLAYER Audio Setup As well as the Audio setup as described earlier in this manual, if you have audio set up through the television or to a Home Theatre System, the BLU-BD1000 allows you to fine tune the audio output to best suit your environment. From the Main Setup menu select Audio Settings >> Speaker Settings >> Configuration. Select the number of speakers that you have connected to your system from simple stereo speaker (2.0) right up to full DTS-HD High resolution 7.1 channel system. You will be asked to select the Channel mode for the selected option. These options will vary depending on what equipment you may have connected to the player via the HDMI cable. The BLU-BD1000 may automatically detect an HDMI connected Home Theatre System and select the number and type of audio channels available Here is a basic diagram of Home Theatre speaker layouts. F= Front Left and Right Speakers SW= Sub Woofer: (1 or 2) C= Centre: Voice channel S= Surround Speakers left and right SR= Surround Rear Speaker left and right RC= Rear Centre Speaker 2.1 F + SW 5.1 F + C + SW + SR 3.1 F + SW + C 6.1 F + C + SW + SR + RC 4.1 F + SR + SW 7.1 F + C + SW + S + SR 6.1 & 7.1 through HDMI only The Audio configuration should be used in conjunction with the documentation for your Home Theatre or speaker setup. This documentation will show the best position, angle and distance for each speaker. The Speaker settings in the Audio setup allow you to fine tune the audio and set the size trim and delay for individual speakers as they are placed in the room. A test sound is also available to help set the position of the speakers in relation to your viewing position. Note: Speaker Identification and terminology may vary slightly between manufactures. Please read all documentation carefully to help identify all components and how they relate to terms used in this document. GETTING THE BEST FROM THE PLAYER 39 BLU-BD1000 USER MANUAL Blu-ray Discs may contain many types of audio signal formats, some of those are of the high resolution types such as Dolby TrueHD and DTS-HD Master Audio. Blu-ray Discs also have many optional audio components such as the Secondary Audio Program and menu clicking sound. The player’s Audio Format Setup menu allows you to configure the audio output to meet your specific preference. The following chart provides a reference to what type of audio signal can be expected when Secondary Audio option is set to off. Output Ports Setting Source Format PCM 2ch PCM 5.1ch PCM 7.1ch Dolby Digital Dolby Digital Plus Dolby TrueHD DTS DTS-HD High Resolution DTS-HD Master Audio HDMI Output Bitstream PCM 2ch PCM 5.1ch PCM 7.1ch Dolby Digital Dolby Digital Plus Dolby TrueHD DTS DTS-HD High Resolution DTS-HD Master Audio Coaxial Output PCM Analogue MultiChannel Output 2ch Bitstream PCM PCM 2ch PCM 5.1ch PCM 7.1ch PCM 5.1ch PCM 2ch PCM 2ch PCM 2ch Dolby Digital PCM 2ch PCM 2ch PCM 2ch PCM 2ch PCM up to 7.1ch Dolby Digital PCM 2ch Dolby Digital PCM 2ch DTS PCM 2ch - PCM up to 7.1ch DTS (core) PCM 2ch - PCM up to 96kHz 24-bit 7.1ch or 192kHz 24-bit 2ch DTS (core) PCM 2ch - PCM up to 192kHz 24-bit 7.1ch PCM up to 7.1ch - Note: If you use HDMI to connect audio to an HDMI A/V receiver or audio processor, it is important that you choose 720p or higher HDMI output resolution when playing high resolution audio content (DVD-Audio, SACD, Dolby TrueHD and DTS-HD Master Audio). According to the HDMI specification, the bandwidth available for audio is proportional to the total bandwidth used by video. At 480p/576p resolution, the HDMI specification can only support 2 channels of audio with high sample rate (up to 192kHz) or 8 channels of audio with standard sample rate (up to 48kHz). If you play high resolution audio content at the 480p/576p resolution, you may get reduced audio resolution, incomplete audio channels, or even no audio/video output at all. Choosing a higher output resolution such as 720p or above allows enough bandwidth for all high sample rate audio channels. 40 BLU-BD1000 USER MANUAL TROUBLESHOOTING TROUBLESHOOTING In order to prolong the service life of your player, it is recommended to wait at least 30 seconds before you turn it on again after switching it off. Remove disc and turn power off after operation. Some functions of the player may not be applicable to certain discs. Some discs with special features may not be fully supported by the player. This is not a malfunction of the unit. In case of player malfunction, please turn it off, wait for 30 seconds and turn it back on. If the problem still exists, please follow the troubleshooting instructions or contact Laser Technical Support. Use this chart to resolve general operational problems. If there are any problems that you cannot resolve, please contact Laser technical Support TROUBLESHOOTING Symptom Possible Cause Solution Will not turn Blu-ray data is still being on loaded No sound No picture Wait for up to 10 seconds for all data to be loaded. The unit will then boot and turn on correctly Audio cable is not properly Check audio cable, and then reconnect if connected necessary. Mute is activated Press the MUTE button to cancel the mute. Volume is too low Press the VOL + button to increase the volume to a preferred level. SACD is played and the This is not supported due to copyright audio connection is coaxial restrictions of SACD. Please use the analogue or HDMI audio output. DVD-Audio is played and This is not supported due to copyright the audio connection is restrictions of SACD. Please use the analogue or coaxial. HDMI audio output. Alternatively, you may switch to the DVD-Video playback mode. Video cable is not properly Check video cable; reconnect if necessary. connected TV input is not correctly Select the input to which the player is connected. selected Video output format is not Select a proper output resolution that is support by the TV supported by your TV. Video system is not Set the correct TV System in the Setup Menu. supported by the TV 41 BLU-BD1000 Symptom No colour Possible Cause Video system is not supported by the TV Saturation set too low Loose or damaged component video cables USER MANUAL Solution Set the correct TV System in the Setup Menu. Check the saturation setting on TV. If using component output, check that the three cables are all properly plugged in and not damaged. Make sure the colour of the plugs match the jacks on both ends. Incorrect video output port If using composite video output, check that the cable is not incorrectly plugged into a component video jack. Incorrect Incorrect colour space If using HDMI for video output, check the colour colour setting space setting on the TV and player. Picture rolling Video system is not Set the correct TV System in the Setup Menu. or supported by the TV split picture “No Disc” or No disc or incompatible Eject disc and check. Verify player functionality “Unknown disc loaded in player by inserting a known working disc. Disc” Error Dirty disc recording surface Eject the disc and clean any dirt or fingerprints. Disc not properly loaded Eject disc and make sure the label side is facing up and the record side is facing down. Condensation on the Laser Turn on the player, eject the disc and leave the pick-up head player on for about an hour. Remote Remote control is out of Use the remote control within the effective control range range. failure Point Remote at IR receiver on front Panel. Low battery Replace the batteries. Temporary Scratched or damaged disc Replace the disc. function is used failure Some functions are not Stop playback completely, then try again. available during playback Interference from other Identify interference by turning off other devices devices, and then relocate or replace the offending device. Some Setup Some setup options cannot Fully stop playback by pressing the stop button Menu items be changed while a disc is twice, eject the disc and try the Setup Menu are greyed playing. Some setup again. out options may be mutually exclusive with other setup options. 42 BLU-BD1000 USER MANUAL TECHNICAL SPECIFICATIONS TECHNICAL SPECIFICATIONS Disc Types* BD Rom (SL/DL) / DVD+RW/+R/+RW(SL/DL) CD/CD-R/RW/CD-DA, VCD JPEG Loader type Sanyo loader HDMI Version 1.3 Blu-ray Playback 1080p / 1080I / 720p via HDMI HD output Full HD output 1080/24p via HDMI DVD UPSCALING 720p/1080i/1080p via HDMI (non restricted content only) Colour System PAL/NTSC/MULTI Audio System Dolby Digital TrueHD/ Dolby Digital Plus Decoder Dolby Digital / DTS decoder BD Region Region B default (Manual convert to region free) DVD Region Region Free Connections Analogue Audio Stereo LEFT/RIGHT (RCA) Digital AUDIO Coaxial (75 OHM RCA) HDMI : Stereo, Up to 7.1 Channel Composite (Yellow RCA) Component (Y/Pb/Pr 480i/480p, 720p/1080i for non restricted content only) HDMI Ver 1.3 PAL 576i/576p/720p/1080i/1080p/1080p24 NTSC 480i/480p720p/1080i/1080p/1080p24 Analogue Video Digital Video Input General Specifications 1 x USB 2.0 Power Supply: ~ 100V – 240V, 50/60Hz AC Power Consumption: Up to 16W (less than 1W Standby) Dimensions: 360mm x 232mm x 49mm Mass: 1.6kg (Player Only) 10°C - 35°C Operating Temperature Operating 20% - 70% Humidity No condensation * Compatibility with user-encoded contents or user-created discs is on a best effort basis with no guarantee due to the variation of media, software and techniques used. 43 BLU-BD1000 USER MANUAL CONTACT INFORMATION CONTACT INFORMATION For more information on this product and technical support please visit HTTP://WWW.LASERCO.NET FOR OTHER ACCESSORIES AND PRODUCTS http://www.laserco.net Warranty Against Defects Laser Corporation Pty Ltd (“Laser”) warrants your new product to be free from defects in materials and workmanship for 12 months, from the date of purchase, provided that the product is used in accordance with accompanying recommendations or instructions where provided. The benefit of this warranty is in addition to your rights under the Australian Consumer Law and to other rights and remedies of the consumer under a law in relation to the goods or services to which the warranty relates. Through a network of retailers and resellers, Laser will provide you with your choice of a refund, repair or exchange (where possible) for this product if it becomes defective within the warranty period. This warranty will no longer apply where the defect is a result of alteration, accident, misuse, abuse, normal wear and tear, neglect or improper storage. Please retain your receipt as proof of purchase How to make a product warranty claim: Step 1: Find your receipt which proves the date of purchase. Where the date of purchase cannot be verified, your place of purchase or Laser will make an assessment based on the date of manufacture, the condition of the Laser Product and the type of defect. Step 2a): Contact your place of purchase. They will assess the nature of the fault and refund or replace the product as per their store refund or warranty policy. Step 2b): If your place of purchase cannot be contacted, then you can contact Laser . Customer Service with details of your defective Laser Product: Phone: (02) 9870 3355; or Email: [email protected] or online www.laserco.net/support/warranty (click on “Consumers (End Users)”). Our business address is at 1/6-8 Byfield Street, North Ryde, NSW 2113 Step 3: Laser . will issue you with a Return Authorisation (RA) number within 48 hours. When requested, send us the defective Product and a copy of your receipt. Laser will cover the cost of the return delivery. Step 4: Wait for us to contact you. Once we have received your defective Laser Product for inspection, we will inform you of our assessment of your claim within 7 days. When we contact you, we will firstly let you know whether you have a valid claim under this Warranty, and if so, we will inform you whether your defective Laser Product will be replaced or repaired, together with the number of days you can expect to wait to receive your replaced or repaired Laser Product. Our goods come with guarantees that cannot be excluded under the Australian Consumer Law. You are entitled to a replacement or refund for a major failure and compensation for any other reasonably foreseeable loss or damage. You are also entitled to have the goods repaired or replaced if the goods fail to be of acceptable quality and the failure does not amount to a major failure. 44