1
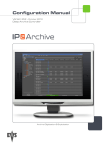
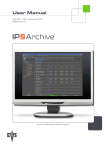
XenData X2500
User Guide
© 2013 XenData Limited. All rights reserved.
XenData is a trademark of XenData Limited.
Updated: May 13, 2013
User Guide: XenData X2500 LTO-6 Archive System
XenData X2500 LTO-6 Archive System User Guide
Contents
1. Overview
1.1 X2500 Contents
1.2 About LTO
1.3 LTO Archive and Restore via Drag and Drop
1.4 Offline File Management
1.5 Barcodes and Tape Labels
1.6 Use on Multiple Computers
1.7 More About XenData6 Workstation Software
2. Installation Guide
2.1 Workstation System Requirements
2.2 Connecting the Hardware
2.3 Installing the Software
3. System Power On/Off Procedure
3.1 System Power-On
3.2 System Power-Off
3.3 Changing the Connected LTO Tape Drive(s)
4. Tape Drive Operation
4.1 Tape Drive Front View
4.2 Powering on the Tape Drive
4.3 Removing Power from the Drive
4.4 Loading a Tape Cartridge
4.5 Ejecting a Tape Cartridge
4.6 Tape Drive Cleaning
Appendix: IBM LTO Drive SCD Codes
User Guide: XenData X2500 LTO-6 Archive System
1. Overview
1.1 X2500 Contents
The X2500 is an LTO-6 digital archive system for installation on a Windows 7 workstation. The
X2500 contains the following items.
IBM LTO-6 tape drive in an external enclosure with a SAS interface
X2500 CD with documentation and XenData6 Workstation software
Dual port SAS Card - for insertion in the computer's PCI Express slot
2m SAS cable - to connect the tape drive to the SAS card
LTO Cleaning Cartridge
1.2 About LTO
Linear Tape Open (LTO) is the leading data tape format and uses technology developed by HP,
IBM and Quantum Corporation. The latest generation of LTO is LTO-6 which provides high
storage capacity, high speed file transfers and a long archival data life:
Huge storage capacity Each LTO-6 tape cartridge stores 2.5 TB without any
compression. For video files, this represents 100 hours at a 50 Mbits/s recording rate.
High speed file transfers LTO-6 tape drives write to and read from tape at up to 160
MBytes/s.
Long archival data life LTO tape cartridges are available from multiple manufacturers
that specify a 30 years archival data life.
LTO tape cartridges are available as rewritable or WORM. WORM is an acronym for Write Once
Read Many and the data written to WORM LTO tape cartridges cannot be altered. This means
that WORM tapes cannot be reformatted and reused, unlike rewritable cartridges.
Tape drive compatibilities are as follows.
Drive
Type
2500 GB
RW
LTO-6
ReadWrite
2500
GB
WORM
ReadWrite
1500 GB
RW
ReadWrite
1500
GB
WORM
ReadWrite
800 GB
RW
800 GB
WORM
ReadOnly
ReadOnly
400 GB &
200 GB
RW
Not
Compatible
1.3 LTO Archive and Restore via Drag and Drop
The X2500 system archives to and restore from LTO tape using Windows Explorer. The
XenData6 Workstation software extends Windows Explorer's capabilities to transfer files to and
from LTO using drag and drop or copy and paste. Files many be archived to tape from any
accessible logical drive letter or network share, including Mac shares. Similarly, files may be
restored to a local drive letter or a network location.
Using familiar Windows Explorer functionality, the software gives an option to copy only files that
have changed or are new.
User Guide: XenData X2500 LTO-6 Archive System
The system supports all file types, including non-video files. It maintains file and folder structures,
which allows the transfer of nested folder structures to and from LTO tapes.
1.4 Offline File Management
The X2500 system can manage a large offline LTO tape archive as the file and folder structure
stored on all tapes that have ever been inserted into the LTO tape drive may be retained. You
can browse the contents of offline tapes using Windows Explorer and should you need to restore
one or more files or folders, the system will prompt with the name of the offline tape.
The software includes a report generator which is useful for managing the archive. Options
include File Search reports that produce a list of files which meet user-defined file search criteria
and identify the LTO cartridge that contains each match. A Tape Contents report is also available
which produces a list of files contained on any LTO cartridge including offline tapes.
1.5 Barcodes and Tape Labels
A label may be attached to an LTO tape cartridge. This can be a paper label with a descriptive
volume label which may be hand-written or it can be a barcode label as shown below.
When using a tape library, barcodes labels are the preferred method for keeping track of tapes,
as most tape libraries include a barcode reader. However, stand-alone tape drives do not have
the capability of reading barcode labels but they are able to read the in-cartridge memory chip
that is present in all LTO tape cartridges. When an LTO tape having a barcode label is formatted
in a tape library under control of XenData server software, the software writes the barcode
information to the in-cartridge memory chip which allows the barcode information to be read in a
stand-alone tape drive and to be displayed by XenData6 Workstation software.
1.6 Use on Multiple Computers
The XenData6 Workstation software license supports use of the supplied LTO tape drive on
multiple computers. When you first install the software, you will assign the supplied tape drive to
your software license. Then you may install the XenData6 Workstation software on multiple
computers and use the specific assigned LTO drive on any of those computers.
1.7 More About XenData6 Workstation Software
Please refer to the XenData6 Workstation User Guide.
User Guide: XenData X2500 LTO-6 Archive System
2. Installation Guide
2.1 Workstation System Requirements
The workstation computer must meet the following minimum requirements.
Windows 7 operating system - all 32 bit and 64 bit editions are supported.
Minimum of 2 GB RAM.
One available PCI Express 2.0 slot - either high profile or low profile
2.2 Connecting the Hardware
2.2.1
Power-off the workstation computer.
2.2.2
Follow the instructions specific to your computer and install the dual port SAS card into
an available PCI Express 2.0 slot.
2.2.3
Connect the LTO tape drive to the SAS card with the supplied 2m SAS cable. Either of
the two SAS ports on the rear of the tape drive may be connected to either of the two
SAS ports on the card.
2.2.4
Connect a power cord to the LTO tape drive.
2.3 Installing the Software
When an Internet connection is available for the workstation computer, use the procedure
described below. (If you do not have an Internet connection, please refer to the XenData6
Workstation User Guide for an alternate method for licensing the XenData software and use this
to modify the procedure provided in section 2.3.8 below.)
2.3.1
Ensure that the hardware is connected as described above.
2.3.2
Power on the LTO tape drive(s).
2.3.3
Boot the workstation computer.
2.3.4
Configure Power Options for the workstation computer to prevent sleeping or hibernating.
(This is because any file transfers to or from LTO tape will pause if the workstation sleeps
or hibernates.)
2.3.5
Ensure that the workstation computer is connected to the Internet.
2.3.6
Ensure that you have administrator rights.
2.3.7
Install the device driver for the IBM LTO-6 LTO tape drive as described on the XenData
web site at http://www.xendata.com/support/X2500/. (Note: this is case sensitive.)
2.3.8
Install the XenData6 Workstation software as described below:
Select from the supplied CD or download the applicable XenData6 Workstation
installation file - either 32 bit or 64 bit as appropriate for your Windows 7 operating
system.
User Guide: XenData X2500 LTO-6 Archive System
Double click on the XD6Workstation_setup file to launch the installation wizard and
proceed as described below.
Carefully review the License Agreement and, if you agree, accept the terms of the
agreement.
When the License Administration Utility interface is displayed as shown below, enter
your Activation Code into the designated field and click ‘Apply’.
The License Administration Utility will connect to a XenData License Server and will
activate your system. It will permanently assign the attached tape drive to your Activation
Code. The details of the activation will be displayed in the lower pane of the License
Administration Utility. Then click ‘OK’
2.3.9
Reboot the workstation after successful completion of the installation wizard.
User Guide: XenData X2500 LTO-6 Archive System
3. System Power On/Off Procedure
3.1 System Power-On
3.1.1
Ensure that at least one LTO tape drive is connected to the Windows 7 workstation using
the supplied SAS cable(s).
3.1.2
Power on the LTO tape drive(s).
3.1.3
Boot the workstation computer.
3.1.4
The system is ready to use when the computer has booted up and the Ready Light on
each LTO tape drive shows steady green.
3.2 System Power-Off
3.2.1
Ensure that each connected LTO tape drive is idle, as indicated by a steady green Ready
Light.
3.2.2
Shut down the workstation from the ‘Start’ menu.
3.2.3
Power off each LTO tape drive using the On/Off switch.
3.3 Changing the Connected LTO Tape Drive(s)
To add or remove one or more LTO tape drives, please power down the system as described
above, attach or remove the tape drive(s) and then follow the power-up procedure as described
above.
If you are adding an LTO tape drive that has not previously been used on this workstation, please
follow the procedure described below.
For LTO Drives Previously Licensed - If one of the attached LTO tape drives has not been
used on this workstation previously but has been licensed on another workstation, please
ensure that this workstation has an Internet connection. The first time that the XenData6
Workstation software identifies a new tape drive, it will use the Internet connection to
determine if the drive is licensed.
For LTO Drives Not Previously Licensed - You will need a valid XenData Activation Code
for each tape drive. Please use the XenData License Administration Utility to license each
drive.
User Guide: XenData X2500 LTO-6 Archive System
4. Tape Drive Operation
4.1 Tape Drive Front View
1. Cartridge Unload Button
2. Ready Light (green)
3. Encryption Light (white)
4. Fault Light (amber)
5. Single Character Display - SCD
6. SCD Dot
7. Drive Power Button
4.2 Powering on the Tape Drive
Connect power to the rear of the unit and press the Drive Power Button. The drive will first
perform self tests, which typically takes about two minutes. Wait until the drive becomes idle. This
is indicated by a steady green Ready Light.
4.3 Removing Power from the Drive
Wait until the drive becomes idle, as indicated by a steady green Ready Light. Then press the
Drive Power Button.
To ensure reliable operation, do not remove power from the drive during read, write, fast search,
load and unload activities. Power should only be removed when the Ready Light shows steady
green.
It is especially important to avoid removing power when files are being written to an LTO
cartridge. This may put the cartridge into an ‘alert state’ which may prevent further files being
written to that tape.
4.4 Loading a Tape Cartridge
4.4.1
Ensure that the Ready Light shows steady green.
4.4.2
Check that the Write Protect Tab on the LTO cartridge is in the desired position.
4.4.3
Slide the cartridge into the cartridge load compartment as shown below.
User Guide: XenData X2500 LTO-6 Archive System
1.Write Protect Tab.
.
Notes:
If the cartridge is already in an ejected position and you want to reinsert it, remove the
cartridge fully and then reinsert it using the procedure described above.
If the cartridge is already loaded and you cycle the power (i.e. you turn the power off and
then on), the cartridge will reload.
4.5 Ejecting a Tape Cartridge
4.5.1
Wait until the system has completed all read and write operations. This is indicated by the
Ready Light which shows steady green.
4.5.2
Press the Cartridge Unload Button on the front panel of the tape drive or use XenData6
Workstation to initiate an eject command.
4.5.3
The tape drive will rewind the tape to the beginning and then partially eject the cartridge.
This may take several minutes. The Ready Light will flash to indicate that the unload
process is still in progress.
4.5.4
After the cartridge partially ejects, grasp the cartridge and remove it.
User Guide: XenData X2500 LTO-6 Archive System
4.6 Tape Drive Cleaning
The tape drive does not require regular cleaning. A Universal LTO Cleaning Cartridge should only
be used when the amber Fault Light is flashing once per second and the SCD (Single Character
Display) shows:
To clean the tape drive:
Load the LTO Universal Cleaning Cartridge into the drive.
The drive will carry out its cleaning cycle and eject the cartridge on completion (which can
take up to 3 minutes).
Each LTO Universal Cleaning Cartridge can be used up to 50 times with LTO tape drives. If the
cleaning cartridge is ejected immediately, it has expired.
User Guide: XenData X2500 LTO-6 Archive System
Appendix: IBM LTO Drive SCD Codes
The Single Character Display (SCD) codes are described below.
Code
0
Meaning
Displayed after diagnostics have finished running and no error occurred. Note that
the SCD is blank during normal operation.
1
A temperature problem was detected.
2
A power problem was detected.
3
A firmware problem was detected.
4
A firmware or hardware problem was detected.
5
A tape drive hardware problem was detected.
6
A tape drive or LTO tape cartridge error was detected.
7
An LTO tape cartridge error was detected.
8
An interface problem was detected.
9
A tape drive error was detected.
A
Degraded operation was detected.
C
The tape drive needs to be cleaned.
e
An encryption error was detected.
J
Incompatible LTO tape cartridge. This drive does not support LTO 1, 2 or 3 tape
cartridges.
An attempted write operation to a protected cartridge was detected.
P