1
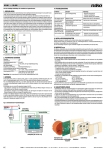
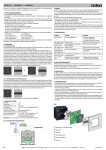
MusiCall
Gebruikers handleiding
User manual
MusiCall gebruikers handleiding
NL
Inleiding
Veiligheidsinstructies
1
Alle veiligheidsinstructies, waarschuwingen en gebruiksaanwijzingen moeten als
eerste gelezen worden.
2
Alle op het apparaat aanwezige waarschuwingen dienen opgevolgd te worden.
3
De gebruiksaanwijzing dient opgevolgd te worden.
4
Bewaar de gebruiksaanwijzing voor toekomstig gebruik.
5
Het apparaat mag nooit in de onmiddellijke nabijheid van water worden gebruikt;
voorkom de mogelijkheid van binnentreden van water en vocht.
6
Het apparaat mag alleen geplaatst of gemonteerd worden op de door de
fabrikant aanbevolen wijze.
7
Het apparaat moet zo geplaatst of gemonteerd worden, dat niets een goede
ventilatie in de weg staat.
8
Het apparaat mag nooit in de onmiddellijke nabijheid van warmtebronnen zoals
verwarmingsinstallatie delen, kachels, en andere warmte producerende
apparatuur (onder andere versterkers) worden geplaatst.
9
Sluit het apparaat alleen aan op de juiste netspanning door middel van de door
de fabrikant aanbevolen kabels, zoals beschreven in de gebruiksaanwijzing
en/of vermeld op de aansluitzijde van het apparaat.
10 Het apparaat mag alleen worden aangesloten op een wettelijk goedgekeurde
(rand)geaarde netspanningsaansluiting.
11 De netspanningskabel of het netspanningssnoer dient zo gelegd, dat er
redelijkerwijs niet overheen gelopen kan worden of geen voorwerpen op of
tegenaan geplaatst kunnen worden welke de kabel kunnen beschadigen.
Speciaal moet rekening gehouden worden met het punt waar de kabel vast zit
aan het apparaat en waar de kabel vastzit aan de netspanningsaansluiting.
12 Voorkom dat vreemde voorwerpen en vloeistoffen in het apparaat kunnen
binnendringen.
13 Het apparaat dient op de door de fabrikant aanbevolen wijze gereinigd te
worden.
14 De netspanningskabel of het netspanningssnoer dient, indien voor langere tijd
het apparaat niet gebruikt wordt, uit de netspanningsaansluiting gehaald te
worden.
15 In alle gevallen, wanneer er na een gebeurtenis gevaar ontstaat voor onveilige
werking van het apparaat, zoals:
•
na het beschadigd raken van de netspanningskabel of het netspanningssnoer
•
na het binnendringen in het apparaat van vreemde voorwerpen of vloeistoffen
(onder andere water)
•
na een val van het apparaat of een beschadiging van de behuizing
•
na het opmerken van een verandering in de werking van het apparaat
moet het gecontroleerd worden door daarvoor bevoegd technisch personeel.
16 De gebruiker moet geen werkzaamheden aan het apparaat uitvoeren anders
dan die in de gebruiksaanwijzing staan omschreven.
2
NL
MusiCall gebruikers handleiding
Inleiding
4
Inleiding
MusiCall centrale
Audio inputs
Power
Input 1
Input 2
Input 3
Input 4
Input 5
Audio outputs
Input 6
Input 7
Input 8
Zone 1
Zone 2
Zone 3
Zone 4
Zone 5
Zone 6
Zone 7
Mains:
230V/ 50Hz/
30VA
Fuse:
315mA slow
RS232
Zone 1
Zone 2
Zone 3
Controllers
Zone 4
Zone 5
Zone 6
Zone 8
Remotes
Zone 7
Zone 8
Console 1
Console 2
Line
Logic
Hybrid
Made by:
R-Bal C-Bal
WARNING: Dangerous voltages inside.
To be opened by authorised people only.
Almere, The Netherlands
Het MusiCall paging systeem is een geluidsdistributie systeem dat acht verschillende
audiobronnen kan verdelen over acht afzonderlijke zones. Met behulp van
bedieningseenheden (WallUnits) kan van elke zone op afstand de audiobron worden
gekozen en het volume worden ingesteld.
Op de centrale eenheid kunnen verschillende audiobronnen worden aangesloten zoals CD-wisselaars,
MP3-spelers, tuners (zoals de QFM) of bijvoorbeeld
satteliet-ontvangers.
Input 1
Power
Input 2
Input 3
Audio inputs
Input 4
Input 5
Input 6
Input 7
Input 8
Z
Mains:
30V/ 50Hz/
0VA
RS232
use:
15mA slow
Zone 1
Zone 2
Zone 3
Controllers
Zone 4
Zone 5
Zone 6
Om de centrale te kunnen bedienen kan voor elke zone een eigen WallUnit worden
aangesloten. Met deze controller kan de gebruiker zijn eigen geluidsbron selecteren
en het volume instellen. Verder kunnen er maximaal twee paging-tableau’s worden
aangesloten. Met deze tableau’s kunnen
oproepen naar één of meerdere zones worden
gemaakt en de meeste instellingen van de
centrale eenheid kunnen worden aangepast.
Zone 1
Zone 2
Zone 3
Controllers
Zone 4
Zone 5
Zone 6
Zone 7
Zone 8
Console 1
Console 2
Line
De audio uitgangen zijn op standaard line-niveau.
Audio outputs
Hierop kunnen de (distributie) versterkers voor de
verschillende zones worden aangesloten. Door
gebruik te maken van zogenaamde 100V versterkers
kunnen op een eenvoudige manier meerdere luidsprekers op één versterker worden
aangesloten.
Input 8
Zone 1
Zone 3
Zone 4
Zone 5
Zone 6
Zone 7
Zone 8
Remotes
Controllers
Zone 5
Zone 2
Zone 6
Zone 7
Zone 8
Console 1
Console 2
Line
Logic
Hybrid
Made by:
De centrale kan op afstand, met behulp van een PC, volledig worden bediend en
geconfigureerd. Hiervoor moet de PC op de RS232-poort worden aangesloten.
QFM
-
+
Fr eq Pset
4
5
QfmStereoFMTuner
6
3
7
2
Monit or
8
1
9
0
10
Power
De Qfm is een viervoudige FM-ontvanger die voor de MusiCall centrale is ontwikkeld.
De Qfm kan met behulp van een dataverbinding communiceren met de MusiCall
centrale. Hierdoor kan de ontvangen RDS-data over het MusiCall netwerk worden
doorgegeven. Tevens is het mogelijk om de tuner aan één bepaalde zone toe te
kennen, zodat met de WallUnit de tuner op afstand kan worden bediend.
5
Inleiding
MusiCall gebruikers handleiding
NL
Bedieningseenheden
WallUnits
MRC1
De WallUnits worden in de verschillende ruimtes (zones)
opgehangen en met behulp van een
tweedraadsverbinding aangesloten op de centrale. De
WallUnits passen in een standaard inbouwdoos. Met de
WallUnits kan de gebruiker het volume instellen en een
audiobron kiezen.
MRA1
Als bij de WallUnit tevens een audio-uitbreiding is
geplaatst kan een microfoon of een andere audio-bron
zoals een CD-speler of zelfs een mengtafel worden
aangesloten. De audio-ingang heeft ook een tweedraads
verbinding. Door op de wallunit tegelijkertijd op de
knoppen ‘Channel +’ en ‘Channel -‘ te drukken zal de
centrale de lokale bron selecteren. Deze lokale bron kan
in principe alleen hoorbaar worden gemaakt in de
bijbehorende zone en eventueel de daaraan gekoppelde
zones.
Paging-tableau
MPC8
MPC-8
••••••••••••••••••••
MusiCall
••••••••••••••••••••
••••••••••••••••••••
MultiZone
Paging
••••••••••••••••••••
Matrix
P
A
E
1
B
2
3
4
5
6
7
8
Het bedieningstableau kan worden gebruikt om zones toe te spreken en instellingen
van de centrale aan te passen. Dit tableau wordt met een vierdraadsverbinding
aangesloten op de centrale.
Bij geen van de genoemde bedieningseenheden is een externe voeding nodig. De
voeding van alle eenheden wordt door de centrale geleverd.
NL
MusiCall gebruikers handleiding
Bediening
Bediening
MRC1
WallUnits
De geluidsbron in de ruimte kan worden aangepast door
op ‘channel +’ of ‘channel -‘ te drukken. Het aantal
geluidsbronnen en de volgorde ervan is afhankelijk van
de configuratie van het systeem. Maximaal kunnen er
16 verschillende bronnen beschikbaar zijn.
Wanneer ook een lokale-audio-ingang is aangesloten
kan deze worden geselecteerd door tegelijkertijd op
‘channel +’ en ‘ channel -‘ te drukken.
Het instellen van het volume gebeurt met de ‘volume +’
en de ‘volume -‘ toetsen. Door de toets ingedrukt te
houden blijft het volume verzwakken of versterken.
Door beide toetsen tegelijkertijd in te drukken zal het
geluid onderdrukt worden. De oproepen worden nog
wel doorkomen.
!
MRA1
• Wanneer de WallUnit niet reageert op de ‘channel +’ en de ‘channel -’ knoppen,
maar wel op de volume knoppen staat de zone ingesteld als slave zone. De
audiobron wordt dan bepaald door de master, en alleen het volume kan dan
afzonderlijk van elkaar worden ingesteld.
• Als de Qfm tuner is aangesloten kan deze de RDS van het radiostation op het
display weergeven.
Lokale audio input
Met behulp van de lokale audio input kan een microfoon
signaal of een line signaal, zoals een CD-speler of zelfs
een mengtafel, snel op het systeem worden aangesloten.
Dit is handig om bijvoorbeeld presentaties te houden. De
MRA1 heeft een gebalanceerde ingang op een XLR
connector, zodat een microfoon direct kan worden
aangesloten. Om een ongebalanceerd signaal zoals een
CD-speler aan te sluiten is een verloop-stekker nodig. Zie
hiervoor de installatie-handleiding.
Met behulp van de Mic/ line schakelaar kan de
ingangsgevoeligheid worden aangepast. Druk de schakelaar in als een line-signaal
wordt aangeboden.
Zodra de clip-LED oplicht wordt het signaal overstuurd, spreek iets zachter in de
microfoon of, indien een mengtafel is aangesloten, zet de uitgangs-volume regelaar
iets zachter.
6
7
Bediening
MusiCall gebruikers handleiding
NL
Consoles
Gebruikers oproepen
Elke zone kan afzonderlijk
worden toegesproken door op de
knoppen 1...8 te drukken.
••••••••••••••••••••
MusiCall
Het lampje in de knop zal eerst
P
A
••••••••••••••••••••
••••••••••••••••••••
MultiZone Paging
rood oplichten; nu klinkt een ding••••••••••••••••••••
Matrix
dong geluid.
Zodra het lampje groen oplicht
E
B
zal de oproep te horen zijn. Door
de knop los te laten komt het
normale audio-signaal weer
1
2
3
4
5
6
7
8
terug.
Meerdere zones kunnen
eenvoudig worden gecombineerd
door meer dan 1 toets
tegelijkertijd in te drukken. Het is ook mogelijk om na het toespreken van één of
meerdere zones later nog een aantal zones toe te voegen. De ding-dong zal nu
alleen in de nieuw toegevoegde zones klinken.
Wanneer twee of meerdere zones aan elkaar zijn gekoppeld zullen de slave-zones
automatisch de oproep van de master zone overnemen. Het is niet mogelijk om een
oproep alleen naar een slave-zone te plaatsen.
Indien slechts één zone wordt toegesproken is in het scherm de naam van deze
zone af te lezen.
Groepen toespreken
In het systeem kunnen meerdere zones worden gegroepeerd. Twee
afzonderlijke groepen kunnen worden aangemaakt. Door op de toetsen
A of B te drukken worden de groepen toegesproken. De lampjes in de
toegesproken zones lichten eerst rood, en daarna groen op zoals ook bij
het toespreken van een enkele zone gebeurt. Ook hier is het mogelijk
afzonderlijke zones toe te voegen door op knop 1...8 te drukken, of
beide groepen tegelijkertijd toe te spreken door A en B samen in te
drukken.
MPC-8
•
•
•
•
A
B
7
!
MPC-8
8
• In het geval dat twee zones zijn gekoppeld en de master zone behoort niet tot de
toegesproken groep maar de slave zone wel, dan zal de oproep niet hoorbaar zijn
in de slave zone.
• Als een master zone tot een toegesproken groep behoort zullen ook alle slave
zones de oproep doorgeven.
• Een oproep naar een zone zal altijd hoorbaar zijn, dus ook als de gebruiker het
volume heeft onderdrukt, of op 0 heeft staan.
NL
MusiCall gebruikers handleiding
Configureren
8
Configuratie aanpassen
Met het console kunnen bijna alle instellingen van het systeem worden aangepast.
Hiervoor moet het systeem wel zodanig zijn geconfigureerd dat de
programmeermode kan worden bereikt met het console. Dit is bij elk console
afzonderlijk in te stellen.
Aanroepen programmeermenu
Houdt de ‘P’ toets enige tijd
ingedrukt.
Het programmeermenu verschijnt.
Met de A en B toetsen kan door de
verschillende opties worden
gescrolled. Met de ‘E’ toets wordt
de gekozen optie actief gemaakt.
P
E
••••••••••••••••••••
---Program
mode--••••••••••••••••••••
Config outputs
••••••••••••••••••••
Room combining
••••••••••••••••••••
Assign groups
A
B
Room combining
Hiermee kunnen verschillende zones aan elkaar worden gekoppeld. De rode lampjes
geven aan welke zones master zijn, en de groene lampjes geven de slave zones
aan.
Een vrije zone kan als master worden ingesteld door de zone toets (1...8) in te
drukken. Het lampje licht nu rood op. Slave zones kunnen nu worden toegevoegd
door de zone toetsen in te drukken. Deze zones lichten groen op.
Druk op de ‘P’ toets om te stoppen met zones koppelen en terug te keren naar het
programmeer-menu, of druk op de geselecteerde master zone om een andere
master zone aan te maken.
Bestaande master-slave zones kunnen achteraf eenvoudig worden aangepast door
een master zone te selecteren. Alle slave zones van deze master zullen groen
oplichten. Slave zones kunnen nu worden ontkoppeld of toegevoegd door de zonetoetsen (1...8) in te drukken.
!
• Een zone kan tot slechts één master zone behoren.
• Na het koppelen van zones zullen de nieuwe slave-zones direct de audio-bron
van de master zone overnemen.
• Slave zones kunnen alleen nog de volume-instelling aanpassen. Zodra de master
het volume harder of zachter instelt zullen de slave zones volgen.
• Als de master overschakelt naar zijn lokale audio ingang zullen de slave zones
ook naar de lokale audio ingang van de master schakelen.
Groepen toekennen
In dit menu kunnen de groepen A en B worden toegekend. Het groene lampje onder
de A of B toets geeft de actieve groep aan.
De lampjes onder de zone toetsen geven aan of een zone wel (groen) of niet (rood)
bij de groep hoort. Door de zone-toetsen in te drukken kan de zone al dan niet aan
de groep worden toegekend.
Door op de A of B toets te drukken kan de andere groep worden geconfigureerd.
!
• Bij het configureren van de groepen wordt ook rekening gehouden met eventuele
master-slave koppelingen. Als de master-zone aan een groep wordt toegekend
zullen de slave zones automatisch volgen.
• Slave zones van een master die niet tot de groep behoort zullen rood oplichten,
zelfs als de slave zone wel tot de group behoort.
• Wanneer een slave zone wordt ingedrukt zal de status (wel of niet gekoppeld) wel
in het systeem worden aangepast, maar niet op het console worden
weergegeven. Zodra de master-slave koppeling wordt opgeheven zal de nieuwe
status actief worden.
9
Configureren
MusiCall gebruikers handleiding
Ingangen configureren
Ingangen die (tijdelijk) ongebruikt zijn kunnen in het systeem inactief worden
gemaakt. Als een gebruiker door de audio-bronnen heen loopt zullen de inactieve
ingangen worden overgeslagen. Dit kan handig zijn wanneer audio-bronnen tijdelijk
worden verwijderd.
Wanneer het menu actief wordt lichten de actieve ingangen groen op, en de
inactieve ingangen rood.
Een ingang wordt geactiveerd door de ingangs-toets (1...8) in te drukken. Het lampje
wordt nu groen, en de naam van de ingang verschijnt in beeld. Indien een
toetsenbord is aangesloten kan de naam van de ingang nu worden aangepast. De
nieuwe naam wordt bewaard door op <enter> te drukken.
Druk nogmaals op dezelfde ingangs-keuze toets. Nu kan de ingangsverzwakking
worden ingesteld met de A en B toetsen. De ingangsverzwakker is ingebouwd omdat
sommige audio-bronnen zoals bijvoorbeeld CD-spelers een meer signaal geven dan
bronnen zoals tuners. Hoe hoger de waarde, hoe zachter de audio-ingang zal
worden doorgegeven.
Uitgangen configureren
In dit menu lichten de lampjes in de zone-toetsen rood op indien er geen WallUnit is
aangesloten op de zone, en groen indien er wel een wallunit op de zone is
aangesloten.
Druk op een zone-toets om de uitgang te configureren. In het scherm verschijnt de
naam van de uitgang. Deze naam kan worden aangepast als een toetsenbord is
aangesloten. Druk op <enter> om de nieuwe naam op te slaan. In ditzelfde scherm
kan met de A en B toetsen het maximale volume worden ingesteld. Alle oproepen
worden ook op dit maximale volume doorgegeven.
Door nogmaals op de zone-toets te drukken kan het standaard-volume worden
ingesteld. Dit is het volume dat wordt ingesteld zodra het systeem wordt aangezet.
Druk weer op de zone-toets. Nu kan de standaard ingangs-bron worden gekozen
met de A en B toetsen. Deze bron wordt actief zodra het systeem wordt aangezet.
Druk nogmaals op de zone-toets om de gegevens op te slaan.
NL
MusiCall user manual
EN
Safety instructions
Safety instructions
1
All safety instructions, warnings and operating instructions must be read first.
2
All warnings on the equipment must be heeded.
3
The operating instructions must be followed.
4
Keep the operating instructions for future reference.
5
The equipment may never be used in the immediate vicinity of water; make sure
that water and damp cannot get into the equipment.
6
The equipment may only be installed or fitted in accordance with the
manufacturers recommendations.
7
The equipment must be installed or fitted such that good ventilation is not
obstructed in any way.
8
The equipment may never be installed in the immediate vicinity of sources of
heat, such as parts of heating units, boilers, and other equipment which
generates heat (including amplifiers).
9
Connect the equipment to a power supply of the correct voltage, using only the
cables recommended by the manufacturer, as specified in the operating
instructions and/or shown on the connection side of the equipment.
10
The equipment may only be connected to a legally approved earthened mains
power supply.
11
The power cable or power cord must be positioned such that it cannot be walked
on in normal use, and objects which might damage the cable or cord cannot be
placed on it or against it. Special attention must be paid to the point at which the
cable is attached to the equipment and where the cable is connected to the
power supply.
12
Ensure that foreign objects and liquids cannot get into the equipment.
13
The equipment must be cleaned using the method recommended by the
manufacturer.
14
If the equipment is not being used for a prolonged period, the power cable or
power cord should be disconnected from the power supply.
15
In all cases where there is a risk, following an incident, that the equipment could
be unsafe, such as:
•
if the power cable or power cord has been damaged
•
if foreign objects or liquids (including water) have entered the equipment
•
if the equipment has suffered a fall or the casing has been damaged
•
if a change in the performance of the equipment is noticed
it must be checked by appropriately qualified technical staff.
16
The user may not carry out any work on the equipment other than that specified
in the operating instructions.
2
EN
MusiCall user manual
Inleiding
4
Introduction
MusiCall central
Audio inputs
Power
Input 1
Input 2
Input 3
Input 4
Input 5
Audio outputs
Input 6
Input 7
Input 8
Zone 1
Zone 2
Zone 3
Zone 4
Zone 5
Zone 6
Zone 7
Mains:
230V/ 50Hz/
30VA
Fuse:
315mA slow
RS232
Zone 1
Zone 2
Zone 3
Controllers
Zone 4
Zone 5
Zone 6
Zone 8
Remotes
Zone 7
Zone 8
Console 1
Console 2
Line
Logic
Hybrid
Made by:
R-Bal C-Bal
WARNING: Dangerous voltages inside.
To be opened by authorised people only.
Almere, The Netherlands
The MusiCall paging system is a music-distribution system, capable of distributing
eight audio-sources over eight independent zones. With the remote-controllers, the
wallunits, the audio-source and the volume can be adjusted.
Different types of audio-sources, such as CDchangers, MP3-players, tuners (for example the QFM)
or satellite-receivers, can be connected to the central
unit.
Input 1
Power
Input 2
Input 3
Audio inputs
Input 4
Input 5
Input 6
Input 7
Input 8
Z
Mains:
30V/ 50Hz/
0VA
RS232
use:
15mA slow
Zone 1
Zone 2
Zone 3
Controllers
Zone 4
Zone 5
Zone 6
To remotely control the system each zone can have it’s own WallUnit connected to
the central unit. With this WallUnit the user can select it’s own audio-source, and
adjust the volume. A maximum of two pagingconsoles can be connected to the system. These
consoles can page to one or more zones, and
they can adjust most system settings.
Zone 1
The audio-outputs are at standard line-level. The
(distribution) amplifiers can be connected here. Using
a 70-volt amplifier makes it easy to hook-up more
than one speaker to the same amplifier-output.
Zone 2
Zone 3
Input 8
Zone 1
Zone 5
Zone 6
Zone 7
Zone 8
Console 1
Audio outputs
Zone 2
Zone 3
Zone 4
Zone 5
Zone 6
Zone 7
Console 2
Line
Zone 8
Remotes
Controllers
Zone 5
Controllers
Zone 4
Zone 6
Zone 7
Zone 8
Console 1
Console 2
Line
Logic
Hybrid
Made by:
The central unit can be remotely configured and controlled with the PC configuration
software. You’ll have to connect the central unit to the PC with a standard RS232
cable.
QFM
-
+
Fr eq Pset
4
5
QfmStereoFMTuner
6
3
7
2
Monit or
8
1
9
0
10
Power
The Qfm contains four stereo RDS FM-tuners and is developed to operate together
with the MusiCall system. The Qfm has a dataport to communicate with the MusiCall
system. This makes it possible to distribute the RDS information over the system.
Another feature is to assign one or more of the tuners to a single zone, so that the
tuner can be remotely-controlled by the WallUnit.
5
Introduction
MusiCall user manual
EN
Controllers
WallUnits
MRC1
The WallUnits are mounted into the different rooms
(zones) and connected to the central unit with a two-wire
cable. The WallUnits will fit into a standard double-gang
electrical box. The WallUnits are used to select the
audio-source and adjust the volume in the room.
MRA1
When, together with the WallUnit, the audio-extension is
installed a microphone or another type of audio-source,
like CD-players or an audio mixer, can be connected
locally. The audio-input has to be connected with two
wires. By pressing the ‘Channel +’ and ‘Channel -‘ key
on the wallunit simultaneously, the central unit will
switch to the local audio-input. The local input can only
be heard in the zone to which it is connected, and the
zones that are combined with this zone
Paging-console
MPC8
MPC-8
••••••••••••••••••••
MusiCall
••••••••••••••••••••
••••••••••••••••••••
MultiZone
Paging
••••••••••••••••••••
Matrix
P
A
E
1
B
2
3
4
5
6
7
8
The paging
console can be used to make a page to the zones, and adjust most of the system
settings. The console is connected with four wires to the central unit.
None of the controllers needs an external power-supply. All the voltages are supplied
by the central unit.
EN
MusiCall user manual
Oeration
Operation
MRC1
WallUnits
The audio-source in the room can be changed by
pressing the ‘channel +’ or the ‘channel -‘ keys. The
number of sources and the sequence depends on the
systems configuration. A maximum of 16 sources can
be configured.
When the local audio-input is installed it can be
monitored by pressing ‘channel +’ and ‘ channel -‘ key
simultaneously.
Adjusting the volume can be done by pressing ‘volume
+’ and ‘volume -‘. As long as key is pressed the volume
keeps in,- or decreasing. When both keys are pressed
at the same time the audio is muted. Any paging
messages will still be heard.
!
MRA1
• When the WallUnit doesn’t respond the ‘channel +’ and the ‘channel -’ keys, but it
does respond to the volume keys the zone is configured as a slave zone. The
audio-source is determined by the master WallUnit, but the volume can be
adjusted separately.
• When the Qfm tuner is connected it is possible that the display shows the RDS
information of the selected radio-station.
Local audio input
The local audio-input makes it possible to connect a
microphone or line-level signal, like a CD-player or audiomixer, to the system. This can be extremely useful for
presentations etc. The MRA1 has a balanced input on a
XLR connector so that a microphone can be plugged in
directly. To connect an unbalanced line-source to the
MRA1 a converter-plug is necessary. See the installationmanual for a description.
Use the Mic/ line switch to toggle the input-sensitivity. The
switch has to be pushed to connect a line-level source.
When the clip-LED illuminates the signal might be distorted. Speak a little less loud in
the microphone, or attenuate the output level of the audio-mixer.
6
7
Operation
MusiCall user manual
EN
Consoles
Paging a user
MPC-8
Each zone can be paged to
separately by pushing the keys
1...8.
••••••••••••••••••••
MusiCall
The lamp will light up red; a
P
A
••••••••••••••••••••
••••••••••••••••••••
MultiZone Paging
chime will be heard. When the
••••••••••••••••••••
Matrix
light illuminates green a page can
be made. When releasing the
E
B
button the regular audio-source
will be returned.
Multiple zones can be accessed
1
2
3
4
5
6
7
8
by pushing more than one button
at the same time. It is also
possible to add one or more
zones when paging to a number
of zones. Simply push the buttons of the corresponding zones. The chime will only
sound in the newly added zones.
When two or more zones are combined to a master-slave zone, the slave zones will
automatically forward the page made to the master zone. It is not possible to page to
a slave zone only.
When a single zone is being paged the name of this zone is displayed.
Paging a group
A group of zones can be combined in the system. It is possible to store
two different groups. Those groups can be accessed by pushing the A,
or B button on the console. The lamps of the paged zones will first light
up red and then green. It is possible to add zones temporarily to the
page by pushing the zone-button, or add the other group by pushing A
and B simultaneously.
MPC-8
•
•
•
•
A
B
!
7
8
• When two or more zones are combined and the slave zone belongs
to the group that is being paged to, but the master zone doesn’t belong to this
group the page is not routed to the slave zone.
• When a master zone belongs to the group the page will be routed to all it’s slave
zones.
• A page to a zone will always be audible, even when the user has muted the audio,
or the volume is set to 0.
EN
MusiCall user manual
Configuration
8
Configuring the system
The console can change almost all of the system settings. The system has to be
configured to allow the programming mode from the specific console. The program
function can be enabled or disabled for each console separately.
Accessing the program menu
Push-and-hold the ‘P’ key.
The program menu shows on the
display. Keys A and B can be used
to scroll through the various
programming options. To select an
option press the ‘E’ key.
P
••••••••••••••••••••
---Program
mode--••••••••••••••••••••
Config outputs
••••••••••••••••••••
Room combining
••••••••••••••••••••
Assign groups
E
A
B
Room combining
This option combines two or more zones. The red lights indicate the master zones,
the green lights indicate the slave zones.
An un-combined zone can be made master simply by pushing the zone-key (1...8).
The light illuminates red. Slaves can be added by pushing the zone-keys. These
lamps light up green.
Push the ‘P’ key to end the room-combining mode and return to the main
programming screen, or push the selected master zone to assign another master
zone.
Existing master-slave zones can be changed very easily by selecting the master
zone. The slaves light up green. Slaves can be added or removed by pushing the
zone-keys (1...8).
!
• A zone can be belong to only one master zone.
• When two or more zones are combined the audio-source of the slaves will
immediately change to the master source.
• Slave zones can only adjust their volume. When the master zone increases or
decreases the volume the slave zones will follow the master.
• When the master zone switches to it’s local input, the slaves will switch to the
local input of the master.
Assigning groups
Groups A and B can be assigned here. The green lamp in the A or B key indicates
the group that is being configured. The lamps in the zone keys will light up green
when a zone belongs to this group, and red when it doesn’t belong to the group. By
pushing the zone-button the group status of the zone is toggled on and off.
When key A or B is pressed the other group can be configured.
!
• When the groups are assigned the slave zone will follow the master status. When
a master is included to a group the slave zones will automatically be included.
• Slave zones of a master that doesn’t belong to the group will light up red, even
when the slave zone is included to the group.
• When a slave zone is pushed the group-status will be updated in the system, but
the console will not display the new status. When the master-slave combining is
removed the new status will be made active.
9
Configuration
MusiCall user manual
EN
Configure inputs
Temporarily unused inputs can be made inactive within the system. Whilst scrolling
through the available inputs, the inactive inputs will be neglected.
This can be useful when audio inputs temporarily are disconnected.
When the menu is operational, active inputs will light up green, inactive inputs will
light up red.
An input will be activated by pushing the input button (1…8).
The light will light up green, and the name of the input will be shown in the display.
If connected to a keyboard, the name of the input can be changed. The new name is
saved by pushing the <enter> button.
Pushing the same input-button again, and the attenuation of the input signals can be
adjusted with the A and B buttons.
The input attenuation function makes it possible to adjust the input level from sources
like CD players which normally have a higher output level than sources like tuners for
instance. The higher the value of attenuation, the lower the volume.
Configure outputs
In this menu, the lights will light up red, when there is no WallUnit connected to that
specific zone. The light will light up green if connected to a WallUnit.
Push a zone button to configure the output. The display shows the name of the
output. This name can be modified if connected to a keyboard.
Push on <enter> to store the new name. Within the same menu, the maximum
volume can be adjusted by pushing the A and B buttons. All paging messages will be
given at the maximum volume level.
By pushing the zone button again the default volume level can be stored.
This is the volume level that is active when powering up the system.
Push the zone button again, and the default source can be chosen by buttons
A and B. This source will be activated when the unit is powered up.
Push the zone button again to store the setting.