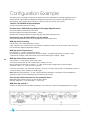
1
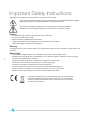
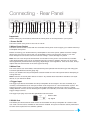
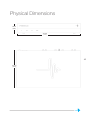
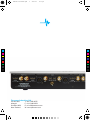
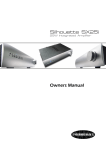
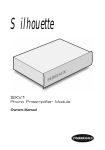
Audiant VP3-Cover.pdf
1
25/03/15
6:50 pm
Audiant VP3 Vinyl Preamplifier
Owners Manual
C
M
Y
CM
MY
CY
CMY
K
Audiant VP3 Vinyl Preamplifier
Important Safety Instructions
Explanation of symbols used in this manual or on the rear of the device:
This symbol is intended to alert the user to the presence of uninsulated dangerous voltages
within the enclosure of sufficient magnitude to cause electric shock.
This symbol is intended to alert the user to the presence of important operation,
maintenance and servicing information in the instruction and service manuals.
Caution
•
•
•
•
•
To reduce the risk of electric shock, do not remove the cover.
No user serviceable parts inside.
Refer servicing to qualified service personnel.
Replace the mains fuse in the plug with one of the same type and rating.
Disconnect supply cord before changing fuse.
Warning
To reduce the risk of fire or electric shock, do not expose this device to rain or moisture. Shock hazard - do
not open.
Mains Plugs
•
•
1
•
•
•
•
•
•
This device is supplied with a non-rewireable mains plug for the intended country.
Replacement mains leads can be obtained from your Perreaux dealer. Should you need to change
the plug please dispose of it carefully.
A plug with bared conductors is dangerous if engaged in a live socket.
The Brown wire must be connected to the Live (Line) supply pin.
The Blue wire must be connected to the Neutral supply pin.
The Green/Yellow wire must be connected to the Earth (Ground) supply pin.
Please contact your dealer or a competent electrician if you are in any doubt.
Refer to the rear of the product for fuse and mains voltage information.
This product is designed to comply with international directives on the Restriction
of Hazardous Substances (RoHS) in electronic equipment. The wheelie bin logo
indicates compliance and that these products must be recycled or processed as
according to these directives.
General Safety Instructions
All safety and operation instructions should be read carefully before the Audiant VP3 Vinyl Preamplifier
is operated. Keep the Owners Manual in a safe place for future reference.
•
Read these instructions.
•
Keep these instructions.
•
Heed all warnings.
•
Follow all instructions.
•
Do not use the device near water, for example near a bathtub, kitchen sink, in a wet basement, near
a swimming pool, etc.
•
Clean only with a dry cloth.
•
Mounting to a wall or ceiling should be via a heavy-duty bracket or shelf designed for audio
equipment use.
•
The device should be situated away from heat sources such as radiators, stoves, or other
appliances that produce excessive amounts of heat.
•
DO NOT place the device directly onto carpeted surfaces.
•
Avoid exposing the device to extremely high or low temperatures.
•
The device should be connected to a mains power supply only of the type described in the
operating instructions, and/or as marked on the rear of the unit.
•
DO NOT defeat the safety earth of the grounding type mains plug, severe injury or death may result.
If the provided plug does not fit into your outlet, contact your dealer or consult an electrician.
•
The power cord should be routed so that it is not likely to be walked on or pinched by items placed
on or against it.
•
Unplug the device during lightning storms or when unused for long periods of time.
•
DO NOT let objects or liquids fall into the device, expose the device to dripping or splashing or place
a vessel containing liquid on top of the device.
•
Keep this device out of reach of children.
•
DO NOT operate the device with the cover removed.
•
DO NOT bypass any fuse, replace only with the value and type specified.
•
DO NOT attempt to repair the device. In the event of a problem, please contact your Perreaux
dealer.
•
DO NOT operate this product in an explosive atmosphere.
2
Table of Contents
INTRODUCTION
4
THE DECISION MAKING PROCESS
5
MINIMALIST DESIGN
6
FEATURES AT A GLANCE
7
INSTALLATION
8
CONNECTING
Rear Panel
9
9
OPERATION
Front Panel
11
11
CUSTOMISATION
11
CONFIGURATION EXAMPLE
14
CARE AND MAINTENANCE
15
TROUBLESHOOTING
15
TECHNICAL SPECIFICATIONS
16
PHYSICAL DIMENSIONS
17
CONTACT
18
3
Copyright and Acknowledgments
Audiant VP3 Manual Version 1.0
Copyright © 2015 Perreaux Industries Ltd.
Perreaux Industries Ltd., Gladstone Road, Mosgiel, Dunedin 9024, New Zealand.
All rights reserved. No part of this publication may be reproduced, stored in a retrieval system, or transmitted, in any form or by any means, electronic, mechanical,
photocopying, recording, or otherwise, without the prior written permission of the publisher. The content of this manual is furnished for information use only, is subject
to change without notice, and should not be construed as a commitment by Perreaux Industries Ltd.
Perreaux Industries Ltd. assumes no responsibility or liability for any errors or inaccuracies that may appear in this manual.
All trademarks and registered trademarks are the property of their respective owners. Perreaux, the Perreaux logo and Audiant are trademarks of Perreaux Industries
Ltd. All rights reserved. Printed in New Zealand.
Introduction
Thank you for choosing this Audiant VP3 Vinyl Preamplifier. We sincerely hope it provides you with
many years of music listening pleasure.
The Audiant VP3 is a highly flexible customisable vinyl preamplifier capable of connecting both Moving
Magnet and Moving Coil cartridges to your audio system, providing low distortion, high dynamic range
and a sound which is open, detailed and transparent.
The VP3 includes separate low noise input stages for Moving Magnet and Moving Coil cartridges with
dip switches for both resistive and capacitive loading on each input allowing for a clean, direct
customisable signal path from the cartridge output.
The separate direct connections and switches ensure minimal noise and maximum channel separation,
with the added ability of connecting two cartridges simultaneously and conveniently selecting between
the two from the front panel.
Four different gain settings, the ability to switch between the normal RIAA and IEC RIAA equalisation
curves and the selectable Mono input ensure the highly flexible VP3 is compatible with any cartridge
and audio system through the high rated balanced (XLR) and unbalanced output connections.
The highest quality internal power supply features a custom designed, fully shielded toroidal transformer
with shunt voltage regulation and filtering ensuring a low noise supply providing high levels of
transparency, detail and dynamics.
The internal layout ensures that the power supply is separated from the preamplifier stage to reduce
noise while the mirrored layout of the preamplifier design about the output ensures maximum channel
separation.
Whether as part of a complete Audiant system or as the vinyl preamplifier in your existing system, the
VP3 will reconnect you with your MUSIC.
Thank you for taking the time to read this manual; we do recommend you keep it for future reference.
Martin van Rooyen,
Perreaux Managing Director
and the Perreaux design team
4
The Decision Making Process
In this section, our objective is to help you extract the most out of your investment in your audio system.
May we take a moment of your time with the following suggestions.
The aim of high fidelity audio is to attempt to recreate the original performance in its entirety via the
recorded medium. To help you get to know what various instruments really do sound like, listen to live
concerts of musical performances that you prefer. Select a few recordings of similar performances for
comparison.
Your Perreaux equipment will (and the rest of your system should) provide a precise duplication in your
listening area of the total musical performance, including the ambience of the venue in which the
recording was made.
Read magazines
Read hi-fi and audiovisual magazines, particularly the equipment reviews and letters to the editor
sections. Use these as a general guide only, and try to read "between the lines". Remember no one
specifically sets out to downgrade a particular piece of equipment, so what is not included in the review
is often as important as the actual printed content.
Choose Your Hi-Fi dealer carefully
Choose your hi-fi dealer carefully; they are your professional guide. Preferably, they should be
knowledgeable about music and recording techniques as well as the equipment itself. They should be
able to provide a total service, including installation, system "tuning" advice, problem solving and after
sales service.
5
Frequent your dealer and listen to a variety of equipment using recordings, which are familiar to you.
Ask questions and listen to advice, but remember to trust your own ears to tell you what sounds right
for you. If possible, listen to your equipment choice in your own listening area before you finally make
your purchase.
When deciding on your system you will need to differentiate between sales gimmicks and cosmetic
wizardry, as against practical features and facilities. Recognise the "Christmas Tree Syndrome"namely, the more flashing lights and switches the better it must be. Bear in mind that you are paying for
these, and because of the necessity of careful pricing, compromises may have been made in the
internal component quality vital for accurate sound reproduction. Each component through which the
audio signal must pass will add its own character to the music you hear, hence the expression,
"colouration".
Perreaux products are carefully designed to minimise componentry within the audio signal path. All
componentry used is of highest quality and only included when absolute necessity is established; no
component is there for a free ride or to correct for deficiencies elsewhere in the circuitry. With Perreaux,
emphasis is placed on maximum sound quality, component and unit reliability and long life.
Minimalist Design
Minimalist design
Leading British architect, John Pawson, writes:
“The Minimum can be defined as the perfection that an object achieves when it is no longer possible to
improve it by subtraction. This is the quality that an object has when every component, every detail, and
every junction has been reduced or condensed to the essentials. It is the result of the omission of the
inessentials”.
Perreaux has historically embraced the minimalist ethic from an audio design perspective only. The
concept of “less equating to more” has been at the heart of all Perreaux audio designs for more than 40
years.
Minimalist electronics
We wish to maximise the quality of your listening pleasure by keeping the componentry and signal path
as uncluttered, short and clean possible. All components in the signal path, even those of the highest
quality have an effect on the signal, thereby altering the quality of the reproduction in some way. Our
aim is to recreate in its entirety, the original performance by not adding or subtracting anything,
irrespective of the source.
Minimalist user Interface
We carefully study the user interface and par down the number of buttons and associated clutter leaving
just the essential and no more. How tempting it has been over the years to loose sight of our core
values as technology or trends have made it possible. That is one of the reasons why our older products
still have such a high resale value today. The user interface has and always will remain simple, free from
adornments, clean and uncluttered.
Minimalist aesthetics
Our products appeal to those who seek the ultimate in audio exclusivity, namely the perfect blend of
“form and function”.
“Form and function” are both tough masters. That is why our amplifier heat sinks are not hidden, but
instead feature prominently in all our designs. We make no excuses for producing some of the most
distinctive high-end audio products on the planet. We let “form and function” blend together in perfect
harmony. This surely is the essence of true minimalist utilisation.
Minimalism in a wider context
John Pawson writes:
“Clearly simplicity has dimensions to it that go beyond the purely aesthetic: it can be seen as the
reflection of some innate, inner quality, or the pursuit of philosophical or literary insight into the nature of
harmony, reason, and truth.”
6
Features at a Glance
Slim and stylish
The VP3 features an extruded full width monocoque aluminium cover / front panel assembly. The
chassis is then carefully sandblasted and clear anodised. The front panel consists of a beautiful black
perspex touch panel for minimalist selection of all functions. The VP3 is slim and stylish and will
perfectly compliment any listening environment.
Highly flexible
The VP3 will fully cater for all high / low output moving coil and moving magnet cartridge types.
Fully customisable
The 36 rear mounted user accessible dip switches provide maximum flexibility and versatility. In years to
come you may wish change your cartridge according to your tastes, however there is no need to
change your VP3 as it can easily be adjusted to suit. In the rare event that you can't find the correct dip
switch settings, the VP3 can also be internally customised to suit your exact requirements.
Two turntables can be independently set up and simultaneously run
The VP3 can simultaneously cater for two turntables.
One turntable input can be set to use moving magnet or high output moving coil cartridge and the other
turntable input can be set up for a low output moving coil.
Possible options are:
7
•
1 x Moving magnet turntable and 1 x low output moving coil turntable
•
1x High output moving coil turntable and 1 x low output moving coil turntable
Touch panel selectable
The VP3 features capacitive touch panel selection of all front panel icons. The user can turn the unit on
or off, select between moving magnet and moving coil inputs and turn the mono output on or off.
Separate inputs
The VP3 features separate low noise input stages for moving magnet and moving coil cartridges,
ensuring minimal noise and maximum channel separation.
Normal RIAA or IEC RIAA equalisation profiles
Using the rear mounted dip switches the user can select between normal RIAA and IEC RIAA
equalisation profiles.
Highly accurate and low distortion
Featuring a diminutive total harmonic distortion figure of only 0.002% at 1KHZ @ rated output, the VP3
is highly accurate and will faithfully reproduce your favorite recordings to be as perfect a recreation of
the original as possible.
High dynamic range
The VP3 features an exceptional dynamic range.
Balanced and unbalanced outputs
The VP3 features balanced and unbalanced outputs. By employing entirely separate buffer stages, it is
perfectly acceptable to use both outputs simultaneously without interference or degradation in signal
performance.
Highest quality internal power supply
The VP3 features a fully shielded toroidal transformer with shunt voltage regulation and filtering,
resulting in an ultra low noise power supply providing high levels of transparency, detail and dynamics.
Fully mirrored internal layout
The internal layout has been laid out in full mirror fashion to ensure maximum channel separation.
Trigger input
The VP3 can be remotely turned on and off as part of your system using the rear mounted trigger input.
Mono
The VP3 also caters for mono recordings.
Installation
Unpacking
8
The Audiant VP3 Vinyl Preamplifier is supplied with the following accessories:
• Mains lead
• This manual
• 3.5mm mono remote trigger lead
We recommend you retain the packaging for reuse in case you need to transport the unit at a later date.
Placement
Your Audiant VP3 Vinyl Preamplifier should generally be placed close to your preamplifier keeping
interconnect cabling short. Although when using balanced interconnects, the amplifier may be placed
further away from the preamplifier without degrading the sound.
Ventilation Requirements
Your Audiant VP3 Vinyl Preamplifier should be placed in a position that does not restrict the airflow
around it. Allow at least 80mm (3 inches) above and to each side of the unit and mount your Audiant
VP3 Vinyl Preamplifier on a flat surface for air circulation to allow heat to dissipate.
Do not place directly onto a carpeted surface as it will reduce air circulation and the heat will not
dissipate as intended.
It the device is used in a cabinet, air must be able to flow through. An enclosed cabinet will severely
restrict heat dissipation. Ensure that nothing is placed above or below the unit that might block or
restrict the vents.
Other Devices
Ideally, your Audiant VP3 Vinyl preamplifier should not be located directly above or adjacent to other
heat-producing products such as radiators, other power amplifiers, etc. If multiple amplifiers are being
used and space is restricted, placing them side by side is preferable to stacking.
It is advisable to position your Audiant VP3 Vinyl Preamplifier close to your turntable and away (and if
possible, connected to a power socket on a different circuit) from powerful electrical or electronic
products such as TV sets, computers, cookers, fridges etc. This will prevent the possibility of the strong
electrical and electromagnetic emissions or interference given off by such devices adversely affecting
the performance of your preamplifier.
Connecting - Rear Panel
6
7
7
6
8
9 10 11 10 9
8
6
7
7
6
5
4
3 2
1
Important:
Before making any connections, switch off the mains power to all components in your system.
1 Power On/Off
The Power switch turns power to the unit on and off.
2 Mains Power Socket
The Mains Power Socket is used with the removable mains power cord to supply your Audiant VP3 Vinyl
Preamplifier with power.
Before connecting your Audiant VP3 Vinyl Preamplifier to the mains power, please check the voltage
label on the rear panel to ensure that your preamplifier conforms to the power supply in your area.
Never attempt to connect the unit to an incorrect voltage – severe damage may result.
Note: The unit must always be earthed when connected to mains power. Use the earthed, moulded
mains lead supplied. Never use an unearthed mains plug, socket or adaptor with this unit. The mains
lead supplied may be fitted with a fused plug, depending on local regulations. If this is the case, always
replace this fuse with another of the same type and rating.
3 Mains Fuse
The mains fuse is user serviceable, and should always be replaced with the same type and rating (see
Technical Specifications section [page 16]).
Ensure your Audiant VP3 Vinyl Preamplifier is disconnected from the mains power before attempting to
change the fuse.
Note: Fuses do not usually blow without a reason. Any doubts about fuse failure should be conveyed
directly to your Perreaux dealer.
4 Trigger Input
The trigger input allows the Audiant VP3 Vinyl Preamplifier to be brought in and out of standby by a
remotely connected device; for example, another audio component or a home automation system. The
trigger input uses a mono 3.5mm (⅛”) plug and accepts voltages of 0V DC up to 12V DC. A trigger
voltage between 3V and 12V DC will bring the amplifier out of standby and it will enter standby when the
trigger voltage is 0V DC.
The trigger input plug must meet the specifications shown below:
Sleeve: GND
Tip: Signal
5 RS232 Port
The RS232 port allows external serial control of the Audiant VP3 Vinyl Preamplifier for custom install
use. A full command set is available on the Perreaux website. This port can also be used by authorised
Perreaux service personnel for software updates.
9
6 Loading Switches
The loading switches provide customisation of each input to correspond with the cartridge manufacturers recommended loading figure. Four seperate loading switches are required to allow for maximum
isolation between the inputs and channels. Each loading switch should be set for the corresponding
input with the left and right channels to be a mirror of each other. For more information on these
switches please refer to the Customisation section [page 11].
Note: Always ensure that the system is powered down or in standby before making any adjustments to
the load switches.
7 Phono Inputs
The Audiant VP3 Vinyl preamplifier has two separate input sections specifically designed to cater for
moving magnet (MM) and moving coil (MC) cartridges. Each set of phono inputs accept standard
unbalanced (RCA) analogue outputs from the corresponding cartridge type. The output of a mono
cartridge should be connected to the right channel of the corresponding input of the Audiant VP3 Vinyl
Preamplifier.
Note: High output MC cartridges can be connected to the MM input if the MC input results in
excessively high sound output.
8 Balanced Outputs
The balanced (XLR) outputs provide a balanced audio signal for connection directly to a preamplifier or
integrated amplifier.
The pin assignments of the balanced XLR output connectors are:
10
Pin 1: Shield
Pin 2: +ve signal (hot)
Pin 3: -ve signal (cold)
Please refer to the owner’s manual of your amplifier to verify that the pin assignments of the input
connectors correspond as above. If this is not the case, wire the cables so that the appropriate Audiant
VP3 Vinyl Preamplifier output pin connects to the equivalent preamplifier input pin.
Note: The balanced outputs employ entirely separate buffer stages to the unbalanced outputs, allowing
both outputs to be used simultaneously without degrading the performance of each other.
9 Unbalanced Outputs
The unbalanced (RCA) outputs provide a single-ended audio signal for connection directly to a
preamplifier or integrated amplifier.
Note: The unbalanced outputs employ entirely separate buffer stages to the balanced outputs, allowing
both outputs to be used simultaneously without degrading the performance of each other.
10 Gain/RIAA Adjustment Switches
The gain/RIAA adjustment switches provide further customisation to each input to allow greater
flexibility in matching the output of the Audiant VP3 Vinyl Preamplifier to your system. For more
information on these switches please refer to the Customisation section [page 11].
11 Phono Earth Terminal
The phono earth terminal connects to the earth lead from the tonearm cable of your turntable, if
required. If your turntable does not have a separate earth lead it may be advisable to run a wire from a
grounded screw on the turntable to this terminal. Turntables are very sensitive to hum and grounding
the table or cartridge to the Audiant VP3 Vinyl Preamplifier can help reduce hum.
Operation - Front Panel
1
2
3
1 Standby Button
The Standby Button switches the unit between Standby mode (indicated by dim standby LED) and On
(indicated by bright standby LED). The unit should be left in Standby mode when not in use.
2 Source Buttons
The Source Buttons allow you to select the source component that you wish to listen to.
3 Mono Selection Button
The Mono Selection Button switches between mono (indicated by bright mono LED) and stereo
(indicated by dim mono LED) output to allow playback of mono LPs. A press of the button will toggle the
mono selection on and off with the current selection conveniently stored for each input. The output of
the Mono cartridge should be connected to the right channel of your Audiant VP3 Vinyl Preamplifier. For
more information on the mono selection button please refer to the Customisation section.
Customisation
Important:
Before making any changes to the dip switch settings ensure that the unit is in 'Standby' or switch off
the mains power.
The Audiant VP3 gives you complete flexibility in customising the Vinyl preamplifier to suit your cartridge,
system and personal audio preferences. This customisation is achieved with seven different loading
switches, three gain switches, mono selection and the ability to switch between a normal or IEC RIAA
equalisation curve on each input.
Customisation is achieved using the six separate sets of dip switches on the rear of the unit and the
mono selection button on the front panel. Separate switches are used to allow for maximum isolation
between each channel and input. It is recommended that you make adjustments to the dip switch
settings using a small flat tip screwdriver or other similar pointed object.
Loading
Loading settings should be configured to directly correspond to the cartridge manufacturers
recommended loading figure. If you don’t know the recommended loading of your cartridge, please
contact the cartridge manufacturer or your dealer for this information before proceeding.
There are two sets of loading dip switches for each of the two inputs, one for the left channel and the
other for the right channel. The left and right switches should be set to be a mirror of the other for both
inputs. A switch in the UP position is ON and a switch in the DOWN position is off. The tables below
document the loading for each input.
11
It is recommended that one resistive load and one capacitive load switch are operated at any given time
when required. However it is possible to use more than one switch to produce a cumulative value, when
doing this the values in the tables below must be added electrically in parallel to give the overall load value.
In the rare occurrence that your cartridge load specifications do not fall within the factory load settings
there is also the ability of adding your own custom loading components. This customisation will need to be
carried out by a qualified service agent, please contact your dealer for further information on this functionality.
MM Loading Dip Switch
None
1
2
3
4
47kΩ
1kΩ
10kΩ
22pF
47pF
5
6
7
100pF 220pF 470pF
MC Loading Dip Switch
None
1
2
3
4
5
6
7
47kΩ
10Ω
30Ω
100Ω
250Ω
500Ω
1kΩ
47pF
Gain
The gain characteristic of the Audiant VP3 Vinyl Preamplifier can be configured to suit the output voltage of
the cartridge you are using. A switch in the UP position is ON and a switch in the DOWN position is off.
12
When discussing the gain of a vinyl preamplifier the words gain and sensitivity are often both used. The
gain figure tells you how many dB of amplification is added to the signal, while the sensitivity figure tells
you the level of input required to achieve the rated output of the preamplifier. It is more common to use
the sensitivity value when deciding the correct gain setting to use, as the rated output voltage of your
cartridge can be matched to this value to get the most out of your VP3 Vinyl Preamplifier.
The tables below document the gain settings for each input and list the corresponding sensitivity value.
Consult your cartridge documentation for its rated output voltage and set the gain configuration where
the “Sensitivity” of the Audiant VP3 Vinyl Preamplifier is within ±50% of this output voltage in the
corresponding table.
Note: If more than one setting falls within ±50% of your cartridge output voltage, the lower sensitivity
configuration will result in greater dynamic range, the higher will be less susceptible to clipping.
MM Gain Dip Switch
Gain
Sensitivity
All ‘Off’
1 ‘On’
1+2 ‘On’
1+2+3 ‘On’
36dB
40dB
44dB
48dB
11.9mV
7.5mV
4.7mV
3.0mV
MC Gain Dip Switch
All ‘Off’
1 ‘On’
1+2 ‘On’
1+2+3 ‘On’
Gain
56dB
60dB
64dB
68dB
Sensitivity
1.2mV
0.7mV
0.5mV
0.3mV
RIAA Equalisation
Two settings are available for RIAA Equalisation of the Audiant VP3 Vinyl Preamplifier to suit your
recordings or personal preference; Normal RIAA and IEC RIAA. These two settings are selectable using
switch ‘4’ of the gain dip switch on each input. With the switch in the DOWN position the Normal
equalisation is selected, in the UP position the IEC equalisation is selected.
Normal RIAA Equalisation Curve:
13
IEC RIAA Equalisation Curve:
Configuration Example
The following is a working example of the popular Thorens TD295 MK iV turntable equipped with an
Ortofon Super OM 40 (Moving Magnet) cartridge being set up to play using the Audiant VP3 Vinyl
Preamplifier. This example can be used as a guide to help you set up your system.
Thorens TD 295 MK IV Specifications
Tonearm and lead capacitance 160pF
Ortofon Super OM 40 Moving Magnet Cartridge Specifications
Recommended load resistance 47K ohms
Recommended load capacitance 200pF – 400pF
Rated output voltage (required to adjust the gain dip switch setting) 4.0mV
Configuring your Audiant VP3 to suit the above
Output of the turntable connected to the MM input of the Audiant VP3
MM dip switch Loading
Dip switches 1 & 2 select Resistance values
If dip switches 1 & 2 are both down, by default the resistance will be 47K ohms which is the correct as
per the Ortofon OM 40 specifications above.
MM dip switch Capacitance
Dip switches 3 - 7 select capacitance values
By selecting dip switch 5 upwards this provides 100pF + turntable capacitance of 160pF = total
capacitance of 260pF which falls within the recommended range of 200pf - 400pF
14
MM dip switch Gain calculation
Dip switches 1 -3 are used to set the gain value.
The Ortofon Super OM 40 has a rated output voltage of 4.0mV.
Set the gain dip switches to be within + or - 50% of the output voltage value of the cartridge.
Therefore 4.0mV + or - 50% is 2.0mV to 6.0mV.
Using this information you select dip switches 1 and 2 to on which will provide a corresponding value of
4.7mV sensitivity which equates to 44dB of gain.
Note: Selecting dip switches 1, 2 and 3 would also be acceptable, it would be more susceptible to
clipping but give you the advantage of increased dynamic range.
Correct dip switch selection for the example above
MM loading dip switch switch 5 up and all others down
Gain dip switches 1, 2 up, alternately 1, 2 and 3 up
MM Gain dip switch 4
Used to set either the Normal RIAA equalisation curve (down) or the IEC RIAA equalisation curve (up)
Care and Maintenance
Notes: Always switch the unit off and remove the power cord from the rear of the unit before attempting
to clean your Audiant VP3 Vinyl Preamplifier in the manner described below.
Never apply liquid directly to the unit.
Never use abrasives.
Never rub in a circular motion.
Front Panel and Cover
The front panel and cover feature a durable, high-quality anodised finish. To remove finger marks and
dirt, simply rub the surface with a soft cloth.
If the dirt is not removed, use a small quantity of isopropyl alcohol on a clean cloth and rework the
effected area.
Troubleshooting
There is no power
Ensure the AC power cord is connected securely.
Ensure the mains plug is fully inserted into the wall socket and is switched on.
Check the mains fuse of the unit.
Check fuse in the mains plug or adaptor.
There is no sound
Check that the input and output interconnects are properly connected to the respective sockets.
Confirm that the cartridge is correctly connected and fitted to the tone arm.
Check that the turntable is turned on and that the tone arm is lowered onto the record.
Check that your preamplifier and/or amplifier are turned on and the correct input is selected.
Check that the volume on your preamplifier is set to a suitable level and not muted.
Check that your speakers are firmly connected to your amplifier.
There is no sound on one channel
Check interconnects.
Check balance setting of your preamplifier and/or amplifier is set to the middle.
There is a crackling noise coming from the speakers
Check that the gain setting is configured correctly for your cartridge and not too high.
Try a lower gain setting to ensure output is not clipping.
Check that the needle and record are free from dust and debris.
The output from the speakers is too quiet
Check that the gain setting is configured correctly for your cartridge and not too low.
Try a higher gain setting until a suitable volume level is achieved.
Check the cartridge loading settings are set correctly.
There is a loud buzz or hum
Ensure no interconnects are loose or defective.
Ensure the earth terminal from your turntable is solidly connected to the earth binding post.
Ensure that your turntable is located close to your Vinyl Preamplifier and away from possible sources of
EMI and/or RF interference, for example computers, televisions etc.
15
Technical Specifications
All specifications are accurate at the time of printing. Perreaux Industries Ltd. reserves the right to
adjust specifications without notice.
All specifications measured at 230V after a 10 minute warm up period using an Audio Precision ATS-2
Audio Analyser. Measurements taken at 65kHz bandwidth, unless specified otherwise. Measurements
taken with lowest gain setting at rated output where appropriate.
Inputs
Audio Inputs:
Input Sensitivity:
‘MM’input
‘MC’ input
Gain:
‘MM’ input
‘MC’ input
Input Impedance:
‘MM’ input
‘MC’ input
Input Capacitance:
‘MM’ input
‘MC’ input
16
Input Overload Margin:
Trigger Input:
OFF voltage
ON voltage
Outputs
Audio Outputs:
Output Impedance:
Balanced
Unbalanced
Rated Output:
Maximum Output:
2 Unbalanced (RCA) (selectable)
3.0mV to 11.9mV (selectable)
0.3mV to 1.2mV (selectable)
36dB to 48dB (selectable)
56dB to 68dB (selectable)
1kΩ to 47kΩ (selectable)
10Ω to 47kΩ (selectable)
22pF to 470pF (selectable)
47pF (selectable)
22dB
1 mono 3.5mm (⅛”) jack
0VDC
3-12VDC
1 Unbalanced (RCA)
1 Balanced (XLR)
30Ω
100Ω
0.75Vrms
10.3Vrms (14.5Vp-p)
Preamplifier
Total Harmonic Distortion (THD+N):
Typically:
20Hz to 20kHz:
RIAA Accuracy:
Signal to Noise Ratio (un-weighted):
General
Mains Fuse Rating:
Dimensions:
Width
Depth
Height
Weight:
0.002%, 1kHz @ rated output
<0.05% @ rated output
±0.5dB, 50Hz to 20kHz
87dB
0.5A (slow blow)
431mm (17.0”)
277mm (12.2”)
67mm (2.6”)
7.5kg (16.5lb)
Physical Dimensions
67mm
(2.6”)
431mm
(17”)
17
277mm
(12.2”)
Installation Notes
Please record the serial number of your Audiant VP3 Vinyl Preamplifier for future reference.
Serial Number:
18
Contact Details
Perreaux Industries Ltd.
PO Box 305
Mosgiel
Dunedin 9053
New Zealand
T: +64 3 489 2975
F: +64 3 489 2976
E: [email protected]
W: www.perreaux.com
Audiant VP3-Cover.pdf
2
25/03/15
6:50 pm
C
M
Y
CM
MY
CY
CMY
K
Perreaux Industries Ltd.
PO Box 305
Mosgiel
Dunedin 9053
New Zealand
T: +64 3 489 2975
F: +64 3 489 2976
E: [email protected]
W: www.perreaux.com