1
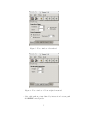
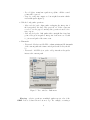
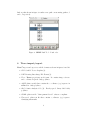
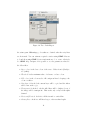
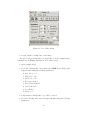
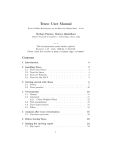
Teseo 2.0.8 user manual
Revision: 1.18 – Date: 2005/10/13 09:37:04
Stefano Pintore, Matteo Quintiliani
Istituto Nazionale di Geofisica e Vulcanologia, Roma, Italy
Preamble
c 2005).
This document contains the user manual of Teseo2 (
Teseo2 is a software tool for accurate digitisation of seismogram traces
from raster files and it is distributed with open source license (GPL).
Teseo2 is a plug-in for GIMP. The GIMP is the GNU Image Manipulation Program. It is a freely distributed piece of software for such tasks
as photo retouching, image composition and image authoring. It works on
many operating systems, in many languages.
Teseo2 is part of Sismos project at Istituto Nazionale di Geofisica e Vulcanologia (Italy) and his name is an acronym for ”Turns the Eldest Seismogram in the Electronic Original One”.
Official site at http://sismos.ingv.it/teseo/ and e–mail to [email protected]
Contents
1 Install Teseo
2
2 Before starting with Teseo
2
3 Starting with Teseo
2
4 Vectorisation
5
5 Path manipulation
6
6 Trace import/export
9
7 Filters
10
8 Before leaving Teseo
13
9 Credits
13
1
1
Install Teseo
Before to install Teseo2 you need to install GIMP 2.2 because Teseo2 is
a GIMP plug-in. Refer to GIMP installation at http://www.gimp.org/ .
Teseo2 has never been tested on GIMP 2.0.
Teseo2 is developed on Unix but it is available for several platforms,
such as Linux, Windows and MAC OS X. You can find source and binary
distributions at the Sismos project web site, http://sismos.ingv.it/teseo/
Follow instructions in the INSTALL file from the distribution of your
choice.
2
Before starting with Teseo
Teseo2 works on greyscale images saved in xcf format, the GIMP proprietary format that supports gzip or bzip2 compression.
To start Teseo2 , start GIMP, open your xcf seismogram image and
select Teseo-2 from Teseo menu (figure 1). Alternatively, you can use the
context menu on the image (right-clicking) or define a shortcut, see GIMP
help for howto.
Figure 1: Teseo menu
3
Starting with Teseo
Teseo2 associates to the working image some information related to seismo2
gram paper, seismic event, station data and vectorisation parameters. All
these information are saved in a Session and it has to be referred to a single
seismic event.
First time Teseo2 starts on a image, it requires to create a new session.
Fill the fields shown in the figures 2, 3, 4, and press on the OK button.
Session properties can be modified at any time selecting File→ Session→
Properties (Ctrl+P in Teseo2 context). New sessions related to other events
in the same image can be created selecting File→ Session→ New (Ctrl+N).
Teseo2 use a fixed session naming convention, so the user can’t change
session file name.
When Teseo2 is starded on a image associated to more sessions, the user
can choose the preferred one.
Figure 2: Session window – Record tab
In figure 2 are shown the parameters associated to the seismic record.
• Station data: following parameters will be saved in SAC files.
– Name: station code.
– Azimuth: component azimuth (degrees clockwise from north).
– Incident angle: component incident angle (degrees from vertical).
– Latitude: station latitude (degrees, north positive).
3
– Longitude: station longitude (degrees, east positive).
– Quote: station elevation (meters).
• Date: date of recording.
• Paper speed: linear velocity of the paper [mm/sec].
• Image file: name of the current image (read-only).
• Resolution: image resolution (read-only).
Figure 3: Session window – Traces tab
In figure 3 are shown the parameters associated to the traces.
• Event first sample time: time of the first sample of the trace, this value
will be saved in SAC files.
• Time mark first sample time: time of the first sample of the trace that
represents the time mark.
In figure 4 are shown the parameters associated to the path manipulation.
• Return directly Bézier path: if checked, when you use automatic vectorisation methods, Fit is executed after every group of iterations.
4
Figure 4: Session window – Path tab
• Resampling step: distance in pixel used by Resample operation.
• Constant abscissa ascendent: if checked, resampling returns abscissa
ascendent, else X-values are evenly spaced regardless direction.
• Export DXF path relocated in origin: if checked, DXF export will translate the path starting a the coordinate (0, 0). This option should be
checked only for Sismos procedures.
4
Vectorisation
Teseo2 trace vectorisation relies on GIMP Path tool, see the GIMP help
for basic usage. Path tool permits to create piecewise cubic Bézier curves
and polygonals.
Warning: Teseo2 does not support closed paths and paths that have
two or more components. Unfortunately, plug-in developers haven’t available procedures to handle the last ones at this time :-(
Warning: Seismogram must be oriented from left to right and top to
bottom. If necessary you can use GIMP tools such as Flip or Rotate to
modify the image ;-)
5
User can manually vectorise the traces by GIMP Path tool, she/he can
create several piecewise cubic Bézier curves or polylines. Moreover, it is
possible use the Teseo2 automatic path vectorisation tool. Up to now, this
tool offers an algorithm based on a weighted mean of the colour trace. For
detailed information about this algorithm read [1]. What effectively takes
place is an iterative procedure, whereby at each single iteration step the
next point is found by submitting to an algorithm a rectangular portion of
the image centred at the current point and the information regarding the
closest previous points.
In figure 5 are shown main parameters of the Teseo2 automatic path
vectorisation tool:
• Forward: algorithm stop condition, maximum iteration number.
• Back: number of points to delete from the current path.
• Stop to the first guide: alternative stop condition, the iterations stop
when the abscissa is greater than first vertical guide position.
• Trace colour: base trace colour (black or white).
• Trace thickness: thickness average in pixels.
The colour weighted mean algorithm takes rectangle dimension in pixels
from the tab shown in figure 6. This algorithm is enabled to operate clicking
on the colour weighted mean button on the toolbar in figure 5. In future
versions of Teseo2 more algorithms should be available (neural network
approach too) and will be associate to other buttons beside this one. The
Arrows buttons on the main window becomes sensitive when user choose an
algorithm to execute. The arrow direction means the preferred direction in
the execution of the previously choosen algorithm.
5
Path manipulation
Besides GIMP path manipulation, Teseo2 adds some useful operations in
seismogram vectorisation. In figure 7 is shown the Teseo2 Path menu. The
operations are subdivided in three groups: operations on the current path,
operations on all unlocked paths and operations on path that represent
Timemark. Some operations rely on GIMP vertical guides tool: you can
place a vertical guide clicking on the ruler on the left of the image window
and dragging it onto the image at the desired place.
• Current path operations
– Resample: resample path with parameter defined in figure 4.
– Fit: fit path with a piecewise cubic Bézier curve.
6
Figure 5: Teseo window - General tab
Figure 6: Teseo window - Colour weighted mean tab
– Split: split path at points defined by intersection beetwen path
and GIMP vertical guides.
7
– Force Polyline: transform a path in a polyline. All the control
points will be ignored.
– Snap: for each point compute a colour weighted mean in a thickness width square (figure 5).
• Unlocked only paths operations
– Align unlocked paths: align paths overlapping the first point of
the next path to the last of the previous one. If the event was
recorded over the paper boundary, this operation is used before
trace export.
– Link unlocked paths: link paths with a straight line from last
point of the previous path to first point of the next one. Useful
to join several path of the same event.
• Timemark
– Timemark - Evaluate middle TMs: evaluate missing middle timemark
of the current path and return vertical guides where they should
be.
– Timemark - Add TMs from guides: add points where the guides
intersect the current path.
Figure 7: Teseo window - Path menu
Warning: order in operations on multiple paths respects order of the
GIMP Path tool, that is from bottom to top. For example, executing a
8
link on paths shown in figure 8 results a new path concatenating paths a, b
and c, respectively.
Figure 8: GIMP Path Tool – Path order
6
Trace import/export
Teseo2 import and export several file formats as shown in figures 9 and 10:
• SVG: Scalable Vector Graphics [2].
• DXF: Drawing Interchange File Format [3].
• Trace: Teseo2 proprietary ascii format. It contains image reference
and coordinate in pixels. Only polylines.
• ASCII: plain text file that contains the coordinates (x,y) sequence in
millimeters. Only polylines.
• SAC: Seismic Analysis Code [4]. Evenly spaced binary SAC. Only
polylines.
• SISMA: plain text file ”Sismogrammi Storici” software compliant.
• Timemark: plain text file that contains coordinates (x,y) sequence
identifying timemarks.
9
• Bézier: GIMP 1.0 Bézier path format. For downward compatibility.
• Examples: binary format that contains information for neural networks
learning. Not available yet.
Up to now, SVG export is possible only by GIMP Path tool, DXF
import is possible only on Teseo2 exported paths, SAC import is not implemented yet.
Figure 9: Teseo Path Import
7
Filters
GIMP offers a variety of filters and instruments to manipulate images.
We strongly recommend to enhance the ”readability” of your seismogram
before vectorising. For example you could increase the contrast of the image.
Warning: if you want save the history of your image modifies, you could
apply the filters on copies of the ”Background Layer”. Rember that all
operations usually work on the current layer and not necessarily this is the
visible one. At the moment, Teseo2 provides a graphical filter useful to
clean a seismogram. What do we intend to clean a seismogram? Often,
before to vectorise a record, it could be advantageous to remove horizontal
traces that cross it but leaving the crossings where they are. The main idea
is to fill contiguous horizontal or vertical lines with the background colour of
10
Figure 10: Teseo Path Export
the seismogram. Warning: good results are obtained when the noisy lines
are horizontal. You can estimate required rotation using GIMP Measure
tool and then using GIMP Rotate trasformation tool to rotate effectively.
See GIMP help. In figure 11 is possible to see the parameters related to
the Clean filter.
• Base colour: is the base colour of the trace. Value from 0 (black) to
255 (white).
• Threshold: is the maximum value of tolerance on base colour.
• Fill colour: is the colour used to fill contiguous lines belonging to the
colour condition.
• New layer: if checked, the current layer will be copied and the filters
will be run on the copy.
• Transparent: if checked, only the filled lines will be displayed, rest of
the image will be transparent. This works only on layer with alpha
channel.
• Horizontal/Vertical: check it to fill horizontal or vertical line.
• Greater/Less: check it to fill lines longer or shorter than length.
11
Figure 11: Teseo Filter Clean
• Length: length of a single line on the image.
If you’ve never used this filter you should try it on the example image
contained in your Teseo2 distribution. Follow these steps:
1. Open example.xcf.gz
2. Select the ”Background” layer inside the GIMP Layer Dialog and
apply the filter using the following parameters:
• Base Colour = 0
• Threshold = 128
• Fill Colour = 255
• New layer checked
• Transparent uncheked
• Vertical checked
• Less checked
• Length = 9
3. A layer named ”Background copy” will be created.
4. Select the ”Background” layer and apply the filter using the following
parameters:
12
• Base Colour = 0
• Threshold = 200
• Fill Colour = 255
• New layer checked
• Transparent uncheked
• Horizontal checked
• Greater checked
• Length = 28
5. A layer named ”Background copy #1” will be created.
6. Select the layer named ”Background copy” and set the layer parameter
Mode to Multiply.
Nice! Isn’t it?
8
Before leaving Teseo
Before to close GIMP is a very good practice to do:
1. Save session (Ctrl+S in Teseo2 context)
2. Close Teseo2 .
3. Save xcf image, it contains all your paths and layers. xcf is your friend
and gzip or bzip2 too...
4. Close GIMP.
9
Credits
In Teseo2 sources have been integrated other works that are distributed
respecting their copyright or license:
• NEWUOA – NEWUOA is a software developed by M.J.D. Powell
for unconstrained optimization without derivatives.
Author: M.J.D. Powell ([email protected])
• cfortran.h – cfortran.h is an easy-to-use powerful bridge between C
and FORTRAN. It provides a transparent, machine independent interface between C and FORTRAN routines and global data.
Author: Burkhard Burow ([email protected]) http://www-zeus.desy.de/ burow/cfortran/
13
References
[1] Stefano Pintore, Matteo Quintiliani, and Diego Franceschi. Teseo:
a vectorizer of historical seismograms. Computers & Geosciences,
31(10):1277–1285, December 2005.
[2] SVG Working Group. Scalable Vector Graphics (SVG) 1.1 Specification. , January 2003. URL http://www.w3.org/TR/2003/REC-SVG1120030114/.
[3] Autodesk. AutoCAD Release 12 DXF Format. Adobe Systems Incorporated - 1585 Charleston Road - P.O. Box 7900 - Mountain View, CA
94039-7900, 1992. Drawing Interchange and File Formats Release 12.
[4] P. Goldstein, D. Dodge, and M. Firpo. SAC2000: Signal processing and
analysis tools for seismologists and engineers. In W. Lee, H. Kanamori,
P. Jennings, and C. Kisslinger, editors, International Handbook of Earthquake & Engineering Seismology, Part B, pages 1613–1614, New York,
2003. Academic Press.
14
Index
File formats
ASCII, 9
Bézier, 10
DXF, 5, 9, 10
Examples, 10
SAC, 3, 4, 9, 10
SISMA, 9
SVG, 9, 10
Timemark, 9
Trace, 9
xcf, 2, 13
Filters
Clean, 11
clean, 10
Greater, 13
Greater/Less, 11
Horizontal, 13
Horizontal/Vertical, 11
Image file, 4
Incident angle, 3
Latitude, 3
Length, 12, 13
Less, 12
Longitude, 4
Mode, 13
Name, 3
New layer, 11–13
Paper speed, 4
Quote, 4
Resampling step, 5
Resolution, 4
Return directly Bézier path, 4
Station data, 3
Stop to the first guide, 6
Threshold, 11–13
Time mark first sample time, 4
Trace colour, 6
Trace thickness, 6
Transparent, 11–13
Vertical, 12
GIMP, 1, 2, 5–13
GIMP tools
Flip, 5
Measure, 11
Path, 5, 6, 8, 10
path, 6
Rotate, 5, 11
Keywords
Session, 3
Menu
Teseo-2, 2
Teseo operations
Align unlocked paths, 8
Parameters
Fit, 4, 6
Azimuth, 3
Force Polyline, 8
Back, 6
Link unlocked paths, 8
Base Colour, 12, 13
Resample, 5, 6
Base colour, 11
Snap, 8
Constant abscissa ascendent, 5
Split, 7
Date, 4
Timemark - Add TMs from guides,
Event first sample time, 4
8
Export DXF path relocated in
Timemark
- Evaluate middle TMs,
origin, 5
8
Fill Colour, 12, 13
Fill colour, 11
Forward, 6
15