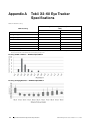
1
U se r ’s Ma n u a l
To b i i X2- 60 E y e Tr acker
Tobii X2-60 Eye Tracker User’s manual
Version 1.0.1
09/2013
All rights reserved.
© Tobii Technology AB
The information contained in this document is proprietary to
Tobii Technology. Any reproduction in part or whole without
prior written authorization by Tobii Technology is prohibited.
Products that are referred to in this document may be either
trademarks and/or registered trademarks of the respective
owners. The publisher and the author make no claim to these
trademarks.
While every precaution has been taken in the preparation of
this document, the publisher and the author assume no
responsibility for errors or omissions, or for damages resulting
from the use of information contained in this document or
from the use of programs and source code that may
accompany it. In no event shall the publisher and the author
be liable for any loss of profit or any other commercial
damage caused or alleged to have been caused directly or
indirectly by this document.
Content subject to change without notice.
Please check Tobii web site www.tobii.com for updated
versions of this document.
Table of Contents
1
In t r o du ct io n . . . . . . . . . . . . . . . . . . . . . . . . . . . . . . . . . . . . . . . . . . . . . . . . . . . . . . . . . . . . . . . . . . . . . . . . . . . . . . . . . . . . . . . . . . . . . . . . . . . . . . . . . . . . . . . . . . . . . . . . . . . . . . . . . . 1
1.1
2
Ha r dwa r e P a c ka ge C o n t e n t . . . . . . . . . . . . . . . . . . . . . . . . . . . . . . . . . . . . . . . . . . . . . . . . . . . . . . . . . . . . . . . . . . . . . . . . . . . . . . . . . . . . . . . . . . . . . . . . . . . . . . . . 2
2.1
2.2
3
3.2
3.3
3.4
4.3
4.4
4.5
4.6
Prerequisites..........................................................................................................................5
Mounting the Eye Tracker ........................................................................................................5
4.2.1
Mounting the Tobii X2 Eye Tracker Compact Edition to a Screen ...................................6
4.2.2
Mounting the Tobii X2 Eye Tracker Using a Desk Stand/Tripod......................................7
Connecting the Tobii X2-60 Eye Tracker external processing unit .................................................9
Tobii Eye Tracker Installer ........................................................................................................9
Installing additional software ..................................................................................................12
The X Configuration Tool .......................................................................................................13
4.6.1
Reference Measurement Point of the Tobii X2 Eye Tracker .........................................13
4.6.2
Setting the parameters in the X Configuration Tool ....................................................14
P o sit io n in g . . . . . . . . . . . . . . . . . . . . . . . . . . . . . . . . . . . . . . . . . . . . . . . . . . . . . . . . . . . . . . . . . . . . . . . . . . . . . . . . . . . . . . . . . . . . . . . . . . . . . . . . . . . . . . . . . . . . . . . . . . . . . . . . . . 17
5.1
6
Temperature & Humidity ..........................................................................................................4
3.1.1
General use............................................................................................................4
3.1.2
Transportation and storage .......................................................................................4
Cleaning ...............................................................................................................................4
Transporting the Tobii X2 Eye Tracker .......................................................................................4
Disposing of the Tobii X2 Eye Tracker .......................................................................................4
S e t t in g U p t h e T o bii X 2–60 Eye T r a c ke r . . . . . . . . . . . . . . . . . . . . . . . . . . . . . . . . . . . . . . . . . . . . . . . . . . . . . . . . . . . . . . . . . . . . . . . . . . . . . . . . . . . . 5
4.1
4.2
5
Standard Package ..................................................................................................................2
Available Accessories .............................................................................................................3
Produ c t Ca r e . . .. . .. . . .. . . .. . .. . . .. . .. . . .. . .. . . .. . . .. . .. . . .. . .. . . .. . .. . . .. . . .. . .. . . .. . .. . . .. . .. . . .. . . .. . .. . . .. . .. . . .. . .. . . .. . . .. . .. . . .. . .. . . . 4
3.1
4
Introduction ...........................................................................................................................1
1.1.1
Overview................................................................................................................1
1.1.2
Basic Operating Principles .......................................................................................1
Freedom of Head Movement ..................................................................................................18
T ypic a l S e t u ps . . . . . . . . . . . . . . . . . . . . . . . . . . . . . . . . . . . . . . . . . . . . . . . . . . . . . . . . . . . . . . . . . . . . . . . . . . . . . . . . . . . . . . . . . . . . . . . . . . . . . . . . . . . . . . . . . . . . . . . . . . . . 19
6.1
6.2
6.3
6.4
6.5
Single Screen Setup.............................................................................................................19
Local Live Viewer Setups.......................................................................................................20
Physical Object Setup...........................................................................................................21
External Video Stimulus Recording..........................................................................................22
E-prime Setup......................................................................................................................23
A ppe n dix A T o bii X 2–60 Eye T r a c ke r S pe c if ic a t io n s . . . . . . . . . . . . . . . . . . . . . . . . . . . . . . . . . . . . . . . . . . . . . . . . . . . . . . . . . . . . . . . . . . . 24
A ppe n dix B R e c o m m e n de d Displa y S iz e s . . . . . . . . . . . . . . . . . . . . . . . . . . . . . . . . . . . . . . . . . . . . . . . . . . . . . . . . . . . . . . . . . . . . . . . . . . . . . . . . . . . . 27
A ppe n dix C Glo ssa r y . . . . . . . . . . . . . . . . . . . . . . . . . . . . . . . . . . . . . . . . . . . . . . . . . . . . . . . . . . . . . . . . . . . . . . . . . . . . . . . . . . . . . . . . . . . . . . . . . . . . . . . . . . . . . . . . . . . . . . 28
A ppe n dix D S a f e t y a n d C o m plia n c e . . . . . . . . . . . . . . . . . . . . . . . . . . . . . . . . . . . . . . . . . . . . . . . . . . . . . . . . . . . . . . . . . . . . . . . . . . . . . . . . . . . . . . . . . . . . . . 29
D1
D2
Safety .................................................................................................................................29
D1.1
Mounting Warning .................................................................................................29
D1.2
Emergency Warning ..............................................................................................29
D1.3
Infrared Warning ...................................................................................................29
D1.4
Epilepsy Warning ..................................................................................................29
D1.5
Magnetic Field Warning .........................................................................................29
D1.6
Child Safety..........................................................................................................30
D1.7
Do not Open the Tobii X2–60 Eye Tracker ................................................................30
Compliance Information.........................................................................................................30
D2.1
D2.2
D2.3
A ppe n dix E
E1
E2
E3
E4
E5
FCC Statement.....................................................................................................30
Industry Canada Statement ....................................................................................30
Standards ............................................................................................................30
S a f e t y a n d R e gu la t o r y In f o r m a t io n : T o bii X 2–60 Ex t e r n a l P r o c e ssin g U n it . . . . . . . . . . . . 31
European Union Declaration of Conformity Statement ...............................................................31
FCC Declaration of Conformity ..............................................................................................31
Canadian Department of Communications Compliance Statement..............................................31
Japan VCCI Statement..........................................................................................................31
Korea Class B Statement ......................................................................................................31
1
1.1
1.1.1
Introduction
Introduction
Overview
This document describes the features and functionality of the Tobii X2–60 Eye Tracker. The X2 Eye Tracker is a stand-alone eye
tracker that can be used in various setups by attaching it to monitors, laptops or for performing eye tracking on physical objects.
The eye tracker requires some assembly before first time use and after transport.
The Tobii X2 Eye Tracker is an unobtrusive eye tracker for detailed research of natural behavior. Its large freedom of head movement allows the participant to move during recording while maintaining accuracy and precision. The Tobii X2 Eye Trackers offer
maximum flexibility with numerous software and stimuli setup options.
The Tobii X2–60 is a small eye trackers measuring only 184 mm (7.2’’) in length. It enables your portable eye tracking lab and
studies that require an eye tracker to track even large objects at close distances (up to 36° gaze angle). Use the eye trackers to
conduct studies on:
•
•
•
•
•
•
1.1.2
Laptops
PC monitors up to app. 25ʺ (16:9)
Mobile devices
Real-world interfaces
Projections, simulators
TV screens
Basic Operating Principles
During tracking, Tobii Eye Trackers use infrared illuminators to generate reflection patterns on the corneas of the participant’s
eyes. These reflection patterns, together with other visual data about the participant, are collected by image sensors. Sophisticated image processing algorithms identify relevant features, including the eyes and the corneal reflection patterns. Complex
mathematics is used to calculate the 3D position of each eyeball, and finally the gaze point; in other words, where the participant
is looking.
Tobii Eye Trackers are designed for use in indoor office environments.
Tobii X2-60 Eye TrackerUser ’s manual v.1.0.1 - en-US
1 Introduction
1
2
Hardware Package Content
2.1
Standard Package
The standard Tobii X2–60 Eye Tracker package contains the following main parts:
•
Tobii X2-60 Eye Tracker Compact Edition
•
Adhesive mounting bracket kit (each kit contains 3 mounting brackets for different screen depths) for permanent
installation.
•
USB extension cable
•
Tobii X2-60 Eye Tracker USB memory stick containing the
Tobii Eye Tracker Installer
•
Tobii X2–60 Eye Tracker external processing unit. It comes
together with:
•
2
–
Power Supply
–
PSU cable EU
–
PSU cable US
–
PSU cable UK
–
Trendnet Adapter
–
Ethernet cable
Safety and Compliance paper — please read this before
starting to use the Tobii X2 Eye Tracker.
2 Hardware Package Content
Tobii X2-60 Eye Tracker User’s manual v.1.0.1 - en-US
•
Installation Guide — Illustrated mounting instructions for
attaching the eye tracker on a screen.
•
Zipper bag
To be used for transporting the eye tracker unit.
•
Tobii X2-60 Eye Tracker user manual
Tobii X2–60 Eye Tracker User Manual (pdf).
2.2
Available Accessories
The following accessories are available for the Tobii X2 Eye Tracker:
•
Tobii X2 Eye Tracker laptop case
Laptop case specially designed for transporting the Tobii X2 Eye Tracker
together with your laptop in one single case.
•
Tobii Mobile Device Testing Solution for X2
The Tobii Mobile Device Testing Solution enables collection of eye tracking data during natural interaction with smartphones, tablet computers
and other devices or objects of similar size such as books or brochures.
•
Additional Mounting Brackets
The mounting brackets package includes more adhesive mounting brackets and enables additional ways of attaching the eye tracker to monitors
and other objects.
•
Tobii X2 Eye Tracker desk stand package:
The desk stand is to be used for setups where the eye tracker is not attached to the screen where the stimuli are presented, such as projection
screen setups. It can be mounted on a tripod. For instructions on how to
mount the eye tracker using the desk stand, please see 4.2.2 Mounting
the Tobii X2 Eye Tracker Using a Desk Stand/Tripod, page 7.
–
Tobii X2 Eye Tracker desk stand kit
–
Digital angle gauge
–
Measuring tape
Tobii X2-60 Eye TrackerUser ’s manual v.1.0.1 - en-US
The digital angle gauge and the measuring tape are provided for the
measurements needed in these kind of setups. Please read 4.6 The X
Configuration Tool, page 13.
2 Hardware Package Content
3
3
Product Care
3.1
Temperature & Humidity
3.1.1
General use
The Tobii X2 Eye Tracker is best kept in dry conditions at room temperature. The recommended range for temperature and the
humidity value for the device is as follows:
•
•
3.1.2
T e m p e r a t u r e : 0°C to 40°C (32°F to 104°F)
Hu m i d i t y : Max 70% (no condensation on the device)
Transportation and storage
For transportation and storage, the recommended range for temperature and the humidity value for the device is as follows:
•
•
T e m p e r a t u r e : -40°C to 70°C (-40°F to 158°F)
Hu m i d i t y : 20% to 70% (no condensation on the device)
The Tobii X2 Eye Tracker is not waterproof or water resistant. The device should not be kept in excessively humid,
damp or wet conditions. Do not submerge the device in water or in any other liquid. Be careful not to allow liquids to
be spilled upon the device.
3.2
Cleaning
Before cleaning the Tobii X2 Eye Tracker device shut down the computer to which it is attached and unplug all cables. Use a
soft, slightly damp, lint-free cloth. Avoid getting moisture in openings on the device. Don’t use window cleaners, household
cleaners, aerosol sprays, solvents, alcohol, ammonia, or abrasives to clean the device.
Please be aware that scratches on the front surface of the eye tracker may result in impaired eye tracking
performances.
3.3
Transporting the Tobii X2 Eye Tracker
Disconnect all the cables and use the zipper bag provided.
When you transport the device for repair or shipment, use the original casing and packaging materials.
3.4
Disposing of the Tobii X2 Eye Tracker
Do not dispose of the Tobii X2 Eye Trackers in general household or office waste. Follow your local regulations for the disposal
of electrical and electronic equipment.
4
3 Product Care
Tobii X2-60 Eye Tracker User’s manual v.1.0.1 - en-US
4
Setting Up the Tobii X2–60 Eye Tracker
The main steps you need to perform in order to set up and configure the Tobii X2 Eye Tracker are:
1.
Check that you have all the components needed — read 2 Hardware Package Content, page 2.
2.
Check the prerequisites in 4.1 Prerequisites, page 5.
3.
Mount the X2 Eye Tracker, according to the setup that you will use — read 4.2 Mounting the Eye Tracker, page 5.
4.
Connect the Tobii X2–60 Eye Tracker External Processing Unit — read 4.3 Connecting the Tobii X2-60 Eye Tracker external processing unit, page 9.
5.
Install the prerequisites from the provided USB memory stick — read 4.4 Tobii Eye Tracker Installer, page 9.
6.
Run the configuration software — read 4.6 The X Configuration Tool, page 13.
7.
Install the supported eye tracking software, such as Tobii Studio or the Tobii SDK.
You can also watch the instructional video on the provided USB memory stick —Installation and Basic Configuration
Tobii X2 Eye Trackers.mp4 — for the main setup and configuration steps to be performed when installing the Tobii X2
Eye Tracker.
4.1
Prerequisites
Before starting to mount and use your Tobii X2 Eye Tracker, you need to make sure that:
•
•
•
•
•
•
•
4.2
Your computer is compatible with the software that you are going to use (Tobii Studio or other eye tracking software).
The latest version of the Tobii System Requirements and Recommendations document is available on the Tobii website
at www.tobii.com.
You have administrator rights for the computer that you are using in order to be able to install and run the installation and
configuration software.
The screen used for presenting the stimuli has a proper size and form factor to be used with the eye tracker that you have.
Please read Appendix B Recommended Display Sizes, page 27.
You are using either Windows 7 or Windows 8 as an operating system.
The firewall(s) that you might have on the computer allow access for the eye tracking software.
You are using USB 2.0. The Tobii X2 Eye Tracker does not support the USB 3.0.
Always try out the Tobii X2 Eye Tracker before attaching it permanently to the screen in order to make sure that it works
properly in conjunction to your screen.
Mounting the Eye Tracker
This section describes the steps you need to perform in order to assemble and mount the Tobii X2 Eye Tracker, depending on
the setup type:
•
•
4.2.1 Mounting the Tobii X2 Eye Tracker Compact Edition to a Screen, page 6
4.2.2 Mounting the Tobii X2 Eye Tracker Using a Desk Stand/Tripod, page 7
Tobii X2-60 Eye TrackerUser ’s manual v.1.0.1 - en-US
4 Setting Up the Tobii X2–60 Eye Tracker
5
4.2.1
Mounting the Tobii X2 Eye Tracker Compact Edition to a Screen
For mounting the Tobii X2 Eye Tracker Compact Edition to a laptop or monitor you use one of the adhesive mounting brackets
provided in the standard package.
1. Choose one of the three mounting bracket types provided in the
Tobii X2 Eye Tracker package, according to the type of the screen
that you are going to connect the eye tracker to (see illustrative picture on the right). Try out the mounting bracket on the screen to
see which bracket works for your screen.
2. Make sure that the area where the Tobii X2 Eye Tracker is going to
be mounted is free from dust and dirt. If you clean it using a wet
wipe, make sure that the area is completely dry before proceeding
with the next step.
3. Measure and locate the middle of the bottom frame of the screen.
You will use this as a reference when positioning the mounting
bracket (step 5).
4. Peel off the adhesive tape on the back of the mounting bracket.
Please be aware that the adhesive tape on the back of the
mounting bracket is permanent, meaning that once you attach it to your screen, you won’t be able to remove it.
Use other non-permanent double-sided tape for non-permanent mounting.
5. Position the mounting bracket on the bottom frame of your screen.
Make sure that it is centered exactly in the middle point of the
screen bottom frame as shown in the picture.
6
4 Setting Up the Tobii X2–60 Eye Tracker
Tobii X2-60 Eye Tracker User’s manual v.1.0.1 - en-US
6. Apply pressure to the mounting bracket for 30 seconds to make
sure it gets attached to the screen.
7. Allow one hour for the adhesive on the mounting bracket to cure
and become permanently attached to the screen before attaching
the eye tracker unit.
8. Position the Tobii X2 Eye Tracker and attach it to the mounting
bracket as shown in the figure to the right. Make sure to position it
in the right way so that the mounting bracket fits exactly in the slot
on the back of the eye tracker. The magnet inside will keep the eye
tracker in place.
Do NOT connect the Tobii X2 Eye Tracker to the computer
before running the installation software provided on the USB memory stick . Connecting the eye tracker prematurely
can lead to the eye tracker not being installed properly.
4.2.2
Mounting the Tobii X2 Eye Tracker Using a Desk Stand/Tripod
A desk stand is available as an accessory for the Tobii X2 Eye Trackers, and it is to be used for setups where the eye tracker is
not attached to the screen where the stimuli are presented, such as projection screen setups. It can be mounted on a tripod. A
typical setup using the Tobii X2 Eye Tracker mounted on a tripod is described in section 6.3 Physical Object Setup, page 21.
To mount the Tobii X2 Eye Tracker on the desk stand:
1. Peel off the adhesive tape on the back of the mounting bracket.
Please be aware that the adhesive tape on the back of the
mounting bracket is permanent, meaning that once you attach it to the desk stand, you won’t be able to remove it.
Use other non-permanent double-sided tape for non-permanent mounting.
2. Attach the mounting bracket to the desk stand, by fitting the upper
part of the mounting bracket in the special slot of the desk stand as
illustrated in the figure:
Please note that the desk stand is made out of bendable
metal. You can attach the mounting bracket on any of the
sides of the desk stand and bend it accordingly.
Tobii X2-60 Eye TrackerUser ’s manual v.1.0.1 - en-US
4 Setting Up the Tobii X2–60 Eye Tracker
7
3. Position the Tobii X2 Eye Tracker and attach it to the mounting
bracket. Make sure to position it in the right way so that the mounting bracket fits exactly in its slot on the back of the eye tracker.
4. The desk stand is made out of bendable metal. You can change the tilt angle of the eye tracker by bending the desk stand
firmly by hand. Remove the eye tracker before bending the desk stand.
Please note that when you use a setup where the eye tracker is not mounted on the screen used for presenting the
stimuli, you need to run the X Configuration Tool to configure the corresponding distances and angles. Please read
section 4.6 The X Configuration Tool, page 13.
8
4 Setting Up the Tobii X2–60 Eye Tracker
Tobii X2-60 Eye Tracker User’s manual v.1.0.1 - en-US
4.3
Connecting the Tobii X2-60 Eye Tracker external processing unit
The Tobii X2–60 Eye Tracker is shipped together with an external processing unit (see 2 Hardware Package Content, page 2).
In order to be able to start using your eye tracker, after mounting the Tobii X2 Eye Tracker to a screen or according to your setup
type, you have to connect it to your computer via the Tobii X2–60 Eye Tracker External Processing Unit.
To connect the Tobii X2–60 Eye Tracker to your computer via the external processing unit:
1.
Connect the Tobii X2 Eye Tracker to the external processing unit, via USB.
2.
Connect the external processing unit to the computer via LAN, using the provided Ethernet cable.
3.
Plug in the external processing unit to a power source (100–240 Vac), using the suitable provided power adapter.
4.
Turn on the external processing unit by pressing the power button.
The figure below shows an example of a simple setup for illustrating how the Tobii X2–60 Eye Tracker external processing unit is
connected.
4.4
Tobii Eye Tracker Installer
In order to install the needed prerequisites and to configure the eye tracker for your screen you have to run the Tobii Eye Tracker
Installer that you can find on the provided USB memory stick or you can download it from the Tobii website at www.tobii.com.
The Tobii X2 Eye Tracker should be mounted before running the Tobii Eye Tracker Installer, but not connected to the
computer.
Do NOT connect the Tobii X2 Eye Tracker to the computer before running the installation software provided on the
USB memory stick. Connecting the eye tracker prematurely can lead to software compatibility issues as the wrong
drivers may then automatically be installed by Windows.
If you move the eye tracker to another computer or attach it to another screen you must always run the Tobii Eye Tracker Installer again to configure the eye tracker for the new setup.
To in st a ll t h e pr e r e qu isit e s an d do a ba sic c on f igu r a tio n o f t h e T obii X2 Eye Tr a c ke r o n you r c om pu t e r :
Please note that you need to have administrator rights in order to be able to install and run the software.
1.
Plug in the provided USB memory stick in the computer that the Tobii X2 Eye Tracker is going to be connected to.
2.
Run the Setup application that you can find on the USB memory stick and follow the on-screen instructions, as described
in the following steps.
Tobii X2-60 Eye TrackerUser ’s manual v.1.0.1 - en-US
4 Setting Up the Tobii X2–60 Eye Tracker
9
3.
When you start the Tobii Eye Tracker Installer it opens with a Welcome screen. In order to be able to continue with the installation you need to confirm that you acknowledge and agree to the conditions of the end-user license agreement by
checking the tick-box:
4.
Click the Start button. You will be directed to the Firmware and Drivers screen. Please wait while the needed drivers and
firmware are being installed. You can see the status on the screen:
5.
When all the software is successfully installed, click the Next button. You will be directed to the Select Eye Tracker
screen.
6.
Connect the Tobii X2 Eye Tracker to your computer by using the provided USB cable. Use an USB extension cable if
needed. If you are using a Tobii X2–60 Eye Tracker with an external processing unit, you need to connect the eye tracker
to the computer via the external processing unit by using an Ethernet cable.
7.
Click to select your Tobii X2 Eye Tracker from the list of the discovered Tobii Eye Trackers in the Tobii Eye Tracker Installer window:
10
4 Setting Up the Tobii X2–60 Eye Tracker
Tobii X2-60 Eye Tracker User’s manual v.1.0.1 - en-US
8.
Click the Next button. You will be directed to the Select Display Monitor screen
9.
Specify on which of the screens connected to your computer the Tobii X2 eye tracker is mounted. If you are unsure which
screen is the one that the eye tracker is attached to, click the Identify button. You will see a number displayed on each
screen so that you can identify it.
10. Click the Next button. You will be directed to the Map to Display Monitor screen. In the following steps you will configure
where the eye tracker is positioned relative to the active display area of the screen:
Tobii X2-60 Eye TrackerUser ’s manual v.1.0.1 - en-US
4 Setting Up the Tobii X2–60 Eye Tracker
11
11. Click the Start mapping button. The mapping screen will be displayed on the monitor the eye tracker is attached to (the
monitor you previously selected in step 9).
12. Drag the handles on the dotted lines to align them with the mounted Tobii X2 Eye Tracker:
•
for the Tobii X2 Eye Tracker Compact Edition — align the dotted lines with the margins of the eye tracker.
It is very important to be as careful and precise as possible when performing this step because a wrongly performed configuration may result in offsets in the eye tracking data.
When you have finished aligning, click the I’m done button. You will get back to the Map to Display Monitor screen of the
Tobii Eye Tracker Installer.
13. Click Next. You will get a notification message that your system is ready for eye tracking.
14. Click Exit or close the Tobii Eye Tracker Installer window to exit the application.
4.5
Installing additional software
After installing and setting up the eye tracker, you need to install other software that you intend to use such as Tobii Studio or Tobii SDK. Please see the respective software user manuals for detailed instructions.
12
4 Setting Up the Tobii X2–60 Eye Tracker
Tobii X2-60 Eye Tracker User’s manual v.1.0.1 - en-US
4.6
The X Configuration Tool
The Tobii X2 Eye Tracker can be used in many different setups. For example, it can be used to perform eye tracking relative to a
physical scene, a TV, or a projection screen. For all this to work, the user must provide some information to the Tobii X2 eye
tracker about the physical setup. This is done using the X C o n f i g u r a t i o n t o o l .
The X Configuration Tool can be accessed via the Eye Tracker Browser software.
T o in st a ll t h e Eye T r a c ke r B r o wse r :
1.
Plug in the provided USB memory stick and run the Eye Tracker Browser installer.
2.
Follow the on-screen instructional steps to complete the installation.
To a ccess the X Con figura t ion To ol:
1.
Open the Eye Tracker Browser (Start > Programs > Tobii > Tobii Eye Tracker Browser). When the Eye Tracker Browser
opens, a list of the discovered eye trackers is displayed.
2.
Select your Tobii X2 Eye Tracker from the list and click the C o n f i g T o o l . . . button. The X Configuration Tool opens.
4.6.1
Reference Measurement Point of the Tobii X2 Eye Tracker
All distance measurements must be performed from the same reference point on the eye tracker. This is marked with a line on
the upper side of the eye tracker as illustrated in the pictures below.
The image below illustrates the reference measurement point of the Tobii X2 Eye Tracker — Compact Edition, as seen from the
front:
The image below illustrates the reference measurement point of the Tobii X2 Eye Tracker, as seen from the side:
Tobii X2-60 Eye TrackerUser ’s manual v.1.0.1 - en-US
4 Setting Up the Tobii X2–60 Eye Tracker
13
4.6.2
Setting the parameters in the X Configuration Tool
When using the Tobii X2 Eye Tracker without being mounted on a standard laptop or monitor, you must specify all the positioning
parameters in the X Configuration Tool, as described below:
1.
U n i t s : — Select the unit you want to use for measuring the distances: inches or centimeters.
2.
Perform the measurements and enter the corresponding values, as described below:
•
A c t i v e D i s p l a y A r e a S i z e — The correct display or stimuli size must always be added in the X Configuration Tool.
The Active Display Area is represented by the area on which the calibration is performed.
If you are using an external calibration grid, it must have the same shape as the calibration pattern used in Tobii Studio and include either five or nine points. The calibration points can be drawn on a paper, marked on a calibration
board, or marked on objects in the scene. Make sure that the corners of the calibration grid are exactly 90 degrees
and that the center point is exactly in the middle of the grid. It is also good to include the 25% larger Active Display
Area around the grid to make it easier to measure the parameters required in the X Configuration Tool.
How to calculate the 25% larger Active Display Area for the setups that use an external calibration grid is described
below:
14
–
Active Display Area Height = 1.25 × Calibration grid height.
–
Active Display Area Width = 1.25 × Calibration grid width.
–
For TV screens and other displays, measure the size of the visible active area on the screen where you can see
the actual image (see the following image):
4 Setting Up the Tobii X2–60 Eye Tracker
Tobii X2-60 Eye Tracker User’s manual v.1.0.1 - en-US
–
For projected displays, measure the size of the visible projection on the display (see the following image). In a
setup where the stimuli are filmed by a scene camera, the active display area must be calculated based on the
calibration grid size:
•
A — eye tracker angle. Calibrate the digital angle gauge supplied with the Tobii X2 Eye Tracker desk stand package
before measuring the angle between the eye tracker and the vertical plane. To calibrate the digital angle meter, place
it on a flat, vertical surface and press the “Zero” button. To measure the angle, place the digital angle gauge on the
front surface of the eye tracker. In many setups the angle is commonly around 25 degrees.
•
B — display angle. Measure the angle between the vertical plane and the active display using the digital angle meter.
In a scene camera setup measure the angle between the vertical plane and the calibration grid. If the display is tilted
forward you should enter a negative angle (use “-” in front of the value). If the active display is completely vertical the
angle value is 0. In a scene camera setup where you want to track objects on a horizontal table the angle would be
90 degrees.
C — Height difference between lowest row of pixels on the display and the measuring point of the eye tracker (read
4.6.1 Reference Measurement Point of the Tobii X2 Eye Tracker, page 13). Measure the height difference between
the measuring point on the eye tracker and the bottom of the active display area. If the active display is located below
the measuring point on the eye tracker (for example, in a projector setup) the value will be negative. Enter the value
in the X Configuration Tool with a “-” in front to signify it as a negative value.
D — distance between the measuring point of the eye tracker (read 4.6.1 Reference Measurement Point of the Tobii
X2 Eye Tracker, page 13) and the display. Measure the distance from the measuring point on the Tobii X2 Eye Tracker to the front of the active display on the monitor, projection screen, or TV screen, or in a scene camera setup to the
•
•
Tobii X2-60 Eye TrackerUser ’s manual v.1.0.1 - en-US
4 Setting Up the Tobii X2–60 Eye Tracker
15
virtual screen. If the measuring point on the eye tracker is located behind the active display, enter a negative distance
(use “-” in front of the value).
Always make sure that the distance to the active display is long enough for the eye tracker to track the entire area. Please read section 5 Positioning, page 17.
•
•
U s e S i d e Of f s e t — If the Eye Tracker is not placed right in front of the screen with the axis horizontally aligned, an
offset can be entered in the X Configuration Tool. In this case:
a.
Check the Use Side Offset tick box. The upper right area of the X Configuration Tool window becomes active.
b.
Enter the side offset value, measured from the center of the active display to the center of the eye tracker. Enter
a negative value if the eye tracker is located to the left of the center as seen from the front.
U s e R o t a t i o n — If the eye tracker is not placed parallel with the display or tracked object:
a.
Check the Use Rotation tick box. The bottom right area of the X Configuration Tool window becomes active.
b.
Enter the value of the angle between the back of the eye tracker and the active display. If the eye tracker is rotated clockwise, enter a negative value.
3.
S a v e t o Ey e T r a c k e r — Once you have entered all the needed parameters corresponding to your setup, you must click
Save to Eye Tracker in order to start using this configuration. The parameters will then be sent to the eye tracker and the
eye tracker will immediately be properly configured. When you change any parameter value in the tool, the button must
be pressed again for the eye tracker to get the new settings.
4.
You also have the option of saving the configuration as an .xcfg file by clicking the S a v e t o F i l e . . . button and setting the
name and location of the file. Click L o a d f r o m F i l e . . . to load a previously saved .xcfg configuration file. This is useful if
you want to save a particular configuration of a setup to be able to reuse it at a later point in time or from another
computer.
16
4 Setting Up the Tobii X2–60 Eye Tracker
Tobii X2-60 Eye Tracker User’s manual v.1.0.1 - en-US
5
Positioning
The distance from the participant’s eyes to the eye tracker should be approximately 60–65 cm (23–26ʺ) for best performance.
However, the eye tracker can still track eye movements as long as the participant stays within the distance interval from the eye
tracker mentioned below. If the eye tracker is too close or too far away from the participant there is a risk of losing some of the
gaze data.
When the Tobii X2 Eye Tracker is used in a setup where it is not attached to a screen, it should be placed below the monitor (or
below the surface that is to be used for presenting the stimuli) without covering the bottom of the display area for the participant
watching the stimuli.
For optimal tracking, the eye tracker should be placed so that the gaze angle (α) illustrated below will not exceed the 36° for Tobii
X2 Compact Edition when the participant is located ~65 cm (26’’) from the eye tracker.
It is very important to have the correct distance to the monitor or the tracked object. Otherwise the eye tracker cannot track the
entire area. If the monitor or object is placed too close to the participant there is a risk that the gaze data for the corners of the
display area of the monitor will not be collected.
The correct distance can be calculated by using basic trigonometry (see image below). By assuming that the tracked area is a
half circle and that the diagonal from the center of the screen or other stimuli to its top corner constitutes the radius of that half
circle, it is possible to calculate the distance needed between the participant and the stimuli using the following formula:
Tobii X2-60 Eye TrackerUser ’s manual v.1.0.1 - en-US
5 Positioning
17
If you place the test participant farther away from the object you can track larger objects, if you place the test participant closer
to the object you can track smaller objects. If you place a test participant at 65 cm (26ʺ) you can track a 25ʺ (16:9) monitor. Regardless of the distance to the object the eye tracker should always be placed approximately 65 cm (26ʺ) from the participant.
For more information about supported monitor sizes please see Appendix B Recommended Display Sizes, page 27
5.1
Freedom of Head Movement
The Tobii X2 Eye Tracker allows for extensive head movement. Once the Tobii X2 Eye Tracker is properly calibrated and placed
in front of the user, no further adjustments are required.
The Tobii X2 Eye Tracker allows for head movements of 50 x 36 cm (20 x 14ʺ) (Width x Height) at the distance of 70 cm (27.5ʺ)
from the eye tracker. Depending on factors such as droopy eyelids, visual aids and other characteristics of the eye, the optimal
distance between the participant and the eye tracker varies. The typical tracking distance limit from the center of the eye tracker
is 45–90 cm (15.7–33.5ʺ) for the Tobii X2 Eye Tracker.
In order to be tracked properly, the participant that is being eye-tracked needs to have at least one eye in the track box at all
times.
18
5 Positioning
Tobii X2-60 Eye Tracker User’s manual v.1.0.1 - en-US
6
Typical Setups
This section describes the typical setup configurations that can be used with the Tobii X2–60 Eye Trackers and Tobii Studio or
other supported software. For specific information about custom configurations or system requirements and recommendations,
please contact your Tobii sales representative or Tobii technical support. The System Requirements and Recommendations can
be downloaded at www.tobii.com.
6.1
Single Screen Setup
This is the simplest setup when using on-screen stimuli, such as images, movies or web. To record the participant’s reactions,
the conversation between the test leader and the test participant, you need to connect an external user camera and microphone
to the computer running Tobii Studio. The setups illustrated below do not include the user camera and user sound.
The eye tracker is directly connected to the computer via USB. You can use either a laptop or a desktop computer for this setup.
To configure this setup:
1.
Mount the eye tracker below the screen as instructed in 4.2.1 Mounting the Tobii X2 Eye Tracker Compact Edition to a
Screen.
2.
Connect the eye tracker to your computer via the Tobii X2–60 external processing unit as instructed in section 4.3 Connecting the Tobii X2-60 Eye Tracker external processing unit, page 9
3.
Run the Tobii Eye Tracker Installer and connect the Eye Tracker to your computer. For instructions, please read 4.4 Tobii
Eye Tracker Installer.
4.
Run Tobii Studio and start your test. For details about how to connect the eye tracker in Tobii Studio and further instructions on using Tobii Studio, please refer to the Tobii Studio documentation available on www.tobii.com.
Tobii X2-60 Eye TrackerUser ’s manual v.1.0.1 - en-US
6 Typical Setups
19
6.2
Local Live Viewer Setups
These setups are used when the test is to be supervised from a separate screen where the test leader can see the test participant’s eye movements in real time during testing.
The following image illustrates two typical setups using the Live Viewer.
The above setup is a simple setup with the eye tracker
mounted on a monitor (where the stimuli will be presented)
connected to a laptop running Tobii Studio that will be used as
a secondary screen by the test leader to see the test participant’s eye movements in real time during the test.
The above setup is using a projected screen for the stimuli
presentation. You use the laptop to present the stimuli on the
screen via the projector and also as a secondary screen so
that the test leader is able to see the test participant’s eye
movements in real time during the test.
To configure this setup:
To configure this setup:
1.
Mount the eye tracker below the screen as instructed
in 4.2.1 Mounting the Tobii X2 Eye Tracker Compact
Edition to a Screen, page 6 .
1.
Mount the eye tracker on a tripod using the supplied
desk stand as instructed in 4.2.2 Mounting the Tobii
X2 Eye Tracker Using a Desk Stand/Tripod, page 7.
2.
Connect the monitor to the laptop through VGA/DVI.
2.
Connect the eye tracker to the laptop via USB.
3.
Connect the eye tracker to your computer via the Tobii
X2–60 external processing unit as instructed in section
4.3 Connecting the Tobii X2-60 Eye Tracker external
processing unit, page 9
3.
Connect the projector to the laptop via VGA/DVI.
4.
Connect the eye tracker to your computer via the Tobii
X2–60 external processing unit,as instructed in section
4.3 Connecting the Tobii X2-60 Eye Tracker external
processing unit, page 9
5.
Position the eye tracker, taking into consideration the
guidelines in 5 Positioning, page 17. Always make sure
the eye tracker is able to track the eyes over the entire
screen by using the correct distance to the screen and
the correct tilt angle of the eye tracker.
6.
Run the X Configuration Tool in order to configure the
eye tracker for your particular setup. Please read 4.6
The X Configuration Tool, page 13.
7.
Run Tobii Studio, configure it for showing live gaze data and start your test. For details about configuration in
Tobii Studio and further instructions on using Tobii
Studio, please refer to the Tobii Studio documentation
available on www.tobii.com.
4.
5.
20
Run the Tobii Eye Tracker Installer and connect the
Eye Tracker to your computer. For instructions, please
read 4.4 Tobii Eye Tracker Installer, page 9.
Run Tobii Studio, configure it for showing live gaze data and start your test. For details about configuration in
Tobii Studio and further instructions on using Tobii
Studio, please refer to the Tobii Studio documentation
available on www.tobii.com.
6 Typical Setups
Tobii X2-60 Eye Tracker User’s manual v.1.0.1 - en-US
6.3
Physical Object Setup
Real objects, such as magazines or mobile devices, can be used as stimuli in a scene camera setup where a video camera is filming the object during the recording. In this setup, the calibration points cannot be displayed on a screen during the calibration,
thus a separate calibration grid must be used. The grid can be drawn on a paper and include five or nine points. The object you
intend to track should fit within an area which is 25% larger than the actual calibration grid. Always make sure that the eye tracker
is able to track the person’s eyes over the entire calibration grid. During the calibration procedure, the person is asked to look at
the corresponding points in the grid.
To configure this setup:
1.
Mount the eye tracker on a tripod using the supplied desk stand as instructed in 4.2.2 Mounting the Tobii X2 Eye Tracker
Using a Desk Stand/Tripod, page 7.
2.
Connect the eye tracker to your computer via the Tobii X2–60 external processing unit as instructed in section 4.3 Connecting the Tobii X2-60 Eye Tracker external processing unit, page 9
3.
Connect the scene camera to the computer.
4.
Position the eye tracker, taking into consideration the guidelines in 5 Positioning, page 17. Always make sure the eye
tracker is able to track the eyes over the entire screen by using the correct distance to the screen and the correct tilt angle of the eye tracker.
5.
If you don’t already have one, create a calibration grid. The calibration grid must have the same shape as the calibration
pattern used in Tobii Studio and include either five or nine points. The calibration points can be drawn on a paper, marked
on a calibration board, or marked on objects in the scene. Make sure that the corners of the calibration grid are exactly
90 degrees and that the center point is exactly in the middle of the grid. It is also good to include the 25% larger Active
Display Area around the grid to make it easier to measure the parameters required in the X Configuration Tool (see the
next step).
6.
Run the X Configuration Tool in order to configure the eye tracker for your particular setup. Please read 4.6 The X Configuration Tool, page 13. How to calculate the 25% larger Active Display Area, which needs to be added in the X Configuration Tool, is described below:
•
•
Active Display Area Height = 1.25 × Calibration grid height.
Active Display Area Width = 1.25 × Calibration grid width.
Tobii X2-60 Eye TrackerUser ’s manual v.1.0.1 - en-US
6 Typical Setups
21
7.
Run Tobii Studio and start your test. For details about how to connect the eye tracker in Tobii Studio and further instructions on using Tobii Studio, please refer to the Tobii Studio documentation available on www.tobii.com.
6.4
External Video Stimulus Recording
The stimulus presented on the screen is generated by an external device such as a DVD player, computer or gaming console.
This setup is suitable when using a Tobii Eye Tracking system for eye tracking data analysis when the stimulus is presented from
a separate computer or other RGB or VGA sources. This could include a computer game, a DVD player, or when stimulus is presented on a computer running a different operating system. The computer running Tobii Studio must be equipped with an additional video capture card.
Note that if the external application runs on the Windows operating system and it does not use 3D graphics acceleration or it does not have a high processor load and high memory usage, it may be more suitable and less complex to run
this on the same computer as Tobii Studio and use the Screen Recording option in Tobii Studio instead.
.
For this setup, the image from the Tobii Studio computer has to be displayed on the screen during calibration (to display the calibration points). The external stimulus computer, however, should be shown on the screen during the actual test. Both devices
must therefore be connected to the same screen. To switch between the inputs, use a switch or a screen that allows for multiple
input sources. The image shown on the screen must be sent to Tobii Studio to record the video stream and synchronize it with
the gaze data. If the stimulus is presented from an analogue video source, e.g., a VCR or an analogue video camera, a similar setup with slightly modified components can be used.
To configure this type of setup:
1.
Mount the eye tracker on the screen as instructed in 4.2.1 Mounting the Tobii X2 Eye Tracker Compact Edition to a
Screen, page 6.
2.
Connect the eye tracker to the eye tracking computer via the Tobii X2–60 external processing unit as instructed in section 4.3 Connecting the Tobii X2-60 Eye Tracker external processing unit, page 9
3.
Connect the screens to the computer via VGA/DVI.
4.
Connect your external device used for generating the stimuli (DVD player, gaming console, etc.) to the video capture card
attached to the eye tracking computer and to the primary screen that is used for stimuli presentation.
5.
Run the Tobii Eye Tracker Installer and connect the Eye Tracker to your computer. For instructions, please read 4.4 Tobii
Eye Tracker Installer, page 9.
6.
When positioning the participant in front of the eye tracker, make sure to take into consideration the guidelines in section
5 Positioning.
7.
Run Tobii Studio and start your test by performing the calibration. For details about how to connect the eye tracker in Tobii Studio and further instructions on using Tobii Studio, please refer to the Tobii Studio documentation available on
www.tobii.com.
22
6 Typical Setups
Tobii X2-60 Eye Tracker User’s manual v.1.0.1 - en-US
8.
6.5
Switch the input source of the primary screen (used for stimulus presentation) to the external device used for generating
the stimuli (DVD player, gaming console, etc.)
E-prime Setup
The setup described in this section is a two-computers setup using Tobii Studio to record the gaze data and E-Prime® to
present the stimulus. The E-Prime® software and Tobii Studio software are run on two different computers and communicate
with the Tobii Eye Tracker as well as between each other over a LAN network.
The image from the Tobii Studio computer has to be displayed on the stimulus display during calibration (to display the calibration points), whereas the E-Prime® computer should be shown on the stimulus display during the actual test. Therefore, both
computers have to be connected to the stimulus display. Two secondary screens can be added to the setup to enable the eye
tracker operator to monitor the progress of the trial during the stimulus presentation and recording.
The image or video presented by E-Prime® on the eye tracker’s display also has to be recorded by Tobii Studio and synchronized with the gaze data. The image or video recording is done via a video capture card installed on the Tobii Studio computer. As
a result, the display output of the E-Prime® needs to be split in two connections: one to the eye tracker’s display and another to
the video capture computer card on the computer running Tobii Sudio.
Tobii X2-60 Eye TrackerUser ’s manual v.1.0.1 - en-US
6 Typical Setups
23
Appendix A
Tobii X2–60 Eye Tracker
Specifications
Table A.1 Gaze Accuracy
T o bii X 2- 60 Ey e T r a c ke r C o m pa c t Edit io n ( f ir m wa r e ve r sio n —
1.0.5)
Ga z e a c c u r a c y1
Bino cula r
Mono cula r
At ideal conditions
0.4
0.4
At 25° gaze angle
0.4
0.5
At 30° gaze angle
0.4
0.5
At 1 lux
1.2
1.9
At 300 lux
0.4
0.4
At 600 lux
0.4
0.6
At 1000 lux
0.6
0.9
White stimuli background
1.2
1.9
1.
Accuracy under ideal conditions is measured in the center of the head movement box with the participant fixed in a chinrest. Data is collected immediately after calibration in a controlled
laboratory environment with constant illumination with 9 stimuli points at gaze angles of ≤20º.
A c c u r a c y a t ide a l c o n dit io n s — X2– 60 Co m pac t Editio n
A c c u r a c y a t va r yin g dist a n c e s — X 2–60 Co mpa c t Edit io n
24
Appendix A Tobii X2–60 Eye Tracker Specifications
Tobii X2-60 Eye Tracker User’s manual v.1.0.1 - en-US
Table A.2 Gaze Precision
T o bii X 2-60 Eye T r a c ke r C o m pa c t Edit io n
Ga z e pr e c isio n at ide a l c o n dit io n s
Bino cula r
Mono cula r
Artificial Eye
NA
NA
Human Eye
0.34
0.45
Table A.3 Eye Tracking Specifications
Ey e T r a c kin g S pe c if ic a t io n s
T o bii X 2-60 Eye T r a c ke r C o m pa c t Edit io n
60 Hz
Sa mplin g ra t e
(std. dev. approx. 0.1 Hz)
To ta l syst e m la te n c y
<35 ms
Tim e t o t r a c kin g r e c ove r y
For blinks: immediate
He a d
1.
mo ve m e n t 1
Freedom of head movement at 70
cm (width x height)
50 x 36 cm (20 x 14ʺ)
Operating distance (eye tracker to
participant)
45–90 cm (15.7–33.5ʺ)
R e c o m m e n de d sc r e e n siz e
up to 25ʺ (16:9)
Da t a sa mple ou t pu t
Timestamp, eye position, gaze point, pupil diameter,
validity code
Freedom of head movement describes the volume in front of the tracker in which the user must have at least one of the eyes. The numbers are specified parallel/orthogonal to screen surface,
assuming the eye tracker is at a 20 degree angle to the screen.
Table A.4 Eye Tracking Unit
Eye Tr a c kin g U n it
T o bii X 2-60 Eye T r a c ke r C o m pa c t Edit io n
Ey e t r a c ke r pr o c e ssin g u n it
Tobii X2-60 Eye Tracker external processing unit
Connectors
USB 2.0
Weight
200 g (7.1 oz)
Siz e
184 x 28 x 23 mm (7.2 x 1.1 x 0.9ʺ)
Mo u n t in g so lu t io n s
Adhesive Mounting brackets for monitors, laptops and tablets. Desk Stand
Accessory package for Tripod and desks
Table A.5 Tobii X2-60 Eye Tracker external processing unit
Connectors
USB 2.0, LAN and power connector
Siz e
116.6 x 112 x 39 mm (4.6 x 4.4 x 1.55’’)
Weight
500 g (17.6 oz)
Table A.6 Hardware package content
T o bii X 2-60 Eye T r a c ke r C o m pa c t Edit io n Ha r dwa r e P a c ka ge
Tobii X2-60 Eye Tracker Compact Edition
3 x Adhesive mounting bracket kit (each kit contains 3 brackets for different screen depths) for permanent installation.
Safety Instructions
Tobii X2-60 Eye TrackerUser ’s manual v.1.0.1 - en-US
Appendix A Tobii X2–60 Eye Tracker Specifications
25
T o bii X 2-60 Eye T r a c ke r C o m pa c t Edit io n Ha r dwa r e P a c ka ge
Installation Guide
Mounting tape kit
USB extension cable
Zipper bag
Tobii X2-60 Eye Tracker USB memory stick containing the Tobii Eye Tracker Installer.
Tobii X2-60 Eye Tracker user manual (pdf)
Tobii X2-60 Eye Tracker external processing unit
Table A.7 Accessories
T o bii X 2-60 Eye T r a c ke r C o m pa c t Edit io n
Tobii X2 Eye Tracker laptop case
Tobii Mobile Device Stand for X2
Additional Mounting Brackets
Tobii X2 Eye Tracker desk stand package:
•
•
•
26
Tobii X2 Eye Tracker desk stand kit
Digital angle gauge
Measuring tape
Appendix A Tobii X2–60 Eye Tracker Specifications
Tobii X2-60 Eye Tracker User’s manual v.1.0.1 - en-US
Appendix B
Recommended Display Sizes
The eye tracker can only do accurate eye tracking of a person’s eyes if the visual angle, as seen from the person’s eyes, does not
exceed 36° for the Compact Edition, between the center of the eye tracker and any point on what the person is looking at. This
is valid as long as the person stays within the area in front of the eye tracker defined as the “freedom of head movement”, which
is roughly between 45-90 cm for the Tobii X2 Eye Tracker from the center of the eye tracker when seen from the side (read
more about this in5 Positioning, page 17.
This means that depending on the position of the eye tracker in relation to the display, it can track different sizes of displays. If
the display is positioned further away from the user, a larger area can be tracked. However, small objects shown on the display
might be difficult to see for the user at a greater distance.
Another aspect to consider is the aspect ratio of the display. Since the optimally tracked area is a half circle, the eye tracker can
track displays with a large width to height ratio better than displays where this ratio is small:
The display sizes below have been calculated to be within 36° gaze angle and is therefore suitable for use with the Tobii X2 Eye
Tracker. It might be possible for some users to use larger displays than the ones given below, but that will be at the user’s own
risk of not being able to collect eye tracking data in the top corners of the display.
A spect ra t io
Ma xim um displa y siz e
Tobii X2 Eye Tr a c ke r — Co mpa c t Edit ion
16:9
25ʺ
16:10
24ʺ
4:3
22ʺ
5:4
22ʺ
The display sizes above are based on tests on participants without vision aids such as lenses or glasses in normal
office lighting without any interfering light sources such as windows or near infrared light-emitting lamps. For
participants with glasses, lenses or other characteristics that might interfere with trackability, for example, droopy
eyelids, extensive use of mascara or environment with interfering light sources, the trackability in the top corners of the
display might be lower than for the conditions tested here.
Tobii X2-60 Eye TrackerUser ’s manual v.1.0.1 - en-US
Appendix B Recommended Display Sizes
27
Appendix C
Glossary
Mo n o c u la r /bin o c u la r
Monocular data shown is based on data from the participant’s dominant eye only. Binocular data is
the average of the two eyes.
Ga z e pr e c isio n
Describes the spatial angular variation between a set of consecutive gaze samples. Gaze precision
can be measured under various conditions.
Ga z e a c c u r ac y
Describes the angular average distance from the actual gaze point to the one measured by the eye
tracker. Gaze accuracy can be measured under various conditions.
Sa mplin g ra t e
Number of eye tracking data samples per second.
To ta l syst e m la te n c y
The duration from mid-point of the eye image exposure, to when a sample is available via the API on
the client computer. This includes half of the image exposure time plus image read-out and transfer
time, processing time and time to transfer the data sample to a client computer.
Tim e t o t ra cking
r e c o ve r y fo r blin ks
When a participant blinks, the eye tracker loses the ability to track eye gaze because the eye is
covered by the eyelid. If the pupil is occluded for only a short period, the system will regain tracking
immediately when the pupil becomes visible again, but only if the participant has maintained
approximately the same head position during the blink. Data during blinks are only lost when the
pupil is occluded, i.e. during the eyelid movement itself or when the eye is closed.
Tim e t o t ra cking
r e c o ve r y a ft e r lost
t r a c kin g
An eye tracker working in a natural user environment may occasionally lose track of the participant’s
eyes, e.g., when the participant completely turns away from the tracker. If a period of a few hundred
milliseconds elapses during which the eye tracker is unable to detect the eyes in close proximity to
where they were last detected, the eye tracker will start searching for the eyes within the entire head
movement box. The stated measurement is the typical time to tracking recovery in such a situation. If
the eye tracker is unable to detect the eyes of the participant even after about one minute, the
system will enter a “slow search” mode, leading to larger recovery times.
Free dom of head
mo ve m e n t
Describes an area ( width x height in cm) where at least one eye is within the eye tracker’s field of
view.
Ope r at in g dist an c e
Describes the range of distances (minimum and maximum) between the participant’s eyes and the
surface covering the eye tracker sensors at which eye tracking can be done while maintaining
tracking.
Ey e t r a c kin g
pr o c e ssin g u n it
Gaze data calculations are performed by firmware embedded in the eye tracker or in a separate
processing unit.
28
Appendix C Glossary
Tobii X2-60 Eye Tracker User’s manual v.1.0.1 - en-US
Appendix D
D1
D1.1
Safety and Compliance
Safety
Mounting Warning
The Tobii X2–60 Eye Tracker should be mounted according to MANUFACTURER instructions of approved mounts.
Tobii or its agents are not liable for damage or injuries to a person or its property due to a Tobii X2–60 Eye Tracker
falling from a mounted configuration. The mounting of a Tobii X2–60 Eye Tracker is done entirely at the user’s own
risk.
The double sided tape supplied with the adhesive Magnetic Mounting Plates is designed to permanently attach the
bracket to the monitor/laptop. Attempting to remove the bracket after attaching it using the supplied tape can result in
damage both to the monitor/laptop and the bracket.
Do not lick the tape or place any part of the tape or Magnetic Mounting Plate in one's mouth.
Do not mount the Tobii X2–60 Eye Tracker on monitors positioned above the head or face of a users unless using a
dedicated "fixed mounting" solution.
D1.2
Emergency Warning
Be aware that due to the low, but possible, risk of failure, the Tobii X2–60 Eye Tracker should not be relied upon
exclusively as an audio communications, or an environmental control, device in emergencies, as well as in dangerous,
or otherwise important, situations. Do not rely on the device for emergency calls or banking transactions. We
recommend having multiple ways to communicate in emergency situations. Banking transactions should only be
carried out with a system recommended by, and approved according to the standards of, your bank.
D1.3
Infrared Warning
When activated, the Tobii X2–60 Eye Tracker emits pulsed infrared (IR) light. Certain medical devices are susceptible
to disturbance by IR light and/or radiation. Do not use the Tobii X2–60 Eye Tracker when in the vicinity of such
susceptible medical devices as their accuracy or proper functionality could be inhibited.
D1.4
Epilepsy Warning
Some people with P h o t o s e n si t i v e E p i l e p s y are susceptible to epileptic seizures or loss of consciousness when
exposed to certain flashing lights or light patterns in everyday life. This may happen even if the person has no medical
history of epilepsy or has never had any epileptic seizures.
A person with Photosensitive Epilepsy would also be likely to have problems with TV screens, some arcade games,
and flickering fluorescent bulbs. Such people may have a seizure while watching certain images or patterns on a
monitor, or even when exposed to the light sources of an eye tracker. It is estimated that about 3-5% of people with
epilepsy have this type of Photosensitive Epilepsy. Many people with Photosensitive Epilepsy experience an "aura" or
feel odd sensations before the seizure occurs. If you feel odd during use, move your eyes away from the eye tracker.
D1.5
Magnetic Field Warning
The Tobii X2–60 Eye Tracker Magnetic Mounting Plates contains magnets. Magnetic fields may interfere with the
function of cardiac pacemakers and implantable cardioverter-defibrillators. As a general rule, maintain a minimum
distance of 6 inches (15 centimeters) between any item with magnets and your heart device.
The magnets can also shut off the monitor on a laptop if the laptop is equipped with a magnetic sensor to switch off
the monitor when closing the laptop. If this happens, shut of the sensor on the laptop.
Tobii X2-60 Eye TrackerUser ’s manual v.1.0.1 - en-US
Appendix D Safety and Compliance
29
D1.6
Child Safety
The Tobii X2–60 Eye Tracker is an advanced computer system and electronic device. As such it is composed of
numerous separate, assembled parts. In the hands of a child certain of these parts have the possibility of being
separated from the device, possibly constituting a choking hazard or another danger to the child.
Young children should not have access to, or the use of, the device without parental or guardian supervision.
D1.7
Do not Open the Tobii X2–60 Eye Tracker
Non-compliance will result in loss of Warranty! There are no user serviceable components inside. Contact
Tobii technical support if your Tobii X2–60 Eye Tracker is not working properly.
D2
Compliance Information
All Tobii X2–60 Eye Tracker are CE-marked, indicating compliance with the essential health and safety requirements
set out in European Directives.
D2.1
FCC Statement
This device complies with Part 15 of the FCC Rules. Operation is subject to the following two conditions: (1) this device may not
cause harmful interference, and (2) this device must accept any interference received, including interference that may cause
undesired operation.
Modifications not expressly approved by Tobii could void the user’s authority to operate the equipment under FCC
rules.
This equipment has been tested and found to comply with the limits for a Class B digital device, pursuant to part 15 of the FCC
Rules. These limits are designed to provide reasonable protection against harmful interference in a residential installation. This
equipment generates, uses and can radiate radio frequency energy and, if not installed and used in accordance with the
instructions, may cause harmful interference to radio communications.
However, there is no guarantee that interference will not occur in a particular installation. If this equipment does cause harmful
interference to radio or television reception, which can be determined by turning the equipment off and on, the user is
encouraged to try to correct the interference by one or more of the following measures:
•
•
•
•
D2.2
Reorient or relocate the receiving antenna.
Increase the separation between the equipment and receiver.
Connect the equipment into a wall outlet on a circuit different from that to which the receiver is connected.
Consult the dealer or experienced radio/TV technician for assistance.
Industry Canada Statement
This Class B digital apparatus complies with Canadian ICES-003.
Cet appareil numérique de la classe B est conforme à la norme NMB-003 du Canada.
D2.3
Standards
The Tobii X2–60 Eye Tracker complies with the following standards:
•
•
•
•
30
IEC/EN62471, Photobiological Safety of Lamps and Lamp Systems
EMC Emission: EN 61000-6-3:2001 including EN 55022:1998/A1/A2 Class B, FCC part 15, Class B
EMC Immunity: EN 61000-6-1:2007
FCC part 15, Class B
Appendix D Safety and Compliance
Tobii X2-60 Eye Tracker User’s manual v.1.0.1 - en-US
Appendix E
Safety and Regulatory
Information: Tobii X2–60
External Processing Unit
Risk of explosion if the battery is replaced with an incorrect type. Batteries should be recycled where possible.
Disposal of used batteries must be in accordance with local environmental regulations.
Failure to use the included FSP Group, Inc. Model FSP065-REBPower Adapter may violate regulatory compliance
requirements and may expose the user to safety hazards.
Modification of the wireless antennas, thermal solution, or enclosure may violate regulatory compliance requirements
and may expose the user to safety hazards.
E1
European Union Declaration of Conformity Statement
The product is properly CE marked demonstrating this conformity and is for distribution within all member states of the EU with
no restrictions. The device is in conformity with all applicable essential requirements necessary for CE marking, following the
provisions of the European Council Directive 2004/108/EC(EMC Directive), 2006/95/EC(Low Voltage Directive), and 2002/
95/EC (ROHS Directive).
E2
FCC Declaration of Conformity
This device complies with Part 15 of the FCC Rules. Operation is subject to the following two conditions: (1) this device may not
cause harmful interference, and (2) this device must accept any interference received, including interference that may cause
undesired operation.
For questions related to the EMC performance of this product, contact: Intel Corporation, 5200 N.E. Elam Young Parkway,
Hillsboro, OR 97124 1-800-628-8686.
E3
Canadian Department of Communications Compliance Statement
This digital apparatus does not exceed the Class B limits for radio noise emissions from digital apparatus set out in the Radio
Interference Regulations of the Canadian Department of Communications.
E4
Japan VCCI Statement
Japan VCCI Statement translation: This is a Class B product based on the standard of the Voluntary Control Council for
Interference from Information Technology Equipment (VCCI). If this is used near a radio or television receiver in a domestic
environment, it may cause radio interference. Install and use the equipment according to the instruction manual.
E5
Korea Class B Statement
Korea Class B Statement translation: This equipment is for home use, and has acquired electromagnetic conformity registration,
so it can be used not only in residential areas, but also other areas.
Tobii X2-60 Eye TrackerUser ’s manual v.1.0.1 - en-US
Appendix E Safety and Regulatory Information: Tobii X2–60
External Processing Unit
31
Tobii Support
EU R OP E / GL O B A L
Phone (SWE): +46 8 522 950 10
Phone (GER): +49 69 24 75 03 4-27
[email protected]
Support hours: 8 am - 6 pm
Between July-August: 9am - 5pm
(Central European Time, GMT +1)
NOR TH AMER ICA
Phone: +1 703 738 1320
JAPAN
Phone: +81 3 5793 3316
CHINA
Phone: +86 180 1558 5168
[email protected]
Support hours: 8 am - 8 pm
(US Eastern Standard Time, GMT -6)
[email protected]
Support hours: 9 am - 5.30 pm
(Japan Standard Time, GMT +9)
[email protected]
©Tobii ®. Illustrations and specifications do not necessarily apply to products and services offered in each local market. Technical specifications are subject to change without prior notice. All other trademarks are the property of their respective owners.
Tobii Headquarters (EMEA)
Tobii Technology AB
Karlsrovägen 2D
S-182 53 Danderyd
Sweden
CENTRAL EUROPE
Tobii Technology GmbH
Niedenau 45
D-60325 Frankfurt am Main
Germany
Phone : +46 8 663 69 90
Fax: +46 8 30 14 00
www.tobii.com
[email protected]
Phone: +49 69 24 75 03 40
Fax: +49 69 24 75 03 429
www.tobii.com
[email protected]
CHINA
Tobii China - Sales Office
Room E2, 29/F
Shanghai Industrial Investment Building
No. 18 Caoxi North Road
Shanghai, China
Mobile: +86 180 1558 6966
www.tobii.com
[email protected]
JAPAN
Tobii Technology Japan, Ltd
3-4-13 Takanawa, Minato-ku
Tokyo 108-0074
Japan
Phone: +81-3-5793-3316
Fax: +81-3-5793-3317
www.tobii.com
[email protected]
NORTH AMERICA
Tobii Technology, Inc.
510 N, Washington Street, Suite 200
Fall Church VA 22046
USA
Toll-Free: +1-888-898-6244
Phone: +1-703-738-1300
Fax: +1-703-738-1313
www.tobii.com
[email protected]