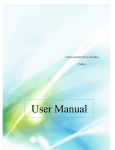
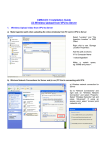
1
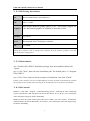
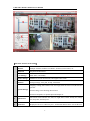
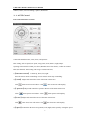
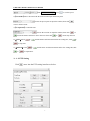
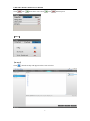
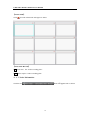
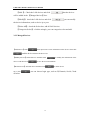
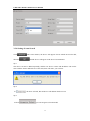
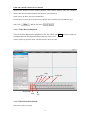
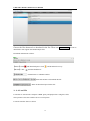
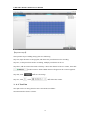
CMS Video Monitor Platform User Manual
CMS3.0 User Manual
8-8-2014
声明
非常感谢您购买我公司的产品,如果您有什么疑问或需要请随时联系我们。
CMS Video Monitor Platform User Manual
This user manual will be updated when the product’s function enhanced, and will regularly
improved and updated the product’s description or the process. The updated details will be
added into the new version. Forgive us to not notice you in other ways.
CMS Video Monitor Platform User Manual
Time
Modify Records
Version
2013.7.21
Rearrange the document
1.0.0.10
2014.8.8
Update playback and equipment modules
1.0.0.28
CMS Video Monitor Platform User Manual
CONTENT
1 Installation&working Environment .......................................................................... 1
1.1 Summary ...................................................................................................... 1
1.2 CMS Working Environment ......................................................................... 2
1.3 CMS Installation .......................................................................................... 2
1.4 CMS Uninstall .............................................................................................. 2
2 The Operation of CMS .............................................................................................. 3
2.1 Login CMS ................................................................................................... 3
2.2 Log Out ........................................................................................................ 5
3 The Features of CMS ................................................................................................ 5
3.1 Realtime Monitoring .................................................................................... 5
3.2 Device Management ................................................................................... 11
3.3 Playback ..................................................................................................... 14
3.4 Business ...................................................................................................... 17
3.5 User Manage .............................................................................................. 22
3.6 System Manage .......................................................................................... 23
CMS Video Monitor Platform User Manual
1 Installation&working Environment
1.1 Summary
This software suits to manage a small internet area for security surveillance.
This software bases on Windows, and can running on PC.
CMS can browse realtime video of multiple cameras.
CMS can browse video playback of multiple cameras.
CMS can set multiple timing broadcasting, and realize the computer on duty.
CMS can set E-map, then know the location of every CCTV products.
CMS can set the alarm of the internet video surveillance, then realize the alarm linkage between
the management software and CCTV products.
CMS has the function of video automatic backup, and mainly use for the none HDD background
date backup, such as IP camera.
CMS can make surveillance plan for each device, each window, and each channel.
Each user can create a setting profile personally, and the habits and styles will not interfere with
each other.
CMS can support Chinese and English.
Attention: This software can connect with different types and different kinds of CCTV
product, such as NVR/HVR/DVR/DVS/IPC. This user manual just describe the operation, and if
want to know the detail information of this software, please read the introduction of this software.
This manual provides to the man who design, execute, check and install the CCTV products, and
the one should have the basic operation knowledge and experience of the NVR/HVR/DVR/
DVS/IPC.
1
CMS Video Monitor Platform User Manual
1.2 CMS Working Environment
O.S
Windows2000/XP/2003/Vista/Windows 7
CPU
Above 2.4 GHZ
Graphics
Must support hardware graphic card (e.g. ATI、TNT2 PRO), suggest use
the dual channel graphics of ATI9800 or more then 128M.
Memory
1G or above
Screen
Recommend 1024*768 display resolution
NIC
100/1000M
Prompt:If the software need to manage many channels, then the memory, graphics card, and
CPU need better configuration.
1.3 CMS Installation
Step 1: Double click CMS3.0 installation package, then the installation dialog will
appear.
Step 2: Click "Next", then select the installation path. The default path is “C:\Program
Files\CMS3.0”.
Step 3: Click "Next" and wait for the complete of installation. Last click "Finish".
Prompt: If the computer has been installed different versions of CMS, recommended to uninstall
the original version of CMS, then according to the installation process of software installation.
1.4 CMS Uninstall
Method 1: Click Start - Program - Video Monitoring System - Uninstall the video monitoring
system. Uninstall the CMS will delete all relevant documents. So we advice you to backup the
video and capture image file before uninstalling.
Method 2: Enter the system control panel, then select “CMS”, next select "delete". Uninstall the
CMS will delete all relevant documents. So we advice you to backup the video and capture image
file before uninstalling.
2
CMS Video Monitor Platform User Manual
2 The Operation of CMS
2.1 Login CMS
Step1: Double-click the CMS3.0 shortcuts on the screen, then the login interface
will appear. Then input the User name and Password. The default user name is
"admin" and the password is "123456". Choose "Save"means saving user name and
password. Choose “Auto”, then next time you can login directly without inputting
user name and password.
Step 2: Click "OK", then can login to the main program show as below.
Click "Cancel", then cancel to login.
3
CMS Video Monitor Platform User Manual
【The basic features of the CMS】
Monitor
Multiple channels realtime surveillance, shortcuts, PTZ Control, etc.
Playback
Playback and download
User manage
Add, delete, and modify
Device manage
Add/delete encoder and decoder, and support auto search.
Business
Storage manage, Tour plan, E-map, Alarm-link
1
Language setting, Start with the OS, Auto login, Start the time record, Restore the
preview.
System manage
Alarm setting, Time checking, Record store.
Alarm record path, User profile input and output etc.
2
Split Screen
The screen can be setted as one, four, six, eight, nine, sixteen, Twenty five, Thirty
six, Forty nine, and Sixty five.
3
Device list
Display the device as "Directory tree", all the information can be seen on the tree.
4
CMS Video Monitor Platform User Manual
4
Monitoring
windows
5
PTZ control
Multiple realtime recording. Have Stop, Capture, Record, and Audio function.
Control the PTZ direction, zoom, focus, and aperture.
PTZ setting, such as Speed, Pre point, Loop point, Scan, Pattern, Light, Wiper.
6
Tools
Shortcuts.
7
Notice Info.
Display alarm, log message,etc.
2.2 Log Out
Click the “×”, then log out the CMS.
3 The Features of CMS
3.1 Realtime Monitoring
Realtime monitoring mainly for monitoring equipment, and can scan the video surveillance
equipment directly, also can set tour and PTZ monitoring.
3.1.1 Split Screen
Choose the split screen
The screen can be setted as one, four, six, eight, nine, sixteen, Twenty five, Thirty six, Forty nine,
and Sixty five.
3.1.2 Device List
double click the device. If the video shows on the screen, means connected. If the video not show
on the screen, means the device is not online or the device adds error. Double click the channel
name, then can see the realtime video recoding.
【Other Features】If the device is DVR/NVR/HVR and connected with the CMS. Then click right
button of the mouse on the connected device, you can setting Remote setup, Time synchronization,
Talkback, Refresh "channel", Open all the main stream, and sub stream. If the device is IPC and
not connected, you can open the main stream and sub stream. Click the right mouse button, the
connection state the device name. Other features is the same as the other device.
3.1.3 Video Monitoring
Double click the device in the device list will appear the operate menu, and them are Close the
5
CMS Video Monitor Platform User Manual
window, Audio, Local recording, Capture, Resolution.
3.1.4 PTZ Control
PTZ control interface as below:
Control the PTZ direction, zoom, focus, and aperture.
PTZ setting, such as Speed, Pre point, Loop point, Scan, Pattern, Light, Wiper.
Opening video interface which you select (Windows have blue frame), so that can control
PTZ (the channels’ PTZ setting will not give instruction here).
1)【Direction control】 Control up, down, left, right.
Press the mouse means controlling. Loosen mouse means stop controlling.
2)【Zoom】Adjust and control the zoom of the PTZ camera lens.
Click
PTZ zoom lens will reduce. Click
PTZ zoom lens will amplify.
3)【Aperture】Adjust and control the aperture distance of the PTZ camera lens.
Click
PTZ aperture will reduce. Click
PTZ aperture will amplify.
4)【Focus】Adjust and control the focus of the PTZ camera lens.
Click
PTZ focus lens will reduce. Click
PTZ focus lens will amplify.
5)【Speed】Control the direction of Up,Down, Left, Right, Tour Speed by setting the speed.
6
CMS Video Monitor Platform User Manual
Click
- reduce + amplify or use
to set the speed.
6)【Pre Point】Move the PTZ to the Preset Point after input the Preset point.
Choose the preset point or input the number, then click
come to the Pre Point.
7)【Loop Point】Control the tour.
Choose the tour line or input the number, then click
, means the PTZ would move due to the tour. Then click
8)【Scan】Click
to
to
to
, means stop the tour.
and the PTZ would start Scan follow the setting line, click
to
to stop Scan.
9)
【Pattern】Click
to
to
and the PTZ would start Pattern follow the setting line,click
to stop Pattern.
3.1.5 PTZ Setting
Click
enter into the PTZ setting interface as below.
7
CMS Video Monitor Platform User Manual
1)【Line Scan】
Via direction button to set the left side of Line Scan, then click
same operation to set the right side, and click
to confirm it. The
to confirm it. Then setting is over.
2)【Pattern】
Click
then start to record the pattern line. Then back to the PTZ interface to set the
Direction, Zoom, Focus, and Aperture. Next, come back to PTZ setting and click
.
The pattern line is setted completely.
3)【Preset】
Input the Preset Point Number, named the Preset Point Name, Stay Time, and set the PTZ Speed.
Click
and the preset point added. Select the Preset Point Number or input Preset
Point Number, then click
and this point deleted.
4)【Cruising】
Setting the Tour Number, Preset and Stay Time. This can Clear, add, and Delete the point.
3.1.6 Tools
【Color Control】
Color Control can adjust the Brightness, Hue, Contrast, and Saturation. Then get the best picture.
Using
to adjust the Brightness, Hue, Contrast, and Saturation.
【Plan Task】 (Tour and Alarm)
8
CMS Video Monitor Platform User Manual
Click
into
, then start to tour. Click
into
【More】
【E-map】
Click
, then the E-map will appear on the screen as below.
9
, then stop tour.
CMS Video Monitor Platform User Manual
【Alarm Link】
Click
, then the Alarm Link will appear as below.
【Tools Time Record】
ON means start the “Video recording plan”.
OFF means stop the “Video recording plan”.
3.1.7 Notice Information
, then will appear info. as below.
Click this area
10
CMS Video Monitor Platform User Manual
3.2 Device Management
This part can Add, Modify and Delete device, and also can Auto Search device.
3.2.1 Device Group
【Add Group】: Add device group
【Delete Group】: Delete group and devices in the group.
3.2.2 Network Devices
【AutoSearch】:Auto search for LAN devices
11
CMS Video Monitor Platform User Manual
【Add 】:Check the LAN devices and click
,then the devices
will be added in the 【Manged devices】box.
【Modify】:check the LAN devices and click
, you can modify
the device information, such as device ip or port.
【Select All】:check the Select box, add all LAN devices.
【Categories Select】: click the triangle, you can categories select and add.
3.2.3 Manged Devices
【Add Device】Click
, then input some correct information of the device. Then click
and the device add into the device list.
【Modify Device】Selected device and then click
device. And then click
to save the new informations.
【Delete Device】Selected device and then click
Tip1: click
to modify the information of the
to delete device.
, you can choose login type, such as IP, Domain, Serial, Cloud
as below.
12
CMS Video Monitor Platform User Manual
3.2.4 Setting of Auto Search
Click
then click
, after fewer minutes, the device will appear. Choose which one need to add,
and the device will appear in the device list at Monitor.
Tip 1
The device can not be added repeatedly, and the new device’s name and IP address can not the
same with the former added device. If the same, then will notice you as below.
Tip 2
If
all device selected, then all device will add into the device list.
Tip 3
If click
you can categories select then add.
13
CMS Video Monitor Platform User Manual
3.3 Playback
The user can search the video record of the device, also can download the video record, and also
can search the local storage of the video record or manual video record.
3.3.1 Device Record
The interface shows as below.
3.3.1.1 Video Record Retrieval
Video Record Retrieval has many methods, such as Channel Retrieval, Time Retrieval, Record
Retrieval, Picture Retrieval, and Record type Retrieval.
Query steps as below.
First, choose the device and the channel number.
Second, can select choose channel or multiple channels. Default means single channel, and only
14
CMS Video Monitor Platform User Manual
playback this channel. If select multiple channels, please add the channels (Max four channels)
that needed. Then the added channels will playback synchronization.
Third, choose the Date, Start time and End time.
Fourth, choose record type. It contains Time, Manual Record, Alarm Sensor and Motion type.
Fifth, click
, and the files list in
.
3.3.1.2 Video Record Playback
Choose the files that need to playback in the list. Then click PLAY and start to playback.
If multiple channels then playback multiple channels video record.
The description of playback menu. And the interface shows as below.
snap
quickopen
play/pause
slow
record
stop
3.3.1.3Video Record Download
The interface shows as below.
15
switch bar
CMS Video Monitor Platform User Manual
Choose the files that need to download in the list. Then click DOWNLOAD and start to
download. It can support download multiple files.
Download information as below.
【Pause】Click
and download pause. Click
【Delete】Click
and download recovery.
and download delete.
Channel name or Channel number.
Start and end time of download this file.
Show the download speed of this file.
3.3.2 Local File
Local files are stored in the computer’s HDD. Query and playback are using these files.
The operation is the same with the device record operate.
Local file interface shows as below.
16
CMS Video Monitor Platform User Manual
3.4 Business
Business part contains Storage manage, Tour Plan, E-Map, and Alarm-Link. All this can be better
management of all device, and have a flexible view of surveillance.
3.4.1 Storage Manage
Memory manage’s interface as below.
Storage manage can realtime record and store at local computer. This part can support many types
of storage. Such as multiple devices store simultaneously, different period of time storage, normal
recording storage and alarm recording storage.
17
CMS Video Monitor Platform User Manual
【Operation Steps】
The operation steps of adding storage plan is as following.
Step one, input the name of storage plan, and choose the period time need to recording.
Step two, set the period time need to recording, multiple period time can be set.
Step three, add the camera that need to backup. Choose the channel of device camera, then click
to add a camera. All the added camera will appear in the "Camera applied".
and save all settings.
Step four, click
Step five, click
and delete this camera.
in the
3.4.2 Tour Plan
Tour plan can be set many plans for more convenient surveillance.
Tour Plan interface shows as below.
18
CMS Video Monitor Platform User Manual
【Operation】
The steps to start Tour plan as below.
to add new item like this
Step One, click
.
Step Two, confirm a Task Name, choose the Windows Count and the Stream type, and set the Stay
Time. Show as below.
Step Three, add the camera of the tour plan, choose the window 1 and then drag the camera in the
list at the right side.
Step Four, click
and save the current tour plan. Click
Step Five, in the Tools’ Plan Task, Click
, then stop tour.
into
and save all tour plans.
, then start to tour. Click
to delete the tour plan.
Step Six, click
3.4.3 Electronic Map
E-map can know the location of every device.
The E-map interface shows as below.
19
into
CMS Video Monitor Platform User Manual
3.4.3.1 The operation of E-map
【Adding Picture】
Click
, then this dialog will appear.
The you can choose the Picture path, picture name and picture describe. Then click OK and the
picture added.
Note: the picture type is BMP or PNG .
20
CMS Video Monitor Platform User Manual
3.4.3.2 Arranging the Device on the Map
After adding the picture, double-click the picture, then the pictures will come to the preview
window. Then drag the device at the device list at right side into the picture, click
then the device added.
3.4.3.3 Canceling the E-map
Choose the map that you want to delete, and then click right button to REMOVE. Click
then the device on the map cleared. Click
, the device
cleared will recover.
3.4.3.4 Setting Hot Spot on E-Map
For example, could add “Map of Binjiang” into “Map of Hanzhou”. And consider as a hot spot.
Operation way, drag the “Map of Binjiang” into “Map of Hanzhou” and make the “Map of
Binjiang” located at Binjiang. Setting over.
3.4.4 Alarm Link
Alarm-link can feedback the video information in time. The feedback way as following. Such as
pop up video, confirmed the location of the device, and snap picture.
Alarm-link interface shows as below.
21
CMS Video Monitor Platform User Manual
Built alarm link as below.
Step One, click
, add new alarm link.
Step Two, choose the alarm type and choose camera in the device list. Then show the windows the
Stay Time, link preset. Last add the camera into the alarm link list.
Step Three, decide alarm link or not (this need to built storage plan). Confirm the recording time
before and after alarm started.
Step Four, Set the alarm notice. This can confirm the location of the device, snap picture and play
video automatically.
Step Five, click
Step six, click
to save the alarm link.
to cancel the alarm task in the list.
3.5 User Manage
User manage default the admin as the highest authority user, using admin login can add, delete,
modify other user's operation.
The user manage interface as below. Here can scan user and view the user’ permissions to manage
the device.
22
CMS Video Monitor Platform User Manual
3.6 System Manage
System manage includes Basic Setting, Alarm Setting, Time Checking, Record Store, and other
Options. And each part has many settings as following.
System Manage interface shows as below.
3.6.1 Basic Setting
【Language】 Support two languages, that is , Chinese and English.
【Auto Login】Auto login CMS or not. Choose means “YES”. Otherwise, “NO”.
【Start the Time Record】Begin to record.
【Restore the Preview】Choose means when you restart the CMS, the CMS will run in the same
condition after you logout last time. such as monitoring, tour.
23
CMS Video Monitor Platform User Manual
3.6.2 Alarm setting
【Pop the Alarm Dialog】Choose means alarm with sound.
【Pop E-map Dialog】 Choose means alarm will show in the E-map. And you can choose one
window or fours windows.
【Accept Un-deployed Alarm】Choose means can receive system information.
3.6.3 Time Revision Setting
【Check Time Enable】Choose means check time automatically, and also can choose the check
period time of the check point.
3.6.4 Record Store
【Picture Path】Choose as the user will.
【Manual Recording Path】Choose as the user will.
【Device Recording Path】Choose as the user will.
【Time/Alarm Recording Path】Choose as the user will.
The Snap picture type can be JPEG and BMP.
The Save Record type can be AVI and H264.
3.6.5 Others Options
【Logs Configure】Can set the Alarm Logs Storage time and the System Logs Storage Time.
3.6.6 System Maintain
After the software working for long time and need to maintain, the user could click
to confirm the software can regular work go on.
24