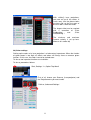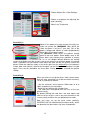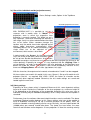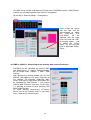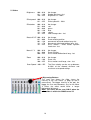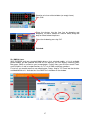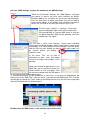
1
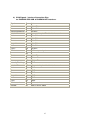
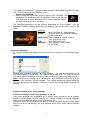
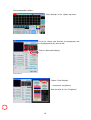
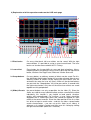
User manual
for
PHOENIX – LIVE
Version: 2.0 – 10.04.2009 – copyright by PHOENIX Showcontroller GmbH & Co.KG - Boris Bollinger – GERMANY
Beforehand
Software concept
PHOENIX-LIVE was designed and programmed for laser jockeys in clubs and discos as well
as for LIVE performers at raves and concerts.
Within 2 years, the entire structure and philosophy of PHOENIX was developed into a very
powerful laser control program, which immediately stands out positive from most of the
controls on the market. Main focus was the simple and intuitive user guidance that allows
inexperienced users to learn the software within one hour. Even without his manual, every
light jockey is able to perform a Live Laser Show, synchronous with the music, within a few
minutes.
Hardware concept
For PHOENIX-LIVE, an affordable USB interface was developed that suits monochrome and
full-color standard ILDA (RGB) laser projectors. It doesn’t matter if the laser comes from the
USA, China or Europe – the only important thing is that the laser is set up completely
according ILDA. It’s important to note, that beside DMX-in and DMX-out and the X/Y-signals,
the LIVE USB Interface only emits 3 colors + intensity - Signals. This means that color
crystals, as mainly used in gas lasers, are only partly activated in a correct manner! For this
clientele, the deployment of the PHOENIX-NET interface is required. These interfaces have
6 color channels + intensity as output. For the USB type, the scanners are driven by 12 bit. In
contrast, the network interface is driven by 16 bit, which results in a finer resolution of the
scanned objects.
Because of the pleasant use of the LAN interfaces (which can also be driven very well via
WLAN), a change to the more professional version pays off for a lot of users.
The advantage of the USB version is of course the quick setup and the easy connection as
well as that the interface doesn’t require an external power supply!
Note: During the laser output, all PHOENIX interfaces can shortly be disconnected from and
connected to the pc again without causing a stoppage of the laser or a software error. This is
especially of main importance when WLAN is used since under certain circumstances, the
signal a standard Windows network may break down in.
General
You can always find the latest information, free updates and tips about PHOENIX live on our
website www.PHOENIX-Showcontroller.de. Therefore, you should always download the
latest update before every reinstall, so you are up-to-date from the beginning.
In the forum www.laserfreak.de, a forum with lots of PHOENIX-LIVE users is set up.
For additional help, software-trainings, ideas or even critics, we are naturally at your disposal
under [email protected] at any time.
2
1) What you have to know ...
a) Hardware requirements to be able to use PHOENIX-LIVE.
b) How a laser projector is properly connected (ILDA connecting diagram)
PHOENIX-LIVE manual
2) Installation
a) Software
b) Hardware (USB-Interface, USB-Dongle / Key, LAN-Interface)
c) PHOENIX-Main menu and first start of PHOENIX.
d) How and where are the interfaces set up?
3) Master settings of the Laser projector
a) Scanner settings – How a laser projector is set up.
b) Color settings – Adjusting the individual laser colors.
c) Size of the individual worlds (projection zones) – for up to 3 scanners and 3 worlds.
d) Safety settings – Limiting the scan velocities and safety-zones
e) DMX-in / Midi-in / Controlling the software with ext. Controller.
4) Explanation of all the operation modes on the LIVE main page
- Laser banks
- Formation of groups
- Slider-Presets
- BPM-functions (Sound-to-Laser)
- Autorun-function
- Color change of an effect
- Menu functions on the right side
- DMX / Midi control of external equipment
- Master-brightness and velocity of all the effects together
- Position adjustment of the laser effect
- etc.
5) Setting up a laser effect (Edit-Mode)
a) Drag and Drop of a trickfilm and its possibilities
Incl. Morphing, Repeat, Surface, Masking and Scanlimit functions
b) Adding animations / rotations etc.
c) All effects
a. Move X / Y / Z
b. Rotate X / Y Z
c. Size X/ Y
d. Zoom
e. DMX
f. Clipping X / Y / Z
g. Fade in / out
h. TXT (Runtext)
i. Singlebeam
j. Pivot-Postion X, Y, Z
k. Clock-Event
d) Which „world“ for which effect ? (Screen/Audience/Text) and for which Scanner /
Multi-Scanner-Programming
e) Set Picture / Name of this effect
f) CURVE-Effect – for all effects and animations
g) How a laser effect is formed from the beginning. (Quick guide from a drawing / logo in
PicEdit until LIVE) Includes importing a BMP-Logo
3
h) SMS-4-Laser Einstellungen
i) PHOENIX Mobile / Windows Mobil-Controlling for PHOENIX
6) Main menu
a) File
b) Options
c) Help
7) Tips and Tricks
a) No laser emission
b) Problems under Windows VISTA
c) The Laser output flickers or is unaesthetic
d) The preview windows don’t work properly and / or are “transparent”.
e) Problem announcements
4
1.
a) Hardware requirements to be able to use PHOENIX-LIVE.
All the specifications are absolute minimum requirements and are considered the optimum
for the version released until april 1st, 2009! The development is permanently running and the
requirements increase accordingly.
- Window PC with Windows XP or VISTA
- min. 2 GHZ (Duocore 2x2 recommended), 2GB RAM Memory (4GB recommended), 10 GB
hard disk, 128MB graphics card (256MB recommended) with OpenGL and DirectX 9.0 (or
higher)
- 15“screen with min. XGA (1024x768) resolution (recommended. 1240x1024)
- Keyboard, mouse (Touch screen recommended)
Optional:
-
external DMX-control desk
Midi-Keyboard
Joysticks
Touch screen
DMX-equipment of all kind
5
b) ILDA Signals / Interface-Connection-Plan
for PHOENIX-PRO USB & PHOENIX-NET Interfaces
Signal name
Pin
Notes
X+
1
-5 to +5V
Y+
2
-5 to +5 V
Intensity/Blanking+ 3
0V to 5V
Interlock A
4
Connected to pin 17 inside interfacecard
Red+
5
0V to 5V
Green+
6
0V to 5V
Blue+
7
0V to 5V
Deep blue+
8
0V to 5V
Yellow+
9
0V to 5V
Cyan+
10
0V to 5V
DMX-out +
11
DMX output +signal
12
Shutter
13
0V / +5V
X-
14
-5V to +5V
Y-
15
-5V to +5V
Intensity/Blanking- 16
GND
Interlock B
17
Connected to pin 4 inside Interfacecard
Red-
18
GND
Green-
19
GND
Blue-
20
GND
Deep blue-
21
GND
Yellow-
22
GND
Cyan-
23
GND
DMX-out minus
24
DMX-out minus
Ground
25
GND (Laser & DMX)
6
For PHOENIX-LIVE USB Interface:
Signal name
Pin
Notes
X+
1
-5 to +5V
Y+
2
-5 to +5 V
Intensity/Blanking+ 3
0V to 5V
Interlock A
4
Connected to pin 17 inside interfacecard
Red+
5
0V to 5V
Green+
6
0V to 5V
Blue+
7
0V to 5V
8
9
DMX-in +
10
DMX-Input Plus-Signal
DMX-out +
11
DMX-Output Plus-Signal
12
Shutter
13
0V / +5V
X-
14
-5V to +5V
Y-
15
-5V to +5V
Intensity/Blanking- 16
GND
Interlock B
17
Connected to pin 4 inside Interfacecard
Red-
18
GND
Green-
19
GND
Blue-
20
GND
21
22
DMX-in -
23
DMX - Input Minus-Signal
DMX-out -
24
DMX - output Minus-Signal
Ground (Also for
25
DMX !)
GND (Laser & DMX)
7
2) INSTALLATION
a) Software
After inserting the CD or downloading the CD kit from the website www.phoenixshowcontroller.de respectively, you have to carry out setup.exe. Follow the windows
typical prompts and install the software on your hard disk.
You can start the software from your desktop when the installation is finished.
Note: The possibility exists, that the software has to be run in administrator mode on some
Vista versions. In this case, release the files where applicable.
b) Hardware
Install the interface after a successful software installation only!
Installation of the PHOENIX-USB Interface.
- Insert the USB-cable
- A windows installation screen opens
- You DON’T want to look for a driver on the internet...
- Install the driver MANUELLY!!! Or else Windows won’t be able to find the correct
driver on first installation.
- Specify the correct path for the driver:
...\Program files\PHOENIX Showcontroller\Interface Drivers
The interface will now be installed correctly and can be used afterwards.
The PHOENIX-Net-Interfaces will not be installed like the USB-Devices. They will be
dedected immediately when they are available in the network. Depending on the
interface-adjustments they will be found automaticly or you have to set the correct IPAddress for your individual network. Please follow these steps to adjust the IPAddresses:
1) Your PC should have the IP Address 192.168.1.135 (for example) & Netmask
255.255.255.0 (Gateway – nothing)
2) The Net-Interfaces are delivered with the standard-IP-Address
“192.168.1.100”. This IP can be changed of course any time in your normal
Webbrowser:
i. Plug in your network-cable in your pc and into the Network-interface
ii. Open your webbowser and type in “192.168.1.100” and press return.
iii. A new Webwindow will be opened – select “Settings”
iv. In the next window you will be able to choose your individual IPAddress…
v. After you are done, pls reset the interface, unplug it, wait 10sec. and
plug it in the power again. Finish – The interface is reprogrammed to
the new IP-Address now.
3) As long as the Network-Interfaces and your PC are in the same network –
PHOENIX will find all Interfaces automaticly and will show them up. If not –
please check again your Network-Settings of the pc.
Note: It is no problem, to mix Network and USB-Interfaces for using PHOENIX!
Installation of the blue USB-Stick (USB-Key)
8
- Just plug in the USB-Stick. It will be installed automacily by Windows! Without this USBKey it is NOT possible to run PHOENIX at all!
Starten von PHOENIX
c) After finishing the installation you are able to start PHOENIX. Just
doubleclick on the desktop-icon of PHOENIX. Plug in the little blue
USB-Stick now. It will be detecet as “HID”-Human Interface Device –
you don’t need any driver in this case.
The PHOENIX-Main-Menu will be opened. Depending on if you bought / use the
complete PHOENIX-Package or just the LIVE-Software, you will see more or less on the
menu.
Selection:
PHOENIX:
Starts PHOENIX 3 – Showcontroller
PicEdit:
Starts the 3D Picture Editor for drawing
graphics and logos.
Show Player: Timeschedule for starting shows in
time. (only for P3 User)
LIVE:
Starts PHOENIX-LIVE
Videohelp: Starts different Video-Tutorials
for PHOENIX
d) Interface-Selection
By starting PHOENIX will dedect automaticly how many Interfaces are connected @ the
pc.
Choose your individual Interface for each Channel, - Or click on “Automatic” to let
PHOENIX organize the Interfaces. The selection will be kept also in the future of course.
You will be able to reorganize and rename your interfaces any time in the program also.
Note: PHOENIX can control up to 10 interfaces and PHOENIX-LIVE up to 3 at the
moment. If the interfaces will be changed – This settings-window will appear again the
next time by starting the software. Otherwise it will be just started without showing this
window.
3) Master settings of the Laser projector
a) Scanner settings – How a laser projector is set up.
Every laser projector has, depending on its quality make, different scanner settings.
Beside scanning speed (scanner velocity), the scanner settings also include important
information regarding the latency times in the corners etc.
Because of this, it is very hard to make default settings! To obtain the best results, these
data has to be set up correctly for your projector once! Every make requires different
values!!!
9
Please proceed as follows:
Start „Settings“ in the „Option“ top menu
First of all, choose your Scanner (Laserprojector) and
the Projectionzone you want to edit.
Click on „Advanced Settings“
Settingswindow
Choose „Color Settings“
... and choose a testpicture
After that click on “Use Testpicture”
10
With visible(!) laser projections,
you now set up all the values in
such a way, that the picture looks
the best and so that the ends of
the lines don’t show overshoot.
The largest effect can be reached
with a correction of “Extra
Preblanking“
and
„Extra
Postblanking“ !
The minimum and maximum
scanner velocity is set up here.
More on this under 3d)
3b) Color settings
Setting up the colors of a laser projection is of elementary importance. When the fraction
of green power is too high, all effects and colors will always have an onerous green
fraction. In this case, the colors have to be trained once.
To do so, two important functions are available:
To do so, proceed as follows:
Start „Settings“ in „Option“Top-Menü
First of all, choose your Scanner (Laserprojector) and
the Projectionzone you want to edit.
Click on „Advanced Settings“
11
Choose Wählen Sie „Color Settings“
Choose a testpicture for adjusting the
colors perfectly...
Select „use Testpicture“
Possibility 1:
More or less power of a color channel, basically has
to be set up with the „MAXIMUM“ slider. When the
slider for green is set to 0.7, then only 70% of the
power is dispensed. Hence, all colors proportionally
loose 30% of their green power.
The „Minimum“ Slider serves the optimal starting
point of the laser power. Since diodes most of the
times don’t start emitting laser radiation at exactly
0.1 V, i.e. all 3 diodes behave different, the starting
values of all diodes must be set up in such a way that also at minimum power, the correct
color is blended. For the extreme value white, the color can be set up with a color test
picture. Slide the slide bar slowly so far to the right, that the whitened line just becomes
visible. Now slide it back a little to the left again, so the whitened line becomes invisible
again. Carry out this procedure for every color. Finally, you have reached the optimal
setting.
Possibility 2:
When you want to set up the colors 100% correct once,
then the color correction has to be carried out manually.
To do so, proceed as follows:
-
- Set the minimum and maximum Slider both to 0 or
100% respectively (no correction)
- Select the test picture with 19 color lines.
- The color bars correspond with the lines of the test
picture exactly.
By double clicking the color bars, the color opens and
now has to be set up in such a way that the color on the
screen exactly matches the real projected laser color.
Now you have set up the base colors perfectly.
PHOENIX-LIVE will now blend all the other colors, which
are based on the base colors, by linear interpolation.
12
3c) Size of the individual worlds (projection zones)
Go to „Settings“ under „Option“ in the Top-Menu
Geometrical trapezoid corrections
With PHOENIX-LIVE it is possible to set up 3
scanners with 3 worlds each. A “World” is a
projections zone in which the respective laser
projection is currently located. This World set up is
very important, since when allocating the effect on a
later stage, it only has to be selected where the effect
has to be shown. When someone changes the
location, only the worlds have to be adjusted and all
effects adapt themselves automatically! When
somebody doesn’t use this world functionality, every
single effect has to be adjusted to every
environment, which means a lot of work
A typical world is the „Screen“. As the name already
says, the screen of the room (when available) should
be set up here. Beside the dimensions, also position,
trapezoid corrections and inversion are required to be able to project the picture on the
screen perfectly. Especially for screens, it is very important that the „Clipping“-Slider is
set up perfectly, so under no circumstances, the laser projection or the individual laser
beams are aside the screen. The picture is then cut-off immediately. Because of this,
there are 4 Clipping-Zones – for all sides (top, bottom, left, right).
With the inversion, the output can be inverted, mirrored and or X and Y can be swapped.
All these values are saved in this world (in this case „Screen“). Set up all 3 worlds for all 3
projectors like this - as required. With LOAD / SAVE, the values of a location can be
saved and, when required, loaded. Otherwise, the last made settings are saved and
loaded again the next time!
3d) Safety settings
Especially for laser shows safety is important! Because of this, some important settings
have to be made. Beside the installation of the laser projector at a minimum height of
2.7m (depending on the directives of the responsible authorities this value may vary or
Audience scanning may be forbidden completely!) also a safety clearance to the public is
standard!
Furthermore, from the software side some helpful functions are also available. The above
mentioned Clipping function belongs to this (these settings also have to be applied in
case of Audience scanning to set up a minimum distance to the public). Also, the
minimum allowable scanning velocity can be set up. Basically, no laser output below 10k
(10.000 points per second) should take place. The slower the laser beam, the more
intensive and therefore more dangerous a laser projection is! How the scanning velocity
13
has to be set up, can be read under 3a) Further more, PHOENIX contains “Safety-Zones”
in which you can adjust special areas with less laserpower!
Go for that in “Scannersettings” > Safetyzones:
Drag n´Drop the corner
with the right and left
mouse-button to adjust
the
safety-zone.
The
laser-Power
will
be
adjusted with the slider
unter the field and JUST
for the pink square…- and
is called the “Safety
Zone”. On this way you
have 2 adjustable SafetyZones
3e) DMX-in & Midi-in / Controlling of the software with external Controller.
PHOENIX can be controlled by external DMX
and Midi-Devices. A special Settings-Window
will be found under “Options” > DMX / Midi
Settings.
After opening the settings-window you will find
different start-addresses for each single part of
the software. For example: “Sliderstart “001”
means, that the first slider of the effectsliders will
be controlled by Midi-Channel 1, the second
slider by Midi-Channel 2 and so on. On this way,
it is possible to control all parts perfectly with
DMX or Midi-Devices.
To avoid wasting unnecessary PC-Power,
please turn on this function ONLY if you really
use it. Otherwise it should stay off.
14
4) Explanation of all the operation modes on the LIVE main page
1
33
2
32
31
30
29
28
27
26
3
34
4
25
24
23
5
22
6
7
8
9 10 11 12 13 14 15 16 17 18 19 20 21
1. Effect banks
On every effect bank, 40 laser effects can be saved. With the right
mouse button, it is possible to assign a name to each bank. The laser
banks can also be accessed with the F1-F8 keys.
2. Laser effect
Every button has the possibility to save and load animations, tickers,
morphing and to save pictures of any kind. By pressing the right mouse
button, functions like Copy/Paste, Delete etc. can be accessed.
3. Group-buttons
On every button, an arbitrary amount of effects can be saved. For this,
the „Multieffect Hold“ button (button 32) must be activated. Now also an
arbitrary amount of effects can be called (the more effects that are
activated, the more the laser will jitter!). When all the desired buttons
are pressed, the “Group-button” has to be pressed for 2 seconds with
the right mouse button. Only then all the active laser effects are saved
together on this group button.
4. (Slider)-Presets
the preset buttons are only responsible for the slider (5). Since the
sliders are valid for every individual effect and are saved with the effect
individually, this function is very helpful to load special situations
quickly and uncomplicated. For instance, a laser effect should be
equipped with a strobe light effect and should be applied on short
notice at the correct moment. Since the slider position of the first slider
has to be set up at a certain value – and this can take a second under
certain circumstances – you can set up this slider (or all sliders) in
advance so its setting is perfect and then save this setting by clicking
the right mouse button (hold it for 2 seconds).
15
5. Sliders
Brightness:
000 – 010
011 – 139
140 – 255
No change
Strobe light slow - fast
Brightness 0 – 100%
Effectspeed: 000 – 010
011 – 255
No change
Effect speed 0 – 100%
Effectcolor:
No change
red
green
blue
yellow
color change slow - fast
000 – 010
011 – 040
041 – 080
081 – 120
121 – 160
161 – 255
Rotate X/Y/Z 000 – 010
011 – 090
091 – 120
121 – 179
181 – 255
No change
Exact rotation position
permanent left-hand rotation long.-fast
permanent right-hand rotation long - fast
Sinus motion – Effect rotates right/left
hand slow - fast
Move X / Y
000 – 010
011 – 089
090 – 255
No change
Exact Position
Sinus motion bidirectional long - fast
Zoom
000 – 010
011 – 199
200 – 255
No change
Exact size
Sinus motion small/large, slow - fast
Scan-Speed 000 – 255
The Scan velocity can be set up between
0-100% of the allowed minimum and
maximum scanspeed settings
Big turning-Buttons
The small icon above the slider shows the
intensity of the sine waves. (It pops up with a
mouse-over) The bigger intensity of the poti, the
bigger the sine wave becomes (e.g. for the Move
X Effect, the effect would cover a longer
bidirectional distance).
Note: The effect will be seen ONLY when the
effectslider is within the SINUS-arrea !!!!!
16
6. K-Speed Window Shows the actual speed of the effect in “Point Per Second” (30k…)
7. SCN-Selection
Selection of the active Scanner for the the effect-sliders (1,2,3,all)
8. Startframe
The Startframe is used for the „Autorun“ mode. After pressing the
starting key, the currently active laser effect is applied (e.g. key 11).
Optionally, the laser effect number can be entered manually. The
starting frame is required together with the „Endframe“ (10) and the
„Autorun-Function“ (9).
9. Autorun
Activating/deactivating the Autorun function (running light), start and
end effect are to be set up with the buttons „8“ and „9“. The velocity of
the autorun has to be set up with the slider below. Note: When “BPM” –
this means button 6 – is activated, the slider is deactivated and the
effects are varied in time with the music!
10. Autorun Loop
if the checkbox is active, the effect will be played only one time.
precondition is to deactive the Loop-Button within the Effect (Inside the
Edit-Window)
11. Random
When the button is activated, the active effects in the autorun mode
aren’t played back one by one, but in random mode.
12. End
End effect for Autorun
13. SMS / PDA
Activate / Deactivate the SMS-4-Laser Function as well as the PDA
Function, whereby it is possible to control with a standard WindowsMobile PDA the PHOENIX-Software. After activating the PDA-Button, a
Window will pop up for adjusting the IP-Address. If everything is
correct, PHOENIX will connect the PDA with the computer automaticly.
More will be written in the special manual-part “PDA Connection”
14. BPM- On/Off
Switching on or off the BPM function respectively. In case that the BPM
function is enabled, the active laser effect is started in step with the
music beat. It is important, that the music beat is also set up when the
BPM function is active (7 or spacebar)
15. Position
The X and Y axis of the active laser effect can be positioned over here.
16. Preview
Turns on/off the preview-Animation on the Lasereffect-buttons. If the
CPU-Power becomes to low – just deactivate the preview to improve
the quality!
17. Man / Autom
Selection if the BPM function should be automatically or manually.
18. BPM-Beat
With the aid of this key (as with the spacebar), the current rhythm of
the music can be set up. Until the correct beat is set up to the music
appropriately, the key has to be pressed 10 times in time with the
music correctly.
18. Tact
Over here, the frequency of an effect in “BPM” mode is indicated. BPM
(6) being switched on is a prerequisite. Example: An orbital effect
should be started 4 times within a cycle – the “Tact” must then set up to
¼. In case that the effect should arise every 8th cycle, then the value to
17
be set up is 8. In contrast, the duration of an effect is set up with the
„Effect-Time“ (13) value.
18. Effect-Time
How long an effect should be shown in BPM mode depends on this
value. Example: Every 8th cycle, I would like to see the effect 4 beats
long. The required setting then would be the value 8 at Tact (12) and
the value 1 at „Effect-Time (13). Now the effect will be shown every 8th
beat for 4 beats long. When the effect has to be shown 4 times in a
beat, then also the max. effect time is only 1!!!
19. Master brightness
Setting of the laser brightness of all effects
20. Master speed
Influences the general speed of ALL effects.
21. ON / OFF
Switching on/off the laser output
22. Effect Position The active effect can be moved by the 4 position buttons accordingly.
23. Lock to Key
When the checkbox is active, the activated laser will be saved to this
lasereffect. By switching to the next lasereffect, the laseroutput will be
changed. If the checkbox is inactive, the laseroutput will be kept for the
next lasereffects and doesn’t change
24. SCN-Switch
Shows the active Laseroutput (Laserprojector).
25. Edit
Calling the edit window of the active laser effect
26. Velocity controller
Setting the transition time for the Crossover / Fade in/out in sec.
27. Blend in/out
fading in/out of the effect when switching on/off
28. Crossover
Blends out the 1st effect while blending in the next effect.
29. Deactivate
Deactivation of all effects.
30. Hold / Flash
Hold: The effects remain activated until they are deactivated again.
Flash: The effects are only activated for the time the laser effect is
pressed.
31. Multieffect-Hold When the switch is activated, an arbitrary amount of laser effects can
be activated at the same time.
32. Preview
Activate the 3D Preview for the Direct X Window
33. Preview Switch Activate / Deactivate each single Scanner for the preview.
34. Colorwheel
The active laser effect is emitted in the color selected from the color
wheel.
18
5) Setting up a laser effect (Edit-Mode)
a) a)
Drag and Drop of a cartoon and its possibilities
A simple effect you obtain by clicking the picture out of the
catalogue and dragging it to the timeline by holding the
mouse button
In this case, the cartoon is visible from the beginning until the
end!
Edit-Window
You can also let the cartoon or the animation respectively,
being shown at a certain moment in case you on the edge
of the cartoon and change or shorten it by pulling and
towing it.
Now you can also move the cartoon in the timeline (by
holding the left mouse button)
You will find further possibilities by double clicking it.
Trickfilm-Event
You can set up important effect settings in the cartoon:
By drag and drop, the start and end frame can be set up here
once more. In case, for example, an ILDA animation is run,
only the end frame has to be different
Morph from one picture to another:
When this function is activated, then the points of the first picture will be morphed, i.e.
moved, to the respective points of the end frame. All the pictures lying between these two
pictures are not considered!
19
Enable autoanimation:
When this function is activated, ALL the pictures which lie between the start and end frame
will be morphed picture by picture. Autoanimation ONLY works when the Morph function is
also activated!
Edit Morph Curve
Allows the user to determine exactly how the morphing proceeds from the first until the last
second. On request, for instance the possibility exists to morph to and from. The functions of
the curve animators, you can read in chapter 5g) „CURVE-animators“, since the curves can
be used in all areas of PHOENIX.
Scanlimit-functions
When the function is activated, the effect is drawn point by point. Without further editing, the
drawing is carried out in the timeline time, point by point. At the moment that the drawing is
complete, the effect has come to an end. This effect for instance
can be used to generate/draw a logo slowly etc.
For the start and end curves has to be set up how the starting and
end point should behave over time. Default value for „Start Edit
Curve“ is „0“. This means, the first point of the drawing will be
shown from the first until the last second. If the curve I slowly
moved towards 1, then the first point of the drawing will be erased
towards the end.
The same counts for the „End Edit Curve“-settings. Here you can see that a linear drop from
0 to 1 takes place. This means, that with the progression of time, more and more end points
are drawn. This until the last second, where the value 1 is reached and ALL the points are
projected.
Repeats
Depending on the value, the entire animation is repeated.
Show on surface
Surfaces are most of the times better known as “Layers”. PHOENIX is built up
with 32 Surfaces. This means, that the higher the surfaces value is, the more in front the
animation is located compared to the animations which are projected at the same time.
Example: You project the animation on a screen. E.g. a car that is continuously spinning.
Now you add the next effect – a dancing woman. Normally, the lines of the car would go
THROUGH the woman and you would see both animations at the same time, which of
course is not so nice. No you give the dancing woman the surface value 2, which gives this
animation a higher priority. In our example, the woman would now dance in front of the car
and always cover the lines of the car correctly.
20
Masking
Mask belongs to “Surface”. Equal to the Survace, the priority gets the higher value. The only
difference to the Surface is, that the second object will be kept within the lines of the first
object.
Optimize
This function should always be switched on, since the graphics are automatically optimized
by PHOENIX. Especially in case of imprecise graphics with too less points in the corners,
this function becomes noticeable.
Softcolor
When activated, all the color transitions of the pictures will be blurred and won’t be chopped
of anymore. The colors are quasi morphing in each other.
Softblank
With Softblank all the ends of the lines are faded out slowly. This is an outstanding effect for
faces etc. However, the total brightness of the picture is reduced!
5b) Adding animations / rotations etc.
aBy drag and drop you can draw
pictures into the timeline. It works
exactly like this for other effects! An
effect ONLY refers to the cartoon above
it!! When you have 2 cartoons, as in this
example, then you also have to use two
effects. Like the cartoon here, the
effects may also vary in length and can
be moved with the mouse. When the
effect is double clicked, the curve
window or other further menus open.
You will find more information about
curves in part 5g)
21
c) All Effects:
- MOVE X, Y, Z
moves the cartoon in the respective direction
- Rotate X, Y, Z
makes the cartoon rotate around the respective axis
- Size X, Y
Size of the cartoon
- Zoom
Size of both axes (X and Y)
At the same time
- DMX
In this event, a simple (!) DMX
output can be realized! For
instance smoke machie on/off,
screen up/down etc. Not suitable to
make a complex light control!
- Clipping X, Y, Z
Cuts off the respective side of the projection
- Pivot X, Y, Z
For rotations you can define the middlepoint / axis for the
rotations.
- Fade in / out
Fades in/out the effect
- Clock
With this effect you can show
the actual pc-time on your
laserprojector (Analog or
Digital version). Further
more its possible to draw the
own individual pictures for the
analog version…
- TxT
Write texts with your laser.
Several
settings
possible
regarding font, animations,
number of letters etc. Contains
all the possibilities for a
spontaneous run text.
22
- Singlebeam
In this window you can adjust
singlebeams. These beams
Are not adjusted to ANY worlds at
all. The laserjockey in the Club
needs to finish start up.
- Startloop-Event
If active: the animation will be repeated all the time
If not active: The Animation will be shown only ONE time – after
that the laseroutput stopps- even if the effect is still activated.
This is very important for the countdown-effect for example… it
should be display only once.
d) Which effect for which world and for which projector?
When you create an effect, then you should also assign it to the correct world
immediately, so the effect is shown correctly when played. Select from the
worlds „Screen“, „Audience“ and „Text“.
Further more it is possible to set this effect to only one special laserprojector
– or for all...
For example: You want to show a graphic-animation only on Scanner 2 – you
must select “Fixed Scanner and click Scanner 2” in that case. For that click on
the event once, now on “Fixed scanner” and now on the selected
Scanner.Done. You can see the word “Scanner 2” written on the event itself…
Just make sure, that you also do this to all
animations below the trickfilm itself – otherwise the
movements will not be correctly!
If you select “Key dependent Scanner” – then all
scanners are allowed to use and display that effect.
(With scannerselection on the main-page…)
23
e) Set Picture
To get the best possible picture together with
the name of an effect in the preview, you have
to scroll the effect to the correct position in the
edit window, then press pause and make a
snapshot with “Set picture”. Subsequently, this
picture will be taken as preview for your effect
button.
f) CURVE-Windows
The CURVES are one of the most powerful tools in PHOENIX, Curves can be used for
movements, rotations, morphing etc. Basically, there are always 2 values where something
can be varied in between. The „CURVE-Line“ then shows, what happens how at which time
point.
It is important to know that the screen always
refers to the entire time frame of an effect! So,
when the effect „CurveRotate Z“ lasts for 10
seconds, this curve and its motion sequence
also refer to a time frame of exactly 10
seconds! We use, for instance, the „Rotation
Z“ as in this example. Here the frame
/animation would rotate from left to right (appr.
¾ of a rotation), then ¼ of a rotation to the left,
then a slow right hand rotation and finally it
rotates to the left rather quick again.
Curve node points can be set with the “+” key.
With “-“ you can delete points. With the
crosshair, points can be moved. With the settings values aside, the node points can be
moved more precise The grid spacing can be set up with high detail in „Grid XY“. When a
certain movement should be repeated, this can be set up under „Repeat“. „Phase“ is a shift
of the entire curve. Exponent only works, when under „Type of animation“ also
„Exponential“ has been selected. In the „Expression“-field also interactive possibilities can
be selected, like for instance „Joystick“ or „Mouse“, which more or less means that the
ACTIVE node should react on the joystick/mouse. In this field, also mathematical formulas
can be entered to create more abstract movements.
24
g) How a laser effect is formed from the beginning...
The entire programming if an effect starts with the PicEdit-Program. PicEdit is a 3D-capable
drawing program where besides simple lines, also complex 3D animations can be drawn
with. As soon as the drawing is finished, it will be saved in „Animator“, also called CATalog.
For a show in PHOENIX LIVE – as for a show in the large version „PHOENIX“ – always a
CAT-file is required in which all the pictures for this show are saved. Afterwards, the pictures
are the „Keyframes“ of an effect and are absolutely required.
Step-by-Step:
Start „PicEdit“
Draw picture
(more about drawing with PicEdit can be found in the PicEdit
manual)
Or import a picture und convert it:
Under „Tools“ – Bitmap
Trace – logos or pictures
in BMP-file format can be
imported. With help of the
settings possibilities, very
good results can be
reached in short time.
Important:
The
pictures
must
always have a black
background
and
if
possible have a lot of
contrast. The higher the
contrast, the better the
results!
25
Save a picture in CATalog
Load CAT-File.
The
best
would
be
“...\PHOENIX
showcontroller\CAT\PHOENIX-Live.cat”
Then place the picture in an empty, green field.
(From the 2nd frame onwards!!! Frame 0 and 1 CAN’T
be used – PHOENIX calculation frames !!!!)
Click “Editor-Animator” to save the picture in the
catalogue
When all the pictures are in the catalogue, then click
„File“ – „Save as“ and save the file.
Close the program „PicEdit“ afterwards
Start LIVE
Select „Settings“ in the menu Option
In the Settings-Menu reload the Cat...
Close the windows with OK
26
Selection of a laser effect window (an empty frame).
Click „Edit“
Place the picture into the time line by dragging and
dropping. To add a rotation or another effect, drag and
drop an effect below the picture.
Close the window by pressing “OK”
Finished.
5h ) SMS-4-Laser
With PHOENIX and your standard Mobile-phone (Just selected models, a list of available
phone-models will be updated and find on our website) you can display incoming Short
Messages (SMS) as runtext on your laserprojector. Further more, you will have several Tools
and Functions as well as exportfunctions as TxT of all SMS and phone-numbers.
First of all, you need to create a new effect-button. Drag n ´drop a TxT-Event into the timeline
and doubleclick on it.. Activate the “Use SMS Text” checkbox in the window.
27
Click on „SMS Settings“ to open the window for the SMS-Settings.
Hauptseite
Select first of all under „Settings“ the „GSM Options“ und select
your phone. Of course you must have installed it by WLANBluetooth before incl. all drivers for the correct communication.
Press on “Auto Scan” to detect your phone. Also you are able to
select several options in this window (e.g. how often you want to
refresh the sms and so on) After you finished – press “OK”.
The next step is „Options“ > „Settings“. Create here
some standard Messages which will be shown after
XX incoming SMS or if no new SMS came in. Also you
can define how often SMS will be repeated. Close the
window with “OK” again.
The last step is „Filter“ from „Settings“. Create some individual
Black words and Black Numbers which should not be shown on the
laserdisplay at all. With different kind of filtertypes you can define
how the filter will work. Maybe you want to check each single sms
by yourself before you display it?
Choose it here!
In the menu „File“ are all kind of
adjustment to load / save. Also export
the list of messages and numbers is here
possible.
When you finished all adjustments in the
SMS-Tool, you just need to “activate” the
SMS-Function on the main-page. Click
for that on the button with the little phone
on it to connect your mobile phone again.
A “Connecting-window” will be opened for a short time. If you want to doublecheck the
adjustments of the SMS-Tool – you can do so, if you click on the SMS-button. BUT it will be
not possible to change the Texts inside or something like that. For that you have to go back
into the Edit-Window of the effect-button!!!
Besides that, the SMS-4-Laser is like all other laser-effects also!
28
5 i ) PHOENIX-Mobile-Option
The Mobile-Option offers the totaly
freedom for the User to work with the
laser in realtime from everywhere... Just
connect by Wireless LAN your standard
Window Mobile Phone or PDA with your
computer and control in realtime (!) your
lasers and also your DMX-Devices which
are connected with PHOENIX. Switch to
the beat of the music the lasereffect and
/ or laserprojectors (!) during you are
drinking a beer at the bar. The setup of
the phone is done in only few minutes.
Just setup the correct IP-Address of your
phone and your PC. Connect them by Wireless LAN, install the little PHOENIX-Mobile-Tool
and run it. Within 10 seconds PHOENIX will upload all effect-pictures on the Mobile-Phone,
so you will see exactly what you have. Even pushing some smoke into the room will be no
problem anymore – from everywhere in the Location! Use it with a standard Wireless Router
up to 300m (With Powertuner) without any problems. Standard Devices are welcome – you
don’t need any extra expensive hardware anymore.
More information you will get from your PHOENIX-Dealer or directly from the
PHOENIX-Team in Germany!
29
6) Main menu
a) File
Load, Save, New Show, Exit
b) Options
Language selection, Settings (For Scanner and colors), New Page (existing page
is then deleted).
c) Help
Information about PHOENIX
7) Tips and Tricks
a) No laser output
- The Interface isn’t correctly selected in the PHOENIX-Settings
- The selected Interface isn’t suitable for PHOENIX-LIVE
- The Interface isn’t installed correctly. Please check if the Hardware is installed
correctly in the System manger and doesn’t contain an exclamation mark
- No Dongle with LIVE-output installed
b) Problems under Windows VISTA
- Sometimes VISTA tries to install the drivers of the Interfaces automatically and
then doesn’t ask for a correct driver when the installation failed. Please first
check in the hardware manager if the interface is installed correctly and if
required, repeat the steps described in 2b).
- When the Software doesn’t start then try to execute the exe file as
administrator.
c) The Laser output flickers or is unaesthetic
- Are the scanners set up correctly?
- Are the Min / Max Scanspeed settings correct?
d) The preview windows don’t work properly and / or are “transparent”.
- Install the latest graphics card driver for your PC as well as DirectX 9 or better.
If the preview still doesn’t work then unfortunately, your graphics card isn’t
able to output 3D visualization under DirectX. This problem often occurs with
low-priced Onboard-solutions in low-Cost Laptops. Unfortunately, we can’t
provide you a remedial action here.
e) Problem reports
You discovered an error in the Software? Or you have a good idea that we should
implement? We are happy to receive criticism and proposals and we try to implement
them! Send us an e-mail – [email protected]
Many thanks! .... and enjoy PHOENIX-LIVE!
30