1
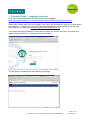
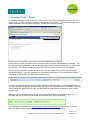
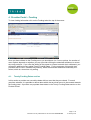
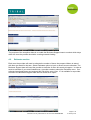
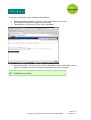
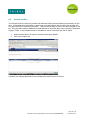
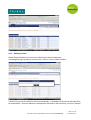
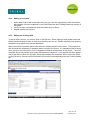
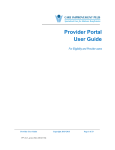
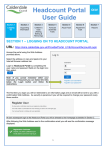
FISO Central Bedfordshire Provider Portal Funding and Forms User Guide 27th January 2015 Information security classification of this document: Not Protected Contents 1. Provider Portal – Logging in and out......................................................................................... 3 2. Provider Portal - User Settings ................................................................................................. 4 3. Provider Portal – Forms............................................................................................................ 5 4. Provider Portal – Funding ......................................................................................................... 7 4.1. Termly Funding Dates section............................................................................................ 7 4.2. Estimates section ............................................................................................................... 8 4.3. Actuals section................................................................................................................. 10 4.3.1. Deleting a child .......................................................................................................... 11 4.3.2. Adding a new child..................................................................................................... 12 4.3.3. Editing an existing child ............................................................................................. 12 4.3.4. Funding Details tab.................................................................................................... 13 4.3.5. Child Details tab ........................................................................................................ 14 4.3.6. Summary section....................................................................................................... 15 Information security classification of this document: Not Protected Page 2 of 16 27 January 2015 1. Provider Portal – Logging in and out Go to the Central Bedfordshire Council Provider Portal webpage https://synergy6.tribalhosted.co.uk/CentralBedfordshire/FISO/ProviderPortal/login.aspx Please note that the above link may change in the future, we will however, notify you of all changes to the system. If in doubt you can visit the Central Bedfordshire Council website to find the most up-to-date link or contact us at [email protected]. To access the Nursery Education Funding online system you need to enter your user name and password and click Sign In. Please see screenshot below: You will then be presented with the following home page. Information security classification of this document: Not Protected Page 3 of 16 27 January 2015 To navigate to the Nursery Education Funding menu options you need to click on the Funding tab. To navigate to your online forms (Notification of Early Leaver, Changes to staff highest qualification, Early Years Census etc) you need to click on the Forms tab. To log out of the portal you need to click on the Logout link on the top right-hand side of the screen. 2. Provider Portal - User Settings The portal allows a provider to change their username and password. In order to do this you need to select the User Settings link on the top right-hand side of the screen. You can then enter a username and password that is suitable for you. It is important that you change your password immediately when you first log into the portal. Click the Confirm button to confirm any changes. Please keep your username and password in a secure place. If at anytime you forget them, you can email the Business Support team at [email protected]. They will then be able to reset your password and inform you of your username. Information security classification of this document: Not Protected Page 4 of 16 27 January 2015 3. Provider Portal – Forms To update your online forms you need to click on the Forms Menu tab and then click on the Fill in Form menu. You will find all you relevant forms listed on the screen. This list may change as we update and add forms throughout the year. Please see screenshot below: Click on the form that you wish to enter and enter all the required information as necessary. You may find that some questions on a form are mandatory, which will be indicated with a red asterisk or a red box. You will not be able to submit your form until these questions are completed. Please note the form will not save any changes you have made until you have clicked on the Submit form button. You can navigate from one page to another but if you exit the form without submitting, all information you have entered will be lost. You can navigate through the form by either clicking on the Next page or Previous page button or by selecting a specific page in the drop down list option at the top or bottom of the page. Once you have selected the page that you want, you then need to select the arrow button to jump to that specific page. When you have completed your form you must select the Submit Form button on the form. A message will pop up to let you know that the form has been sent successfully. This will trigger an email to the [email protected] email inbox, to let the Business Support team know that a provider has submitted some information. Information security classification of this document: Not Protected Page 5 of 16 27 January 2015 After you have clicked on the Submit From button the form will be held in the “View Forms” menu section on the Provider Portal. Here you can view all previously submitted forms and their status, whether it is Denied, Pending or Authorised. Please see below an example of what you may see: If for whatever reason there is a problem with the form, the form will be denied and an email will be sent to you to explain the reasons why. The form could be denied for many reasons, e.g. you have completed the wrong questions or the Data Protection Statement, if applicable has not been accepted. IMPORTANT: If a form is denied you will need to re-enter and submit the form again, so it is very important you get it right first time. Please double check all pages before you click on the Submit Form button on the online form. To re-enter a form you need to click on the “Fill in Forms” section on the Provider Portal and start the above process again. Information security classification of this document: Not Protected Page 6 of 16 27 January 2015 4. Provider Portal – Funding To view funding information click on the Funding tab at the top of the screen. Once you have clicked on the Funding menu you should see 4 or 5 menu options, the number of menu options depends on whether you are a provider offering the stretched entitlement or a term time only provision. If you offer the ability for the parent to choose to stretch their entitlement, you will see an additional menu called Termly Funding Dates. For the purposes of this guide, two providers will be used: Daffodils Day Nursery, offers the stretched entitlement and Daisy Preschool, which is a term-time only setting. 4.1. Termly Funding Dates section In this section a provider can record the dates within a term that they are closed. For each year/term selected, it is possible to define dates within the term that are not to be counted towards the funding total. A provider can populate these dates in the Termly Funding Dates section on the Provider Portal. Information security classification of this document: Not Protected Page 7 of 16 27 January 2015 The purpose of the exception dates is to enable the Business Support team to workout which days within the term the provider should be counting towards funding. 4.2. Estimates section Each term the provider will need to estimate the number of hours they expect children to attend with them per week for the term. Select Estimates option to input or amend current estimates. The Business Support team will send the provider a reminder of when this needs to happen. In order to send an estimate of your total funded hours, a provider needs to select the Estimates menu. If an estimate has already been sent and paid the link will be set to View. If it is available for a provider to send to the Business Support team the link will be set to Open. Information security classification of this document: Not Protected Page 8 of 16 27 January 2015 To send in your estimate return, please do the following: Enter the number of weeks in the term, if this is not already done for you. Input Estimate Funded Hours and Select Calculate Total Number of Hours for the Term will be calculated Select Send Claim. Once you have sent your estimates a green confirmation box will appear on screen to let you know that the submission has been successful. Information security classification of this document: Not Protected Page 9 of 16 27 January 2015 4.3. Actuals section The Actuals section is where a provider can edit and submit actual headcount information for the term. If the headcount information is set to pay or already paid to the provider, the provider will only have access to View the information. They will not be able to edit or re-submit children in the list. If the provider requires additions or amendments to be made they must contact the Business Support Team. If the Actuals section is available to edit or submit the link will be Open. Select Actuals option to input or amend current pupil details Click on the Open link. If children are already attached to the provider they will be shown in the list. Information security classification of this document: Not Protected Page 10 of 16 27 January 2015 4.3.1. Deleting a child Select Request Delete link to remove a child from the Actual Headcount. A message will pop up asking if you are sure. Click on Yes to confirm deletion. This will not remove the child from the list automatically. A message will be sent to the back office for authorisation. Once the deletion is accepted the child will be removed from your list of children. Information security classification of this document: Not Protected Page 11 of 16 27 January 2015 4.3.2. Adding a new child Select Add Child to add a new child to the list, you can then complete the child information. More details of this are explained in the Child Details tab and Funding Details tab section of this guide. Once you have completed the child information click on Save. Repeat process as required 4.3.3. Editing an existing child To edit a child in the list, you need to click on the Edit link. When editing a child, please check the details that are already in there to make sure that they are correct. Please especially note spelling mistakes in their name and incorrect addresses. Within the child’s information some fields will have a black asterisk next to them. This means that this field must be completed (if available) before you save the record. If a mandatory field is empty when you click the Save button, error messages will appear at the bottom of the screen. The error message will let the provider know when field has been missed off. A red asterisk will also appear next to the field to inform the Provider, which field needs to be completed. When a provider clicks on the Edit link to view the child’s information the portal will automatically show the Funding Details tab. Information security classification of this document: Not Protected Page 12 of 16 27 January 2015 4.3.4. Funding Details tab Present during Census – Needs to be ticked always. Term Start Date* - This is the start date of the child for the current term. Term End Date* - This is the end date of the child for the current term. If the child is an early leaver put the last date of when they leave. Attends Two Days or More – This is ticked if the child attends your provision over two or more days. Weeks Attended in Term* – This is the number of weeks a child has attended your provision. If a child starts part way through the week, then you need to round it up to the nearest full week. If this field is greyed out it means that the child is on the stretched attendance. Once this is greyed out the number in the box is not used. Funded Hours per Week* - This is the number of funded hours per week a child is claiming for. If this field is greyed out it means that the child is on the stretched attendance. Once this is greyed out the number in the box is not used. Non-Funded Hours per Week* - This is the number of hours per week that the child is paying for. We require this for Audit Purposes. Stretched offer – The provider needs to tick this box if a child is on a stretched attendance. Please note that when this box is ticked the Weeks Attended in Term and the Funded Hours per Week is greyed out. If you un-tick this box, the stretched attendance fields are greyed out and the Weeks Attended in Term and the Funded Hours per Week are available for the Provider to use. Once the fields are greyed out the information is not used. Monday to Sunday – The provider needs to enter the number of funded hours the child attends on each day. The daily hour’s total, in conjunction with the attendance date range, and the provider exception dates, will determine funding hours for the term. Information security classification of this document: Not Protected Page 13 of 16 27 January 2015 4.3.5. Child Details tab Forename* - The given name of the child Middle Name – If known, this is not a mandatory field Surname* - The childs legal surname. DOB* - Date of Birth of the child. Please note that if the child falls out of the eligible birth dates, the portal will return an error message informing you of this. Proof of DOB – Even though this is not a mandatory field, we ask that you complete for all children. This requirement is part of our Code of Practice. Gender* - Please tick Male or Female. Preferred Surname – Please enter if indicated on the parent declaration form. Ethnicity – Please select an option from the drop-down. SEN COP Stage – Please select an option from the drop-down. Address fields – Please fill in as much details of the address as you can. Once we receive the address details we will check that the address and postcode is correct. If it isn’t, the Business Support team will let you know. Once you have completed your Headcount return for the period you must select Submit. A message will pop up to let you know that the Submission as has been successful. This will trigger an email to the [email protected] email inbox, to let the Business Support team know that a provider has submitted some information. When you look at your child list, you will see that there are messages in the status column against the children you have added, deleted or changed. Once these changes are authorised and accepted by the Business Support team, these messages will change to unchanged. If you do not click on submit and logout of the provider portal, when you next log in you will be greeted with a message informing you that you have not yet submitted changes made to your children list. Information security classification of this document: Not Protected Page 14 of 16 27 January 2015 4.3.6. Summary section To view your estimates and actuals summary for a period, you first need to select the Summary menu. Select the View link of a particular period you would like to see. You will then be presented with a similar screen in the next screenshot picture. Please note that the figures represented in the actuals section are for the whole period. In order to calculate the monthly amount you need to divide the balance by 4. The first three payments in each term will total 75% of the number of hours on the providers estimate form. The fourth Information security classification of this document: Not Protected Page 15 of 16 27 January 2015 payment will be the final balancing payment based on the term’s actual headcount of eligible children and any other adjustments. On the screen you will notice arrows against Total Rate per Hour and Child Weightings Total. You can click on the arrows to show a breakdown of these figures. It will show your provider weightings if applicable i.e. Level 4 practitioner, Qualified Teacher Status or Early Years Professional status and if any children live in a deprived area. Please see below examples. Information security classification of this document: Not Protected Page 16 of 16 27 January 2015