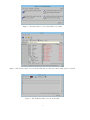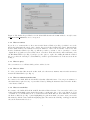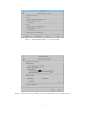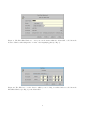
1
HPCx Archiving User Guide
V 1.2
Elena Breitmoser, Ian Shore
April 28, 2004
Abstract
The Phase 2 HPCx system will have 100 Tb of storage space, of which around 70 Tb comprises
offline tape storage rather than disk. This represents a doubling of the storage available on Phase 1.
Users who create a large amount of data can benefit significantly from archiving data to tape to free up
disk space.
This guide gives a quick overview of the tape storage archive system on HPCx and how to use it. If
you have any comments or questions then please feel free to send them in to the HPCx helpdesk.
i
Contents
1 Introduction
1.1 Before you can get started . . . . . . . . . . . . . . . . . . . . . . . . . . . . . . . . . . . . .
1.2 Archiving and retrieving files . . . . . . . . . . . . . . . . . . . . . . . . . . . . . . . . . . .
1
1
1
2 Using the command line modes,
2.1 Using ‘batch’ mode . . . . . . .
2.1.1 How to archive . . . . .
2.1.2 How to retrieve . . . . .
2.1.3 How to query . . . . . .
2.1.4 How to delete . . . . . .
2.2 Using the interactive mode . .
2.2.1 How to find help . . . .
rdsmc, for archiving
. . . . . . . . . . . . .
. . . . . . . . . . . . .
. . . . . . . . . . . . .
. . . . . . . . . . . . .
. . . . . . . . . . . . .
. . . . . . . . . . . . .
. . . . . . . . . . . . .
and retrieving files
. . . . . . . . . . . . .
. . . . . . . . . . . . .
. . . . . . . . . . . . .
. . . . . . . . . . . . .
. . . . . . . . . . . . .
. . . . . . . . . . . . .
. . . . . . . . . . . . .
.
.
.
.
.
.
.
.
.
.
.
.
.
.
.
.
.
.
.
.
.
.
.
.
.
.
.
.
.
.
.
.
.
.
.
.
.
.
.
.
.
.
.
.
.
.
.
.
.
.
.
.
.
.
.
.
1
2
2
2
2
3
3
4
3 Using the GUI based modes for archiving and
3.1 Using the Motif–GUI dsm . . . . . . . . . . . .
3.1.1 How to archive . . . . . . . . . . . . . .
3.1.2 How to retrieve . . . . . . . . . . . . . .
3.1.3 How to query . . . . . . . . . . . . . . .
3.1.4 How to delete . . . . . . . . . . . . . . .
3.1.5 How to estimate transfer time . . . . . .
3.1.6 How to search files . . . . . . . . . . . .
3.2 Using the JAVA–GUI dsmj . . . . . . . . . . .
3.2.1 How to find help . . . . . . . . . . . . .
retrieving
. . . . . . .
. . . . . . .
. . . . . . .
. . . . . . .
. . . . . . .
. . . . . . .
. . . . . . .
. . . . . . .
. . . . . . .
files
. . .
. . .
. . .
. . .
. . .
. . .
. . .
. . .
. . .
.
.
.
.
.
.
.
.
.
.
.
.
.
.
.
.
.
.
.
.
.
.
.
.
.
.
.
.
.
.
.
.
.
.
.
.
.
.
.
.
.
.
.
.
.
.
.
.
.
.
.
.
.
.
.
.
.
.
.
.
.
.
.
.
.
.
.
.
.
.
.
.
.
.
.
.
.
.
.
.
.
.
.
.
.
.
.
.
.
.
.
.
.
.
.
.
.
.
.
.
.
.
.
.
.
.
.
.
.
.
.
.
.
.
.
.
.
.
.
.
.
.
.
.
.
.
.
.
.
.
.
.
.
.
.
4
4
4
6
6
6
6
6
7
10
4 Some useful options explained
4.1 The description option . . . . . . . . . . . .
4.2 Command line options . . . . . . . . . . . . .
4.2.1 The subdir option . . . . . . . . . . .
4.2.2 The verbose option . . . . . . . . . .
4.2.3 The showdetail option . . . . . . . .
4.2.4 The replace and the ifnewer options
4.2.5 The fromdate and related options . .
4.2.6 The archsymlinkasfile option . . .
.
.
.
.
.
.
.
.
.
.
.
.
.
.
.
.
.
.
.
.
.
.
.
.
.
.
.
.
.
.
.
.
.
.
.
.
.
.
.
.
.
.
.
.
.
.
.
.
.
.
.
.
.
.
.
.
.
.
.
.
.
.
.
.
.
.
.
.
.
.
.
.
.
.
.
.
.
.
.
.
.
.
.
.
.
.
.
.
.
.
.
.
.
.
.
.
.
.
.
.
.
.
.
.
.
.
.
.
.
.
.
.
.
.
.
.
.
.
.
.
.
.
.
.
.
.
.
.
.
.
.
.
.
.
.
.
10
10
10
10
10
10
11
11
11
5 Miscellaneous
5.1 Passwords . . . . . . . . . . . . . . . . . . . . . . . . . . . . . . . . . . . . . . . . . . . . . .
5.2 The client user option file dsm.opt . . . . . . . . . . . . . . . . . . . . . . . . . . . . . . . .
5.3 The dsmerror.log file . . . . . . . . . . . . . . . . . . . . . . . . . . . . . . . . . . . . . . . .
12
12
12
12
ii
.
.
.
.
.
.
.
.
.
.
.
.
.
.
.
.
.
.
.
.
.
.
.
.
.
.
.
.
.
.
.
.
.
.
.
.
.
.
.
.
.
.
.
.
.
.
.
.
.
.
.
.
.
.
.
.
.
.
.
.
.
.
.
.
.
.
.
.
.
.
.
.
1
Introduction
The HPCx archiving system is built upon the Tivoli Storage Manager (TSM) [1], version 5, release 2. TSM
provides a number of back–up and archive clients, namely rdsmc, dsm or dsmj (see below). In this document
we will only discuss the archiving functions of TSM.
Data archives are copies of data from online storage copied to offline storage. Archives keep point–in–
time copies of your data for a defined lifetime1 . It is useful to store inactive data from expensive online
storage to less expensive offline storage, especially if your codes generate huge data sets which you will need
again but do not have to access constantly.
If you require more information about TSM, than that provided in this user guide, we recommend the
online IBM Tivoli Storage Manager for UNIX [2].
All examples given in this document assume a username user, belonging to group q03 on HPCx.
1.1
Before you can get started
To use the HPCx archive, your project must first be set up appropriately for tape access. You can tell if
this has been done already by logging in to the HPCx Admin pages https://www.hpcx.ac.uk/. For each
project that you are a member of you will see details of AU and disk allocations; if the project has access
to the tape archive, you will also see information such as “Usage in Archive”, “Quota in Archive” etc. If
a project does not have archive access, your PI must email the helpdesk [email protected] stating how
much storage space (in Gigabytes) is required in total for the project.
Once access has been enabled, tape resources are managed by the PI (via the HPCx Admin pages) in the
same way as disk resources, with the one exception that it is not possible to impose user quotas. However,
if required, group quotas can be used and tape quotas transferred between groups via the “Archive” button
on the “Manage Project Resources” page.
1.2
Archiving and retrieving files
The two main tasks are to get the data from your local disk, home or work, into the archive or vice versa.
In the following two Sections we will cover these two main archival and retrival tasks and the different
tools available on HPCx to do so. These are the two command-line modes, ‘batch’ and interactive, and
the two GUI–based modes, the Motif–GUI and the JAVA–GUI. They are described in more detail in [2].
Your choice of which mode to use will depend on personal taste and the task you want to perform, for
example, if you want to write data directly to the archive from a LoadLeveler script you will have to use the
‘batch’ mode2 . In general, the command line may be more versatile but the GUIs are more user–friendly
and self-explanatory without having to memorize all the possible commands and options. On HPCx all files
will be archived without any time limit.
Note that if you are deleting files from storage in order to make space within your tape quota, this space
will not be freed before 20:15 each night.
If any errors are produced, they will be written to the file dsmerror archive.log in the directory from
which you run the TSM.
2
Using the command line modes, rdsmc, for archiving and retrieving files
The non–GUI based modes: the ‘batch’ and the interactive mode, are typed in by hand.
NB, the terms ‘batch’ and interactive mode might be misleading. The term ‘batch’ does not reflect
submission through LoadLeveler. It means that you can only enter single commands which TSM submits
to its internal batch system. Once the TSM batch job is completed, the control is returned to the user
prompt. For each command a new connection to the server has to be established, which is time–consuming
1 On
HPCx all archived files expire: NEVER.
term ‘batch’ mode must not be confused here with batch jobs run through the LoadLeveler. The usage of the TSM
‘batch’ mode does not require a LoadLeveler script to be run (see Section 2).
2 The
1
if you want to execute several commands. The TSM processes one command at a time and returns to the
shell command prompt once it is executed.
In ‘batch’ mode each command has to start with rdsmc. When you are in interactive mode, do not
precede commands with rdsmc. The command rdsmc is a HPCx–specific version of the standard Tivoli
client dsmc.
You can use the command line modes with a variety of options. The rdsmc options are not case
sensitive and most of them can be abbreviated. The order of the processing options, preceded by a “-”, is
not important. Some of the most useful options are described in some more detail in Section 4.2.
2.1
Using ‘batch’ mode
To use ‘batch’ mode, i.e. type rdsmc followed by an option directly from the Unix shell prompt, if you only
want to enter a single command. Each command must be preceded with rdsmc.
This mode can be used to store data to the archive directly from within the LoadLeveler script. In
other words, you can write the results obtained through a batch job via LoadLeveler into the archive within
the same LoadLeveler script. Simply add the appropriate batch mode command line to the end of your
LoadLeveler script. However, note that this will be charged as part of your batch job.
2.1.1
How to archive
To create an archive of a subdirectory work in your home file system in batch mode (for interactive mode
just omit rdsmc) with a description (not archive name, see Section 4.1) My First Archive, say, type
rdsmc archive -subdir=yes -description="My First Archive" "$HOME/work/*"
where you will have to replace $HOME explicitly by the full path of your home directory when using the
interactive mode, NB, the default behaviour of the command line modes has been modified so that files are
deleted from the local filesystem once the archive has been created. You can make another HPCx user’s
file disappear after archival if you do have read–and–write permissions for their directory and their file as
well. Read–and–write permissions for the file only are not sufficient to delete it. As a general rule: TSM
will not do anything that you cannot do as a Unix user. Use the processing option -nodeletefiles to
prevent your files from being removed from disk at the time of archive. This is a non-standard TSM option
which you will not find in any TSM documentation.
2.1.2
How to retrieve
To restore this archive to a different directory NewDir in your home space, type
rdsmc retrieve -subdir=yes -desc="My First Archive" "$HOME/work/*" NewDir/
where NewDir will be created for you and does not have to exit beforehand. The default is not to overwrite
an existing file if you try to retrieve a file that already exists.
2.1.3
How to query
To check if the file has been archived, type
rdsmc query archive -subdir=yes "$HOME/work/*"
If you are looking for example for all C–files you have archived
rdsmc query archive -subdir=yes "$HOME/work/*.c"
Here the inclusion of -subdir=yes is crucial for finding the files if they are within a subdirectory of your
directory work and have been archived with this option. To get a list of all of your archived data, which is
equivalent to looking at the Retrieve Window of the GUI as described in Sections 3.1.2 and 3.1.3 3 , type:
3 This is not completely true. Under BAHOME you get an overview list of all files you archived, even those which you archived
from another user, see the archive FromJoachim in Fig. 5 where a file from another HPCx user was archived which was not
read–protected for the person doing the archival. This list would only show up if the username in the interactive archive query
had been omitted.
2
rdsmc query Archive -subdir=yes "/hpcx/home/q03/q03/user*"
Size Archive Date - Time
File - Expires on - Description
---- ------------------------------------------------32,768 Bytes 03/12/04
10:25:43
/hpcx/home/q03/q03/user Never First Archive
32,768 Bytes 03/05/04
14:01:40
/hpcx/home/q03/q03/user Never Second Archive
32,768 Bytes 03/05/04
16:25:01
/hpcx/home/q03/q03/user Never Archive Date: 03/05/04
32,768 Bytes 03/11/04
13:57:44
/hpcx/home/q03/q03/user Never Archive Date: 03/08/04
32,768 Bytes 03/11/04
13:42:53
/hpcx/home/q03/q03/user Never Archive Date: 03/11/04
32,768 Bytes 04/05/04
13:17:53
/hpcx/home/q03/q03/user Never Generalized
32,768 Bytes 03/23/04
15:25:38
/hpcx/home/q03/q03/user Never Archive Date: 03/23/04
where user is the username. In other words, this command is listing any archives of the subdirectory
/hpcx/home/q03/q03/user, but not its contents. Notice the size of 32768, this is the usual size of a
subdirectory in Unix if you run the command ls -l. If you want to show the contents use
rdsmc query archive -subdir=yes "/hpcx/home/q03/q03/user/*",
which displays a detailed list of your achive. This second list might be quite large. Type
rdsmc query archive -subdir=yes "/hpcx/home/q03/q03*",
to get a list of all directories archived by anyone belonging to the q03 project. It will also contain directories
you have never archived. You will find the other usernames by
rdsmc query archive -subdir=yes "/hpcx/home/q03/q03/*",
which will, again, give you a very detailed list. If you use the GUI instead, the directories which were not
archived by yourself will not appear and cannot be found.
2.1.4
How to delete
To delete, say, all C–files from your archive, type
rdsmc delete archive -subdir=yes "$HOME/work/*.c"
2.2
Using the interactive mode
Use the interactive mode when you want to issue a series of commands and do not want to use the GUI.
The TSM establishes the connection to the server only once for interactive mode. You can process a series
of commands more quickly in interactive mode than in batch mode. To start the interactive mode, enter:
rdsmc -inter
This will change your prompt to tsm>. To exit the interactive mode type quit. An example session could
look like the following:
user@hpcx$ rdsmc -inter
IBM Tivoli Storage Manager
Command Line Backup/Archive Client Interface - Version 5, Release 2, Level 2.0
(c) Copyright by IBM Corporation and other(s) 1990, 2003. All Rights Reserved.
Node Name: BAHOME
Session established with server HPCXTSM: AIX-RS/6000
Server Version 5, Release 2, Level 2.0
Server date/time: 04/30/04
16:01:16 Last access: 04/30/04
tsm>query archive -subdir=yes "/hpcx/home/q03/q03/user"
tsm>help
tsm>quit
user@hpcx$
3
15:58:04
Here the results of querying the archive and the help function are not displayed.
2.2.1
How to find help
There is also help available within the interactive mode. Typing help will come up with all topics available.
They are accessed by the associated number. When you continue browsing the help, beware that some
options might only be specific for the back–up facility of TSM and do not apply to the HPCx tape archive.
You can find many more options under Using Processing Options of the interactive help.
3
Using the GUI based modes for archiving and retrieving files
The JAVA and the Motif based GUIs have many features in common. Some of the differences will be dealt
within the following two Subsections. In Section 3.1 we go through the GUI Windows step by step for the
example of the Motif–GUI which offers some more features than the JAVA–GUI.
You have to export the following two environment variables before you start using the GUIs 4 :
export DSM_DIR=/usr/tivoli/tsm/client/ba/bin_archive
export DSM_CONFIG=/usr/tivoli/tsm/client/ba/bin_archive/dsm.opt
We recommend to add this to your .bashrc, .bash profile, or .profile (depending on which shell you
use) if you use the GUI regularly and want to make sure you do not forget exporting the variables. These
variables, for example, instruct the TSM as to which tape quota you use. If you do not export them you
will not be able to archive any files. A failure to set the variables before archiving will result in the files
not being archived, however, the archive will still run and appear to complete successfully. Only the error
message in the Archive Report Window (see Fig. 4) will record that the file(s) have not been archived. Do
not export your Display environment variable for the GUIs when you are logged on via ssh and, hence,
use ssh tunneling.
Both GUI applications do not delete your files on your local disk after archive in contrast to the
interactive and batch mode versions. You can enable this option before archive within the GUI. To modify
specific archive options click the Options button within the Archive Window (see Fig. 2). Any options you
change will only be effective during the current session.
3.1
Using the Motif–GUI dsm
To start the Motif GUI, enter:
dsm
The Main Window, as shown in Fig. 1, will appear. Click the appropriate icon within the main window to
archive or retrieve your data.
3.1.1
How to archive
If you choose archive, expand the Local section within the Archive Window (see Fig. 2) to view all
directories and files you have access to. This will not apply to all directories and files listed there as most
belong to different projects or other users within your project who have their files read protected. If you
want to archive everything from a certain directory onwards, click the checkbox at the very left of the
directory’s name. To archive certain files from a directory, expand the directory’s content by clicking on
the folder object to the left of the directory name. All of its content will be listed in the right panel of
the Archive Window with details about each file’s name, size, etc. Then click the checkboxes on the left
hand–side of all file names you want to archive without clicking the checkbox of the directory itself (see
Fig. 2). Provide a name for this set of data you intend to archive in the section Description within the
Archive Window. Once you click on Archive, the Archive Task List Window (see Fig. 3) displays the
archive processing status. When the archival process has finished the Archive Report will let you know if
it has been successful or not (see Fig. 4 for an unsuccessful archiving process).
4 C–shell
users will have to use setenv instead of export.
4
Figure 1: The Main Window of the Motif–GUI for the TSM.
Figure 2: The Archive Window for the Motif–GUI with two files ticked in the right panel for archival.
Figure 3: The Task List Window for the Motif–GUI.
5
Figure 4: The Archive Report Window for the Motif–GUI when the file is not archived correctly because
DSM DIR and DSM CONFIG have not been exported.
3.1.2
How to retrieve
If you choose to retrieve files or directories from the Retrieve Window (see Fig. 5) tick the boxes of the
files in the right hand–side panel or the complete directories in the left hand–side panel. Afterwards the
Retrieve Button will become available for selection. Click it to retrieve the chosen files or directories. The
Retrieve Destination Window (see Fig. 6) will ask you where you want to restore your files, i.e. in the
original directory/path were it was archived from or elsewhere. If the files already exist it will warn you in
the File Exists Window (see Fig. 7) and give you the option to replace the existing file with the archived
file or not. After the retrieval process has finished you will be given information about its success as shown
in Fig. 8.
3.1.3
How to query
Choose retrieve to see all data which you have archived so far.
3.1.4
How to delete
To delete your archived files from the archive itself, select the Delete Archive Data from the Utilities
menu in the Main Window (see Fig. 1).
3.1.5
How to estimate transfer time
In contrast to the JAVA–GUI, the Motif–GUI offers this additional feature. You can get an estimate for
the transfer time required for any of your archived data by clicking the Estimate button from the Archive
or the Retrieve Window.
3.1.6
How to search files
In contrast to the JAVA–GUI, the Motif–GUI offers this additional feature. You can search for all of your
archived files which fulfill certain criteria, like having a certain name, size or date of modification, access
or archival. To access this function choose retrieve from the Main Window, then click Edit -> Find in
the Retrieve Window (see Fig. 5) after highlighting the path from which you want to start your search.
Alternatively, click the button with the magnifying glass. The window shown in Fig. 9 will appear with all
the search criteria mentioned above.
6
Figure 5: The Retrieve Window of the Motif–GUI with the one file ticked in the right panel for retrieval.
Figure 6: The Retrieve Destination Window of the Motif–GUI.
Note that if you want to search through all of your archived files and directories you have to start the
search path from the node name, namely BAHOME5. Figure 10 shows the window in which you can set the
dates for which you want to find all files you archived within this period. If you want to know in which
archive the detected files reside, click the file in question. This will show a red tick on a yellow background
in the left hand–side box next to the file and also colour the lower part of the left hand–side box of the
archive yellow within the Retrieve Window.
3.2
Using the JAVA–GUI dsmj
To start the JAVA–GUI, enter:
dsmj
The layout looks a bit different from the Motif-GUI and it is a bit less versatile than the Motif-GUI (see
description in Section 3.1). At the time of writing, the Help function does not crash the application, unlike
the Motif-GUI.
5 Before the TSM client can be used, it has to be registered with the server. The process of setting up a node name, among
other things, is called registration. The node name, BAHOME, is like the hostname of the TSM. For more information see [2].
7
Figure 7: The File Exists Window of the Motif–GUI.
Figure 8: The Retrieve Report Window of the Motif–GUI after a successful retrieval.
8
Figure 9: The Find Files Window to enter your search criteria within the Motif–GUI, evoked from the
Retrieve Window when using Edit -> Find or the magnifying glass (see Fig. 5).
Figure 10: The Window to set the dates for which you are looking for archived files as evoked from the
Find Files Window (see Fig. 9) of the Motif–GUI.
9
3.2.1
How to find help
Online help is available through the Help menu for both GUI versions. At the time of writing the MotifGUI Help is broken, though. Evoking this Help by accident will crash the application and you will have to
restart it.
The JAVA–GUI Help is very useful, you can search on any keyword you like or read the Help information
on any specific topic you are currently dealing with. If you are looking for a specific expression the GUI
Help is more flexible than the interactive one, which was introduced in Section 2.2.1.
4
4.1
Some useful options explained
The description option
Note that the description option is a name given to an archived object at the time of archival. It is not
the name of the archive, even though the organization of objects within the GUI may make it appear this
way. We recommend to use different descriptions for each archiving event to avoid confusion when retrieving
it again. The archive description does not work like CVS [3] where you update or add to existing versions.
If you do not specify a description, the default is Archive Date: mm/dd/yy. If you are concerned
about possible data format issues, please see the Description section of the Help facility.
4.2
4.2.1
Command line options
The subdir option
If you set the subdir option to yes, the TSM will recursively archive, query or delete all subdirectories
under that path, and any instance of the specified file that exists under any of those subdirectories.
4.2.2
The verbose option
On HPCx the default is quiet, not verbose. You can use the verbose option to get information about
each directory/ file which is being archived, e.g. type
rdsmc archive -verbose -subdir=yes -desc="Another Archive" "$HOME/myfile"
When the archiving is successful it ends with a message confirming that the archiving process has finished
without failure. The option might be especially useful, though, when you encounter problems archiving a
specific file and appreciate some more detailed information.
4.2.3
The showdetail option
This option is an HPCx–extension to TSM and displays TSM messages and summary:
user@hpcx$ rdsmc archive -showdetail -nodeletefiles -desc="Test Archive" "myfile"
Tivoli Storage Manager
Command Line Backup Client Interface - Version 5, Release 2, Level 2.0
(C) Copyright IBM Corporation, 1990, 2000, All Rights Reserved.
(C) Copyright IBM Corporation - 1990, 2000 All Rights Reserved.
Node Name: BAHOME
Session established with server HPCXTSM: AIX-RS/6000
Server Version 5, Release 2, Level 2.0
Server date/time: 03/23/04
10:57:58 Last access: 03/23/04
10
10:57:30
Total number of objects inspected:
8
Total number of objects archived:
8
Total number of objects updated:
0
Total number of objects rebound:
0
Total number of objects deleted:
0
Total number of objects expired:
0
Total number of objects failed:
0
Total number of bytes transferred: 102 Bytes
Data transfer time:
0.00 sec
Network data transfer rate:
33,203.12 KB/sec
Aggregate data transfer rate:
0.03 KB/sec
Objects compressed by:
0%
Elapsed processing time:
00:00:03
Even though it is only one file to be archived, the TSM lists 8 in this example, this includes all the directories
downwards from the home directory which lead to the file in question.
4.2.4
The replace and the ifnewer options
The replace option specifies whether to overwrite existing files on your workstation when retrieving them
from the archive, or to prompt you for your selection when you retrieve files. The default on HPCx is not
to replace automatically. You cannot use replace in batch mode as the prompt for the selection will not
appear. Consequently, the command may hang waiting for user input that the user never sees.
The ifnewer option replaces an existing file with the latest archive version only if the archive version is
newer than the existing file on your workstation. This option is ignored if the replace option is set to No.
4.2.5
The fromdate and related options
Use the fromdate option with the fromtime option to specify a date and time from which you want to
search the archives during a retrieve or query operation. Files that were archived before this date and time
are not included, although older directories might be included, if necessary, to retrieve the files. The option
fromtime specifies a beginning time on a specific date from which you want to search for archived files.
If you do not specify a time, the time defaults to 23:59:59. The option timeformat specifies the format
in which you want to display system time. The format number you choose determines the layout. All
possibilities are described in the interactive help under timeformat. When you include the timeformat
option in a command, it must precede the fromtime and totime options.
tsm> query archive -timeformat=4 -fromt=11:59AM
-fromdate="03/11/04" -tot=11:59PM -tod=03/15/04 "/hpcx/home/q03/q03/user*"
These commands are equivalent to the Find Files tool, i.e. the magnifying glass or Edit -> Find, in the
Motif–GUI.
4.2.6
The archsymlinkasfile option
The archsymlinkasfile option specifies whether or not an archive instruction follows a symbolic link and
archives the associated file or directory. The default is Yes. If for example, you were archiving a directory in
your work filespace that contained a link to your home directory, then the contents of your home directory
would also be archived, and if using rdsmc without the option -nodeletefiles, deleted. To only archive
the link rather than its associated file/directory, specify -archsyml=no.
The equivalent for the GUIs is one of the option boxes within the Archive Window. Check the box to
archive the file or directory that a symbolic link points to. If the box is not selected, only the symbolic link
is archived.
11
5
5.1
Miscellaneous
Passwords
The users do not have to worry about any additional passwords related to the archive. If you read about
any password access options in some TSM documentation, you can safely ignore them on HPCx.
5.2
The client user option file dsm.opt
The users are not allowed to do any changes to the client user option file dsm.opt. The Edit -> Preferences
buttons in the GUIs main window are not enabled.
5.3
The dsmerror.log file
The file dsmerror.log is produced with every invocation of the archiving process and you can safely ignore it.
As long as the file(s) you wanted to archive are listed when you query them, there is no reason to question
the success of the archival process.
Acknowledgements
The authors would like to thank Gavin Pringle for useful discussions and comments.
12
References
[1] IBM Tivoli Storage Manager,
http://www-306.ibm.com/software/tivoli/products/storage-mgr/
[2] IBM Tivoli Storage Manager for UNIX
http://publib.boulder.ibm.com/tividd/td/TSMC/GC32-0789-03/en US/HTML/ans50002.htm#ToC
[3] Concurrent Versions System
http://www.cvshome.org
13